Welcome guys to this very tutorial on how to install and configure Squid proxy on Fedora 29/Fedora 28/CentOS 7.
Squid is a full-featured web proxy cache server application which provides proxy and cache services for HTTP, FTP, SSL requests and DNS lookups. It also performs transparent caching that reduces bandwidth and improves response time by caching and reusing frequently requested web pages.
Installing Squid Proxy on Fedora 29/Fedora 28/CentOS 7
Squid proxy is available on both Fedora and CentOS default repositories and can be installed by running the command below.
dnf install squid -y     << Fedora or
yum install squid -y     << Fedora/CentOS
Once the installation is done, start and enable squid to run in system start.
systemctl start squid
systemctl enable squid
When run, squid listens on port 3128 by default on all network interfaces on the machine. You can however change this by replacing the port number on http_port directive to your respective port number on the squid proxy configuration file, /etc/squid/squid.conf. For example, to use port 8080,
vim /etc/squid/squid.conf...
# Squid normally listens to port 3128
# http_port 3128 << comment the default port
http_port 8080
...Squid Configuration
The default squid configuration file is located at /etc/squid/squid.conf. This configuration file contains the minimum recommended configuration options.
In order to make your own configuration customization, you can make a copy of the original configuration file.
cp /etc/squid/squid.conf /etc/squid/squid.conf.bakThe default squid configuration file without comments looks like;
acl localnet src 0.0.0.1-0.255.255.255  # RFC 1122 "this" network (LAN)
acl localnet src 10.0.0.0/8             # RFC 1918 local private network (LAN)
acl localnet src 100.64.0.0/10          # RFC 6598 shared address space (CGN)
acl localnet src 169.254.0.0/16         # RFC 3927 link-local (directly plugged) machines
acl localnet src 172.16.0.0/12          # RFC 1918 local private network (LAN)
acl localnet src 192.168.0.0/16         # RFC 1918 local private network (LAN)
acl localnet src fc00::/7               # RFC 4193 local private network range
acl localnet src fe80::/10              # RFC 4291 link-local (directly plugged) machines

acl SSL_ports port 443
acl Safe_ports port 80          # http
acl Safe_ports port 21          # ftp
acl Safe_ports port 443         # https
acl Safe_ports port 70          # gopher
acl Safe_ports port 210         # wais
acl Safe_ports port 1025-65535  # unregistered ports
acl Safe_ports port 280         # http-mgmt
acl Safe_ports port 488         # gss-http
acl Safe_ports port 591         # filemaker
acl Safe_ports port 777         # multiling http
acl CONNECT method CONNECT
#
http_access deny !Safe_ports
http_access deny CONNECT !SSL_ports
http_access allow localhost manager
http_access deny manager
http_access allow localnet
http_access allow localhost
http_access deny all
http_port 3128
coredump_dir /var/spool/squid
refresh_pattern ^ftp:           1440    20%     10080
refresh_pattern ^gopher:        1440    0%      1440
refresh_pattern -i (/cgi-bin/|\?) 0     0%      0
refresh_pattern .               0       20%     4320
Configure Squid Access Control List
In order to allow a specific network or CIDR ranges to access Internet through proxy server, you need to define an ACL for the same network. For example to allow hosts in the 192.168.56.0/24 network to access internet through our proxy server, edit the /etc/squid/squid.conf configuration file and add an ACL entry as shown below.
...
# INSERT YOUR OWN RULE(S) HERE TO ALLOW ACCESS FROM YOUR CLIENTS
#
acl internal src 19.168.56.0/24 # Allow Internal hosts
...
Next, you need to allow access from the network based on your defined ACL above.
...
# INSERT YOUR OWN RULE(S) HERE TO ALLOW ACCESS FROM YOUR CLIENTS
#
acl internal src 19.168.56.0/24 # Allow Internal hosts
http_access allow internal
...
Blocking Specific Websites
Squid proxy can be used to restrict access to specific websites. For example to block access to youtube, facebook, netflix you would have to create a file that defines the domains of these websites as shown below;
vim /etc/squid/restricted-sites.squid.youtube.com
.facebook.com
.netflix.comAfter that, created an ACL for the restricted sites above in the squid configuration file. After that, set the deny rule for the defined rule.
...
# INSERT YOUR OWN RULE(S) HERE TO ALLOW ACCESS FROM YOUR CLIENTS
#
acl internal src 19.168.56.0/24 # Allow Internal hosts
acl blockedsites dstdomain "/etc/squid/restricted-sites.squid" # For restricted sites
http_access deny blockedsites
http_access allow internal
...
Block Sites based on Specific Keywords
Just like how you block a website based on a domain, you can also restrict access to a website by the use of a keyword. Create a file with specific keywords.
vim /etc/squid/keyword-ban.squidporn
ads
movie
gambleMake the necessary changes on squid configuration file.
...
# INSERT YOUR OWN RULE(S) HERE TO ALLOW ACCESS FROM YOUR CLIENTS
#
acl internal src 19.168.56.0/24 # Allow Internal hosts
acl blockedsites dstdomain "/etc/squid/restricted-sites.squid" # For restricted sites
<strong>acl keyword-ban url_regex "/etc/squid/keyword-ban.squid" </strong>
http_access deny blockedsites
<strong>http_access deny keyword-ban</strong>
http_access allow internal
...
Masking Outgoing Traffic
As much as you use proxy server to anonymize your IP addresses by presenting the IP address of the proxy to other web servers, proxy servers may expose you by including your IP addresses on the outgoing HTTP requests. You can however disable this by including the following directives at the end of your squid configuration file.
...
#
refresh_pattern ^ftp:           1440    20%     10080
refresh_pattern ^gopher:        1440    0%      1440
refresh_pattern -i (/cgi-bin/|\?) 0     0%      0
refresh_pattern .               0       20%     4320
# Anonymize Traffic
via off
forwarded_for off

request_header_access From deny all
request_header_access Server deny all
request_header_access WWW-Authenticate deny all
request_header_access Link deny all
request_header_access Cache-Control deny all
request_header_access Proxy-Connection deny all
request_header_access X-Cache deny all
request_header_access X-Cache-Lookup deny all
request_header_access Via deny all
request_header_access X-Forwarded-For deny all
request_header_access Pragma deny all
request_header_access Keep-Alive deny all
Once you are done with the configuration, save the file and restart squid.
systemctl restart squidIf Firewalld is running, you need to allow squid proxy service.
firewall-cmd --add-service=squid --permanent
firewall-cmd --reload
Configure Proxy Clients to connect to the Proxy server
To configure client to connect to the Internet through the squid proxy server, you can either set system wide proxy configurations, configure client to use the Squid proxy as the gateway and set the proxy settings on the browser.
System Wide proxy configuration
To set system wide proxy configurations, create a configuration file under /etc/profile.d with environment variables defining squid proxy server details as follows;
vim /etc/profile.d/squid.shPROXY_URL="192.168.43.70:3128"
HTTP_PROXY=$PROXY_URL
HTTPS_PROXY=$PROXY_URL
FTP_PROXY=$PROXY_URL
http_proxy=$PROXY_URL
https_proxy=$PROXY_URL
ftp_proxy=$PROXY_URL
export HTTP_PROXY HTTPS_PROXY FTP_PROXY http_proxy https_proxy ftp_proxyAfter that, source the new configuration file.
source /etc/profile.d/squid.sh
To test this, try to download anything from the clients terminal while tailing access logs on squid proxy server.
On the client’s terminal, run;
wget google.com--2018-11-20 12:46:29-- http://google.com/
Connecting to 192.168.43.70:3128... connected.
Proxy request sent, awaiting response... 301 Moved Permanently
Location: http://www.google.com/ [following]
--2018-11-20 12:46:29-- http://www.google.com/
Reusing existing connection to 192.168.43.70:3128.
Proxy request sent, awaiting response... 200 OK
Length: unspecified [text/html]
Saving to: ‘index.html’
index.html [ <=> ] 11.59K 44.0KB/s in 0.3s
2018-11-20 12:46:30 (44.0 KB/s) - ‘index.html’ saved [11865]On the server;
tail -f /var/log/squid/access.log 1542327358.562 0 192.168.43.214 TCP_MEM_HIT/301 667 GET http://google.com/ - HIER_NONE/- text/html
1542327359.036 472 192.168.43.214 TCP_MISS/200 12756 GET http://www.google.com/ - HIER_DIRECT/216.58.223.68 text/htmlUse Squid Proxy as the gateway and Configure Proxy Setting on the browser
To set Squid proxy as the default gateway, modify your interface configurations.
ip route add default via 192.168.43.70 dev enp0s3or
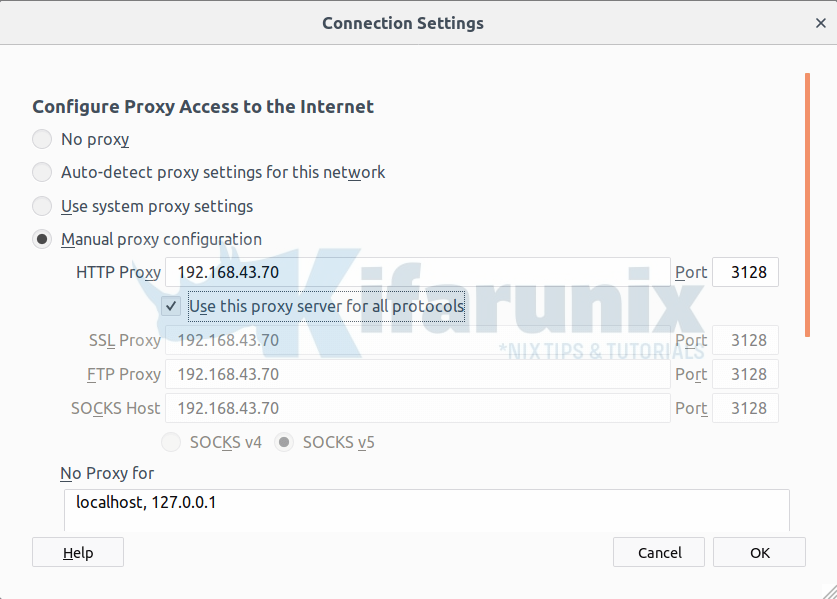
nmcli con mod eth0 ipv4.gateway 192.168.43.70To set proxy settings on browser, navigate to Preferences > General > Network Settings > Manual Proxy Configuration. Enter the proxy server details as shown b below. Be sure to check Use this proxy server for all protocols.

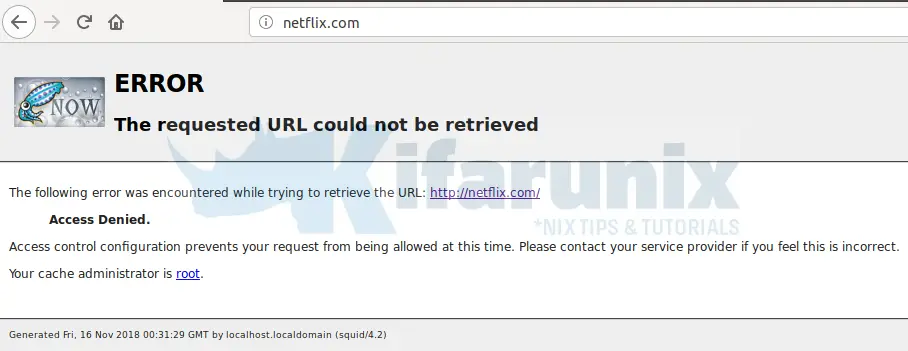
Trying to access Netflix on the browser;

On the server;
tail -f /var/log/squid/access.log1542328269.419 0 192.168.43.214 TCP_DENIED/403 3995 CONNECT facebook.com:443 - HIER_NONE/- text/html
1542328289.684 0 192.168.43.214 TCP_DENIED/403 4080 GET http://netflix.com/ - HIER_NONE/- text/html
1542328289.820 0 192.168.43.214 TCP_HIT/200 13052 GET http://localhost.localdomain:3128/squid-internal-static/icons/SN.png - HIER_NONE/- image/png
1542328289.922 0 192.168.43.214 TCP_DENIED/403 4075 GET http://netflix.com/favicon.ico - HIER_NONE/- text/htmlYou can also see how to configure Squid proxy authentication.
We also covered how to set system wide proxy settings on Ubuntu 18.04 in our previous article.
How to Set System Wide Proxy in Ubuntu 18.04
Other Tutorials
Monitor Squid logs with Grafana and Graylog

