
CloudBees CI can use Active Directory as its authentication source, allowing users to sign in with their existing corporate identities and Active Directory group memberships.
This guide walks through a secure Active Directory integration on OpenShift, from establishing the LDAPS connection and certificate trust to configuring the LDAP security realm in Operations Center. It then maps Active Directory groups to CloudBees Role-Based Access Control (RBAC), applies the resulting permissions to the appropriate resources, and extends the configuration to connected controllers through single sign-on.
The result is an end-to-end integration in which Active Directory remains the source of user identities and group membership, while CloudBees CI uses those groups to determine what authenticated users can access and manage.
Table of Contents
CloudBees CI Active Directory Integration with LDAPS
How the Integration Works
CloudBees CI uses two separate security mechanisms for this integration:
- the security realm and
- the authorization strategy.
The security realm handles authentication. In this configuration, CloudBees CI uses the LDAP security realm to connect to Active Directory over LDAPS. When a user signs in, CloudBees CI connects to the configured Active Directory endpoint, uses the LDAP service account to search the directory, locates the user, and verifies the user’s credentials. It also resolves the Active Directory groups to which that user belongs.
The authorization strategy handles what that authenticated user is allowed to do. CloudBees Role-Based Access Control (RBAC) can use the Active Directory groups returned by the LDAP security realm to assign roles and permissions. Those permissions can be applied at the appropriate CloudBees CI scope, such as Operations Center, a managed controller, a folder, or other supported resources.
The two parts are related, but they are not the same. A user can authenticate successfully and still have no access to a controller or project because the expected Active Directory group was not resolved or was not mapped to an RBAC role. Conversely, an RBAC role can be configured correctly while authentication fails because CloudBees CI cannot connect to Active Directory or cannot validate the LDAPS certificate.
The complete integration therefore has a clear sequence:
- CloudBees CI connects to Active Directory over LDAPS. The connection uses either an LDAPS domain-controller endpoint or an LDAPS Global Catalog endpoint, depending on the Active Directory environment.
- The TLS connection is validated. CloudBees CI must trust the CA that issued the domain controller certificate, and the certificate must be valid for the hostname being used.
- CloudBees CI searches Active Directory for the user. The LDAP configuration determines where users are searched for and which directory attribute is used to identify them.
- Active Directory authenticates the user. The supplied password is verified against the user’s AD account.
- CloudBees CI resolves the user’s Active Directory groups. These groups are returned by the LDAP security realm as external groups.
- RBAC uses those groups for authorization. The external AD groups are mapped to CloudBees RBAC groups and roles, which determine what the user can access and what operations they can perform.
- Operations Center applies the security configuration to connected controllers. With the appropriate single sign-on configuration, the security realm and authorization strategy are propagated to managed controllers.
This distinction also gives you a straightforward way to troubleshoot the integration. If the user cannot sign in, investigate the connection, TLS, LDAP search, or authentication path first. If the user can sign in but has the wrong access, investigate group resolution and RBAC. Do not change the authentication and authorization configuration at the same time.
Prerequisites
Before configuring CloudBees CI, make sure the Active Directory, OpenShift, and CloudBees CI information and access required for the integration are available.
Active Directory
You need:
- The Active Directory DNS domain name and forest name.
- The fully qualified hostname of the domain controller or Global Catalog that CloudBees CI will use.
- The AD topology: whether the environment contains a single domain or multiple domains in the forest.
- Confirmation that LDAPS is enabled on the endpoint you intend to use.
- The CA certificate chain that issued the LDAPS certificate on the domain controller or Global Catalog.
- A dedicated Active Directory service account for CloudBees CI LDAP searches.
- The exact distinguished name (DN) of the service account.
- The OUs containing the users and groups that CloudBees CI will search.
- Test users with known Active Directory group memberships.
- At least one test user for each AD group that will be mapped to CloudBees RBAC.
OpenShift
You need:
- Access to the OpenShift project where Operations Center is running.
- Access to the projects where managed controllers are running, if they are separate from Operations Center.
ocaccess to run DNS, network, and TLS tests from the CloudBees CI environment.- The ability to inspect the relevant CloudBees CI pods when troubleshooting connectivity or certificate trust.
- Access to the OpenShift configuration used to distribute the AD CA certificate to the CloudBees CI Java runtime.
CloudBees CI
You need:
- Administrative access to Operations Center.
- An existing CloudBees CI administrator account for performing the initial configuration. Note that once the security realm is switched to LDAP, local accounts are no longer valid identities and cannot be used to sign in. The guide uses a temporary authorization setting to bridge that gap, and establishes an Active Directory administrator before restoring enforcement.
- The LDAP security realm available in the CloudBees CI installation.
- RBAC available for configuring authorization.
- A clear mapping between Active Directory groups and the CloudBees CI roles those groups should receive.
Information to have ready
By the time you begin the configuration, you should be able to answer these questions:
| Question | Example |
|---|---|
| What is the AD domain? | kifarunix.com |
| Which AD endpoint will CloudBees use? | dc01.kifarunix.com |
| Will CloudBees use LDAPS on 636 or Global Catalog LDAPS on 3269? | 636 or 3269 |
| What is the LDAP search root? | DC=kifarunix,DC=com |
| Which account will perform LDAP searches? | svc-cbci |
| Where are the users? | OU=Accounts (Staff, Contractors) |
| Where are the groups? | OU=Groups (Identity, Access) |
| Which CA issued the AD certificate? | Let's Encrypt (public), or the internal CA |
| Which AD groups will map to CloudBees RBAC? | CloudBees-Admin, MobileBanking-Developer, etc. |
Do not guess any of these values from the examples later in this guide. Obtain the actual values from your Active Directory and OpenShift environments before continuing.
The Example Environment
The configuration examples in this guide use kifarunix.com as the Active Directory domain. This is an example environment; replace kifarunix.com and the corresponding hostnames, organizational units, users, groups, and service account with the values from your own Active Directory environment.
The example Active Directory structure is:
kifarunix.com
├── OU=Accounts
│   ├── OU=Staff
│   │   ├── Alice Smith (a.smith)
│   │   ├── Elise Bernard (e.bernard)
│   │   └── ...
│   ├── OU=Contractors
│   │   ├── Mary Mwangi (m.mwangi)
│   │   └── James Kamau (j.kamau)
│   ├── OU=Admins
│   └── OU=ServiceAccounts
│       ├── svc-cbci
│       └── read-only
│
└── OU=Groups
    ├── OU=Identity
    │   ├── CN=SoftwareEngineering (Amandine Girard, Camille Dubois, ...)
    │   ├── CN=DevOps (Alice Smith, Bob Colly, Jane Doe)
    │   └── ...
    │
    └── OU=Access
        ├── OU=Applications
        │   ├── CN=MobileBanking-Admin (Mary Mwangi, Mathieu Lefevre)
        │   ├── CN=MobileBanking-Developer (Samuel Otieno, Amandine Girard)
        │   ├── CN=MobileBanking-Viewer (Theo Rousseau, John Doe)
        │   ├── CN=CardBanking-Admin (James Kamau, Camille Dubois)
        │   └── ...
        ├── OU=Engineering
        │   └── CN=CloudBees-Admin (Elise Bernard, Alice Smith, Bob Colly)
        └── OU=Business
            ├── CN=Ticketing-Admin (Jane Smith)
            └── ...
The OpenShift environment contains the project:
cloudbees-ci, which runs Operations Center and controllers.
The Operations Center manages three controllers. controller-02 hosts the MobileBanking application and controller-03 hosts CardBanking; each is assigned to its application team later in this guide. controller-01 is a shared controller reserved for platform use, and no application team group is created on it. Only members of CloudBees-Admin can administer it, since administer propagates from the Operations Center root while the team-level groups do not.
A note about Active Directory distinguished names
Do not assume that a user’s login name is the same as the CN in Active Directory. For example, the user who signs in as m.mwangi might have a distinguished name such as:
CN=Mary Mwangi,OU=Contractors,OU=Accounts,DC=kifarunix,DC=comThe actual DN depends on how the user object was created in Active Directory. Always retrieve the real DN from Active Directory rather than constructing it from the login name. The commands later in this guide show how to retrieve the values you need.
Choose the Right Active Directory Endpoint
Before configuring CloudBees CI, determine which Active Directory endpoint it should use. The choice is primarily between:
- LDAPS on a domain controller (
636) and - LDAPS through the Global Catalog (
3269).
The right choice depends on where the users and groups that CloudBees CI needs to resolve are located.
Check the Active Directory forest
If you have the Active Directory PowerShell module, check whether the forest contains one domain or several:
Get-ADForest | Select-Object Name, DomainsFor example:
Name          Domains
----          -------
kifarunix.com {kifarunix.com, europe.kifarunix.com, us.kifarunix.com}
A single-domain forest does not normally require the Global Catalog. In a multi-domain forest, the Global Catalog can be useful when CloudBees CI needs to search for users or groups across multiple domain boundaries.
Check whether a Global Catalog is available
Query the Active Directory DNS service record:
nslookup -q=SRV _gc._tcp.kifarunix.comA response such as the following shows that dc01.kifarunix.com and dc02.kifarunix.com advertise the Global Catalog service:
_gc._tcp.kifarunix.com
    service = 0 100 3268 dc01.kifarunix.com.

_gc._tcp.kifarunix.com
    service = 0 100 3268 dc02.kifarunix.com.
Active Directory uses these ports for LDAP and Global Catalog services:
| Service | Standard port | TLS port |
|---|---|---|
| LDAP | 389 | 636 |
| Global Catalog | 3268 | 3269 |
For example:
LDAP:          dc01.kifarunix.com:389
LDAPS:         dc01.kifarunix.com:636
Global Catalog: dc01.kifarunix.com:3268
Secure GC: dc01.kifarunix.com:3269This guide uses LDAPS. The CloudBees CI connection should therefore use either port 636 or port 3269, depending on the directory endpoint selected.
Choose between LDAPS and Global Catalog LDAPS
Use LDAPS on port 636 when the users and groups CloudBees CI needs are contained within the domain being queried and a standard domain-controller LDAP endpoint is sufficient.
Use Global Catalog LDAPS on port 3269 when CloudBees CI needs to search across multiple domains in the same Active Directory forest.
Having multiple domains does not automatically mean that you must use the Global Catalog. The deciding factor is whether the CloudBees CI directory searches need to cross domain boundaries and whether the attributes required by the integration are available through the Global Catalog.
For either option, use the fully qualified DNS hostname of the selected server rather than its IP address. The hostname must match a name covered by the domain controller’s TLS certificate.
For example:
dc01.kifarunix.com:636or:
dc01.kifarunix.com:3269For the example environment used in this guide, the Active Directory forest contains a single domain. CloudBees CI will connect to the organization’s LDAPS endpoint on port 636:
ldaps://dc01.kifarunix.com:636The next step is to prove that the selected Active Directory endpoint is reachable, accepts LDAPS connections, and presents a certificate that can be validated successfully.
Prepare the Active Directory Service Account
CloudBees CI needs an Active Directory account for directory lookups when the LDAP configuration uses a bind account. Create a dedicated account for this purpose rather than using a personal or administrative account.
For the example environment:
Username: svc-cbci
Purpose:  CloudBees CI LDAP directory lookups
Access:   Read-only
The account should:
- be dedicated to CloudBees CI;
- have permission to read the directory information required by the LDAP searches;
- not be a Domain Admin or other privileged administrative account;
- have a managed password and documented ownership; and
- have an appropriate password-expiration and rotation process.
Record the account’s actual distinguished name (DN) from Active Directory. Do not construct the DN from the username.
For the example environment, the account is located under:
OU=ServiceAccounts,OU=Accounts,DC=kifarunix,DC=comYou can retrieve it directly using the command:
Get-ADUser -Identity svc-cbci | Select-Object -ExpandProperty DistinguishedNameSample output:
CN=svc-cbci,OU=ServiceAccounts,OU=Accounts,DC=kifarunix,DC=comUse the actual DN returned by your Active Directory environment.
The service account is not the identity used by CloudBees CI users to log in. It is the directory identity CloudBees CI uses to perform LDAP operations.
Verify Connection to Active Directory
Before configuring the CloudBees CI LDAP security realm, verify the complete connection to the selected Active Directory endpoint.
The verification has two parts:
- Verify that Active Directory and LDAPS are correctly configured.
- Verify that the CloudBees CI environment in OpenShift can reach and use the same endpoint.
For the example environment, the endpoint is:
ldaps://dc01.kifarunix.com:636Replace dc01.kifarunix.com with the LDAPS endpoint used by your own Active Directory environment.
Verify the LDAPS Certificate
From a Linux machine, I am using my OpenShift cluster bastion host, with openssl installed, inspect the certificate presented by the domain controller:
openssl s_client -connect dc01.kifarunix.com:636 -servername dc01.kifarunix.com </dev/null 2>/dev/null | openssl x509 -noout -subject -issuer -dates -ext subjectAltName -ext extendedKeyUsageCheck the output for:
- A valid
notBeforeandnotAfterdate. - The expected hostname in the Subject Alternative Name (SAN).
TLS Web Server Authenticationin the Extended Key Usage.- The expected issuing CA.
For example:
subject=CN = dc01.kifarunix.com
issuer=C = US, O = Let's Encrypt, CN = YR2
notBefore=Aug 13 12:46:35 2026 GMT
notAfter=Nov 11 12:46:34 2026 GMT
X509v3 Extended Key Usage:
    TLS Web Server Authentication
The hostname is critical. CloudBees CI will connect to dc01.kifarunix.com, so the certificate presented by the server must be valid for dc01.kifarunix.com. Do not configure CloudBees CI with an IP address when the certificate is issued to the DNS name.
The certificate must also support Server Authentication. Microsoft documents the certificate requirements for LDAPS, including the server authentication usage and name requirements.
Next, verify that the endpoint completes an LDAPS/TLS handshake:
openssl s_client -connect dc01.kifarunix.com:636 -servername dc01.kifarunix.com </dev/nullA successful connection should include the Verification: OK and Verify return code: 0 (ok) messages in the output. This confirms that the server certificate was successfully validated against the trusted certificate chain.
If your test machine does not trust the organization’s internal CA, you may instead see a verification error such as:
Verify return code: 21 (unable to verify the first certificate)That does not by itself mean that LDAPS is incorrectly configured. It means the machine running the test cannot build the certificate chain to a trusted CA.
Also note that a certificate that works from an administrator’s workstation does not automatically mean that CloudBees CI will trust it. The CA must eventually be made available to the CloudBees CI Java runtime. That is handled in the next section.
Verify an LDAP bind
Once TLS verification succeeds, verify that the dedicated Active Directory service account can actually bind and search the directory.
You can run the tests directly from the bastion host. You will need to install LDAP client tools if necessary:
RHEL / Fedora
sudo dnf install openldap-clientsDebian / Ubuntu
sudo apt install ldap-utilsThen run:
(Enter the svc-cbci password when prompted, replace the domain name and service account name accordingly)
ldapsearch -H ldaps://dc01.kifarunix.com:636 -x -D "CN=svc-cbci,OU=ServiceAccounts,OU=Accounts,DC=kifarunix,DC=com" -W -b "DC=kifarunix,DC=com" -s base "(objectClass=*)"A successful response confirms that:
- the LDAPS connection works;
- the certificate can be trusted using the supplied CA chain;
- the service account can authenticate to Active Directory; and
- the account can perform an LDAP search against the directory.
Do not put the service-account password directly in the command.
Verify DNS from the CloudBees CI Environment
The previous tests prove that the Active Directory endpoint works. The next tests prove that CloudBees CI can reach that endpoint from OpenShift.
First identify the Operations Center pod:
oc get pods -n cloudbees-ciFor the example environment:
NAME                             READY   STATUS    RESTARTS   AGE
cjoc-0                           1/1     Running   0          37h
controller-01-0                  1/1     Running   0          37h
controller-02-68db9d9f44-4zf7z   1/1     Running   0          36h
controller-02-68db9d9f44-kgdx4   1/1     Running   0          36h
controller-03-77df749678-97k7p   1/1     Running   0          36h
controller-03-77df749678-h4p75   1/1     Running   0          36h
Check that the CloudBees CI pod can resolve the Active Directory hostname:
oc exec -n cloudbees-ci cjoc-0 -- getent hosts dc01.kifarunix.comThe command should return the address for dc01.kifarunix.com. Sample output:
10.184.10.40 dc01.kifarunix.comIf the hostname cannot be resolved, stop here. Check the OpenShift DNS configuration and ensure that the pod can resolve the Active Directory DNS zone.
Verify TCP connectivity from the CloudBees CI pod
The CloudBees CI container does not include nc. Use a temporary network-diagnostic pod with the required networking tools instead.
oc run ad-connectivity-test -n cloudbees-ci --rm -it --restart=Never --image=nicolaka/netshoot -- bashFrom inside the diagnostic pod, test TCP port 636:
nc -vz dc01.kifarunix.com 636A successful result should look similar to:
Connection to dc01.kifarunix.com (10.184.10.40) 636 port [tcp/ldaps] succeeded!A successful result confirms that the OpenShift network environment can establish a TCP connection to the LDAP server on port 636. A failed result indicates that TCP connectivity to the LDAP server is not available from the OpenShift environment, and therefore LDAPS connectivity and LDAP authentication tests cannot succeed until the underlying network connectivity issue is resolved.
Exit the container:
exitVerify TLS from the CloudBees CI Environment
Confirm that the Operations Center pod can establish a TLS connection to the LDAP server and successfully validate its certificate:
oc exec -n cloudbees-ci cjoc-0 -- openssl s_client -connect dc01.kifarunix.com:636 -servername dc01.kifarunix.com </dev/null | grep -E "subject=|issuer=|Verify return code"Example result:
verify return:1
subject=CN=dc01.kifarunix.com
issuer=C=US, O=Let's Encrypt, CN=YR2
DONE
Verify return code: 0 (ok)
The Verify return code: 0 (ok) confirms that the certificate presented by dc01.kifarunix.com is trusted by the CloudBees CI environment.
In this case, the certificate is issued by Let’s Encrypt and chains to the publicly trusted ISRG Root X1 CA. Therefore, no custom CA certificate needs to be imported into the CloudBees CI trust store.
If the verification result is anything other than 0 (ok), do not immediately assume that a custom CA needs to be imported. First inspect the certificate being presented and its certificate chain. Confirm that the expected Let’s Encrypt certificate is being returned and that the chain is complete and trusted by the CloudBees CI environment.
Verify LDAP from the CloudBees CI environment
The CloudBees CI Operations Center image does not ship ldapsearch. As such, you can use a temporary diagnostic pod in the cloudbees-ci namespace instead:
oc run ad-ldap-test -n cloudbees-ci --rm -it --restart=Never --image=registry.access.redhat.com/ubi9/ubi -- bashOnce inside the pod, install the LDAP utilities:
dnf install -y openldap-clientsIf your cluster does not have outbound access to public registries or package repositories (common in locked-down or air-gapped OpenShift environments using an internal registry mirror), both the oc run pull and the dnf install step above can fail independently of anything covered in this guide. In that case, pull an equivalent base image from your internal registry, or bake a small diagnostic image with openldap-clients already installed and push it to your internal registry ahead of time. That is an environment-specific prerequisite this guide cannot solve generically.
Since this environment uses a Let’s Encrypt certificate chaining to a publicly trusted root, no CA file needs to be supplied:
(Use the service account password when prompted)
ldapsearch -H ldaps://dc01.kifarunix.com:636 -x -D "CN=svc-cbci,OU=ServiceAccounts,OU=Accounts,DC=kifarunix,DC=com" -W -b "DC=kifarunix,DC=com" -s base "(objectClass=*)"The search should return the directory base object, for example dn: DC=kifarunix,DC=com, followed by result: 0 Success.
Exit the pod!
exitAt this point, the complete connection path has been verified:
- DNS resolution: CloudBees CI can resolve
dc01.kifarunix.com. - TCP connectivity: CloudBees CI can reach port
636. - TLS handshake: CloudBees CI can establish a secure connection to the LDAPS endpoint.
- Certificate validation: The server certificate is valid for the configured hostname and can be trusted.
- LDAP bind: The configured service account can authenticate to Active Directory.
- LDAP search: The account can perform the directory searches required by CloudBees CI.
Only after all of these checks pass should you proceed to configure the LDAP security realm.
Configure CloudBees CI to Trust an Internal or Private CA
Skip this section if your LDAPS certificate chains to a publicly trusted root, as confirmed in the Verify TLS step above. This section applies only when using an internal or private CA, such as an AD CS enterprise CA.
CloudBees CI provides a dedicated mechanism for this called the sidecar injector. It is a Helm-installed Kubernetes admission webhook that injects a custom certificate bundle, replacing both the OS-level trust store and the JVM’s cacerts, into every pod scheduled in a labeled namespace.
Prerequisite: confirm the MutatingAdmissionWebhook admission controller is enabled on your cluster:
oc api-versions | grep admissionregistration.k8s.io/v1This should return admissionregistration.k8s.io/v1.
This procedure also requires cluster-admin privileges, since it creates a MutatingWebhookConfiguration.
Step 1: Extract the pod’s existing certificate bundle files
oc cp cjoc-0:/etc/pki/ca-trust/extracted/pem/tls-ca-bundle.pem ./ca-certificates.crt -n cloudbees-cioc cp cjoc-0:/etc/pki/ca-trust/extracted/java/cacerts ./cacerts -n cloudbees-ciStep 2: Append your internal CA’s root certificate to the system bundle
If Active Directory is using LDAPS, retrieve the certificate chain from the AD server with openssl. The chain is emitted leaf first, root last, so pull the last certificate block and write it directly to the file:
openssl s_client -connect <AD_SERVER>:636 -showcerts </dev/null 2>/dev/null \
| awk 'BEGIN{n=0} /-----BEGIN CERTIFICATE-----/{n++} n{print} /-----END CERTIFICATE-----/{if(n>1) exit}' > kifarunix-ca-root.pem
Do not save the AD server/leaf certificate. The certificate you append to the trust store must be the internal CA certificate that issued the LDAPS server certificate.
Verify what you extracted. A root CA is self-signed, so subject and issuer must match, and it must carry CA:TRUE:
openssl x509 -in kifarunix-ca-root.pem -noout -subject -issueropenssl x509 -in kifarunix-ca-root.pem -noout -text | grep -A1 "Basic Constraints"If subject and issuer differ, the server sent only the leaf and an intermediate, which is common since servers are not required to send the root. In that case export the root from the AD CA itself on a domain-joined Windows box and copy it over to your bastion host for import into the CBCI cert store:
certutil -ca.cert kifarunix-ca-root.pemAppend your internal CA’s root certificate to the system bundle
cat kifarunix-ca-root.pem >> ca-certificates.crtStep 3: Import the same CA into the extracted JVM cacerts file.
sudo dnf install -y java-17-openjdk-headlesssudo apt install -y openjdk-17-jre-headlesskeytool -import -noprompt -keystore cacerts -file kifarunix-ca-root.pem -storepass changeit -alias kifarunix-cakifarunix-ca-root.pem must contain exactly one certificate. keytool cannot import multiple certificates from a single file in one pass.
Step 4: Create the ConfigMap the sidecar injector will mount
oc create configmap --from-file=ca-certificates.crt,cacerts ca-bundles -n cloudbees-ciThis ConfigMap name (ca-bundles) is fixed. It must be created in every namespace where the sidecar injector will operate.
Step 5: Install the sidecar injector
oc new-project cloudbees-sidecar-injectorhelm install cloudbees-sidecar-injector cloudbees/cloudbees-sidecar-injector --namespace cloudbees-sidecar-injectorConfirm it is running:
oc --namespace cloudbees-sidecar-injector get podsStep 6: Label the CloudBees CI namespace
oc label namespace cloudbees-ci sidecar-injector=enabledAny pod scheduled in this namespace from this point forward will have the custom CA bundle injected automatically.
Step 7: Restart existing pods so the injection takes effect
The label only affects newly scheduled pods, not already-running ones. Restart Operations Center and any running controllers:
oc delete pod cjoc-0 -n cloudbees-ciRepeat for each controller pod.
Step 8: Re-verify
Repeat the JVM trust check from the previous section against the newly restarted pod. A matching entry for your CA’s alias confirms the injection succeeded.
Configure the LDAP Security Realm in Operations Center
You can configure the LDAP security realm in the CloudBees CI Operations Center. The Operations Center provides the cluster-level security configuration. When single sign-on security enforcement is enabled later, connected controllers can inherit the security realm and authorization strategy from Operations Center.
Before continuing, make sure the LDAP connection has passed the verification steps in the previous section. In particular, you should already have verified that:
dc01.kifarunix.comresolves from the CloudBees CI environment.- TCP port
636is reachable. - The LDAPS certificate is valid for
dc01.kifarunix.com. - The CloudBees CI environment trusts the certificate.
svc-cbcican bind to Active Directory.- The service account can perform the required LDAP search.
Therefore, sign in to the CloudBees CI Operations Center with an account that currently has administrative access.
Before configuring LDAP, make sure the LDAP Plugin is installed in Operations Center. It is required for LDAP to appear as a Security Realm option. Hence:
- In Operations Center, go to Manage Jenkins.
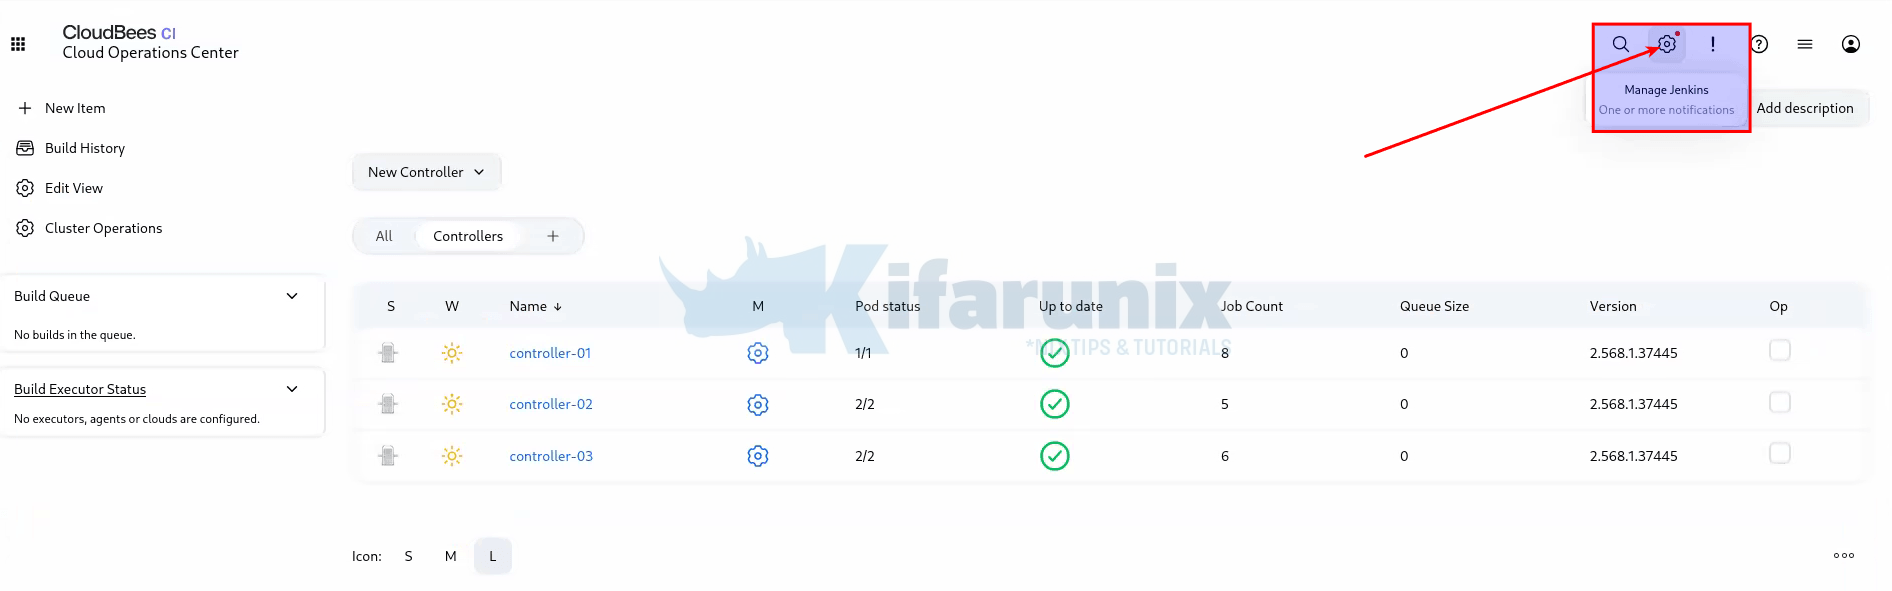
- Select Plugins.
- Click the Available plugins tab.
- Search for LDAP and select the LDAP Plugin. You may see two similar plugins, same release number. Select one of them.
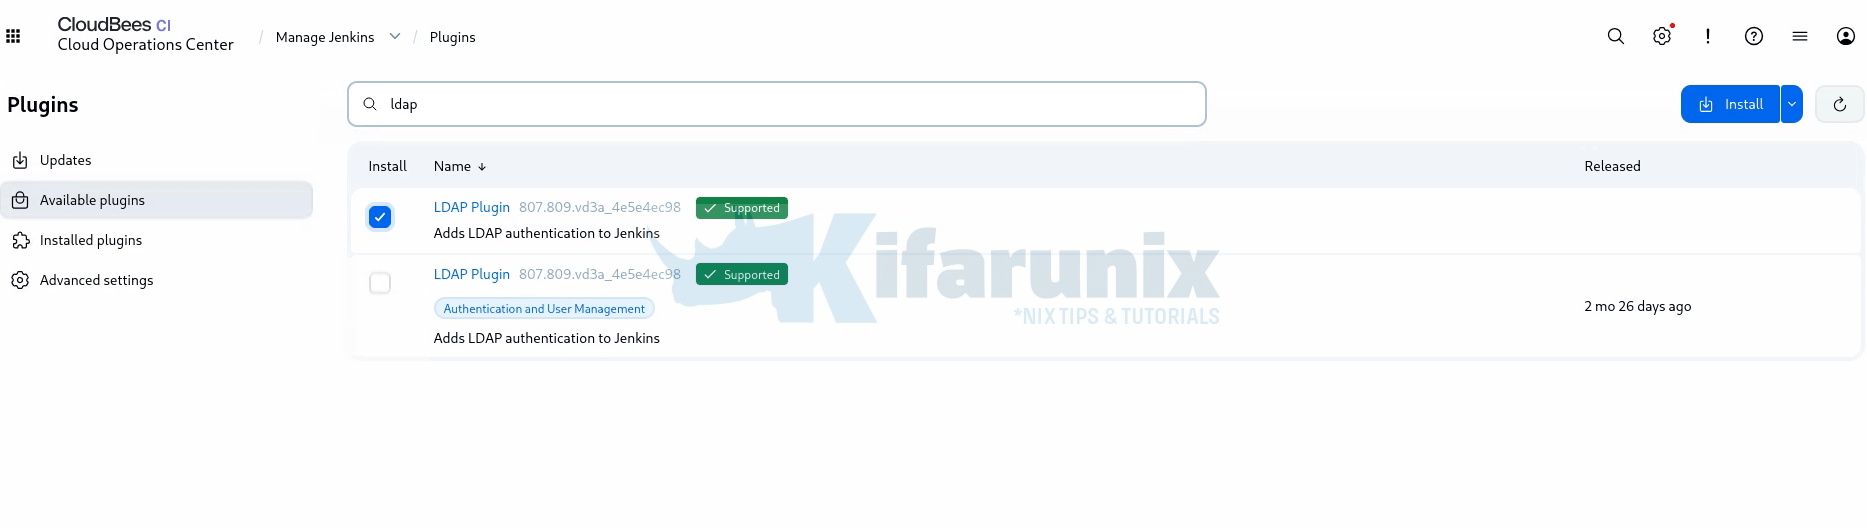
- Then click Install button to install the plugin.
- If prompted, restart Operations Center after the installation completes.
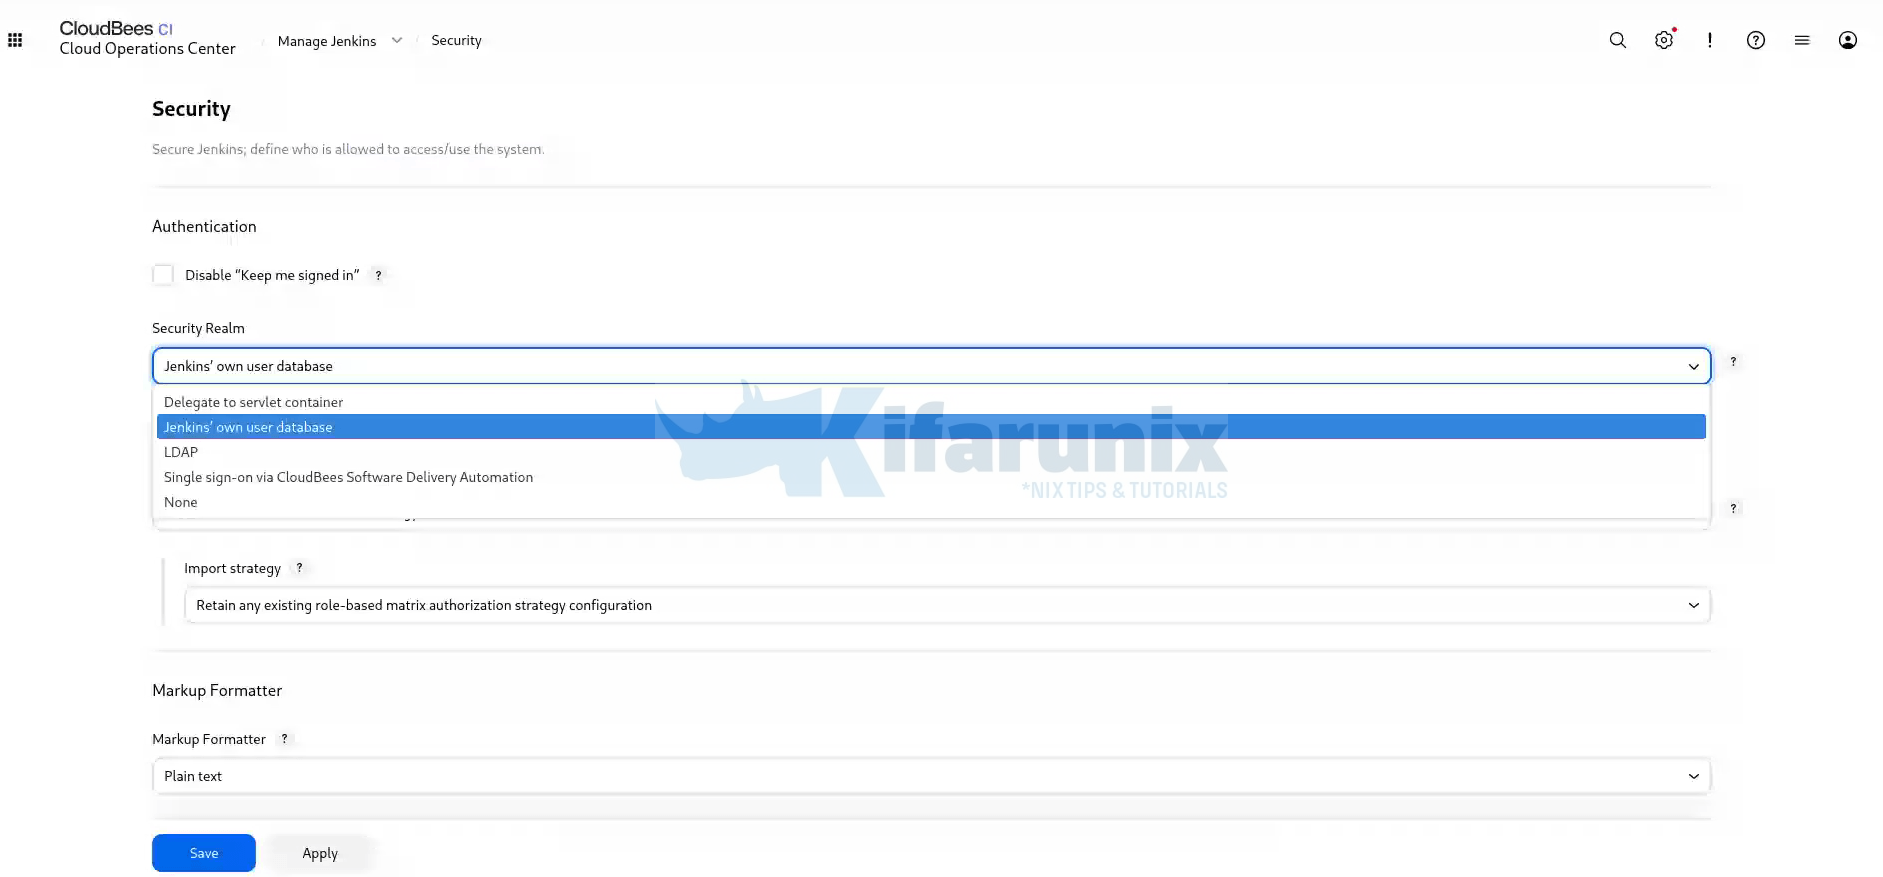
Once the plugin is installed, configure the LDAP security realm in the Operations Center:
- From the Operations Center dashboard, select Manage Jenkins.
- Select Security.
- Locate Security Realm.
- Select LDAP.
Configure the LDAP server
When you select LDAP as the security realm, the LDAP configuration settings are displayed. For more information about a configuration setting, click the ? icon next to it.
In Server field, enter the LDAPS endpoint using one of the following formats: SERVER, SERVER:PORT, or ldaps://SERVER[:PORT]. If using LDAPS, then use the DNS name that appears in the server certificate. Do not replace it with the server IP address.
For example:
ldaps://dc01.kifarunix.com:636If your production environment uses multiple LDAPS endpoints or an LDAP load balancer, use the endpoint design appropriate for that environment. The hostname configured here must still be covered by the certificate presented by the endpoint.
- Set Root DN to the root of the Active Directory domain. Root DN is used as the starting point for LDAP searches:
This establishes the directory subtree from which CloudBees CI performs its LDAP searches.DC=kifarunix,DC=com - Leave Allow blank rootDN unchecked.
This option is only needed when Root DN itself is left empty and the server should discover naming contexts automatically. Since Root DN is explicitly set above, this checkbox should stay off. - Define User search base. Leave this field blank:
Since the search base is relative to Root DN and Active Directory searches the full subtree beneath it by default (in our AD structure setup), leaving this blank means CloudBees CI searches every OU under the domain, including bothOU=StaffandOU=Contractors. Scoping this to a single OU would silently lock out users in the other OU.Use the appropriate value as per your AD setup - Set User search filter to match how Active Directory identifies a login name:
Active Directory does not use thesAMAccountName={0}uidattribute found in OpenLDAP. Its login attribute issAMAccountName, which matches what users actually type when signing in, for examplem.mwangi. Leaving the filter asuid={0}causes every login attempt to fail, since no Active Directory user has auidattribute populated. - Set Group search base to the OU where security groups are stored:
Since Root DN is already set toOU=GroupsDC=kifarunix,DC=com, CloudBees appends this value onto that base automatically. Entering the full DNOU=Groups,DC=kifarunix,DC=comhere causes the domain suffix to be duplicated during the search,OU=Groups,DC=kifarunix,DC=com,DC=kifarunix,DC=com, which does not exist and produces aNameNotFoundException(LDAP error code 32) at login. Using the relative value scopes group lookups correctly to where the actual role and department groups live, such as CardBanking-Admin, MobileBanking-Developer, and SoftwareEngineering.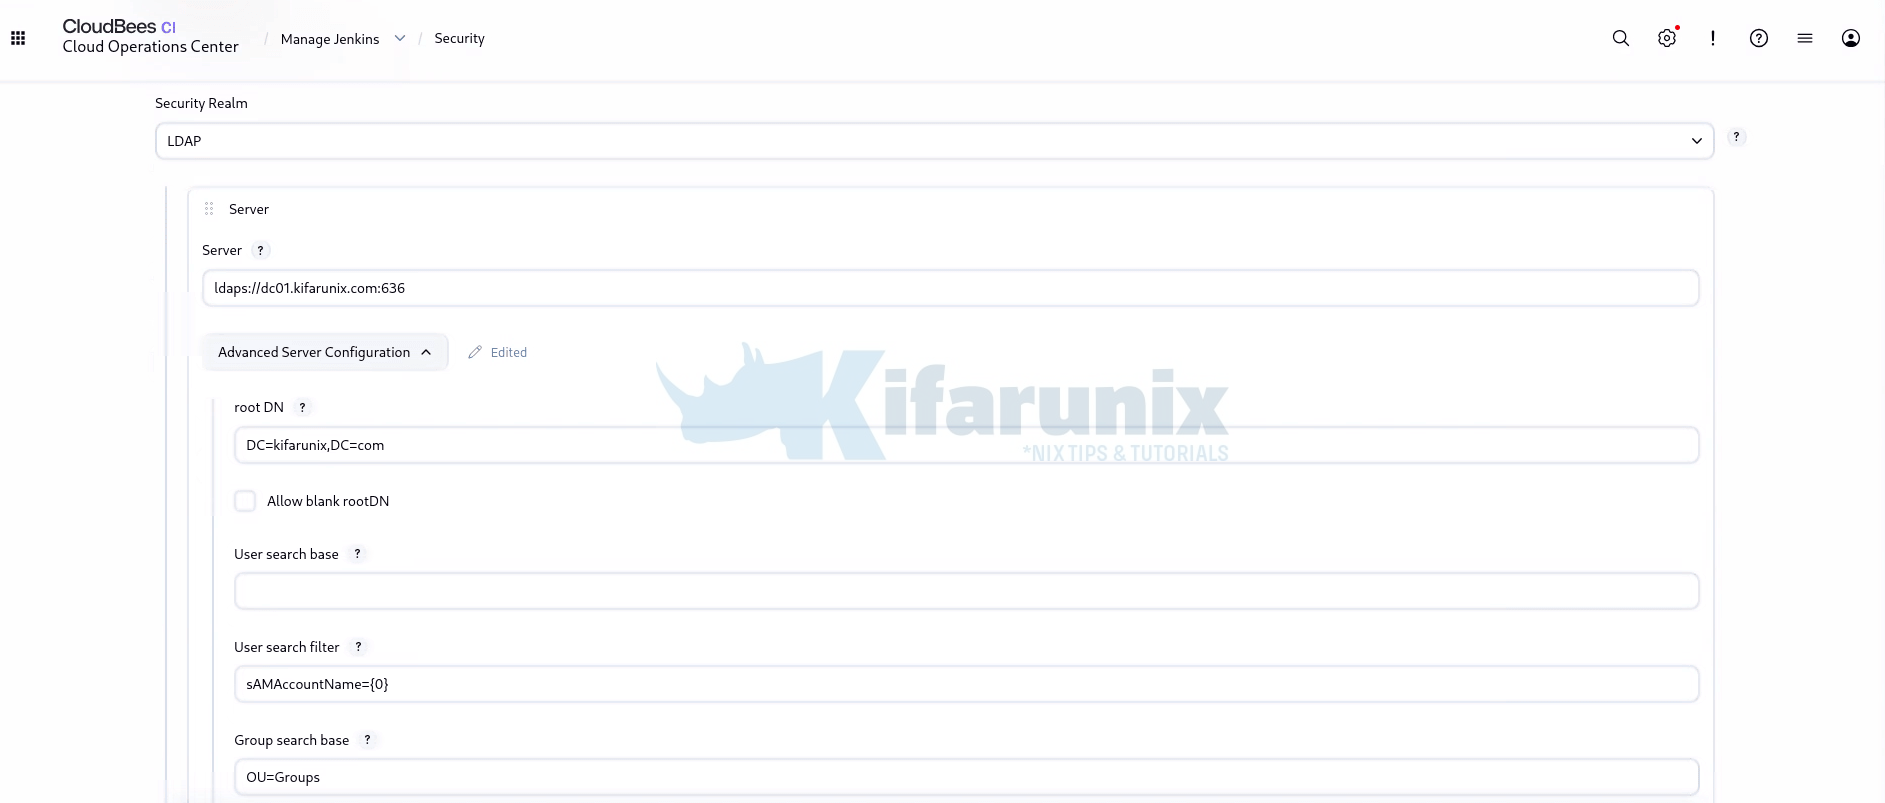
- Leave Group search filter at its default value, or set it explicitly:
This is the standard Active Directory group filter and does not need to change from the default.(& (cn={0}) (objectclass=group)) - Under Group membership, select Search for LDAP groups containing user, rather than the “Parse user attribute” option.
Active Directory groups store their membership on the group object itself, in thememberattribute, rather than storing a list of group DNs on each user object. Searching for groups containing the user matches how Active Directory actually stores this relationship.
For the group membership filter, you can use:(&(objectClass=group)(member={0})) - Set Manager DN to the CloudBees service account used to bind and search the directory:
This is the account CloudBees CI authenticates as before performing any LDAP search. It needs read access to the directory, not administrative rights.CN=svc-cbci,OU=ServiceAccounts,OU=Accounts,DC=kifarunix,DC=com - Set Manager Password to the current password on the svc-cbci account.
This must match whatever password is actually set on the account in Active Directory, since a stale or incorrect value here causes every LDAP search to fail, not just individual logins. - Leave Display Name LDAP attribute as:
This matches the CN values already set on user accounts, for exampledisplaynameMary MwangiorJulien Moreau, and is used to show a readable name in CloudBees CI rather than the raw login name. - Leave Email Address LDAP attribute as:
This is the correct attribute name for Active Directory, though it will not resolve to anything until themailmailattribute is populated on user accounts. It does not block login, it only affects whether an email address is displayed for each user.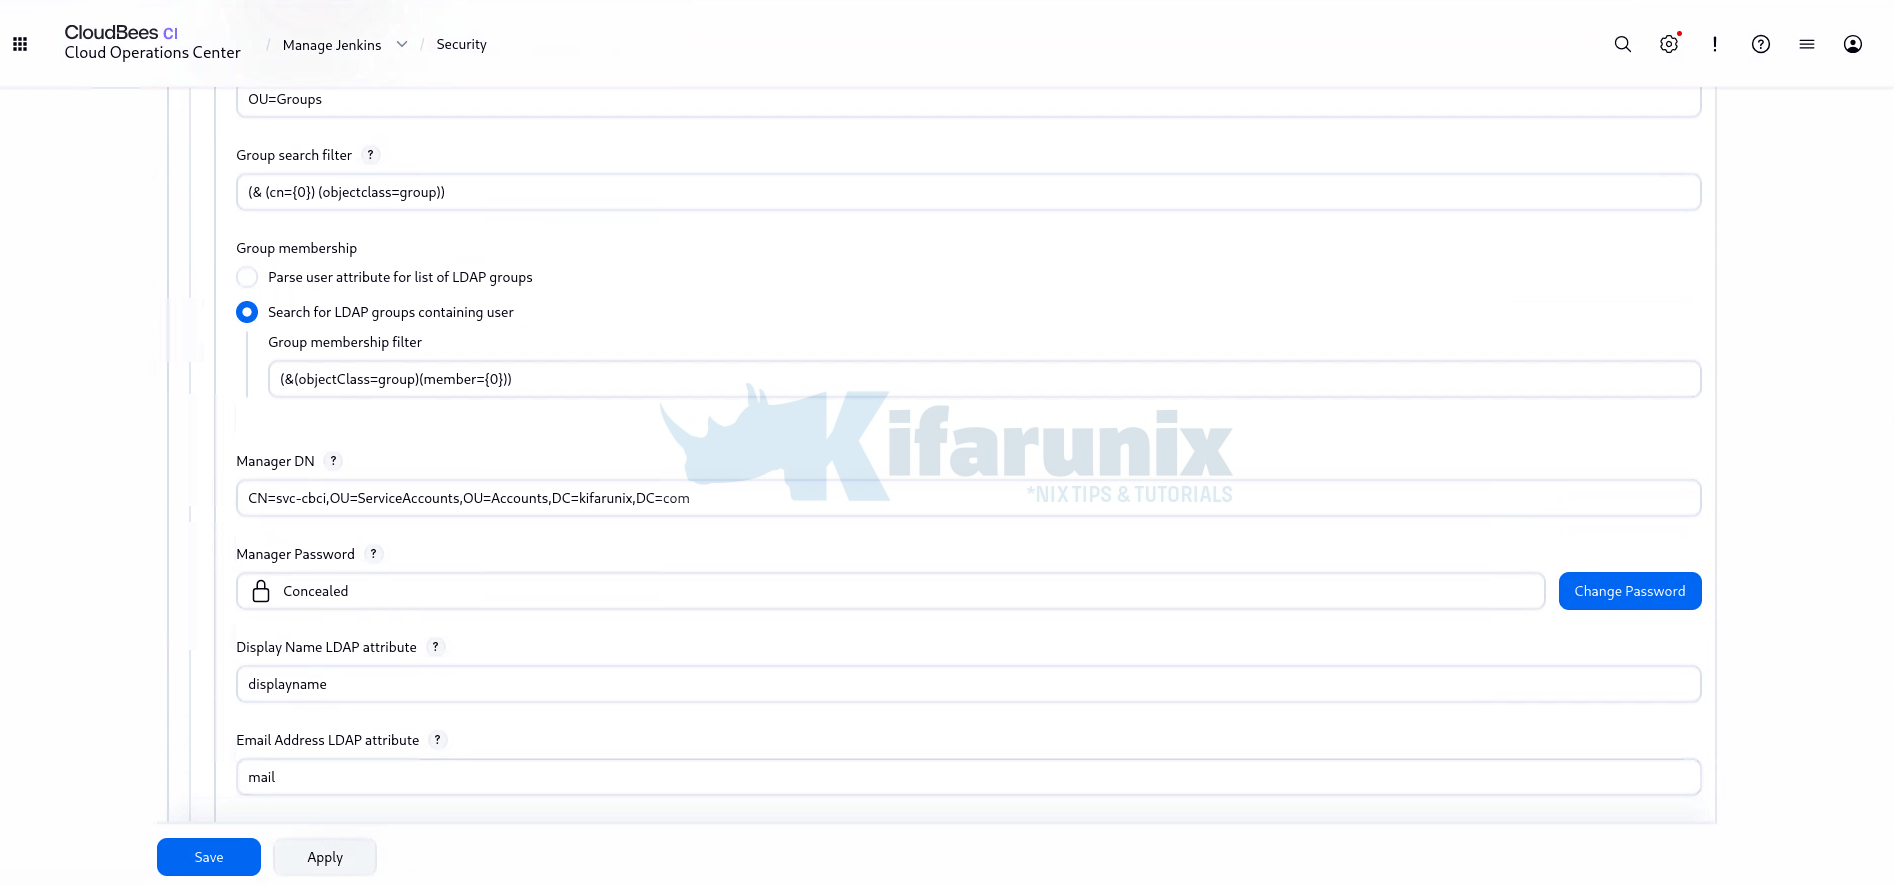
- Leave Environment Properties empty unless a specific timeout or referral setting is required.
Optional JNDI properties, such ascom.sun.jndi.ldap.connect.timeout, can be added here later if the LDAP server becomes slow to respond or unreachable, but none are required for a working connection. - Leave Ignore if Unavailable unchecked.
This setting silently skips the LDAP realm if the server cannot be reached, which would allow authentication to fail open or fall back unexpectedly. Leaving it unchecked ensures a directory outage is visible rather than silently bypassed.
Do NOT save yet!
Before saving the security configuration, use Test LDAP Settings.
The LDAP plugin’s test function checks the complete LDAP configuration and prompts for a username and password. It is recommended to use it to verify the configuration before committing the security change.
Use a real test user from the example environment, such as:
Username: m.mwangi
Password: <the user's AD password>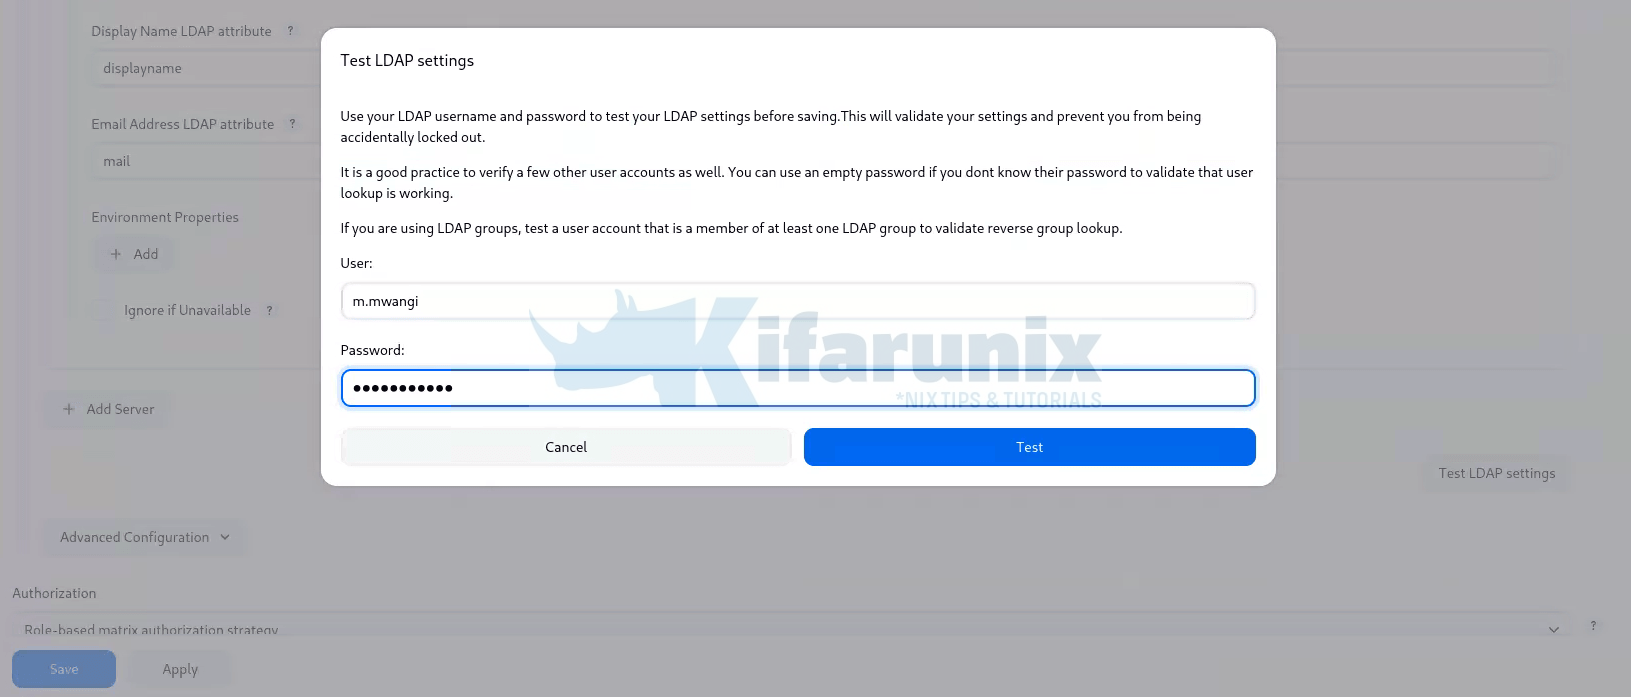
The test should successfully authenticate the user and resolve the user’s directory information and group memberships.
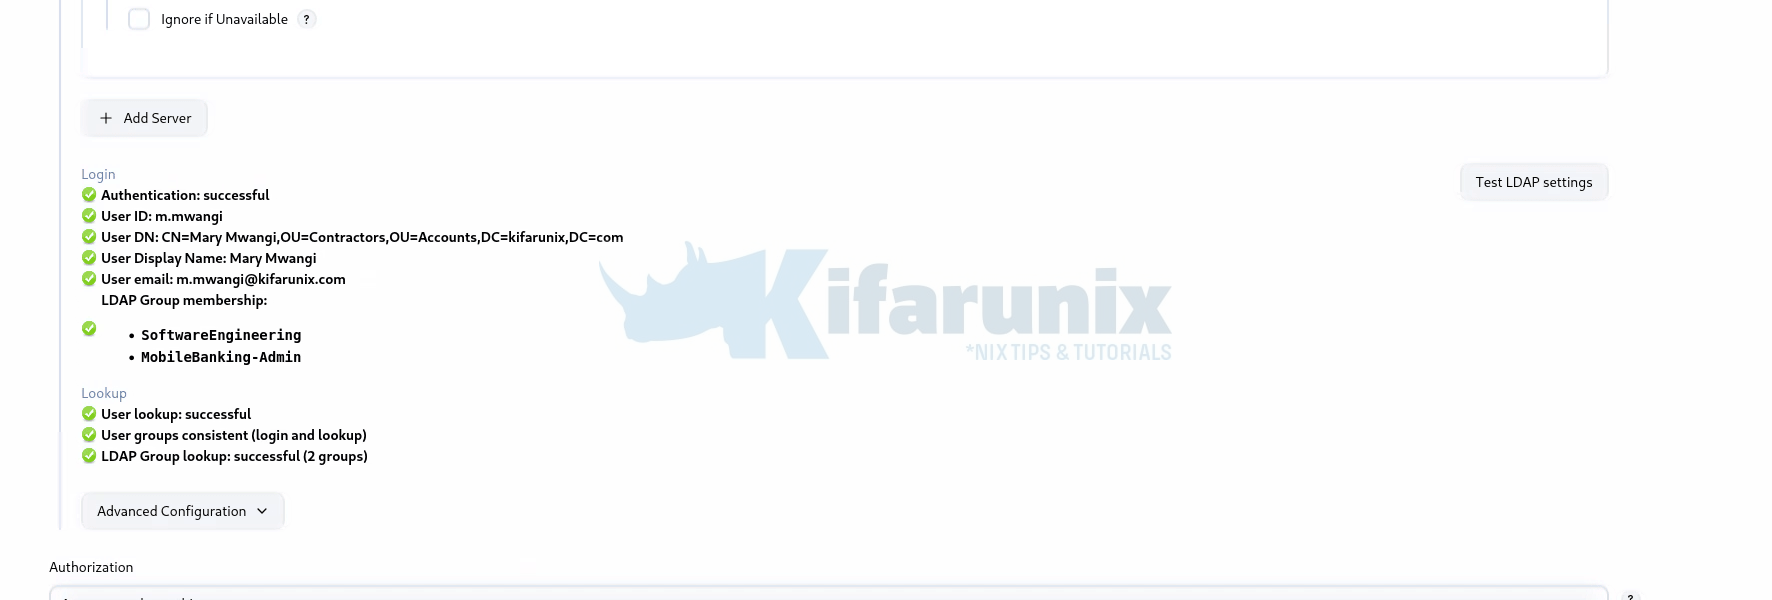
At this point, do not consider the configuration complete just because the test accepts the password. The next step is to verify that CloudBees CI receives the expected Active Directory groups.
That is particularly important for this integration because the groups are what you will subsequently map to CloudBees RBAC.
Before saving the LDAP security realm settings, temporarily set Authorization to Anyone can do anything.
The security realm determines who can authenticate, while the authorization strategy determines what they can access. After switching to LDAP, your existing local administrator account may no longer be available as a valid identity. If authorization is still enforcing permissions and no LDAP user or group has the required access, you can lose administrative access once your current session expires.
Security note: Anyone can do anything grants unrestricted access to Jenkins, including jobs and potentially sensitive credentials. Keep this setting enabled for the shortest practical period and restrict network access to the controller while it is enabled. Re-enable the appropriate authorization strategy after LDAP authentication and authorization have been configured and tested.
Authorization set to “Anyone can do anything“
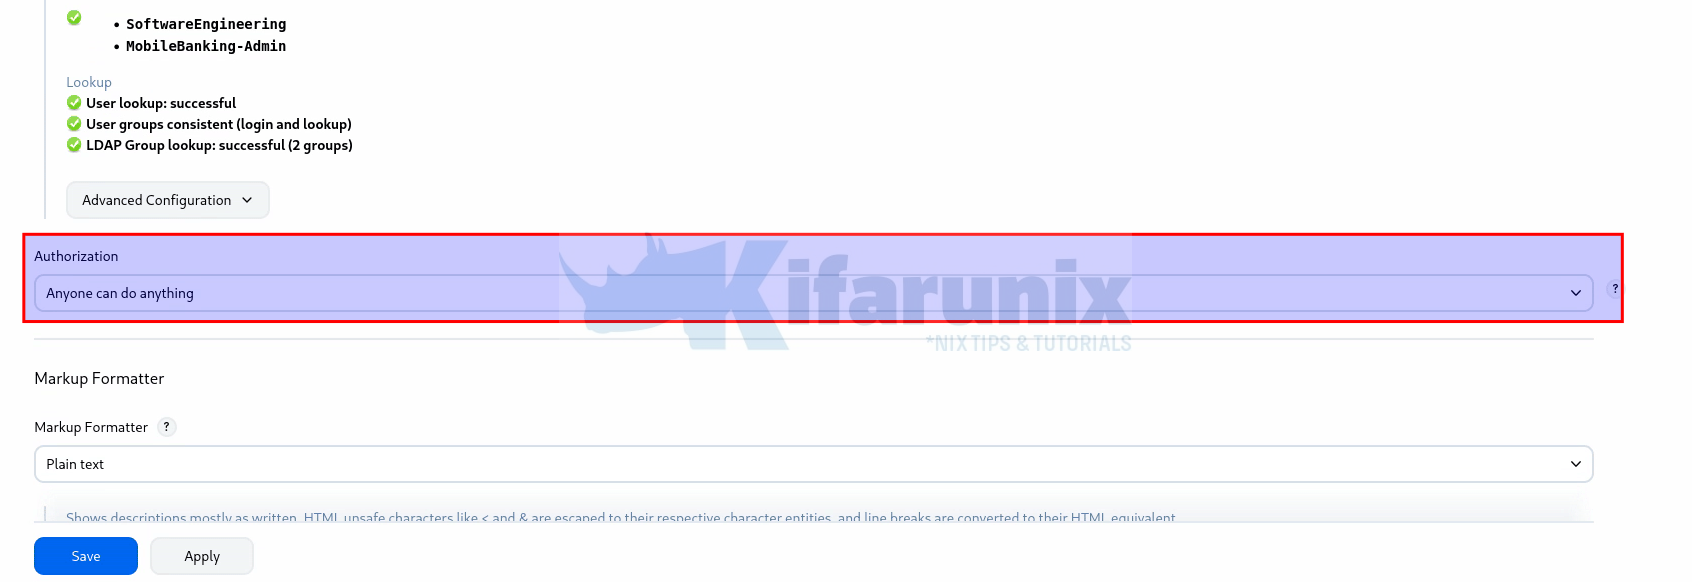
Once the LDAP test/validation succeeds, click Save to apply the LDAP security realm settings.
Test Active Directory Authentication
Passing Test LDAP Settings confirms that the LDAP configuration can authenticate the supplied credentials. Now verify the running Operations Center with an actual Active Directory login.
This test confirms three things:
- CloudBees CI can authenticate an Active Directory user.
- CloudBees CI identifies the authenticated user correctly.
- CloudBees CI receives the user’s Active Directory group memberships.
The third check is particularly important. The groups reported by the LDAP Security Realm become external groups in CloudBees CI. RBAC uses those external groups when determining which permissions a user receives.
Sign in with an Active Directory user
Open a new private or incognito browser window so that your existing administrator session does not interfere with the test.
Sign in to Operations Center using an Active Directory test user, for example in my setup:
Username: m.mwangi
Password: <m.mwangi AD password>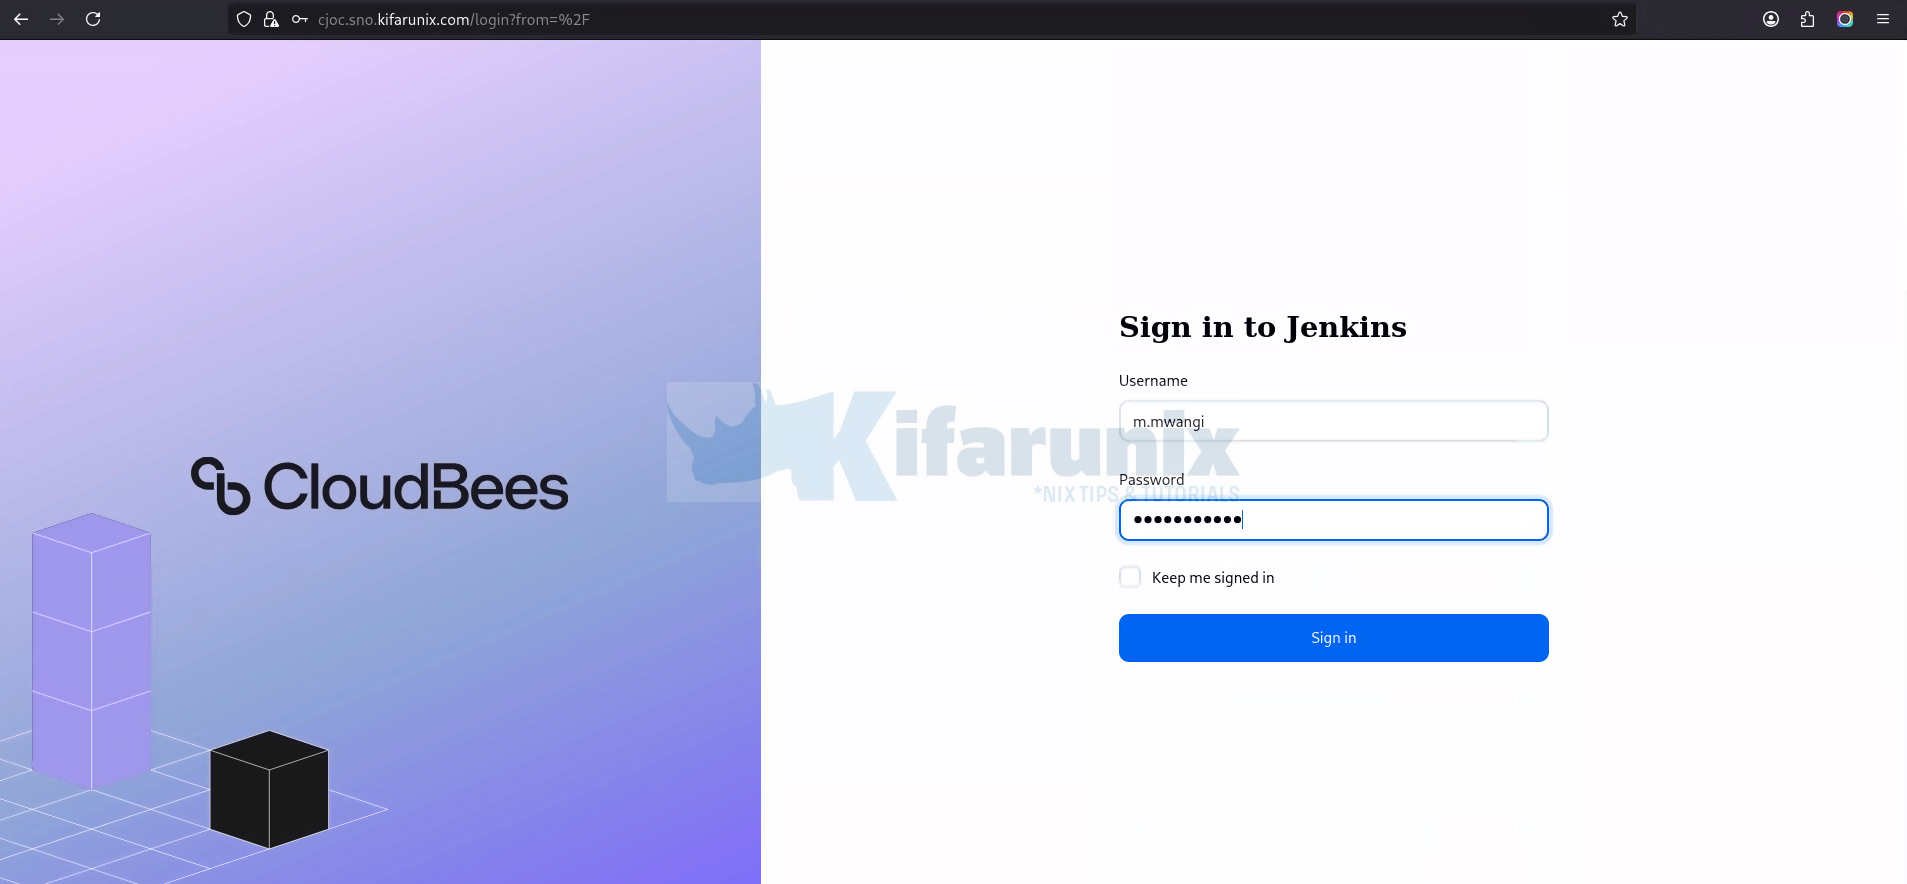
The login must succeed.
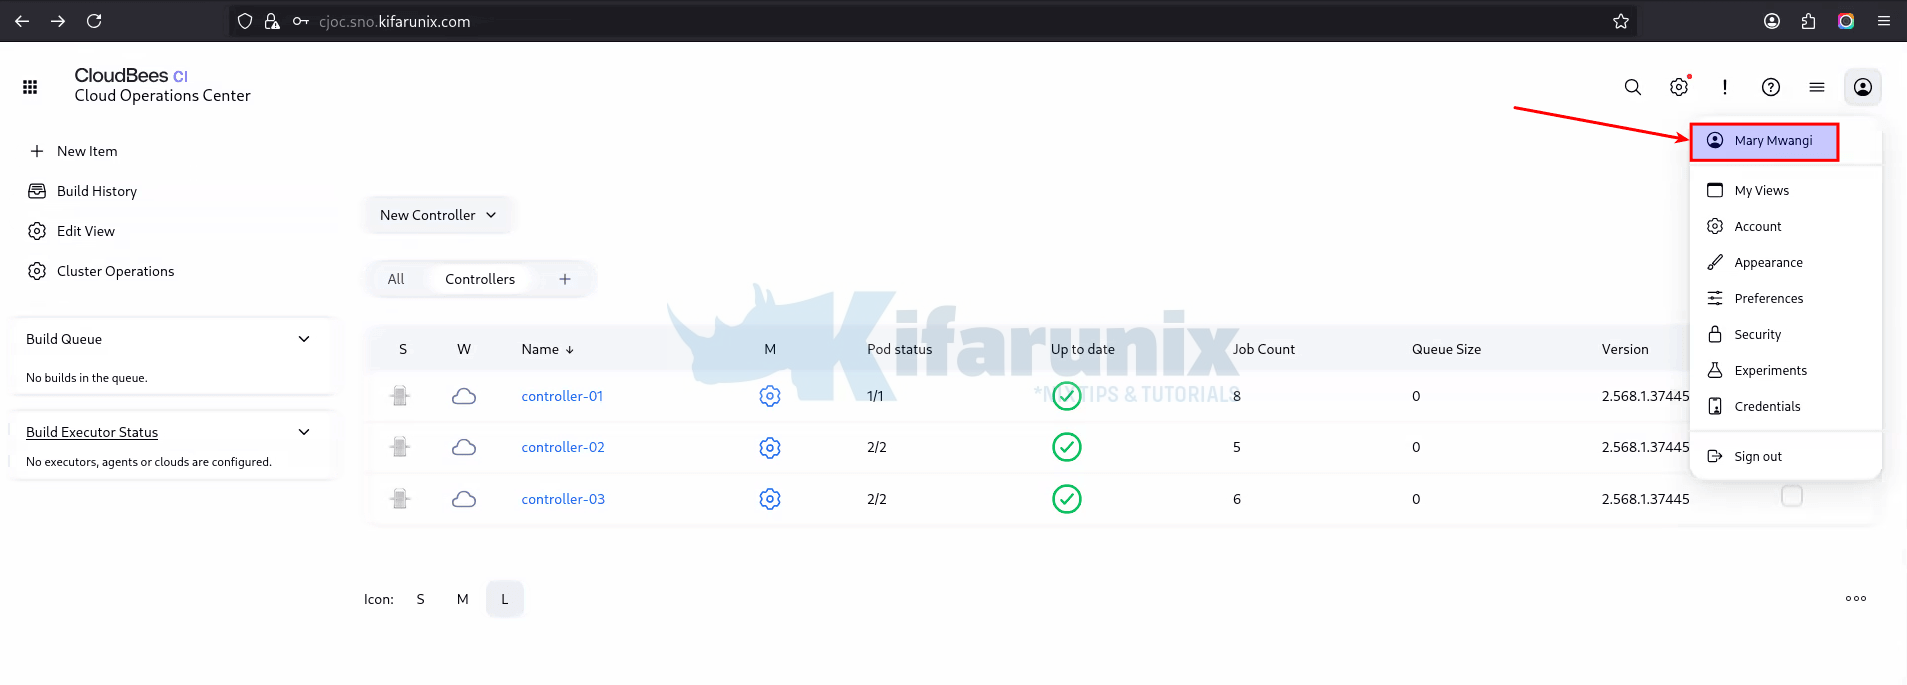
If the login fails, stop here. Do not configure RBAC until Active Directory authentication is working.
Verify the authenticated identity and groups
While signed in as an AD user, open:
https://<operations-center-url>/whoAmI/This is to validate the LDAP configuration and to verify that the authenticated user and their LDAP groups are correctly retrieved.
Verify that the page identifies the expected user and displays the expected external groups.
For example, if m.mwangi is a member of: MobileBanking-Admin as is in my setup, that group should be present in the groups reported for the authenticated user.
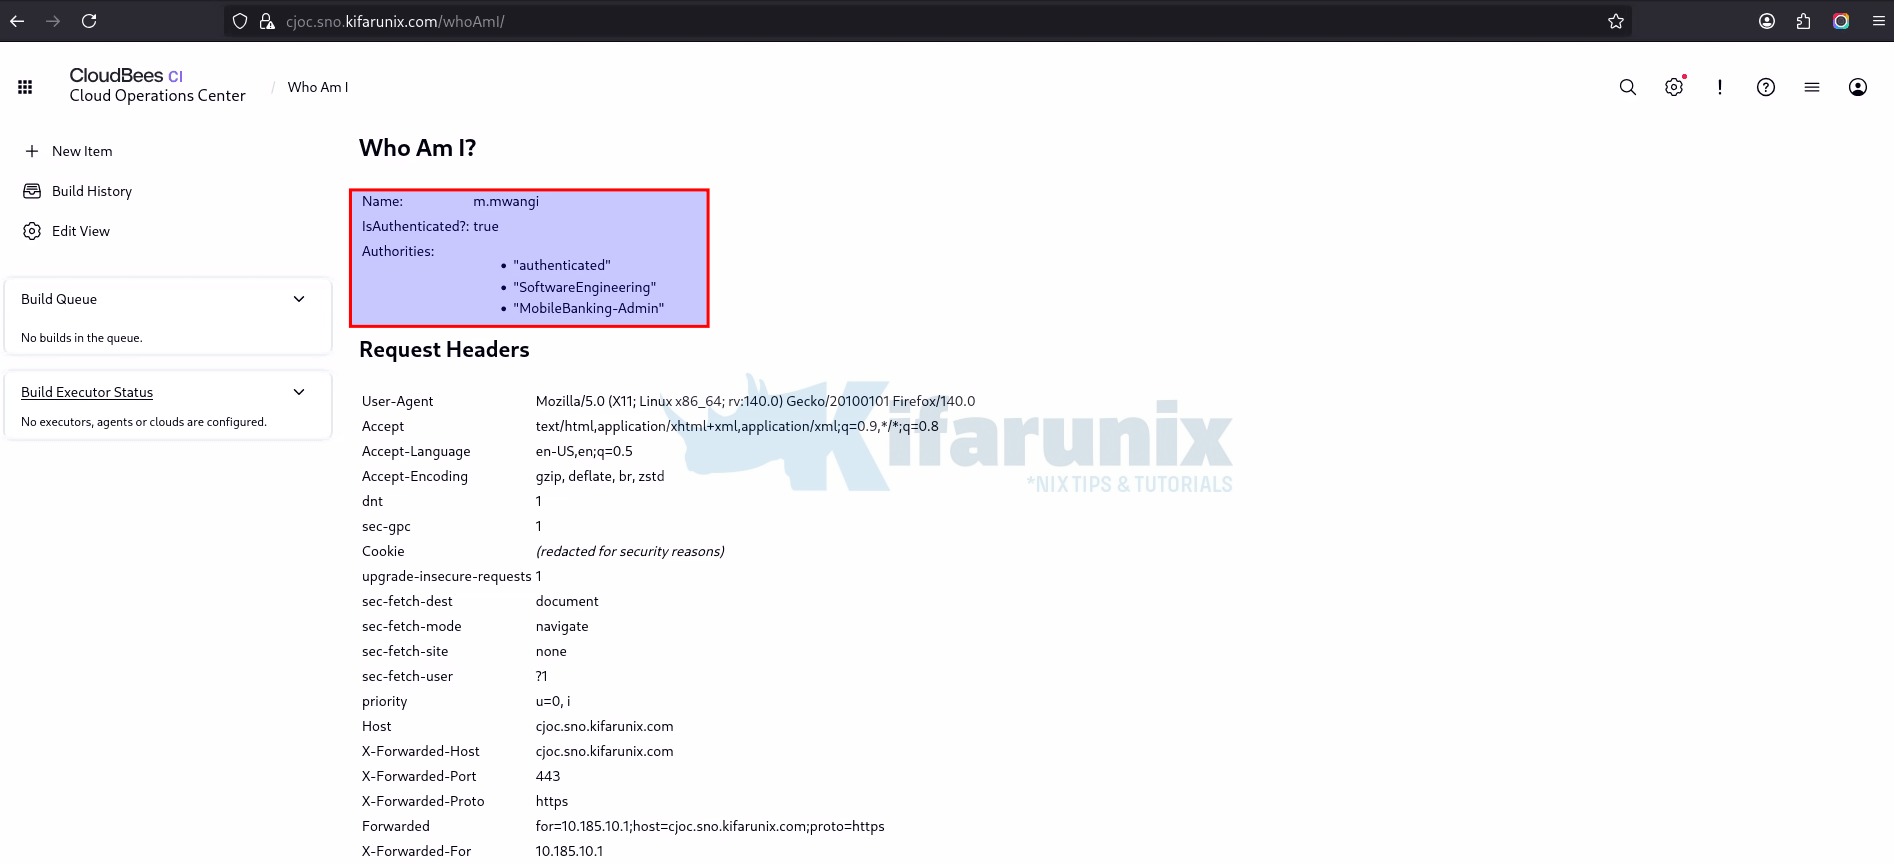
A successful login with missing or unexpected groups is not a successful integration for this guide. Authentication and group resolution must both work before you configure RBAC.
Repeat the test with users representing the access levels you intend to map to RBAC.
Also verify a member of:
CloudBees-AdminFor each test user, confirm:
- the user can sign in;
- the authenticated identity is correct;
- the expected AD groups are returned.
Do not assume that a group is available to RBAC merely because it exists in Active Directory. It must be reported by the Security Realm for an authenticated user. LDAP groups reported by the Security Realm are treated as external groups, and these can then be added as members of RBAC groups.
You are ready to proceed when:
- an Active Directory user can authenticate;
- CloudBees CI identifies the correct user;
- the expected Active Directory groups are returned; and
- those groups are available as external groups to the authorization layer.
If all the above check, you can now proceed to Map Active Directory Groups to CloudBees CI RBAC.
Map Active Directory Groups to CloudBees CI RBAC
Active Directory authentication and group resolution are now verified. The next step is to use those verified Active Directory groups to control what users can do in CloudBees CI.
The model is straightforward:
- Active Directory manages group membership.
- CloudBees CI RBAC manages permissions.
- Operations Center controls cluster-level access.
- Controller-level RBAC restricts each application team to its own controller.
CloudBees CI RBAC allows roles to be assigned to groups, including external groups supplied by an authentication server such as LDAP. Groups and roles can be defined at the Operations Center level and for specific controllers or other objects.
The names used in this guide are specific to the example environment. CloudBees-Admin, MobileBanking-Admin, MobileBanking-Developer, MobileBanking-Viewer, CardBanking-Admin, CardBanking-Developer, and CardBanking-Viewer are Active Directory groups created for this example. They are not standard CloudBees CI or Active Directory group names. Likewise, team-admin is a custom role created in this example, while administer, develop, and browse are roles created by the Typical initial setup import strategy. The RBAC group names beginning cloudbees-, mobilebanking-, and cardbanking- are created later in this guide, and controller-02 and controller-03 are example controller names.
For this example, the Active Directory groups are:
| Active Directory group | Purpose |
|---|---|
| CloudBees-Admin | CloudBees CI platform administrators |
| MobileBanking-Admin | MobileBanking administrators |
| MobileBanking-Developer | MobileBanking developers |
| MobileBanking-Viewer | MobileBanking read-only users |
| CardBanking-Admin | CardBanking administrators |
| CardBanking-Developer | CardBanking developers |
| CardBanking-Viewer | CardBanking read-only users |
Do not create individual CloudBees CI users for these staff. Their identities and group memberships remain in Active Directory. CloudBees CI consumes those external groups when determining authorization.
Define the Authorization Model
For this example, the authorization boundaries are:
| Active Directory group | Operations Center | controller-02 | controller-03 |
|---|---|---|---|
| CloudBees-Admin | Administrator | Administrator | Administrator |
| MobileBanking-Admin | Read | Administrator | No access |
| MobileBanking-Developer | Read | Developer | No access |
| MobileBanking-Viewer | Read | Viewer | No access |
| CardBanking-Admin | Read | No access | Administrator |
| CardBanking-Developer | Read | No access | Developer |
| CardBanking-Viewer | Read | No access | Viewer |
This gives platform administrators control over the CloudBees CI installation while keeping the MobileBanking and CardBanking teams isolated from each other’s controllers.
The permissions in this table describe the intended authorization boundary. The actual permissions assigned to the Administrator, Developer, and Viewer roles are configured in the CloudBees CI RBAC permission matrix.
The exact permissions available on the Roles screen depend on the CloudBees CI version and the installed plugins. Use the permission matrix displayed by your installation rather than copying a permission list from another version.
Enable RBAC in Operations Center
Up to this point the authorization strategy has been set to Anyone can do anything, so every authenticated Active Directory user has full access. Enabling RBAC ends that. The moment you save, CloudBees CI begins enforcing roles, and only accounts that hold a role will retain access.
The RBAC configuration screens, Roles and Groups, are provided by the RBAC strategy itself, so the roles and groups cannot be created before the strategy is enabled. There is therefore no way to pre-build the mapping and switch to it in one move.
On a genuinely clean instance this is less dangerous than it sounds. The first time the Role-Based Access Control plugin is enabled, it defaults to a configuration where signed-in users have no restrictions and users cannot access the system anonymously. Any authenticated Active Directory user would still be able to work.
The real hazard is that the instance may not be clean. The Role-Based Access Control plugin remembers its configuration even when a different authorization strategy is configured. If RBAC was enabled at any earlier point, for example while local accounts were still in use, that earlier configuration is still stored and will be reinstated. A configuration that granted administration to a local account grants nothing to an Active Directory user, and enabling it produces an immediate lockout.
Do not select Retain any existing role-based matrix authorization strategy configuration unless you know exactly what that stored configuration contains. If RBAC was previously configured against local accounts, this option restores those assignments, and no Active Directory account will hold any role. Recovery then requires stopping the instance and editing files on the controller filesystem.
CloudBees provides an import strategy that avoids both problems. The Typical initial setup option creates a group of administrators with full permissions, whose sole initial member is the account that is signed in at the moment the change is saved. It also creates empty developers and browsers groups with useful permission sets. This option is only available when signed in, because it needs an authenticated identity to make the sole administrator.
If the instance has an earlier RBAC configuration that you do not want, note that it can be cleared completely from the script console before you begin, using the documented reset procedure. That reset is irreversible, so confirm that nothing in the stored configuration is still needed.
Because the signed-in account becomes the sole initial administrator, sign in with the right one before making this change.
- Sign in to Operations Center as an Active Directory user who is a member of an administrative group, for example,
CloudBees-Admingroup, whose members includee.bernard. - Go to Manage Jenkins > Security.
- Under Authorization, select Role-based matrix authorization strategy.
- In Import strategy, select Typical initial setup.
- Select Save.
Immediately confirm that this account still has administrative access. Reload the Operations Center dashboard and open Manage Jenkins. If the page loads and the administration options are present, the initial setup worked and e.bernard is the sole member of the administrators group.
If access has been lost at this point, stop and recover before continuing. CloudBees documents two ways to recover from a lock-out, and both require the instance to be stopped and then restarted after the steps are completed. The first removes all roles defined in the system but requires no manual editing of XML files. The second involves editing nectar-rbac.xml directly. If the instance is configured using CloudBees Configuration as Code, set the authorizationStrategy directive to unsecured in the jenkins section, which configures the Anyone can do anything authorization strategy, then restart the instance.
Create the RBAC Roles
Perform the RBAC configuration from Operations Center. Roles are defined centrally and can then be assigned to groups at the Operations Center or controller level. A single role definition can therefore be reused across any number of controllers, with the groups determining which team receives it. In the example environment, the same role definitions are reused across controller-02 and controller-03.
When Role-Based Access Control is enabled, the interface gains Groups and Roles at the Jenkins root and on objects that support local groups, together with Manage Roles under Manage Jenkins. Roles are configured from the Manage Roles screen.
How roles and permissions work
A role is a named set of permissions. It does nothing on its own. Authorization takes effect only when a role is assigned to a group at a particular scope, and a user is a member of that group.
Three properties of the model are worth understanding before working with the permission matrix.
- Permissions are grouped by the object they apply to. The Manage Roles screen is a wide table in which each row is a role and each column is a permission. Columns are grouped under headings such as Overall, Job, Run, View, Credentials, Agent, etc. Two of those headings are worth noting because their names collide with the concepts being configured: the Group and Role permission columns govern who may create and modify RBAC groups and roles themselves, and are not the groups and roles being defined on this screen. The available permission groups depend on the CloudBees CI version and the installed components, so the screen itself is the authority. This guide covers only the permissions used by the example design. For a full description of the permission groups and worked examples of complete role definitions, refer to the Role-based access control documentation and the example RBAC configurations.
- Some permissions imply others. Selecting Overall/Administer causes most other permissions to display with a coloured background, indicating they are already granted by implication and do not need to be selected separately. There is one exception, covered under the
administerrole below. - Some permissions are not visible until they are enabled. Overall/Manage is not present on every installation. The CloudBees example configurations state as a precondition that the instance has the Overall/Manage permission enabled. Check for a Manage column under Overall on the Manage Roles screen before relying on it, and enable it first if it is absent, as described in delegate administration.
Review the roles created by the Typical initial setup import strategy
Before creating any new roles, inspect what RBAC has already created. Because the previous step enabled RBAC using the Typical initial setup import strategy, the initial configuration should already contain these role definitions:
| Role | Purpose in the initial configuration | Filterable |
|---|---|---|
| administer | Full administrative access | No |
| develop | Development access | Yes |
| browse | Read-only access | Yes |
There are also the built-in anonymous and authenticated roles, which are system roles and cannot be deleted.
The same import strategy also creates an administrators group containing the account that was signed in when RBAC was enabled, together with empty developers and browsers groups. These are bootstrap objects. They are not automatically the final authorization model for a given deployment.
Therefore, from Operations Center:
- Select Manage Jenkins.
- Select Manage Roles.
- Locate
administer,develop, andbrowse. - Review the permissions selected for each role.
- Check the
anonymousandauthenticatedrows as well, and record what you find. - Record what is actually present before creating any additional role.
Do not assume that a role created by the import strategy has exactly the permissions this guide describes. The permission matrix on the instance is the authoritative configuration, and the available permissions depend on the installed CloudBees CI components.
Both the anonymous and authenticated rows should be empty after the Typical initial setup import strategy, which means signing in grants nothing by itself and all access comes from the roles you assign. If either row carries permissions, note them now. They apply to every user and will mask the effect of everything else you configure, which makes the isolation tests later in this guide meaningless. Clearing them is covered in Clear the default roles and remove the temporary access.
How the initial roles map to this design
In the example environment, the three initial roles are treated as follows:
| Initial role | Use in the example environment | Action |
|---|---|---|
| administer | Platform administration | Reuse it as the platform administrator role |
| develop | Developer access | Review it, and reuse it if its permissions match the intended developer boundary |
| browse | Read-only access | Reuse it for both Operations Center read access and controller-level viewer access |
This means do not automatically create platform-admin, team-developer, team-viewer, or a separate Operations Center reader role. Only one role is genuinely missing, and that is team-admin.
The names of roles do not determine their authority. The permissions assigned to them do. A role is a reusable set of permissions that is subsequently assigned to groups at the required scope.
Confirm the administer role
The administer role created by the import strategy is a natural platform-administrator role, and is used as such in the example environment.
Open the administer row and verify that:
- Overall/Administer is selected;
- Overall/RunScripts, Overall/UploadPlugins, and Overall/ConfigureUpdateCenter are each selected explicitly; and
- Filterable is cleared.
The three additional Overall permissions matter because of a deliberate change in the RBAC plugin. Starting in the recent versions, Overall/Administrator no longer implies Overall/RunScripts, Overall/Uploadplugins, and Overall/ConfigureUpdateCenter. Roles configured before that update keep those permissions, but roles created afterwards must select them explicitly. If any are missing from administer, select them and save.
The role must remain non-filterable. A role filter can prevent roles inherited from a parent object from applying to a child object, so an administrative role that is filterable can be blocked at a lower level. CloudBees notes that a Jenkins administrative role ought to be valid anywhere in the system, so that a project manager cannot accidentally block even site administrators from seeing an otherwise private project.
Where the administer role does not contain the administrative permissions an environment requires, the correct action is to amend that role rather than create a second administrator role. Two near-identical administrative roles means two places to keep correct, and one of them will eventually drift.
In the example environment, administer becomes the platform administrator role:
CloudBees-Admin (AD group) > cloudbees-platform-admins (CBCI group) > administer (CBCI role) > Operations Center root, Propagates ON (scope)Review the develop role
Next inspect the develop role. It is already intended to represent development access, so there is no reason to create a new role simply because the design table used a different name.
Compare the permissions displayed for develop against the intended developer boundary. In the example environment, developers must be able to:
- see their team’s controller;
- create, configure, and run the jobs they are responsible for;
- build and cancel builds;
- inspect build results and workspaces;
- use existing credentials where appropriate; and
- work with the SCM integration.
Developers must not be able to administer the controller, manage RBAC, or receive platform administration.
CloudBees’ RBAC examples describe a developer as a member of a team project, implementing features on a project, and their sample developer role grants read access, plus item read, create, and configure. The exact permission set is intentionally configurable rather than being a universal CloudBees definition, which is why reviewing it against the intended boundary matters more than matching any published list.
Two specific permissions are worth a deliberate decision:
- Job/Delete and Run/Delete. Deleting a job destroys its build history, and deleting a run removes an individual build record. Both are audit-relevant. Where build history is treated as a record, these are better removed from
develop, leaving deletion toteam-admin. - Job/Workspace. This exposes the build workspace, including any file a build writes. It is generally required for debugging, but a secret accidentally written to a workspace is visible to everyone holding this permission.
If develop matches the intended developer boundary, reuse it:
MobileBanking-Developer (AD group) > mobilebanking-developers (CBCI group) > develop (CBCI role) > controller-02 (scope)CardBanking-Developer (AD group) > cardbanking-developers (CBCI group) > develop (CBCI role) > controller-03 (scope)Where the existing develop role is too broad for the intended boundary, a separate role with the narrower permission set is preferable to silently accepting the broader bootstrap role. Do not modify a role merely to make its name match this guide. The permission boundary matters; the role name does not.
Review the browse role
The browse role is the best fit for the read-only portion of this design, and it serves two distinct purposes here.
Review its permissions and confirm that it provides read access without granting build, configuration, credential, or administrative capability. At minimum it needs Overall/Read, Job/Read, and View/Read.
Job/Read is the one to check carefully. Connected controllers appear as items in Operations Center, so Job/Read at the Operations Center root is what makes a controller visible and openable from the dashboard. Without it, a team member signs in, sees an empty dashboard, and cannot reach their controller even though their controller-level permissions are correct. This is a common and confusing failure, and it looks like an authentication problem when it is not.
Consider also selecting Job/Discover. Where a user lacks Job/Read on a specific item, Job/Discover causes them to be redirected to sign in rather than shown a misleading message that the item does not exist.
The two uses of browse role in this design are:
- Operations Center read access for all application teams, so they can see and open their own controller.
- Read-only access inside a team’s controller, for the viewer tier.
CloudBees’ own example uses the same pattern: developer teams have read-only access to the operations center instance and are only able to access their own controller.
browse (CBCI role)
    │
    ├── cloudbees-operations-readers (CBCI group)   scope: Operations Center root, Propagates OFF
    │       ├── MobileBanking-Admin       (AD group)
    │       ├── MobileBanking-Developer   (AD group)
    │       ├── MobileBanking-Viewer      (AD group)
    │       ├── CardBanking-Admin         (AD group)
    │       ├── CardBanking-Developer     (AD group)
    │       └── CardBanking-Viewer        (AD group)
    │
    ├── mobilebanking-viewers (CBCI group)          scope: controller-02
    │       └── MobileBanking-Viewer      (AD group)
    │
    └── cardbanking-viewers (CBCI group)            scope: controller-03
            └── CardBanking-Viewer        (AD group)
Note that all six application groups receive browse at the Operations Center root, including the admin and developer groups. Their elevated permissions are granted separately at their own controller. This is what keeps the Operations Center itself read-only for everyone except platform administrators.
Create the team administrator role
Unlike the platform administrator, the application-team administrator needs a role that does not yet exist.
The distinction is fundamental:
administermeans CloudBees CI platform administration.team-adminmeans administration of a team’s controller and its workloads.
A team administrator must therefore not receive Overall/Administer.
Create team-admin only after confirming that administer, develop, and browse do not already provide the required boundary.
Hence:
- On the Manage Roles screen, enter
team-adminin Role to add. - Select Add.
- Configure the permissions below.
- Leave Filterable checked.
- Select Save.
The anchor permission
Overall/Manage is what makes this role possible. It was introduced alongside Overall/SystemRead, specifically so that an administrator can delegate some parts of administration to a user without having to grant them the powerful Overall/Administrator permission.
The boundary it draws is documented precisely. Overall/Manage allows a user to modify non-security related configuration settings, including project naming restrictions, the system message, updating a CasC bundle, and managing nodes and clouds. Security related configuration is not accessible to a user holding it, including the script console, changing the security realm, and managing plugins.
That last sentence is the reason this role is safe. The three most dangerous capabilities on a Jenkins instance are excluded by the permission definition itself, rather than by a checkbox being left unselected.
Permissions
| Permission area | team-admin | Reason |
|---|---|---|
| Overall/Read | Yes | See the instance |
| Overall/Manage | Yes | Non-security configuration of the controller |
| Overall/Administer | No | Would make this role identical to administer |
| Overall/RunScripts | No | Script console executes arbitrary code as the Jenkins process and can read every credential on the instance |
| Overall/UploadPlugins, Overall/ConfigureUpdateCenter | No | Plugins run with full privileges and are a platform-wide concern |
| Client/Managed Controller/Configure | Yes | Configure the team’s own controller |
| Client/Managed Controller/Lifecycle | Optional | Start, stop, and restart the team’s own controller. Omit where controller restarts remain with the platform team |
| Job | Yes, according to workload requirements | Typically Build, Cancel, Configure, Create, Delete, Discover, Move, Promote, Read, Workspace |
| Run | Yes | Typically Delete, Replay, Update |
| View | Yes | Configure, Create, Delete, Read |
| SCM/Tag | Yes | Tagging as part of the build workflow |
| Credentials | Decide | See below |
| Agent | Yes, except Secure | Agent management is workload configuration; Agent/Secure is security configuration |
| Metrics | Yes | HealthCheck, ThreadDump, View, for diagnosing their own controller |
| Group/Configure, Create, Delete, View | Optional | See below |
| Group/Manage | No | Allows altering the authorization configuration itself |
| Role/View | Yes, if delegating group management | Needed to see which roles can be assigned to a group |
| Role/Filter | No | Role filtering allows a team admin to alter where roles apply |
| Update center, Shared Agent, Shared Cloud | No | Cluster-wide shared resources owned by the platform team |
| CloudBees CasC/Administer | No | Bundle administration is platform-level |
Two decisions to make deliberately
- Credentials. Granting Credentials Create, Delete, ManageDomains, Update, and View gives the team full credential management within their own scope, which suits teams that own their own integration secrets. Where credentials are managed centrally, reducing this to Credentials/View allows the team to select existing credentials without creating new ones.
- Group management. Granting Group Configure, Create, Delete, and View lets a team administrator manage RBAC groups inside their own controller. This is the point of delegated administration: the platform team stops being a ticket queue for team membership changes. CloudBees supports delegating group management without giving the delegated user control over the roles themselves, which is why Role/View is included and Role/Filter and Group/Manage are not. Where this delegation is not wanted, removing all four Group permissions hides the Groups screens from the team administrator.
Leaving Filterable checked on team-admin is deliberate, and is the counterpart to clearing it on administer. It means a role filter can restrict where this role applies, while platform administrators remain able to see everything.
The resulting role is:
MobileBanking-Admin (AD group) > mobilebanking-admins (CBCI group) > team-admin (CBCI role) > controller-02 (scope)CardBanking-Admin (AD group) > cardbanking-admins (CBCI group) > team-admin (CBCI role) > controller-03 (scope)The role is reusable. The group and its scope provide the team boundary.
The resulting role model
After reviewing what the import strategy created and adding only the role that was actually missing, this is how the role model for the example environment looks:
| Role | Source | Filterable | Purpose |
|---|---|---|---|
| administer | Typical initial setup | No | CloudBees CI platform administration |
| team-admin | Custom | Yes | Administration of an assigned application controller |
| develop | Typical initial setup, if suitable | Yes | Application development |
| browse | Typical initial setup | Yes | Read-only access |
Four roles, not eight. Specifically:
- No separate
platform-admin, unlessadministerdoes not meet the required administrative boundary. - No separate Operations Center reader role, unless
browsedoes not provide the required Operations Center access. - No separate
team-viewer, unlessbrowsedoes not provide the required viewer boundary. - No separate
team-developer, unlessdevelopis too permissive or otherwise does not match the required developer boundary.
That is the design decision worth carrying away: reuse the roles created by the Typical initial setup import strategy where their permission boundaries already fit, and create new roles only where they do not.
The final role to Active Directory design
The roles are now defined. The groups named below, and the assignment of roles to them, are created in the sections that follow.
| Active Directory group | CloudBees RBAC group | Role | Scope |
|---|---|---|---|
| CloudBees-Admin | cloudbees-platform-admins | administer | Operations Center root, Propagates ON |
| MobileBanking-Admin | mobilebanking-admins | team-admin | controller-02 |
| MobileBanking-Developer | mobilebanking-developers | develop | controller-02 |
| MobileBanking-Viewer | mobilebanking-viewers | browse | controller-02 |
| CardBanking-Admin | cardbanking-admins | team-admin | controller-03 |
| CardBanking-Developer | cardbanking-developers | develop | controller-03 |
| CardBanking-Viewer | cardbanking-viewers | browse | controller-03 |
One further group is required at the Operations Center root. All six application Active Directory groups are also members of a group named cloudbees-operations-readers, which holds the browse role at the Operations Center root with Propagates cleared.
This group is what allows a team member to see and open their own controller. Connected controllers appear as items in Operations Center, so an account with no permission at the root signs in to an empty dashboard and never reaches the controller, however correct its controller-level permissions may be.
Two details of that group are easy to misread:
- The administrator groups are included.
MobileBanking-AdminandCardBanking-Adminare members of a readers group because at the Operations Center they are read-only, like everyone else. Their administrative permissions apply only within their own controller. - Propagates must remain cleared. If
browsepropagated from the root, every application team member would inherit read access inside every controller, and the separation between the two teams would not exist.
The resulting structure at the Operations Center root:
Operations Center root
├── cloudbees-platform-admins (CBCI group)  [administer, Propagates ON]
│   └── CloudBees-Admin (AD group)
└── cloudbees-operations-readers (CBCI group)  [browse, Propagates OFF]
    ├── MobileBanking-Admin (AD group)
    ├── MobileBanking-Developer (AD group)
    ├── MobileBanking-Viewer (AD group)
    ├── CardBanking-Admin (AD group)
    ├── CardBanking-Developer (AD group)
    └── CardBanking-Viewer (AD group)
Within controller-02:
controller-02
├── mobilebanking-admins (CBCI group)  [team-admin, Propagates ON]
│   └── MobileBanking-Admin (AD group)
├── mobilebanking-developers (CBCI group)  [develop, Propagates ON]
│   └── MobileBanking-Developer (AD group)
└── mobilebanking-viewers (CBCI group)  [browse, Propagates ON]
    └── MobileBanking-Viewer (AD group)
Within controller-03:
controller-03
├── cardbanking-admins (CBCI group)  [team-admin, Propagates ON]
│   └── CardBanking-Admin (AD group)
├── cardbanking-developers (CBCI group)  [develop, Propagates ON]
│   └── CardBanking-Developer (AD group)
└── cardbanking-viewers (CBCI group)  [browse, Propagates ON]
    └── CardBanking-Viewer (AD group)
The three structures are independent, with one exception. Permissions inside a controller come only from the groups defined on that controller, except for administer, which propagates down from the Operations Center root and therefore applies in both controllers as well. The browse role granted at the root does not propagate, so it has no effect inside either controller.
This matches the underlying RBAC model: roles define capabilities, groups bind identities to those capabilities, and scope and propagation determine where those capabilities apply. External Active Directory groups remain identities supplied by the security realm rather than becoming CloudBees CI users.
Create the Platform Administrator Group
RBAC groups can contain external groups reported by the security realm. The Active Directory group becomes a member of the RBAC group. It does not itself become the RBAC group.
The procedure below is the same at every scope, so it is worth reading once. Later sections vary only the object, the group name, the role, the propagation setting, and the member.
- From the Operations Center dashboard, select the Groups icon at the root of Jenkins.
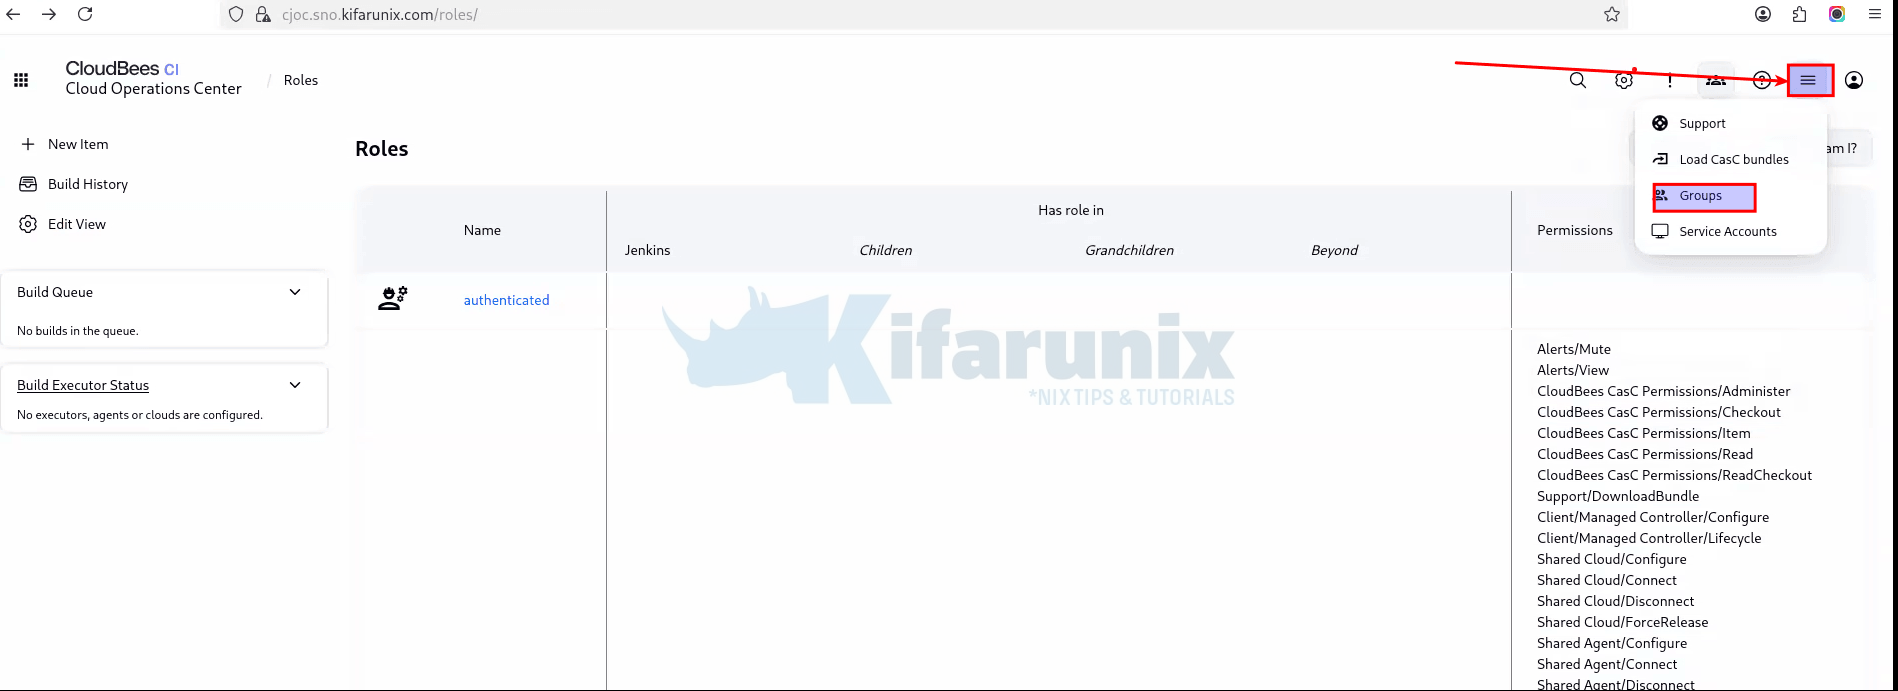
- Under Groups, you will see already existing ones created by the typical setup import strategy. Click New Group to add new groups.
- Enter the group name configured for the target environment and select OK. In this example the name is
cloudbees-platform-admins. - On the Configuration screen, assign
administerat the current level. Leave Propagates enabled.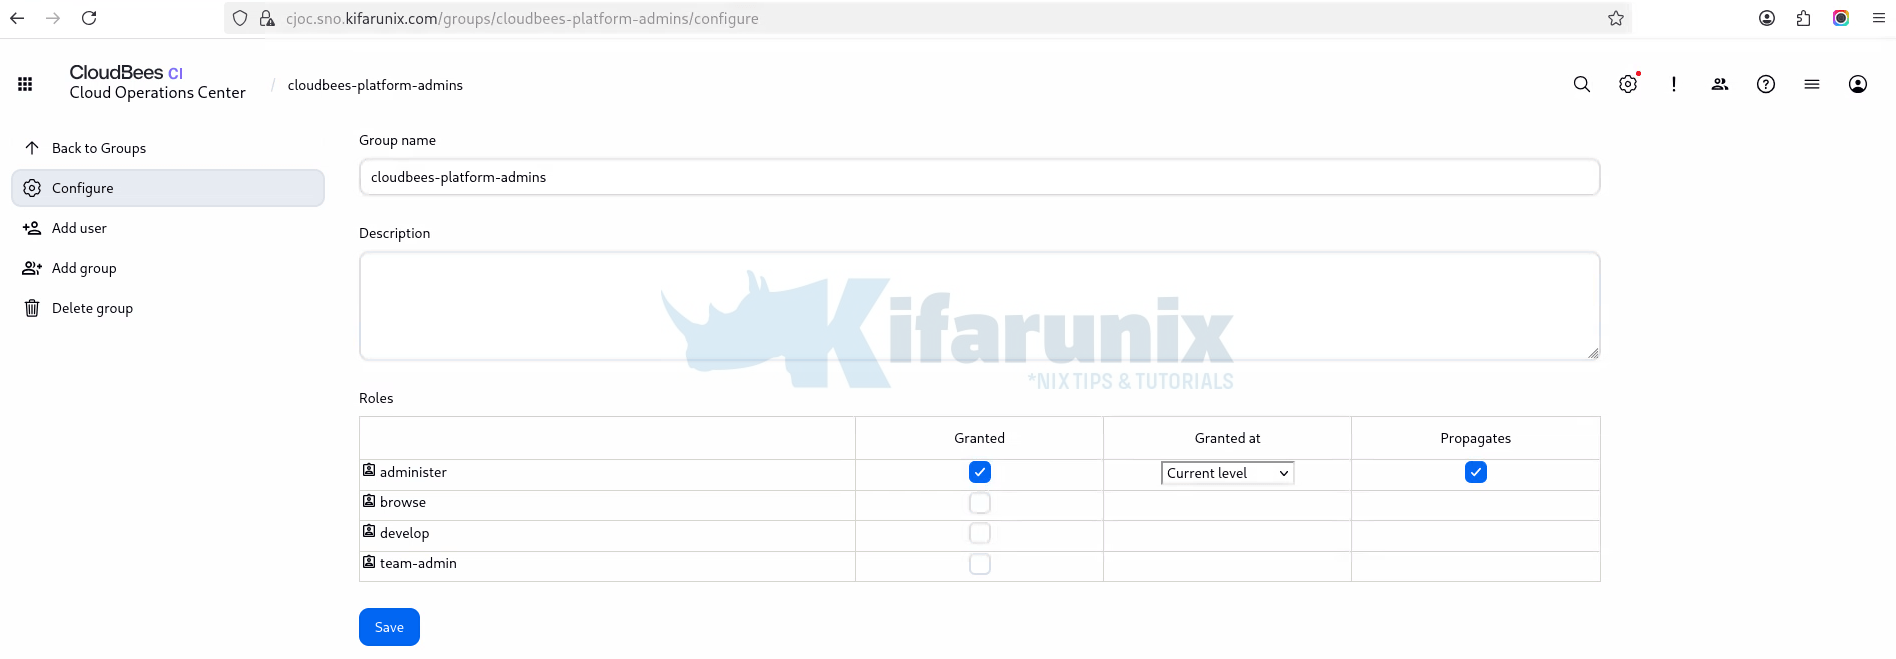
- Save the group configuration.
- Next, you need to add members to the group. Hence, on the group page, select Add group, available in the left menu and beneath the Members panel. The member being added is the Active Directory group itself, so every account in that group inherits the role.
- In the ID field, enter the external Active Directory group name exactly as the security realm reported it on the
/whoAmIpage. In this example the group isCloudBees-Admin. - Select OK.
Propagates must remain enabled here. It is what carries administrative access from the Operations Center root down to the connected controllers.
Three details cause avoidable failures:
- Add group adds an Active Directory group; Add user adds a single account. The ID field accepts a user ID, a group in the current context, a group in a parent context, or an external group from the security realm.
- Names are case-sensitive. Enter the group name exactly as it appeared on the
/whoAmIpage, not as it appears in Active Directory Users and Computers. - Creating an RBAC group with the same name as one in a parent context hides the parent group, without removing the permissions its members already hold.
Whether the Configuration screen appears after saving depends on effective permissions. Users holding the Group Configure permission see it; users without it go straight to the group details screen. That distinction is what allows group membership management to be delegated without allowing the delegate to add roles and escalate their own permissions.
If the Active Directory group does not resolve as an external group, stop here. Do not add individual users as a workaround. Return to the Active Directory authentication and group resolution test and confirm that the security realm reports the group for an authenticated user.
Enforce the Security Configuration on Connected Controllers
Up to this point, the security realm and authorization strategy have been configured in Operations Center only. Connected controllers do not inherit that configuration automatically. Security Setting Enforcement is what pushes it down, so that controllers use the same Active Directory realm and the same RBAC configuration rather than maintaining their own.
Configure this before creating the controller-level groups. Without an SSO option selected, a connected controller has no security configuration from Operations Center at all. CloudBees describes the symptom directly: where Operations Center single sign-on is not enabled for the controller, the Unlock Jenkins screen appears as it would for the startup of any fresh, unsecured Jenkins instance. Active Directory users cannot sign in to that controller, and the roles defined in Operations Center are not available there.
- From the Operations Center dashboard, go to Manage Jenkins.
- Select Security.
- Under Client controller security, set Security Setting Enforcement to Single Sign-On (security realm and authorization strategy). CloudBees documents this as the recommended option.
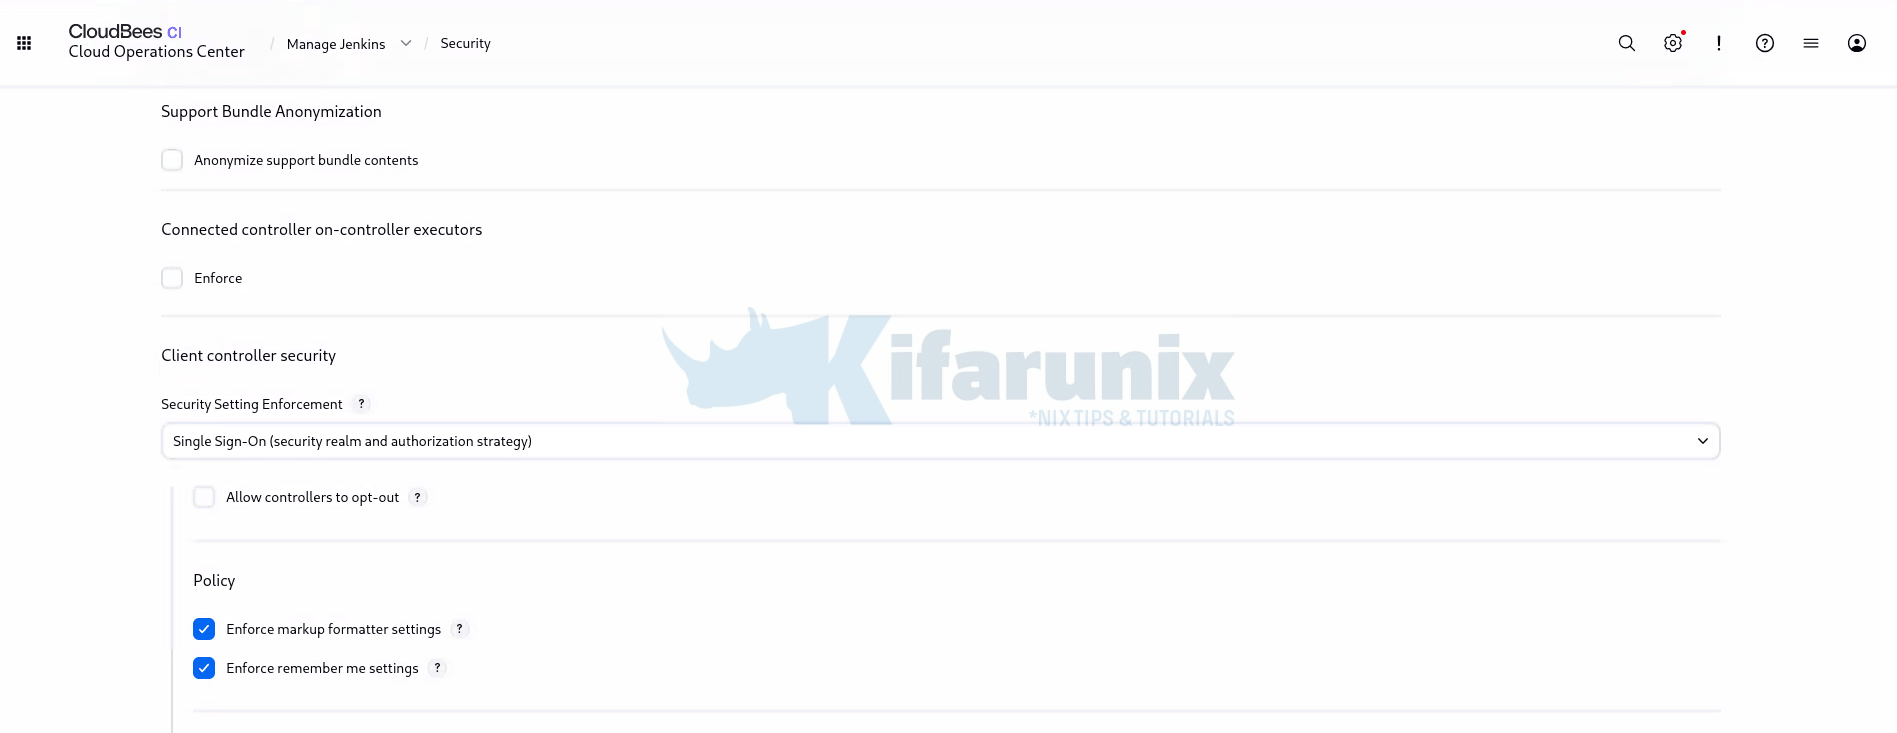
- Select Save.
Controllers connected to the Operations Center then inherit both the security realm configuration and the authorization strategy. When the Role-Based Access Control plugin is in use, the roles are managed by Operations Center, and the groups applied at a controller’s root are those that apply to the controller item in Operations Center. This is what allows the controller-level groups created in the next sections to reference roles that were defined once in Operations Center.
Prerequisite: the Operations Center Server Role Based Access Control plugin must be installed in Operations Center. Where it is missing, roles and groups applied to users in Operations Center are not visible on the controllers, even though the enforcement setting appears to be configured correctly. If that happens, go to Manage Jenkins > Plugins > Available in Operations Center, select Check now, and install the Operations Center Server Role Based Access Control plugin. Roles and groups should propagate to the controllers a few minutes later.
To confirm enforcement is active, either:
- open a controller and select Groups. The groups defined in Operations Center appear under an Inherited from Jenkins heading, separate from the groups defined on the controller itself; or
- open the controller’s own security configuration page. The security realm and authorization options are disabled there and labelled Managed by operations center security policy.
With Single Sign-On enforcement enabled, Operations Center overwrites the authorization configuration on each connected controller whenever it detects a change. Where a controller already holds its own root-level roles or groups, back up its configuration before enabling enforcement.
Verify the Active Directory Administrator Path
This is a gate. Do not configure the application teams until it passes, because everything that follows depends on a working administrative path that does not rely on the bootstrap configuration.
- Keep the session opened when RBAC was enabled.
- Open a separate private or incognito browser window.
- Sign in as a different Active Directory account that belongs to the administrative group. In this example that is a second member of
CloudBees-Admin, such asa.smithorb.colly. - Confirm that this second account can reach the Operations Center administration functions, open
controller-02andcontroller-03, and perform the operations granted byadminister.
Using a different account matters. The account used for the initial setup already holds administrative access through its individual membership in the administrators group, so testing with it proves nothing about the CloudBees-Admin mapping.
I can confirm this on my environment:
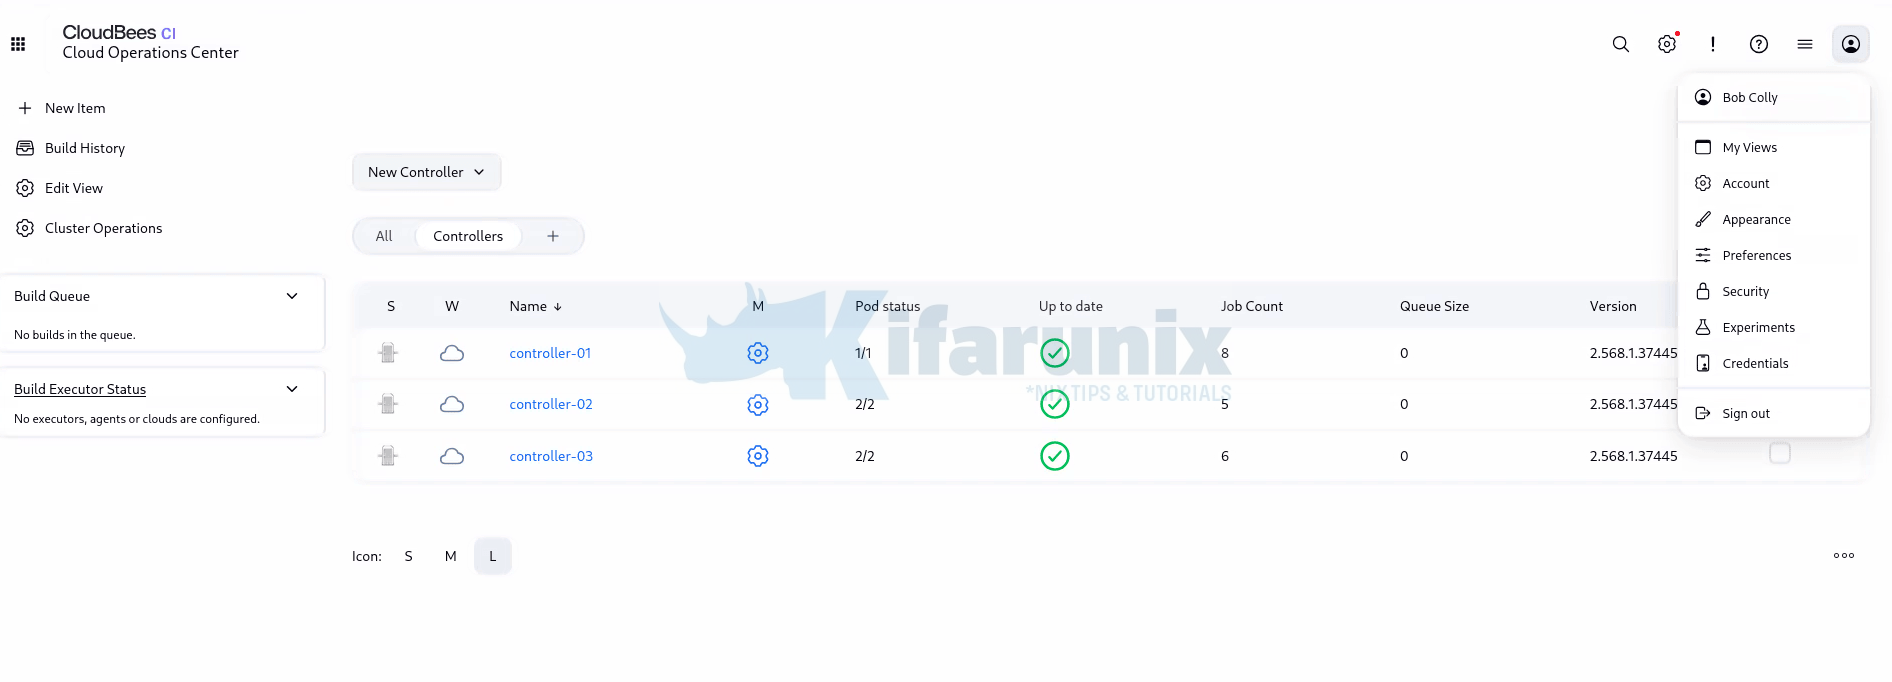
If a check fails, return to the platform administrator group and verify that:
- the Active Directory group is listed as a member;
- the platform administrator role is assigned;
- the role is assigned at the Operations Center root;
- Propagates is enabled; and
- the platform administrator role is not filterable.
Do not continue until this test succeeds.
Configure Operations Center Access
In the following steps, we will configure access at two levels: first, we will create a read-only group in Operations Center; then, we will configure access to the managed applications for the appropriate teams. The application and controller names used in this example are specific to the example environment.
Create the Operations Center read-only group
Application teams need enough Operations Center access to see and open the controller they are authorized to use.
- From the Operations Center root, select the Groups icon and then New Group.
- Enter the group name configured for the target environment and select OK. In this example the name is
cloudbees-operations-readers. - On the Configuration screen, assign the read-only role at the current level. In this example that role is
browse. - Clear/uncheck Propagates.
- Save the group.
- Select Add group, enter one application Active Directory group name in the ID field, and select OK.
- Repeat step 6 for each remaining application group, adding one per pass. In this example that is
MobileBanking-Admin,MobileBanking-Developer,MobileBanking-Viewer,CardBanking-Admin,CardBanking-Developer, andCardBanking-Viewer.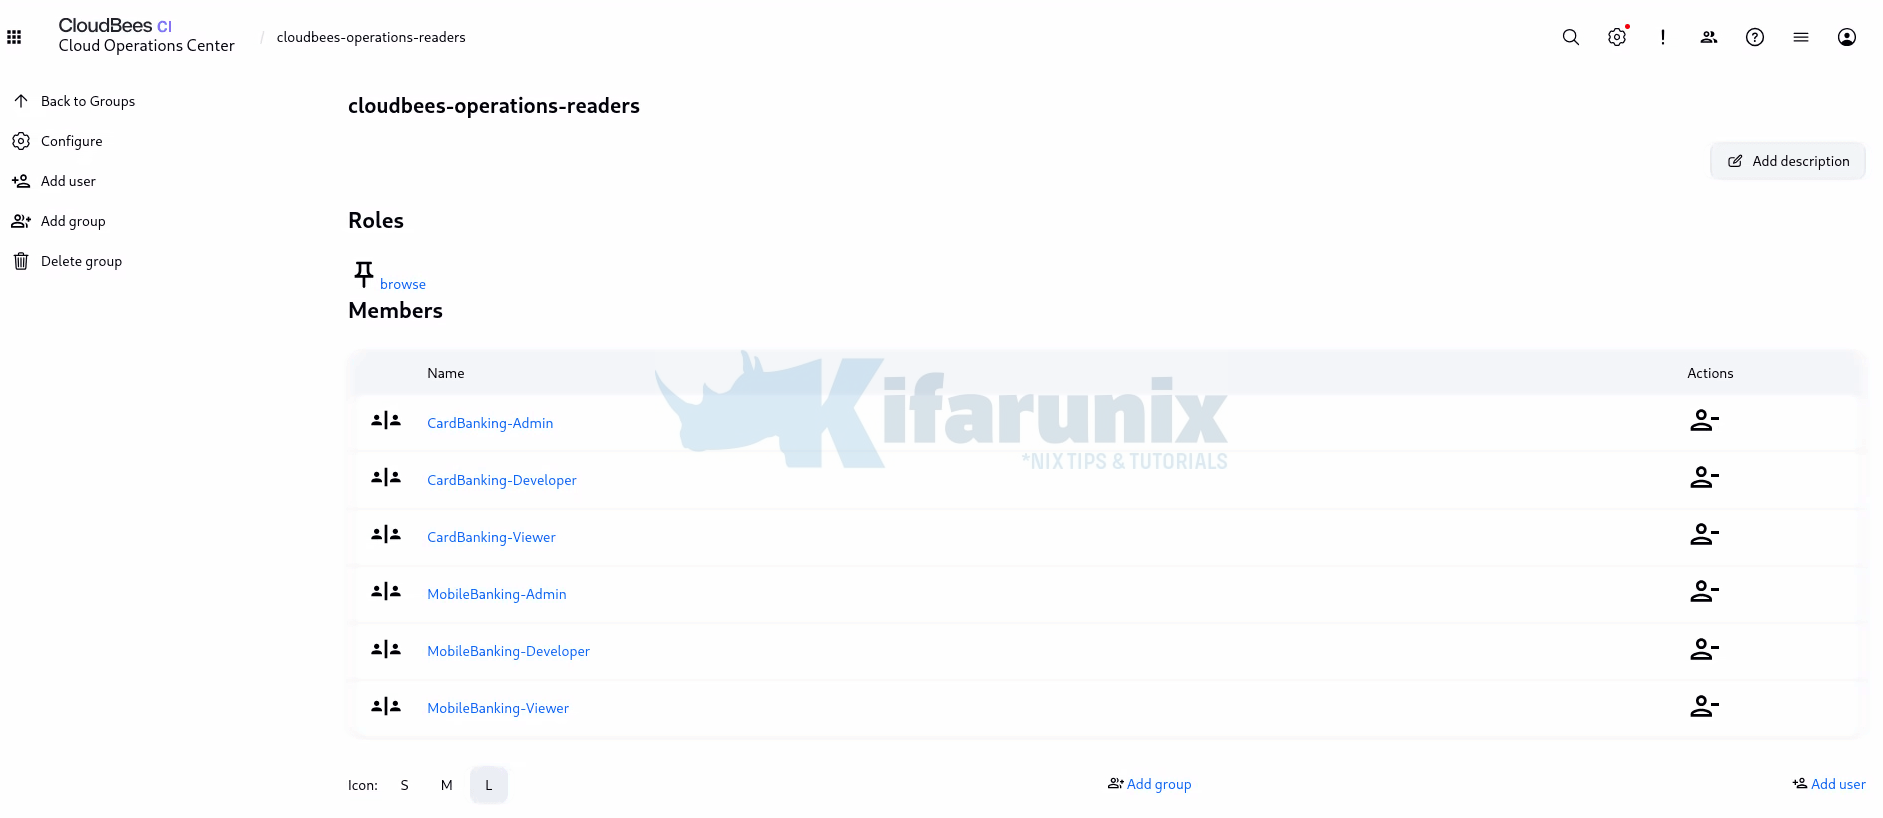
Clearing Propagates is what keeps this a root-level grant. It provides Operations Center read access without becoming the controller-level authorization for the application teams. What each team can do inside a controller comes only from the groups created on that controller.
Configure Access for Each Managed Application
In this example, the Operations Center manages two applications, one for each team. MobileBanking is hosted on controller-02, and CardBanking is hosted on controller-03. The following steps show how to configure access for each application; use the corresponding application and controller names from your own environment.
Configure MobileBanking access on controller-02
controller-02 hosts the MobileBanking application. Controller-level groups are created from the controller itself, not from Operations Center.
- From Operations Center, open
controller-02. - Select Groups from the controller navigation.
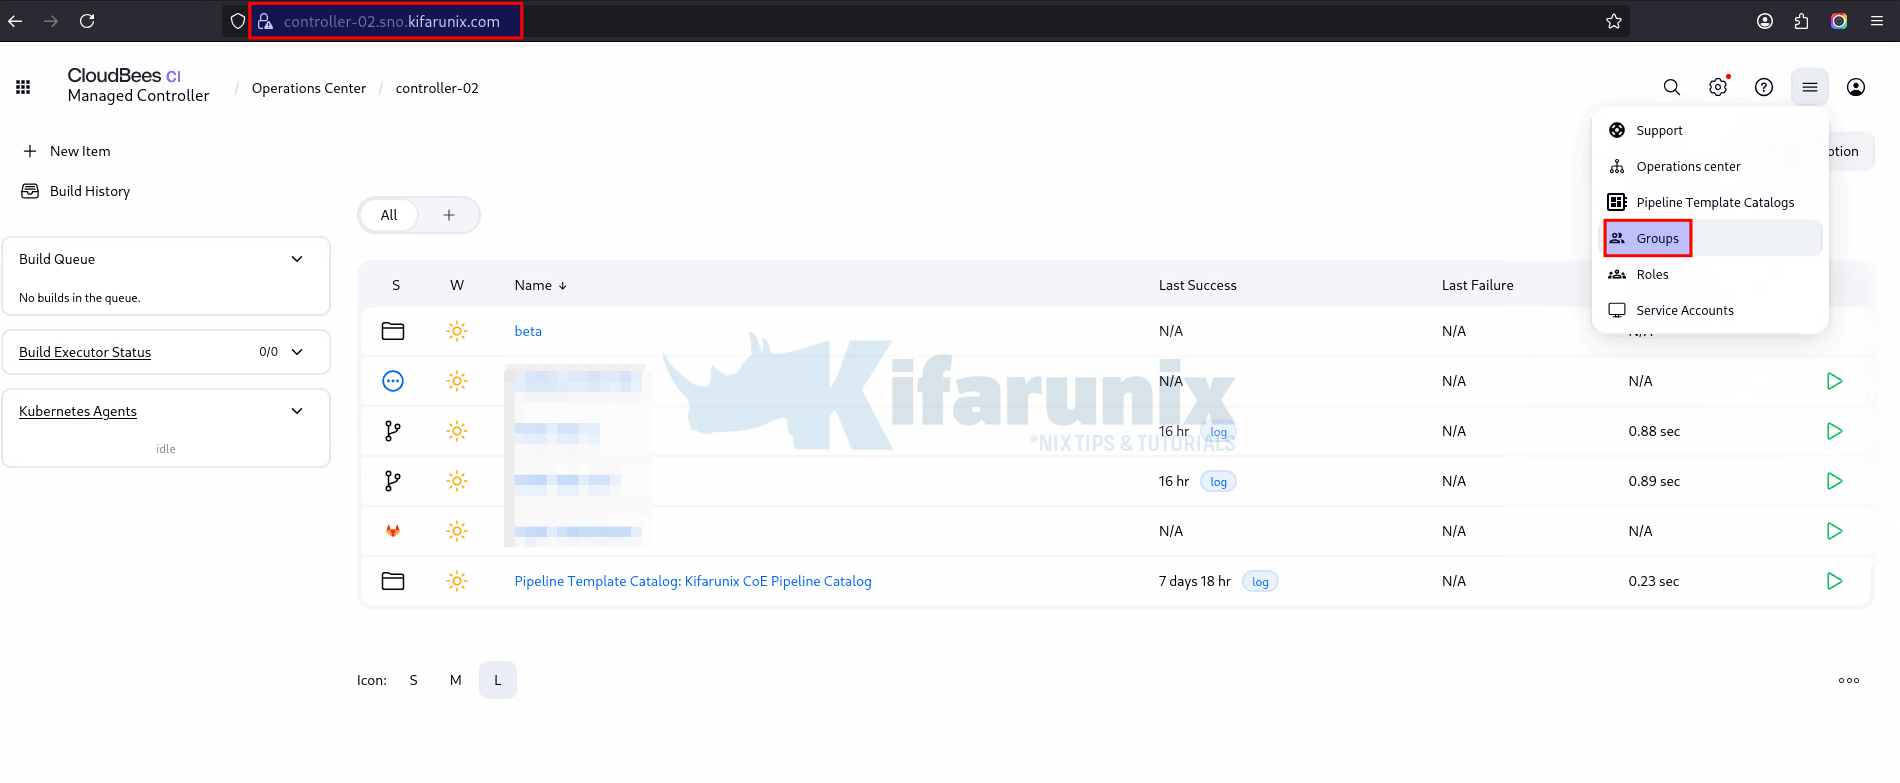
- For each row in the table below:
- create the group,
- assign the role at the current level,
- enable Propagates,
- Save,
- then add the external Active Directory group as a member and save again.
| RBAC group | Role | External AD group |
|---|---|---|
| mobilebanking-admins | team-admin | MobileBanking-Admin |
| mobilebanking-developers | develop | MobileBanking-Developer |
| mobilebanking-viewers | browse | MobileBanking-Viewer |
Propagates is enabled on these groups so the permissions apply to the jobs, folders, and other child objects within the controller. This is the opposite of the root-level readers group, and for the opposite reason: propagation is wanted inside a controller and not wanted from the root.
Configure CardBanking access on controller-03
controller-03 hosts the CardBanking application. Open controller-03, select Groups, and repeat the same procedure.
| RBAC group | Role | External AD group |
|---|---|---|
| cardbanking-admins | team-admin | CardBanking-Admin |
| cardbanking-developers | develop | CardBanking-Developer |
| cardbanking-viewers | browse | CardBanking-Viewer |
Assign each application team’s groups only to the controller that hosts that team’s application. Do not assign a team’s groups to controllers hosting another team’s application. This controller-level separation ensures that each application team has access only to its intended application.
For example, in this environment, do not assign the CardBanking groups to controller-02 or the MobileBanking groups to controller-03.
Verify Every External Group Mapping
Open each group’s details page and verify that the expected external directory group is listed as a member. Confirm that the assigned permissions and propagation settings match the intended access for that group and scope.
In this example, the expected mappings are:
At the Operations Center root:
cloudbees-platform-adminscontainsCloudBees-Admin, withadministerand Propagates enabled.cloudbees-operations-readerscontains all six application groups, withbrowseand Propagates cleared.
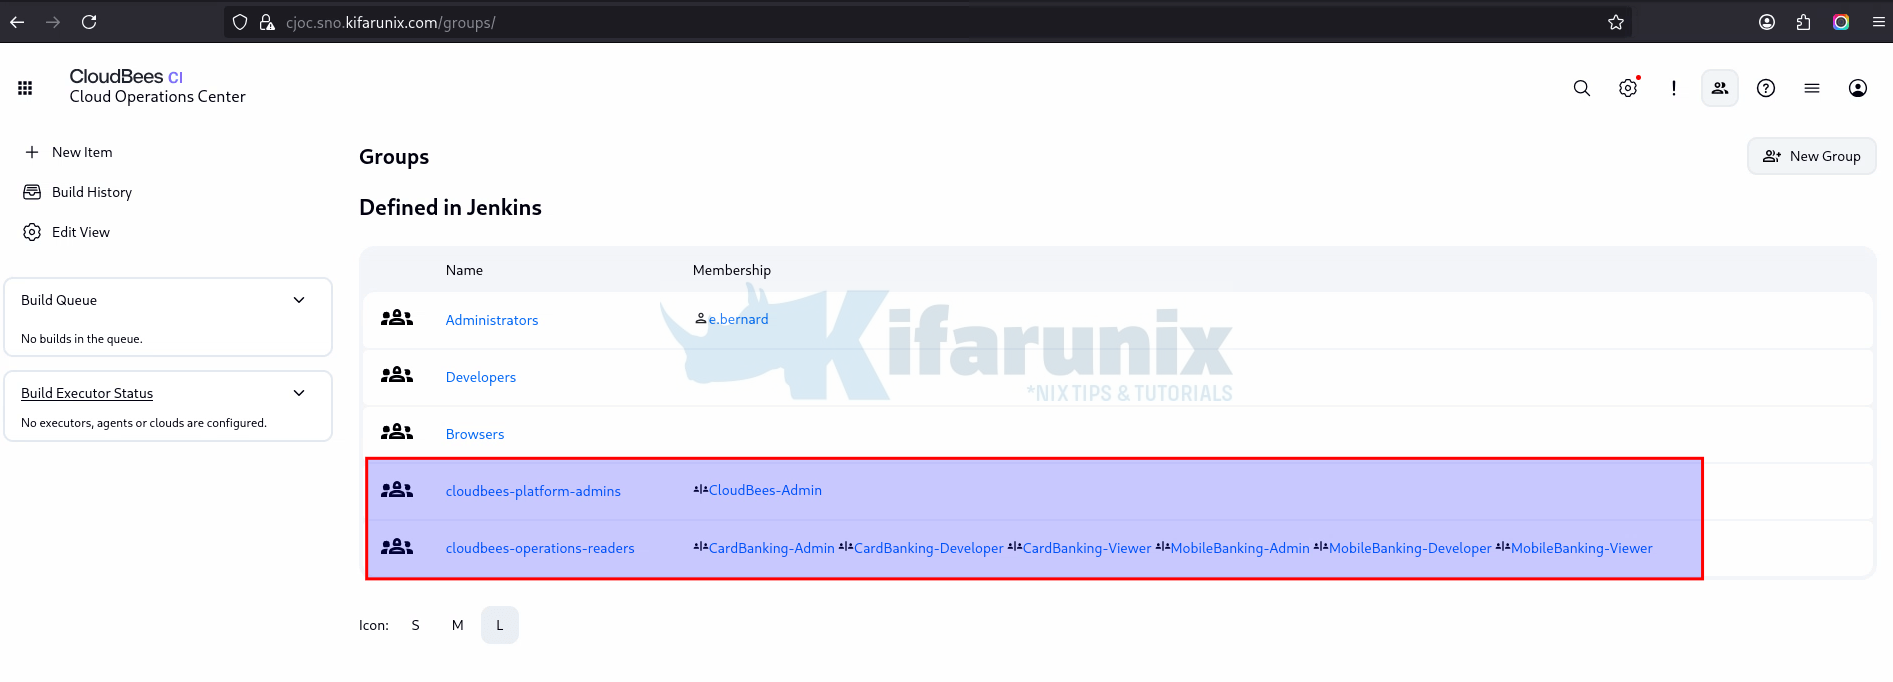
On the first application controller (controller-02 in this example):
mobilebanking-adminscontainsMobileBanking-Admin, withteam-admin.mobilebanking-developerscontainsMobileBanking-Developer, withdevelop.mobilebanking-viewerscontainsMobileBanking-Viewer, withbrowse.
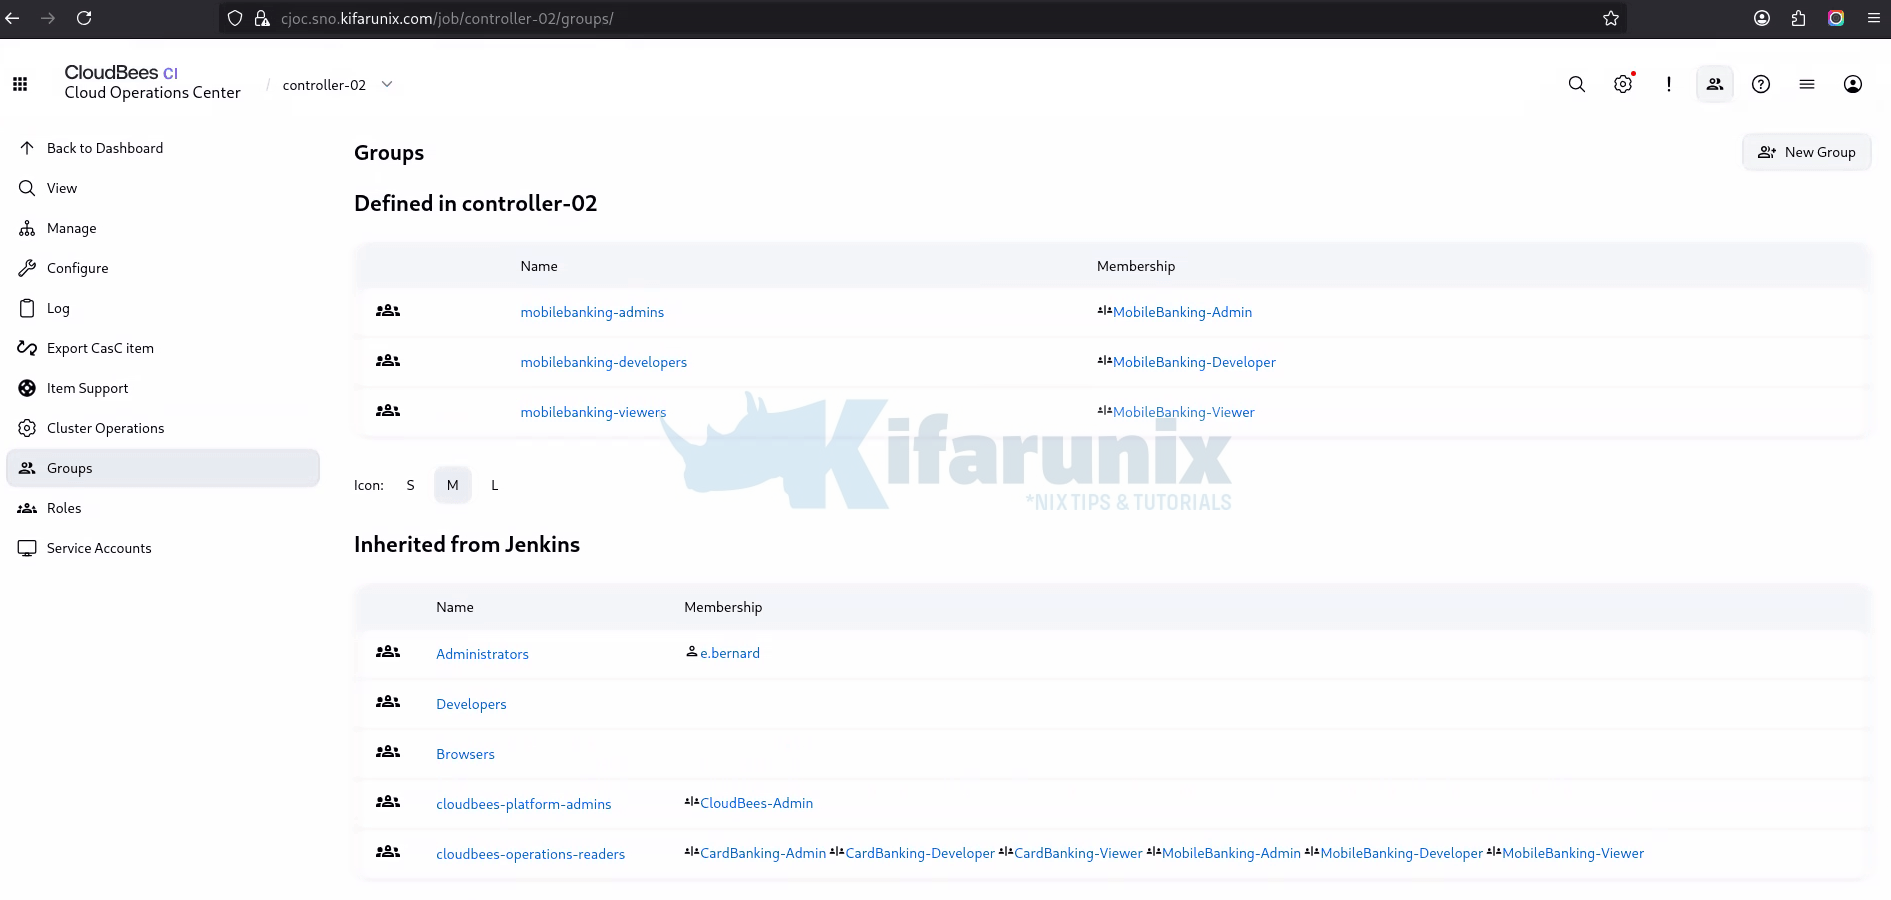
On the second application controller (controller-03 in this example):
cardbanking-adminscontainsCardBanking-Admin, withteam-admin.cardbanking-developerscontainsCardBanking-Developer, withdevelop.cardbanking-viewerscontainsCardBanking-Viewer, withbrowse.
Note that MobileBanking-Viewer and CardBanking-Viewer each appear twice in this example: once at the Operations Center root and once on their respective controllers. These are not duplicate assignments. The same external directory group receives browse at two different scopes, and each grant serves a different purpose: one provides access at the Operations Center level, while the other provides access within the application controller.
Active Directory remains the source of group membership. Do not add individual users simply to make an authorization test pass. If an expected external group cannot be resolved, stop and return to the Active Directory authentication and group resolution test.
Test with Real Users
Authentication working is not the same as authorization working. Test both allowed and denied access, using a separate private or incognito window for each test user.
In this example, the expected results are:
| Test user | Active Directory group | Must be able to | Must not be able to |
|---|---|---|---|
a.smith | CloudBees-Admin | Administer Operations Center and both controllers | Not applicable |
m.mwangi | MobileBanking-Admin | Administer controller-02 | Administer controller-03, or access controller-01 |
s.otieno | MobileBanking-Developer | Build and configure jobs on controller-02 | Administer controller-02 or access controller-03 |
t.rousseau | MobileBanking-Viewer | Read jobs on controller-02 | Build anything or access controller-03 |
j.kamau | CardBanking-Admin | Administer controller-03 | Administer controller-02 |
r.achieng | CardBanking-Developer | Build and configure jobs on controller-03 | Administer controller-03 or access controller-02 |
j.watson | CardBanking-Viewer | Read jobs on controller-03 | Build anything, or access controller-02/01 |
Use equivalent test users, groups, applications, and controllers from your own environment when reproducing these tests.
For each user, confirm that Operations Center is visible, that the authorized controller opens, that an operation the role permits succeeds, that an operation the role denies fails, and that the other team’s controller is not administrable.
The first thing each test user sees is the Operations Center Controllers view, and it is already a complete isolation test. Each user should see only the controller their team is assigned to.
For example:
- Signed in as
j.watson, a member ofCardBanking-Viewer. Onlycontroller-03is listed.controller-02andcontroller-01do not appear, because no group grants this account anything at those scopes.
- The same view signed in as
m.mwangi, a member ofMobileBanking-Admin. Onlycontroller-02appears, and the M column shows a management icon that is absent for the viewer above.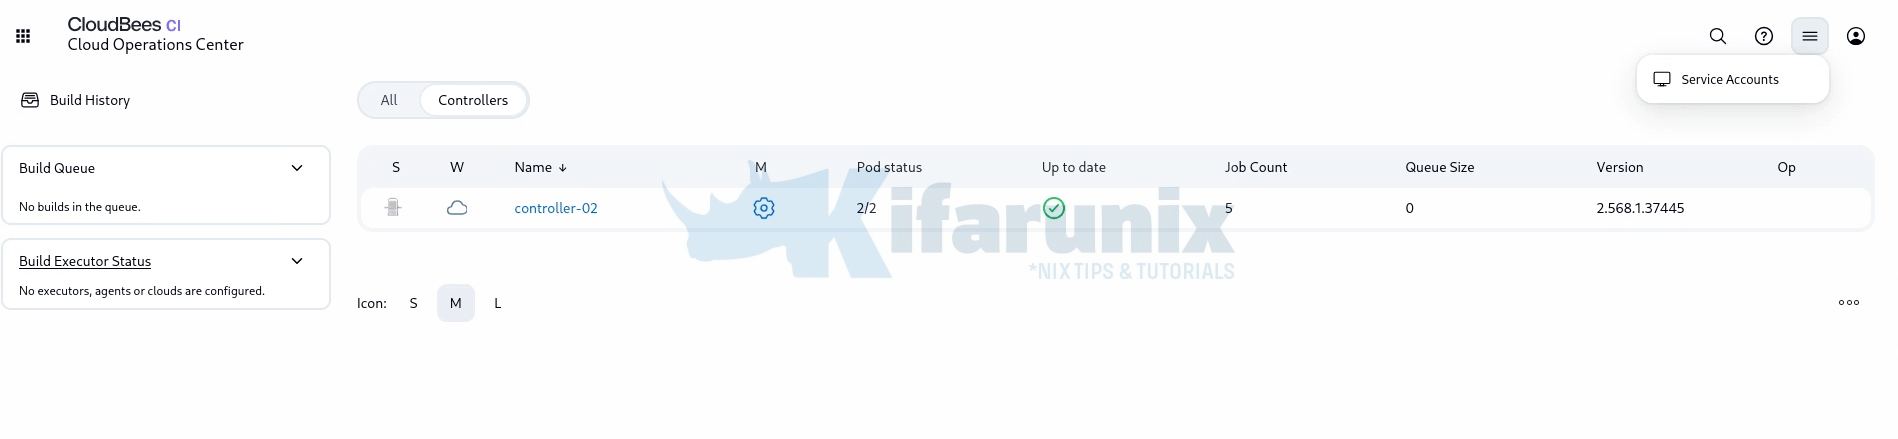
Neither user is denied access by an error page. The other team’s controller is simply not there. This is the intended result: browse at the Operations Center root makes a controller visible only where a group grants access at that controller.
The tier boundary is equally visible inside a controller. Compare the left-hand menu for the two accounts:
m.mwangioncontroller-02. The menu offers Configure, Scan Multibranch Pipeline Now, Delete Multibranch Pipeline, Rename, Move/Copy/Promote, and Roles. These come fromteam-admin.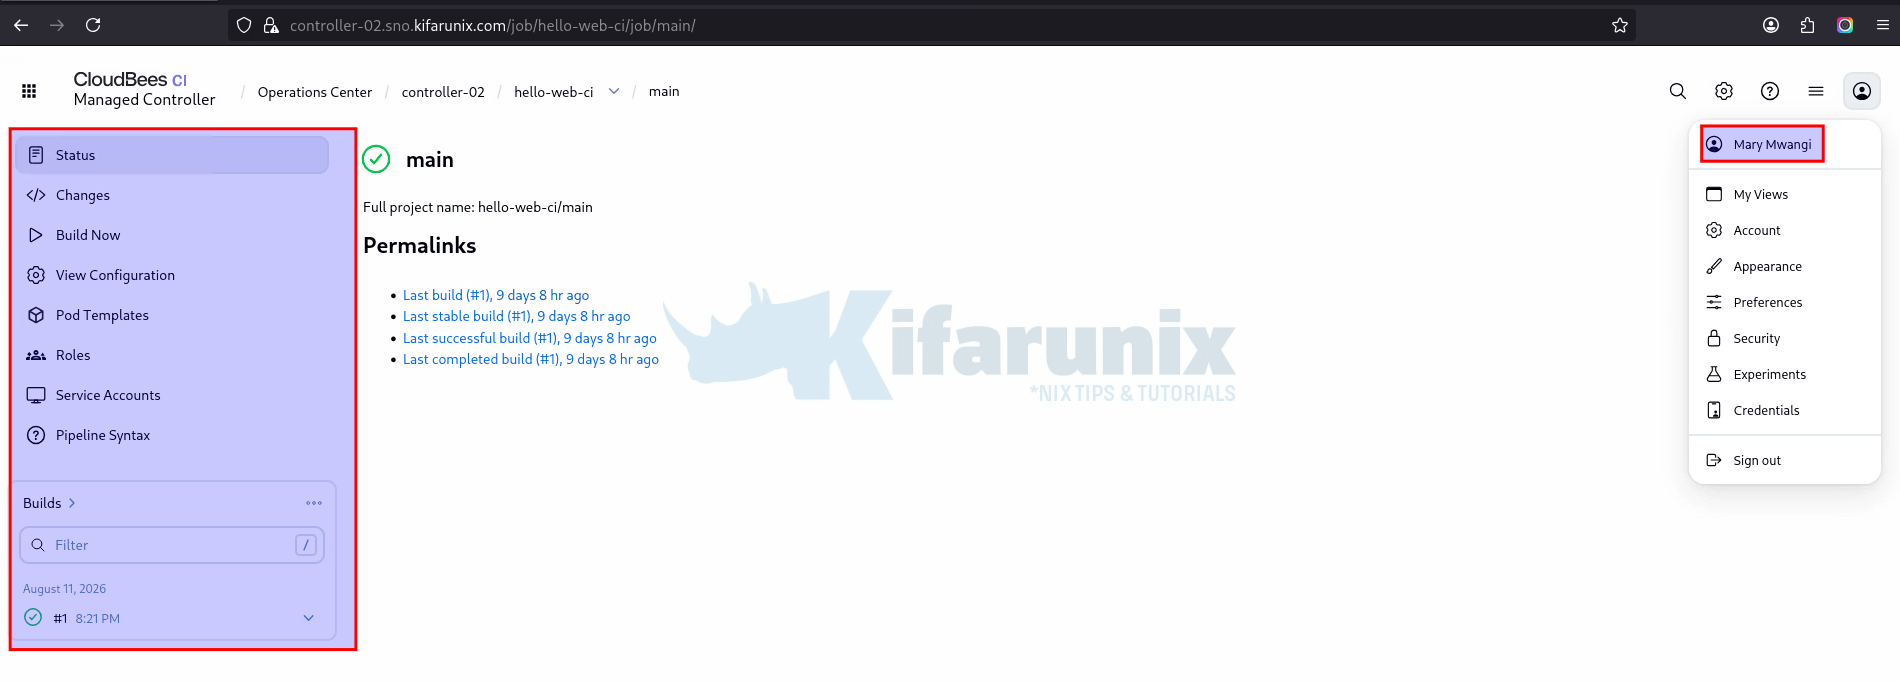
j.watsononcontroller-03. The same kind of object offers only Status and Changes. No Configure, no Delete, no Build. These are the permissionsbrowsedoes not carry.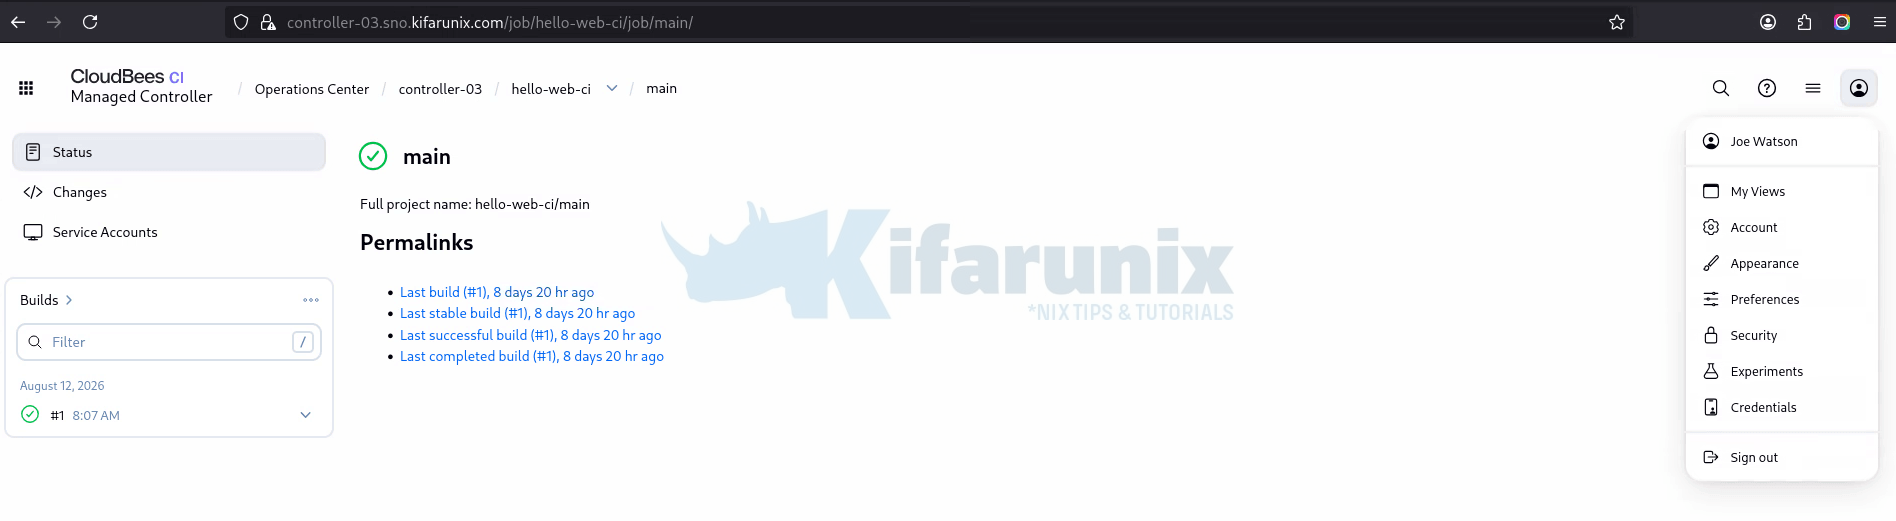
The absence of the Build option is the check worth making explicitly. A viewer who can trigger a build can cause side effects, including deployments, so read access must not imply it.
A user’s effective permissions are the aggregate of all roles assigned to the groups they belong to, within the scope of the object being accessed. An unexpected pass is therefore usually an additional group membership rather than a failure of the intended mapping.
Where a team can administer the other team’s controller, the cause is normally one of the following:
- the
authenticatedrole still carrying permissions; - incorrect Active Directory group membership;
- a role assigned at the wrong scope;
- a role propagating when it should not; or
- another group membership granting additional permissions.
Clear the Default Roles and Remove the Temporary Access
Two items remain from the bootstrap. Perform this step only after the administrator path has been verified.
Check the anonymous and authenticated roles on the Manage Roles screen. After the Typical initial setup import strategy both are normally empty, in which case there is nothing to change. Where either carries permissions, clear them now. CloudBees notes that the authenticated permission includes overall administration permissions and is no longer necessary once a formal admin role exists and is assigned to an administration group, and instructs that the default authenticated and anonymous roles be disabled once that is done. While authenticated grants administration, every account that can sign in is effectively an administrator, and none of the controller isolation is being enforced. Neither role can be removed, but both can be emptied.
Remove the individual membership created by the initial setup. The account that was signed in when RBAC was enabled is the sole member of the administrators group. That was a bootstrap, not part of the intended model.
The order matters. With anonymous and authenticated empty, that single individual membership is the only protection against a lockout, so it must not be removed until your administrative group such as CloudBees-Admin used in this setup, is mapped and a second member of that group has signed in successfully.
- Keep the existing administrator session open.
- In a separate private window, sign in as a different member of
CloudBees-Adminand confirm the expected administrative access. - Keep that second session open while making the change.
- Clear any permissions on
anonymousandauthenticated, if they are not already empty. - Remove the individual account from the
administratorsgroup. - Repeat the administrator login test using an Active Directory account.
- Where permissions were cleared in step 4, repeat the tests in the previous section, because the earlier results were not meaningful.
The account removed in step 5 does not lose administrative access. It is a member of your administrative group such as CloudBees-Admin and continues to receive administer through the mapped group. What is removed is the individual grant that bypassed the group.
The empty developers and browsers groups created by the initial setup can be deleted if they are not being used. Keep the develop and browse roles, which are in use.
Do not remove the bootstrap access first and then attempt to establish the replacement administrator path.
Final Authorization Model
| Active Directory group | RBAC group | Role | Scope |
|---|---|---|---|
| CloudBees-Admin | cloudbees-platform-admins | administer | Operations Center root, Propagates ON |
| All six application groups | cloudbees-operations-readers | browse | Operations Center root, Propagates OFF |
| MobileBanking-Admin | mobilebanking-admins | team-admin | controller-02 |
| MobileBanking-Developer | mobilebanking-developers | develop | controller-02 |
| MobileBanking-Viewer | mobilebanking-viewers | browse | controller-02 |
| CardBanking-Admin | cardbanking-admins | team-admin | controller-03 |
| CardBanking-Developer | cardbanking-developers | develop | controller-03 |
| CardBanking-Viewer | cardbanking-viewers | browse | controller-03 |
Two propagation settings create the entire separation. administer propagates from the Operations Center root, so platform administrators reach both controllers. browse does not propagate from the root, so a team member’s Operations Center access stops at Operations Center, and what they can do inside a controller comes only from the group defined on that controller.
None of the group names, role names, usernames, application names, or controller names in this example are CloudBees CI defaults. Replace them with the names used in the target environment while preserving the authorization pattern.
Configuration Checklist
- RBAC enabled with the Typical initial setup import strategy, while signed in as a member of
CloudBees-Admin. - Administrative access confirmed immediately after enabling RBAC.
administerconfirmed to hold Overall/Administer, RunScripts, UploadPlugins, and ConfigureUpdateCenter, and to be non-filterable.developandbrowsereviewed against the intended developer and viewer boundaries.team-admincreated with Overall/Manage, without Overall/Administer or Overall/RunScripts, and left filterable.cloudbees-platform-adminscreated at the root withadministerand Propagates enabled.CloudBees-Adminadded as an external member.- A second
CloudBees-Adminmember signed in successfully in a separate session. cloudbees-operations-readerscreated at the root withbrowseand Propagates cleared.- All six application Active Directory groups added to
cloudbees-operations-readers. - MobileBanking groups created on
controller-02only, with Propagates enabled. - CardBanking groups created on
controller-03only, with Propagates enabled. - Every external Active Directory group visible as a group member.
- Allowed-access tests passed for the administrator, developer, and viewer tiers on both controllers.
- Denied-access tests passed, including cross-controller access.
anonymousandauthenticatedconfirmed empty, or cleared.- Bootstrap individual membership removed only after the replacement administrative path was verified.
Conclusion
Active Directory now provides identity and group membership for CloudBees CI, and RBAC translates those groups into permissions that apply at the correct scope. Users sign in with their corporate credentials, and their access follows their Active Directory group membership without any per-user configuration in CloudBees CI.
Three things are worth carrying forward:
- Authentication and authorization are separate. When something goes wrong, establish which one has failed before changing anything. A user who cannot sign in has an authentication problem. A user who signs in but sees the wrong things has an authorization problem.
- Group membership changes now happen in Active Directory. Adding an engineer to
MobileBanking-Developergrants them controller access on their next sign-in. Removing them revokes it. There is nothing to change in CloudBees CI. - Adding an application follows the same pattern. Create the three Active Directory groups, create the matching RBAC groups on that application’s controller, and assign the existing roles. No new roles are required.
Two operational risks to keep in mind:
- Bind account password rotation. The
svc-cbcipassword must be rotated on a schedule. Changing it in Active Directory without updating the Manager Password in Operations Center breaks authentication for every user, not just one. - Active Directory group renames. The group names stored in the RBAC group members are plain strings, with no reference back to Active Directory. Renaming a group in Active Directory silently orphans the mapping. The RBAC group remains, its member entry remains, and it grants nothing.