

If you are about to create your first CloudBees CI managed controller on OpenShift and plan to “turn on HA later,” check your storage configuration first.
CloudBees CI High Availability (HA) is more than a setting on the managed controller. HA requires shared storage that supports ReadWriteMany (RWX) access, so the storage architecture you choose when creating the controller can determine how straightforward a future HA migration will be. CloudBees documents a migration path for existing managed controllers, but moving from storage that does not meet the HA requirements can involve migrating the controller’s JENKINS_HOME data and planning for downtime.
This is why the OpenShift StorageClass should be part of your HA planning from day one. A controller can run normally for months on a ReadWriteOnce volume, only for an HA requirement to expose the fact that its underlying storage cannot be mounted by multiple controller replicas.
This guide explains how CloudBees CI High Availability works for managed controllers on OpenShift, what storage requirements you need to meet, how to configure replicas and autoscaling, and what to expect if you need to migrate an existing controller to HA.
Table of Contents
Configure CloudBees CI High Availability for Managed Controllers on OpenShift
HA vs. Non-HA: The Difference That Decides Your Storage
A CloudBees CI managed controller that is not configured for High Availability (HA) runs with a single active controller replica. Its JENKINS_HOME is backed by a PersistentVolumeClaim (PVC), and the controller does not require multiple replicas to mount that storage concurrently. Storage that supports ReadWriteOnce (RWO) can therefore be suitable for a non-HA controller.
A managed controller configured for High Availability (HA) works differently. CloudBees CI runs the controller as a Kubernetes Deployment, allowing multiple replicas to run concurrently. Those replicas need shared access to the controller’s JENKINS_HOME, so the underlying storage must support ReadWriteMany (RWX) access. CloudBees identifies RWX-capable storage as a requirement for managed controller HA.
This distinction matters when you provision the controller. A ReadWriteOnce volume can work perfectly well for a non-HA controller and continue doing so for months. But if you later need HA, that existing storage may not meet the requirements. CloudBees provides a documented migration path for moving an existing managed controller to HA, but the process can require moving JENKINS_HOME data to storage that supports RWX and planning for the associated maintenance window.
The key difference is the relationship between controller replicas and persistent storage. Non-HA controllers can use storage that is writable by a single pod, while HA controllers require multiple replicas to access the same controller data concurrently.
In other words, HA is not simply a matter of increasing the replica count. The storage architecture must support the HA configuration as well.
That is why your OpenShift StorageClass is one of the first things to verify before configuring CloudBees CI managed controller HA.
Do Not Assume Your Default StorageClass Supports RWX
Having a default StorageClass in OpenShift does not mean that the class supports the shared storage required for CloudBees CI High Availability. CloudBees CI can use the cluster’s default StorageClass when no storage class is explicitly selected for a managed controller, so you need to verify that the default class provides the access mode required by your HA design.
This distinction is easy to miss. A storage class can successfully provision a volume for a normal, single-replica managed controller while still being unsuitable for HA. For HA, the controller’s shared filesystem must support ReadWriteMany (RWX) so that multiple controller replicas can access the same JENKINS_HOME concurrently.
On OpenShift, the storage available to you depends on how the cluster was built and which storage platforms your organization has deployed. Common RWX-capable options include:
- CephFS through OpenShift Data Foundation (ODF): a CephFS-backed StorageClass can provide the RWX filesystem access required by HA.
- NFS-backed storage: NFS can provide shared filesystem storage when it is provisioned through an appropriate StorageClass.
- Enterprise storage with an RWX-capable CSI driver: vendor storage platforms can expose shared filesystems through CSI.
If NFS is your chosen storage backend, CloudBees supports NFS 4.1 and higher and does not support NFS 4.0 because of known performance issues. If you need to build the NFS layer itself, see How to Configure NFS Storage for CloudBees CI Managed Controllers HA on OpenShift.
The important point is not the product name. The StorageClass you select for the managed controller must be capable of provisioning a volume with ReadWriteMany access.
You can see the StorageClasses available in your OpenShift cluster with:
oc get storageclassDo not assume that the class marked (default) is the right one for HA. If you leave Storage Class Name empty when configuring a managed controller for HA, CloudBees CI uses the Kubernetes cluster’s default StorageClass.
Verify RWX Before You Configure HA
The safest approach is to test the candidate StorageClass before using it for a production managed controller.
Create a test PersistentVolumeClaim that explicitly requests ReadWriteMany, then mount that volume from two pods at the same time. Verify that both pods can read from and write to the same filesystem.
For example, first inspect the available classes:
oc get storageclassSample output;
 oc get sc
NAME                  PROVISIONER      RECLAIMPOLICY   VOLUMEBINDINGMODE      ALLOWVOLUMEEXPANSION   AGE
...
managed-nfs-storage   nfs.csi.k8s.io   Delete          Immediate              true                   12h
Then check the candidate class’s provisioner and configuration:
oc describe storageclass <storage-class-name>For example:
oc describe storageclass managed-nfs-storageSample output;
Name:            managed-nfs-storage
IsDefaultClass:  No
Annotations:     kubectl.kubernetes.io/last-applied-configuration={"allowVolumeExpansion":true,"apiVersion":"storage.k8s.io/v1","kind":"StorageClass","metadata":{"annotations":{},"name":"managed-nfs-storage"},"mountOptions":["hard","nfsvers=4.1"],"parameters":{"mountPermissions":"0770","onDelete":"archive","server":"10.185.10.199","share":"/data/cloudbees"},"provisioner":"nfs.csi.k8s.io","reclaimPolicy":"Delete","volumeBindingMode":"Immediate"}

Provisioner:           nfs.csi.k8s.io
Parameters:            mountPermissions=0770,onDelete=archive,server=10.185.10.199,share=/data/cloudbees
AllowVolumeExpansion:  True
MountOptions:
  hard
  nfsvers=4.1
ReclaimPolicy:      Delete
VolumeBindingMode:  Immediate
Events:             <none>
Pay particular attention to the provisioner and any parameters that identify the underlying storage system, such as server, share, mount permissions…
The important question is not whether the StorageClass name contains nfs, cephfs, or rwx. Verify that it can actually provision a ReadWriteMany volume.
Therefore, create a temporary PVC that explicitly requests RWX:
oc apply -f - << 'EOL'
apiVersion: v1
kind: PersistentVolumeClaim
metadata:
  name: rwx-storage-test
spec:
  accessModes:
    - ReadWriteMany
  storageClassName: managed-nfs-storage
  resources:
    requests:
      storage: 1Gi
EOL
Then check whether the PVC binds:
oc get pvc rwx-storage-test -o custom-columns=NAME:.metadata.name,STATUS:.status.phase,CLASS:.spec.storageClassName,MODE:.spec.accessModesYou want to see:
NAME               STATUS   CLASS                 MODE
rwx-storage-test   Bound    managed-nfs-storage   [ReadWriteMany]
A Bound PVC with RWX confirms that the StorageClass can provision a volume with the required access mode. It does not yet prove that two pods can successfully mount and write to that filesystem concurrently.
For the HA prerequisite, test that too.
Create two temporary pods that mount the same PVC:
oc apply -f - <<'EOL'
apiVersion: v1
kind: Pod
metadata:
  name: rwx-test-a
spec:
  containers:
    - name: test
      image: registry.access.redhat.com/ubi9/ubi-minimal
      command: ["/bin/sh", "-c", "sleep 3600"]
      volumeMounts:
        - name: shared
          mountPath: /shared
  volumes:
    - name: shared
      persistentVolumeClaim:
        claimName: rwx-storage-test
---
apiVersion: v1
kind: Pod
metadata:
  name: rwx-test-b
spec:
  containers:
    - name: test
      image: registry.access.redhat.com/ubi9/ubi-minimal
      command: ["/bin/sh", "-c", "sleep 3600"]
      volumeMounts:
        - name: shared
          mountPath: /shared
  volumes:
    - name: shared
      persistentVolumeClaim:
        claimName: rwx-storage-test
EOL
Check both pods:
oc get pods rwx-test-a rwx-test-bBoth should reach Running.
NAME         READY   STATUS    RESTARTS   AGE
rwx-test-a   1/1     Running   0          38s
rwx-test-b   1/1     Running   0          38s
Now prove that they can access the same filesystem:
oc exec rwx-test-a -- sh -c 'echo "RWX test" > /shared/test.txt'Read the file from the second pod:
oc exec rwx-test-b -- cat /shared/test.txtYou should get:
RWX testThen reverse the test:
oc exec rwx-test-b -- sh -c 'echo "written by pod B" > /shared/test-b.txt'And:
oc exec rwx-test-a -- cat /shared/test-b.txtIf both pods can mount the PVC simultaneously and read and write the same files, you have verified the behavior CloudBees CI HA depends on: concurrent read/write access to the shared filesystem.
After the test, remove the temporary resources:
oc delete pod rwx-test-a rwx-test-b
oc delete pvc rwx-storage-test
Important: This is a functional RWX test, not a performance test. A StorageClass can successfully provide RWX while still delivering insufficient IOPS, throughput, or latency for a production Jenkins JENKINS_HOME. Evaluate storage performance separately before putting a heavily loaded controller on it.
Setting Storage Class Name When You Create the Controller
When you create or configure a managed controller in the operations center and enable High Availability, the configuration screen includes a Storage Class Name field for the shared filesystem used by the controller replicas.
If you leave Storage Class Name empty, CloudBees CI uses the default StorageClass defined in the Kubernetes/OCP cluster. If that default StorageClass has been tested and can provision the required ReadWriteMany (RWX) storage, leaving the field empty is valid. Otherwise, explicitly select the RWX-capable StorageClass you have tested for the controller.
Do not choose the StorageClass based only on its name. The important question is whether it can actually provision a volume with the access mode required by HA.
Refer to the verification section above.
Operations Center Storage Is a Separate Question
The storage used by the operations center is configured separately from the shared storage required by an HA managed controller.
The RWX requirement in this guide applies to the managed controller’s shared JENKINS_HOME filesystem. Do not assume that the StorageClass selected for the operations center is automatically the correct StorageClass for an HA managed controller.
Likewise, selecting an RWX-capable StorageClass for the operations center does not make a managed controller HA-ready. Treat the two storage requirements independently and verify each against the component’s deployment configuration.
Plan Before You Provision: HA Checklist
Before creating a production managed controller in HA mode, verify the following:
- Does this controller need HA? HA provides multiple-replica workload distribution and failover behavior, but it also introduces shared-storage requirements, replica coordination, autoscaling considerations, and HA-specific plugin and API behavior.
- Do you have a tested RWX StorageClass? OpenShift requires a StorageClass with
ReadWriteManyaccess for CloudBees CI HA. Do not wait until the controller is already in production to discover that the default class only supports single-node read/write access. - Can the storage handle the workload? CloudBees notes that Jenkins is highly dependent on filesystem performance and that storage must provide sufficient IOPS, throughput, and low latency. Shared filesystem performance should therefore be evaluated separately from simply confirming that RWX is supported.
- How many controller replicas do you need? Choose the desired replica count based on workload and availability requirements.
- Will you use autoscaling? If yes, verify that the cluster’s metrics service is available and returning CPU metrics before relying on HPA.
- What CPU threshold will you use? CloudBees recommends performance testing to determine an appropriate threshold rather than prescribing one universal value.
- Can the cluster accommodate additional controller pods? CloudBees warns that scale-up is blocked when the cluster reaches capacity and recommends considering cluster autoscaling and dedicated controller node pools.
- Are the installed plugins compatible with HA? Review the current HA considerations for the CloudBees CI version you are deploying before production use.
- Do you need a custom PodDisruptionBudget? The default HA configuration uses
minAvailable: 1. Increase it only if the cluster has enough capacity to maintain that availability requirement during voluntary disruptions.
Configuring HA for Managed Controllers
Once the RWX storage and other infrastructure prerequisites are ready, you can create the managed controller and configure High Availability (HA) from the CloudBees CI operations center.
Open the managed controller configuration
- Sign in to the CloudBees CI operations center.
- Click New Controller.
- Enter a name for the managed controller.
- Click Go to Configure the Controller.
Or simply:
- Sign in to the CloudBees CI operations center.
- Click New Item.
- Enter the name of the controller
- Select Managed Controller.
- Click OK to Configure the Controller.
The managed controller configuration screen opens. Work through the controller settings before provisioning it.
- Jenkins Controller Disk Space in GB
- Review the value provided by default.
- Increase or decrease it according to the expected size and growth of the controller’s
JENKINS_HOME. - Consider the number of jobs, builds, plugins, artifacts stored locally, and other controller data when sizing the volume.
- Make sure the underlying storage has enough capacity for the requested size and expected future growth.
- For a test controller, a smaller volume may be sufficient. Production controllers should be sized from the actual workload rather than copied from a generic example.
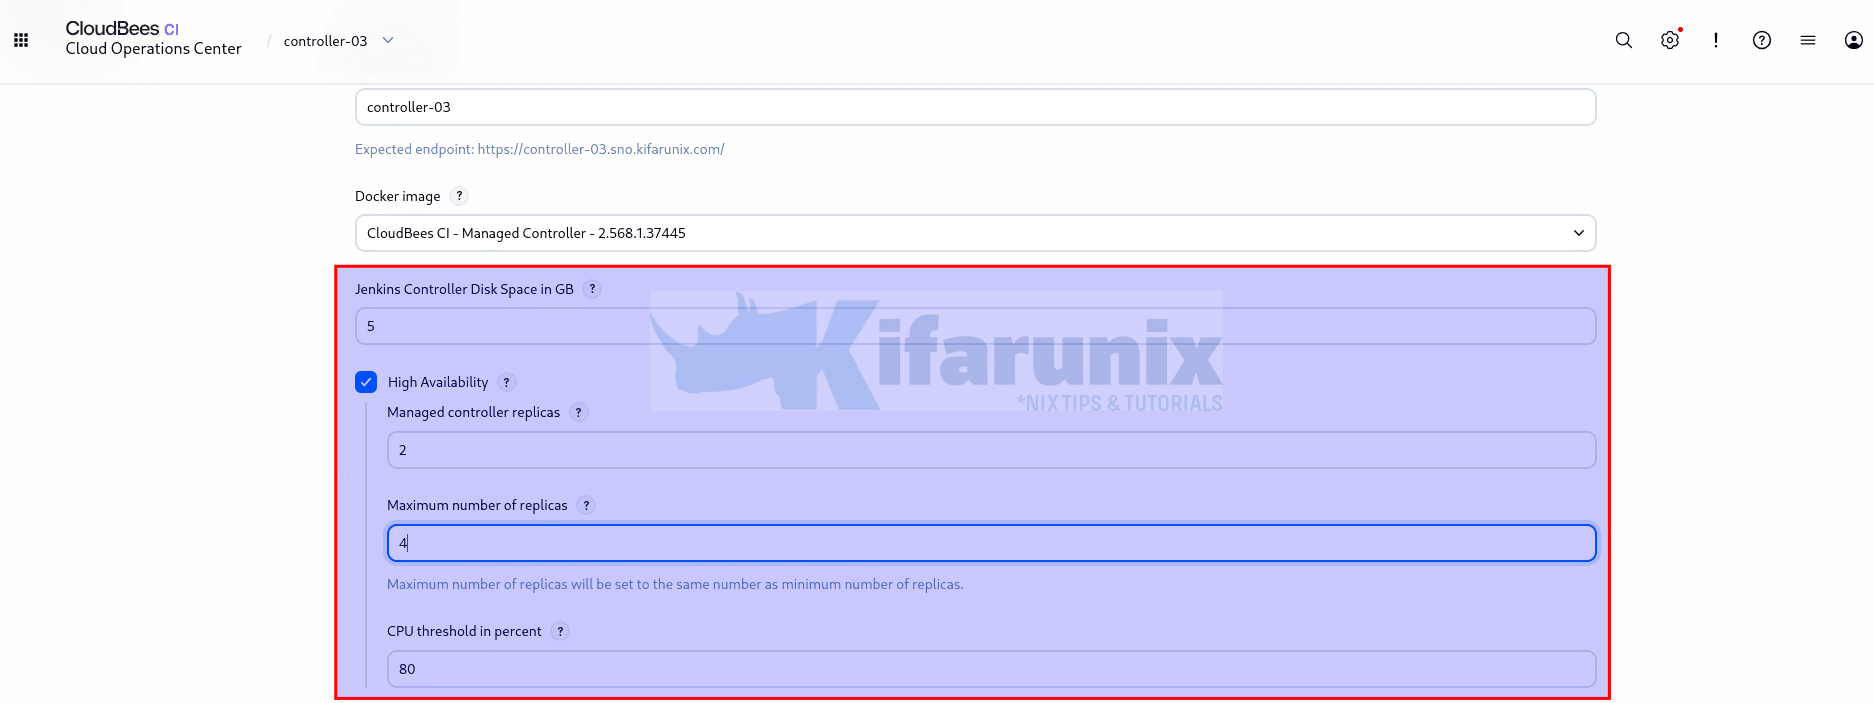
- High Availability
- Enable High Availability.
- This changes the managed controller to the HA configuration and exposes the HA-specific settings below, including replica count, autoscaling, CPU threshold, and Storage Class Name.
- HA requires a shared filesystem that supports concurrent read/write access by the controller replicas, so make sure the selected StorageClass supports ReadWriteMany (RWX) before provisioning the controller.
- Hence:
- Controller Replicas
- Enter the number of controller replicas you want running under normal conditions.
- If you require actual replica redundancy, use at least 2 replicas. A single-replica HA controller is supported, but it does not provide replica failover because there is only one controller replica.
- Maximum number of replicas
- For a fixed number of replicas, keep this value equal to Managed controller replicas.
- To enable autoscaling, set the maximum higher than the normal replica count.
- CloudBees documents setting this value to
0to disable autoscaling. - For example, you could configure:
- Managed controller replicas: 3
- Maximum number of replicas: 5
- CPU threshold in percent
- Set this value when autoscaling is enabled.
- The threshold determines when the Horizontal Pod Autoscaler should scale the managed controller based on CPU utilization.
- CloudBees recommends performance testing to determine an appropriate threshold rather than prescribing one universal percentage.
- Do not choose the value simply because it is commonly used for another Kubernetes workload. Test the controller with representative builds and workload.
- Metrics Server
- Make sure the cluster’s metrics infrastructure is working before relying on autoscaling.
- CloudBees requires the Metrics Server for HA autoscaling and notes that its HA implementation has been tested with
autoscaling/v1, which relies on CPU values. - On OpenShift, verify that the node metrics are actually available:
Check pod metrics as well:oc adm top nodesoc adm top pods -A - If these commands cannot return current metrics, resolve the cluster metrics problem before depending on HPA to scale the controller.
- Controller Replicas
- Storage Class Name
- Enter the name of the RWX-capable StorageClass you tested before creating the controller.
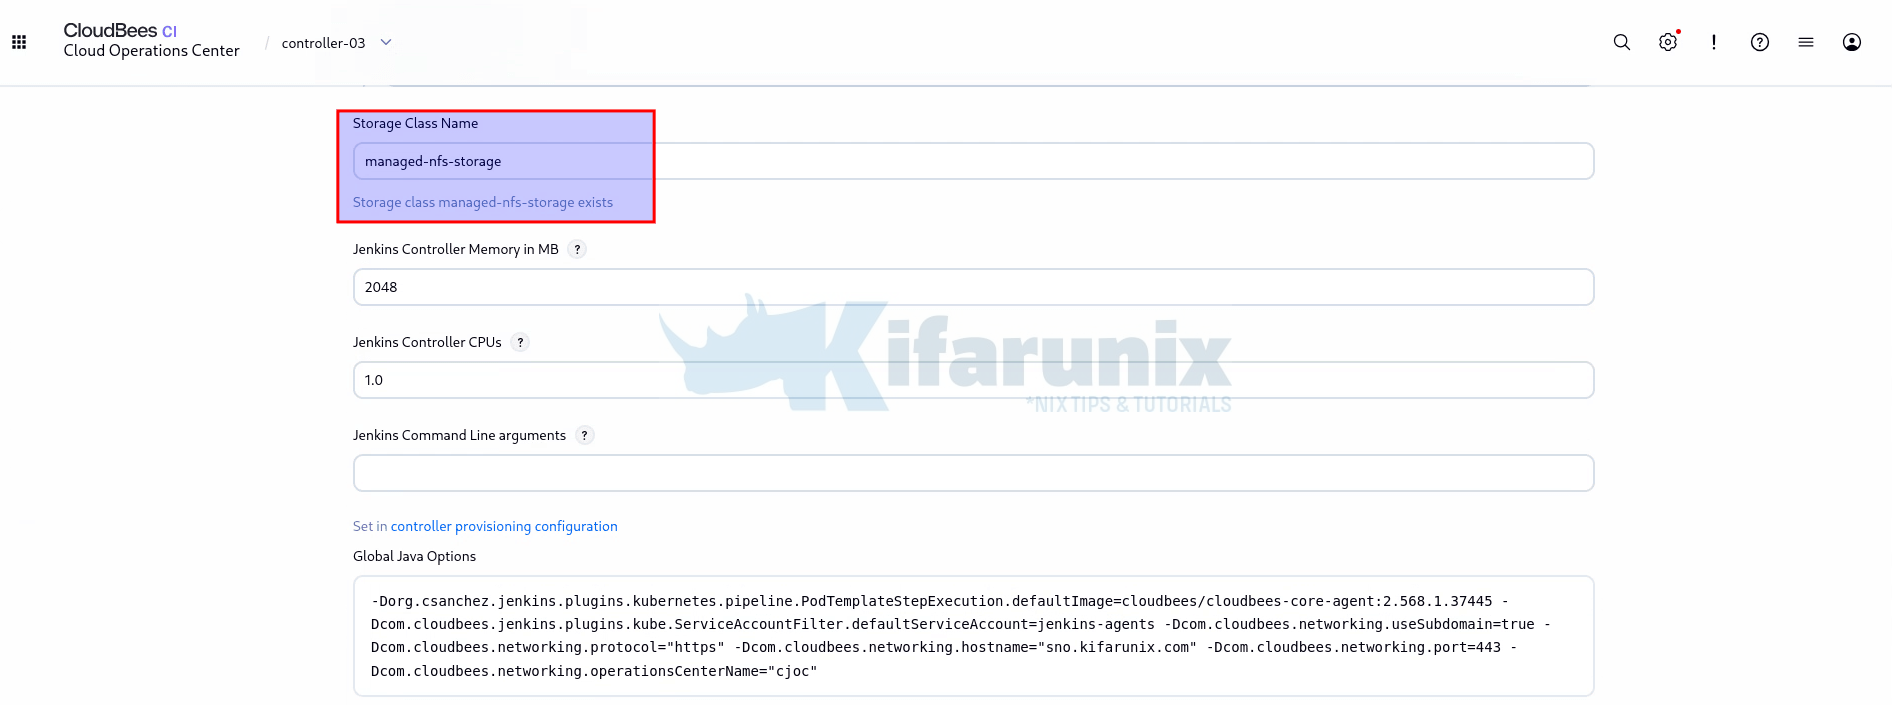
- The StorageClass must be able to provision the shared filesystem required by the HA controller replicas.
- If you leave the field empty, CloudBees CI uses the default StorageClass defined in the Kubernetes cluster.
- Only leave it empty if you have already verified that the cluster’s default StorageClass can provision the required
ReadWriteManystorage. - Do not select a StorageClass simply because its name contains terms such as
nfs,cephfs, orrwx. Verify that it can actually provision and mount an RWX volume from multiple pods. - For example, if your tested RWX StorageClass is named
managed-nfs-storage, enter:
Storage Class Name: managed-nfs-storage
- Enter the name of the RWX-capable StorageClass you tested before creating the controller.
- Jenkins Controller Memory in MB
- Set the controller memory according to the expected workload.
- Consider the number of jobs, Pipeline activity, plugins, concurrent builds, and other controller-side workloads.
- Make sure the worker nodes have enough capacity to schedule the configured memory for every controller replica.
- CloudBees recommends provisioning the managed controller with appropriate memory and CPU for the intended workload.
- Jenkins Controller CPUs
- Set the CPU resources according to the expected controller workload.
- Consider the number of concurrent builds and the amount of controller-side processing when choosing the value.
- Remember that CPU resource sizing and the HPA CPU threshold are related but different settings.
- The CPU setting determines the resources available to each controller replica; the HPA threshold determines when additional replicas may be requested.
- Filesystem group
- Configure the filesystem group (
fsGroup) to match the UID/GID range assigned to thecloudbees-ciOpenShift project. Check itsopenshift.io/sa.scc.supplemental-groups(oropenshift.io/sa.scc.uid-range) annotation:oc get project cloudbees-ci -o yaml | grep scc - This setting matters on OpenShift because a filesystem group outside the
cloudbees-ciproject’s assigned range will prevent the controller pod from being admitted, or will cause permission problems on mounted storage. - Do not blindly copy a filesystem group value from another OpenShift cluster or project, each project gets its own dynamically assigned UID/GID range, so the correct value here is specific to
cloudbees-ci.
- Configure the filesystem group (
- Configure additional controller settings
- If you need to add Kubernetes configuration such as Secrets, environment variables, volume mounts, or other pod settings, review the generated workload carefully.
- An HA managed controller must use
kind: Deployment. - Do not configure the managed controller as
kind: StatefulSetwhen HA is enabled. - CloudBees explicitly states that managed controllers require
kind: Deploymentto run in HA mode and that provisioning fails when HA is enabled withkind: StatefulSet. - For example, a custom deployment configuration can expose a Secret as a mounted directory:
kind: Deployment
apiVersion: apps/v1
spec:
  template:
    spec:
      containers:
        - name: jenkins
          env:
            - name: SECRETS
              value: /var/run/casc-secrets
          volumeMounts:
            - name: casc-secrets
              mountPath: /var/run/casc-secrets
              readOnly: true
      volumes:
        - name: casc-secrets
          secret:
            secretName: controller-03-casc-secrets
- Configuration as Code (CasC)
- If you are using CasC, enable and configure it as part of the managed controller configuration.
- CasC is independent of HA. Enabling CasC does not enable HA, and HA does not require CasC.
- CasC can be used together with HA to provide declarative configuration for the logical controller.
- If the CasC configuration references Kubernetes Secrets, verify that those Secrets are available to the controller replicas.
Save and verify the controller
- Verify the underlying Kubernetes resources directly from OpenShift.
- Review the managed controller configuration.
- Save the controller configuration, this automatically provisions it unless Save and Provision is unchecked; if unchecked, provision it separately.
- Monitor provisioning progress from the controller’s provisioning page or directly via OpenShift CLI using
oc get eventsandoc logs. - Wait for the controller pod to become ready.
- Verify the controller from the Operations Center.
Verify the HA Deployment and Shared Storage
If all goes well, you should see that the managed controller is now approved and connected:
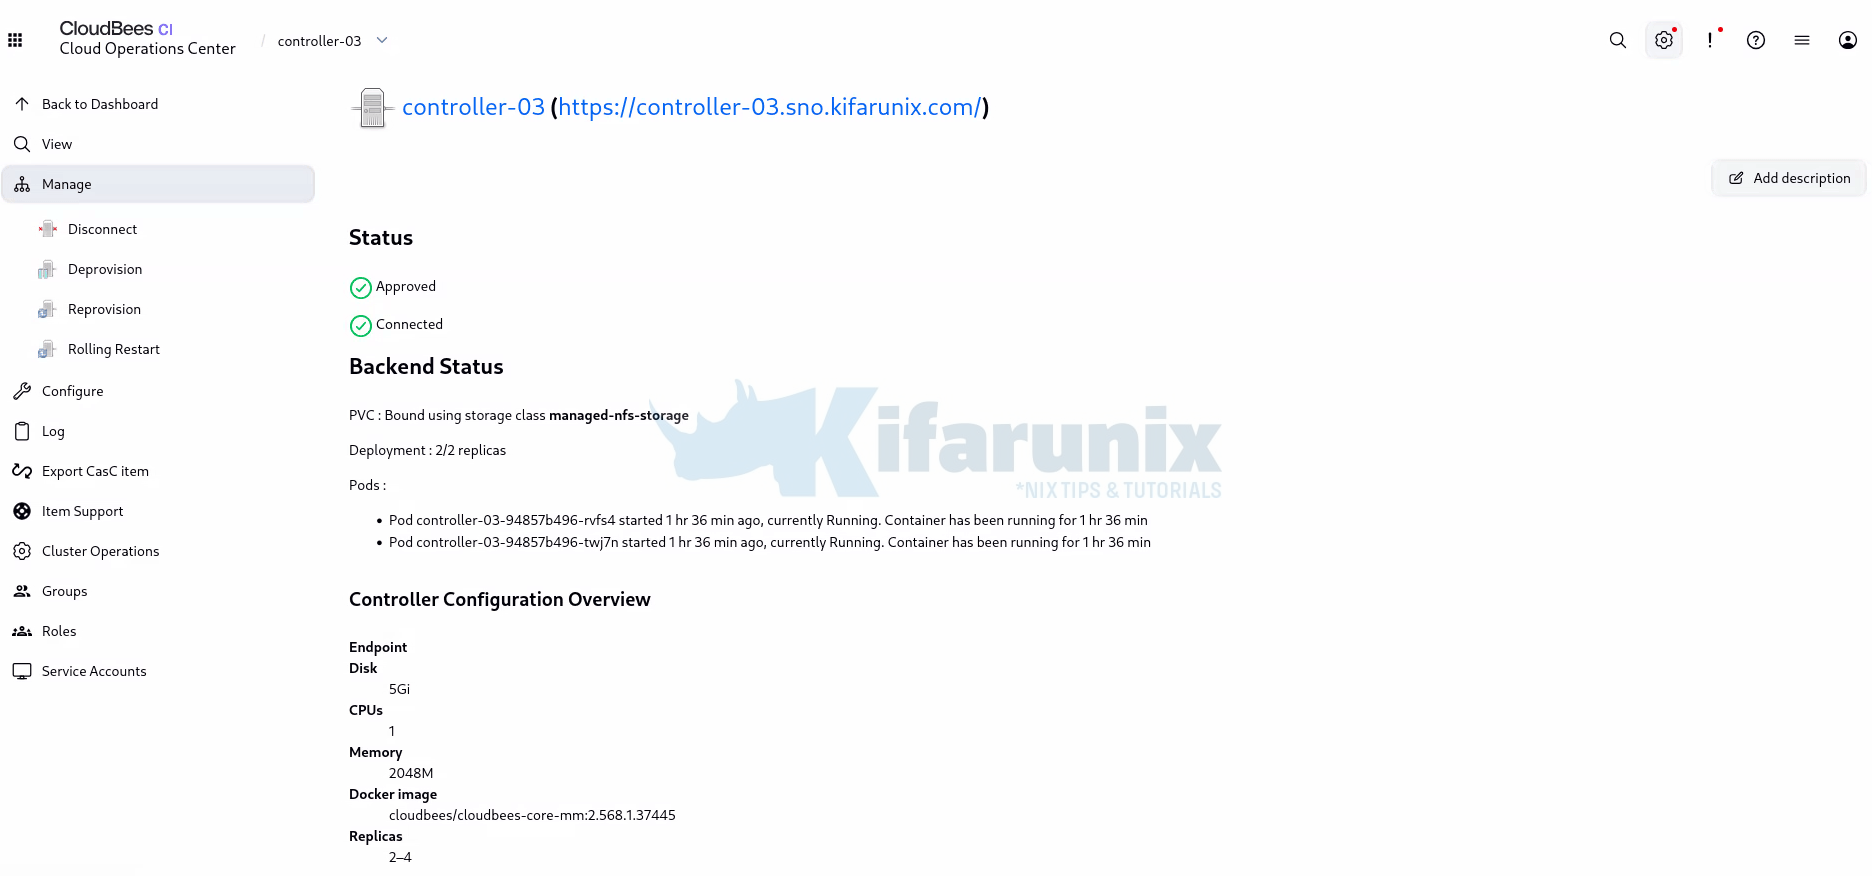
Do not stop at seeing the controller marked as running. Verify that the expected replicas are actually available and that the shared storage was provisioned with the intended access mode.
Start by checking the managed controller’s pods:
oc get pods -n <controller-namespace>E.g
oc get pods -n cloudbees-ciSample output;
controller-03-94857b496-rvfs4    1/1     Running   0             109m
controller-03-94857b496-twj7n    1/1     Running   0             109m
Then inspect the controller’s PVC:
oc get pvc -n cloudbees-ciNAME STATUS VOLUME CAPACITY ACCESS MODES STORAGECLASS VOLUMEATTRIBUTESCLASS AGE
...
jenkins-home-controller-03-0 Bound pvc-cd3e467c-6560-47eb-aca2-bfded8644212 5Gi RWX managed-nfs-storage <unset> 110m Check the PVC details:
oc describe pvc <pvc-name> -n <controller-namespace>E.g
oc describe pvc jenkins-home-controller-03-0 -n cloudbees-ciLook for the expected StorageClass and ReadWriteMany access mode.
Name:          jenkins-home-controller-03-0
Namespace:     cloudbees-ci
StorageClass:  managed-nfs-storage
Status:        Bound
Volume:        pvc-cd3e467c-6560-47eb-aca2-bfded8644212
Labels:        com.cloudbees.cje.tenant=controller-03
               com.cloudbees.cje.type=master
               com.cloudbees.pse.tenant=controller-03
               com.cloudbees.pse.type=master
               tenant=controller-03
               type=master
Annotations:   pv.kubernetes.io/bind-completed: yes
               pv.kubernetes.io/bound-by-controller: yes
               volume.beta.kubernetes.io/storage-provisioner: nfs.csi.k8s.io
               volume.kubernetes.io/storage-provisioner: nfs.csi.k8s.io
Finalizers:    [kubernetes.io/pvc-protection]
Capacity:      5Gi
Access Modes:  RWX
VolumeMode:    Filesystem
Used By:       controller-03-94857b496-rvfs4
               controller-03-94857b496-twj7n
...
You can also inspect the underlying PersistentVolume:
oc get pvThe exact PVC and pod names depend on the managed controller and CloudBees CI version, so use the names returned by your namespace rather than assuming a fixed resource name.
If the expected number of replicas is not available, check the pod events:
oc describe pod <pod-name> -n <controller-namespace>Confirming the pods and the PVC only proves the Kubernetes side is healthy. It does not prove CloudBees CI itself recognizes both replicas as one HA cluster, or that builds actually survive losing a replica. Check that from inside the controller next.
Confirm the Controller Sees Both Replicas as One HA Cluster
Sign in to the managed controller and go to Manage Jenkins > CloudBees CI High Availability.
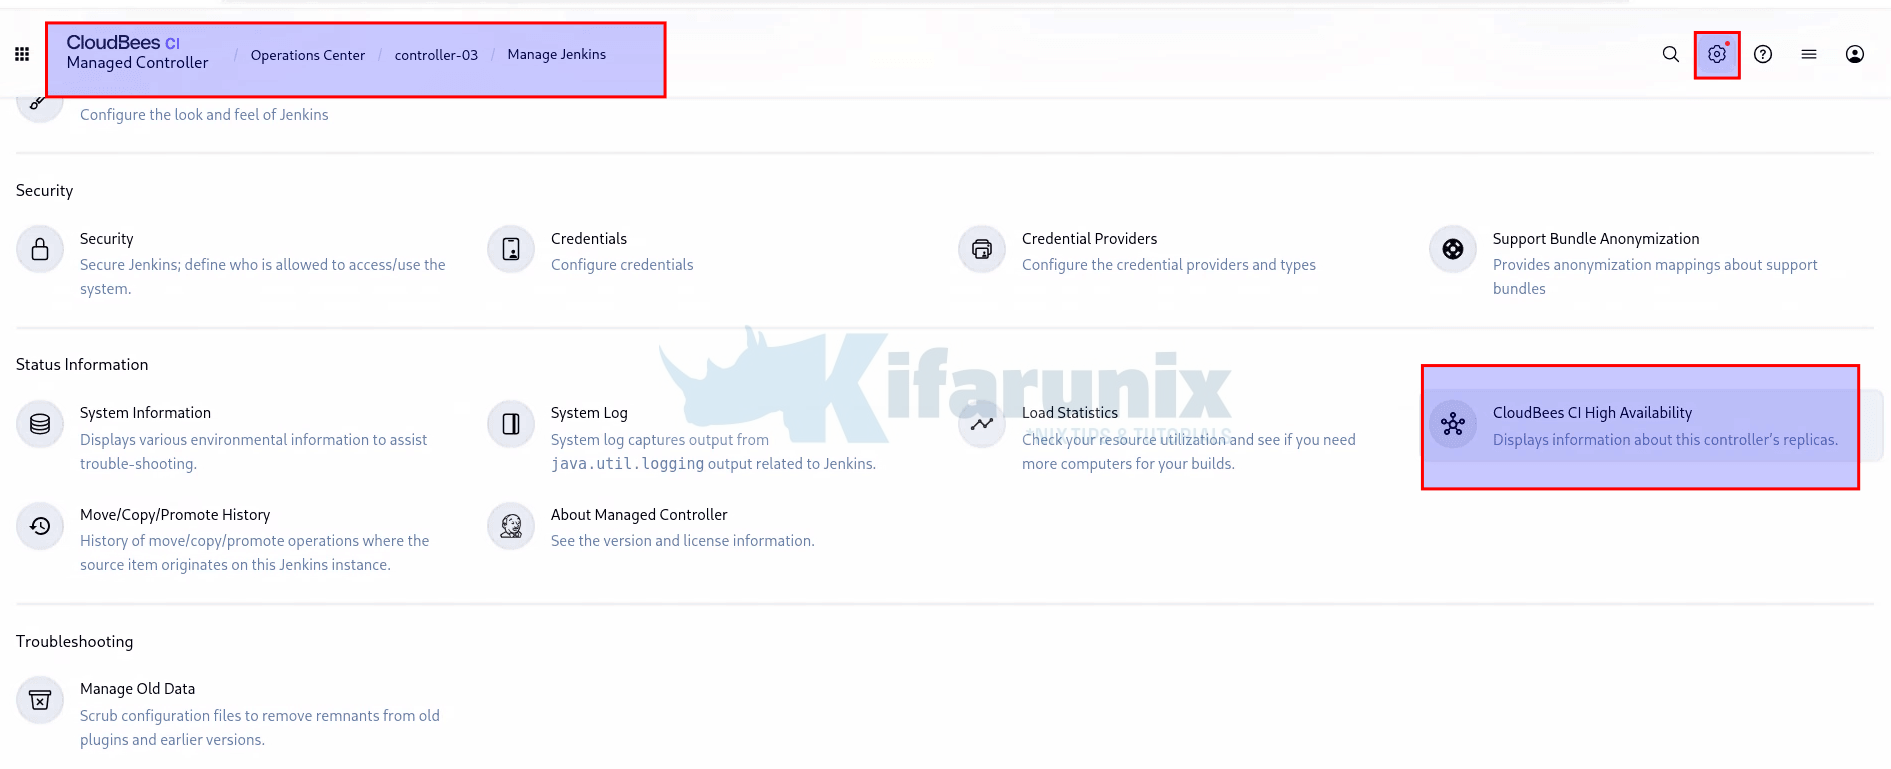
This screen lists every replica in the cluster along with its uptime, and it should show the same replica count you just saw with oc get pods. If the controller only lists one replica here while Kubernetes shows two running pods, the replicas have started but have not actually joined as an HA cluster, and something in the shared storage or replica discovery needs investigating before you trust this controller in production.
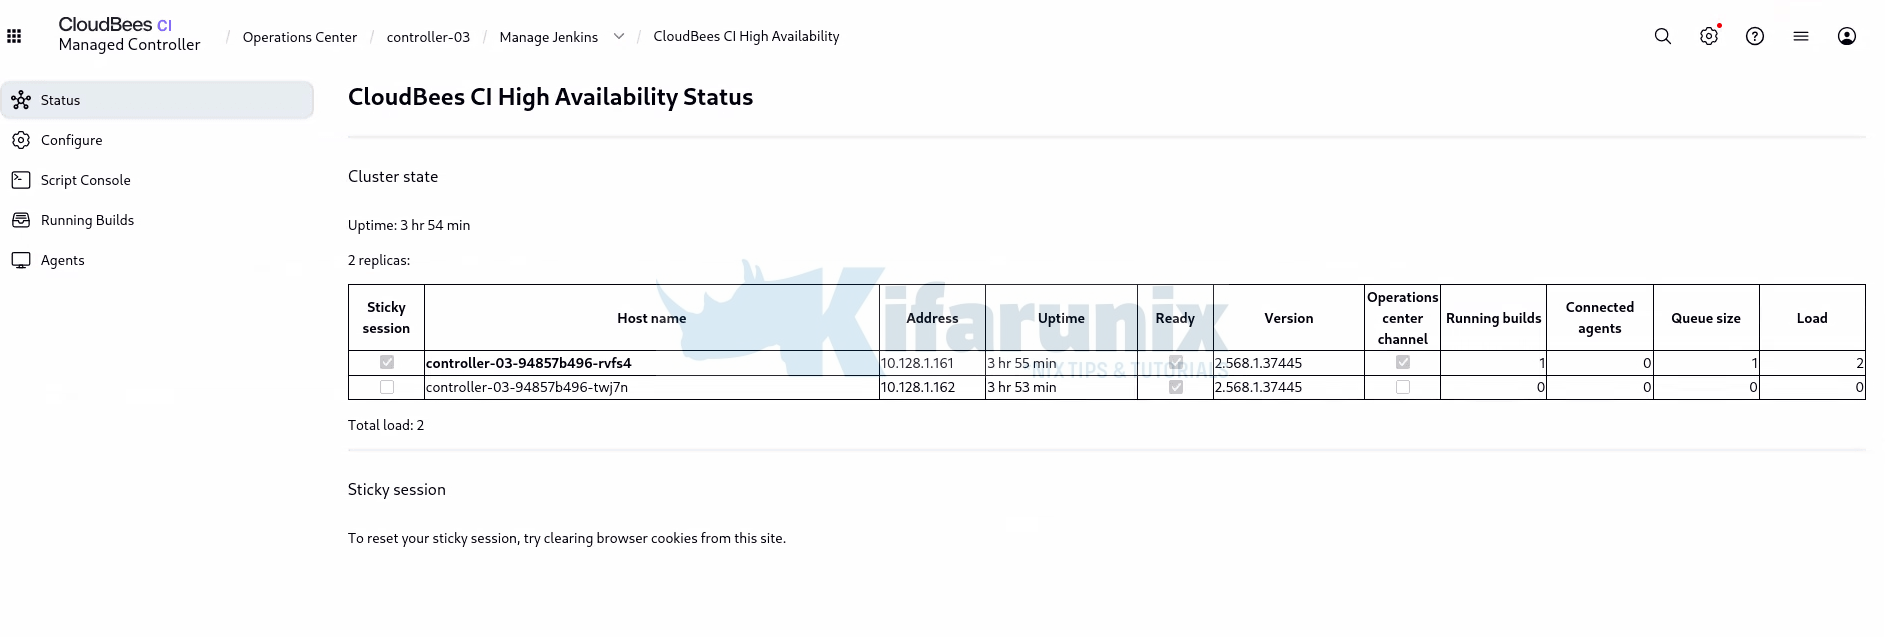
While you’re on this screen, enable Developer mode under Configure in the left pane. This adds a button to the page footer showing which replica is currently serving your session, and the button’s background color changes depending on which replica that is. It’s a quick way to confirm sticky sessions are actually working: reload the page a few times, and you should keep landing on the same replica rather than bouncing between them.
Prove a Build Survives a Replica Being Killed
This is the test that actually matters, and it’s the one most people skip. Start a Pipeline build with a step that runs long enough to give you a window to act, a minute or two is enough, on the same HA controller you just verified. While that build is running, delete the replica pod that’s currently executing it:
oc delete pod controller-03-94857b496-rvfs4 -n cloudbees-ciWatch what happens to the build, not just the pod. Kubernetes will recreate the pod on its own, that part is expected and not the point of the test. What you’re actually checking is whether the build itself is adopted by the surviving replica and continues to completion, rather than failing outright or hanging indefinitely in the queue. In a correctly functioning HA controller, the build keeps running and finishes normally. If it fails or gets stuck, HA is not protecting your builds the way you think it is, and you want to find that out now, deliberately, on a test controller, rather than during a real node failure in production.
One important caveat on what this test proves. Builds triggered by the Pipeline build step always run on the same replica as their upstream build, not on the least-loaded one. If that replica dies and another adopts the build, notifications from the downstream job never reach the upstream job, so an upstream job configured to wait for completion waits indefinitely until someone kills it manually. A simple single-job pipeline will pass the kill test cleanly and tell you nothing about this. If your pipelines use the build step, test that path specifically, and review CloudBees’ documented workaround for emulating the build step in HA controllers.
To see this from the controller’s point of view rather than guessing, go to Manage Jenkins > CloudBees CI High Availability > Running builds. This view shows running builds across every replica in the cluster, which is the one place in the UI where you get an honest, aggregated picture, since ordinary dashboard elements like the Jenkins list view’s build status or weather icons can reflect just the replica that’s serving your request rather than the whole cluster.
Do not treat a controller as production-ready HA until you’ve done this once. A green pod and a bound RWX volume tell you the infrastructure is correct. Only a killed replica with a build that survives it tells you HA is actually working.
Replicas, Autoscaling, and the CPU Threshold
CloudBees CI supports Horizontal Pod Autoscaling (HPA) for managed controllers running in High Availability mode. HPA adjusts the number of controller replicas according to the CPU-based autoscaling configuration. CloudBees requires the cluster’s Metrics Server for HA autoscaling and states that HA has been tested with autoscaling/v1, which relies on CPU values.
The HA configuration screen contains these related settings:
| Setting | What it controls |
|---|---|
| Managed controller replicas | The desired number of controller replicas under normal conditions. |
| Maximum number of replicas | The maximum number of replicas HPA can use when autoscaling is enabled. Set it to 0 to disable autoscaling. |
| CPU threshold in percent | The CPU utilization threshold used for the HA autoscaling configuration. |
| Storage Class Name | The StorageClass used for the shared filesystem. This is an HA storage setting, not an autoscaling setting. |
For autoscaling, the Maximum number of replicas must allow HPA to increase the controller beyond its normal replica count. If you set the maximum to the same number as the configured controller replicas, there is no additional replica capacity for HPA to use.
Verify OpenShift resource metrics
Before relying on autoscaling, verify that OpenShift is providing current CPU and memory metrics. CloudBees requires the Metrics Server for HA autoscaling. OpenShift provides resource-usage information through its metrics infrastructure, and the oc adm top commands can be used to verify that metrics are available.
Check node metrics
oc adm top nodesCheck pod metrics
oc adm top pods -ABoth commands should return current CPU and memory usage. The commands require the cluster’s metrics to be available.
If these commands return an error indicating that metrics are unavailable, resolve the OpenShift metrics problem before relying on HPA to scale the controller.
You do not need to install a separate metrics implementation simply because another OpenShift cluster uses a different metrics configuration. The practical requirement is that the resource metrics required by HPA are available and usable in your cluster.
Verify the HPA
After configuring the managed controller for autoscaling, verify that the HPA exists and is receiving the CPU metric.
List the HPAs in the controller namespace
oc get hpa -n <controller-namespace>e.g
oc get hpa -n cloudbees-ciSample output;
NAME            REFERENCE                  TARGETS       MINPODS   MAXPODS   REPLICAS   AGE
controller-02   Deployment/controller-02   cpu: 5%/80%   2         3         2          14h
controller-03   Deployment/controller-03   cpu: 1%/80%   2         4         2          142m
Inspect the HPA
oc describe hpa <hpa-name> -n <controller-namespace>e.g
oc describe hpa controller-03 -n cloudbees-ciCheck the HPA’s reported metrics. You want to see a current CPU utilization value rather than an unavailable or unknown metric.
Name:                                                  controller-03
Namespace:                                             cloudbees-ci
Labels:                                                com.cloudbees.cje.tenant=controller-03
                                                       com.cloudbees.cje.type=master
                                                       com.cloudbees.pse.tenant=controller-03
                                                       com.cloudbees.pse.type=master
                                                       tenant=controller-03
                                                       type=master
Annotations:                                           <none>
CreationTimestamp:                                     Wed, 12 Aug 2026 10:05:24 +0200
Reference:                                             Deployment/controller-03
Metrics:                                               ( current / target )
  resource cpu on pods  (as a percentage of request):  1% (13m) / 80%
Min replicas:                                          2
Max replicas:                                          4
Deployment pods:                                       2 current / 2 desired
Conditions:
  Type            Status  Reason            Message
  ----            ------  ------            -------
...
In the output above, 1% (13m) / 80% means current utilization is 1 percent of the requested CPU against an 80 percent target. The actual values depend on your controller’s workload and configuration.
The important test is not simply that a Metrics Server exists. Verify that OpenShift can return resource metrics and that the HPA can obtain the CPU metric it needs.
Choose the CPU threshold
CloudBees does not prescribe one CPU percentage that is appropriate for every managed controller. Instead, CloudBees recommends performance testing to determine an appropriate threshold that does not negatively affect response time.
Do not copy a value such as 50%, 70%, or 80% from another Kubernetes workload and present it as a CloudBees default.
Test the controller with a workload that represents how the controller will actually be used and observe:
- CPU utilization across the controller replicas.
- Build queue behavior as workload increases.
- Controller response times under load.
- Time required for a new replica to become ready.
- Build throughput as workload increases and decreases.
- Available cluster capacity for additional controller replicas.
Use those observations to select a CPU target appropriate for the controller’s workload and resource allocation.
A lower CPU target generally causes HPA to request additional capacity sooner, while a higher target allows existing replicas to operate at higher CPU utilization before additional replicas are requested. The appropriate value depends on the workload, the resources assigned to each replica, how quickly a new replica becomes ready, and the capacity available in the cluster.
Make sure the cluster can actually scale
A functioning HPA does not guarantee that a new controller replica will become available. OpenShift still needs sufficient capacity to schedule the additional pod.
CloudBees states that scheduling new controller replicas is blocked when the cluster reaches capacity. CloudBees recommends using the cluster autoscaler where applicable, considering dedicated node pools for controllers, and assigning a lower priority class to agent pods so controller pods can be scheduled first when necessary.
For OpenShift, test the complete scaling path rather than testing HPA in isolation:
- Metrics are collected. The metrics server tracks CPU usage of the running controller replica(s).
- Average utilization crosses the HPA’s target threshold. For example, usage exceeds 80% of the requested CPU, sustained over the HPA’s evaluation window (not a single spike).
- HPA calculates desired replica count and requests an additional replica (up to maxReplicas).
- Kubernetes schedules the new pod onto a node with sufficient resources.
- OpenShift provisions additional capacity if required. For example, the cluster autoscaler adds a node if no existing node has room.
- The new controller replica starts and becomes available once it passes readiness checks.
If the HPA requests another replica but the cluster has nowhere to schedule it, HPA can be functioning correctly while the controller remains below its configured maximum replica count.
Understand what happens during upscale and downscale
Adding a replica does not rebalance builds that are already running.
- During an upscale:
- New builds are dispatched using explicit load balancing (available since 2.426.1.2), which routes them to the replica with the least load, calculated from running builds, already-scheduled queue items, and online agents. The exception is the
buildstep, which always targets the same replica as its upstream build. - Existing web sessions remain associated with their current replica because HA uses sticky sessions.
- New web sessions are distributed randomly between replicas.
- New builds are dispatched using explicit load balancing (available since 2.426.1.2), which routes them to the replica with the least load, calculated from running builds, already-scheduled queue items, and online agents. The exception is the
- During a downscale:
- Builds running on a removed replica are adopted by the remaining replicas.
- Web sessions associated with the removed replica are redirected to a remaining replica.
This distinction matters when testing autoscaling. A scale out event provides additional capacity for subsequent work. It does not immediately move existing builds onto the newly created replica.
Configure a PodDisruptionBudget for Maintenance
CloudBees CI managed controllers running in HA mode have a default PodDisruptionBudget with:
minAvailable: 1This means at least one replica must always be available to ensure controller availability during voluntary disruptions, such as node maintenance or cluster upgrades. It does not apply to involuntary disruptions, such as an OOM kill, a node crash, or a hardware failure since such events are outside the PDB’s scope.
Check the current PDB status:
oc get pdb -n cloudbees-ciSample output:
NAME            MIN AVAILABLE   MAX UNAVAILABLE   ALLOWED DISRUPTIONS   AGE
controller-02   1               N/A               1                     14h
controller-03   1               N/A               1                     154m
CloudBees CI administrators can customize the PodDisruptionBudget for managed controllers running in HA mode by providing a custom YAML definition in the managed controller configuration screen. For example, the following sets minAvailable to 2:
apiVersion: policy/v1
kind: PodDisruptionBudget
metadata:
  name: ${name}
spec:
  minAvailable: 2
Do not increase minAvailable without checking cluster capacity first. If the cluster cannot keep the required number of replicas available during maintenance, the PDB can block the voluntary disruption from proceeding at all.
Single-Replica HA Is a Real Configuration
CloudBees CI allows an HA managed controller to run with a single replica. This is a valid, supported configuration, but it does not give you the redundancy people usually associate with HA:
- There is only one controller pod.
- There is no workload distribution across replicas.
- If that replica fails, the controller is unavailable until it recovers.
What single-replica HA does give you is two specific operational benefits: rolling restarts and rolling upgrades. It does not give you failover. Do not describe single-replica HA as failover protection. It is an HA-mode configuration with real operational value, but replica redundancy only exists once you run more than one replica.
What Changes for Users Once HA Is Enabled
HA is not fully transparent to administrators or users. A few controller behaviors work differently than they do on a standard single-instance controller.
First startup and the setup wizard. When an HA controller starts for the first time, one replica acquires a lock on the shared JENKINS_HOME. That replica is the only one available while the Setup wizard runs, and the lock stays in place until a user completes the wizard. Once it finishes, the remaining replicas acquire the lock one at a time, start, and release it, until every replica is available. If the controller is provisioned with a Configuration as Code bundle instead, the Setup wizard never displays, and all replicas work through the same startup sequence automatically, with no manual step required.
Plugin installation requires a restart, but only with multiple replicas. Dynamic plugin loading, meaning installing a plugin without restarting Jenkins, is not supported once a controller is running more than one HA replica. Installing or upgrading a plugin therefore requires the controller to restart. In the operations center, selecting “Restart Jenkins when installation is complete and no jobs are running” triggers a rolling restart, and the new plugin version becomes available across all replicas once it finishes. This restart requirement does not apply if you are running single-replica HA: a controller with exactly one replica still supports dynamic plugin loading, the same as a non-HA controller.
Some API responses reflect one replica, not the whole cluster, and this behavior has changed across versions. With HA, pull-based endpoints such as /metrics and /monitoring return data from whichever replica handled the request, not the cluster as a whole. Global settings, jobs and folders, static agent configuration, and completed builds are generally synchronized or aggregated correctly regardless of which replica answers. JVM information stays replica-specific by nature.
Running builds, queue items, and agent status are replica-specific by default, but CloudBees overrides three core endpoints to return aggregated data, with conditions attached. Aggregation only happens when you pass a tree parameter containing specific mandatory fields:
/job/<name>/api/json?tree=builds[number,building,result]:numberis mandatory, since it’s used to sort builds after they’re collected from every replica./computer/api/json?tree=computer[displayName,offline]:displayNameis mandatory, since it’s what uniquely identifies an agent across the cluster./queue/api/json?tree=items[id,task,inQueueSince,params,stuck,url,why,buildableStartMilliseconds,pending,blocked,buildable,actions]
Omit tree, use /api/xml or /api/python instead of /api/json, or include an HA-incompatible field, and you get a 400 Bad Request rather than aggregated output. The incompatible fields are lastBuild, firstBuild, queueItem, inQueue, color, and healthReport on the builds endpoint, and discoverableItems on the queue endpoint.
Also worth knowing before you build monitoring on these: CloudBees recommends against the aggregated endpoints when you only need one object. Single-object endpoints such as /job/<name>/lastBuild/api/json, /computer/<agent>/api/json, and /queue/item/<id>/api/json are routed to the replica that owns the object and behave exactly as they would on a non-HA controller, without the network, server-side, and client-side overhead of aggregating everything and filtering it back down.
Because this keeps changing release to release, do not hardcode assumptions about which endpoints are aggregated. Check the HA considerations page for the exact CloudBees CI version you are running before building automation or monitoring against these endpoints.
Check plugins for HA compatibility before production. Several plugins need specific configuration to behave correctly in HA, and a few don’t work in HA at all. Check High Availability (HA) considerations for the exact CloudBees CI version you’re deploying, and check it again after every version upgrade, since plugin behavior in HA changes between releases.
HA uses per-replica temporary cache locations. HA controllers automatically move certain caches out of the shared JENKINS_HOME and into a temporary folder local to each replica’s container, under /tmp. This applies to the GitHub branch source cache, generic Git repository caches, Pipeline “script from SCM” checkouts using plain Git references, Pipeline Groovy library checkouts (when not using clone mode), and CloudBees Pluggable Storage’s local cache for archived builds downloaded from cloud object storage. Because these live outside the shared filesystem, size them for the workload of each individual replica, not the cluster total.
If /tmp fills up with caches, you may be able to request a larger volume depending on your platform. Alternatively, mount a generic ephemeral volume at /tmp at whatever size you need, it only has to support ReadWriteOnce:
containers:
- name: jenkins
  volumeMounts:
  - name: tmp
    mountPath: /tmp
volumes:
- name: tmp
  ephemeral:
    volumeClaimTemplate:
      spec:
        accessModes:
        - ReadWriteOnce
        storageClassName: <storage-class-name>
        resources:
          requests:
            storage: 200Gi
One caveat if you take that route: Kubernetes does not recognize this volume as ephemeral storage, so the pod is not terminated even when the volume runs out of free space. You get no automatic signal that the cache volume is full, monitor it yourself.
HA Requires Real-Time Shared Storage, Not Multi-Region Replication
CloudBees CI HA depends on all replicas reading and writing the same shared JENKINS_HOME in real time through an RWX volume. That architecture assumes low-latency, consistent access to one shared filesystem, which is not something you get across regions. Do not design a CloudBees CI HA deployment as a multi-region or geo-redundant architecture. Keep controller replicas within a single cluster topology where the shared storage can deliver the access and performance HA depends on. If your availability requirements include regional disaster recovery, treat that as a separate architecture and recovery-planning problem, not something managed-controller HA solves for you.
Configuration Changes to a Running HA Controller Apply Automatically
Once an HA controller is running, changing the number of replicas or the container image updates the underlying Deployment directly and does not require an explicit stop and start from the operations center. This is a different mechanism than the “Save automatically provisions” behavior on initial controller creation, this one applies to a controller that is already up and running.
Treat other settings as unverified. CloudBees documents this behavior for replica count and container image specifically, not for CPU, memory, or autoscaling changes, so test those on a non-production controller before assuming they apply without an interruption. It also does not mean every CloudBees CI version upgrade is interruption-free: HA-specific infrastructure or library changes can carry their own upgrade requirements, so check the release notes for the specific version transition you’re planning.
Migrating an Existing Controller from RWO to RWX Storage
If your managed controller is already running on storage that does not support ReadWriteMany, enabling HA will not fix that for you. CloudBees documents a specific migration procedure for moving an existing controller onto RWX-capable storage:
- Create a new volume using the RWX-capable StorageClass.
- Import a snapshot of the existing volume into the new volume where your storage platform supports it, then run the initial sync.
- Set ownership on the root directory of the new volume to match the UID/GID your controller actually runs as. This is
1000:1000on plain Kubernetes and will be different on OpenShift, check your project’s assigned range rather than copying the value from anywhere else. - Stop the controller. The outage starts here.
- Rename the existing volume claim, since the binding between a controller and its volume claim is name-based, then sync the delta from it to the new volume.
- Update the controller configuration to enable HA: switch any custom YAML from
StatefulSettoDeployment, set Storage Class Name to the new class, start with a single replica (you can increase it later), and setfsGroupChangePolicy. You can do this while the delta sync is still running.apiVersion: "apps/v1" kind: Deployment spec: template: spec: securityContext: fsGroupChangePolicy: OnRootMismatch - Rename the new volume to the original claim name so the controller can mount it.
- Start the controller, now backed by the new volume. The outage ends here.
This procedure requires Job/{create,delete,get,list}, PersistentVolumeClaim/{create,delete,get,list}, and PersistentVolume/{create,patch,delete,get,list} in your Kubernetes or OpenShift cluster, and CloudBees recommends testing the RWX StorageClass with a sample application before starting.
It’s also worth reducing migration time up front: discarding fingerprints you don’t need and clearing out old builds that aren’t required for the migration can meaningfully shrink the amount of data that has to sync. Because JENKINS_HOME can contain a large number of small files, moving it to new storage is I/O-intensive and can affect controller performance during the sync. Don’t estimate your migration window purely from volume size in gigabytes, file count and filesystem I/O characteristics matter more than raw capacity.
Common Mistakes
- Assuming the default StorageClass supports RWX. This is the most common cause of failed HA provisioning. It is also the most avoidable: run
oc get storageclass, then run the concurrent-mount test covered earlier, before you ever put the name into a controller’s HA configuration. - Leaving custom YAML that still specifies
kind: StatefulSet. If a controller carries YAML overrides from a previous non-HA configuration, provisioning fails outright the moment you enable HA, because HA managed controllers must run askind: Deployment. Update the override before enabling HA, not after it fails. - Enabling autoscaling with no Metrics Server running. The HA configuration screen accepts a maximum replica count whether or not the Metrics Server exists in your cluster. Nothing errors at save time. Scaling simply never happens, and the first time anyone notices is during a real load spike, when it matters most. Verify the Metrics Server before you trust the autoscaling settings, not after.
- Treating HA as a backup strategy. HA protects against pod and node failure. It does nothing for a bad plugin upgrade, an accidentally deleted job, or corruption on the shared volume, because every replica reads and writes the same JENKINS_HOME. If that filesystem is damaged, every replica sees the damage. HA and backups solve different problems. You still need real backups.
- Under-sizing RWX I/O for the actual workload. Jenkins controllers are a small-file, high-churn workload, not a handful of large files. A storage backend that performs fine in a generic RWX functional test can behave very differently once it’s absorbing real build metadata churn. Load test the storage with representative Jenkins activity before committing to it in production, not just the read/write test from the verification section.
- Migrating without cleaning up first. Skipping fingerprint cleanup and old-build cleanup before an RWO-to-RWX migration inflates both the initial sync and the final delta sync, and every extra minute in that final sync is downtime you didn’t need to take.
- Going to production without checking plugin compatibility. Docker, Amazon EC2, Kubernetes, and Google Compute Engine all have documented HA-specific configuration requirements, and Blue Ocean, dashboard-view, the CloudBees SDA Data plugin, and File Parameters’
stashedFiletype have documented HA limitations or outright incompatibilities. Review the current HA considerations page for your CloudBees CI version before production, and again after every version upgrade, since this list changes across releases.
Troubleshooting
- Controller stays pending after enabling HA. Check the PVC first.
oc describe pvc <name>usually surfaces an event that explains exactly why binding failed, and the most common reason is a StorageClass that cannot actually provide the RWX access mode the controller requested. - Autoscaling never reacts, even under sustained load. Confirm the Metrics Server is actually registered:
oc get apiservices | grep metrics. Then checkoc get hpa -n cloudbees-ciand look at theTARGETScolumn. If it shows<unknown>instead of a real percentage, the HPA has no CPU data to scale on, regardless of what threshold you configured. - Provisioning fails immediately after enabling HA on a previously non-HA controller. Check the operations center provisioning logs for a
StatefulSetversusDeploymentkind mismatch. Leftover custom YAML from the controller’s non-HA configuration is almost always the cause, as covered above. - Permission errors on the volume after an RWO-to-RWX migration. Compare the UID and GID at the root of the new volume against the UID your pods actually run as under OpenShift’s assigned SCC range. This produces errors that look exactly like a storage or mount failure and gets misdiagnosed as one, when it’s actually a filesystem group mismatch.
- Builds using Docker plugin agents fail once they pass roughly 5 minutes. This is the orphan container watchdog, and it is more aggressive than it sounds: in an HA controller, a replica that did not launch a given container can consider it orphaned and remove it, and that check runs every 5 minutes. In practice, this means any build using Docker plugin containers that runs longer than 5 minutes will fail, not just occasionally lose an agent. If you rely on the Docker plugin for longer builds, either disable the watchdog with
-Dcom.nirima.jenkins.plugins.docker.DockerContainerWatchdog.enabled=false, or move those builds off Docker plugin agents entirely.
Conclusion
CloudBees CI HA on OpenShift is straightforward to enable and easy to get subtly wrong. The failure mode is rarely the HA toggle itself, it’s everything the toggle assumes is already true: an RWX StorageClass that was never actually tested for concurrent mounts, a filesystem group that doesn’t match the project’s assigned SCC range, a Metrics Server that was never confirmed to be running, or leftover YAML from a controller’s pre-HA life that quietly breaks provisioning the moment HA is switched on.
None of that shows up as an error message when you save the configuration. It shows up later, as a controller stuck pending, an autoscaler that never fires, or a build that mysteriously loses its agent five minutes in. That’s why verification matters as much as configuration: check the pods, check the PDB, check every PVC’s access mode individually rather than assuming, and actually kill a replica to watch the failover happen before you trust it in production.
Treat this guide as the checklist, not the finish line. Storage first, replicas and autoscaling second, PDB for maintenance third, then prove it with a real replica-failure test. Do that once, deliberately, in a non-production controller, and you’ll know exactly how your cluster behaves the day a node fails for real instead of finding out during an incident.