
CloudBees CI HA on OpenShift starts with one requirement that can stop the deployment before it even begins: shared storage with ReadWriteMany (RWX) access. OpenShift Data Foundation (ODF) is a common choice, but if your OpenShift cluster does not have ODF, you do not need to deploy an entire storage platform just to provide RWX storage. NFS is a supported option for on premises environments, with CloudBees recommending NFS 4.1.
The real challenge is getting NFS right for CloudBees CI. Storage performance, SSD or NVMe selection, network speed, NFS configuration, filesystem settings, mount options, OpenShift integration, and failure handling all matter. This guide walks through the complete setup, from building and sizing the NFS server to configuring OpenShift and enabling HA for CloudBees CI Managed Controllers, with a focus on the settings that matter in production.
Table of Contents
Configure NFS Storage for CloudBees CI Managed Controllers HA on OpenShift
How CloudBees CI HA actually Works
Before touching any YAML files, it is worth understanding what CloudBees CI High Availability (HA) is actually doing under the hood. Once you understand how the replicas share state, workloads, and persistent data, the NFS requirements make a lot more sense.
CloudBees CI HA runs multiple replicas of the same Managed Controller as one logical controller. The replicas work together to provide failover, workload distribution, and rolling operations:
- Controller failover: If a replica fails, running builds can be adopted by another replica, allowing the controller to continue operating without the failed replica.
- Horizontal scaling: A single logical controller can spread its workload across multiple replicas. CloudBees CI also provides explicit build load balancing, which can direct new builds toward the replica with the least workload.
- Rolling restarts and upgrades: Replicas can be restarted or upgraded incrementally, allowing the controller to remain available during supported rolling operations.
- Live state synchronization: CloudBees CI replicas use the embedded Hazelcast distributed computation library to keep their live state synchronized. No separate Hazelcast deployment or storage configuration is required.
- Shared filesystem: This is the part that matters most for this guide. The replicas need access to shared persistent controller content. That means the storage backing the controller must support simultaneous read and write access from multiple pods, which is why ReadWriteMany (RWX) storage is required for a multi-replica HA controller.
This is fundamentally different from a standard non-HA Managed Controller, where a single controller pod can use storage with ReadWriteOnce (RWO) access. When you move that controller to HA with multiple replicas, the storage architecture changes with it. The replicas must be able to access the same shared filesystem, which is where an RWX-capable backend such as NFS becomes important for on-premises OpenShift environments. CloudBees’ current platform guidance specifically supports NFS 4.1 and higher. CloudBees’ NFS knowledge base article recommends NFS 4.1 or higher for CloudBees CI installations.
The architecture at a glance
CloudBees CI HA combines multiple Managed Controller replicas into a single logical controller. The replicas share workloads, synchronize live state through embedded Hazelcast, and access the same shared filesystem for persistent controller data. For resilience, CloudBees recommends placing HA replicas on different worker nodes and, where possible, across different availability zones.
 		  ┌───────────────────────────────────────────┐
                  │            OpenShift Cluster              │
                  │                                           │
                  │    CloudBees CI HA Managed Controller     │
                  │                                           │
                  │      ┌───────────┐     ┌───────────┐      │
                  │      │ Replica 1 │     │ Replica 2 │      │
                  │      └─────┬─────┘     └─────┬─────┘      │
                  │            │                 │            │
                  │            │   Hazelcast     │            │
                  │            │ synchronization │            │
                  │            └────────┬────────┘            │
                  │                     │                     │
                  │           ┌─────────▼─────────┐           │
                  │           │  Shared RWX PVC   │           │
                  │           │ NFS StorageClass  │           │
                  │           └─────────┬─────────┘           │
                  └─────────────────────┼─────────────────────┘
                                        │
                                        │ NFS 4.1+
                                        │ over TCP
                          ┌─────────────▼─────────────┐
                          │        NFS Server         │
                          │       RHEL / Linux        │
                          │       SSD / NVMe          │
                          │       High-speed NIC      │
                          └───────────────────────────┘
There are two separate paths to understand:
- Hazelcast handles live state synchronization between the controller replicas, while
- the shared RWX filesystem provides persistent controller storage.
CloudBees requires shared storage between HA replicas and recommends NFS 4.1 for on premises deployments.
Every Managed Controller replica mounts the same NFS-backed RWX volume concurrently. This makes the NFS layer a critical dependency for the controller’s persistent filesystem. Its storage media, network capacity, latency, NFS version, filesystem configuration, and failure behavior therefore become important parts of the overall CloudBees CI HA architecture.
NFS does not provide the HA functionality itself. It provides the shared storage layer that HA requires. The complete HA architecture combines multiple controller replicas, shared RWX storage, Hazelcast-based state synchronization, and the OpenShift scheduling and networking infrastructure that connects them.
Part 1: Sizing and Building the NFS Server
Hardware and Storage Type
CloudBees CI’s own reference architecture is clear about the storage requirement:
- Pipelines typically read and write many files during execution, so CloudBees CI requires high speed storage.
- CloudBees also notes that the underlying storage provider must provide sufficient IOPS, throughput, and low latency. For on premises deployments, CloudBees recommends NFS 4.1.
That matters even more when the storage is backing HA Managed Controllers. Multiple controller replicas can access the same persistent filesystem concurrently, so a slow NFS backend can quickly become the bottleneck for the entire controller.
For a production NFS server backing CloudBees CI, this is the baseline I would use:
| Component | Recommendation | Why it matters |
|---|---|---|
| Disk type | Enterprise SSD or NVMe, preferably with redundant storage such as RAID 10 | CloudBees CI generates frequent filesystem activity, including metadata operations, configuration updates, logs, plugin access, and build data. SSD or NVMe provides substantially lower latency and higher IOPS than spinning disks. |
| Filesystem | XFS for a Linux NFS server, or the filesystem managed by your NAS platform | XFS is a strong default for a high concurrency Linux NFS server. Ext4 is also viable when it better matches your existing storage standards. |
| RAID controller cache | Battery backed or flash backed write cache, where supported | A protected write cache can reduce write latency while preserving data integrity during a power or controller failure. Do not enable unprotected write back caching for controller data. |
| CPU | 4 or more cores as a starting point | NFS request processing and filesystem activity consume CPU. Increase CPU when monitoring shows the server becoming CPU bound. |
| RAM | 16 to 32 GB as a starting point | Linux uses available memory for the filesystem page cache, which can significantly reduce repeated reads from the underlying storage. Larger environments may benefit from more memory. |
| IOPS | Size from measured workload rather than a fixed CloudBees number | CloudBees does not publish a universal IOPS requirement. The correct target depends on controller count, concurrent builds, filesystem activity, and workload characteristics. |
The important point is that the table above is an engineering baseline, not a CloudBees minimum specification. CloudBees requires sufficient IOPS, throughput, and low latency, but there is no single IOPS figure that is correct for every installation.
If you are virtualizing the NFS server, pay just as much attention to the storage underneath the VM. A 16 core NFS VM with plenty of RAM will still perform badly if its virtual disks sit on an oversubscribed datastore. This is one of those problems that often looks like a CloudBees CI performance issue until you look at the storage latency underneath the NFS server.
For production, I would also avoid putting the CloudBees CI export on the same storage pool as unrelated workloads such as backup repositories, large file shares, or bulk archival jobs. CI workloads can produce sudden bursts of filesystem activity, and competing workloads can turn otherwise healthy storage into a latency problem.
Network Requirements
Because every HA controller replica accesses the shared $JENKINS_HOME over the network, NFS network performance needs to be treated as a core part of the storage design.
There is no single network speed that CloudBees defines as a requirement for NFS. The right size depends on the number of controllers, workload, concurrency, and storage performance. As a practical starting point:
| Deployment size | Minimum starting point | Recommended production target | Target latency |
|---|---|---|---|
| Small / development | 1 GbE | 10 GbE | < 1 ms |
| Standard production | 10 GbE | 10 GbE or higher | < 1 ms |
| Large / multi team HA cluster | 10 GbE | 25 GbE or higher | < 1 ms |
These are infrastructure design targets, not CloudBees product requirements. Measure the actual network path between the OpenShift worker nodes and the NFS server before deciding that additional bandwidth is necessary.
A few practical rules make a significant difference:
- Keep NFS traffic isolated where practical. A dedicated NIC, VLAN, or storage network prevents storage traffic from competing with unrelated high volume traffic such as backups, image transfers, or application ingress.
- Keep the NFS server close to the OpenShift worker nodes. Avoid putting the shared controller filesystem across a WAN, across regions, or across a high latency network path.
- Watch retransmissions and packet loss. A link can have plenty of available bandwidth and still deliver poor NFS performance when packets are being retransmitted.
- Do not enable jumbo frames blindly. MTU 9000 can reduce network overhead for large transfers, but it must be configured consistently across the entire path. If the NFS server, OpenShift nodes, switches, VLAN interfaces, or routers disagree about the MTU, troubleshooting becomes much harder.
- Benchmark with concurrent clients. A network that looks excellent with one NFS client can behave very differently when several controller replicas and other workloads are accessing the server simultaneously.
For an HA deployment, I would establish a baseline for latency, throughput, packet loss, TCP retransmissions, and peak interface utilization before putting production controllers on the storage.
NFS Server Software
Use NFS 4.1 or later for this deployment. CloudBees supports NFS v3.x and NFS v4.1 and higher, but does not support NFS 4.0 because of known performance issues. For CloudBees CI on premises, CloudBees specifically recommends NFS 4.1.
If you are running a Linux based NFS server, install and maintain the NFS server packages provided by your distribution’s supported repositories. For example, RHEL uses nfs-utils. Keep the operating system and NFS components patched and within the vendor’s supported lifecycle.
For NFS 4.1, do not blindly copy older NFSv3 configuration guides. NFSv4 does not require rpcbind, so an NFS 4.1 only server does not need it for NFS communication. Install and enable the NFS server components required by your operating system, then verify that the server is actually exporting the filesystem over NFS 4.1.
If you are using NFSv4 identity mapping, make sure the UID and GID mapping behavior is consistent between the NFS server and clients. With OpenShift, however, do not assume that containers will run as root. OpenShift requires containers to run as non root users and commonly assigns arbitrary UIDs, so permissions need to be designed accordingly.
This guide assumes you already have an NFS server installed and running. If you need to set one up from scratch, package installation, enabling the service, and firewalld are already covered in our NFS server installation guides. The rest of this section covers two things a generic install guide will not:
- an SELinux setting specific to exporting a non-standard directory, and
- a squash policy decision specific to how csi-driver-nfs operates.
SELinux. On RHEL, SELinux blocks NFS from exporting files by default, independent of the Unix permissions on the directory. This is a separate control from the root_squash and ownership settings covered below, and missing it produces a similar looking permission denied error, so it is worth checking first.
Check the current state:
getsebool -a | grep nfs_exportWhat you want to see, for a read write export:
nfs_export_all_ro --> on
nfs_export_all_rw --> on
If either shows off, set it:
setsebool -P nfs_export_all_rw on
setsebool -P nfs_export_all_ro on
The -P flag makes this persist across reboots. Without it, the setting is lost on the next boot and the export silently breaks again. These booleans are not required if the export directory is labeled with the public_content_rw_t SELinux context instead, but for a directory outside the standard public content paths, such as /data/cloudbees in this guide, the booleans are the simpler option. Re-check with the same getsebool command afterward to confirm the change took.
Example /etc/exports:
cat /etc/exports# CloudBees CI NFS export
/path/to/cloudbees-ci 10.185.10.0/24(rw,sync,no_subtree_check)Replace both the path and network subnet with the ones from your environment:
/path/to/cloudbees-ciis the directory or filesystem you created for CloudBees CI on the NFS server. It could be something such as/srv/nfs/cloudbees-ci,/export/cloudbees-ci, or a mount point backed by a dedicated storage volume.10.0.0.0/16is the IP network containing the OpenShift worker nodes that need to mount the export. Replace it with your actual OpenShift node subnet or, where appropriate, a specific list of allowed client networks.
A few export options deserve particular attention:
rwallows the OpenShift clients to read and write the CloudBees CI filesystem.syncis the safer choice for persistent controller data. The NFS server does not acknowledge writes before the changes are committed to stable storage.no_subtree_checkavoids unnecessary subtree checking when exporting a directory from a larger filesystem.- Restrict the export to the OpenShift nodes or networks that actually require access. The NFS export rules should be backed by host firewall and network controls rather than being treated as the only security boundary.
root_squash and csi-driver-nfs
csi-driver-nfs’s controller was granted the privileged SCC in Part 2, with no runAsUser override, so its nfs container runs as UID 0, actual root, inside the container. When it creates a subdirectory on this export, that write genuinely originates from root. Standard root_squash applies to it and will squash it to the anonymous UID, and an anonymous UID has no write access to a root:root, mode 755 directory. This is confirmed directly in the driver’s own issue tracker: exports with default root_squash produce provisioned directories owned by the anonymous UID and fail; exports with no_root_squash produce directories owned by actual root, and work.
Because this export is restricted to the OpenShift node subnet, and the only thing on that subnet writing to it as root is the csi-driver-nfs controller running inside a privileged, infrastructure-only namespace, no_root_squash is the correct setting here.
See our NFS export configurarion then:
cat /etc/exports# CloudBees CI NFS export
/data/cloudbees 10.185.10.0/24(rw,sync,no_subtree_check,no_root_squash)Leave the export directory owned root:root. No chown is needed.
If you would rather not grant root over NFS at all, the alternative is all_squash with anonuid and anongid mapped to a dedicated, no login service account that owns the export directory:
useradd -r -s /sbin/nologin cloudbees-nfschown cloudbees-nfs:cloudbees-nfs /data/cloudbeesLook up the UID and GID this account was actually assigned:
id cloudbees-nfsSample output:
uid=985(cloudbees-nfs) gid=985(cloudbees-nfs) groups=985(cloudbees-nfs)Take the uid and gid values from that output, 985 and 985 above, and use them in the export line:
/data/cloudbees 10.185.10.0/24(rw,sync,no_subtree_check,all_squash,anonuid=985,anongid=985)Replace 985 with your own account’s actual values. System accounts created with useradd -r are assigned from a reserved range, not a fixed number, so yours will very likely differ from the example above. This avoids granting root over NFS entirely, at the cost of one extra account to manage. Either configuration, this or no_root_squash, is valid; this guide uses no_root_squash for the rest of the walkthrough.
exportfs -arvTuning the NFS Server Daemon
Do not start by throwing a collection of NFS kernel parameters at the server or arbitrarily setting the NFS server thread count to 16 because a tuning guide says 16 is a good number.
The number of NFS server threads is a fixed value you configure, it does not scale up or down automatically. There is still no single number that is right for every CloudBees CI environment, since the right value depends on your hardware and workload; the NFS server’s CPU capacity, storage performance, network capacity, number of connected clients. Start with the operating system defaults, measure performance under realistic CloudBees CI load, and tune only when the measurements show that NFS request processing is actually limiting performance.
Start with the default configuration and establish a baseline under realistic CloudBees CI load.
On the NFS server, use nfsstat to check server-side NFS activity and retransmissions:
sudo nfsstat -sUse iostat to check storage latency, utilization, and queue depth:
iostat -xz 1Use vmstat to get a quick view of CPU, memory, and I/O pressure:
vmstat 1Use sar to check network traffic and interface utilization:
sar -n DEV 1On an NFS client, you can also inspect client side NFS statistics:
nfsstat -cWatch for:
- High disk latency
- Increasing storage queue depth
- CPU saturation
- Network saturation
- NFS retransmissions
- Memory pressure
- Increasing NFS operation latency
If the server is CPU bound while the storage and network still have capacity, increasing NFS concurrency may be worth testing. If the disks are already saturated, increasing NFS threads will not make the storage faster. It will simply put more requests into the queue.
That distinction matters. Tune the bottleneck, not the NFS server by folklore.
If the NFS server is also being used as a backup target, registry storage, general file server, or anything else with heavy I/O, isolate the CloudBees CI storage whenever possible. A build storm combined with a large backup job is exactly the kind of workload that can turn a healthy NFS server into a controller performance problem.
The goal is not to find a magic NFS configuration. The goal is to give CloudBees CI a fast, predictable, low latency shared filesystem with enough IOPS, throughput, and headroom to remain stable during peak workload. That is the foundation the HA configuration depends on.
If you are looking at guides on how to install and setup NFS server, refer to our guides.
Part 2: Wiring NFS into OpenShift as a StorageClass
Deploy the NFS CSI Driver
At this point, you have an NFS server with a directory exported to your OpenShift nodes. The next step is to make that storage available to OpenShift as a StorageClass.
A StorageClass allows OpenShift to create Persistent Volumes automatically when CloudBees CI requests storage. Instead of manually creating a PV for every controller, the driver creates a directory on the NFS export for each dynamically provisioned volume.
This guide uses csi-driver-nfs, the CSI-compliant NFS driver maintained under Kubernetes SIG Storage. It integrates with Kubernetes’ current storage architecture and supports dynamic provisioning, volume expansion, and snapshots, making it a good fit for a new production deployment. A separate project, the NFS Subdir External Provisioner, provides NFS dynamic provisioning through a different, older approach and is not covered here.
One thing to watch with csi-driver-nfs: versions before v4.13.1 are affected by CVE-2026-3864, a path traversal vulnerability involving the subDir parameter. A crafted volumeHandle could cause cleanup to delete files outside the intended export directory. The vulnerability is fixed in v4.13.1 and later. Every command below pins a later version, so do not install an older release.
Before starting, have these two values from your NFS server configuration:
- NFS server address: for example,
10.185.10.199 - NFS export path: for example,
/data/cloudbees
The export path is the path you configured in /etc/exports. It is not necessarily /data/cloudbees, so use the actual path from your environment.
First, add the csi-driver-nfs Helm repository:
helm repo add csi-driver-nfs https://raw.githubusercontent.com/kubernetes-csi/csi-driver-nfs/master/chartsUpdate the Helm repository index to fetch the latest chart information.
helm repo updateBefore installing, check which chart version is actually current. Do not copy a version number from this guide since it will most likely be out of date by the time you read it:
helm search repo csi-driver-nfs/csi-driver-nfs --versionsSample output, at the time of writing:
NAME                          	CHART VERSION	APP VERSION	DESCRIPTION
csi-driver-nfs/csi-driver-nfs	4.13.4       	4.13.4     	CSI NFS Driver for Kubernetes
csi-driver-nfs/csi-driver-nfs	4.13.3       	4.13.3     	CSI NFS Driver for Kubernetes
csi-driver-nfs/csi-driver-nfs	4.13.2       	4.13.2     	CSI NFS Driver for Kubernetes
csi-driver-nfs/csi-driver-nfs	4.13.1       	4.13.1     	CSI NFS Driver for Kubernetes
csi-driver-nfs/csi-driver-nfs	4.13.0       	4.13.0     	CSI NFS Driver for Kubernetes
csi-driver-nfs/csi-driver-nfs	4.12.1       	4.12.1     	CSI NFS Driver for Kubernetes
The top row is the current release. Chart version and app version match in this repo, so either column tells you the same thing. Take that value, 4.13.4 in the output above, and use it below. Yours may already be higher by the time you read this.
This version must be v4.13.1 or later.
Install the driver into its own namespace, using the version you found. OpenShift already ships the external snapshotter CRDs, so the chart’s attempt to create them is disabled to avoid an ownership conflict.
A few things to note:
- Replace
4.13.4with whatever version your ownhelm search repooutput showed at the top - If your cluster is a compact or Single Node OpenShift deployment where workloads run on control plane nodes, add
--set controller.runOnControlPlane=trueand reducecontroller.replicasto1.
helm install csi-driver-nfs csi-driver-nfs/csi-driver-nfs \
  --create-namespace --namespace csi-driver-nfs \
  --version 4.13.4 \
  --set controller.replicas=2 \
  --set externalSnapshotter.enabled=true \
  --set externalSnapshotter.customResourceDefinitions.enabled=false
This chart does not take NFS server connection details or create a StorageClass by default. It only deploys the driver itself, a controller Deployment and a node DaemonSet. The server address and export path are supplied later, in the StorageClass, not at Helm install time.
Verify the controller and node pods:
oc get pods -n csi-driver-nfsYou should see one or more csi-nfs-controller pods and one csi-nfs-node pod per worker node, all Running.
NAME                                   READY   STATUS    RESTARTS   AGE
snapshot-controller-666cbcc594-cjzhv   1/1     Running   0          40s
Allow the driver to mount NFS on OpenShift
The node component performs actual host level mount and unmount operations on each worker node, which the default restricted-v2 SCC does not permit. The CSI node plugin needs the privileged SCC to do this. This is expected and matches how every CSI driver, not just NFS, runs on OpenShift.
Why this needs full privileged, not a narrower SCC
Check the actual pod spec the chart deploys and the reason becomes concrete rather than theoretical:
oc get ds csi-nfs-node -n csi-driver-nfs -o yamlThe nfs container in that DaemonSet runs with:
securityContext:
  allowPrivilegeEscalation: true
  capabilities:
    add:
    - SYS_ADMIN
    drop:
    - ALL
  privileged: true
The pod spec also sets hostNetwork: true, and mounts /var/lib/kubelet/pods from the host with mountPropagation: Bidirectional, which is what lets a mount made inside the container become visible on the host and vice versa. That bidirectional propagation is how the actual NFS mount ends up usable by the kubelet and, in turn, by application pods.
Compare that against hostmount-anyuid (oc describe scc hostmount-anyuid):
Allow Privileged:        false
Allowed Capabilities:    <none>
Allow Host Network:      false
Three separate fields the pod needs, three separate fields this SCC denies. It is not a matter of degree or caution; the pod is rejected at admission under hostmount-anyuid regardless of which of the three you look at first. The same is true of hostmount-anyuid-v2. Neither grants SYS_ADMIN, privileged mode, or host networking, all three of which this daemonset’s node container requires to perform the actual mount operation and make it visible to the host’s kubelet.
This is not specific to csi-driver-nfs. Every CSI node plugin that mounts external storage on OpenShift needs the same combination, for the same reason: it is not reading and writing files on the host, it is issuing mount and unmount system calls into the host’s mount namespace and propagating the result back out. Ceph CSI, vSphere CSI, HPE CSI, and Synology CSI all document an identical requirement for their node components. The old NFS Subdir External Provisioner avoided this because its pod consumed an NFS mount the same way any application pod does, through a Kubernetes nfs: volume, rather than performing the mount itself. A CSI node plugin’s whole job is to be the thing performing that mount, which is why it sits at a different privilege tier.
As such, you need to grant the plugin privileged SCC for it to work. Therefore, first confirm the service account names the chart created. The defaults are csi-nfs-controller-sa and csi-nfs-node-sa, but verify against your release:
oc get sa -n csi-driver-nfsNAME AGE
builder 25m
csi-nfs-controller-sa 25m
csi-nfs-node-sa 25m
default 25m
deployer 25m
snapshot-controller 25mbuilder,default, anddeployerare not created by this chart. OpenShift creates them automatically in every project.snapshot-controlleris created by the chart, but only becauseexternalSnapshotter.enabled=truewas set in the install command earlier; it runs the external snapshot sidecar and does not need the SCC grants below.
The two that matter for the mount operations described above are worth understanding on their own:
csi-nfs-controller-sais used by the controller Deployment. It handles provisioning and deprovisioning: creating and deleting the per volume subdirectory on the NFS export when a PVC is created or removed. To do that, itsnfscontainer mounts the export itself, which is why it carries the sameprivilegedandSYS_ADMINrequirement as the node component, not because it talks to the Kubernetes API, which it also does, but specifically because provisioning a new subdirectory means mounting the share first.csi-nfs-node-sais used by the node DaemonSet, one pod per worker node. It handles attaching an already provisioned volume into a specific pod: the actual mount and unmount operation that makes the NFS share appear inside a container’s filesystem, and the bidirectional mount propagation that makes that mount visible to the host kubelet.
Both perform a real mount operation, just at different points in the volume’s lifecycle: the controller when the directory is created or removed, the node when the volume is attached to or detached from a pod. That is why both need the same SCC grant, and why snapshot-controller does not.
Grant the privileged SCC to both:
oc adm policy add-scc-to-user privileged -z csi-nfs-controller-sa -n csi-driver-nfsoc adm policy add-scc-to-user privileged -z csi-nfs-node-sa -n csi-driver-nfsRestart the controller and node components to apply the newly configured SCC permissions.
oc rollout restart deployment -n csi-driver-nfsoc rollout restart daemonset -n csi-driver-nfsTreat the csi-driver-nfs namespace as infrastructure, restrict who can create pods in it, and do not grant privileged to application workloads elsewhere in the cluster.
Create the StorageClass
The provisioner name for csi-driver-nfs is: nfs.csi.k8s.io.
Create managed-nfs-storage.yaml:
cat > managed-nfs-storage.yaml << 'EOF'
apiVersion: storage.k8s.io/v1
kind: StorageClass
metadata:
  name: managed-nfs-storage
provisioner: nfs.csi.k8s.io
parameters:
  server: 10.185.10.199
  share: /data/cloudbees
  onDelete: archive
  mountPermissions: "0770"
reclaimPolicy: Delete
volumeBindingMode: Immediate
allowVolumeExpansion: true
mountOptions:
  - hard
  - nfsvers=4.1
EOF
The important settings here are the NFS version, the mount behaviour, and the reclaim policy. CloudBees recommends NFS 4.1 for on-premises deployments, so explicitly specifying NFS 4.1 avoids accidentally mounting the export with a different protocol version.
Replace server and share with your actual NFS server address and export path from Part 1.
onDeletecontrols what happens to data on PVC deletion. Values aredelete(default),retain, orarchive.archiverenames the subdirectory instead of removing it, giving recoverability without an orphaned PV.mountPermissionscontrols the mode bits csi-driver-nfs applies to each subdirectory it creates. Its default is0, meaning the driver performs no chmod and the directory inherits whatever permissions your export already grants. Setting it non-zero, as above, makes the driver chmod each provisioned subdirectory after mount. This solves a different problem thanroot_squash, covered in Part 1:root_squashgoverns whether the csi-driver-nfs controller itself, running as root, can create the subdirectory in the first place.mountPermissionsgoverns whether the pod that later consumes that PVC, such as the Jenkins controller, can write to it. That consuming pod normally runs under therestricted-v2SCC with a non-root, arbitrary UID assigned from the project’s range, not as root, so the subdirectory’s mode bits need to grant it access some other way, typically through group permissions matched to the pod’sfsGroup, set in Part 3.
The two mount options above are the important starting point:
hardkeeps retrying an NFS operation if the server becomes temporarily unavailable instead of immediately returning an I/O error to the application. This is appropriate for persistent controller data.nfsvers=4.1explicitly selects NFS 4.1, which is the version CloudBees recommends for on-premises deployments.
What about rsize, wsize, actimeo, and nconnect?
You will find many NFS tuning guides recommending values such as rsize=262144, wsize=262144, actimeo=60, or nconnect=4. Do not treat those values as universal CloudBees CI requirements.
Modern NFS clients can negotiate appropriate read and write sizes, and the best values for attribute caching or multiple connections depend on the kernel, NFS server, network, and workload. Changing these settings without measuring the result can improve one workload while making another worse.
Start with the documented NFS 4.1 configuration and establish a performance baseline. If testing shows that the NFS client is the bottleneck, tune these options based on measurements from your specific environment.
For example, nconnect can be useful on high-bandwidth networks by allowing multiple connections to an NFS server, but support and behaviour depend on the client kernel and NFS server. Treat it as an optimisation to test, not a requirement for CloudBees CI HA.
Apply and verify:
oc apply -f managed-nfs-storage.yamloc get storageclass managed-nfs-storage -o jsonpath='{.provisioner}{"\n"}'This must print nfs.csi.k8s.io.
A StorageClass declares no access modes itself. RWX capability comes from NFS supporting concurrent read write mounts, which the two pod validation later in this section confirms directly.
At this point, the path is:
NFS Server
    │
    └── /data/cloudbees
            │
            ▼
    csi-driver-nfs
            │
            ▼
    managed-nfs-storage (or your SC name)
            │
            ▼
    CloudBees CI PVC
            │
            ▼
    RWX Persistent Volume
The next step is to prove that dynamic provisioning actually works by creating a small RWX test PVC before involving CloudBees CI. This catches NFS permissions, connectivity, StorageClass, and OpenShift security issues early, instead of discovering them later when the Managed Controller fails to start.
Decide: Cluster Default or Explicit StorageClass
Once the NFS StorageClass has been created and verified, CloudBees CI can use it in two ways:
- Make the NFS StorageClass the OpenShift cluster default.
- Keep the existing OpenShift default unchanged and configure CloudBees CI to use the NFS StorageClass explicitly.
Both approaches are supported by CloudBees. For a shared production OpenShift cluster, leaving the existing cluster default unchanged and explicitly configuring the CloudBees CI storage class is generally the more controlled approach.
The NFS StorageClass name used in this guide, managed-nfs-storage, is an example. Replace it with the actual name of the NFS StorageClass created in your OpenShift cluster.
Option 1: Make the NFS StorageClass the cluster default
A PVC that does not specify a storageClassName uses the cluster’s default StorageClass. Therefore, making the NFS StorageClass the OpenShift default allows CloudBees CI to use NFS without specifying the StorageClass separately.
For example:
oc patch storageclass managed-nfs-storage \
  -p '{"metadata":{"annotations":{"storageclass.kubernetes.io/is-default-class":"true"}}}'
If another StorageClass is currently marked as the default, remove that designation:
oc patch storageclass <existing-default-storage-class> \
  -p '{"metadata":{"annotations":{"storageclass.kubernetes.io/is-default-class":"false"}}}'
Verify the result:
oc get storageclassThe NFS StorageClass should now be marked as the default.
This approach is straightforward, but the change is cluster-wide. The default StorageClass is an OpenShift/Kubernetes cluster setting, not a CloudBees CI setting. Any PVC that does not explicitly specify a StorageClass can therefore use the new default.
For example, if the existing default StorageClass provides block storage and is used by other applications in the cluster, changing the default to NFS can affect those applications as well.
For that reason, changing the cluster default is generally not appropriate on a shared OpenShift platform unless NFS is intentionally intended to become the default storage backend for the cluster.
If the OpenShift cluster is dedicated to CloudBees CI and there is a deliberate requirement for NFS to be the cluster-wide default, this approach is valid.
For the deployment described in this guide, the existing OpenShift default remains unchanged and the NFS StorageClass is configured explicitly for CloudBees CI.
Option 2: Configure CloudBees CI to use the NFS StorageClass
The CloudBees CI Helm chart provides the Persistence.StorageClass value for selecting the StorageClass used for CloudBees CI persistent storage.
The chart defines this value at the top level:
Persistence:
  StorageClass: null
The default value is null. This does not mean that CloudBees CI uses NFS. When Persistence.StorageClass is unset, CloudBees CI uses the default StorageClass configured in the Kubernetes/OpenShift cluster.
You can verify the current chart value with:
helm show values cloudbees/cloudbees-core | grep -iC 5 storageclassThe relevant chart definition is:
Persistence:
...
  StorageClass: null
...
For current CloudBees CI versions, CloudBees documents that setting Persistence.StorageClass changes the StorageClass used by both the Operations Center and Managed Controllers.
This distinction is important because CloudBees CI has separate persistent storage for the Operations Center and for each Managed Controller. The Operations Center has its own $JENKINS_HOME, and each Managed Controller has its own $JENKINS_HOME. When new Managed Controllers are provisioned, the Operations Center creates the Kubernetes resources and persistent storage required for them.
The correct configuration therefore depends on when the NFS StorageClass is introduced.
Scenario 1: NFS is available before CloudBees CI is installed
For a new CloudBees CI installation, create and verify the NFS StorageClass first, then decide how widely it should apply.
Persistence.StorageClass applies to both the Operations Center and Managed Controllers. Setting it places every CloudBees CI component on that StorageClass, including components that do not require RWX. There are two valid configurations.
Configuration 1: NFS for everything
Set Persistence.StorageClass at install:
helm install cloudbees-core cloudbees/cloudbees-core \
  --set OperationsCenter.HostName='<hostname>' \
  --set OperationsCenter.Route.tls.Enable=true \
  --set Subdomain=true \
  --set Agents.SeparateNamespace.Enabled=true \
  --set Agents.SeparateNamespace.Create=true \
  --set CasCBundleService.enabled=true \
  --set Persistence.StorageClass='<nfs-sc-name>' \
  -n cloudbees-ci
Replace <nfs-sc-name> with the actual name of the NFS StorageClass in your cluster.
This is simple and uniform, with a single storage dependency for the whole installation. The cost is that the Operations Center and non-HA controllers run on NFS rather than block storage, which is slower for the small-file I/O Jenkins generates.
Configuration 2: NFS only where HA requires it
Omit Persistence.StorageClass so the Operations Center and non-HA controllers use the cluster default block storage:
helm install cloudbees-core cloudbees/cloudbees-core \
  --set OperationsCenter.HostName='<hostname>' \
  --set OperationsCenter.Route.tls.Enable=true \
  --set Subdomain=true \
  --set Agents.SeparateNamespace.Enabled=true \
  --set Agents.SeparateNamespace.Create=true \
  --set CasCBundleService.enabled=true \
  -n cloudbees-ci
Then select the NFS StorageClass per controller using the Storage Class Name field when provisioning an HA Managed Controller, as described under “HA Managed Controllers” below.
This guide follows Configuration 2, and the summary diagram at the end reflects it. RWX is applied where HA requires it and nowhere else.
Under either option, establishing the storage backend before CloudBees CI creates any persistent storage avoids a migration later. Changing Persistence.StorageClass after installation does not move existing data, as covered in Scenario 2.
Scenario 2: CloudBees CI is already installed and NFS is added later
NFS can also be introduced after CloudBees CI has already been installed.
First create and verify the NFS StorageClass. Then update the existing CloudBees CI Helm release so that Persistence.StorageClass points to the NFS StorageClass.
Because the CloudBees CI release already exists, use helm upgrade rather than running helm install again.
For example:
helm upgrade cloudbees-core cloudbees/cloudbees-core \
  --reuse-values \
  --set Persistence.StorageClass='managed-nfs-storage' \
  -n cloudbees-ci
The --reuse-values option is useful when the original installation was performed with --set parameters and no separate values file. It tells Helm to retain the values already stored for the release while applying the new Persistence.StorageClass value. This flag also carries forward old chart defaults if you are upgrading to a newer chart version at the same time, which can leave you on outdated settings without realizing it.
If you’re changing chart versions, save the current values first with:
helm get values cloudbees-core -n cloudbees-ci -o yaml > values.yamlthen run the command below instead.
helm upgrade -f values.yamlThe important point is that changing Persistence.StorageClass does not migrate an existing PVC.
If the Operations Center already has a PVC backed by another StorageClass, changing the Helm value does not change that PVC’s StorageClass or move its data to NFS. CloudBees explicitly documents that StorageClass changes do not apply to an existing PV/PVC. Moving existing data to a different StorageClass requires provisioning new storage and migrating the data.
Therefore, after introducing NFS into an existing installation:
- The existing Operations Center PVC remains on its current storage.
- The existing Managed Controller PVCs remain on their current storage.
Persistence.StorageClassbecomes the configured StorageClass for subsequent CloudBees CI storage provisioning.- Existing CloudBees CI data is not automatically copied to NFS.
- If existing data must actually be moved to NFS, perform a separate storage migration.
Do not delete an existing CloudBees CI PVC simply to force the new StorageClass to be used. The PVC contains the persistent $JENKINS_HOME data. CloudBees provides separate procedures for recreating or migrating persistent storage when a StorageClass change is required.
Managed Controllers Provisioned After NFS Is Available
The Operations Center provisions Managed Controllers and creates the Kubernetes resources and persistent storage required for them.
If Persistence.StorageClass has been configured to use the NFS StorageClass, that configuration applies to new Managed Controllers as well as the Operations Center in current CloudBees CI versions.
Therefore, a new ordinary Managed Controller does not require a separate Helm StorageClass configuration simply because it is being created after NFS was introduced.
CloudBees also provides a Storage Class Name setting in Managed Controller provisioning. This can be used when a particular controller should use a specific StorageClass instead of the default configured for the Kubernetes cluster or provisioning configuration. Current CloudBees documentation states that when provisioning a controller, the administrator can set the storage class name if the cluster default should not be used.
For example:
Storage Class Name: <nfs-storage-class>Use the actual NFS StorageClass name from the cluster.
This is especially relevant in environments with multiple Kubernetes clusters or controller provisioning endpoints, where storage configuration may need to be selected for a particular provisioning target.
HA Managed Controllers
HA introduces an additional storage requirement.
A Managed Controller running in HA mode has multiple replicas that must access the same shared filesystem. The StorageClass used for that filesystem must therefore provide ReadWriteMany.
CloudBees’ current HA documentation provides a Storage Class Name field specifically for the replica’s shared filesystem. If the field is left empty, CloudBees uses the default StorageClass defined in the Kubernetes cluster.
Therefore, when the NFS StorageClass is not the OpenShift cluster default, explicitly select the NFS StorageClass when configuring the HA Managed Controller:
Storage Class Name: <nfs-storage-class>For example:
Storage Class Name: managed-nfs-storageThe name above is only the example used in this guide. Use the actual NFS StorageClass name in your environment.
The cluster can therefore retain its existing default StorageClass while CloudBees CI uses NFS for the HA shared filesystem.
For example:
OpenShift default StorageClass:  <existing-default>
NFS StorageClass:                <nfs-storage-class>
There is no requirement to make the NFS StorageClass the OpenShift cluster default simply to provision an HA Managed Controller.
The important requirement is that the StorageClass selected for the HA replica shared filesystem supports ReadWriteMany. CloudBees explicitly requires RWX-capable shared storage for HA.
Existing Managed Controllers and HA
An existing Managed Controller cannot be converted to HA merely by changing the StorageClass selection.
If its existing $JENKINS_HOME is backed by a StorageClass that does not support ReadWriteMany, the controller must first be migrated to RWX-capable storage.
CloudBees provides a specific migration procedure for this situation. The procedure creates a new volume using the RWX StorageClass, copies the existing controller data to the new volume, updates the controller configuration to use the new storage, and then enables HA.
This is necessary because changing a StorageClass configuration does not change the storage backend of an existing PVC.
For example:
Existing Managed Controller
        |
        +-- Existing PVC
              |
              +-- RWO StorageClass
cannot simply become:
Existing Managed Controller
        |
        +-- Existing PVC
              |
              +-- RWX NFS StorageClass
The existing PVC remains associated with its original storage. A new RWX volume must be provisioned and the controller’s persistent data migrated.
For a new Managed Controller, no such migration is required. The controller can be provisioned using the NFS StorageClass from the beginning.
For a shared on-premises OpenShift cluster, the recommended approach is:
- Create and verify the NFS StorageClass.
- Keep the existing OpenShift cluster default unchanged unless NFS is intentionally required as the default storage backend for the entire cluster.
- For a new CloudBees CI installation, choose Configuration 1 or Configuration 2 as described under Scenario 1. This guide uses Configuration 2: leave Persistence.StorageClass unset and select the NFS StorageClass per HA controller.
- If CloudBees CI is already installed, update the existing Helm release with
helm upgradeand addPersistence.StorageClass. When the original installation used--setparameters rather than a values file,--reuse-valuescan be used to retain the existing release values. - Understand that changing
Persistence.StorageClassdoes not migrate existing PVCs. Existing Operations Center and Managed Controller data remains on its existing storage until a separate migration is performed. - When provisioning a new Managed Controller, the configured CloudBees CI StorageClass applies by default. A specific Storage Class Name can also be selected in the Managed Controller provisioning configuration when required.
- When creating an HA Managed Controller, explicitly select the NFS StorageClass in the Storage Class Name field for the replicas’ shared filesystem when NFS is not the cluster default.
- Verify that the selected NFS StorageClass provides
ReadWriteMany. - If an existing Managed Controller must be converted to HA and its current storage is not RWX-capable, migrate its
$JENKINS_HOMEto RWX storage before enabling HA.
The key distinction is between three different storage decisions:
- OpenShift cluster default StorageClass: a cluster-wide Kubernetes/OpenShift setting that affects PVCs that do not specify another StorageClass.
- CloudBees CI
Persistence.StorageClass: the CloudBees CI Helm configuration that, in current versions, establishes the StorageClass used for persistent storage by both the Operations Center and Managed Controllers. - HA Managed Controller Storage Class Name: the StorageClass specifically selected for the shared filesystem used by the HA replicas. If left empty, the cluster default is used.
For this reason, there is no need to change the OpenShift cluster default simply to introduce NFS for CloudBees CI HA. Keep the cluster default appropriate for the wider OpenShift environment, configure CloudBees CI’s persistent storage explicitly, and select the RWX-capable NFS StorageClass for the HA shared filesystem.
Verify RWX dynamic provisioning
Do not proceed to performance benchmarking or a production CloudBees CI deployment until the storage path has been validated end-to-end. The objective of this step is not to benchmark NFS; it is to establish that the configured StorageClass can dynamically provision a volume, that the resulting PVC binds successfully, and that the volume can be mounted read-write by multiple pods.
This validation should use a disposable PVC and test pods rather than a CloudBees CI Operations Center or Managed Controller $JENKINS_HOME. A successful PVC bind alone is not sufficient evidence that the storage path is usable by the workload.
The path being validated is:
- NFS export
- csi-driver-nfs
- StorageClass
- PVC
- dynamically provisioned PV
- RWX mount in pods
- read/write verification
Each stage must be verified independently. A failure to provision, bind, mount, or write must be diagnosed before continuing. Do not infer that the entire path is working from a single successful Kubernetes object or from documentation describing a different version or configuration.
1. Confirm the StorageClass and provisioner configuration
Before creating the test PVC, verify that the StorageClass actually exists and that its provisioner matches the driver installed in the cluster:
oc get storageclass <storage-class-name> -o yamloc get pods -n csi-driver-nfsConfirm the following before continuing:
<storage-class-name>is the StorageClass you intend to test.- Its
provisionervalue isnfs.csi.k8s.io. - The controller and node pods are running and healthy.
- The
serverandshareparameters on the StorageClass point at the intended NFS server and export path.
For csi-driver-nfs, dynamic provisioning creates a subdirectory on the NFS share for each PVC. Do not substitute a StorageClass name or provisioner configuration from an older installation guide. Verify the values against the version actually deployed in the cluster.
2. Create a disposable RWX test PVC
Assuming your storageClass name is managed-nfs-storage, create a small test claim using the StorageClass under test:
oc new-project cbci-nfs-demooc apply -f - <<'EOF'
apiVersion: v1
kind: PersistentVolumeClaim
metadata:
name: nfs-rwx-test-pvc
namespace: cbci-nfs-demo
spec:
accessModes:
- ReadWriteMany
storageClassName: managed-nfs-storage
resources:
requests:
storage: 1Gi
EOFWatch the claim:
oc get pvc nfs-rwx-test-pvc -n cbci-nfs-demoThe expected result is: STATUS: Bound
oc get pvc nfs-rwx-test-pvc -n cbci-nfs-demo
NAME               STATUS   VOLUME                                     CAPACITY   ACCESS MODES   STORAGECLASS          VOLUMEATTRIBUTESCLASS   AGE
nfs-rwx-test-pvc   Bound    pvc-4476e212-0f66-4e33-9eec-3cb08f1acbcb   1Gi        RWX            managed-nfs-storage   <unset>                 41m
OpenShift defines ReadWriteMany (RWX) as a volume that can be mounted read-write by many nodes, and NFS supports RWX.
If the PVC remains Pending, stop here. Inspect the claim and the driver rather than proceeding to pod-level testing:
oc describe pvc nfs-rwx-test-pvc -n cbci-nfs-demooc get events -n cbci-nfs-demo --sort-by='.lastTimestamp'Provisioning happens on the controller, so check its logs:
oc logs -n csi-driver-nfs -l app=csi-nfs-controller -c nfsDo not assume that a Pending claim is an NFS network problem. The failure may be in StorageClass selection, SCC permissions on the controller or node service accounts, provisioning, or access to the configured export.
3. Mount the claim from a test pod and perform a write/read test
Once the PVC is Bound, mount it from a disposable pod:
oc apply -f - <<'EOF'
apiVersion: v1
kind: Pod
metadata:
  name: nfs-rwx-test-pod
  namespace: cbci-nfs-demo
spec:
  containers:
    - name: test
      image: registry.access.redhat.com/ubi9/ubi-minimal:latest
      command: ["sleep", "3600"]
      volumeMounts:
        - name: nfs-test-vol
          mountPath: /mnt/nfs-test
  volumes:
    - name: nfs-test-vol
      persistentVolumeClaim:
        claimName: nfs-rwx-test-pvc
EOF
Apply the pod and wait for it to become ready:
oc wait --for=condition=Ready pod/nfs-rwx-test-pod -n cbci-nfs-demo --timeout=60sThen perform an explicit write and read:
oc exec -n cbci-nfs-demo nfs-rwx-test-pod -- sh -c \
  'echo "rwx-check-$(date +%s)" > /mnt/nfs-test/hello.txt && cat /mnt/nfs-test/hello.txt'
The command must successfully create and read the file.
Sample output:
rwx-check-1786476861If it fails with Permission denied, diagnose the effective UID and GID, the pod security context, the NFS export permissions, and the mountPermissions value on the StorageClass. Do not treat no_root_squash as a generic fix or weaken NFS export security merely to make the test pass.
Validate the permission model used by the version and deployment configuration in your environment rather than applying a permission workaround from an unrelated example.
A successful write/read from one pod proves that that pod can use the mounted volume. It does not by itself demonstrate that the same PVC can be mounted and accessed concurrently by another pod.
Create a second disposable pod using the same PVC:
oc run nfs-rwx-test-pod-2 \
  -n cbci-nfs-demo \
  --image=registry.access.redhat.com/ubi9/ubi-minimal:latest \
  --restart=Never \
  --overrides='{
    "spec": {
      "containers": [{
        "name": "nfs-rwx-test-pod-2",
        "image": "registry.access.redhat.com/ubi9/ubi-minimal:latest",
        "command": ["sleep", "3600"],
        "volumeMounts": [{
          "name": "v",
          "mountPath": "/mnt/nfs-test"
        }]
      }],
      "volumes": [{
        "name": "v",
        "persistentVolumeClaim": {
          "claimName": "nfs-rwx-test-pvc"
        }
      }]
    }
  }'
Wait for the second pod:
oc wait --for=condition=Ready pod/nfs-rwx-test-pod-2 -n cbci-nfs-demo --timeout=60sThen read the file created by the first pod:
oc exec -n cbci-nfs-demo nfs-rwx-test-pod-2 -- cat /mnt/nfs-test/hello.txtThe second pod must be able to see the file created by the first pod.
Sample output:
rwx-check-1786476861This verifies the important workload behavior: the same PVC can be mounted read-write by multiple pods and changes made through one mount are visible through another. OpenShift’s definition of RWX is specifically read-write mounting by many nodes; the two-pod test provides an additional practical verification of the shared filesystem behavior.
5. Verify the provisioned directory on the NFS server
If you have administrative access to the NFS server, independently verify that the test file exists in the export.
For example:
On the NFS server
find <NFS_EXPORT_PATH> -name hello.txt -exec cat {} \;Where:
<NFS_EXPORT_PATH>should be replaced with the actual NFS export, for example:
find /data/cloudbees -name hello.txt -exec cat {} \;The file should contain the value written by the test pod.
This provides an independent check that the write reached the NFS export rather than relying solely on the Kubernetes-side view.
6. Record the validation result
Before proceeding, confirm all of the following:
- The intended StorageClass exists.
- The StorageClass references
nfs.csi.k8s.io. - The controller and node components are running and configured for the intended NFS export.
- The test PVC reaches
Bound. - The resulting PV is associated with the test PVC.
- A pod can mount the PVC successfully.
- The pod can create and read a file.
- A second pod can mount the same PVC and read the first pod’s file.
- The file is visible on the NFS export when server-side verification is available.
- No permission or security workaround was introduced solely to make the test pass.
If any item fails, stop and resolve the underlying storage configuration before continuing.
7. Clean up
After the validation is complete:
oc delete pod nfs-rwx-test-pod nfs-rwx-test-pod-2 -n cbci-nfs-demooc delete pvc nfs-rwx-test-pvc -n cbci-nfs-demooc delete project cbci-nfs-demoIf the StorageClass is configured with onDelete: archive, also verify the resulting directory on the NFS server and remove the test data according to the retention policy you actually configured.
Example:
ls /data/cloudbees/archived-pvc-4476e212-0f66-4e33-9eec-3cb08f1acbcbls /data/cloudbees/archived-pvc-4476e212-0f66-4e33-9eec-3cb08f1acbcb/hello.txt8. Proceed to performance testing only after functional validation
Only after the end-to-end functional test succeeds should you proceed to the fio benchmarking described later in this guide.
Do not use benchmark results as evidence that the storage configuration is correct. Functional validation and performance validation are separate tests. First establish that the storage provisions, binds, mounts, and provides the required shared read/write behavior. Then measure whether its performance is suitable for the intended CloudBees CI workload.
Likewise, do not point a production Operations Center or Managed Controller at the StorageClass until this disposable validation has succeeded.
For CloudBees CI specifically, verify the storage configuration against the CloudBees documentation and the exact CloudBees CI/chart version being deployed. Current CloudBees documentation identifies Persistence.StorageClass as the Helm value used to configure the storage class, and notes that storage-class changes do not modify an existing PV/PVC; a new volume and data migration are required.
The governing rule for this guide is simple: current configuration must be researched and validated before it is presented as fact. Do not carry forward a key path, command, Helm value, or behavior from an older KB or installation guide without confirming that it applies to the versions currently being deployed.
Part 3: Installing CloudBees CI with HA Managed Controllers on NFS
Two storage requirements exist here, and they are not the same thing:
- The Operations Center needs persistent storage for its own
$JENKINS_HOME. A normal default StorageClass covers this. - A Managed Controller running in HA mode needs shared
ReadWriteManystorage, because its replicas access the same$JENKINS_HOMEconcurrently. This is whatmanaged-nfs-storageis for.
CloudBees documents HA, replicas, and shared storage as features of Managed Controllers, not the Operations Center. The Operations Center has its own built-in fault tolerance on modern cloud platforms and does not run in an HA mode itself. Keep the Operations Center on the cluster’s normal default StorageClass. Put NFS only where HA actually requires it: the Managed Controller’s shared filesystem.
Pre-installation Checklist for OpenShift
CloudBees’ current OpenShift requirements specify:
- A currently supported OpenShift version.
- Network access to the required container images, either through Docker Hub or a private registry.
- An OpenShift project with permission to create
RoleandRoleBindingobjects. - DNS and TLS requirements prepared for the CloudBees CI deployment.
- A defined default StorageClass for persistent storage.
- Containers running as non-root and non-privileged on OpenShift.
For HA Managed Controllers specifically, add one more: a StorageClass supporting ReadWriteMany. That is the only place RWX is required. Do not treat it as a blanket requirement for the whole installation:
- Operations Center: persistent storage; a suitable default StorageClass is sufficient.
- Non-HA Managed Controller: persistent storage; RWX is not inherently required.
- HA Managed Controller: shared persistent storage; the StorageClass must support RWX.
Install CloudBees CI
With the checklist above satisfied and managed-nfs-storage validated in Part 2, install CloudBees CI using the current OpenShift installation procedure:
Treat that guide as the authoritative installation procedure for the release you are deploying, and verify the actual chart values for that release rather than assuming values from an older CloudBees CI version still apply.
One decision to make at install time: do not point the Operations Center at NFS. It does not need RWX simply because Managed Controllers will later run in HA mode. If the cluster’s default StorageClass is suitable, let CloudBees CI use it by default, meaning the Helm configuration does not need a storage class override for the Operations Center at all:
OperationsCenter:
  HostName: cjoc.example.com
Omitting the override does not mean the Operations Center has no storage. It means the cluster’s configured default StorageClass is used. Reserve managed-nfs-storage for the one place that actually needs RWX: the shared filesystem of an HA Managed Controller, configured next.
Enable HA on a Managed Controller
HA is configured on the Managed Controller, not the Operations Center. CloudBees’ current HA documentation describes it as multiple replicas of one logical Managed Controller sharing storage. Once enabled, the Operations Center dashboard shows a Pod status column with the replica count and how many are available.
Walking through it in the CJOC UI:
- Name the controller. From the CJOC dashboard, use New Controller, enter a name, for example
controller-02, and click Go. CJOC shows the expected endpoint it will provision, for examplehttps://controller-02.sno.kifarunix.com/, before you continue. - Set the Docker image and disk size. Leave the Docker image at the current CloudBees CI Managed Controller version unless you have a specific reason to pin an older one. Jenkins Controller Disk Space in GB is not a separate disk, it is the size request for the same
jenkins-homePVC whose backend you select in the Storage Class Name field below. In HA mode that PVC is the shared, NFS-backed$JENKINS_HOMEevery replica mounts. This field stays editable after creation only becausemanaged-nfs-storagewas created withallowVolumeExpansion: truein Part 2; without that, CJOC greys the field out. - Enable High Availability. Check the High Availability box. Three fields appear:
- Managed controller replicas: the number of controller pods. Two is the minimum meaningful HA configuration.
- Maximum number of replicas: only relevant if autoscaling. Leave at
0to disable autoscaling. The UI itself explains the behavior: with autoscaling off, the maximum is set to the same number as the replica count. - CPU threshold in percent: the autoscaling trigger. Only meaningful once a maximum above the replica count is set.
- Set the Storage Class Name. Further down the same form, enter
managed-nfs-storage, or whatever you named the StorageClass in Part 2. CJOC validates this against the cluster in real time and confirms directly under the field: “Storage class managed-nfs-storage exists.” If that confirmation does not appear, or shows an error instead, stop here. It means either the name does not match the StorageClass created in Part 2, or CJOC’s service account cannot list StorageClasses in this cluster; either way, the controller will fail to provision if you continue. - Set memory and CPU. Jenkins Controller Memory in MB and Jenkins Controller CPUs size the controller pod itself, separately for each HA replica. These are ordinary Kubernetes resource requests and have no special interaction with NFS; size them the same way you would for a non-HA controller.
- Set the FS Group to match this project’s allowed range. CJOC sets FS Group to
1000by default, which becomes the pod’ssecurityContext.fsGroupand, combined with themountPermissions: "0770"set on the StorageClass in Part 2, determines whether the controller pod can actually write to the mounted volume. On OpenShift, every project is allocated its own UID and supplemental group range, and a pod requesting anfsGroupoutside that project’s range is rejected at admission under therestricted-v2SCC, not silently ignored. Check the range this project was actually assigned before relying on the default:
This prints something likeoc get project <cloudbees-namespace> -o jsonpath='{.metadata.annotations.openshift\.io/sa\.scc\.supplemental-groups}{"\n"}'1000740000/10000, meaning the project’s allowed group range starts at1000740000. The default1000is almost certainly outside that range on a real OpenShift project, since these ranges are allocated per project starting well above the low numbers used in generic Kubernetes examples. Either set FS Group explicitly to a value inside the range this command returns, or leave the field empty, which is CloudBees’ own documented workaround, and let OpenShift assign a compliant value automatically from the project’s range rather than guessing one by hand. - Leave Jenkins Command Line arguments and Global Java Options alone unless you have a specific reason to change them. CJOC pre-populates Global Java Options with the settings that wire the controller into this Operations Center’s networking and agent configuration, for example the
-Dcom.cloudbees.networking.hostnameand-Dcom.cloudbees.jenkins.plugins.kube.ServiceAccountFilter.defaultServiceAccountflags shown on the form. These are generated, not something to hand-edit.
Save, and CJOC provisions the controller with the replica count and StorageClass set above.
Confirm from the OpenShift side once it comes up. Since HA controllers run as a Deployment, their pods are named with a hash suffix rather than a fixed name, so filter by the controller name prefix rather than guessing a label:
oc get pods -n <cloudbees-namespace> | grep controller-02Sample output, for two replicas:
controller-02-77d47f47b6-95rpb   1/1   Running   0             7m
controller-02-77d47f47b6-s6vjb   1/1   Running   1 (5m41s ago) 7m15s
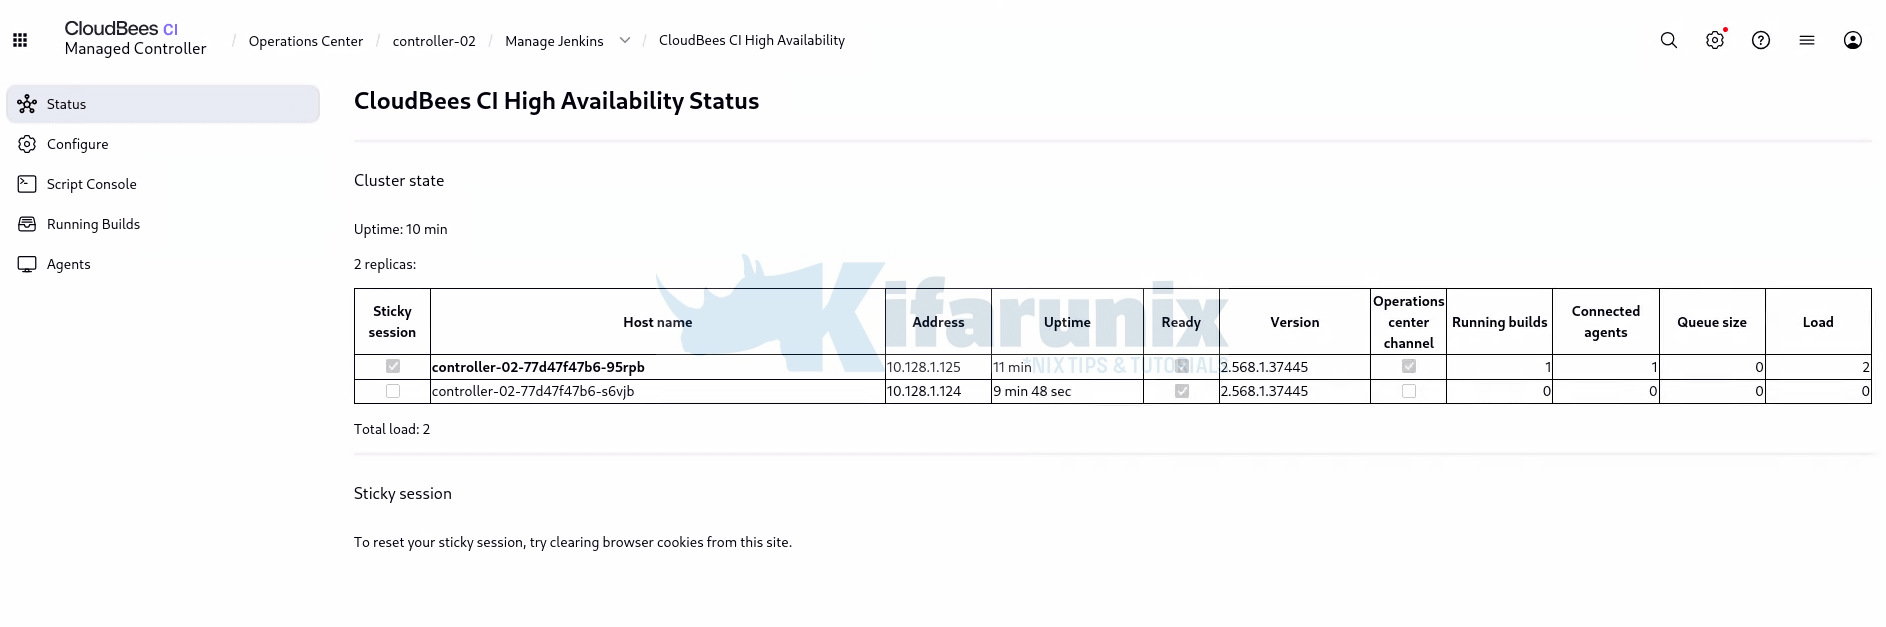
You should see one pod per replica configured above, both 1/1 Running. For a controller-side view rather than the OpenShift side, go to Manage Jenkins > CloudBees CI High Availability on the controller itself. This shows a per-replica table: host name, address, per-replica uptime, a Ready checkbox, version, which replica currently holds the Operations Center channel and the sticky session, and running builds, connected agents, queue size, and load broken out per replica, with a total load figure underneath. Confirm every replica shows Ready checked and the same version number, rather than relying on a single summary figure.
One thing that fails silently: when HA is enabled, CloudBees CI manages the controller pods with a Deployment, not a StatefulSet. If you are supplying Advanced YAML or migrating older customizations, any leftover kind: StatefulSet is not rejected with an error, it is simply ignored, and the controller fails to provision in HA mode without a clear message pointing at the cause. Check the kind field first if an HA controller silently fails to come up.
If provisioning through Configuration as Code instead of the UI shown above, use the current CloudBees CI items.yaml schema for the exact version being deployed. Do not copy a replication example from an older release, HA settings are version-sensitive. Validate against the current items.yaml reference before deployment. At a conceptual level, the fields above map to:
items:
  - kind: managedController
    name: "controller-02"
    configuration:
      kubernetes:
        replication:
          config:
            replicas: 2
            maxReplicas: 0
            targetCPUUtilizationPercentage: 80
If autoscaling is not required, configure only the replica count supported by that release rather than assuming omitted fields have a particular default.
Validate NFS Performance before Production
Functional validation and performance validation are separate activities. The previous section verified that managed-nfs-storage can provision an RWX PVC and that multiple pods can access the same volume. This section measures the performance of that same storage path.
Verify the documented NFS requirements
Complete these before benchmarking. Measuring a misconfigured export produces numbers that describe the misconfiguration rather than the storage.
| Requirement | Check | Expected |
|---|---|---|
| NFS version 4.1 or higher (4.0 is not supported) | mount | grep <nfs-path> on a node | vers=4.1 or higher |
| Export options | grep <export> /etc/exports on the NFS server | rw,sync,no_subtree_check. async improves write performance, but the server acknowledges writes before they reach stable storage. Only consider async with a protected write cache, and record the trade-off. |
| nfsd thread count recorded | grep threads /etc/nfs.conf (RHEL 8 and 9) or grep RPCNFSDCOUNT /etc/sysconfig/nfs (RHEL 7) | Record the current value as part of the baseline. Do not raise it before measuring; see “Tuning the NFS Server Daemon” above. |
| SSD-backed export | Confirm with the storage owner | SSD recommended |
For reference, the CloudBees NFS knowledge base article uses the following client mount options: _netdev,rw,bg,hard,intr,rsize=32768,wsize=32768,vers=4.1,proto=tcp,timeo=600,retrans=2,noatime,nodiratime,async
Treat this as an example rather than a target configuration. As noted in the StorageClass section above, modern NFS clients negotiate read and write sizes, and 32768 is conservative by current standards. Note also that intr has had no effect since Linux kernel 2.6.25 and is retained only for historical compatibility. The async mount option here is a client-side setting and is unrelated to the async export option discussed above.
Create the temporary project
oc new-project nfs-performance-testAll resources created below are placed in the current nfs-performance-test project.
Create the test PVC
Use the same StorageClass that will be used by the HA Managed Controllers:
oc apply -f - <<'EOF'
apiVersion: v1
kind: PersistentVolumeClaim
metadata:
  name: nfs-fio-test-pvc
spec:
  accessModes:
    - ReadWriteMany
  storageClassName: managed-nfs-storage
  resources:
    requests:
      storage: 5Gi
EOF
Wait for the PVC to become Bound:
oc get pvc nfs-fio-test-pvcDo not continue until the PVC is Bound.
Create two FIO pods on the same PVC. The second is required for the concurrency test below.
for i in 1 2; do
oc apply -f - <<EOF
apiVersion: v1
kind: Pod
metadata:
  name: nfs-fio-test-${i}
spec:
  restartPolicy: Never
  containers:
    - name: fio
      image: quay.io/cloud-bulldozer/fio:latest
      command: ["/bin/sh", "-c", "sleep 3600"]
      volumeMounts:
        - name: nfs-test
          mountPath: /mnt/test-nfs
  volumes:
    - name: nfs-test
      persistentVolumeClaim:
        claimName: nfs-fio-test-pvc
EOF
done
oc wait --for=condition=Ready pod/nfs-fio-test-1 pod/nfs-fio-test-2 --timeout=120sThe cloud-bulldozer/fio image is used here because it ships fio preinstalled. Under the restricted-v2 SCC, OpenShift assigns an arbitrary UID to the container, so confirm the pod can write to the mount before running the benchmarks:
oc exec nfs-fio-test-1 -- sh -c 'id; touch /mnt/test-nfs/.write-check && echo OK'If this fails, the benchmark will fail for permission reasons rather than performance reasons. Resolve it using the same UID and ownership approach described in Part 1.
Confirm the mount and the negotiated NFS version:
oc exec nfs-fio-test-1 -- sh -c 'df -h /mnt/test-nfs; mount | grep test-nfs'Establish the single-client baseline
The small-block workload models JENKINS_HOME config and build-record I/O, which determines controller responsiveness. The large-block workload models artifact and log handling.
oc exec nfs-fio-test-1 -- \
  fio --name=metadata --directory=/mnt/test-nfs --rw=randrw --bs=4k \
      --size=512M --numjobs=8 --iodepth=16 --runtime=60 --time_based \
      --group_reporting
oc exec nfs-fio-test-1 -- \
fio --name=throughput --directory=/mnt/test-nfs --rw=readwrite --bs=1M \
--size=2G --numjobs=4 --iodepth=8 --runtime=60 --time_based \
--group_reportingRecord four values per workload, for read and write separately: IOPS, BW, clat p99, and clat p99.99. Averages conceal stalls; percentiles do not.
While each run is active, capture server-side data on the NFS host. Without it, a poor result cannot be attributed to disk, network, or NFS configuration.
iostat -x 1            # check latency (await) and queue depth, not just %util
nfsstat -s             # rising badcalls indicate server or network fault
sar -n DEV 1       # interface throughput and errors
On an OpenShift worker node (NFS client) running one of the test pods:
nfsstat -c         # client-side NFS call and retransmission counts
nfsiostat 1        # per-operation NFS latency, read from client mountstats
nfsiostat reads /proc/self/mountstats on the NFS client, so it must be run on the OpenShift node, not on the NFS server. On OpenShift’s default node operating system these commands aren’t directly runnable on the node itself; use oc debug node/ — chroot /host instead
Test HA-level concurrency
HA controllers hold the same RWX volume simultaneously. This result carries more weight than the single-client baseline. Both clients must run at the same time; sequential runs measure nothing new.
oc exec nfs-fio-test-1 -- mkdir -p /mnt/test-nfs/pod1
oc exec nfs-fio-test-2 -- mkdir -p /mnt/test-nfs/pod2

oc exec nfs-fio-test-1 -- \
  fio --name=metadata --directory=/mnt/test-nfs/pod1 --rw=randrw --bs=4k \
      --size=512M --numjobs=8 --iodepth=16 --runtime=60 --time_based \
      --group_reporting > pod1-concurrent.log 2>&1 &

oc exec nfs-fio-test-2 -- \
  fio --name=metadata --directory=/mnt/test-nfs/pod2 --rw=randrw --bs=4k \
      --size=512M --numjobs=8 --iodepth=16 --runtime=60 --time_based \
      --group_reporting > pod2-concurrent.log 2>&1 &

wait
Interpret the results
CloudBees defines no numeric pass/fail threshold, so these ranges are used to detect misconfiguration, not to gate deployment. They describe normal behaviour for SSD-backed NFS over a LAN.
| Metric | Normal | Investigate |
|---|---|---|
| 4k random IOPS | 500 to 5,000+ | Under 100 |
| 4k p99 latency | Under approximately 20ms | Sustained hundreds of ms |
| 1M sequential bandwidth | 100 to 400+ MB/s, link dependent | Under 20 to 30 MB/s |
| Read vs write symmetry | Within approximately 2x | Write an order of magnitude below read |
Two rules govern the deployment decision.
- Rule 1: Single-client results below the normal range are usually a configuration fault, not a hardware ceiling. Check NFS version (4.0 has known performance issues), rsize/wsize negotiated lower than requested, nfsd thread starvation, and the storage underneath the export. Note that sync exports cost write performance by design; that is the integrity trade documented in Part 1, not a misconfiguration. HA will not improve a poor single-client result.
- Rule 2: Concurrency must degrade proportionally, not collapse. Sum the two pods’ IOPS from above. A combined total near the single-client baseline, with latency rising by a modest multiple, confirms the storage shares capacity correctly and HA is viable. A combined total well below the baseline, or p99 latency rising by an order of magnitude, indicates the storage path saturates under concurrency. Resolve this through NFS server tuning, a dedicated export, or an alternative RWX backend before deploying HA.
Record the single-client and concurrent figures side by side. That comparison is the deliverable of this section and becomes the environment baseline for future capacity planning.
Clean up
oc delete project nfs-performance-testIf the namespace stalls in Terminating:
oc get namespace nfs-performance-test -o json \
  | jq 'del(.spec.finalizers)' \
  | oc replace --raw "/api/v1/namespaces/nfs-performance-test/finalize" -f -
Confirm the outcome on the NFS server. With onDelete: archive set on the StorageClass, the driver renames the directory with an archived- prefix rather than removing it. Delete the archived benchmark directory manually once the results have been recorded.
Common Pitfalls
Using RWX for the Operations Center simply because controllers use HA
- This is unnecessary.
- The Operations Center requires persistent storage, but CloudBees’ OpenShift requirements distinguish the normal default StorageClass requirement from the additional RWX requirement for HA.
- Use the default StorageClass for the Operations Center unless there is an explicit architectural reason to use NFS.
Assuming “persistent storage” means NFS
- CloudBees requires dynamically provisioned persistent storage for the Operations Center and Managed Controllers. HA adds the requirement that the Managed Controller’s storage support RWX.
Configuring HA without RWX
- An HA Managed Controller’s replicas must share the same filesystem. CloudBees explicitly requires a
ReadWriteManyStorageClass for HA. - Do not enable HA against an RWO-only storage class.
Assuming a Bound PVC proves that HA storage works
Boundproves the provisioner works. It proves nothing about concurrent access, throughput, or latency.- Validate in three stages before production: provisioning, multi-pod concurrent access, then measured performance.
- CloudBees states that the storage must provide sufficient IOPS, throughput, and low latency, but publishes no numeric threshold. Establishing the environment baseline is the operator’s responsibility.
- This staged validation is engineering practice rather than a documented CloudBees procedure.
Manually modifying generated controller resources
- The Operations Center manages Managed Controller Kubernetes resources. Configure the Managed Controller through the supported CloudBees configuration mechanisms rather than treating its generated Deployment/StatefulSet as an independently managed workload.
Using soft mounts to avoid hangs.
- Trades data integrity for the appearance of resilience;
softreturns I/O errors on timeout and can corrupt$JENKINS_HOME. Usehardand fix the capacity problem underneath.
Summary
What the storage architecture looks like:
                         CloudBees CI
                              │
        ┌─────────────────────┼─────────────────────┐
        │                     │                     │
 Operations Center    Managed Controller    Managed Controller
                         (non-HA)                 (HA, 3 replicas)
        │                     │                     │
   $JENKINS_HOME        $JENKINS_HOME          $JENKINS_HOME
        │                     │                     │
   RWO block storage    RWO block storage      RWX storage class
    [recommended]        [recommended]         managed-nfs-storage
                                                 [REQUIRED]
                                                     │
                                              NFS shared filesystem
                                                     │
                                    ┌────────────────┼────────────────┐
                                 Replica 1        Replica 2        Replica 3
Read the labels carefully, because they aren’t equally binding.
[REQUIRED] is documented. CloudBees states that to install HA on OpenShift you must set up a storage class with ReadWriteMany access mode, and that an existing controller not already on an RWX class must be migrated before it can run HA. That arrow is not negotiable.
[recommended] is engineering judgement, mine, not a CloudBees requirement. Nothing in the documentation says the operations center or a non-HA controller must avoid shared storage. The reasoning is that RWX buys you nothing without HA and NFS is slower than block storage for the small-file, metadata-heavy I/O Jenkins generates, so paying the shared-storage cost where it isn’t needed is waste.
There is a legitimate case against that recommendation, and it’s CloudBees’ own. In its EKS guidance, CloudBees notes that putting both the operations center and managed controllers on EFS (shared, RWX storage) lets pods be rescheduled onto healthy nodes during an availability-zone outage. If your OpenShift cluster spans failure domains and you want that rescheduling property for the operations center too, putting the OC on NFS is a deliberate availability trade, slower I/O in exchange for not being pinned to one zone’s block storage. Decide it on your own topology; don’t treat either arrangement as the mandated one.
So the one-line version: RWX where HA forces it, everything else your call, with a real trade-off to weigh if you’re multi-zone.