In this guide, we will learn how to install and configure BackupPC on Debian 10. BackupPC is a free, high-performance enterprise-grade backup software suite with a web-based frontend that can be used for backing up Linux, Windows and mac OSXs PCs and laptops to a server’s disk.
Installing BackupPC on Debian 10
Update and upgrade your system packages.
apt update
apt upgrade
Once the system update is done, proceed to install BackupPC. BackupPC is usually available on the default APT repositories and can be installed using the package, backuppc.
apt install -y backuppcNOTE: This commands installs BackupPC v3.2. You can install the latest version of BackupPC by building your own packages.
During installation you will be prompted to configure samba settings. If you are not using DHCP server, select no to proceed installation.
Next, choose the web server to be used by BackupPC. Apache web server is used in this guide.
A default BackupPC administrative user, backuppc, and its password is also created during the installation. This user is used to administer various tasks such as access to BackupPC web dashboard, carry out backups etc.
You can choose to copy the password provided or you can proceed and reset the password later by executing the command below;
htpasswd /etc/backuppc/htpasswd backuppcConfiguring BackupPC Server on Debian 10
Define BackupPC Backup User and Backup Protocol
BackupPC uses different protocols to get backup data from devices being backed up:
- smb – used for backing up windows machines
- tar – used for backing up Linux/Unix/MacOSX systems
- rsync – used for backing up Linux/Unix/MacOSX systems. This can also be used to backup Windows systems.
In this tutorial we are going to configure BackupPC to use the rsync protocol as a backup method.
Also, by default, BackupPC is using root user run backup tasks. However, in this guide, we are going to use a backuppc user to execute backup tasks.
If you happen to change the backup user, edit BackupPC configuration file, /etc/backuppc/config.pl and replace the root user with a user you are using for backup under the Rsync/Rsyncd Configuration.
vim /etc/backuppc/config.pl###########################################################################
# Rsync/Rsyncd Configuration
# (can be overwritten in the per-PC log file)
###########################################################################
...
# This setting only matters if $Conf{XferMethod} = 'rsync'.
# Comment this line and add the same line with root user changed to backuppc
#$Conf{RsyncClientCmd} = '$sshPath -q -x -l root $host $rsyncPath $argList+';
$Conf{RsyncClientCmd} = '$sshPath -q -x -l backuppc $host $rsyncPath $argList+';
...
...
...
# Comment out this line and add the same line with root user changed to backuppc
#$Conf{RsyncClientRestoreCmd} = '$sshPath -q -x -l root $host $rsyncPath $argList+';
$Conf{RsyncClientRestoreCmd} = '$sshPath -q -x -l backuppc $host $rsyncPath $argList+';
...Configure BackupPC Apache Authentication
BackupPC uses htpasswd user files to restrict access to web interface. As such, you require a valid user in order to authenticate. Therefore, edit the BackupPC configuration file, /etc/backuppc/apache.conf and add the line, require valid-user under authentication section as shown below;
vim /etc/backuppc/apache.conf...
...
AuthUserFile /etc/backuppc/htpasswd
AuthType basic
AuthName "BackupPC admin"
require valid-user
...
...Save the configuration file and quit.
The Web authentication user and its hashed credential password is stored under the /etc/backuppc/htpasswd. You can reset the password by running;
htpasswd /etc/backuppc/htpasswd backuppcNext, restart both backuppc and Apache service to apply the changes made above.
systemctl restart backuppc apache2If UFW is running, allow external access to Apache.
ufw allow WWWGenerate Backup User SSH Keys
For rsync to work, BackupPC requires passwordless SSH login for backuppc user to every client it will be getting backup data from. This also means that you should create a dedicated backuppc user on the hosts you need to backup for backup purposes.
As a result, switch to backuppc user on BackupPC server and generate passwordless ssh keys and copy them to every host you want to backup.
su - backuppcThis will opens up the sh shell. You can run bash command to launch bash shell.
Generate SSH key pair by running the following command;
ssh-keygen
Generating public/private rsa key pair.
Enter file in which to save the key (/var/lib/backuppc/.ssh/id_rsa): ENTER
Created directory '/var/lib/backuppc/.ssh'.
Enter passphrase (empty for no passphrase): ENTER
Enter same passphrase again: ENTER
Your identification has been saved in /var/lib/backuppc/.ssh/id_rsa.
Your public key has been saved in /var/lib/backuppc/.ssh/id_rsa.pub.
The key fingerprint is:
SHA256:qZUR/Aohas/rqkqp2ME1RHOA7D7vMiBvqXgGxr2RMoc [email protected]
The key's randomart image is:
+---[RSA 2048]----+
| . .+.... |
| o..o. .. |
| . ... ... |
| +. . +. |
|.ooo+ .S. |
|+E+*o. o. |
|o**+o.. |
|=.Ooo |
|O*o*o |
+----[SHA256]-----+
Create Backup User Account On Clients
Next, login to the system servers you want to backup and create an account on the client dedicated for backup purposes for example, create a backuppc user account on remote client and copy the public key to that user.
useradd -m backuppc
passwd backuppc
Copy BackupPC Server SSH Keys
Now logout from client host and copy the SSH public key for backuppc user on BackupPC server to backuppc user on the client. Copy the keys while logged as backuppc user.
ssh-copy-id [email protected]Where 192.168.43.214 is my client IP address. Once you copy the key, you should be able to login without being prompted for a password.
Now, test the login to client with the backup user to ensure user can successfully login to client. You can use root user if you didn’t make the changes above.
su - backuppc
ssh -l backuppc client_IP whoami
backuppc
or
ssh -l root client_IP whoami
root
If you changed you backup user to non-root user, Login to the client host as an administrative user and allow the non-user to run the rsync command without being prompted for password by adding the user to sudoers list. backuppc user is used in this case.
ssh admin@client_IPecho "backuppc ALL=NOPASSWD: /usr/bin/rsync" | sudo tee /etc/sudoers.d/backuppcYou can run the command below to find the absolute path of rsync.
which rsyncIf rsync command is not installed, run the following commands to install it.
apt install rsync -y
yum install rsync -y
You may also want to disable ssh agent-forwarding, port-forwarding or even the pty for backuppc user logging in to the client from BackupPC.
To do this, login to client, edit the ssh authorized key file and add the line below before the ssh-rsa keyword.
from=”backuppc_server_ip”,no-agent-forwarding,no-port-forwarding,no-ptyReplace the backuppc_server_ip with the IP address of the backuppc server.
vim /home/backuppc/.ssh/authorized_keysfrom="192.168.43.154",no-agent-forwarding,no-port-forwarding,no-pty ssh-rsa AAAAB3NzaC1SSSc2EAAAADAQABAAABAQDYuDSNIPxQL6hNh6FeW4wj3hYJ+p42SD9BGVg5Rn6HuzIAi1zrU2pRceQ5VDRj5nXxSjs+oJJ4lXZ/HTaUQDBFysVyIe9Sc4Z9Z5nmmmGWIJnKWfuvzSYbV2JbSJjcTfUPjH32DOvU+4PMdil/4GjKW7pr8fyywl4XuhZMU6RfVw0LgzYuqzUQX5D6Q4MsgIN4HGqBsnVIBvSz2TcPc0hovtfKQMmUBQvp7L9Ob3AKuG01ZZznQ8Q6+eGL7EJHnS30h/FLM8rKBxsvI6El8xog2E0/ALnNGKWsg2NTEqWqQ3xpUDEnA6exgHEm+2xCuKAy1sAuSJHJHScUMLZIUE36t2+nB0Vn [email protected]Next, you can also configure ssh logins to backuppc user accounts on clients hosts from the BackupPC server only. This can be done by editing sshd_config file on the client and configuring as shown below;
sudo vim /etc/ssh/sshd_configAdd the line below to SSHd configuration to allow login to the client as backuppc from the BackupPC server only.
Match Host 192.168.43.154
         AllowUsers backuppc
Reload SSH configurations
systemctl reload sshAccessing BackupPC Web User Interface
Once the configuration is done, login to BackupPC via browser using the address, http://backuppc_server_IP or hostname/backuppc.
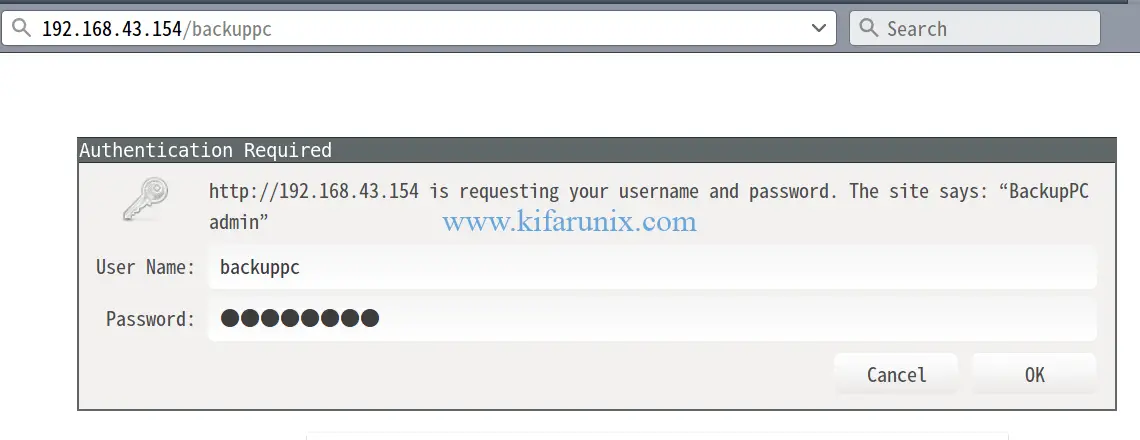
You are prompted to authenticate before accessing the dashboard. Use the backuppc credentials set above.
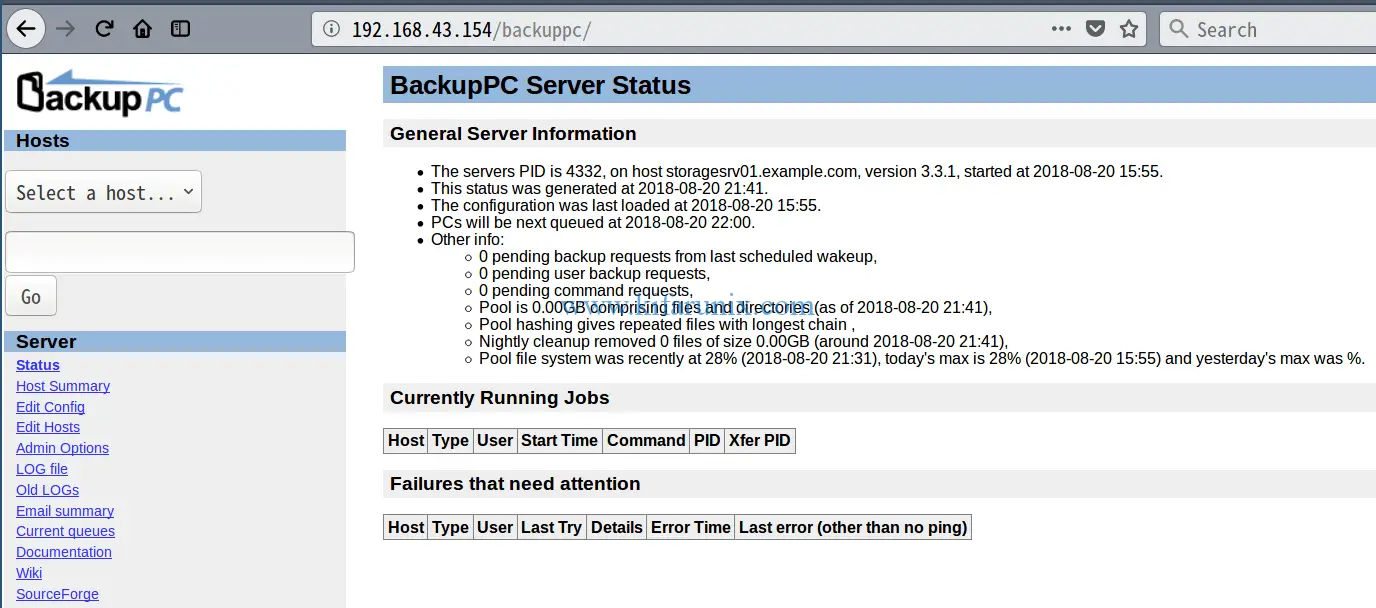
When you login, you will land on BackupPC dashboard.
Add Hosts to Backup
Once you are logged in, you can now add the clients to backup. To add a client host, click on Edit Hosts on the left panel. This opens up a hosts configuration editor. Localhost is already added as the client. You can choose to leave it or delete it.
Click add to add your new client hosts. For user, enter backuppc.
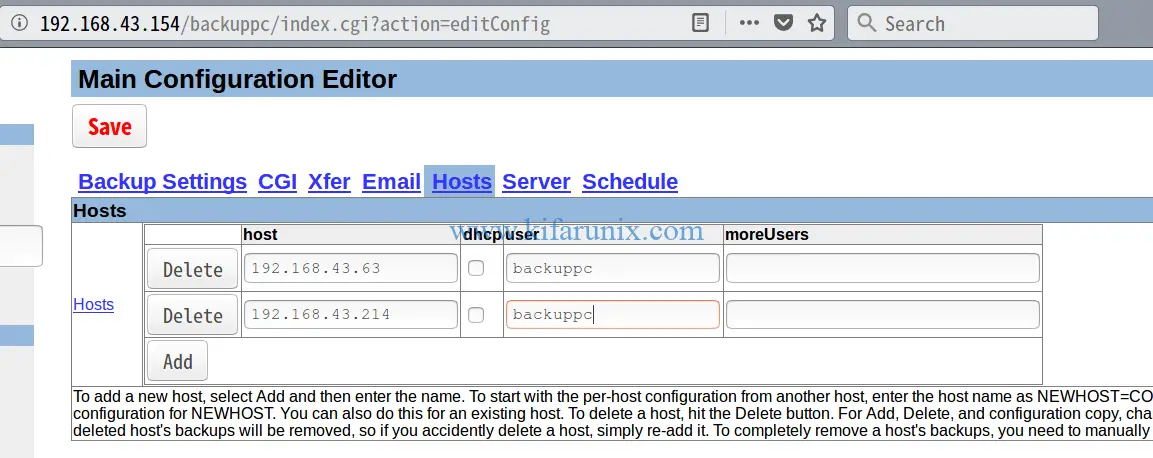
When done adding hosts, click the save button to apply the changes.
The backuppc hosts are kept under the /etc/backuppc/hosts configuration file.
Configure Backup Data Transfer Settings
Once the changes are saved, Configure backup data transfer settings, ie the protocol for backup method, In this case, we are using rsync. So still on the configuration editor, Click Xfer tab. Under Xfer Settings > XferMethod, click the dropdown and select rsync.
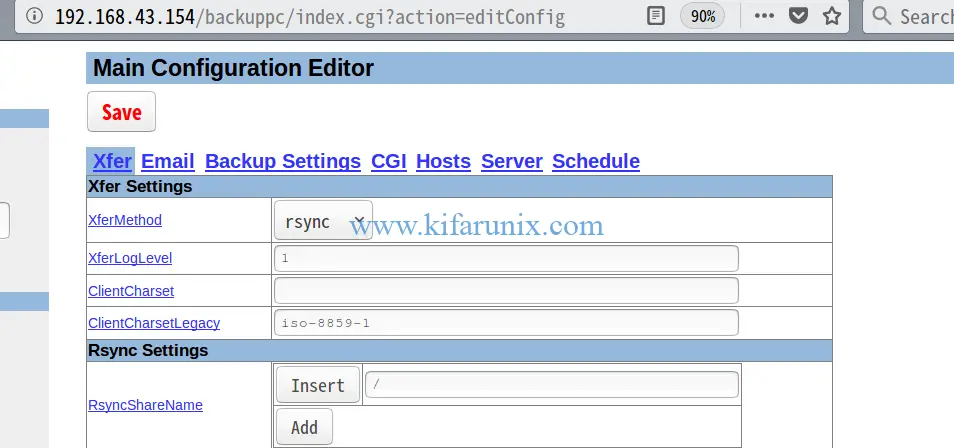
Click Save to apply the changes.
The main configuration file for BackupPC server is, /etc/backuppc/config.pl.
Configure BackupPC Backup Directories
Next, we need to configure the paths to backup for the clients. On the left pane, under Hosts, click on the dropdown button and select a client host.
Under the hosts settings, click on Edit Config and navigate Xfer settings on the configuration editor.
Under Xfer Settings, check the override box under RsyncShareName and add specific path to backup on client. For instance, the home directory of a user.
To exclude some directories or paths from backup, check the box under under BackupFilesExclude on Include/Exclude settings and add the parent directory then sub-directories to exclude. See the screenshot below.
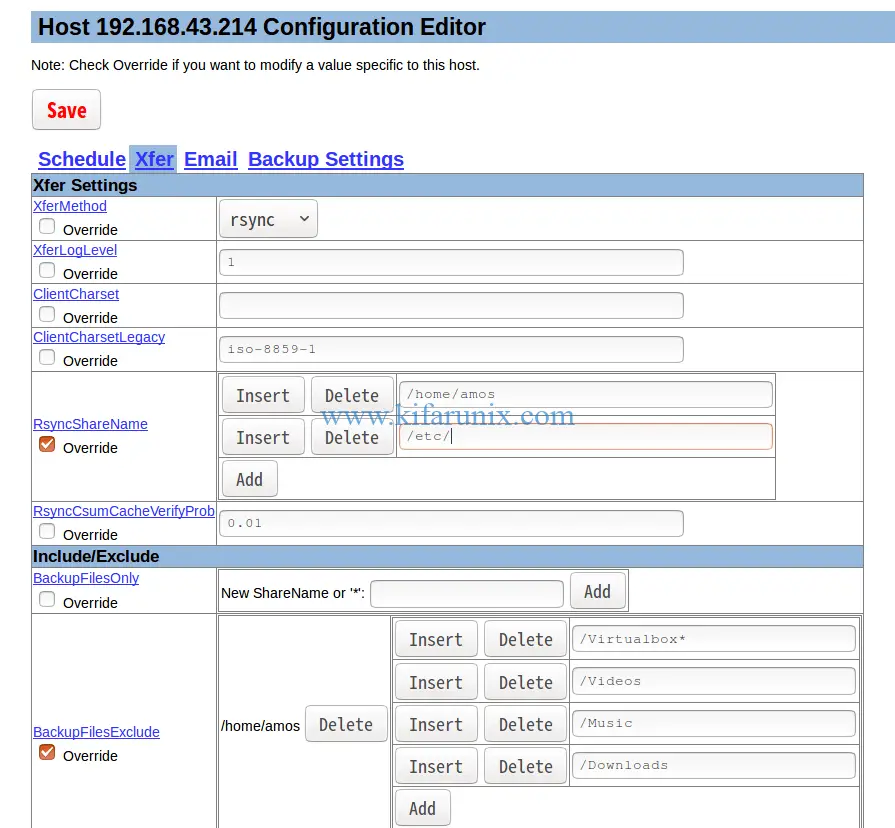
Once done with settings, click save to apply changes.
All the host configuration settings are saved under the /etc/backuppc/pc/ directory.
To save some time of having to manually set the host backup files and directories, add the host and login to BackupPC console as backuppc user or any administrative user.
Next, simply copy the data transfer configuration file of one of the hosts you have configured manually. Be sure to preserve the permissions the file ownership.
For example, to copy the configuration file for host, 192.168.43.214 to be used for host 192.168.43.110, simply run the command below.
cp -p /etc/backuppc/pc/192.168.43.214.pl /etc/backuppc/pc/192.168.43.110.plNext, modify copied host configuration, preserving the permissions, to make the per host changes as per the format of the configuration.
sudo -u backuppc vim /etc/backuppc/pc/192.168.43.110.plOnce you have made the changes, reload the BackupPC service
systemctl reload backuppcIf you can go back to the web interface, under the host data transfer settings, you should see the backup directories populated.
Configure BackupPC Backup Schedule
Once you have set the backup directories and files, configure backup schedule.
There are two types of backing up data;
- Incremental backup
- Full backup
Incremental backup is done daily and only 6 most recent backups are kept while full backup happens every 7 days and only newest copy of data is backed up.
On the left pane, under Server settings, click Edit Config and navigate to Schedule tab.

You can make any changes as you see fit.
Run BackupPC Host Backup
Once you are done with the configuration, you can now run a manual backup on the two clients.
Under Hosts on the top left panel, select the hosts one by one. For each , under Backup Summary > User Actions, click Start Full Backup.
If everything is okay, you should see Reply from was server ok.
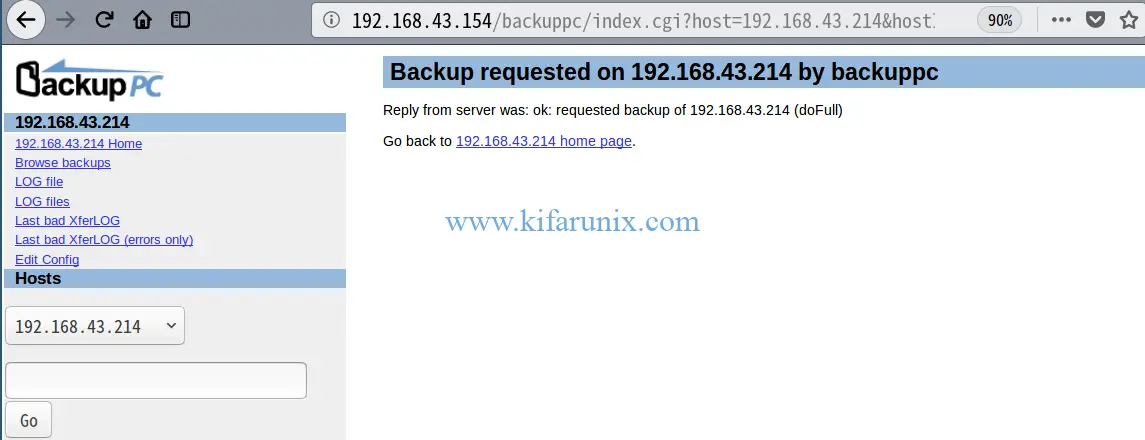
To check the backup logs, click the host LOG files or LOG file on the left panel. You can also check under following path on the server:
/var/lib/backuppc/pc/ip_address_of_client/View BackupPC Host Backup Summary
To check the backup summary, click the Host Summary under Server section on the left panel.

To have an overview of what is backed up, click the host IP/hostname as shown in the summary above, then click Browse Backups > Backup number you wish to view.
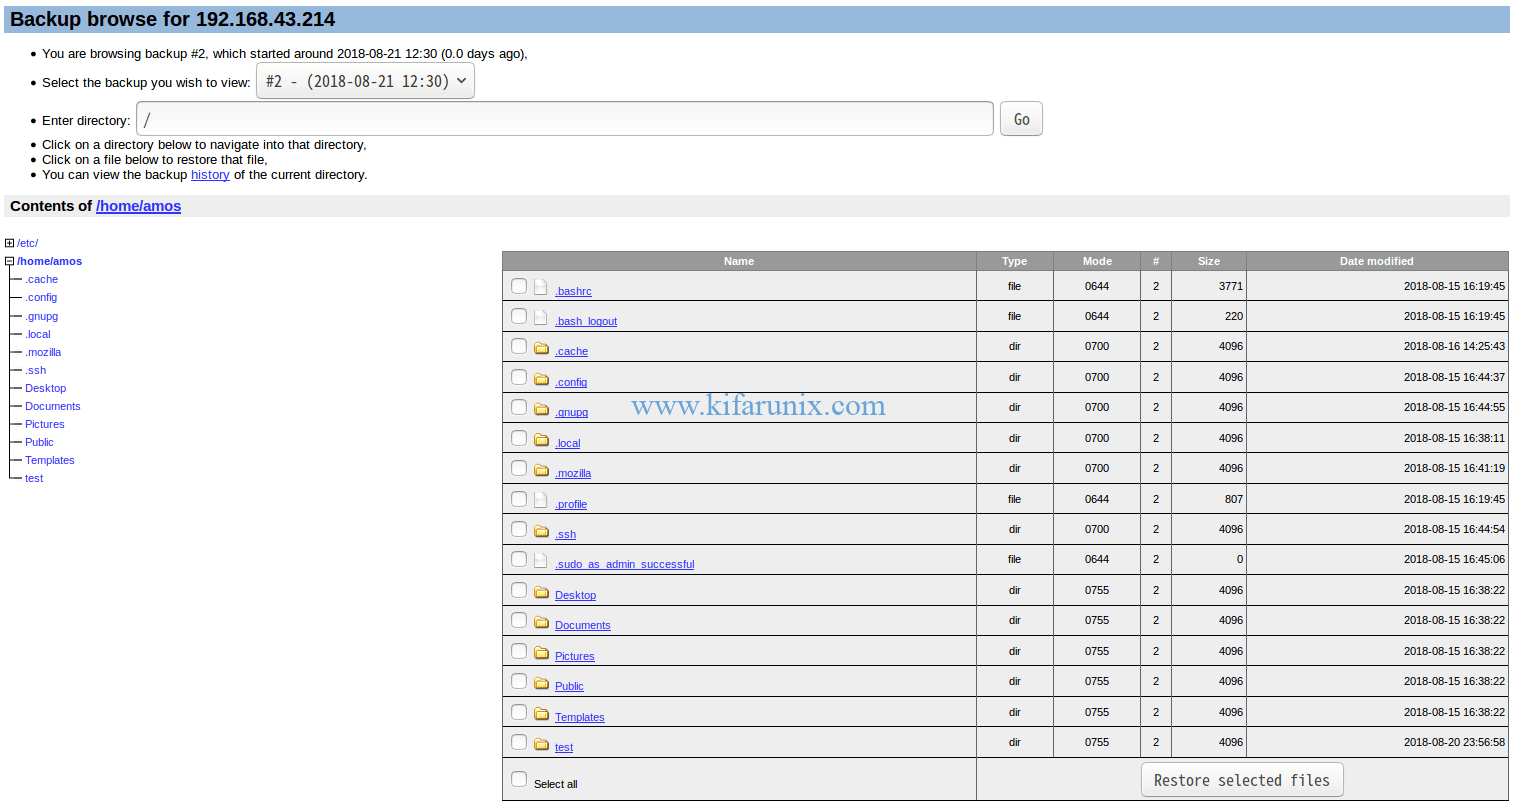
You can now add more hosts to backup.
That is basically it on our on installing and configuring BackupPC on Debian 10 Buster.
Related Tutorials
Backup Windows System via SMB Using BackupPC
How to Install and Configure BackupPC as a Backup Server on Ubuntu 18.04


Thank you for the detailed how-to. I am not an expert in linux, so I may have done something wrong in the configuration.
I have configured a server and a client as indicated and using the backuppc account instead of root. I can backup some files, but files that are restricted to root are returning access denied.
from the client: /home/djensen/.config has these permissions
drwx—— 12 djensen djensen 4096 Nov 24 04:31 .config
when I try to execute this from the server
$ ssh -l backuppc 192.168.0.136 ls -l /home/djensen/.conf
ls: cannot access ‘/home/djensen/.conf’: No such file or directory
while this command returns the info on all the unrestricted files
ssh -l backuppc 192.168.0.136 ls -l /home/djensen/
do you have any suggestions as to what I may have done wrong? or some thoughts on what I should check.
Well, as an ordinary user, you cant list the contents of the other user’s directory unless you got the right privileges.
For backuppc, ensure that on the client, the backuppc user is able to run rsync command with sudo passwordlessly.
from the server I tried the following
ojensen@Deb-101:~$ su – backuppc
Password:
$ ssh -l backuppc 192.168.0.136 whoami
backuppc
$ ssh -l backuppc 192.168.0.136 sudo rsync -help
rsync version 3.1.3 protocol version 31
Copyright (C) 1996-2018 by Andrew Tridgell, Wayne Davison, and others.
so it appears that I can connect to the client without entering a password and execute sudo rsync
is there something else I should check?
Then you should be good to run your backupps. Any error on BackupPC?
Yes there are errors on BackupPC. Any files that are restricted to owner only are not backed up:
drwx—— 12 djensen djensen 4096 Nov 24 04:31 .config
What is the specific error on the Log file on BackupPC?