This tutorial will take you through how you can configure filebeat-elasticsearch authentication. You realize that when you enable Elastic basic authentication, you need to valid user credentials to authenticate and validate access to restricted Elastic resources.
Our previous guide showed how to enable Elastic stack basic authenticaion.
How to Enable Basic Authentication on ELK Stack
Table of Contents
Configureing Filebeat Elasticsearch Authentication
Create Required Publishing Roles
Before you can proceed, first create Filebeat users and assign the user specific roles to be able to write/publish data to specific indices.
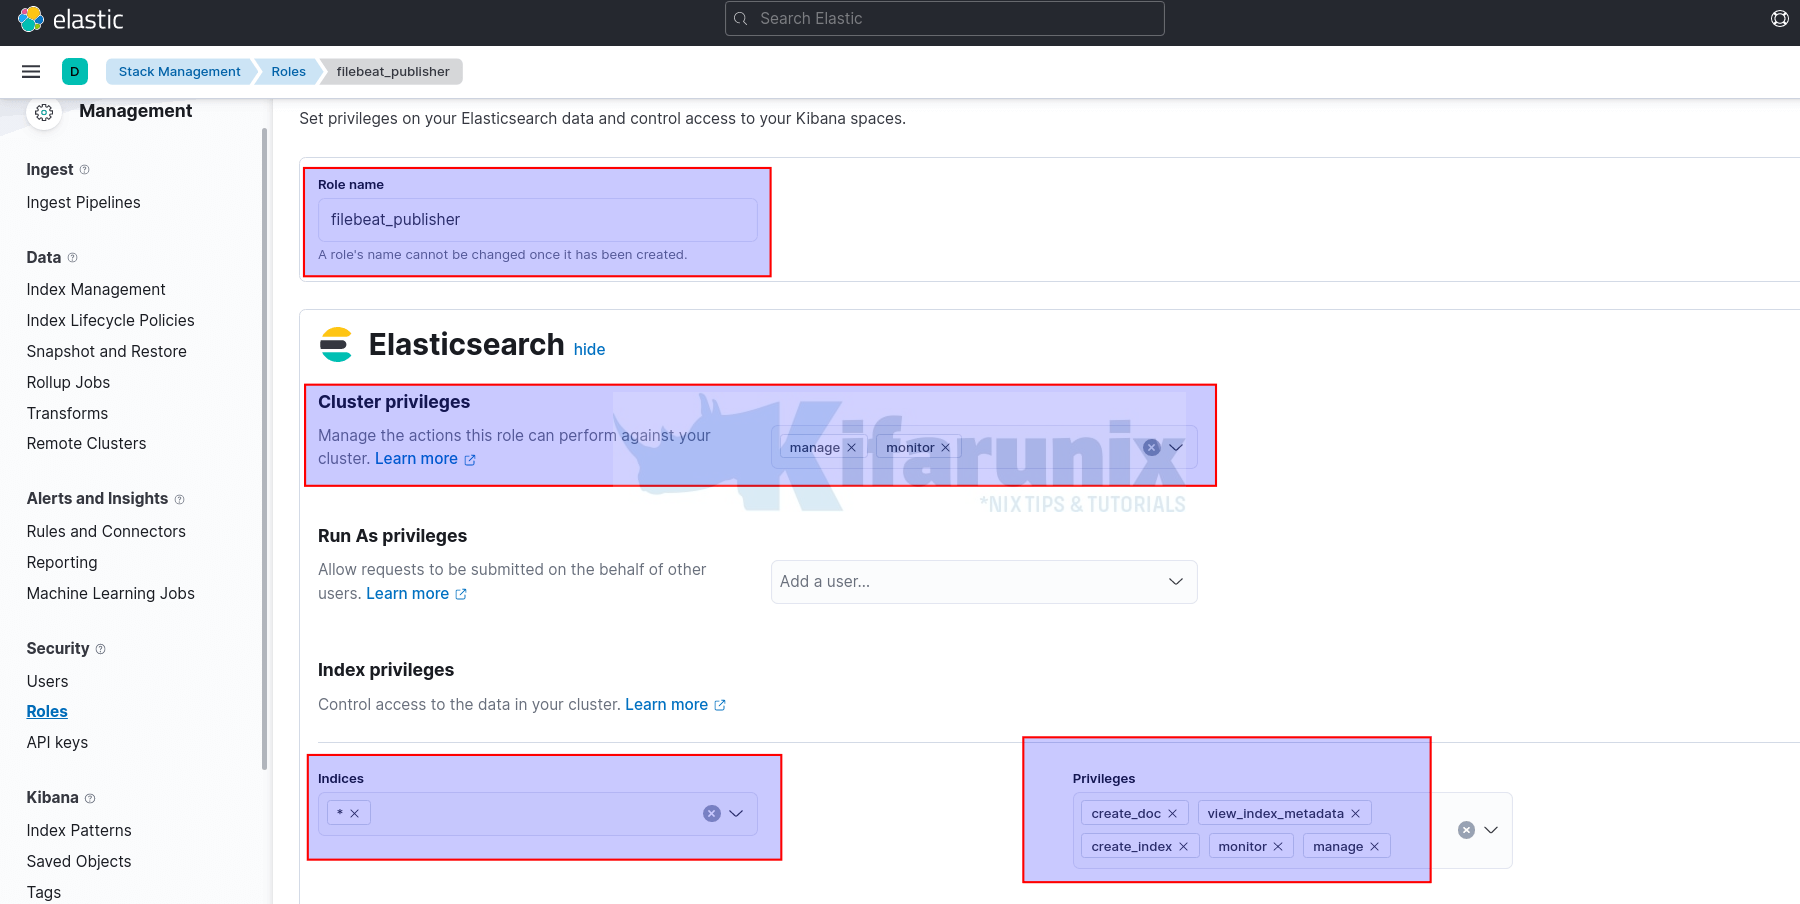
To begin with, login to Kibana and navigate Management > Stack Management > Security > Roles to create a publishing role.
On the roles page, click Create role and;
- Set the name of the role, e.g
filebeat_publisher. Cluster privileges: If you are running ELK cluster, you need to define the cluster privileges such as;monitor: provides all cluster read-only operations, like cluster health and state, hot threads, node info, node and cluster stats, and pending cluster tasks.- manage: Builds on
monitorand adds cluster operations that change values in the cluster. - See example cluster privileges on the Security privileges page.
Run As privileges: this defines a user that is allowed to submit requests on behalf of other users. We wont use this in our setup.Index Privileges:- Indices: Select specific index from the list or simply enter the wildcard name of your index and press ENTER. We used * (asterisk to specify any index)
- Privileges: Define the privileges that allows a user to publish events on the specific index. Such privileges can include;
monitor: enables the user to retrieve cluster detailscreate_index: enables a user create an index or data stream.create_doc: enables a user to write events into an indexview_index_metadata: enables a user to check for alias when connecting to clusters that support ILM.manage_ilm: gives a user all index lifecycle management operations relating to managing the execution of policies of an index or data stream.
Read more on Index Privileges page.

Once done defining the roles, scroll down the page and click Create role.
The role should now appear under the list of roles.
Create Indexing User and Assign Respective Roles
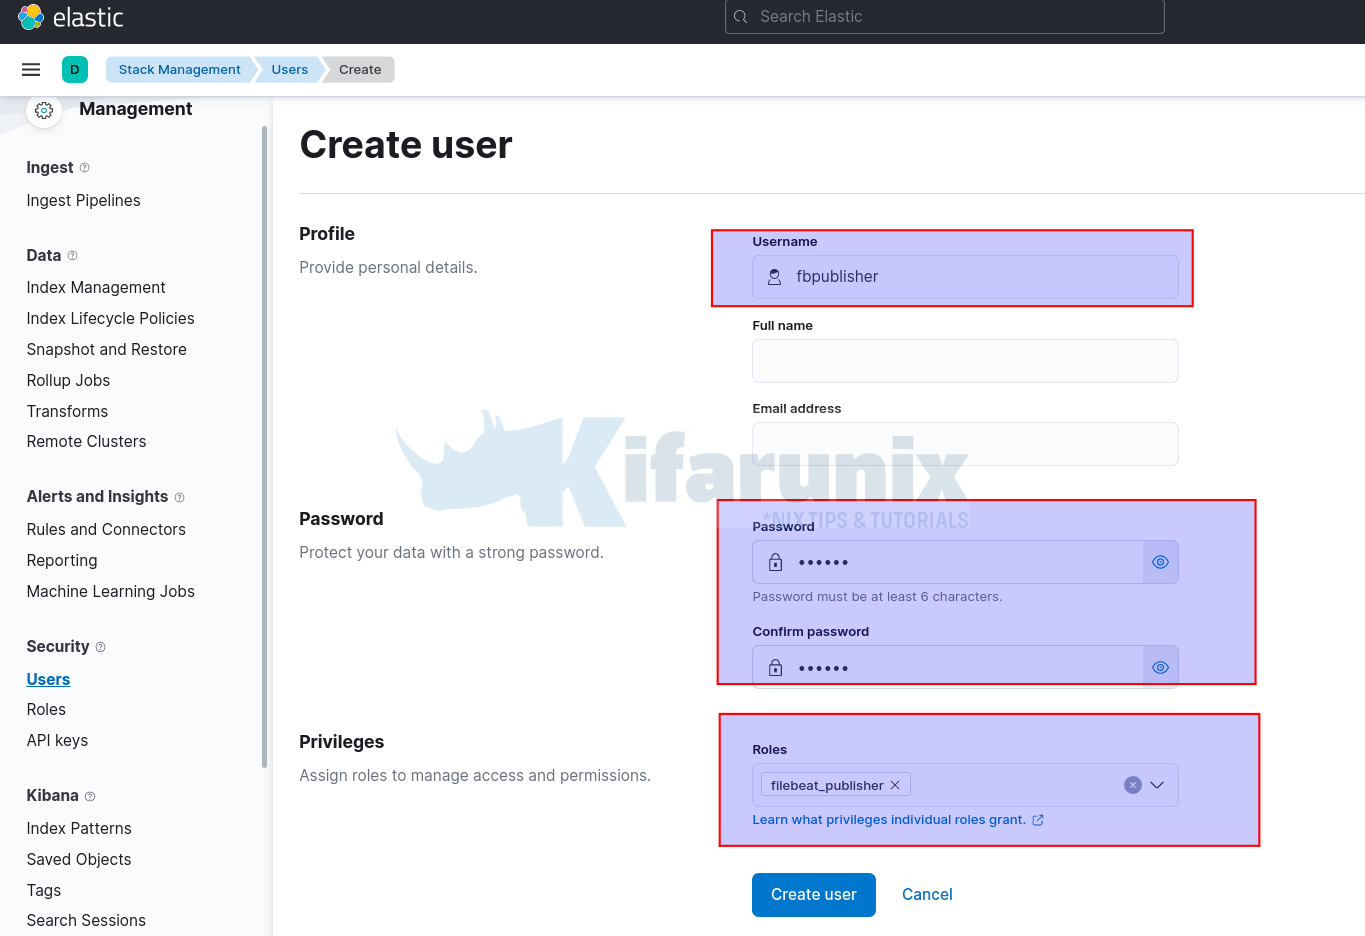
Under Security > Users, click Create user.
- Set the username
- Set the password
- Assign the respective roles

- Create the user
- The user is now listed under users page.
Install Filebeat
You can follow the links below to install Filebeat on your favorite Unix distro;
Install and Configure Filebeat on CentOS 8
Install Filebeat on Fedora 30/Fedora 29/CentOS 7
Install and Configure Filebeat 7 on Ubuntu 18.04/Debian 9.8
Configure Authentication in Elasticsearch Output
Once you have installed Filebeat, it is now time to configure it so that it can be able to authenticate to Elastic stack and be able to write events to the specific index defined on the roles assigned to the user being used.
Thus, open the filebeat.yml;
vim /etc/filebeat/filebeat.ymlUnder Elasticsearch Output;
- define the Elasticsearch host
- define the authentication credentials. In this case it is the username/password.
# ================================== Outputs ===================================

# Configure what output to use when sending the data collected by the beat.

# ---------------------------- Elasticsearch Output ----------------------------
output.elasticsearch:
  # Array of hosts to connect to.
  hosts: ["192.168.:9200"]

  # Protocol - either `http` (default) or `https`.
  #protocol: "https"

  # Authentication credentials - either API key or username/password.
  #api_key: "id:api_key"
  #username: "elastic"
  #password: "changeme"
While defining the credentials, you can specify them in plain text or store them more securely using Filebeat keystore.
To define the credentials in plain text, define the values for the username and password in the configuration file;
# ================================== Outputs ===================================

# Configure what output to use when sending the data collected by the beat.

# ---------------------------- Elasticsearch Output ----------------------------
output.elasticsearch:
  # Array of hosts to connect to.
  hosts: ["192.168.58.22:9200"]

  # Protocol - either `http` (default) or `https`.
  #protocol: "https"

  # Authentication credentials - either API key or username/password.
  #api_key: "id:api_key"
  username: "fbpublisher"
  password: "p@ssw0rd-fb"
To store the password in Filebeat Keystore;
- Create Filebeat keystore.
filebeat keystore create- Add the username and password into the keystore using variables e.g USER for username and PASS for password.
- Add the username by running the command below. When prompted, enter the publishing username,
fbpublisher, for example.
- Add the username by running the command below. When prompted, enter the publishing username,
filebeat keystore add USER- Add the password. When prompted, enter the password for the publishing user.
filebeat keystore add PASS- Specify the variables for the username and password in the configuration file,
username: "${ES_USER}"andpassword: "${ES_PWD}";
vim /etc/filebeat/filebeat.yml# ================================== Outputs ===================================
# Configure what output to use when sending the data collected by the beat.
# ---------------------------- Elasticsearch Output ----------------------------
output.elasticsearch:
# Array of hosts to connect to.
hosts: ["192.168.58.22:9200"]
# Protocol - either `http` (default) or `https`.
#protocol: "https"
# Authentication credentials - either API key or username/password.
#api_key: "id:api_key"
username: "${ES_USER}"
password: "${ES_PWD}"
Save and exit the configuration file.
Verify Filebeat-Elasticsearch Authentication
To check whether the authenticated connection works and whether Filebeat can be able to create an index, just run the test output command;
filebeat test output
elasticsearch: http://192.168.58.22:9200...
  parse url... OK
  connection...
    parse host... OK
    dns lookup... OK
    addresses: 192.168.58.22
    dial up... OK
  TLS... WARN secure connection disabled
  talk to server... OK
  version: 7.16.3
If there is any authentication issue, you should be able to see from the command output.
Now when you run your Filebeat, it shoud be able to connect to Elasticsearch and publish event data without any issue.
You can run Filebeat in debug mode to test this as well. This will show to you some errors to standard output, including the permissions/roles issues.
filebeat -eSample index privilege error;
2022-01-21T23:56:32.328+0300 ERROR [index-management.ilm] ilm/std.go:133 Index Alias filebeat-7.16.3 setup failed: failed to create alias: {"error":{"root_cause":[{"type":"security_exception","reason":"action [indices:admin/aliases] is unauthorized for user [fbpublisher] with roles [filebeat_publisher], this action is granted by the index privileges [manage,all]"}],"type":"security_exception","reason":"action [indices:admin/aliases] is unauthorized for user [fbpublisher] with roles [filebeat_publisher], this action is granted by the index privileges [manage,all]"},"status":403}: 403 Forbidden: {"error":{"root_cause":[{"type":"security_exception","reason":"action [indices:admin/aliases] is unauthorized for user [fbpublisher] with roles [filebeat_publisher], this action is granted by the index privileges [manage,all]"}],"type":"security_exception","reason":"action [indices:admin/aliases] is unauthorized for user [fbpublisher] with roles [filebeat_publisher], this action is granted by the index privileges [manage,all]"},"status":403}.Such an error is due to missing manage privilege on the specified role. Thus you can edit the role and add manage index privilege as stated on the log.
Filebeat should now be able to authenticate to Elasticsearch and write data to various indices that you can define. Remember while specifying indices to give access to, we used * to mean the user can publish the events to any defined index.

