
In this tutorial, you will learn how to automate Windows Server patching with Ansible AWX to streamline updates, boost security, and save time. Manual patching remains time-consuming, error-prone, and difficult to audit at scale. As enterprise infrastructure grows increasingly, automating patch management is no longer optional, it’s essential.
Ansible AWX, the open-source upstream project of Red Hat Ansible Automation Platform, provides a powerful and user-friendly interface to orchestrate IT automation. In this post, you’ll learn how to automate Windows patching using Ansible AWX, drawing from years of experience in IT infrastructure and Red Hat-based automation environments.
Table of Contents
Automate Windows Server Patching with Ansible AWX
Why Automate Windows Server Patching with Ansible AWX?
So, what exactly is the point of automating windows servers patching with Ansible AWX?
Well, manual patching is time-consuming, error-prone, and risks missing critical updates. Ansible AWX automates Windows Server patch management, offering:
- Auditability: Ansible brings about auditability by storing the results of automation, which allows teams to trace what actions were performed, when, and on which systems. This stored data provides a historical record, enabling accountability and traceability of automation activities.
- Efficiency: Schedule and deploy updates across multiple servers with ease.
- Security: Ensure timely critical patches for Windows Server vulnerabilities.
- Scalability: Manage hundreds of servers with ease.
Prerequisites
Before diving into automating Windows Server updates with Ansible AWX, ensure you have:
1. Ansible AWX Installed
We have deployed our AWX on Kubernetes cluster.
2. Windows Servers:
- We have three windows Servers in our environment: Windows Server 2016, 2019 and 2022.
- Configured for WinRM (Windows Remote Management) with PowerShell 5.1+. here, we are using the default configurations with the WinRM listener configured to listen on HTTP port 5985/TCP. Note that this is a test local network and it is safer for me to use non HTTPS. For production envs where security is tight, ensure WinRM is configured with HTTPS (Port 5986/TCP).
- From Powershell, you can see my basic WinRM service configs:
winrm get winrm/config/serviceSample output;
Service
    RootSDDL = O:NSG:BAD:P(A;;GA;;;BA)(A;;GR;;;IU)S:P(AU;FA;GA;;;WD)(AU;SA;GXGW;;;WD)
    MaxConcurrentOperations = 4294967295
    MaxConcurrentOperationsPerUser = 1500
    EnumerationTimeoutms = 240000
    MaxConnections = 300
    MaxPacketRetrievalTimeSeconds = 120
    AllowUnencrypted = false
    Auth
        Basic = false
        Kerberos = true
        Negotiate = true
        Certificate = false
        CredSSP = false
        CbtHardeningLevel = Relaxed
    DefaultPorts
        HTTP = 5985
        HTTPS = 5986
    IPv4Filter = *
    IPv6Filter = *
    EnableCompatibilityHttpListener = false
    EnableCompatibilityHttpsListener = false
    CertificateThumbprint
    AllowRemoteAccess = true
This shows that WinRM is enabled, uses secure authentication, disallows unencrypted connections, and listens on default ports.
- AllowUnencrypted:
false - Auth: Basic =
false, Kerberos =true, Negotiate =true - DefaultPorts: HTTP =
5985, HTTPS =5986 - IPv4Filter:
* - AllowRemoteAccess:
true
And for the WinRM listener settings:
winrm enumerate winrm/config/listenerSample output;
Listener
    Address = *
    Transport = HTTP
    Port = 5985
    Hostname
    Enabled = true
    URLPrefix = wsman
    CertificateThumbprint
    ListeningOn = 127.0.0.1, 192.168.122.234, ::1, fe80::5efe:192.168.122.234%4, fe80::18f2:1296:a168:608e%3
This means WinRM listens over HTTP on default port 5985, accepts connections on localhost and host network IP, but does not use HTTPS. In summary;
- Listener enabled on all addresses (
Address = *) - Transport protocol: HTTP
- Port: 5985 (default HTTP WinRM port)
- Enabled: true
- Listening on IPs:
127.0.0.1,192.168.122.234,::1, plus some IPv6 link-local addresses - No HTTPS certificate configured (no
CertificateThumbprint)
Therefore, ensure the WinRM Listener port is opened on the host firewall as well as on the network perimeter firewall.
Read more about WinRM configuration.
3. Credentials:
Ensure you have admin access to AWX and of course, an administrative account for connecting to the Windows Server via Ansible AWX for running patches.
If using a local admin account on Windows Servers that is okay.
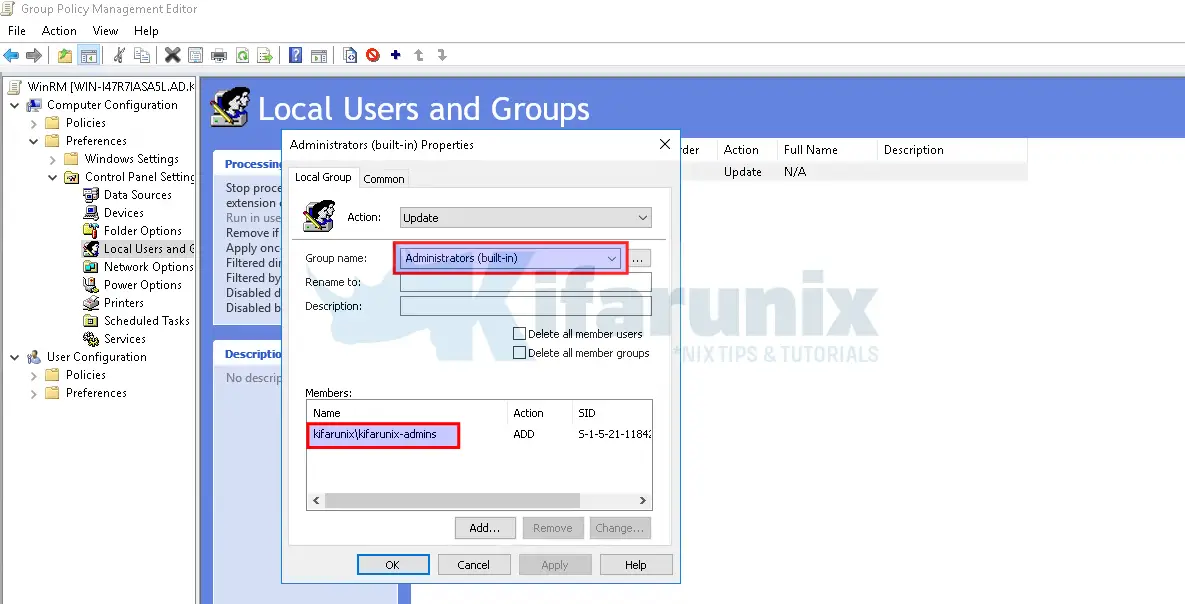
In this guide, we are using an AD account that has been added to local administrators group account via GPO.
4. Network:
Verify that Ports 5985 (HTTP) or 5986 (HTTPS) open for WinRM depending on the scheme your WinRM is configured with.
We are using HTTP scheme in our test environment and thus, let’s verify connection to the port from Ansible AWX node.
Since we are running Ansible AWX on Kubernetes cluster, i just tested the access to the port from any of the cluster node;
telnet WIN_SERVER_IP 5985If the port is opened on firewall, here is the sample output;
Trying 192.168.122.236...
Connected to 192.168.122.236.
Escape character is '^]'.
That confirms access to the WinRM service on the server. If that is not the case for you, ensure you fix the firewall.
5.Python:
Ansible requires pywinrm module for Windows connectivity.
If you are running standalone Ansible AWX, simply install the module;
pip3 install pywinrmIf you are running Ansible AWX on a Kubernetes cluster, chances are you have seen a pod called awx-demo-task;
kubect get podsSee output below;
NAME                                               READY   STATUS      RESTARTS        AGE
awx-demo-migration-24.6.1-kdtmp                    0/1     Completed   0               134d
awx-demo-postgres-15-0                             1/1     Running     6 (8d ago)      134d
awx-demo-task-68f6988547-jx28q                     4/4     Running     0               47h
awx-demo-web-78df66c7f-scczw                       3/3     Running     3 (8d ago)      99d
awx-operator-controller-manager-58b7c97f4b-ggfjq   2/2     Running     1813 (8d ago)   134d
Now, if you check the containers in the awx-demo-task pod, you will see an execution environment container, awx-demo-ee;
kubectl get pod awx-demo-task-68f6988547-jx28q -o jsonpath="{range .spec.containers[*]}{.name}{'\n'}{end}"Sample output;
redis
awx-demo-task
awx-demo-ee
awx-demo-rsyslog
The awx-demo-ee container provides a base environment with common Ansible tools and dependencies for executing playbooks and thus, should already have the pywinrm module installed.
kubectl exec -it awx-demo-task-68f6988547-jx28q -c awx-demo-ee -- pip3 show pywinrmSample command output;
Name: pywinrm
Version: 0.4.3
Summary: Python library for Windows Remote Management
Home-page: http://github.com/diyan/pywinrm/
Author: Alexey Diyan
Author-email: [email protected]
License: MIT license
Location: /usr/local/lib/python3.9/site-packages
Requires: requests, requests-ntlm, six, xmltodict
Required-by:
So, we are good to go.
Step 1: Set Up Ansible AWX for Windows Patching
The initial configuration of Ansible AWX for Windows Server patching requires careful attention to credential management, inventory organization, and playbook development.
You can create your Windows server patching with Ansible AWX project locally on the filesystem directories or utilize Git repository. We will see both ways.
Create Project Directory
In our Ansible AWX running on a Kubernetes cluster, we have created a persistent volume (awx-projects-pv) backed by NFS and bound it to a persistent volume claim specifically for storing AWX project data persistently across pod restarts.
kubect describe pv awx-projects-pvSample output/snippet;
Name:            awx-projects-pv
Labels:          <none>
Annotations:     pv.kubernetes.io/bound-by-controller: yes
Finalizers:      [kubernetes.io/pv-protection]
StorageClass:
Status:          Bound
Claim:           awx/awx-projects-pvc
Reclaim Policy:  Retain
Access Modes:    RWX
VolumeMode:      Filesystem
Capacity:        2Gi
Node Affinity:   <none>
Message:
Source:
    Type:      NFS (an NFS mount that lasts the lifetime of a pod)
    Server:    192.168.233.181
    Path:      /mnt/awx/projects
    ReadOnly:  false
Events:        <none>
Let’s check the PVC;
kubectl describe pvc awx-projects-pvcSample output;
kubectl describe pvc awx-projects-pvc
Name:          awx-projects-pvc
Namespace:     awx
StorageClass:
Status:        Bound
Volume:        awx-projects-pv
Labels:        <none>
Annotations:   pv.kubernetes.io/bind-completed: yes
               pv.kubernetes.io/bound-by-controller: yes
Finalizers:    [kubernetes.io/pvc-protection]
Capacity:      2Gi
Access Modes:  RWX
VolumeMode:    Filesystem
Used By:       awx-demo-task-68f6988547-jx28q
               awx-demo-web-78df66c7f-scczw
Events:        <none>
As shown above, the PVC is successfully bound to the NFS-backed volume and currently used by the AWX task and web pods (awx-demo-task-* and awx-demo-web-*), which mount it at /var/lib/awx/projects to access shared project data. Now, any project added to the NFS share at /mnt/awx/projects on the NFS server (192.168.233.181) will automatically appear in AWX under the Projects section.
Since we are using an NFS share for our Ansible AWX, we will create our Windows servers patching project under the NFS share, /mnt/awx/projects.
mkdir /mnt/awx/projects/windows-patchingIn general, this is how our current project directory structure look like;
tree -aSample output;
.
├── inventory
│   └── hosts
└── playbooks
    ├── check-available-updates.yaml
    ├── install-win-updates.yaml
    ├── kvm-snapshot.yaml
    ├── ping.yaml
    └── windows-check-free-disk-space.yaml

2 directories, 6 files
Create an Inventory for Windows Servers
Let’s begin by creating an inventory for our target Windows servers.
We will navigate to the project directory we created above. It could be different path for you. So trade accordingly.
cd /mnt/awx/projects/windows-patchingAs you can see from the tree command output above, we have already created an inventory and playbooks directories.
We already had an existing inventory file. This is how it looks like;
cat inventory/hostsSample output;
[kvm]
kvm-host ansible_host=192.168.122.1

[linux:children]
kvm

[linux:vars]
ansible_ssh_common_args='-o StrictHostKeyChecking=no'

[windows]
win2016 ansible_host=192.168.122.234
win2019 ansible_host=192.168.122.236
win2022 ansible_host=192.168.122.232

[windows:vars]
ansible_connection=winrm
ansible_winrm_transport=ntlm
ansible_winrm_server_cert_validation=ignore
ansible_winrm_scheme=http
ansible_port=5985

[kvm_guests:children]
windows
As you can see, the inventory include both Linux and Windows hosts. The [windows] group now lists multiple Windows Server nodes (win2016, win2019, and win2022), each with an ansible_host variable to specify its IP address. This is important because the inventory name (e.g., win2016) may not resolve directly, so ansible_host tells Ansible which IP to connect to.
Under [windows:vars], we’ve defined WinRM connection settings required for managing Windows with Ansible:
ansible_connection=winrmspecifies the use of WinRM instead of SSH.ansible_winrm_transport=ntlmconfigures authentication (Negotiate connection type).ansible_winrm_server_cert_validation=ignoreallows connection without validating SSL certs.ansible_winrm_scheme=httpandansible_port=5985match the standard unsecured WinRM setup.
We’ve also defined a [kvm_guests] group that includes Windows hosts. This group helps us manage all KVM virtual machines, while the [kvm] group (representing the KVM hypervisor) is included under [linux]. This structure allows us to automate tasks like taking VM snapshots on the KVM host before initiating patching on the guests (The windows servers are running as VMs on KVM).
Finally, access credentials Windows hosts will be securely defined later in AWX, allowing centralized and credential-safe automation.
Build Playbooks for Windows Server Patching
Create playbooks to automate Windows Server patch updates. As you can see from the directory structure output above, we have five playbooks:
- check-available-updates.yaml – Checks for available Windows updates on target hosts
- install-win-updates.yaml – Installs pending Windows updates using Ansible
- kvm-snapshot.yaml – Creates snapshots of KVM virtual machines before making changes (e.g. patching)
- ping.yaml – Tests reachability of hosts (e.g. using
win_pingorpingmodules) - windows-check-free-disk-space.yaml – Checks disk space on Windows hosts to ensure enough space is available before updates or installs
Here is the content of each of the playbooks above;
cat playbooks/check-available-updates.yaml- name: Windows Update Assessment and Reporting
hosts: windows
gather_facts: false
tasks:
- name: Ensure temporary directory exists
win_file:
path: C:\Temp
state: directory
- name: Scan for available Windows updates
win_updates:
state: searched
category_names: '*'
register: avail_updates
- name: Process and format update information
set_fact:
formatted_kb_updates: |
{% for update_id, update in avail_updates.updates.items() %}
{% if update.kb | length > 0 %}
{% set major_category = update.categories | reject('match', '.*Windows Server.*') | first | default('Unknown') %}
Major Category: {{ major_category }}
Title: {{ update.title }}
KB: {{ update.kb | join(', ') }}
---
{% endif %}
{% endfor %}
formatted_non_kb_updates: |
{% for update_id, update in avail_updates.updates.items() %}
{% if update.kb | length == 0 %}
Title: {{ update.title }}
ID: {{ update.id }}
Categories: {{ update.categories | join(', ') }}
---
{% endif %}
{% endfor %}
has_non_kb_updates: >-
{% set non_kb_count = [] %}
{% for update_id, update in avail_updates.updates.items() %}
{% if update.kb | length == 0 %}
{% set _ = non_kb_count.append(1) %}
{% endif %}
{% endfor %}
{{ non_kb_count | length > 0 }}
- name: Show available updates with KB numbers
debug:
msg: "{{ formatted_kb_updates.split('\n') }}"
- name: Show updates without KB numbers (if any)
debug:
msg: "Updates without KB numbers:\n{{ formatted_non_kb_updates.split('\n') }}"
when: has_non_kb_updates | bool
- name: Save KB updates report to file
ansible.windows.win_copy:
content: "{{ formatted_kb_updates }}"
dest: C:\Temp\windows_updates_with_kb.txt
- name: Save non-KB updates report to file
ansible.windows.win_copy:
content: "{{ formatted_non_kb_updates }}"
dest: C:\Temp\windows_updates_without_kb.txt
when: has_non_kb_updates | bool
cat playbooks/install-win-updates.yaml---
- name: Windows Update Installation from Assessment Report
hosts: windows
gather_facts: no
tasks:
- name: Get current timestamp
set_fact:
current_timestamp: "{{ lookup('pipe', 'date +%Y-%m-%dT%H:%M:%S') }}"
- name: Check if KB updates report file exists
win_stat:
path: 'C:\Temp\windows_updates_with_kb.txt'
register: kb_updates_file
- name: Fail if updates report file is missing
fail:
msg: 'KB updates report file not found at C:\Temp\windows_updates_with_kb.txt. Please run the assessment playbook first.'
when: not kb_updates_file.stat.exists
- name: Read KB updates report content
win_shell: Get-Content -Path 'C:\Temp\windows_updates_with_kb.txt'
register: updates_content
when: kb_updates_file.stat.exists
- name: Extract KB numbers from report file
set_fact:
kb_numbers: "{{ updates_content.stdout_lines | select('match', '.*KB: .*') | map('regex_replace', '.*KB: ([0-9,\\s]+).*', '\\1') | map('split', ',') | flatten | map('trim') | select('match', '^[0-9]+$') | list | unique }}"
when:
- kb_updates_file.stat.exists
- updates_content.stdout_lines is defined
- name: Display KB numbers to be installed
debug:
msg:
- "Found {{ kb_numbers | length }} unique KB numbers to install:"
- "{{ kb_numbers | join(', ') }}"
when:
- kb_updates_file.stat.exists
- kb_numbers is defined
- kb_numbers | length > 0
- name: Install Windows updates by KB numbers
win_updates:
category_names: '*'
state: installed
accept_list: "{{ kb_numbers }}"
log_path: 'C:\Temp\windows_update_installation.log'
register: installation_result
when:
- kb_updates_file.stat.exists
- kb_numbers is defined
- kb_numbers | length > 0
- name: Display installation summary
debug:
msg:
- "=== WINDOWS UPDATE INSTALLATION COMPLETE ==="
- "Host: {{ inventory_hostname }}"
- "Updates Found: {{ installation_result.found_update_count | default(0) }}"
- "Updates Installed: {{ installation_result.installed_update_count | default(0) }}"
- "Updates Failed: {{ installation_result.failed_update_count | default(0) }}"
- "Reboot Required: {{ 'Yes' if installation_result.reboot_required | default(false) else 'No' }}"
when:
- kb_updates_file.stat.exists
- kb_numbers is defined
- kb_numbers | length > 0
- installation_result is defined
- name: Reboot if required
win_reboot:
reboot_timeout: 1800
when: installation_result.reboot_required | default(false)
- name: Create installation report
set_fact:
installation_summary: |
Windows Update Installation Report
=================================
Host: {{ inventory_hostname }}
Date: {{ current_timestamp }}
Summary:
--------
Total Updates Found: {{ installation_result.found_update_count | default(0) }}
Successfully Installed: {{ installation_result.installed_update_count | default(0) }}
Failed Installations: {{ installation_result.failed_update_count | default(0) }}
Reboot Required: {{ installation_result.reboot_required | default('No') }}
Requested KB Numbers: {{ kb_numbers | join(', ') }}
{% if installation_result.updates is defined %}
Installed Updates:
-----------------
{% for update_id, update_info in installation_result.updates.items() %}
- {{ update_info.title }}
KB: {{ update_info.kb | join(', ') if update_info.kb else 'None' }}
{% endfor %}
{% endif %}
when:
- kb_updates_file.stat.exists
- kb_numbers is defined
- kb_numbers | length > 0
- installation_result is defined
- name: Save installation report to file
win_copy:
content: "{{ installation_summary }}"
dest: 'C:\Temp\windows_update_installation_report.txt'
when:
- kb_updates_file.stat.exists
- kb_numbers is defined
- kb_numbers | length > 0
- installation_result is defined
- installation_summary is defined
- name: Give a report when no KB numbers were found on updates
debug:
msg: "No valid KB numbers found in the updates report file. Please verify the assessment report."
when:
- kb_updates_file.stat.exists
- (kb_numbers is not defined or kb_numbers | length == 0)
cat playbooks/kvm-snapshot.yaml---
- name: Check and take PrePatch Snapshot
hosts: kvm
become: true
vars:
target_group: windows
snapshot_suffix: "{{ '%d%b%Y' | strftime }}"
tasks:
- name: Set VM list
set_fact:
vm_list: "{{ groups[target_group] }}"
- name: Check if PrePatch Snapshot already exists
shell: >
virsh snapshot-list --domain {{ item }} --name
loop: "{{ vm_list }}"
register: snapshot_list
failed_when: false
changed_when: false
- name: Create snapshot if today's PrePatch snapshot does not exist
shell: >
virsh snapshot-create-as --domain {{ item }} {{ item }}-PrePatch-{{ snapshot_suffix }}
loop: "{{ vm_list }}"
loop_control:
index_var: idx
when: (item + '-PrePatch-' + snapshot_suffix) not in snapshot_list.results[idx].stdout
register: snapshot_creation_status
async: 600
poll: 0
- name: Wait for snapshot creation jobs to complete
async_status:
jid: "{{ item.ansible_job_id }}"
loop: "{{ snapshot_creation_status.results | selectattr('ansible_job_id', 'defined') | list }}"
register: snapshot_jobs
until: snapshot_jobs.finished
retries: 60
delay: 5
cat playbooks/ping.yaml---
- name: Check Windows hosts reachability
hosts: windows
gather_facts: false
tasks:
- name: Ping Windows Hosts
win_ping:
cat playbooks/windows-check-free-disk-space.yaml---
- name: Check Free Disk Space
hosts: windows
gather_facts: false
tasks:
- name: "Check Free Disk Space in C:"
win_shell: |
$freeSpace = [math]::Round((Get-PSDrive C | Select-Object Free).Free / 1GB, 2)
Write-Output $freeSpace
register: freediskspace
- name: Report Free Disk Space
debug:
msg: "Free disk space on C: drive: {{ freediskspace.stdout | trim }} GB"
when: freediskspace is defined and freediskspace.stdout is defined
- name: Fail if there is not Enough Space
fail:
msg: "the node {{ inventory_hostname }} has insufficient disk space: {{ freediskspace.stdout | trim }} GB (minimum required: 20 GB)"
when:
- freediskspace.stdout | trim | float < 20
Step 2: Create Windows Servers Patching Project on Ansible AWX UI
Now that we have the project ready both on Git repo and on local Ansible AWX projects directory, navigate to the Ansible AWX UI and create the project.
On the UI, navigate to Resources > Projects.
Click the ADD button to add the project.
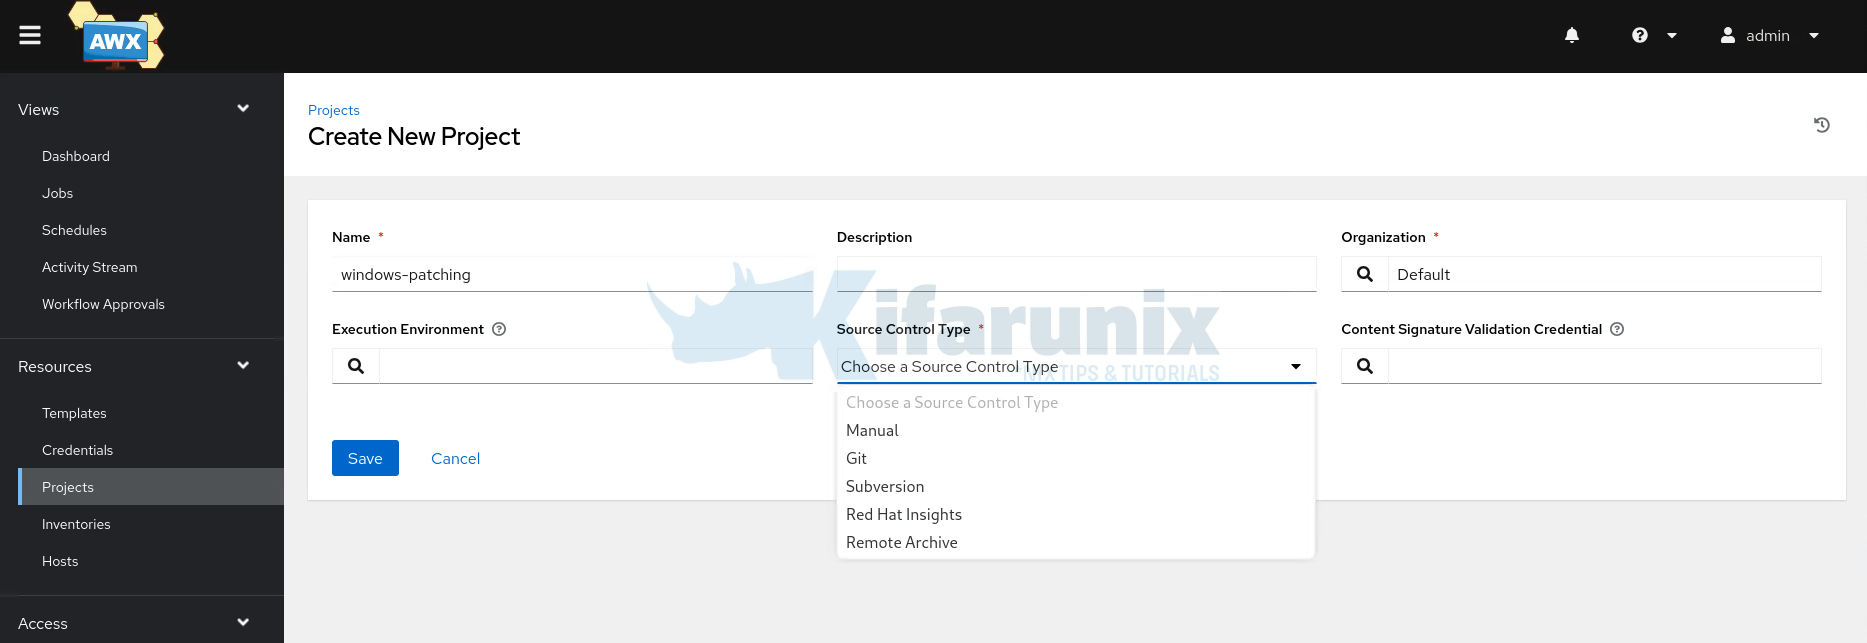
So, basically, what is required is the name of the project, the Organization (we use the default) and project source control type.
Create Local Filesystem Project
For the source control type, we have two options for ourselves as we have the project both on Git and on the local filesystem. So, those are the only options we will explore in this guide.
If you have the project on the local filesystem, simply select the Manual source control type. You will then see the default Ansible AWX projects auto-updated for the base project path.
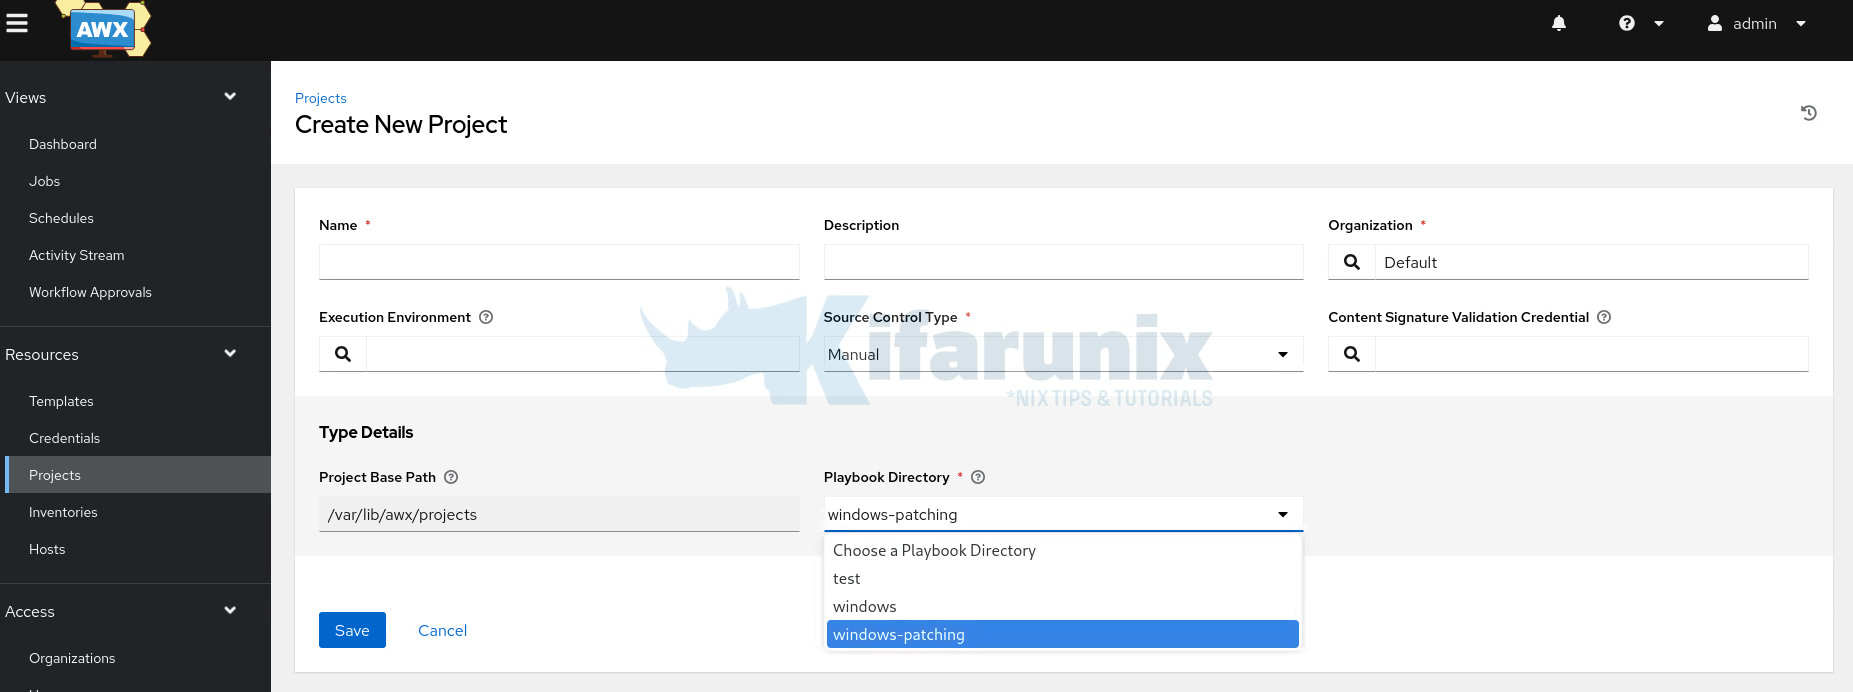
All you need to do is to choose your project playbooks directory and click Save. Ensure you have defined the name of the project before hitting save.
The details of your project will now be displayed.
Create Git Repository Project
If you want to create your project from a Git repository, you first need to create the credentials for accessing the Git repo if your repository is private. Hence:
- Go to: https://github.com/settings/tokens or respective address for the local Gitlab repository.
- Click “Generate new token (classic)” (or use a fine-grained token if required)
- Give it a name, and under scopes, select:
- repo (for private repo access)
- Generate and copy the token (you won’t see it again)
Next, on Ansible AWX navigate to Resources > Credentials > ADD. Fill in:
- Name: e.g.,
GitHub Access - Credential Type:
Source Control - Description (Optional)
- Organization: (select your org, we go with default one)
Under Type Details:
- Username: your GitHub username
- Password / Token: paste the GitHub PAT
Click Save

Next, create Git based project by navigating to Resources > Projects > ADD:
- Enter the name of the project
- Set the Source Control Type: Git
- Source Control URL: This is the HTTP address you usually use to clone the git repo e.g https://github.com/kifarunix/ansible.git
- For the Source Control Credential, search for the credentials we created above.
- You can specify other options if it applies to you.
- Save the project when done configuring.
Once you saved the project, it will start to sync with the Git source and pull project files into the Ansible AWX projects directory.

Ensure sync is Successful.
Create Windows Hosts Machine Credentials
Next, you need to create credentials that Ansible AWX will use to connect to the Windows servers to execute playbooks.
Hence, navigate to Resources > Credentials > Add.
- Enter the name
- Select Description and Choose Organization (We use default values)
- Credentials Type: Machine (for WinRM connections to hosts)
- Provide the Username. This can be for the AD account with local admin rights on the host or just the local administrative account.
- Username: Enter the AD username in one of these formats:
- DOMAIN\username (e.g., MYDOMAIN\adminuser)
- [email protected] (e.g., [email protected])
- Username: Enter the AD username in one of these formats:
- Provide the username password.
- Save the credentials. Otherwise, if other options applies to your account, provide them.

Create Windows Patching Hosts Inventory
Now that you have the project created, proceed to create your hosts inventory. You can create an inventory from Resources > Inventories > ADD.
- Enter the name of the inventory
- Description
- Orginization
- Instance Groups if you have any groups created already
- Labels that optionally describe the inventory, such as ‘dev’ or ‘test’. Labels can be used to group and filter inventories and completed jobs.
- If there is any custom variables that you want to apply to your hosts, define them.
- Click Save when done.
When you click Save inventory Details wizard opens up. From here:
- you can now add the hosts manually to the inventory (Hosts > Add) or
- choose the source of the inventory, for example, if you already have an inventory in your project folder with hosts defined, you can go to Sources > Add.
- Set the name of the hosts source.
- Define the description and Execution environment (We use default values)
- Source: Sourced from a Project
- Under Source Type, select the project and the inventory file.
- Update other settings if applicable.
- Click Save and then hit Sync to sync the inventory and get the hosts.
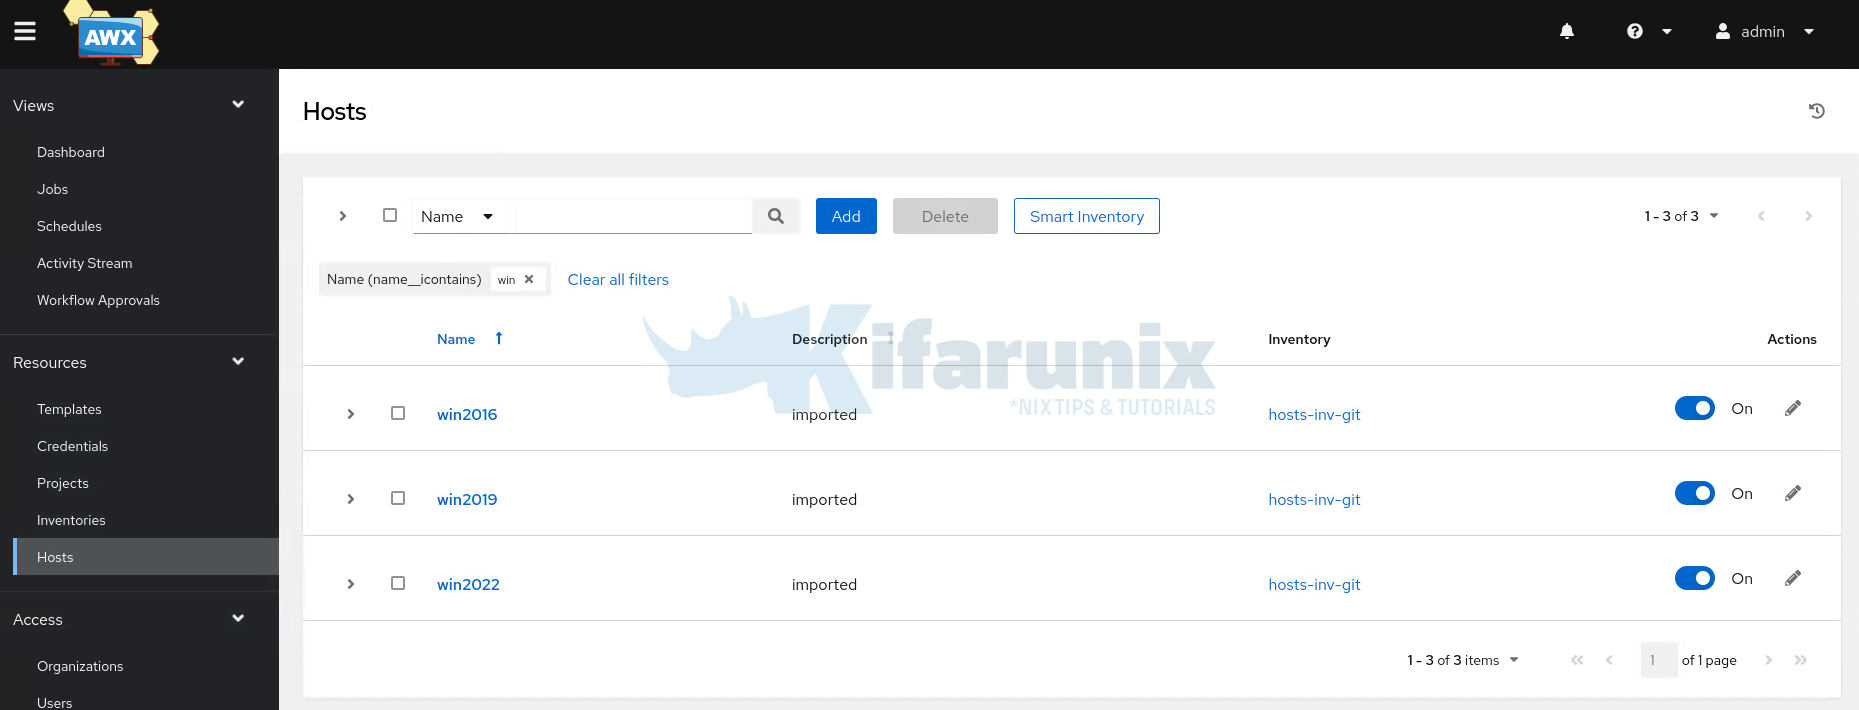
You hosts will now appear under Resources > Hosts.
Step 3: Create Windows Patching Templates on Ansible AWX
Create Patching Job Templates
Next, you have to create job templates. A Job Template in AWX is what lets you execute a specific playbook with:
- The actual playbook to run
- An inventory (hosts)
- A set of credentials (SSH or WinRM)
- Variables (extra vars, prompts)
- Project (your Git repo or file source)
Hence, let’s create job templates for the five of our playbooks.
To create a job template, navigate to Resources > Templates > Add > Add job template.
- Enter the name of the template
- Job Type: Leave it at Run.
- Choose the Inventory file, the project and the playbook you need for the template. We will choose our ping playbook for checking host reachability as the first playbook to run
- Select the credentials for accessing the hosts
- If there is any variables you need to apply to the playbook, define them.
- We left the rest of the settings with the default values.
- Save the job template.
Add the rest of the playbooks in the order of execution. Here is how our templates look like;
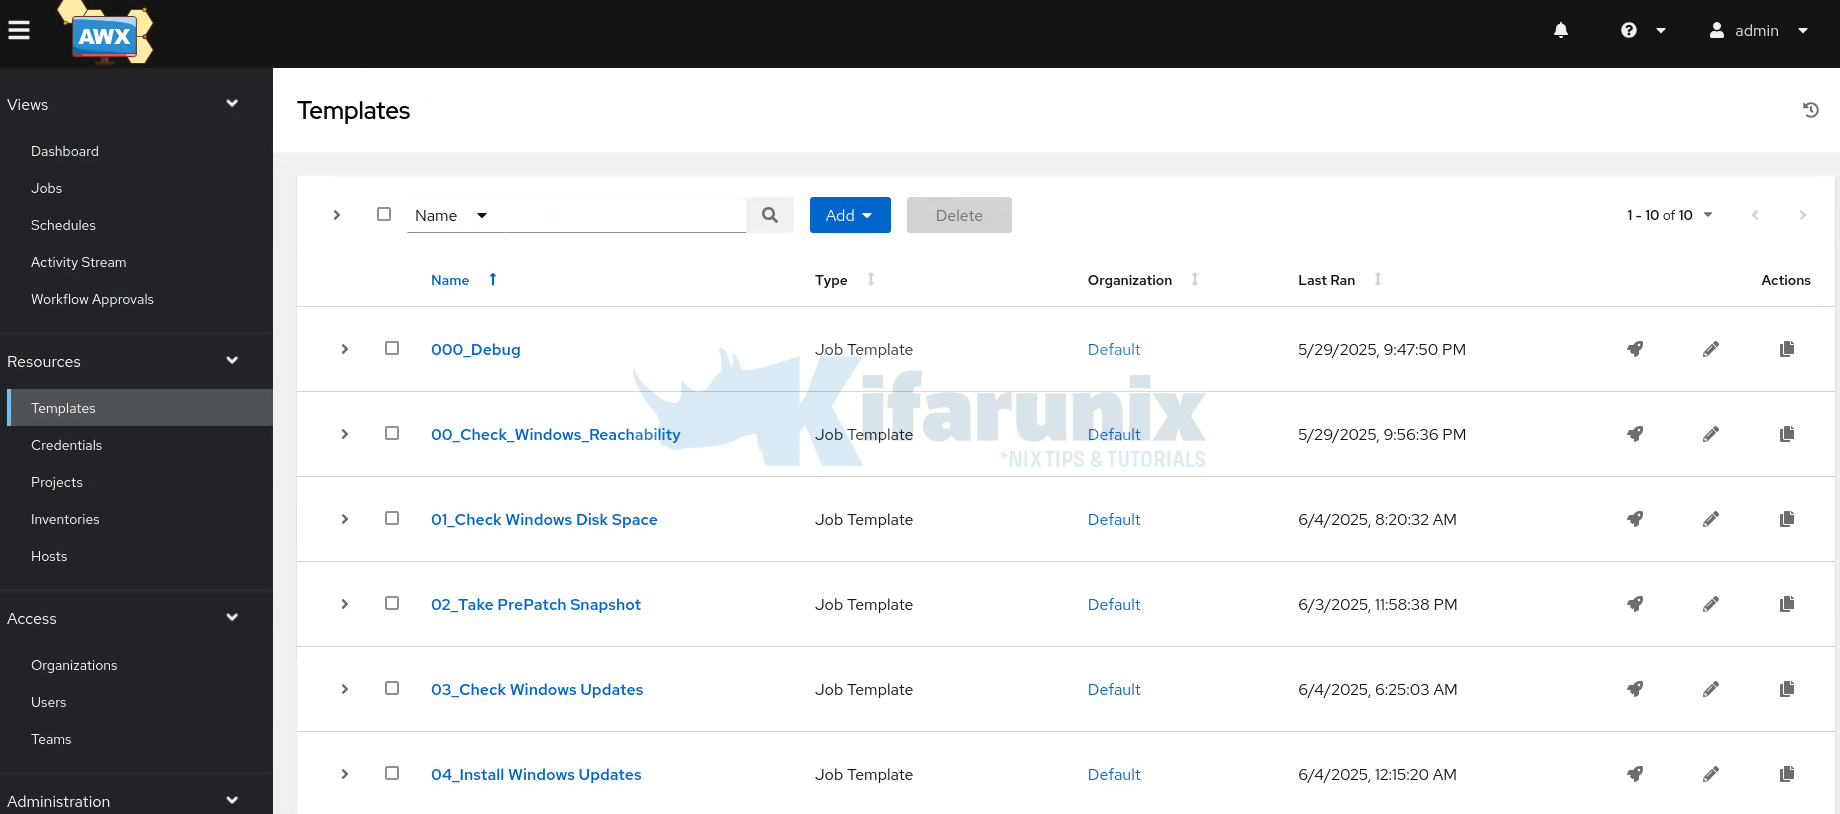
If you want, you can launch individual job template. Otherwise, use a workflow.
Create Patching WorkFlow Templates
Now, we want to combine the job templates we created above into a workflow. In Ansible AWX, workflow template lets you chain multiple job templates (or workflows) together into a sequence — like a visual automation pipeline.
So, we will create a workflow run as follows:
ping.yaml: Check if target Windows hosts are reachable.windows-check-free-disk-space.yaml: Ensure there is enough free disk space before patching.kvm-snapshot.yaml: Take a snapshot of the VM (hosted on KVM) to allow rollback if needed.check-available-updates.yaml: Detect available Windows updates on the target systems.install-win-updates.yaml: Apply the detected updates.
Hence, navigate to Resources > Templates > Add > Add workflow template.
Just enter the name of the workflow, e.g Windows-Server-Patching and click Save. This will open up a wizard where you can define your workflow.
Hence, on the wizard, click Start and select the first job template and click Save.
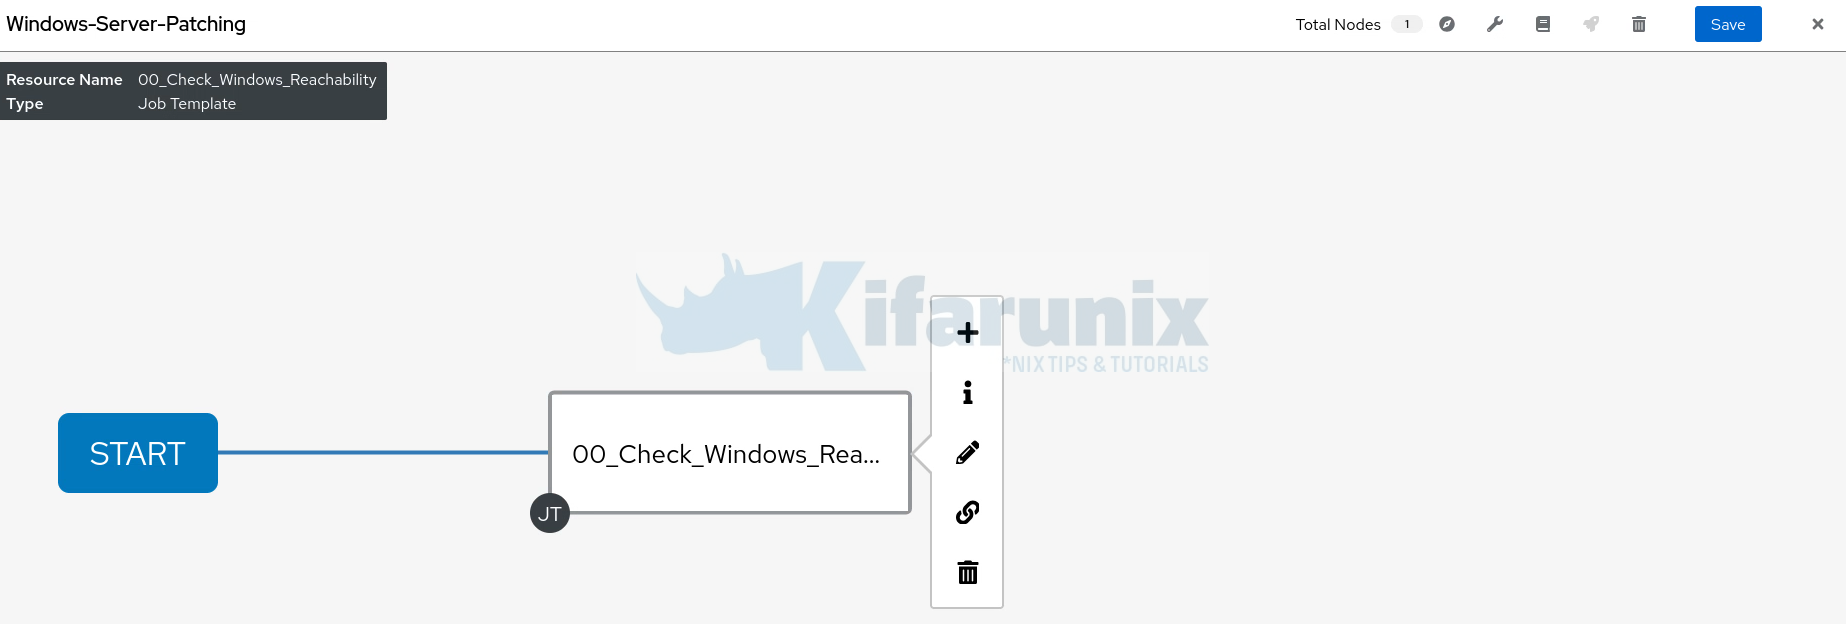
Hover the mouse on the first template, click + to add the next one. Ensure you select On Success condition to ensure that the next template can only run if the first one succeeds. Click Next to add the second template.
Do the same until you have added all the templates into the workflow.
Finally, my template looks like:

Click Save to save the workflow.
Step 4: Running Windows Server Patching WorkFlow
You can choose to Launch the workflow immediately when done creating or even access them on Resources > Templates.
Open the workflow and launch and see how to automate windows server patching with ansible awx works!
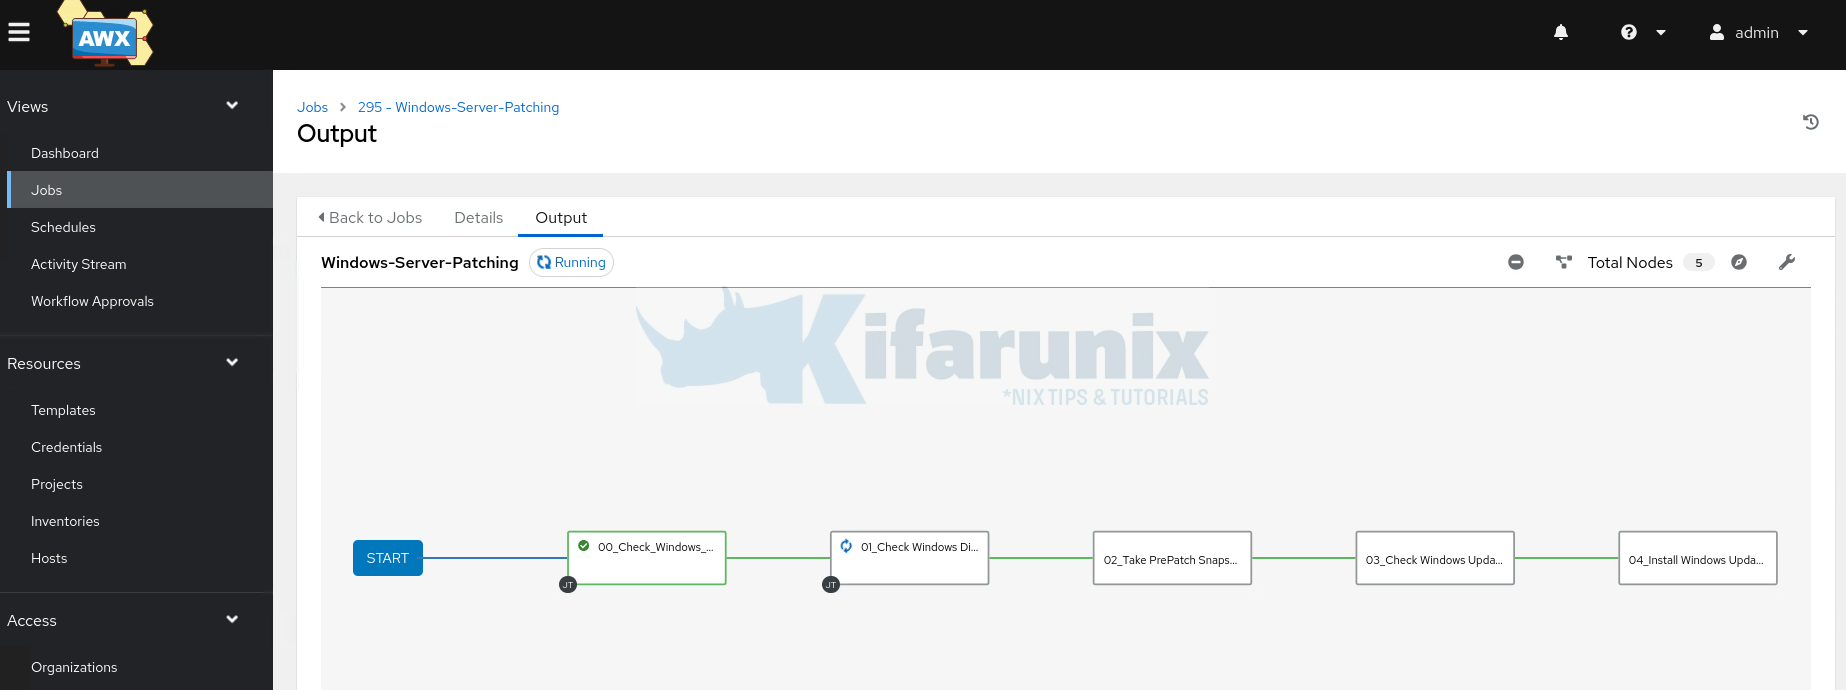
If the playbooks fail and upon inspection you see such an error:
TASK [Check for updates] *****************************************************************************************************
An exception occurred during task execution. To see the full traceback, use -vvv. The error was:    at System.Management.Automation.Interpreter.EnterTryCatchFinallyInstruction.Run(InterpretedFrame frame)
fatal: [win2022]: FAILED! => {"changed": false, "msg": "internal error: failed to become user 'SYSTEM': Exception calling \"CreateProcessAsUser\" with \"9\" argument(s): \"Failed to get token for NT AUTHORITY\\SYSTEM required for become as a service account or an account without a password\""}
It basically mean that you need to define how to elevate your privileges.
For Windows, in order to elevate your Ansible user privileges, you have to define some variables. See below variables that we have added to our inventory file:
ansible_become=true
ansible_become_method=runas
ansible_become_user=DOMAIN\username
ansible_become_password='Password'
So, my inventory file now looks like;
cat inventory/hosts[kvm]
kvm-host ansible_host=192.168.122.1
[linux:children]
kvm
[linux:vars]
ansible_ssh_common_args='-o StrictHostKeyChecking=no'
[windows]
win2016 ansible_host=192.168.122.234
win2019 ansible_host=192.168.122.236
win2022 ansible_host=192.168.122.232
[windows:vars]
ansible_connection=winrm
ansible_winrm_transport=ntlm
ansible_winrm_server_cert_validation=ignore
ansible_winrm_scheme=http
ansible_port=5985
ansible_become=true
ansible_become_method=runas
ansible_become_user=DOMAIN\username
ansible_become_password='Password'
[kvm_guests:children]
windows
If you want, you can define access elevation credential on AWX interface on Playbook configuration page.
If the updates require a system reboot, the servers will be rebooted to apply the updates.
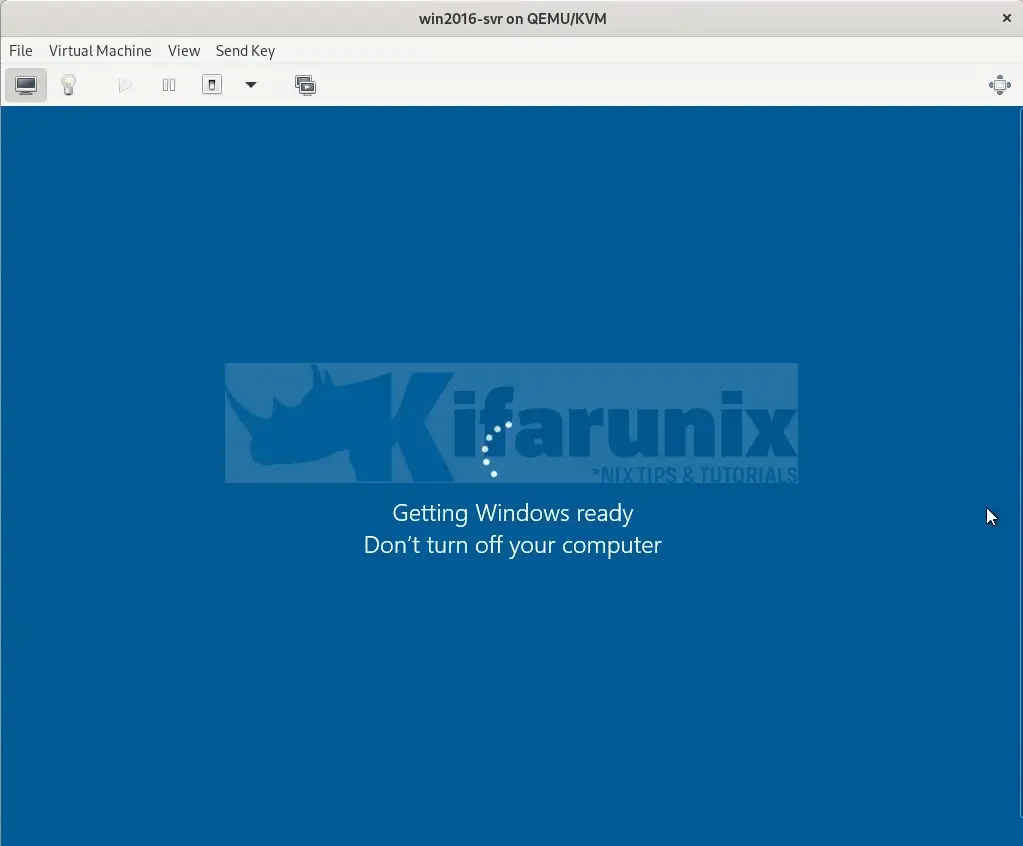
Sample Install Windows Updates Job template output from Ansible AWX;
SSH password:

PLAY [Windows Update Installation from Assessment Report] **********************

TASK [Get current timestamp] ***************************************************
ok: [win2022]
ok: [win2016-svr]
ok: [win2019]

TASK [Check if KB updates report file exists] **********************************
ok: [win2016-svr]
ok: [win2019]
ok: [win2022]

TASK [Fail if updates report file is missing] **********************************
skipping: [win2022]
skipping: [win2016-svr]
skipping: [win2019]

TASK [Read KB updates report content] ******************************************
changed: [win2016-svr]
changed: [win2019]
changed: [win2022]

TASK [Extract KB numbers from report file] *************************************
ok: [win2022]
ok: [win2016-svr]
ok: [win2019]

TASK [Display KB numbers to be installed] **************************************
ok: [win2022] => {
    "msg": [
        "Found 5 unique KB numbers to install:",
        "5055688, 2267602, 890830, 5010475, 5058385"
    ]
}
ok: [win2016-svr] => {
    "msg": [
        "Found 4 unique KB numbers to install:",
        "2267602, 4103720, 5058524, 890830"
    ]
}
ok: [win2019] => {
    "msg": [
        "Found 5 unique KB numbers to install:",
        "4589208, 2267602, 890830, 5058392, 5055681"
    ]
}

TASK [Install Windows updates by KB numbers] ***********************************
changed: [win2019]
changed: [win2022]
changed: [win2016-svr]

TASK [Display installation summary] ********************************************
ok: [win2022] => {
    "msg": [
        "=== WINDOWS UPDATE INSTALLATION COMPLETE ===",
        "Host: win2022",
        "Updates Found: 5",
        "Updates Installed: 5",
        "Updates Failed: 0",
        "Reboot Required: Yes"
    ]
}
ok: [win2016-svr] => {
    "msg": [
        "=== WINDOWS UPDATE INSTALLATION COMPLETE ===",
        "Host: win2016-svr",
        "Updates Found: 4",
        "Updates Installed: 4",
        "Updates Failed: 0",
        "Reboot Required: Yes"
    ]
}
ok: [win2019] => {
    "msg": [
        "=== WINDOWS UPDATE INSTALLATION COMPLETE ===",
        "Host: win2019",
        "Updates Found: 5",
        "Updates Installed: 5",
        "Updates Failed: 0",
        "Reboot Required: Yes"
    ]
}

TASK [Reboot if required] ******************************************************
changed: [win2019]
changed: [win2022]
changed: [win2016-svr]

TASK [Create installation report] **********************************************
ok: [win2022]
ok: [win2016-svr]
ok: [win2019]

TASK [Save installation report to file] ****************************************
changed: [win2022]
changed: [win2016-svr]
changed: [win2019]

TASK [Give a report when no KB numbers were found on updates] ******************
skipping: [win2022]
skipping: [win2016-svr]
skipping: [win2019]

PLAY RECAP *********************************************************************
win2016-svr                : ok=10   changed=4    unreachable=0    failed=0    skipped=2    rescued=0    ignored=0
win2019                    : ok=10   changed=4    unreachable=0    failed=0    skipped=2    rescued=0    ignored=0
win2022                    : ok=10   changed=4    unreachable=0    failed=0    skipped=2    rescued=0    ignored=0
And there you go. Automated Windows patching via Ansible AWX is complete.
Let’s login to one of the Windows server and verify the updates.
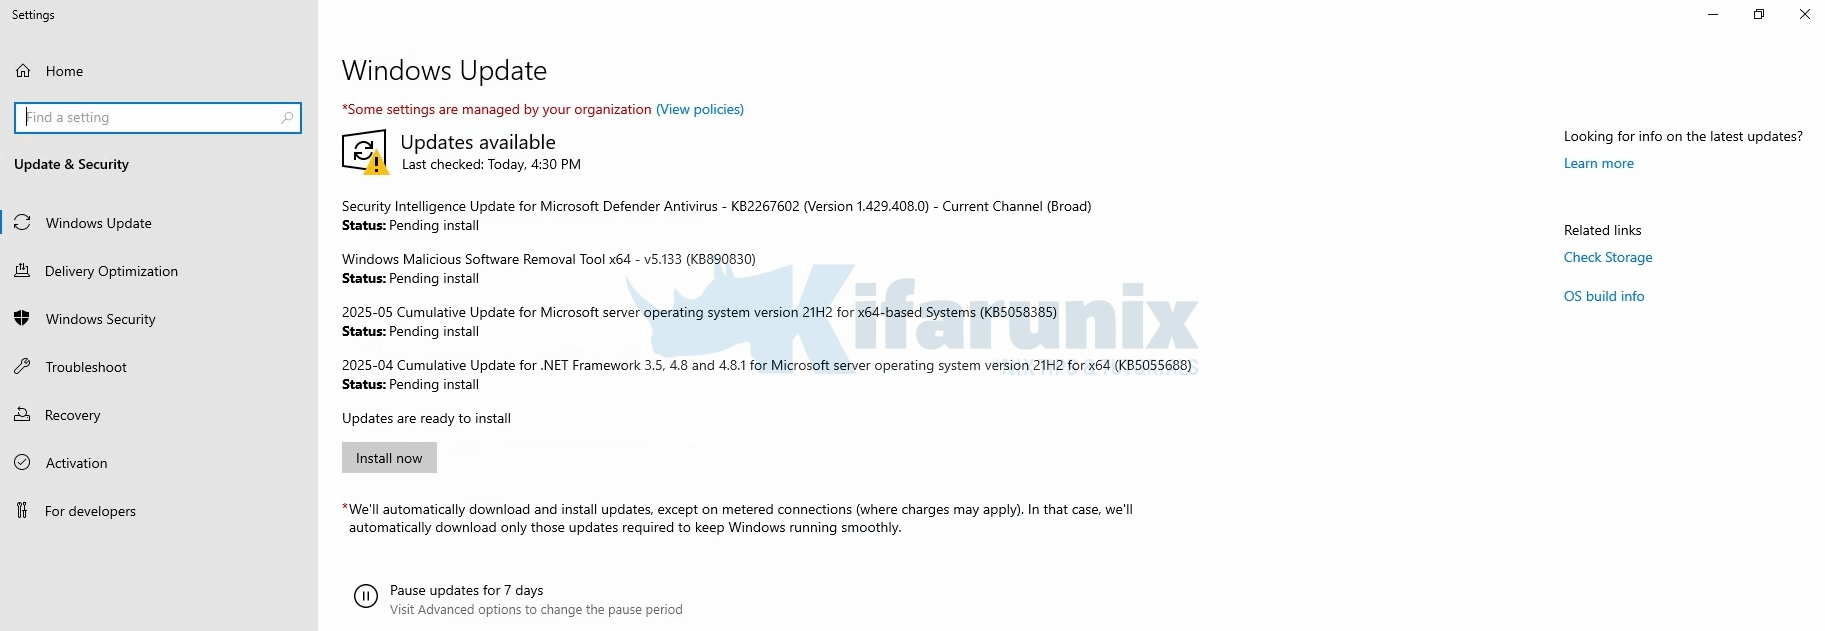
It shows as updates still available for installation. That is fine, simply click Install now to refresh the state. You should see that it finds no updates available for installation and update the status.

And that is all.
Best Practices for Ansible AWX Windows Patching
- Run tests on a staging server to avoid production disruptions.
- Use HTTPS and certificates for encrypted communication.
- Align with Microsoft’s Patch Tuesday for timely updates.
- Snapshot servers (if running as VMs) or take full backup before patching to mitigate risks.
Conclusion
Automating Windows Server patching with Ansible AWX streamlines updates, enhances security, and reduces manual effort. This step-by-step guide walked you through setup, playbook creation, and job execution. Leverage the Git repo and manual resources to customize your workflow. Stay proactive—automate Windows Server patch management today!

