In this guide will take you through how to add FreeIPA user accounts via CLI or Web interface. Our previous guide, link provided a stepwise tutorial on how to install and setup FreeIPA server.
First install and Setup FreeIPA server by following the links below;
Install and Setup FreeIPA Server
Table of Contents
Add User Accounts to FreeIPA Server
There are two ways in which FreeIPA user accounts can be created:
- Via command line interface
- Via the FreeIPA web user interface.
Add FreeIPA User Accounts via CLI
FreeIPA user accounts can be created via the command line using the ipa user-add command.
ip user-add --helpUsage: ipa [global-options] user-add LOGIN [options]
Add a new user.
Options:
-h, --help show this help message and exit
--first=STR First name
--last=STR Last name
--cn=STR Full name
--displayname=STR Display name
--initials=STR Initials
--homedir=STR Home directory
--gecos=STR GECOS
--shell=STR Login shell
--principal=PRINCIPAL
Principal alias
--principal-expiration=DATETIME
Kerberos principal expiration
--password-expiration=DATETIME
User password expiration
--email=STR Email address
--password Prompt to set the user password
--random Generate a random user password
--uid=INT User ID Number (system will assign one if not
provided)
--gidnumber=INT Group ID Number
--street=STR Street address
--city=STR City
--state=STR State/Province
--postalcode=STR ZIP
--phone=STR Telephone Number
--mobile=STR Mobile Telephone Number
--pager=STR Pager Number
--fax=STR Fax Number
--orgunit=STR Org. Unit
--title=STR Job Title
--manager=STR Manager
--carlicense=STR Car License
--sshpubkey=STR SSH public key
--user-auth-type=['password', 'radius', 'otp', 'pkinit', 'hardened', 'idp', 'passkey']
Types of supported user authentication
--class=STR User category (semantics placed on this attribute are
for local interpretation)
--radius=STR RADIUS proxy configuration
--radius-username=STR
RADIUS proxy username
--idp=STR External IdP configuration
--idp-user-id=STR A string that identifies the user at external IdP
--departmentnumber=STR
Department Number
--employeenumber=STR Employee Number
--employeetype=STR Employee Type
--preferredlanguage=STR
Preferred Language
--certificate=CERTIFICATE
Base-64 encoded user certificate
--setattr=STR Set an attribute to a name/value pair. Format is
attr=value. For multi-valued attributes, the command
replaces the values already present.
--addattr=STR Add an attribute/value pair. Format is attr=value. The
attribute must be part of the schema.
--noprivate Don't create user private group
--all Retrieve and print all attributes from the server.
Affects command output.
--raw Print entries as stored on the server. Only affects
output format.
--no-members Suppress processing of membership attributes.
The command can be run interactively or non-interactively by entering the attributes interactively or by passing the attributes directly on the command line respectively.
For example, to create a user called bsmith on the command line using the ipa user-add non-interactively.
ipa user-add bsmith --first=Bill --last=Smith --random
The command will create the user account with other account default values.
-------------------
Added user "bsmith"
-------------------
  User login: bsmith
  First name: Bill
  Last name: Smith
  Full name: Bill Smith
  Display name: Bill Smith
  Initials: BS
  Home directory: /home/bsmith
  GECOS: Bill Smith
  Login shell: /bin/sh
  Principal name: [email protected]
  Principal alias: [email protected]
  User password expiration: 20240504072504Z
  Email address: [email protected]
  Random password: 3Wp<[email protected]~j3Ebmq_,_
  UID: 1152000004
  GID: 1152000004
  Password: True
  Member of groups: ipausers
  Kerberos keys available: True
To interactively create a FreeIPA user account using the ipa user-add command, simply run the command on the terminal as shown below;
ipa user-add --password
When run, you are prompted to provide the required values. Where the default values can be used, press Enter to accept the defaults or enter your values and proceed.
First name: Bonnie
Last name: Parker
User login [bparker]:
Password:
Enter Password again to verify:
--------------------
Added user "bparker"
--------------------
  User login: bparker
  First name: Bonnie
  Last name: Parker
  Full name: Bonnie Parker
  Display name: Bonnie Parker
  Initials: BP
  Home directory: /home/bparker
  GECOS: Bonnie Parker
  Login shell: /bin/sh
  Principal name: [email protected]
  Principal alias: [email protected]
  User password expiration: 20240504072646Z
  Email address: [email protected]
  UID: 1152000005
  GID: 1152000005
  Password: True
  Member of groups: ipausers
  Kerberos keys available: True
Password provided during account setup is temporary and the user is prompted to change the password on the first login.
Read more on, ipa user-add --help.
List FreeIPA User Accounts on Command Line
You can list FreeIPA user accounts using the ipa user-find command.
To list all created FreeIPA user accounts, simply run the command;
ipa user-find --all
---------------
3 users matched
---------------
  dn: uid=admin,cn=users,cn=accounts,dc=kifarunix,dc=com
  User login: admin
  Last name: Administrator
  Full name: Administrator
  Home directory: /home/admin
  GECOS: Administrator
  Login shell: /bin/bash
  Principal alias: [email protected], [email protected]
  User password expiration: 20240802064123Z
  UID: 1152000000
  GID: 1152000000
  Account disabled: False
  Preserved user: False
  Member of groups: admins, trust admins
  ipantsecurityidentifier: S-1-5-21-4293870940-1827731141-612974734-500
  ipauniqueid: d8dbfdea-09e0-11ef-9c0d-525400088c21
  krbextradata: AAKT2DVmcm9vdC9hZG1pbkBLSUZBUlVOSVguQ09NAA==
  krblastadminunlock: 20240504064123Z
  krblastfailedauth: 20240504065202Z
  krblastpwdchange: 20240504064123Z
  krbloginfailedcount: 0
  objectclass: top, person, posixaccount, krbprincipalaux, krbticketpolicyaux, inetuser, ipaobject, ipasshuser, ipaSshGroupOfPubKeys, ipaNTUserAttrs

  dn: uid=bparker,cn=users,cn=accounts,dc=kifarunix,dc=com
  User login: bparker
  First name: Bonnie
  Last name: Parker
  Full name: Bonnie Parker
  Display name: Bonnie Parker
  Initials: BP
  Home directory: /home/bparker
  GECOS: Bonnie Parker
  Login shell: /bin/sh
  Principal name: [email protected]
  Principal alias: [email protected]
  User password expiration: 20240504072646Z
  Email address: [email protected]
  UID: 1152000005
  GID: 1152000005
  Account disabled: False
  Preserved user: False
  Member of groups: ipausers
  ipantsecurityidentifier: S-1-5-21-4293870940-1827731141-612974734-1005
  ipauniqueid: aa9f4944-09e7-11ef-8ba4-525400088c21
  krbextradata: AAI24zVmcm9vdC9hZG1pbkBLSUZBUlVOSVguQ09NAA==
  krblastpwdchange: 20240504072646Z
  mepmanagedentry: cn=bparker,cn=groups,cn=accounts,dc=kifarunix,dc=com
  objectclass: top, person, organizationalperson, inetorgperson, inetuser, posixaccount, krbprincipalaux, krbticketpolicyaux, ipaobject, ipasshuser,
               ipaSshGroupOfPubKeys, mepOriginEntry, ipantuserattrs

  dn: uid=bsmith,cn=users,cn=accounts,dc=kifarunix,dc=com
  User login: bsmith
  First name: Bill
  Last name: Smith
  Full name: Bill Smith
  Display name: Bill Smith
  Initials: BS
  Home directory: /home/bsmith
  GECOS: Bill Smith
  Login shell: /bin/sh
  Principal name: [email protected]
  Principal alias: [email protected]
  User password expiration: 20240504072504Z
  Email address: [email protected]
  UID: 1152000004
  GID: 1152000004
  Account disabled: False
  Preserved user: False
  Member of groups: ipausers
  ipantsecurityidentifier: S-1-5-21-4293870940-1827731141-612974734-1004
  ipauniqueid: 6d832300-09e7-11ef-94ea-525400088c21
  krbextradata: AALQ4jVmcm9vdC9hZG1pbkBLSUZBUlVOSVguQ09NAA==
  krblastpwdchange: 20240504072504Z
  mepmanagedentry: cn=bsmith,cn=groups,cn=accounts,dc=kifarunix,dc=com
  objectclass: top, person, organizationalperson, inetorgperson, inetuser, posixaccount, krbprincipalaux, krbticketpolicyaux, ipaobject, ipasshuser,
               ipaSshGroupOfPubKeys, mepOriginEntry, ipantuserattrs
----------------------------
Number of entries returned 3
----------------------------
To list specific user;
ipa user-find USERNAMEFor example;
ipa user-find jdoeLearn more on ipa user-find --help.
Modify FreeIPA User Accounts on Command Line
To change the attributes of the FreeIPA user account, use the ipa user-mod command.
For example, to change the shell for the user, simply run;
ipa user-mod USERNAME --shell=/bin/bashSubstitute USERNAME with the user's login ID.
See other options for changing user attributes, ipa user-mod --help.
To delete the user, use the ipa user-del command.
ipa user-del USERNAMETo remove a user from a specific group;
ipa group-remove-member GROUPNAME --users=USERNAMETo disable a user;
ipa user-disable USERNAMEAdd FreeIPA User Accounts via Web Interface
To create, view or modify users and their attributes from FreeIPA server web interface, login to FreeIPA as an administrative user.
Once logged in, Under Identity > Users tab, you can see multiple user account management options.

As you can see from the Users tab, there are three types of the user account states;
- Stage users are not allowed to authenticate. Some of the user account properties required for active users might not yet be set.
- Active users are allowed to authenticate. All required user account properties must be set in this state.
- Preserved users are former
activeusers. They are considered inactive and cannot authenticate to IdM.
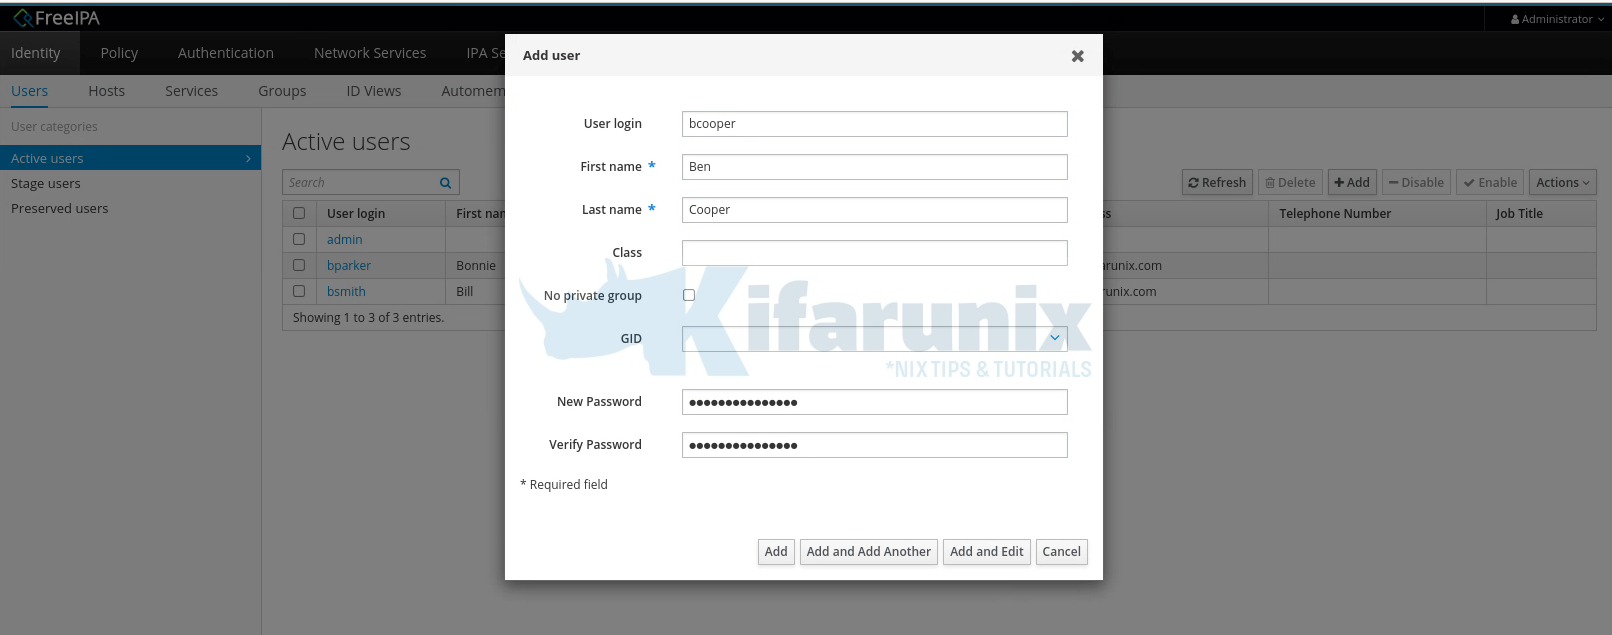
To add a user account, click +Add button. This opens up a screen where you can set the user's username, the first and last names, passwords and other attributes.

Click Add to create the user account. You can click on other options like Add and Add another to add the user and proceed to add another, Add and Edit to add the edit the user attributes...
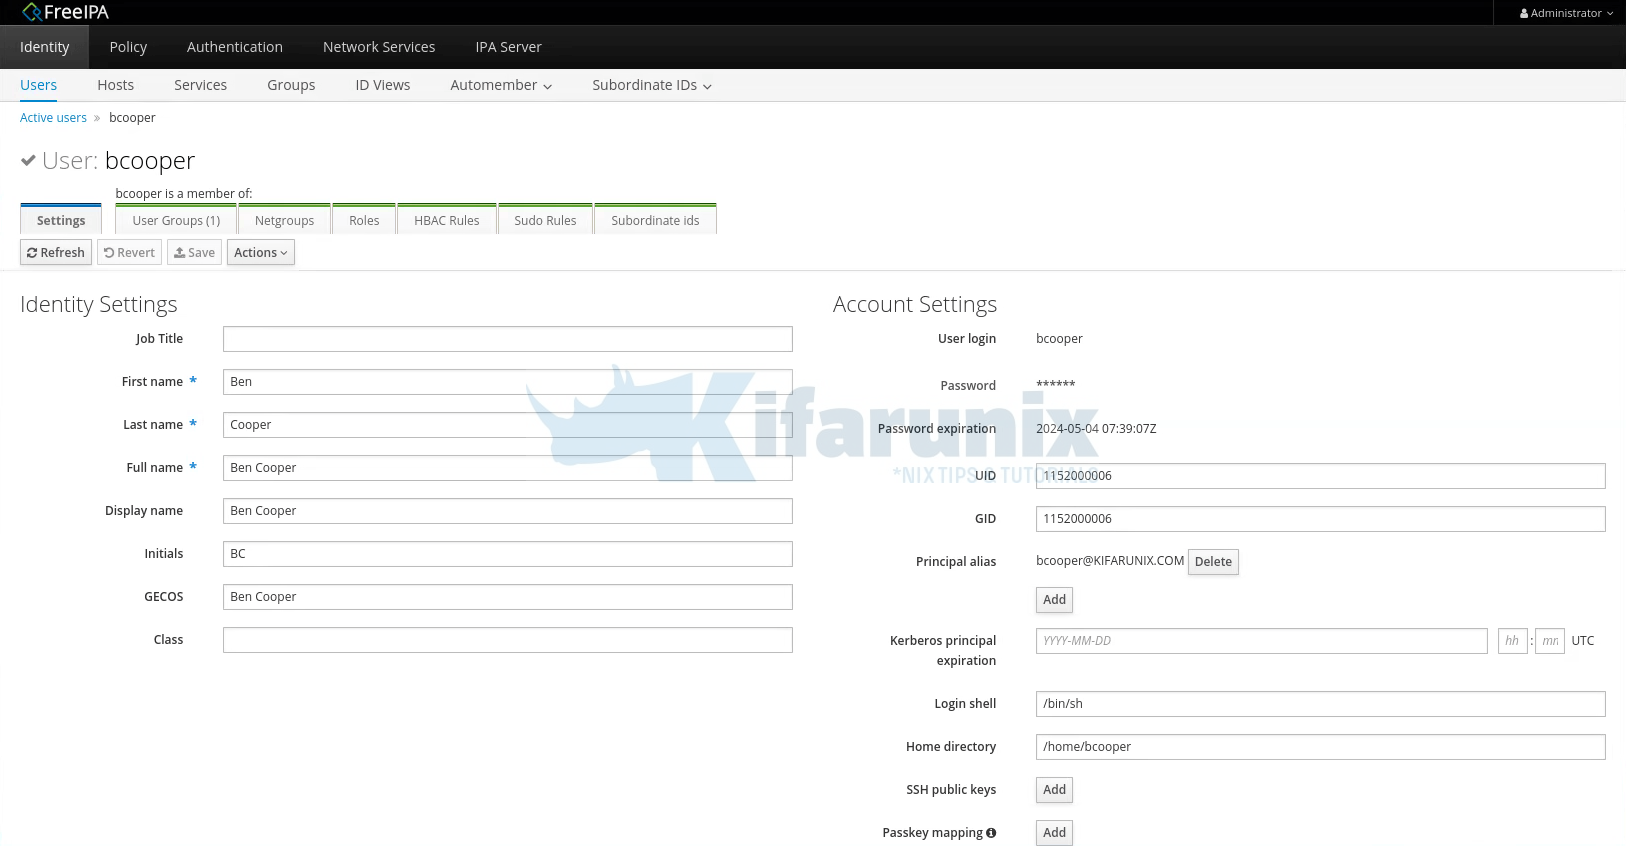
To edit FreeIPA user account attributes, click on the user's username.

Scroll down the screen to see other user's attributes that can be modified. You can also set user roles, user groups from the same screen.
Be sure to hit Save when you have modified the user attributes.
You can also Delete, Enable or Disable user account.
Other Related guides
Configure SSSD for OpenLDAP Client Authentication on Debian 10/9


What if i have an csv file with usernames,first name last name, group and i want to upload this.
how would i go about it.?