In this guide, we are going to learn how to install and configure OSSEC agent on Ubuntu 18.04/CentOS 7. OSSEC is an open source Intrusion Detection System (HIDS) that runs across multiple OS platforms such as Linux,Solaris, AIX, HP-UX, BSD, Windows, Mac and VMware ESX.
It monitors all aspects of system activity such as;
- file integrity monitoring
- Windows registry monitoring
- log monitoring
- rootcheck
- process monitoring
It can also be configured to notify on a suspicious activity via alert logs or email alerts. OSSEC can be integrated with SIEM solutions such as AlienVault. You can therefore have a look at our previous article on setting up AlienVault HIDs agent on a Linux system by following the link below;
How to Install and Configure AlienVault HIDs Agent on a Linux Host.
Table of Contents
Installing OSSEC agent on Ubuntu 18.04/CentOS 7
Prerequisites
To install OSSEC agent on a Ubuntu 18.04/CentOS 7 or any other Linux/Unix system, ensure that you have the C compiler as well as the make utility installed;
Install Prerequisites on Ubuntu
Run the command below to install required build tools;
apt install gcc make libevent-dev zlib1g-dev libssl-dev libpcre2-dev wget tar -yInstall Prerequisites on CentOS
Run the command below to install required build tools;
yum install gcc make zlib-devel openssl-devel pcre2-devel wget tar -yDownload OSSEC Agent Tarball
OSSEC 3.7 is the latest stable release version as of this writing. Check the releases page for the latest releases.
Replace the value of VER with the current release version of OSSEC agent;
VER=3.7.0wget https://github.com/ossec/ossec-hids/archive/${VER}.tar.gz -P /tmpExtract OSSEC Source Code
Once the OSSEC source download is completed, extract it as follows;
cd /tmptar xzf ${VER}.tar.gzInstall OSSEC Agent on Ubuntu 18.04/CentOS 7
Navigate to the Agent source directory
cd ossec-hids-${VER}/Launch the OSSEC agent installer;
./install.shThe installer will first prompts you to select the installation language, English by default, abbreviated as [en]. Press Enter to accept the default
(en/br/cn/de/el/es/fr/hu/it/jp/nl/pl/ru/sr/tr) [en]: ENTERAgain, press ENTER to continue.
-- Press ENTER to continue or Ctrl-C to abort. --Specify the type of installation. In our case, we are installing ossec-hids agent, hence select agent.
1- What kind of installation do you want (server, agent, local, hybrid or help)? agent

  - Agent(client) installation chosen.
Choose the installation path. We go with the default, /var/ossec.
2- Setting up the installation environment.

 - Choose where to install the OSSEC HIDS [/var/ossec]: ENTER

    - Installation will be made at  /var/ossec .
Enter the OSSEC-HIDs Server IP address or hostname. Replace the IP used here accordingly.
3- Configuring the OSSEC HIDS.

  3.1- What's the IP Address or hostname of the OSSEC HIDS server?: 192.168.56.11

   - Adding Server IP 192.168.56.11
Enable system integrity check
  3.2- Do you want to run the integrity check daemon? (y/n) [y]: y

   - Running syscheck (integrity check daemon).
Enable rootkit detection engine.
  3.3- Do you want to run the rootkit detection engine? (y/n) [y]: y

   - Running rootcheck (rootkit detection).
Disable active response. Otherwise, you can enable it if you an understanding of the type and number of alerts you want.
  3.4 - Do you want to enable active response? (y/n) [y]: n

   - Active response disabled.
The agent installer then displays the log files that are read by default. You can add more later on ossec.conf file.
  3.5- Setting the configuration to analyze the following logs:
    -- /var/log/messages
    -- /var/log/secure
    -- /var/log/maillog
...
Once you are done defining the default options, proceed to install OSSEC agent on Ubuntu 20.04 by pressing ENTER.
Once the agent is installed, you will see an output similar to;
 - System is Debian (Ubuntu or derivative).
 - Init script modified to start OSSEC HIDS during boot.

 - Configuration finished properly.

 - To start OSSEC HIDS:
      /var/ossec/bin/ossec-control start

 - To stop OSSEC HIDS:
      /var/ossec/bin/ossec-control stop

 - The configuration can be viewed or modified at /var/ossec/etc/ossec.conf


    Thanks for using the OSSEC HIDS.
    If you have any question, suggestion or if you find any bug,
    contact us at https://github.com/ossec/ossec-hids or using
    our public maillist at
    https://groups.google.com/forum/#!forum/ossec-list

    More information can be found at http://www.ossec.net

    ---  Press ENTER to finish (maybe more information below). ---
Press ENTER to close the installer.
Connect the Agent to the Server
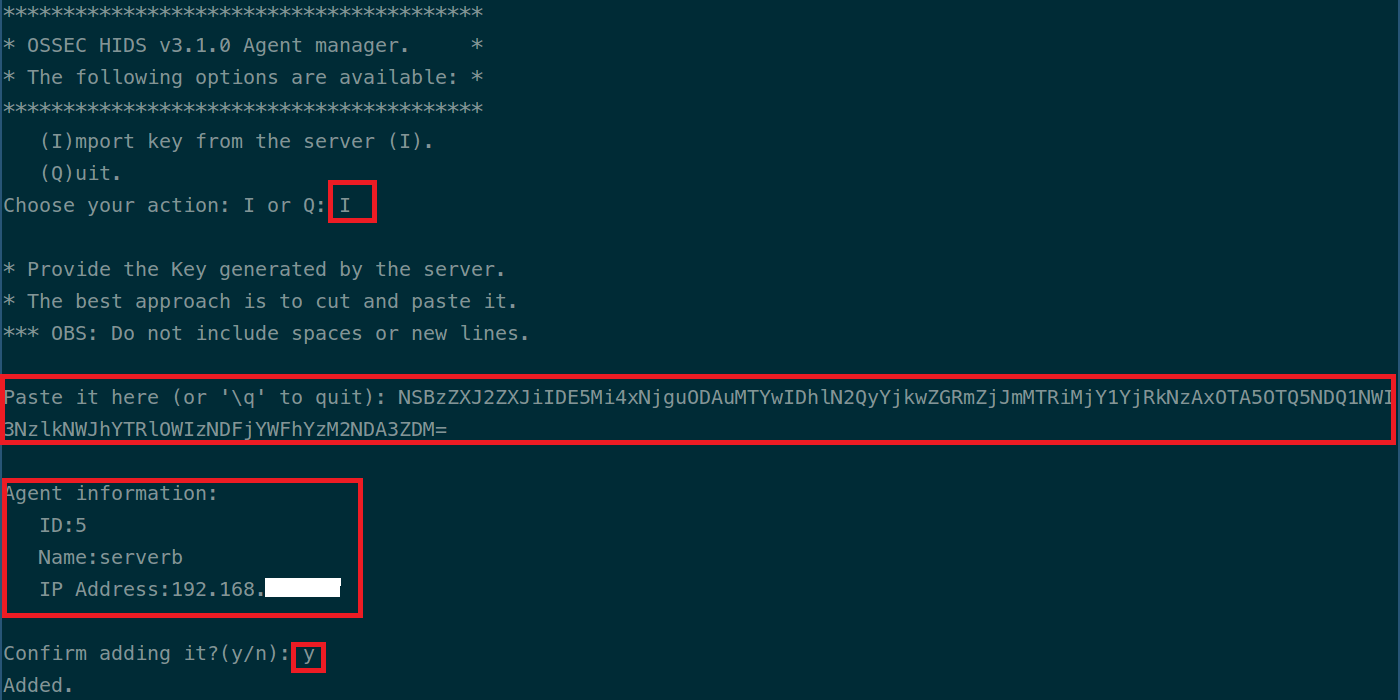
Now that the agent is installed, run the following command to add the server-agent connection key. You can extract the Key for the specific host from the server. Enter option I, paste the key and confirm adding the key. Then type Q and press enter to exit.
/var/ossec/bin/manage_agentsStart the OSSEC Agent
Now that the server-agent key is installed, run the command below to start the OSSEC agent;
/var/ossec/bin/ossec-control startYou can verify that the agent is communicating with the server by checking the ossec agent logs as shown below.
tail /var/ossec/logs/ossec.logYou should be able to see a line stating that the agent has connected to the server. If that is not the case, check the firewall issues.
That is all. You have successfully installed OSSEC agent on Ubuntu 18.04/CentOS 7.
Other Tutorials
Install Wazuh Agent on pfSense
Monitor Changes to Critical Files on Windows Systems using Wazuh and ELK


