Follow through this tutorial to learn how to enable and configure Cortex Analyzers. Cortex is an opensource software created by TheHive that can be used by IT security personnel to manually or automatically (through Cortex REST APIs) analyze event/incident observables and IOCs such as IP addresses, file, hashes, domain names, URLs, email addresses e.t.c. Analyzers allow analysts and security researchers to analyze such observables and IOCs at scale.
You can check our previous guide on how to install Cortex on Ubuntu;
Install Cortex on Ubuntu 22.04/Ubuntu 20.04
How to Enable and Configure Cortex Analyzers
Cortex ships with the support of various analyzers. Some that are free to use, some that requires special access or valid subscription or product license.
- Free Analyzers
- Abuse_Finder
- AbuseIPDB
- Backscatter.io
- C1fApp
- Censys.io
- Clamav
- Crtsh
- CuckooSandbox
- CyberChef
- Cybercrime-Tracker
- Cyberprotect
- Cymon
- DNSSinkhole
- DShield
- EmailRep
- EmlParser
- FileInfo
- FireHOLBlocklists
- Fortiguard
- GoogleDNS
- GoogleSafeBrowsing
- Hashdd
- HIBP
- Hippocampe
- HybridAnalysis
- Hunterio_DomainSearch
- Maltiverse
- MalwareClustering
- MaxMind
- MISP
- MISP Warninglists
- Msg_Parser
- NSLR
- Onyphe
- OpenCTI
- OTXQuery
- Patrowl
- PhishTank
- PhishingInitiative
- Pulsedive
- Robtex
- SpamhausDBL
- StaxxSearch
- StopForumSpam
- Talos Reputation
- Team Cymru MHR
- ThreatCrowd
- Tor Blutmagie
- Tor Project
- Unshortenlink
- UrlScan.io
- URLhaus
- Virusshare
- WOT
- Yara
- Yeti
- Analyzers Requiring Special Access
- ANY.RUN
- CERTatPassiveDNS
- CIRCLPassiveDNS
- CIRCLPassiveSSL
- GreyNoise
- IBM X-Force
- IPInfo
- IntezerCommunity
- LastInfoSec
- Malpedia
- Malwares
- MalwareBazaar
- MnemonicPDNS
- Sendgrid
- SinkDB
- Shodan
- Subscription and License-based Analyzers
- Autofocus
- DNSDB
- DomainTools
- DomainTools Iris
- EmergingThreats
- FireEye iSIGHT
- JoeSandbox
- Investigate
- IPVoid
- Nessus
- PassiveTotal
- PayloadSecurity
- RecordedFuture
- SecurityTrails
- SoltraEdge
- ThreatGrid
- Threat Response
- Umbrella
- VirusTotal
- VMRay
In this guide, we will just see how to enable and configure some of the analyzers to get you started.
Login to Cortex as an Organization Admin
To get started, login to Cortex as a specific organization admin for you to be able to access, enable and configure your organization analyzers.
Note that for you to create an organization and organization administrative user, you need to login as super-admin first.
The check the guide below on how to create an organization and admin user for that account;
Next, Create Cortex Organization and Organization administrator
Install and Host Cortex Analyzers Locally on the Host
You can view available analyzers by navigating to Organization > Analyzers.
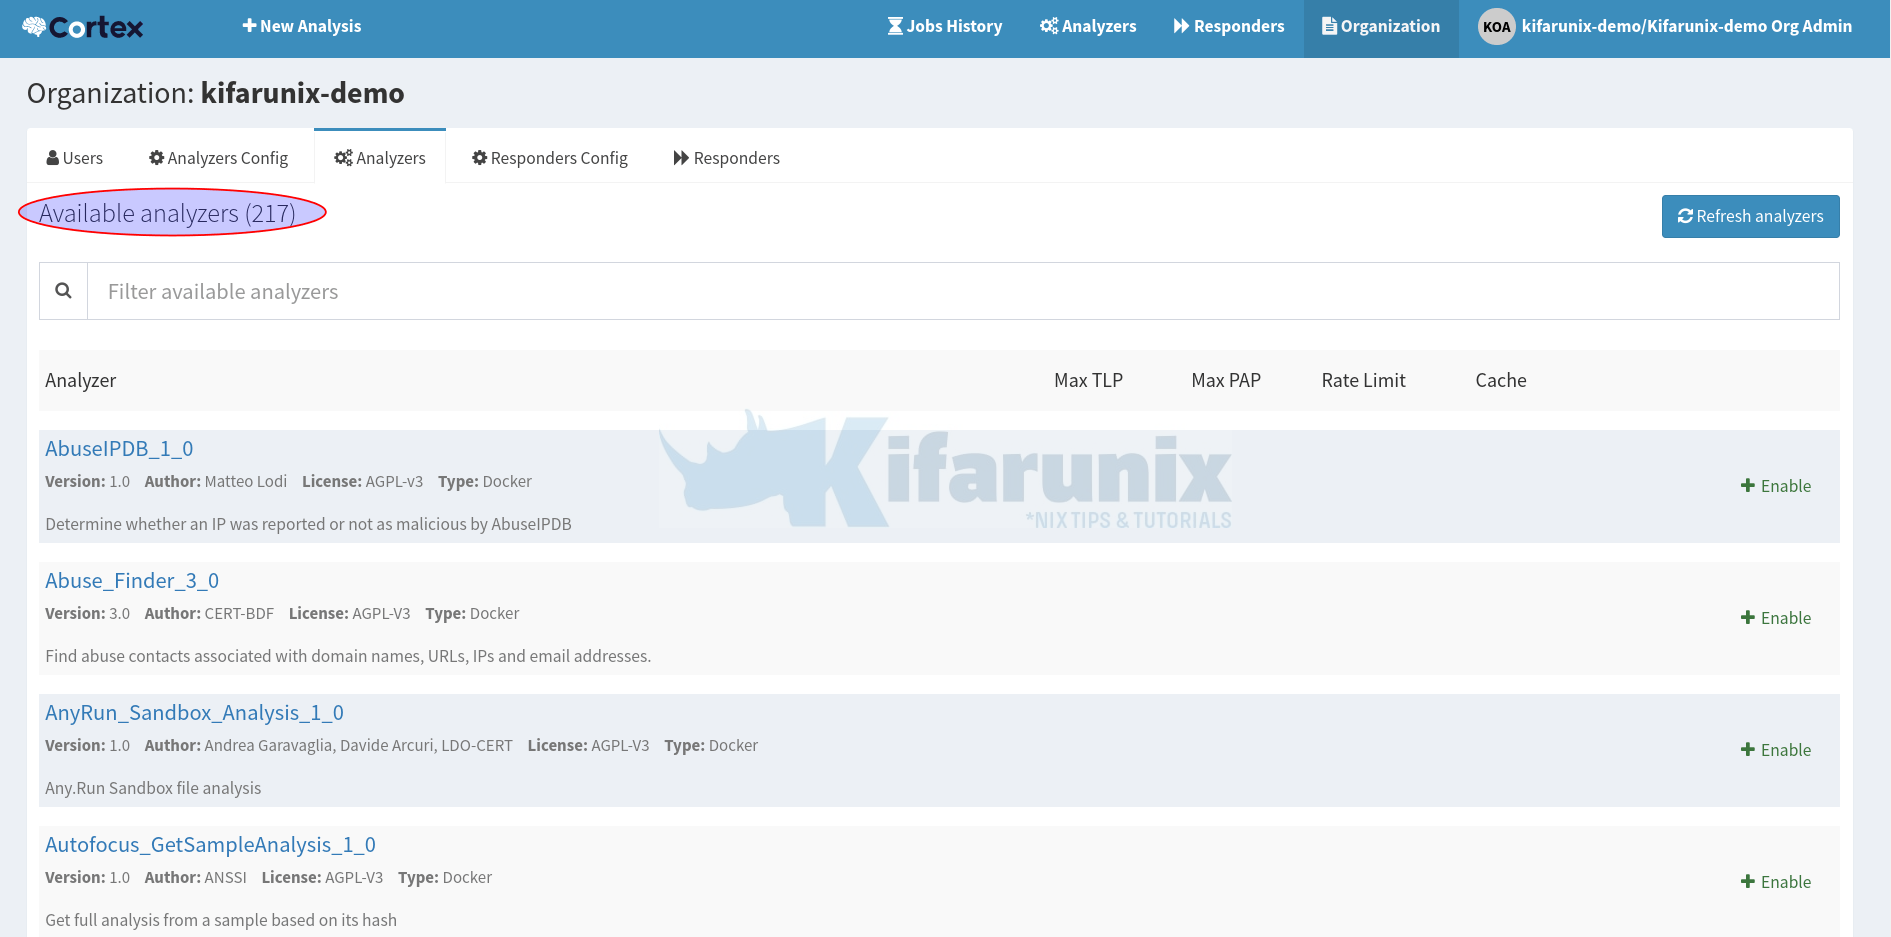
From the above, you can see we have 217 available analyzers.
By default, Cortex is configured to get the list of analyzers from https://download.thehive-project.org/analyzers.json;
sudo vim /etc/cortex/application.conf## ANALYZERS
#
analyzer {
# analyzer location
# url can be point to:
# - directory where analyzers are installed
# - json file containing the list of analyzer descriptions
urls = [
"https://download.thehive-project.org/analyzers.json"
#"/absolute/path/of/analyzers"
]
# Sane defaults. Do not change unless you know what you are doing.
fork-join-executor {
# Min number of threads available for analysis.
parallelism-min = 2
# Parallelism (threads) ... ceil(available processors * factor).
parallelism-factor = 2.0
# Max number of threads available for analysis.
parallelism-max = 4
}
}
We will however install and host our analyzers on the Cortex server.
Hence, install required packages.
Note that you will need both Python 2 and Python 3 for compatibility of different analyzers.
sudo apt install -y --no-install-recommends python2.7-dev python3-pip \
python3-dev ssdeep libfuzzy-dev libfuzzy2 libimage-exiftool-perl libmagic1 \
python3-testresources build-essential git libssl-dev
Next, install Python setuptools;
sudo pip3 install -U pip setuptoolssudo pip install -U pip setuptoolsClone the Cortex-analyzers repository in the directory of your preferred directory;
sudo git clone https://github.com/TheHive-Project/Cortex-Analyzers /opt/cortex/analyzers-respondersInstall Python requirements of each analyzer thereafter;
for i in `find /opt/cortex/analyzers-responders -name 'requirements.txt'`; do sudo -H pip install -r $i; done && \
for i in `find /opt/cortex/analyzers-responders -name 'requirements.txt'`; do sudo -H pip3 install -r $i || true; done
We will now our analyzers on our custom directory, /opt/cortex/analyzers-responders/analyzers/.
ls /opt/cortex/analyzers-responders/analyzers/AbuseIPDB Crowdsec EchoTrail GreyNoise KasperskyTIP NSRL Robtex TeamCymruMHR Verifalia
Abuse_Finder Crtsh Elasticsearch HIBP LastInfoSec Nessus SEKOIAIntelligenceCenter ThreatGrid VirusTotal
AnyRun CuckooSandbox EmailRep Hashdd LdapQuery OTXQuery SecurityTrails ThreatMiner Virusshare
Autofocus CyberChef EmergingThreats Hippocampe MISP Onyphe SentinelOne ThreatResponse Vulners
BackscatterIO CyberCrime-Tracker EmlParser Hunterio MISPWarningLists OpenCTI Shodan Threatcrowd WOT
BitcoinAbuse Cyberprotect FalconSandbox HybridAnalysis Malpedia PaloAltoWildFire SinkDB Thunderstorm Yara
C1fApp Cylance FileInfo IBMXForce Maltiverse PassiveTotal SoltraEdge TorBlutmagie Yeti
CERTatPassiveDNS DNSDB FireEyeiSight IP-API MalwareBazaar Patrowl SophosIntelix TorProject Zscaler
CIRCLHashlookup DNSLookingglass FireHOLBlocklists IPVoid MalwareClustering PayloadSecurity SpamAssassin Triage
CIRCLPassiveDNS DNSSinkhole ForcepointWebsensePing IPinfo Malwares PhishTank SpamhausDBL URLhaus
CIRCLPassiveSSL DShield Fortiguard IVRE MaxMind PhishingInitiative Splunk Umbrella
CISMCAP Diario GRR Inoitsu MetaDefender ProofPoint StamusNetworks UnshortenLink
Censys DomainMailSPFDMARC GoogleDNS IntezerCommunity MnemonicPDNS Pulsedive StaxxSearch Urlscan.io
CheckPhish DomainTools GoogleSafebrowsing Investigate MsgParser RecordedFuture StopForumSpam VMRay
ClamAV DomainToolsIris GoogleVisionAPI JoeSandbox NERD RiskIQ TalosReputation Valhalla
They might be less than those you can obtain from the https://download.thehive-project.org/analyzers.json.
Now that you have locally installed Analyzers, configure Cortex to use these local analyzers.
Thus, change the urls from https://download.thehive-project.org/analyzers.json to the local file system path containing Analyzers;
sudo vim /etc/cortex/application.confanalyzer {
# analyzer location
# url can be point to:
# - directory where analyzers are installed
# - json file containing the list of analyzer descriptions
urls = [
"https://download.thehive-project.org/analyzers.json"
#"/absolute/path/of/responders"
]To something like;
analyzer {
  # analyzer location
  # url can be point to:
  # - directory where analyzers are installed
  # - json file containing the list of analyzer descriptions
  urls = [
    #"https://download.thehive-project.org/analyzers.json"
    "/opt/cortex/analyzers-responders/analyzers"
  ]
Save and exit the file;
Restart Cortex;
sudo systemctl restart cortexYou can tail the logs immediately to see if Cortex has found the new Analyzer worker list;
sudo tail -f /opt/cortex/logs/application.logEnable Cortex Analyzers
From the list of available analyzers above, you can see that none of the analyzer is enabled by default.
Some Analyzers requires some configurations such as API keys to be able to use them while some are just available for use out of the box without any further configuration.
You can get the requirements of each Analyzer on Cortex Analyzers page.
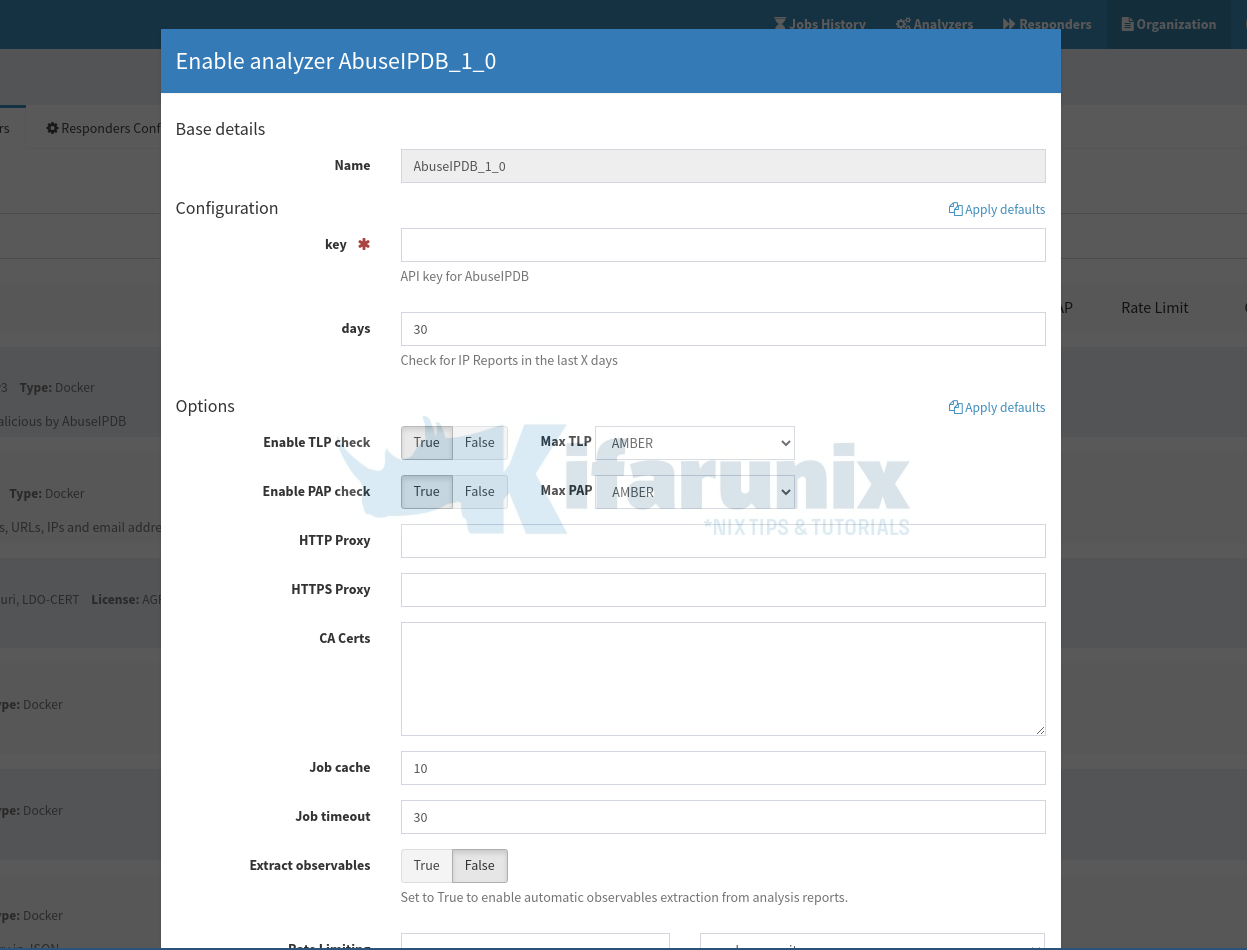
As an example, let’s see how to enable AbuseIPDB Analyzer. Thus, from the Organization Analyzers, click +Enable against the analyzer;
The analyzer configuration pops up!
As you can see, you need an API key from AbuseIPDB in order to be able to utilize this analyzer.
Thus, create an account on AbuseIPDB (it has different plans from Free to Enterprise plans). Choose your subscription plan accordingly.
Once you have an account;
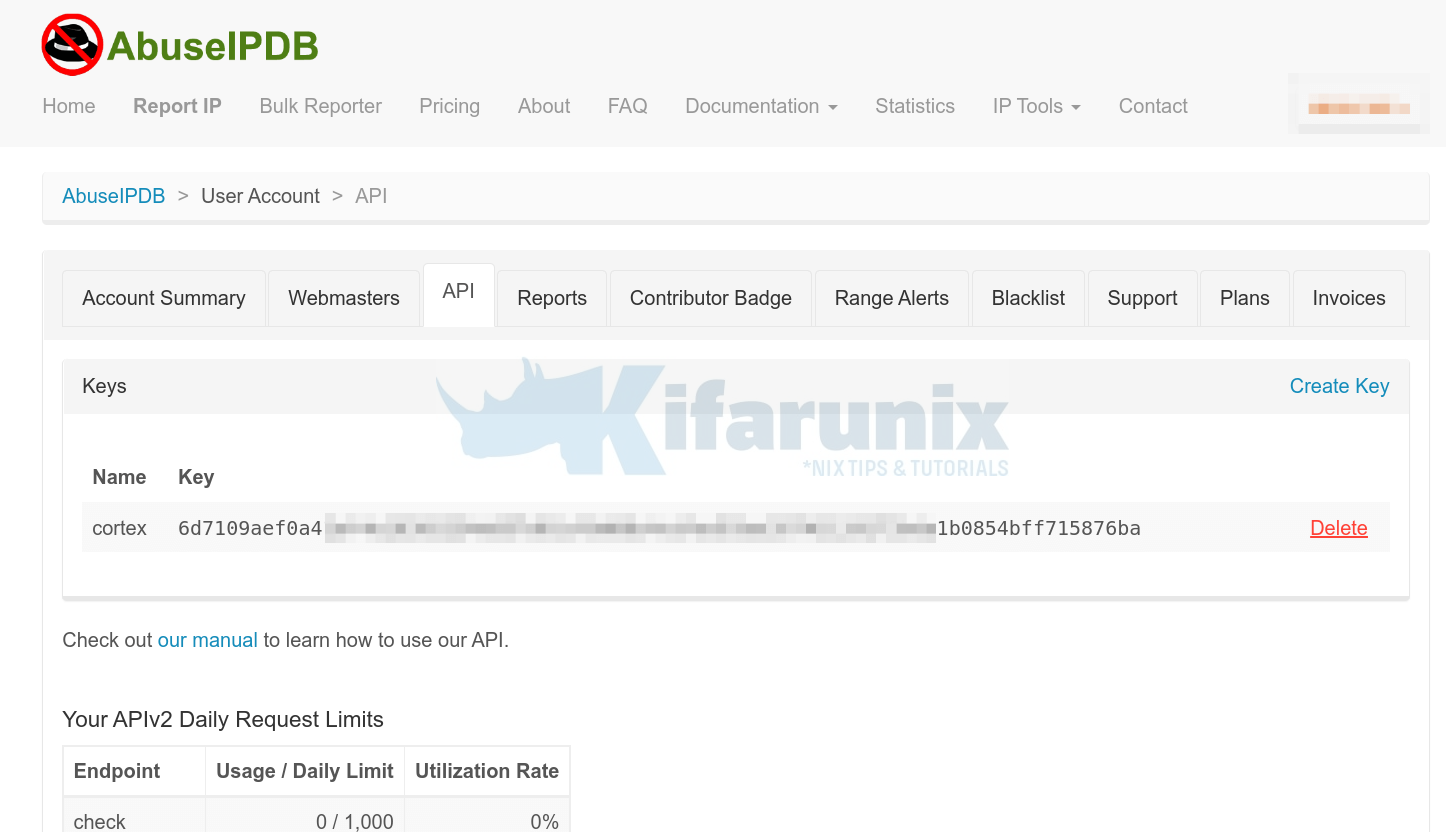
- Login and navigate to your account summary page and head over to API tab > Create Key.
- Enter the name of the API key
- Click Create to create the key.
Copy the API key and paste it under the AbuseIPDB analyzer key configuration.
Once you paste the key, click Save.
The analyzer should now be showing like in the screenshot below;

You can enable other Cortex analyzers in the same way.
Using Enabled Cortex Analyzers
Once you enable an analyzer, click Analyzers menu at the top. You will now see enabled analyzers ready to do the analysis.
Each analyzer will show what observables it applies to. For example, AbuseIPDB is used to analyze IP addresses, domain names or network subnets for any abuse.
When you click on the > Run button, a wizard that let’s you enter the IP address or domain name to manually analyze pops up.
Similarly, you can click +New analysis to start a new analysis.

- Data type: select IP
- Data: enter IP address or domain name.
Click Start to analyze IP/domain in question.
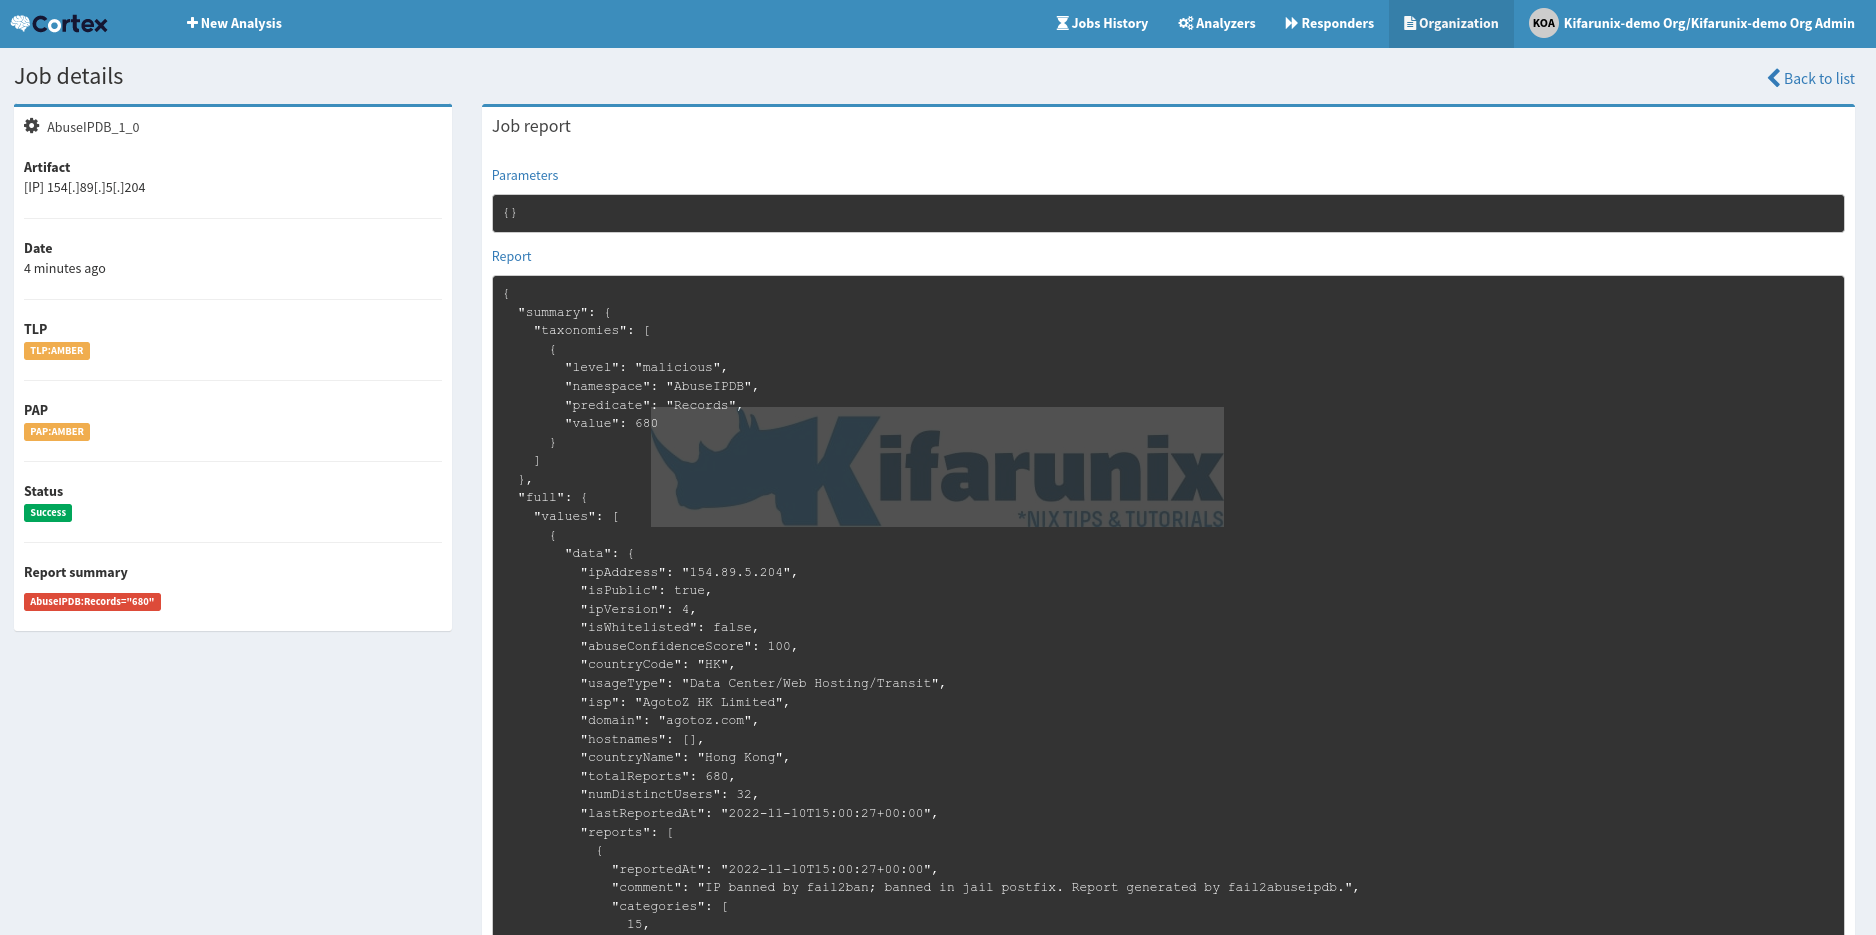
You analysis job should now run and be completed in a short while;

Click View to check the analysis report;
In a similar way, you can now enable and configure other Cortex analyzers.


