In this guide, we are going to learn how to install Kismet on Ubuntu 18.04. Kismet is a wireless network and device detector, sniffer, wardriving tool and wireless intrusion detection (WIDS) framework. It works with Wi-Fi interfaces, Bluetooth interfaces, some software defined radio hardware like the RTLSDR, and other specialized capture hardware.
Install Kismet on Ubuntu 18.04
Kismet is available on the default Ubuntu 18.04 repositories. However, the available version may not be up to date. For example, 2019-04-R1 is the current release of Kismet while the available version on Ubuntu 18.04 repos is;
apt-cache policy kismet
 kismet:
   Installed: (none)
   Candidate: 2016.07.R1-1.1~build1
   Version table:
      2016.07.R1-1.1~build1 500
         500 http://ke.archive.ubuntu.com/ubuntu bionic/universe amd64 Packages
Hence, to get the latest version up and running, you need to install Kismet from source. The current release comes bundled with several features including a massively rewritten code base, modern web UI, scriptable REST-like interface, massive data set, transparent remote capture, massive multiple-radio support etc. You can check more features on release page.
Install Kismet on Ubuntu 18.04 from Source
Install Required Dependencies
Before you can compile and install Kismet on Ubuntu 18.04 from source, there are a number of dependencies that are required to get is up and running.
NOTE: Be sure to remove any existing Kismet installations before proceeding, if you have any.
As usual, update and upgrade your system packages.
apt update
apt upgrade
Once the update is done, install the required dependencies. Fire up your terminal and execute the command below;
apt install build-essential git libmicrohttpd-dev pkg-config zlib1g-dev libnl-3-dev \
libnl-genl-3-dev libcap-dev libpcap-dev libnm-dev libdw-dev libsqlite3-dev libprotobuf-dev \
libprotobuf-c-dev protobuf-compiler protobuf-c-compiler libsensors4-dev python python-setuptools \
python-protobuf python-requests librtlsdr0 python-usb python-paho-mqtt libusb-1.0-0-dev
Clone Kismet from Git
Once the installation of the dependencies above is done, clone the Kismet Github repository to your system by running the command below;
git clone https://www.kismetwireless.net/git/kismet.gitConfigure Kismet
Once the clone is done, navigate to Kismet directory and run the configure script to optimize it to the system, identify any missing dependency in preparation for compilation.
cd kismet
./configure
If you encounter any dependency issue, be sure to fix it before proceeding.
Compile Kismet
If all goes well, proceed to compile Kismet. The compilation may take some time depending on the “horse power” of your machine.
makeInstall Kismet on Ubuntu 18.04
Next, proceed to install Kismet on Ubuntu 18.04. To be able to run Kismet as a local user, you should install it as suid-root. In this case, Kismet will keep the packet decoding and web interface running without root privileges.
make suidinstallIf the installation is successful, you should see such an output.
Installed kismet into /usr/local/bin/.
 If you have not done so already, read the README file and the FAQ file.  Additional
 documentation is in the docs/ directory.  You MUST edit /usr/local/etc/kismet.conf
 and configure Kismet for your system, or it will NOT run properly!
 Kismet has been installed with a SUID ROOT CAPTURE HELPER executeable by
 users in the group ' kismet '.  This WILL ALLOW USERS IN THIS GROUP
 TO ALTER YOUR NETWORK INTERACE STATES, but is more secure than running
 all of Kismet as root.  ONLY users in this group will be able to
 run Kismet and capture from physical network devices.
 If you have just created this group, you will need to log out and back in
 before your user will have access.   Check the output of the 'groups'
 command to make sure your user has the proper group!
 If you have installed Kismet in the past, you may need to UPDATE YOUR CONFIG
 FILES or Kismet may not work properly!  You can manually reconcile differences
 or you can replace the previously installed config files entirely by running
 make forceconfigs
To enable the local users to alter network interface states, you need to add the specific user to kismet group that is created during installation. For example, to add user amos to kismet group, run the command below;
usermod -aG kismet amosInstalling Kismet using APT package manger
If you need to simplify your life, then you can use this approach. Since Kismet is not available on the default repos, you can create the repository as shown below and run the installation.
wget -O - https://www.kismetwireless.net/repos/kismet-release.gpg.key | sudo apt-key add -
echo 'deb https://www.kismetwireless.net/repos/apt/release/cosmic cosmic main' | sudo tee /etc/apt/sources.list.d/kismet.list
sudo apt update
Next, install Kismet using package manager.
sudo apt install kismetTo install individual Kismet tools, run the command;
sudo apt install kismet-core kismet-capture-linux-bluetooth kismet-capture-linux-wifi kismet-capture-nrf-mousejack python-kismetcapturertl433 python-kismetcapturertladsb python-kismetcaptureamr python-kismetcapturefreaklabszigbee kismet-logtoolsRun Kismet
Kismet is now installed and can be run by pointing it to your system’s wireless interface.
kismet -c wlp3s0
...
LOCAL: This is the first time Kismet has been run as this user.  You will
        need to set an administrator password before you can use many
        features of Kismet.  Visit http://localhost:2501/ to configure the
        password, or consult the Kismet documentation to set a password
        manually.
 INFO: Enabling channel hopping by default on sources which support channel
       control.
 INFO: Setting default channel hop rate to 5/sec
 INFO: Enabling channel list splitting on sources which share the same list
       of channels
 INFO: Enabling channel list shuffling to optimize overlaps
 INFO: Sources will be re-opened if they encounter an error
 INFO: Saving datasources to the Kismet database log every 30 seconds.
 INFO: Launching remote capture server on 127.0.0.1:3501
 INFO: Data sources passed on the command line (via -c source), ignoring
       source= definitions in the Kismet config file.
 INFO: Probing interface 'wlp3s0' to find datasource type
 INFO: Opened kismetdb log file './/Kismet-20190418-21-29-01-1.kismet'
 INFO: Saving packets to the Kismet database log.
 INFO: Starting Kismet web server…
 INFO: Started http server on port 2501
 INFO: Found type 'linuxwifi' for 'wlp3s0'
...
You can however run kismet without any option. In this case, you will have to login to Kismet UI so that you can set the interface card to be used.
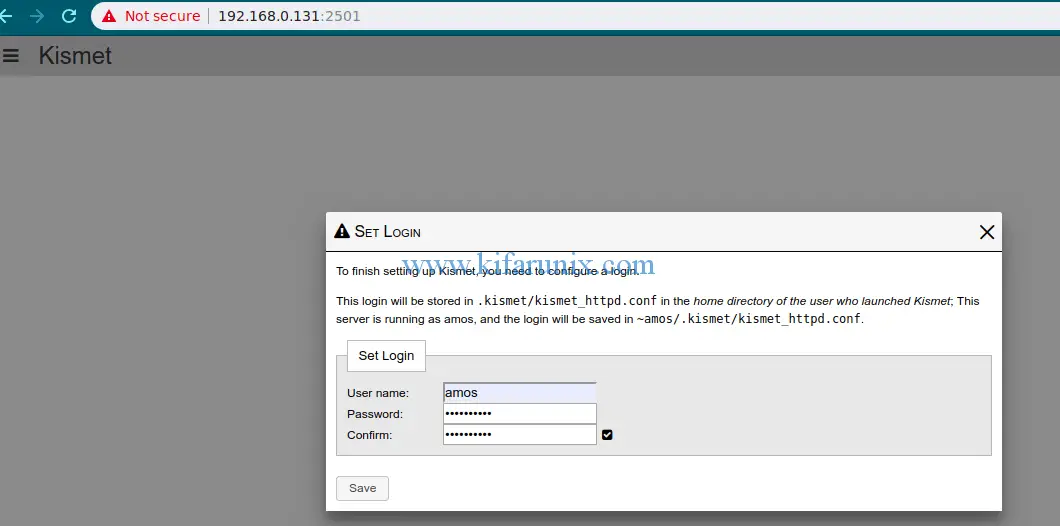
kismetTo finish setting up Kismet, you need to configure a login which is used for changing server settings, accessing sensitive information, adding data-sources, and other privileged actions.
Access Kismet UI
The Kismet UI can access via http://localhost:2501. However, since Kismet listens on all interfaces on the server it is running, then you can access it remotely via an interface IP using the URL; http://<IP.of.Kismet.server>:2501.

Enter your login details and hit the save button. This login will be stored in .kismet/kismet_httpd.conf in the home directory of the user who launched Kismet. For example, ~amos/.kismet/kismet_httpd.conf since am running it as user amos.

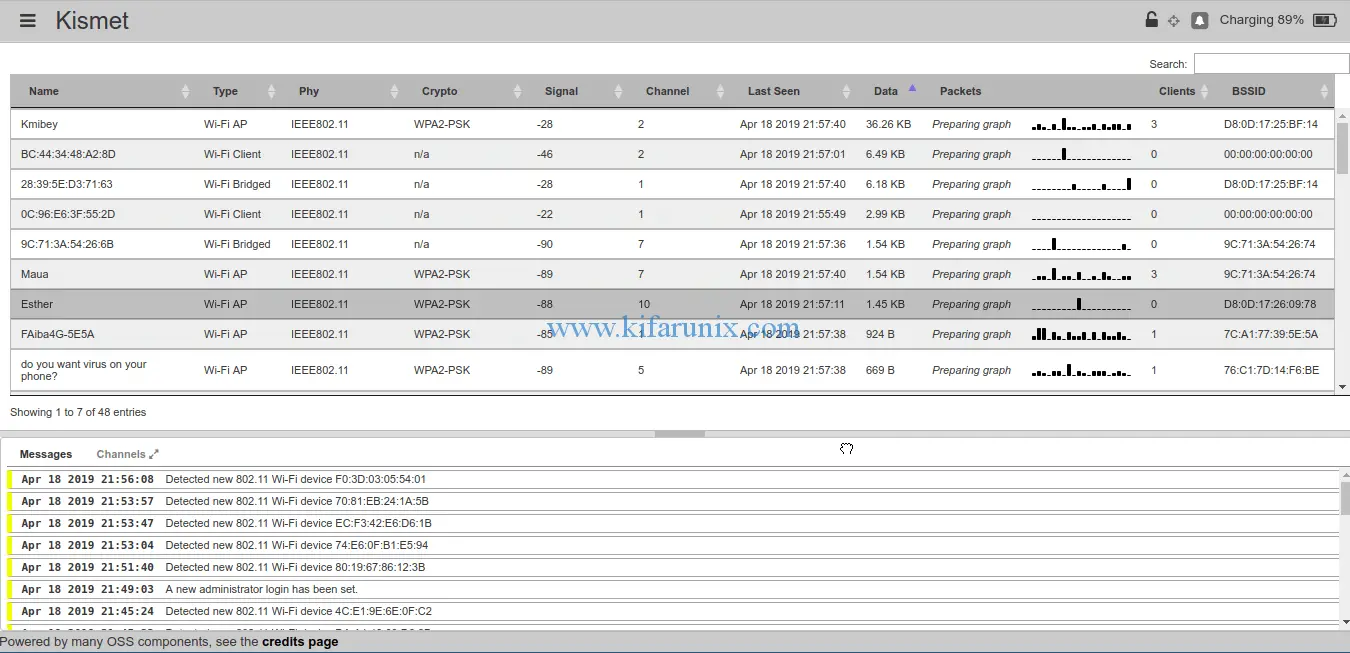
You can access Kismet settings by clicking on the three line on the Kismet title on the left top corner for your customizations.
Well, that is all about how to install Kismet on Ubuntu 18.04. Feel free to explore the potential of this tool. Enjoy.

