In this tutorial, you will learn how to setup IPSec Site-to-Site VPN Tunnel on pfSense. Internet Protocol Security (IPsec) is a secure network protocol suite that authenticates and encrypts the packets of data to provide secure encrypted communication between two computers over an Internet Protocol network. It is commonly used in virtual private networks (VPNs).
Setup IPSec Site-to-Site VPN Tunnel on pfSense
In order to demonstrate how to setup a secured site to site IPSec VPN tunnel, we will be using two pfSense, a free and open source firewall and router, running on two different LANs.
See our representation below;
  +------------------------+       IPSec VPN Tunnel      +------------------------+
  |    [  pfSense gw  ]    | [ Side A ]   |   [ Side B ] |    [  pfSense gw  ]    |
  +      65.108.95.120     +--------------+--------------+      135.181.192.121   +
  |       172.16.0.1 [VPN] |                             |      192.168.10.1 [VPN]|
  +------------------------+                             +------------------------+
               |                                                       |
               +                                                       +
               |                                                       |
+-------------------------------+                        +------------------------------------+
|    [  Side A Local LAN  ]     |                        |    [  Side B Local LAN  ]          |
+        172.16.0.0/24          +                        +        192.168.10.0/24             +
|                               |                        |                                    |
| [ 172.16.0.10] [ 172.16.0.20] |                        |   [ 192.16.10.20] [ 192.168.10.50] |
+-------------------------------+                        +------------------------------------+
The pfSense firewalls/routers acts as the IPSec peers. The peers perform VPN negotiations aimed at encrypting and securing the communications between the local area networks.
The VPN negotations happen over two phases;
- Phase 1: The main purpose of Phase 1 is to set up a secure encrypted channel through which the two peers can negotiate Phase 2. When Phase 1 finishes successfully, the peers quickly move on to Phase 2 negotiations. If Phase 1 fails, the devices cannot begin Phase 2.
- Phase 2: The purpose of Phase 2 negotiations is for the two peers to agree on a set of parameters that define what traffic can go through the VPN, and how to encrypt and authenticate the traffic. This agreement is called a Security Association.
WireGuard VPN technologies has explained this extensively.
While setting up IPSec VPN, it is very paramount to ensure that the configurations on both the peers match exactly. otherwise the VPN negotiations will fail.
Below are our configurations for this setup.
| VPN device host information | Side A | Side B |
| VPN device version | pfSense 2.6.0 | pfSense 2.6.0 |
| IP address | 65.108.95.120 | 135.181.192.121 |
| IKE – Phase 1 properties | Side A | Side B |
| Authentication method | PSK (ChangeME) | PSK (ChangeME) |
| Encryption scheme | IKEv2 | IKEv2 |
| Perfect Forward Secrecy – IKE | DH Group 20 | DH Group 20 |
| Encryption algorithm – IKE | AES256 | AES256 |
| Hashing algorithm – IKE | SHA256 | SHA256 |
| IKE SA lifetime | 86400 sec | 86400 sec |
| IPSec – Phase 2 properties | Side A | Side B |
| Transform (IPSec protocol) | ESP | ESP |
| Perfect Forward Secrecy – IPSec | DH Group 20 | DH Group 20 |
| Encryption algorithm – IPSec | AES256 | AES256 |
| Hashing algorithm – IPSec | SHA256 | SHA256 |
| IPSec SA lifetime | 3600 sec | 3600 sec |
| Encryption hosts | Side A | Side B |
| Hosts | 172.16.0.0/24 | 192.168.10.0/24 |
Configuring IPSec on pfSense on Side A
pfSense comes with IPSec VPN support by default.
Thus, in order to configure IPSec site-to-site VPN tunnel;
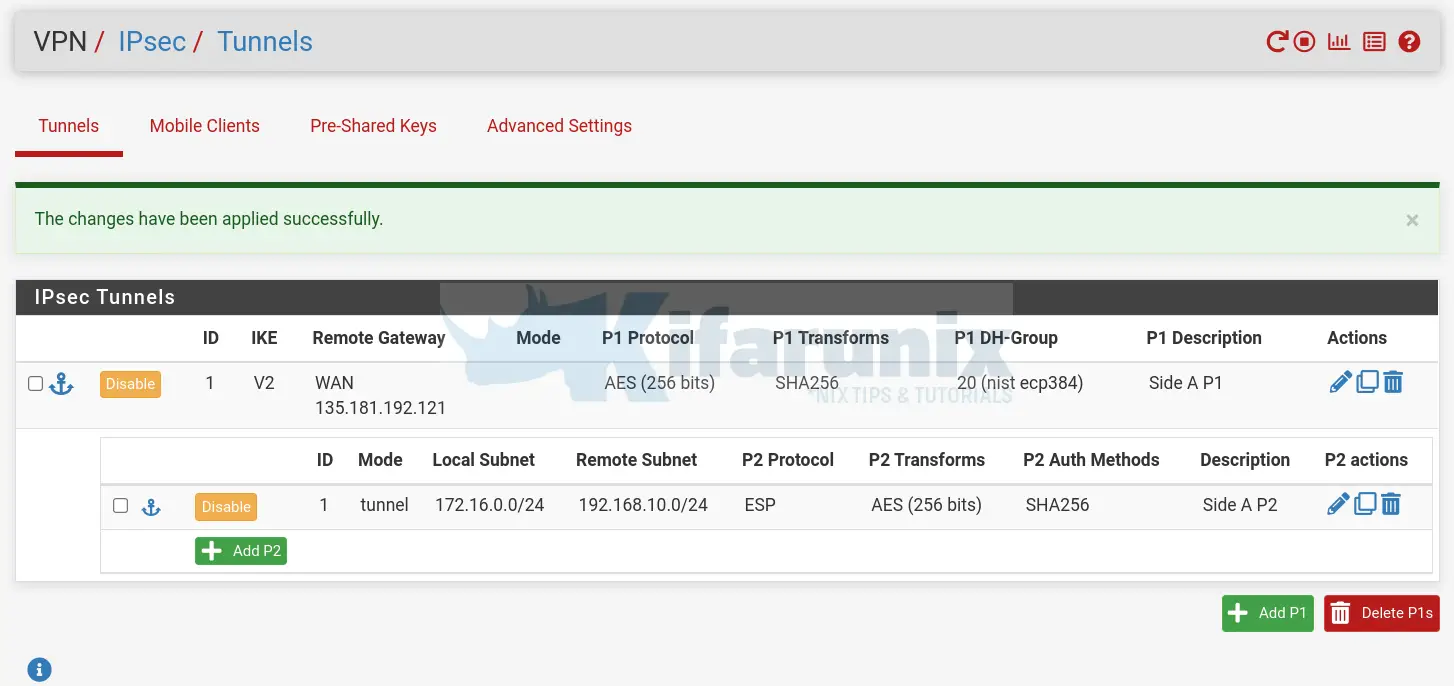
- Login to pfSense and navigate to VPN > IPSec. Such an interface welcomes you.
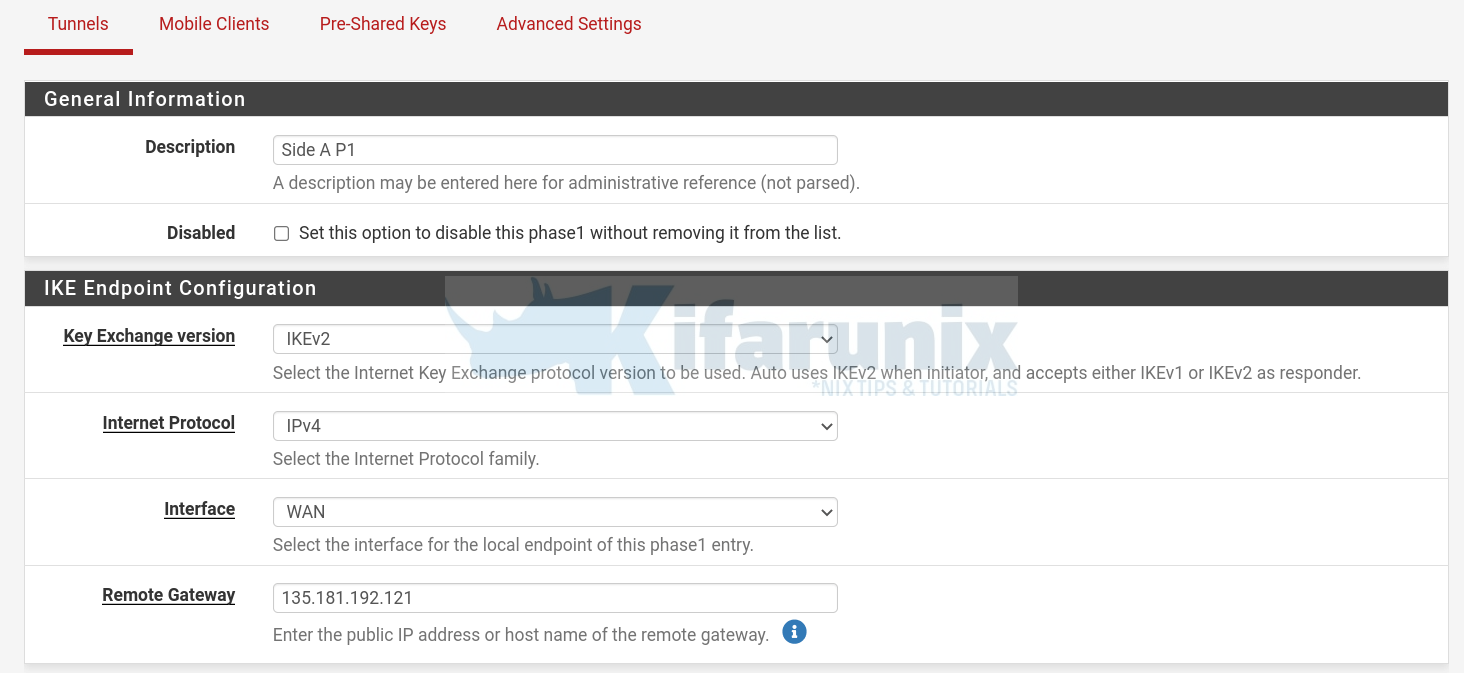
- To begin with, configure IPSec Phase 1 Settings. Hence click Add P1. NOTE: All settings must match between the peers.
- General information and IKE Endpoint Configuration;
- Description: Side A P1
- Key Exchange version: IKEv2
- IP: IPV4
- Interface: WAN
- Remote Gateway: 135.181.192.121
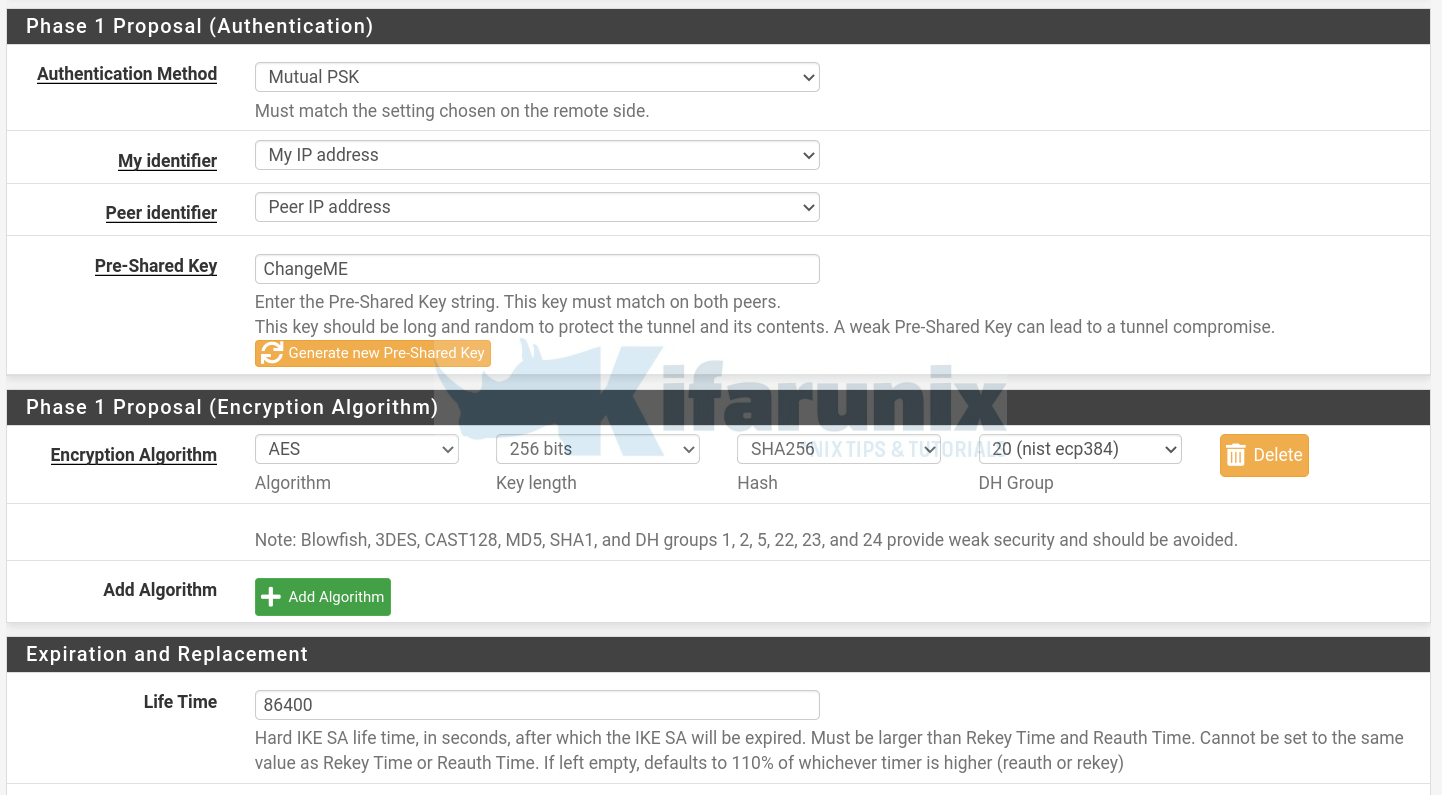
- Phase 1 Proposal Authentication:
- Authentication Method: Mutual PSK
- My Identifier: My IP address
- Peer Identifier: Peer IP address
- Pre-Shared Key: YOUR PSK KEY (should match in both peers)
- Encryption Algorithms:
- Encryption: AES256
- Hash: SHA256
- DH Group: Group 20
- Expiration and Replacement:
- Lifetime: 86400
- General information and IKE Endpoint Configuration;
We will leave other configurations with the default values.
Scroll down and click Save to save Phase 1 settings.
- Configure IPSec Phase 2 by clicking Show Phase 2 Entries > Add P2.
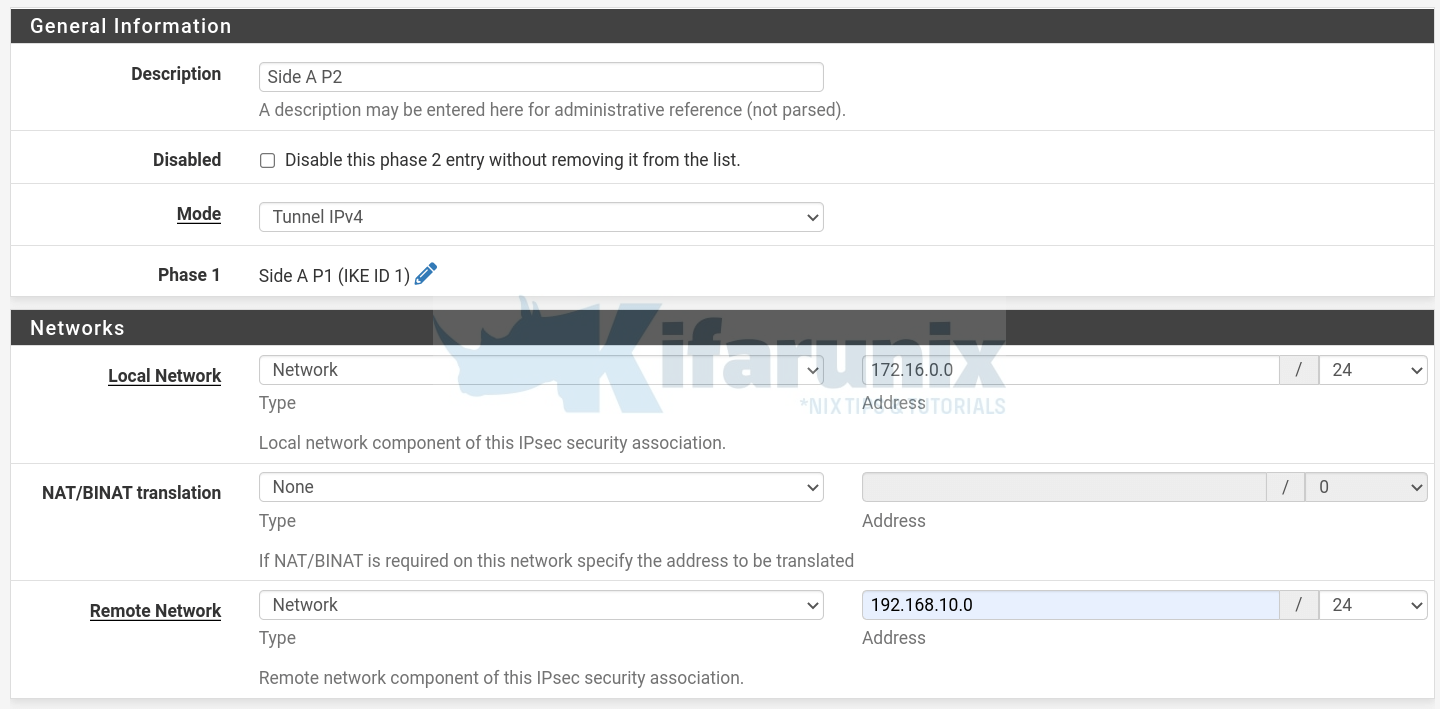
- General information:
- Mode: Tunnel IPv4
- Networks:
- Local Network: 172.16.0.0/24.
- Use single IP address if just want to connect specific systems only.
- Remote Network: 192.168.10.0/24.
- Similarly, use single IP address if just want to connect specific systems only.
- Local Network: 172.16.0.0/24.
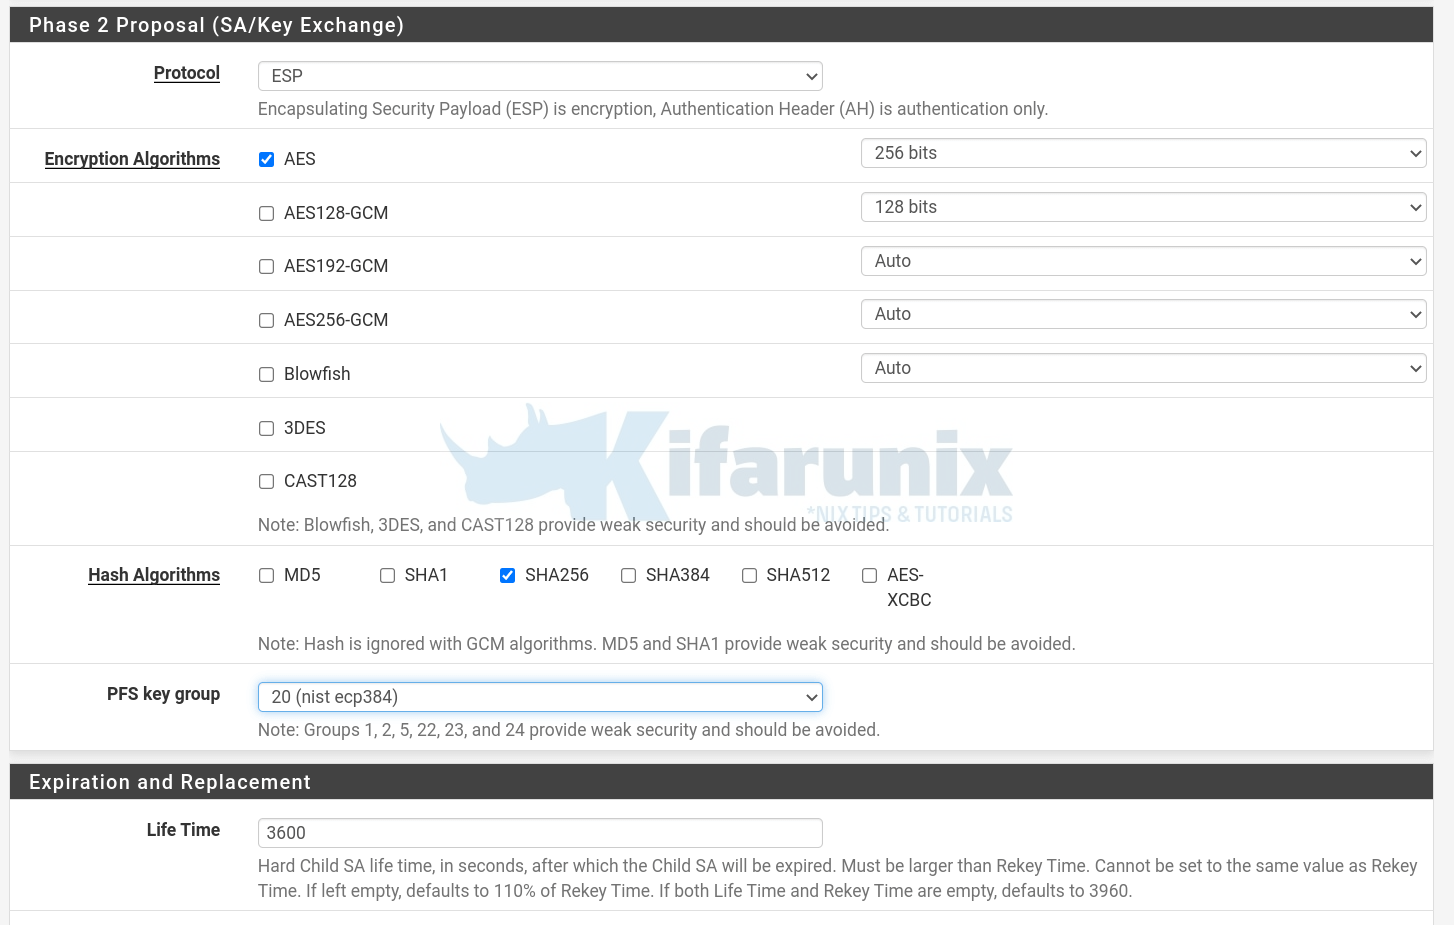
- Phase 2 Proposal Settings:
- Proposal: ESP
- Encryption Algorithms: AES256
- Hash Algorithms: SHA256
- PFS Key group: Group 20
- Expiration and Replacement:
- Lifetime: 3600s
- Leave the rest of the default settings.
- General information:
Scroll down and Click Save to save the settings.
Then click Apply Changes to save all the changes.
Configuring IPSec on pfSense on Side B
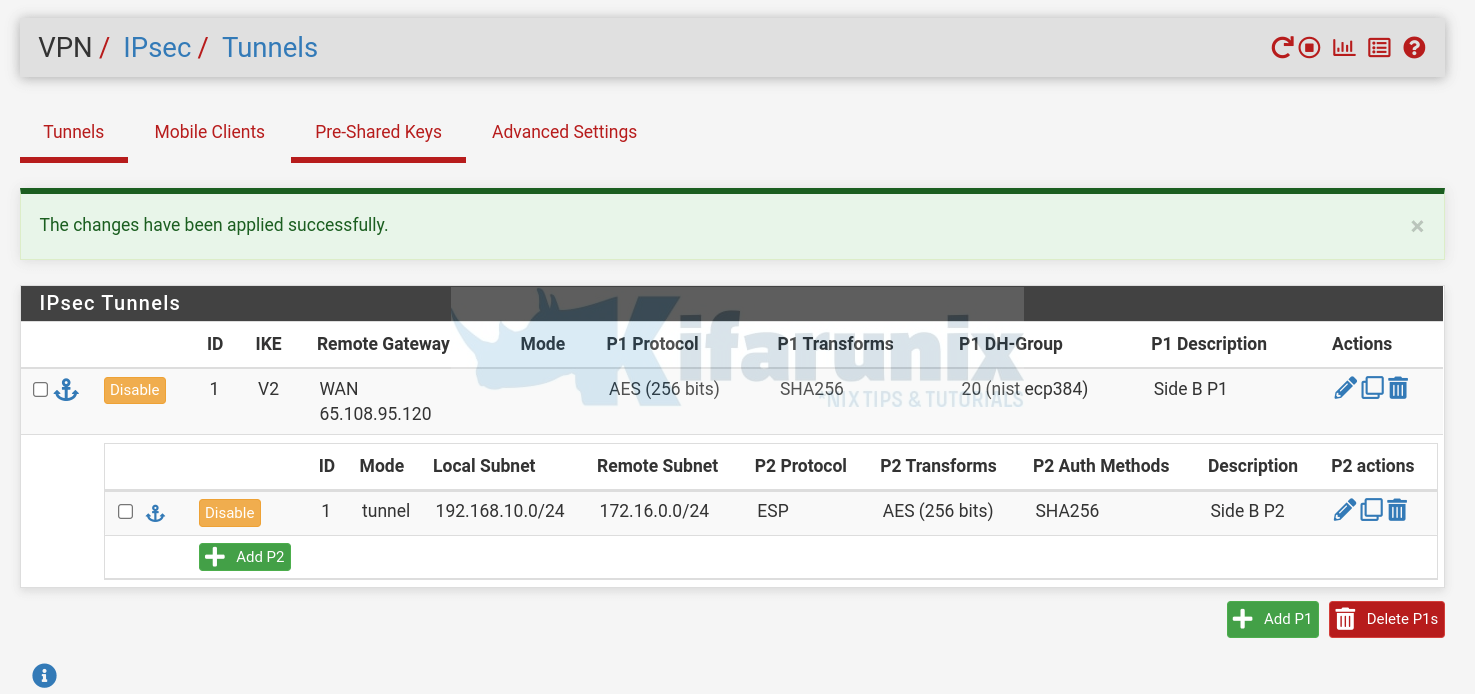
On Side B, configure pfSense just the same way. Ensure the settings are exactly the same;
Connect IPSec VPN Servers
Navigate to Status > IPSec.
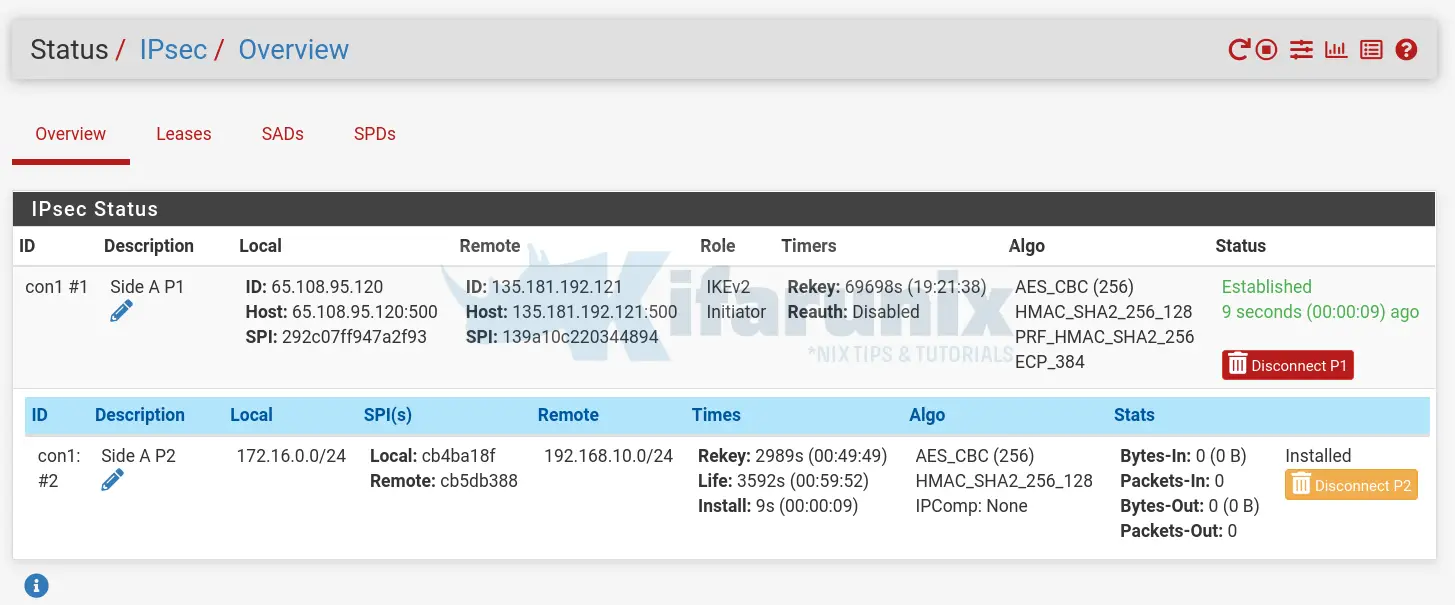
Click Connect P1 and P2s to establish the tunnel and allow the local sites LAN to communicate.
The status once the tunnel is established;
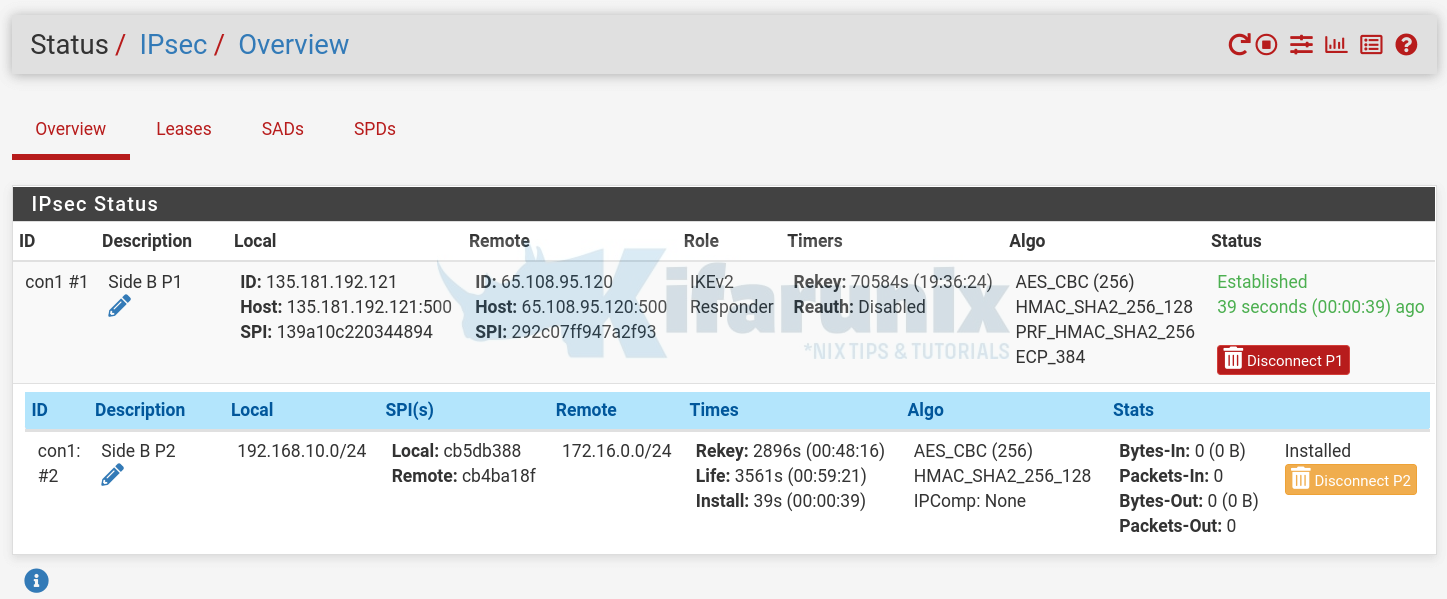
Similarly, check on Side B, the status should be same;
Updating the Firewall Rules
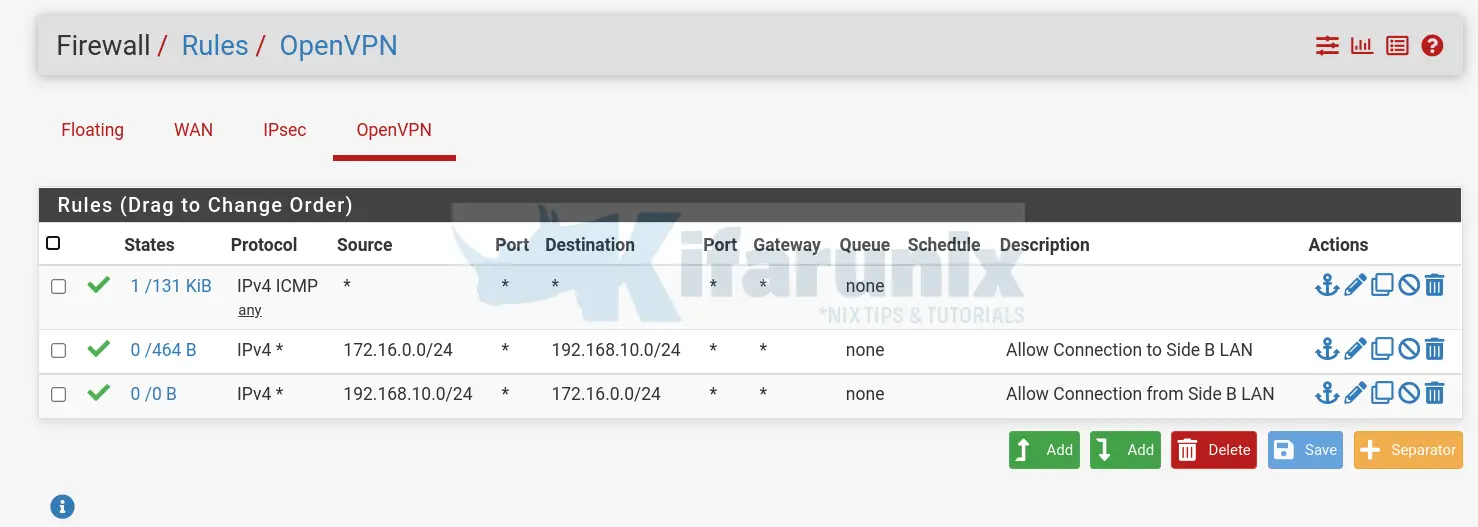
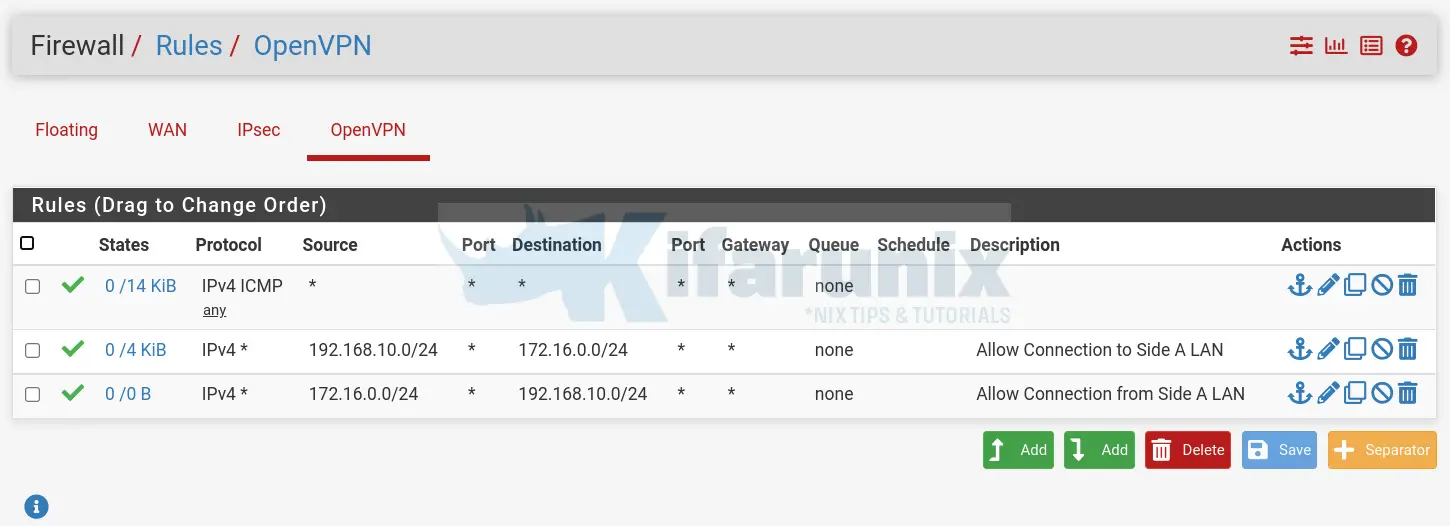
You need to ensure that correct firewall rules are in place in order to get the connections working.
My example Firewall rules on both Side A and Side B to allow SSH connections only. You can add other services/ports as you so wish.
IPSec Firewall Rules on Side A:

IPSec Firewall Rules on Side B:

Test the Site-to-Site connections
Now that the tunnel has been established and firewall rules in place, you can try to check whether the connection has been established between the local sites that are set to communicate via the IPSec VPN tunnel.
In my setup, i have two remote systems running on 172.16.0.10 on Side A and 192.168.10.20 on Side B;
One thing you need to confirm is that both local networks have the correct routing to their counterpart remote networks;
On Side A, server 172.16.0.10, this is my routing table info;
ip a show dev tun0
6: tun0:  mtu 1500 qdisc pfifo_fast state UNKNOWN group default qlen 500
    link/none
    inet 172.16.0.10/24 scope global tun0
       valid_lft forever preferred_lft forever
    inet6 fe80::6732:c5da:20a8:f0c2/64 scope link stable-privacy
       valid_lft forever preferred_lft forever
Route information;
ip r show dev tun0172.16.0.0/24 proto kernel scope link src 172.16.0.10
192.168.10.0/24 via 172.16.0.1All traffic to 192.168.10.0/24 are routed via the IPSec VPN Server, 172.16.0.1.
Side B server, 192.168.10.20;
ip a show dev tun0
7: tun0:  mtu 1500 qdisc fq_codel state UNKNOWN group default qlen 100
    link/none
    inet 192.168.10.20/24 brd 192.168.10.255 scope global tun0
       valid_lft forever preferred_lft forever
    inet6 fe80::931b:4dea:6e0e:bed8/64 scope link stable-privacy
       valid_lft forever preferred_lft forever
Routing information;
ip r show dev tun0172.16.0.0/24 via 192.168.10.1
192.168.10.0/24 proto kernel scope link src 192.168.10.20Traffic to 172.16.0.0/24 is routed via the Side B IPSec VPN server, 192.168.10.1.
Test connections, in this example setup, only SSH connections and PING requests were allowed on the firewall;
On Side A, test connection to Side B;
telnet 192.168.10.20 22Trying 192.168.10.20...
Connected to 192.168.10.20.
Escape character is '^]'.
SSH-2.0-OpenSSH_8.2p1 Ubuntu-4
^]
telnet>On Side B, test connection to Side A;
telnet 172.16.0.10 22Trying 172.16.0.10...
Connected to 172.16.0.10.
Escape character is '^]'.
SSH-2.0-OpenSSH_8.4p1 Debian-5
^]
telnet>And that is it on how to configure IPSec Site-to-Site VPN Tunnel on pfSense.
Read more on documentation page.
Other tutorials;


