In this article, we are going to learn how to import assets to AlienVault USM/OSSIM using CSV file. The assets in this case refers to hosts, servers, routers, or any other device or endpoint you want to monitor for HIDs, NIDs, file integrity, vulnerability using AlienVault USM/OSSIM server.
In our previous article, we learned how to install and set up AlienVault OSSIM on VirtualBox.
Importing Assets to AlienVault USM/OSSIM using a CSV file
There are a number of ways in which assets can be imported to AlienVault server for monitoring. Some of the common ways include;
- Using the Getting Started Wizard
- Scanning for new Assets
- Importing a CSV File
- Using SIEM Events
- Adding assets manually
Create Asset CSV File
In this article, we are going to learn how to imports assets using a CSV file. To achieve this, you need to create a CSV file containing a list of assets to be imported into the SIEM in the following format.
"IPs";"Hostname";"FQDNs";"Description";"Asset Value";"Operating System";"Latitude";"Longitude";"Host ID";"External Asset";"Device Type"Where:
- IP(s) is the IP of the host/server. If an asset has multiple IPs, seperate them with comma(,) eg 192.169.34.12 or 192.168.34.13,192.168.33.13.
- Hostname is the short hostname (without domain part) eg server1
- FQDN is the fully qualified domain name of the asset eg server1.example.com
- Operating System is the OS the system is running eg Windows, Linux, AIX, HP-UX
- Asset Value defines the criticality of a system with the highrdt being 5 and lowest being 1. The default asset value is 2.
- Latitude and Longitude defines the location of the asset
- Asset ID defines the identity number of a device if it has one.
- External Asset defines whether your asset resides outside your environment.
- Device Type defines the type of the asset like a router, firewall, linux server, etc.
Note the Delimiter is semi-colon(;)
Create a csv file with containing details of your assets and save in a convenient directory. For example, in my case, myassets.csv.
Based on the format above, myassets.csv file will look like;
"IPs";"Hostname";"FQDNs";"Description";"Asset Value";"Operating System";"Latitude";"Longitude";"Host ID";"External Asset";"Device Type"
"172.16.30.5";"crsav01 ";"crsav01.example.com ";"McAfee";"5";"CentOS 7";"";"";"";"";""
"172.16.30.78";"cheat01 ";"cheat01.example.com ";"HEAT";"3";"CentOS 7";"";"";"";"";""
"172.16.30.7";"csrva01 ";"csrva01.example.com ";"Nexpose";"3";"CentOS 7";"";"";"";"";""
"172.16.0.13";"drserver";"drserver.example.com";"";"3";"CentOS 7";"";"";"";"";""
"10.1.0.13";"Cisco WSA S190_1";"";"Web Security Appliance";"5";"Cisco IOS";"";"";"";"";""
"10.2.1.4";"Cisco ESA S190_1";"";"Email Security Appliance";"5";"Cisco IOS";"";"";"";"";""
"10.0.0.1";"Cisco ASA 5515";"";"Firewall ";"5";"Cisco IOS";"";"";"";"";""
"172.16.30.22";"cfcas01";"cfcas01.example.com";"PR APPS Server";"5";"HP-UNIX";"";"";"";"";""
"172.16.30.42";"cfdc1";"cfdc1.example.com";"PR Dc Server";"5";"HP-UNIX";"";"";"";"";""
"192.168.57.22";"cfcas02";"cfcas02.example.com";"DR APPS Server";"5";"HP-UNIX";"";"";"";"";""
"192.168.57.23";"cfdc2";"cfdc2.example.com";"DR Dc Server";"5";"HP-UNIX";"";"";"";"";""
"172.16.30.60";"crsrp01 ";"crsrp01.example.com ";"Printer Server";"3";"RedHat 7";"";"";"";"";""
"172.16.30.66";"crsvc01 ";"crsvc01.example.com ";"File backups Server";"3";"RedHat 7";"";"";"";"";""
"192.168.56.112";"winsrv01";"winsrv01.example.com";"Windows Server 01";"3";"Windows 2008";"";"";"";"";""
"172.16.30.1";"caddc01 ";"caddc01.example.com ";"AD Domain Controller";"5";"Windows 2008 ";"";"";"";"";""
"172.16.30.2";"caddc02 ";"caddc02.example.com ";"AD Domain Controller backup";"3";"Windows 2008 ";"";"";"";"";""
"172.16.30.3";"cexms01 ";"cexms01.example.com ";"Exchange";"5";"Windows 2008 ";"";"";"";"";""
"172.16.30.75";"crsst01 ";"crsst01.example.com ";"File Server";"5";"Windows 2008 ";"";"";"";"";""
"172.16.30.67";"cotrs01 ";"cotrs01.example.com ";"Service Desk";"3";"Windows 2008 ";"";"";"";"";""
"192.168.82.75";"crsst02 ";"crsst02.example.com ";"Backup Server";"3";"Windows 2008 ";"";"";"";"";""
To easily make a CSV file in the above format, step through the following;
- Put the assets on excel sheet in the format stated above. See the screen-shot below.
- Save the file as CSV and before you save, at least on LibreOffice, click on “Edit filter settings” so that you can get an option to save the file as semi-colon delimited. This also gives us an option to quote all text cells but if the cell is empty, it won’t quote and thus to overcome this, we can employ the use of stream editor command to do some substitutions as shown below.
- Once you have saved the assets list, run the following command to quote each field and make necessary substitutions
sed -e 's/;/";"/g' -e 's/^\|$/"/g' assets-list.csv > myassets.csvThis generates the above asset-list. The procedure may not be efficient as such but at least it saved the day for me. If you know any automated way of generating such a csv file, feel free to educate me as well, thank you.
Importing Assets using a CSV file
Now that is done, it is time to import assets to AlienVault USM/OSSIM using CSV file;
- Navigate to OSSIM web dashboard > Environment > Assets & Groups > Assets.
- On the upper right-hand corner, click Add Assets > Import CSV.
- Under Choose File click Browse… to select your csv file. In case your hostnames contain special characters, you can ignore them by selecting the square box besides the line “Ignore invalid characters (Hostnames)”.
- Once you have selected you asset list csv file, click IMPORT to onboard your assets to OSSIM server.
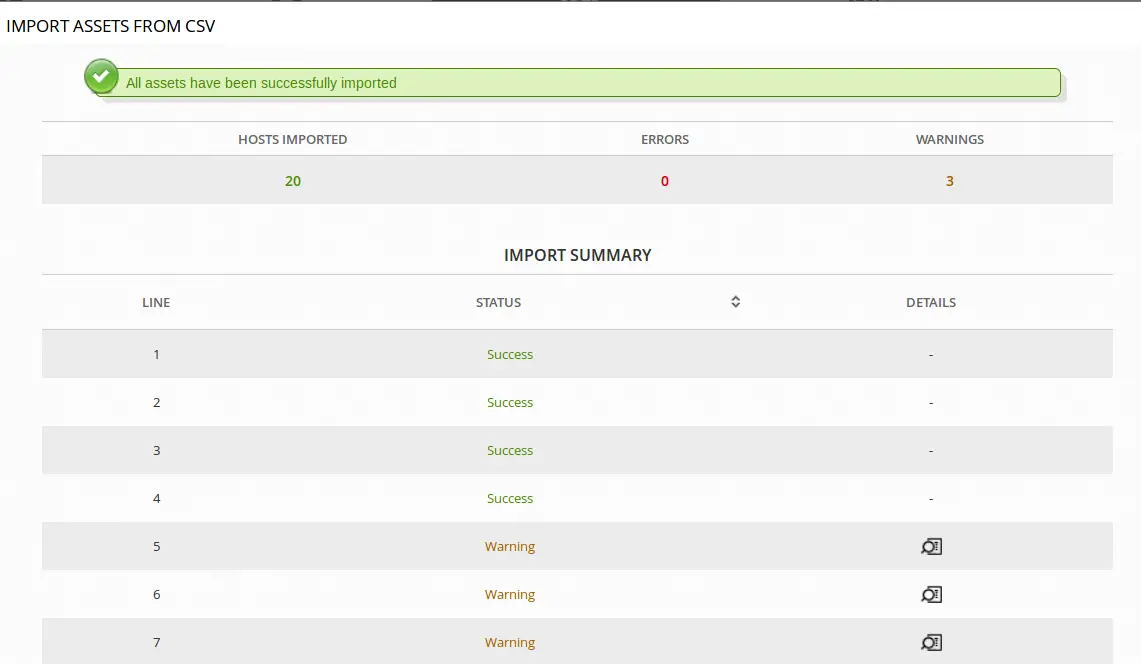
- If the format used in the CSV is correct, import will be successful and you will see the number of errors and warnings that occurred during the import. The screen-shot below shows part of the output.
Assests imported successfully.
That is all about how to import assets to AlienVault USM/OSSIM using CSV file. Feel free to explore the other methods stated above.
In our next article, we will learn how to install and setup OSSEC agents Linux and Windows Systems.


