In this tutorial, we are going to learn how to install and setup Squid proxy on pfSense. pfSense is a free and open source firewall and router that also features unified threat management, load balancing, multi WAN and many more features that are comprehensively described on pfSense features page.
Squid is a caching proxy for the Web supporting HTTP, HTTPS, FTP, and more. It reduces bandwidth and improves response times by caching and reusing frequently-requested web pages. Squid has extensive access controls and makes a great server accelerator.
You can learn how to install pfsense on a KVM Hypervisor by following the link below;
Install pfSense Firewall on KVM
Installing Squid Proxy on pfSense
Assuming you already have a running pfSense, proceed to install and configure Squid proxy.
Install Squid Package on pfSense
Squid package can be installed on pfSense by navigating to System > Package Manager menu on the web interface.
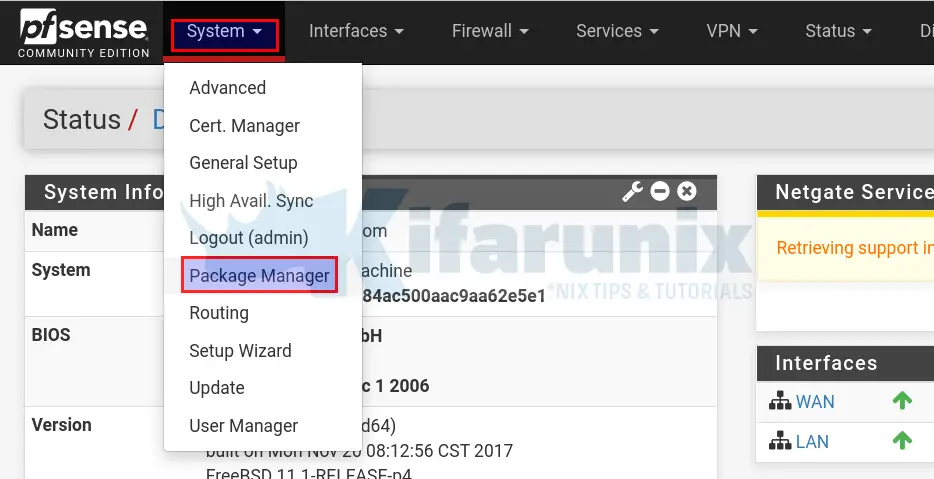
Once the Package Manager opens up, click Available Packages and enter squid as the search term on the search bar.
Click Search button to search for the squid package. You should be able to see squid related package.
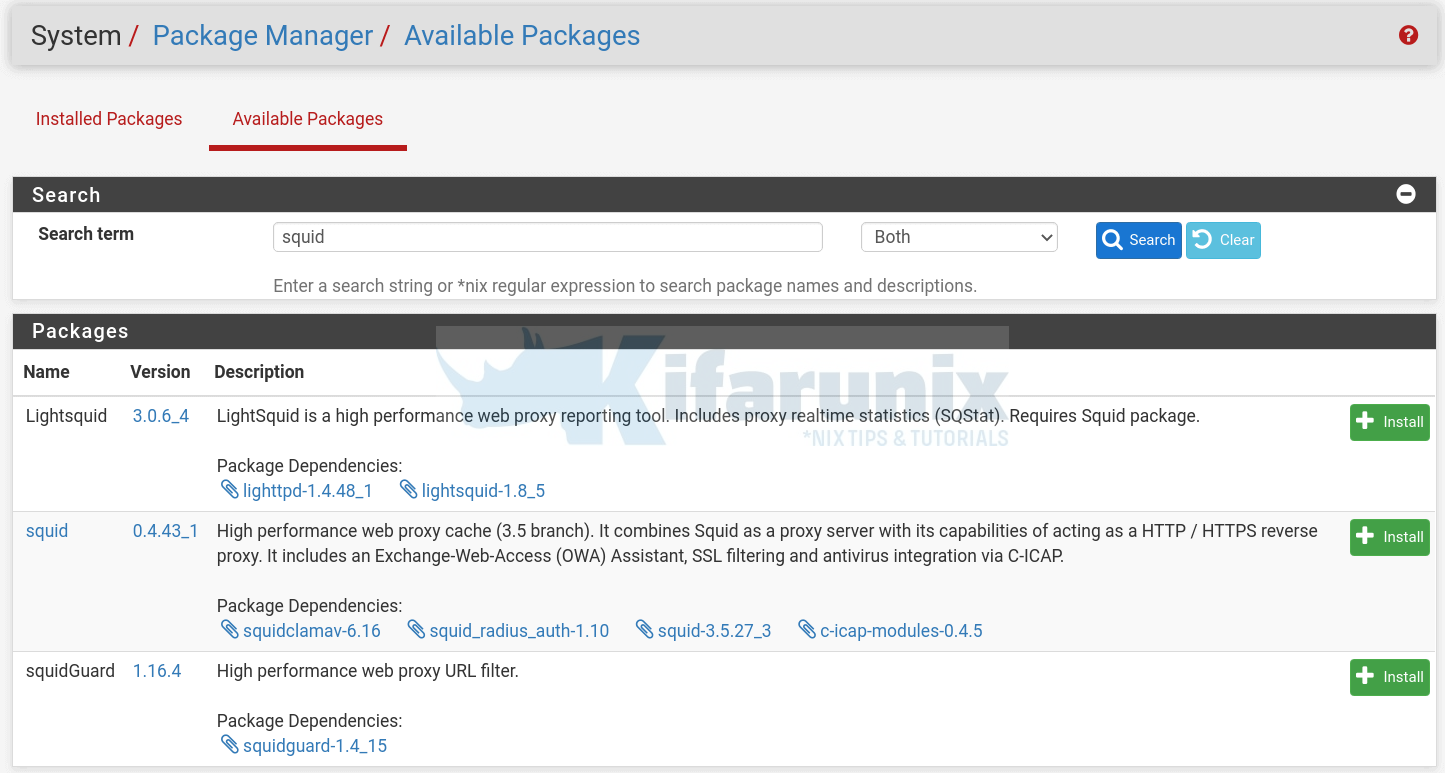
From the search output above, we are only interested in installing Squid. Hence, begin the installation of Squid proxy package by clicking the install button on the far right and confirm the installation.
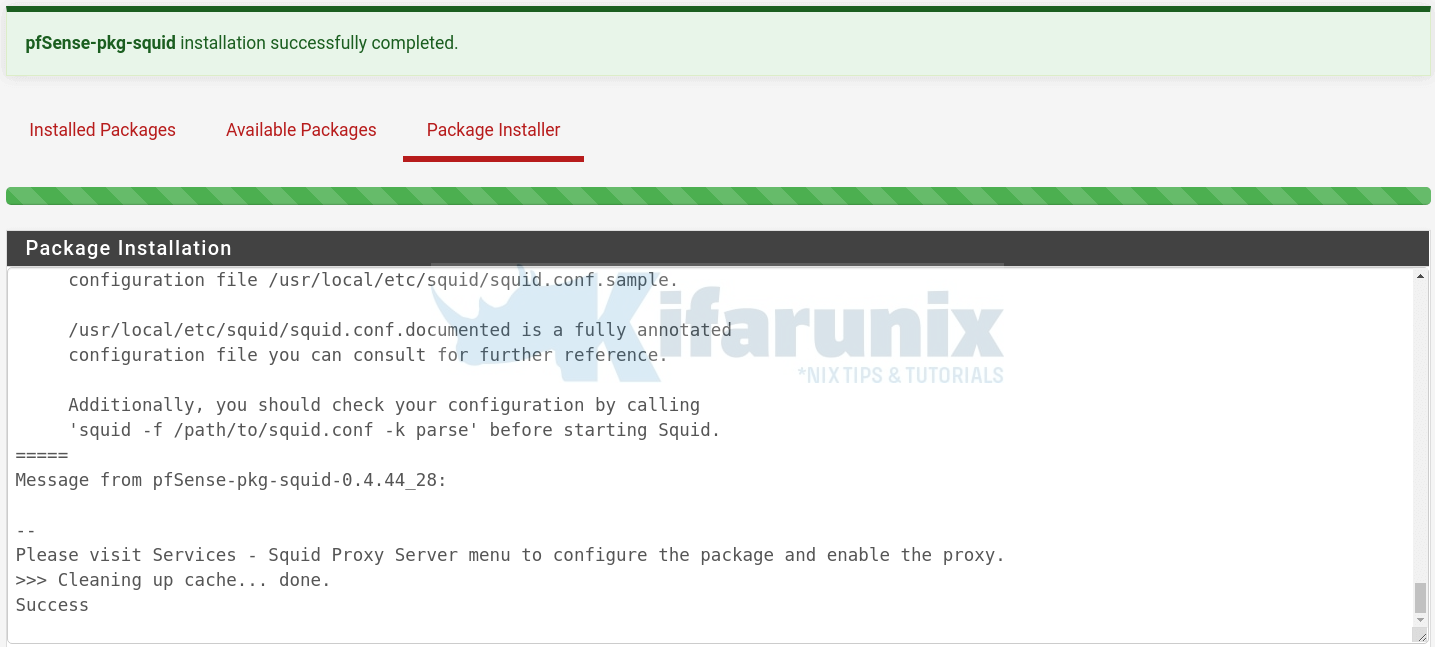
You should be able to see such a screen once the installation is done.
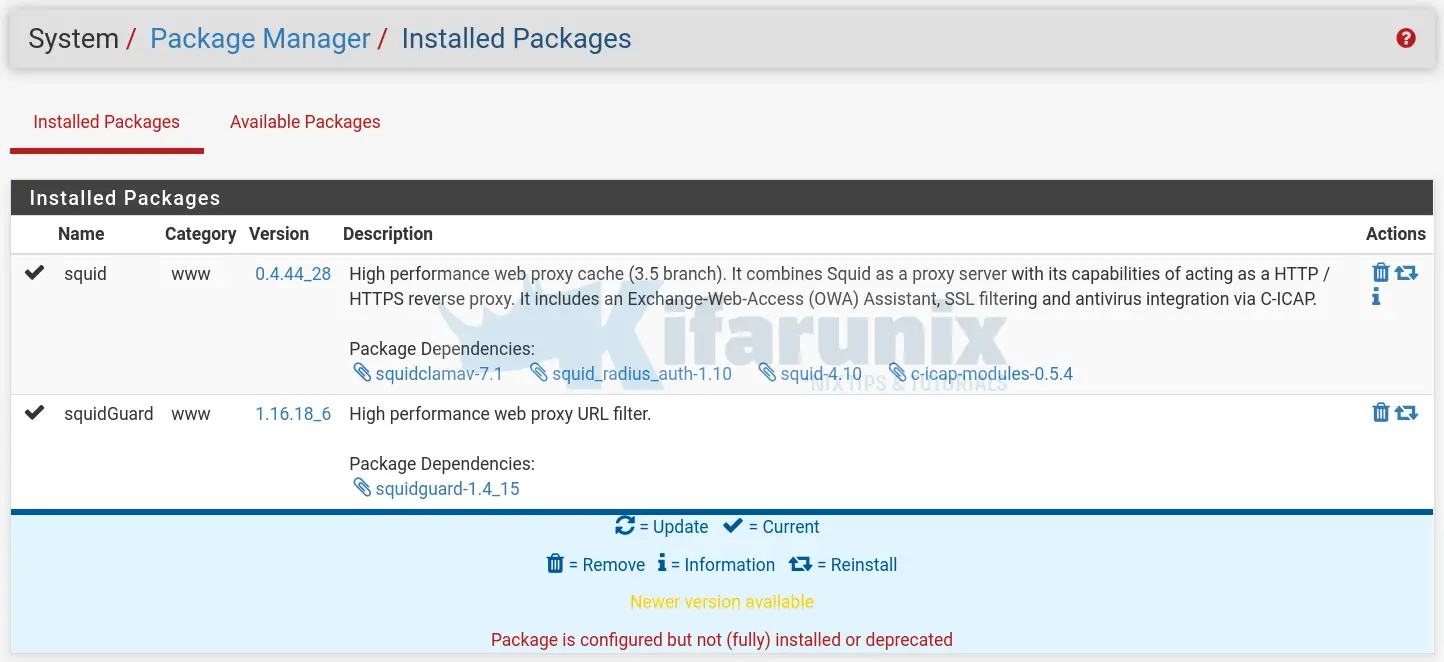
You should now be able to see both packages under Installed Packages tab.
Configuring Squid Proxy Server on pfSense
Once the installation is done, you can proceed to configure Squid proxy server on pfSense.
Navigate to Services > Squid Proxy Server.
Configure Squid Proxy Server Local Cache
Click on the Local Cache tab to define Squid Proxy cache management settings.
In our setup, the we only changed the disk cache size to 3GB (3000MB) and leave the other default settings including the default cache directory, /var/squid/cache.
Be sure to clear the cache by clicking the Clear Disk Cache Now button.
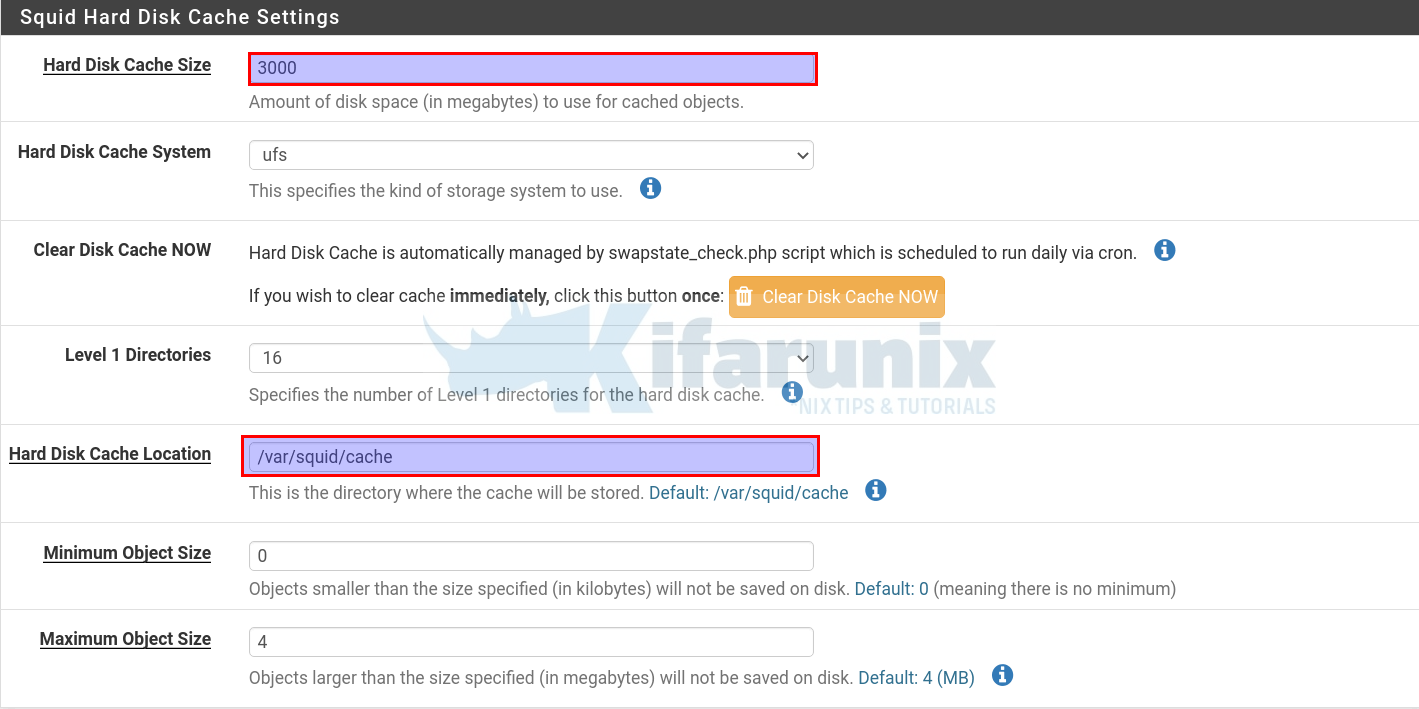
Once you are done with the settings, click Save button at the bottom of the page.
Configure Squid Proxy Server General Settings
Click on the General tab to enable Squid Proxy server and to define other general settings.
Under Squid General Settings section;
- Check the box adjacent to Enable Squid Proxy to enable Squid.
- Choose the interface(s) the proxy server will bind to, we chose LAN interface in this demo.
- Set the proxy port, we use the default 3128 in this demo
- Check the box adjacent to Allow users on interface to give the users connected to the same subnets as the Proxy LAN interface selected automatic access without the need for creating an allow Access Control List for them.
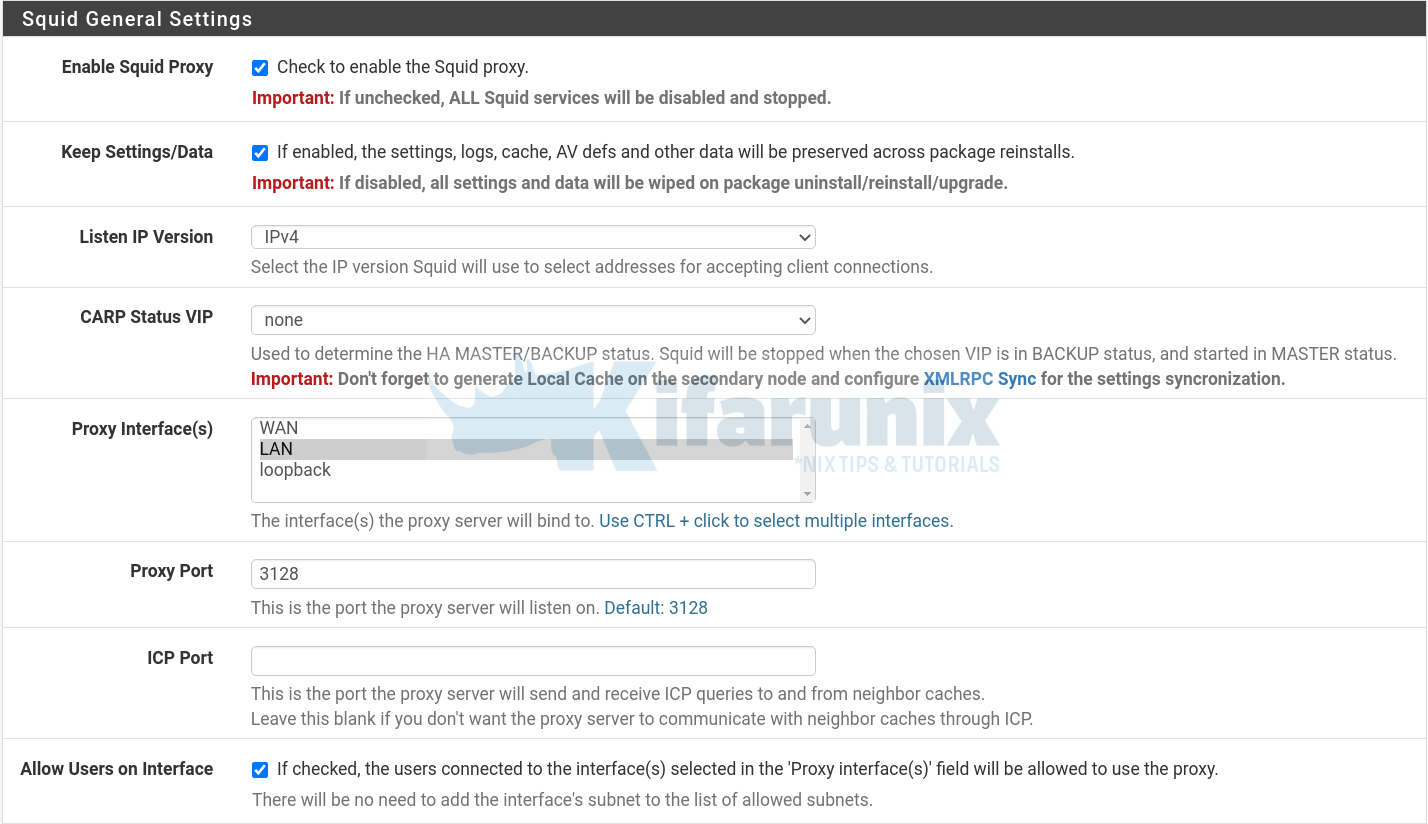
We will skip the use of Transparent Proxy and SSL filtering settings in this demo.
Configure Squid Proxy Logging Settings
- Enable logging
- Set the logs storage directory,
/var/squid/logs, by default - Set how long the log files should be kept.

Configure Other Squid Proxy customizations
- Configure other customizations including the visible squid hostname, admin email, proxy server messing language. These details are displayed on an error message
- Enable your Squid proxy to append your client’s IP address in the HTTP requests it forwards.
- Disable Squid Via header in requests and replies
- Enable suppression of squid version string info in HTTP headers and HTML error pages.
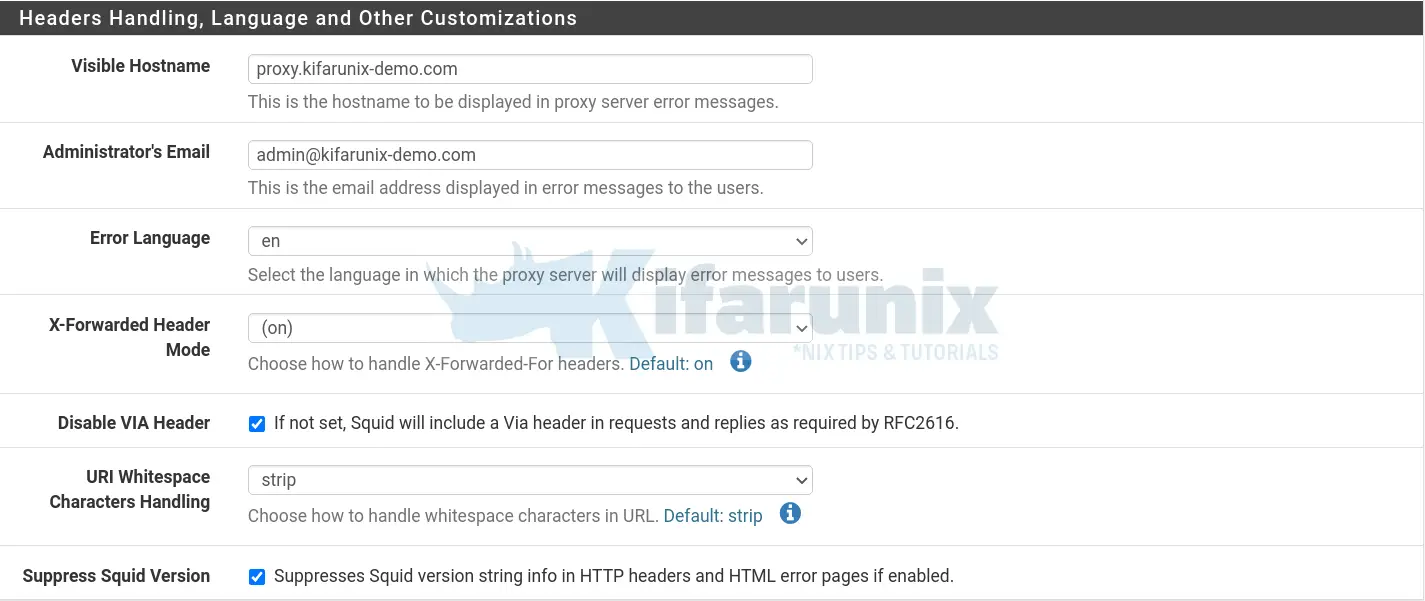
You can click Show Advanced Options for further configuration options.
Click Save once you are done with configurations.
Configure Squid Proxy Server Access Control Lists
You can now proceed to configure Squid proxy access control list to define what elements to allow or deny access on proxy server.
If you noticed in the general settings above, we enabled Allow Users on Interface. This means that, user who are connected to the Proxy LAN Interface subnet are automatically allowed to connect via the proxy without the need for an ACL for that specific subnet.
In our setup, we have three interfaces as highlighted below;
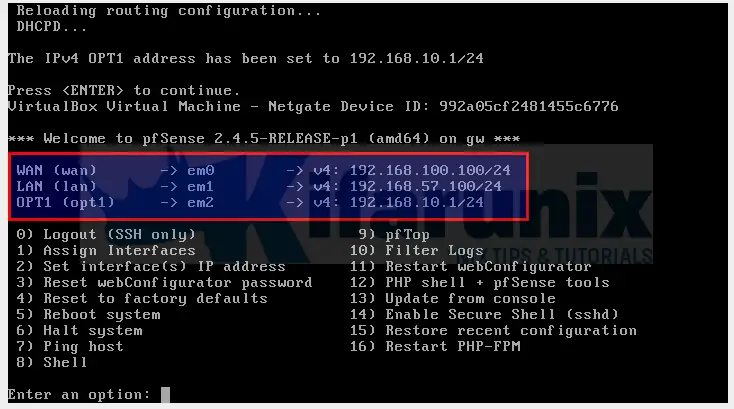
As such, we set our Proxy Interface to LAN, which means, any users that will be connected to that subnet, will not need any ACL to use the proxy.
We also have the third interface OPT1, as in the above screenshot. Our clients will be connecting to Proxy through this subnet. Let us create an ACL for this subnet;
Click ACLs tab and under allowed subnets, enter your subnet to be allowed to connect through Proxy.

You can further set your ACLs for unrestricted IPs, blacklist, whitelist, banned hosts, blocked user agents…
Define your Safe ports if any to add to the already predefined ports.
If you have any other custom settings you want to define, click Show Advanced Options to configure them.
Click Save after configurations.
Allow Hosts in OPT1 interface to use Proxy on the Firewall
Next, you need to define the destination IP and Port for the proxy server and set the firewall to allow all hosts on your specific subnet to pass all the traffic through the proxy server.
Navigate to Firewall > Rules > choose your Interface, in this case, OPT1.
- Click on either of the add button to add the firewall rule.
- Allow traffic through by setting action to Pass
- Select the interface from which traffic comes from, select IP address family and the protocol.
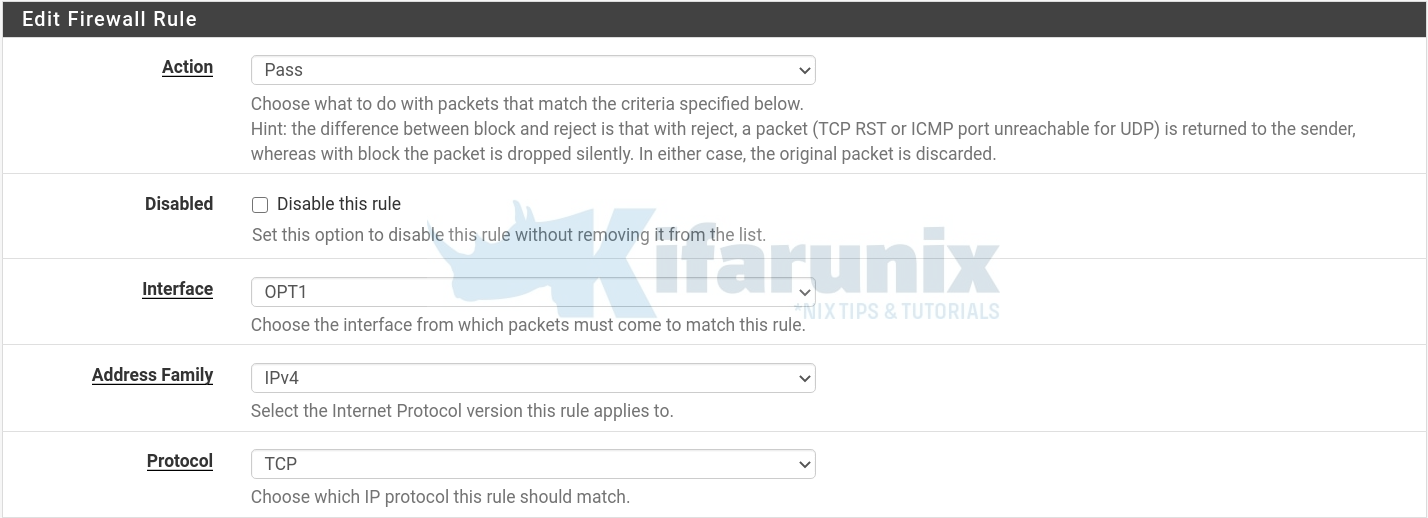
Define the source and destination as shown in the screenshot below. Note that we set the destination to the LAN interface we configured Proxy to bind to.

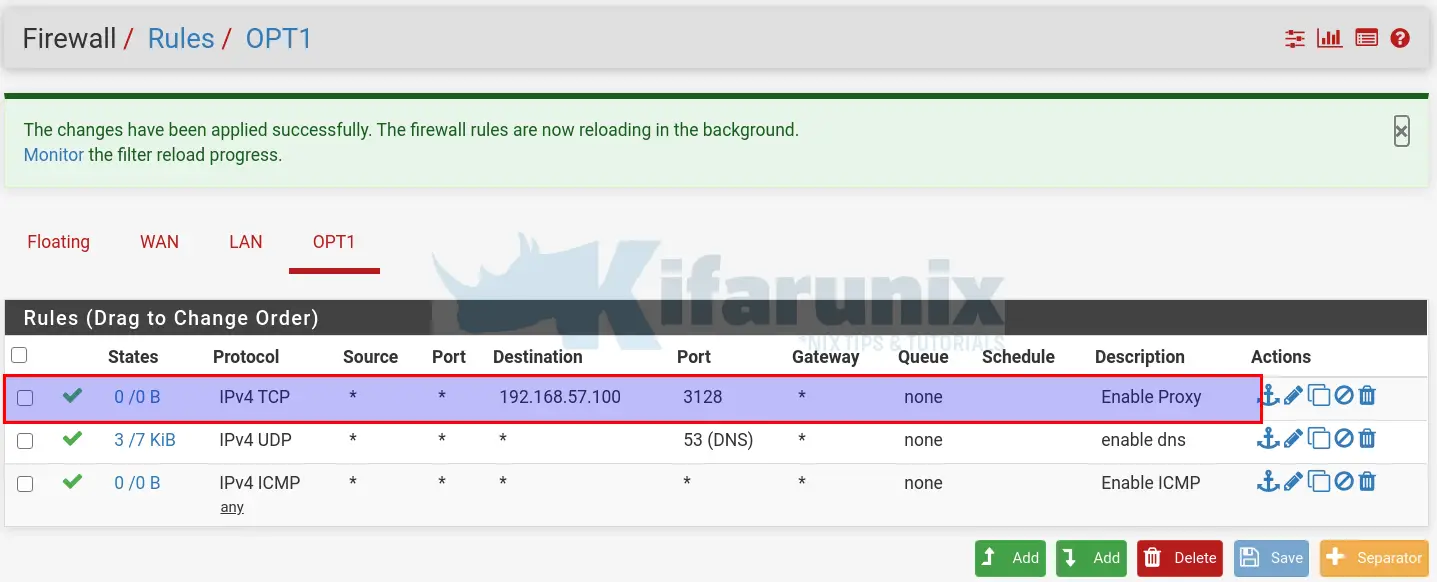
Once done configuring the rule, click Save and then Apply Changes to reload the firewall configurations.
You rule should now be looking like;
Testing Squid Proxy
Literally, your proxy server is now ready. I will be testing from an Ubuntu 20.04 desktop with the following IP details;
ip add show enp0s32: enp0s3: <BROADCAST,MULTICAST,UP,LOWER_UP> mtu 1500 qdisc fq_codel state UP group default qlen 1000
link/ether 08:00:27:99:9a:af brd ff:ff:ff:ff:ff:ff
inet 192.168.10.10/24 brd 192.168.10.255 scope global noprefixroute enp0s3
valid_lft forever preferred_lft forever
inet6 fe80::1b2a:9fab:fa5b:a375/64 scope link noprefixroute
valid_lft forever preferred_lft foreverip route show defaultdefault via 192.168.10.1 dev enp0s3 proto static metric 20100Testing the reachability to the Proxy IP;
ping 192.168.57.100 -c 4PING 192.168.57.100 (192.168.57.100) 56(84) bytes of data.
64 bytes from 192.168.57.100: icmp_seq=1 ttl=64 time=1.22 ms
64 bytes from 192.168.57.100: icmp_seq=2 ttl=64 time=1.23 ms
64 bytes from 192.168.57.100: icmp_seq=3 ttl=64 time=1.09 ms
64 bytes from 192.168.57.100: icmp_seq=4 ttl=64 time=0.964 ms
--- 192.168.57.100 ping statistics ---
4 packets transmitted, 4 received, 0% packet loss, time 3007ms
rtt min/avg/max/mdev = 0.964/1.126/1.226/0.107 msCheck the connectivity to the Proxy port;
telnet 192.168.57.100 3128Trying 192.168.57.100...
Connected to 192.168.57.100.
Escape character is '^]'.
Configure Proxy settings on Firefox browser.
On your Firefox, configure it to connect external network via your Squid server. Preferences > General > Network Settings > Manual Proxy Configuration. Check Use this proxy server for all protocols.
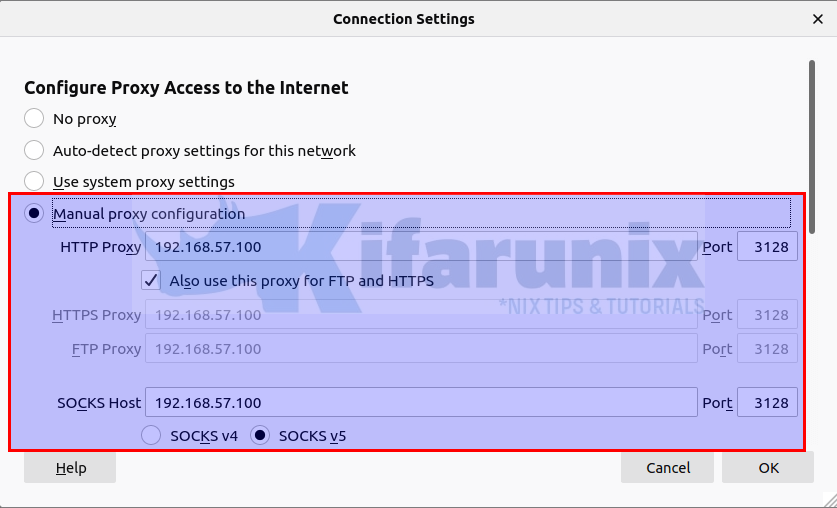
You should now be able to access internet via Squid Proxy.
What if you are using Google Chrome, how do you set the proxy server settings? Learn how to configure system wide proxy settings by following the link below
How to configure System Wide Proxy settings on Ubuntu systems
Checking Squid Logs
You can tail squid logs to verify connection.
tail -f /var/squid/logs/access.logFor example, these are the sample logs trying to access YouTube;
...
1593755589.111   1184 192.168.10.10 TCP_TUNNEL/200 9507 CONNECT yt3.ggpht.com:443 - HIER_DIRECT/216.58.223.65 -
1593755589.131   1180 192.168.10.10 TCP_TUNNEL/200 7861 CONNECT yt3.ggpht.com:443 - HIER_DIRECT/216.58.223.65 -
1593755589.133   1197 192.168.10.10 TCP_TUNNEL/200 9363 CONNECT yt3.ggpht.com:443 - HIER_DIRECT/216.58.223.65 -
1593755589.177    257 192.168.10.10 TCP_TUNNEL/200 7716 CONNECT yt3.ggpht.com:443 - HIER_DIRECT/216.58.223.65 -
1593755589.185    272 192.168.10.10 TCP_TUNNEL/200 9518 CONNECT yt3.ggpht.com:443 - HIER_DIRECT/216.58.223.65
...
Your Squid Proxy server is now running on a pfSense gateway.
Reference
Configuring Squid Proxy on pfSense
Related Tutorials
Install and Setup Squid Proxy on Ubuntu 20.04
Install and Setup HAProxy on CentOS 8
Install and Configure Squid Proxy on CentOS 8
Configure APT Proxy on Debian 10 Buster
Configure Highly Available HAProxy with Keepalived on Ubuntu 20.04


in here once you allowed the dns.. to any any, users can bypass the proxy server