In this tutorial, you will learn how to install Fleet osquery manager on Debian 10. With the official retirement of the Kolide Fleet as on November 4th, 2020, there has been yet another Fleet that offers the same functionality as Kolide Fleet. According to its Github repository, “Fleet is the most widely used open source osquery manager. Deploying osquery with Fleet enables programmable live queries, streaming logs, and effective management of osquery across 50,000+ servers, containers, and laptops. It’s especially useful for talking to multiple devices at the same time.“
If you are using Ubuntu, you can use the guide below;
Install Fleet Osquery Manager on Ubuntu 20.04/Ubuntu 22.04
Installing Fleet Osquery Manager on Debian
Prerequisites
In order to install Fleet osquery manager on Debian, there are a few requirements. In our setup, we will be using Debian 10 as our base OS.
Install MySQL Database
Fleet uses MySQL as its main database
In this setup, we will use MariaDB database. Hence, create latest MariaDB (currently v10.5) APT repository
apt install software-properties-commonapt-key adv --fetch-keys https://mariadb.org/mariadb_release_signing_key.ascecho "deb [arch=amd64,arm64,ppc64el] http://sfo1.mirrors.digitalocean.com/mariadb/repo/10.5/debian $(lsb_release -sc) main" > /etc/apt/sources.list.d/mariadb-10.5.listIf you need, you can choose other MariaDB mirrors closed to your region.
Update your package cache.
apt updateRun the command install MariaDB server 10.5 on Debian 10
apt install mariadb-serversystemctl status mariadb.serviceMariaDB is started and enabled to run on system boot upon installation.
● mariadb.service - MariaDB 10.5.9 database server
   Loaded: loaded (/lib/systemd/system/mariadb.service; enabled; vendor preset: enabled)
  Drop-In: /etc/systemd/system/mariadb.service.d
           └─migrated-from-my.cnf-settings.conf
   Active: active (running) since Mon 2021-03-22 13:19:24 EDT; 10min ago
     Docs: man:mariadbd(8)
           https://mariadb.com/kb/en/library/systemd/
 Main PID: 16307 (mariadbd)
   Status: "Taking your SQL requests now..."
    Tasks: 8 (limit: 1149)
   Memory: 69.7M
   CGroup: /system.slice/mariadb.service
           └─16307 /usr/sbin/mariadbd

Mar 22 13:20:34 debian /etc/mysql/debian-start[16330]: performance_schema
Mar 22 13:20:34 debian /etc/mysql/debian-start[16330]: Phase 6/7: Checking and upgrading tables
Mar 22 13:20:34 debian /etc/mysql/debian-start[16330]: Processing databases
Mar 22 13:20:34 debian /etc/mysql/debian-start[16330]: fleetdb
Mar 22 13:20:34 debian /etc/mysql/debian-start[16330]: information_schema
Mar 22 13:20:34 debian /etc/mysql/debian-start[16330]: performance_schema
Mar 22 13:20:34 debian /etc/mysql/debian-start[16330]: Phase 7/7: Running 'FLUSH PRIVILEGES'
Mar 22 13:20:34 debian /etc/mysql/debian-start[16330]: OK
Mar 22 13:20:34 debian /etc/mysql/debian-start[16481]: Checking for insecure root accounts.
Mar 22 13:20:34 debian /etc/mysql/debian-start[16485]: Triggering myisam-recover for all MyISAM tables and aria-recover for all Aria tables
Create Fleet Database and Database User
Run the initial MySQL security script, mysql_secure_installation, to remove anonymous database users, test tables, disable remote root login.
mysql_secure_installationBy default, MariaDB 10.5 uses unix_socket for authentication by default and hence, can login by just running, mysql -u root. If have however enabled password authentication, simply run;
mysql -u root -pNext, create the Fleet database.
Note: the database database names used here are not standard. Choose any name of your preference.
create database fleetdb;Create Fleet database user with all grants on Fleet DB created above.
grant all on fleetdb.* to fleetadmin@localhost identified by 'StrongP@SS';Reload privileges tables and exit the database;
flush privileges;
exit
Install Redis on Debian 10
Fleet uses Redis to ingest and queue the results of distributed queries, cache data, etc.
Install Redis on Debian 10 by running the command below;
apt install redisRedis server is similarly started upon installation;
systemctl status redis-server.service
● redis-server.service - Advanced key-value store
   Loaded: loaded (/lib/systemd/system/redis-server.service; enabled; vendor preset: enabled)
   Active: active (running) since Mon 2021-03-22 13:29:24 EDT; 1s ago
     Docs: http://redis.io/documentation,
           man:redis-server(1)
  Process: 17869 ExecStart=/usr/bin/redis-server /etc/redis/redis.conf (code=exited, status=0/SUCCESS)
 Main PID: 17870 (redis-server)
    Tasks: 4 (limit: 1149)
   Memory: 2.2M
   CGroup: /system.slice/redis-server.service
           └─17870 /usr/bin/redis-server 127.0.0.1:6379

Mar 22 13:29:24 debian systemd[1]: Starting Advanced key-value store...
Enable it to run on system boot;
systemctl enable redis-serverInstall Fleet Osquery Manager
Install the Fleet binary on Debian 10
The Fleet application is distributed as a single static binary. This binary serves:
- The Fleet web interface
- The Fleet application API endpoints
- The osquery TLS server API endpoints
Download the latest Fleet binary from the releases page;
curl -LO https://github.com/fleetdm/fleet/releases/download/fleet-v4.20.1/fleet_v4.20.1_linux.tar.gzcurl -LO https://github.com/fleetdm/fleet/releases/download/fleet-v4.20.1/fleetctl_v4.20.1_linux.tar.gzExtract the binaries for Linux platform:
tar xzf fleet_v4.20.1_linux.tar.gztar xzf fleetctl_v4.20.1_linux.tar.gzCopy Fleet binaries to binaries directories;
cp fleet_v4.20.1_linux/fleet /usr/local/bin/cp fleetctl_v4.20.1_linux/fleetctl /usr/local/bin/To verify the binaries are in place;
which fleet fleetctl/usr/local/bin/fleet
/usr/local/bin/fleetctlRunning Fleet Server on Debian 10
Initialize Fleet Database
To initialize Fleet infrastructure after installing and setting up all the requirements above, use the fleet prepare db as follows;
fleet prepare db --mysql_address=127.0.0.1:3306 --mysql_database=fleetdb --mysql_username=fleetadmin --mysql_password=StrongP@SSIf the initialization completes successfully, you should get the output,
Migrations completed.Generate SSL/TLS Certificates
Fleet server is used to run the main HTTPS server. Hence, run the command below to generate self-signed certificates.
NOTE: If you are using Self Signed Certificates as in this demo, DO NOT use wildcards lest enrollment of hosts won’t work.
openssl req -x509 -nodes -days 3650 -newkey rsa:2048 -keyout /etc/ssl/private/fleet.key -out /etc/ssl/certs/fleet.cert -subj "/CN=osquery.kifarunix-demo.com/"If you can, use the commercial TLS certificates from your preferred trusted CA.
Launching Fleet Osquery Manager
Once you have initialized the database, obtained the TLS certs and get a JWT random key, you can then launch it to verify that it can run successfully using the fleet serve command as shown below.
The syntax for running fleet serve is given below;
fleet serve [flags]There are different ways in which you can specify Fleet flags;
Specifying Fleet Manager Flags on Command line
You can specify the flags on command line as shown below;
fleet serve --mysql_address=127.0.0.1:3306 \
--mysql_database=fleetdb --mysql_username=fleetadmin --mysql_password=StrongP@SS \
--server_cert=/etc/ssl/certs/fleet.cert --server_key=/etc/ssl/private/fleet.key \
--logging_json
If all is well, you should see that Fleet server is now running on 0.0.0.0:8080 and hence can be accessed on https://<server-IP>:8080.
{"component":"service","err":null,"level":"info","method":"ListUsers","took":"1.943838ms","ts":"2021-03-22T17:42:25.40539689Z","user":"none"}
{"address":"0.0.0.0:8080","msg":"listening","transport":"https","ts":"2021-03-22T17:42:25.406425857Z"}
Press Ctrl+c to stop Fleet server.
Specifying Fleet Manager Flags Using Environment Variables
Similarly, you can specify the Fleet flags using environment variables as shown below (update the values for the environment variables and paste the command on the terminal);
FLEET_MYSQL_ADDRESS=127.0.0.1:3306 \
FLEET_MYSQL_DATABASE=fleetdb \
FLEET_MYSQL_USERNAME=fleetadmin \
FLEET_MYSQL_PASSWORD=StrongP@SS \
FLEET_REDIS_ADDRESS=127.0.0.1:6379 \
FLEET_SERVER_CERT=/etc/ssl/certs/fleet.cert \
FLEET_SERVER_KEY=/etc/ssl/private/fleet.key \
FLEET_LOGGING_JSON=true \
$(which fleet) serve
Similarly, press Ctrl+c to stop Fleet server.
Setting the Fleet Manager Flags in a Configuration file
You can create a YAML configuration file where you can define the flags and their options. For example, let us create a configuration file, e.g /etc/fleet/fleet.yml.
mkdir /etc/fleetThe, create a YAML configuration file under the directory above.
You can simply execute the command below and be sure to replace your settings appropriately.
cat > /etc/fleet/fleet.yml << 'EOL'
mysql:
  address: 127.0.0.1:3306
  database: fleetdb
  username: fleetadmin
  password: StrongP@SS
redis:
  address: 127.0.0.1:6379
server:
  cert: /etc/ssl/certs/fleet.cert
  key: /etc/ssl/private/fleet.key
logging:
  json: true
# auth:
# jwt_key: 0iXLJRKhB77puDm13G6ehgkClK0kff6N
EOL
Next, launch the Fleet manager by running the command below;
fleet serve -c /etc/fleet/fleet.ymlSimilarly, press Ctrl+c to stop Fleet server.
Create Fleet Systemd Service Unit on Debian 10
Once you have verified that Fleet is running fine, create a systemd service file, /etc/systemd/system/fleet.service. You can use any method shown above to specify the flags for ExecStart option while creating the systemd service unit file.
Example of Fleet systemd service unit file with Flags specified in ‘cli’ like format.
cat > /etc/systemd/system/fleet.service << 'EOL'
[Unit]
Description=Fleet Osquery Fleet Manager
After=network.target

[Service]
LimitNOFILE=8192
ExecStart=/usr/local/bin/fleet serve \
  --mysql_address=127.0.0.1:3306 \
  --mysql_database=fleetdb \
  --mysql_username=fleetadmin \
  --mysql_password=StrongP@SS \
  --redis_address=127.0.0.1:6379 \
  --server_cert=/etc/ssl/certs/fleet.cert \
  --server_key=/etc/ssl/private/fleet.key \
  --logging_json
ExecStop=/bin/kill -15 $(ps aux | grep "fleet serve" | grep -v grep | awk '{print$2}')

[Install]
WantedBy=multi-user.target
EOL
The method I preferred myself is to use the configuration file instead. The below service file uses the configuration file with Fleet flags defined as shown above.
cat > /etc/systemd/system/fleet.service << 'EOL'
[Unit]
Description=Fleet Osquery Fleet Manager
After=network.target

[Service]
LimitNOFILE=8192
ExecStart=/usr/local/bin/fleet serve -c /etc/fleet/fleet.yml
ExecStop=/bin/kill -15 $(ps aux | grep "fleet serve" | grep -v grep | awk '{print$2}')

[Install]
WantedBy=multi-user.target
EOL
Reload systemd configurations.
systemctl daemon-reloadStart and enable Fleet service.
systemctl enable --now fleetCheck the status;
systemctl status fleet
● fleet.service - Fleet Osquery Fleet Manager
   Loaded: loaded (/etc/systemd/system/fleet.service; disabled; vendor preset: enabled)
   Active: active (running) since Mon 2021-03-22 13:44:47 EDT; 2s ago
 Main PID: 19114 (fleet)
    Tasks: 5 (limit: 1149)
   Memory: 14.9M
   CGroup: /system.slice/fleet.service
           └─19114 /usr/local/bin/fleet serve -c /etc/fleet/fleet.yml

Mar 22 13:44:47 debian systemd[1]: fleet.service: Control process exited, code=exited, status=1/FAILURE
Mar 22 13:44:47 debian fleet[19056]: {"terminated":"http: Server closed","ts":"2021-03-22T17:44:47.059951181Z"}
Mar 22 13:44:47 debian systemd[1]: fleet.service: Failed with result 'exit-code'.
Mar 22 13:44:47 debian systemd[1]: Stopped Fleet Osquery Fleet Manager.
Mar 22 13:44:47 debian systemd[1]: Started Fleet Osquery Fleet Manager.
Mar 22 13:44:47 debian fleet[19114]: Using config file:  /etc/fleet/fleet.yml
Mar 22 13:44:47 debian fleet[19114]: {"component":"service","err":null,"level":"info","method":"ListUsers","took":"349.023µs","ts":"2021-03-22T17:44:47.121370591Z","user":"
Mar 22 13:44:47 debian fleet[19114]: {"address":"0.0.0.0:8080","msg":"listening","transport":"https","ts":"2021-03-22T17:44:47.122012677Z"}
Access Fleet Web Interface
Fleet can be accessed on the browser using the URL https://<server-IP_OR_hostname>:8080.
If firewall is running, open this port to allow external access;
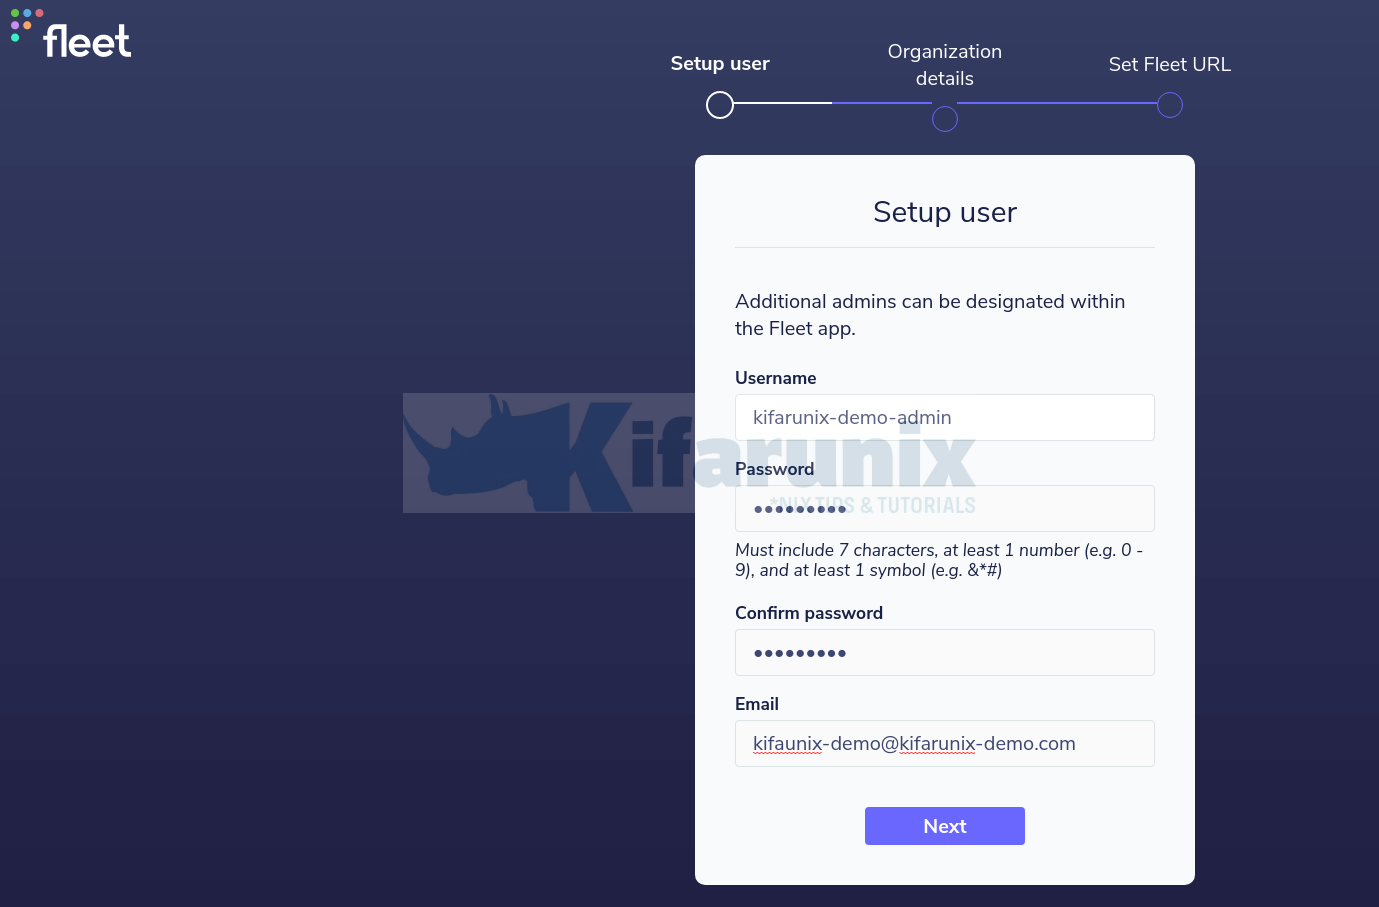
ufw allow 8080/tcpThen access Fleet Web interface from browser. and proceed to finalize the setup of Fleet Osquery manager on Debian 10;
Create the admin user;

Enter your organization details, Name and url to logo.
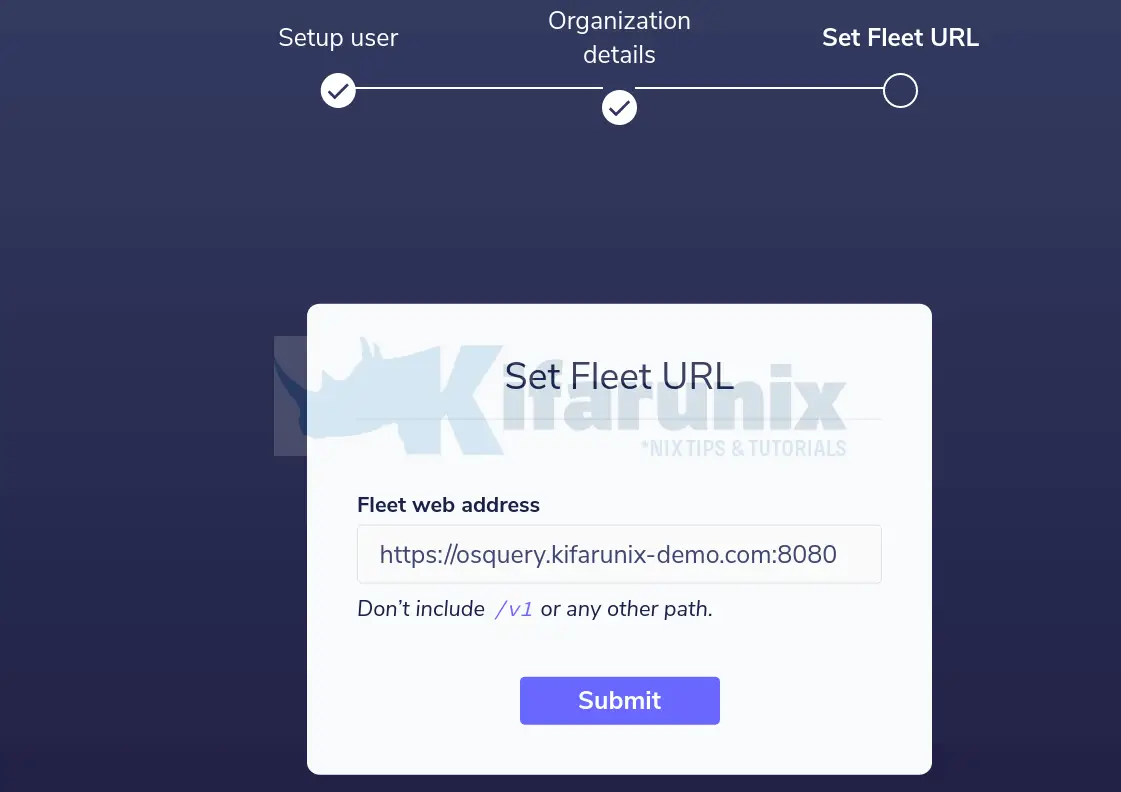
Set the Fleet server URL.

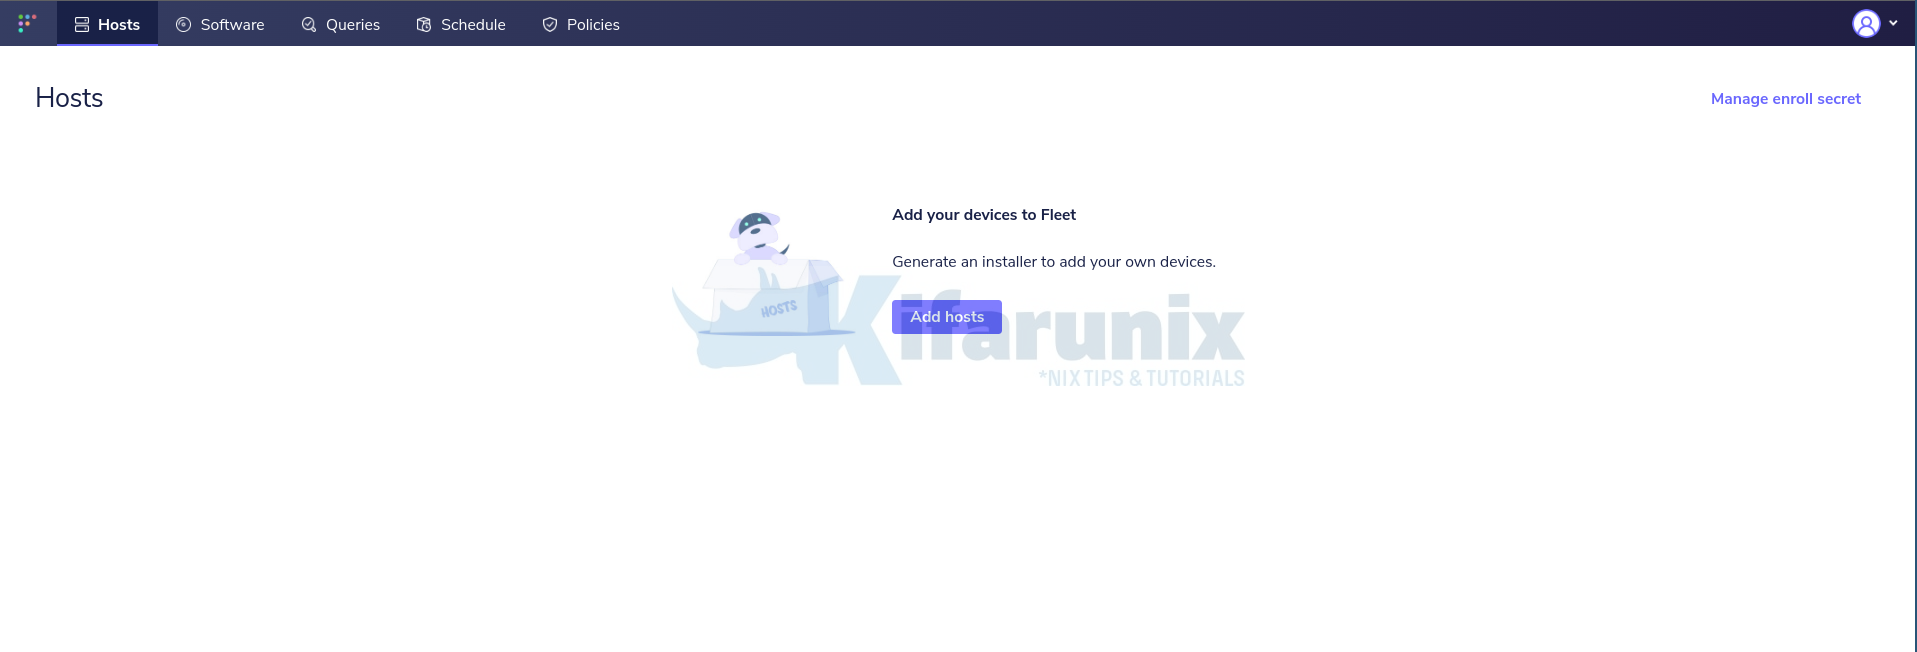
Submit the details and proceed to Fleet web interface.

And that marks the end of our tutorial on how to install Fleet Osquery Manager. In our next tutorial, you will learn how to enroll Osquery agents to Fleet manager.
How to Enroll Osquery Hosts on Fleet Manager
Reference
Other Related Tutorials
Install Osquery on Ubuntu 20.04

