In this guide, we are going to learn how to install phpLDAPadmin on Rocky Linux 8. phpLDAPadmin is web application written in PHP for administering LDAP and thus it comes in very handy for system administrators who are gui centric. With it, you can administer LDAP via the browser.
Before you can proceed, learn how to install OpenLDAP on Rocky Linux 8 by following the link below;
Install and Setup OpenLDAP on Rocky Linux 8
Installing phpLDAPadmin on Rocky Linux 8
Install Required Third Party Repositories
Some of the required packages such phpLDAPadmin and php-ldap module, are not available on the default Rocky Linux 8 repositories.
As such, you need to install some third party repo.
- Install EPEL repos on Rocky Linux:
dnf install epel-release- Install Lux YUM repository, which provides phpLDAPadmin packages:
dnf install http://repo.iotti.biz/CentOS/8/noarch/lux-release-8-1.noarch.rpm- Install Remi repository, which provides required PHP-LDAP modules:
dnf install https://rpms.remirepo.net/enterprise/remi-release-8.rpmEnable PHP 7.4 Remi module
dnf module reset phpdnf module enable php:remi-7.4Install phpLDAPadmin
Once the repos are in place, then run the command below to install phpLDAPadmin.
dnf install phpldapadmin
Dependencies resolved.
============================================================================================================================================================================
 Package                                   Architecture                       Version                                        Repository                                Size
============================================================================================================================================================================
Installing:
 phpldapadmin                              noarch                             1.2.6.2-1.el8.lux                              lux                                      799 k
Installing dependencies:
 oniguruma5php                             x86_64                             6.9.7.1-1.el8.remi                             remi-safe                                210 k
 php-common                                x86_64                             7.4.20-1.el8.remi                              remi-modular                             1.2 M
 php-fpm                                   x86_64                             7.4.20-1.el8.remi                              remi-modular                             1.6 M
 php-gd                                    x86_64                             7.4.20-1.el8.remi                              remi-modular                              93 k
 php-json                                  x86_64                             7.4.20-1.el8.remi                              remi-modular                              77 k
 php-ldap                                  x86_64                             7.4.20-1.el8.remi                              remi-modular                              97 k
 php-mbstring                              x86_64                             7.4.20-1.el8.remi                              remi-modular                             529 k
 php-xml                                   x86_64                             7.4.20-1.el8.remi                              remi-modular                             215 k

Transaction Summary
============================================================================================================================================================================
Install  9 Packages

Total download size: 4.8 M
Installed size: 26 M
Is this ok [y/N]: y
Configure phpLDAPadmin on Rocky Linux 8
After installing phpLDAPadmin, proceed to configure it to connect to your openLDAP server.
To begin with, backup the default configuration file provided;
cp /etc/phpldapadmin/config.php{,.orig}Open the configuration file, /etc/phpldapadmin/config.php for editing;
vim /etc/phpldapadmin/config.phpScroll down the configuration file to the section;
/*********************************************
 * Define your LDAP servers in this section  *
 *********************************************/
Define a suitable name for your LDAP server. This name will appear on phpLDAPadmin web interface.
$servers->setValue('server','name','Kifarunix-demo LDAP master');Set your OpenLDAP address, this can be a resolvable hostname or an IP address.
$servers->setValue('server','host','192.168.60.29');If your OpenLDAP server is listening on non default port, uncomment the highlighted line below and define the port. (Default port, 389/tcp is used here)
/* The port your LDAP server listens on (no quotes). 389 is standard. */
// $servers->setValue('server','port',389);
Define your OpenLDAP base DNs.
$servers->setValue('server','base',array('dc=ldapmaster,dc=kifarunix-demo,dc=com'));If you want to define a static bind DN, set it under the section;
/* The DN of the user for phpLDAPadmin to bind with. For anonymous binds or
    'cookie','session' or 'sasl' auth_types, LEAVE THE LOGIN_DN AND LOGIN_PASS
    BLANK. If you specify a login_attr in conjunction with a cookie or session
    auth_type, then you can also specify the bind_id/bind_pass here for searching
    the directory for users (ie, if your LDAP server does not allow anonymous
    binds. */
 // $servers->setValue('login','bind_id','');
#  $servers->setValue('login','bind_id','cn=Manager,dc=example,dc=com');

/* Your LDAP password. If you specified an empty bind_id above, this MUST also
   be blank. */
// $servers->setValue('login','bind_pass','');
#  $servers->setValue('login','bind_pass','secret');
In this guide, we have chosen not define a static bind DN. Read the highlighted section above.
Define phpLDAPadmin login attribute. We use dn in this guide. You can use uid, if you want.
// $servers->setValue('login','attr','uid');
$servers->setValue('login','attr','dn');
This will require a full DN for logging in.
Those are just but a few phpLDAPadmin configurations made in this guide. Be sure to make configurations to suit your needs.
Create Web Server configuration for phpLDAPadmin
First, you need a web server, which can be Apache or Nginx to be able to access phpLDAPadmin from the web browser.
We use Apache in this setup. Thus install it.
dnf install httpdNext, you need to create web configuration for phpLDAPadmin to define how it is going to be access from the browser.
cat > /etc/httpd/conf.d/phpldapadmin.conf << 'EOL'
Alias /phpldapadmin /usr/share/phpldapadmin/htdocs

<Directory /usr/share/phpldapadmin/htdocs>
  <IfModule mod_authz_core.c>
    Require all granted
  </IfModule>
</Directory>
EOL
Save and exit the configuration file.
With this configuration, you will have to access phpLDAPadmin on browser using the URL, http://ldap-server-hostname-OR-IP/phpldapadmin.
On the other hand, you can create an Apache VirtualHost for phpLDAPadmin as shown below. Be sure to make appropriate replacements in the configurations.
cat > /etc/httpd/conf.d/phpldapadmin.conf 'EOL'
<VirtualHost *:80>
        ServerName ldapmaster.kifarunix-demo.com
        DocumentRoot /usr/share/phpldapadmin/htdocs

        <Directory /usr/share/phpldapadmin/htdocs>
          <IfModule mod_authz_core.c>
            # Apache 2.4
            Require all granted
          </IfModule>
        </Directory>
        ErrorLog /var/log/httpd/phpldapadmin.error.log
        CustomLog /var/log/httpd/phpldapadmin.access.log combined
</VirtualHost>
EOL
With this configuration, you can access phpLDAPadmin using the URL, http://ldap-server-hostname-OR-IP.
Set the proper ownership of the document root as shown below;
chown -R apache:apache /usr/share/phpldapadminCheck apache for syntax errors.
httpd -tIf you get the output, Syntax OK, then you good to go. Otherwise, fix any would be error before you can proceed.
Configure FirewallD
Allow external access to Apache on firewalld, if it is running.
firewall-cmd --add-port=80/tcp --permanentfirewall-cmd --reloadConfigure SELinux
If SELinux is running, run the following commands to;
Allow httpd to connect to the network.
setsebool -P httpd_can_network_connect 1Allow httpd to connect to OpenLDAP server.
setsebool -P httpd_can_connect_ldap 1Resolve user passwd entries directly from ldap
setsebool -P authlogin_nsswitch_use_ldap 1To allow system to run with NIS.
setsebool -P nis_enabled 1Running Apache
Start and enable Apache to run on system boot.
systemctl enable --now httpdAccessing phpLDAPadmin on Rocky Linux 8
You can now access phpLDAPadmin from any browser using the url. http://server-hostname-or-IP/phpldapadmin or http://server-hostname-or-IP depending on your configuration.
This will take you the phpLDAPadmin web interface.

Click login just below the name of your LDAP server to get a login interface. To login, you can specify your DN for example, cn=admin,dc=ldapmaster,dc=kifarunix-demo,dc=com.

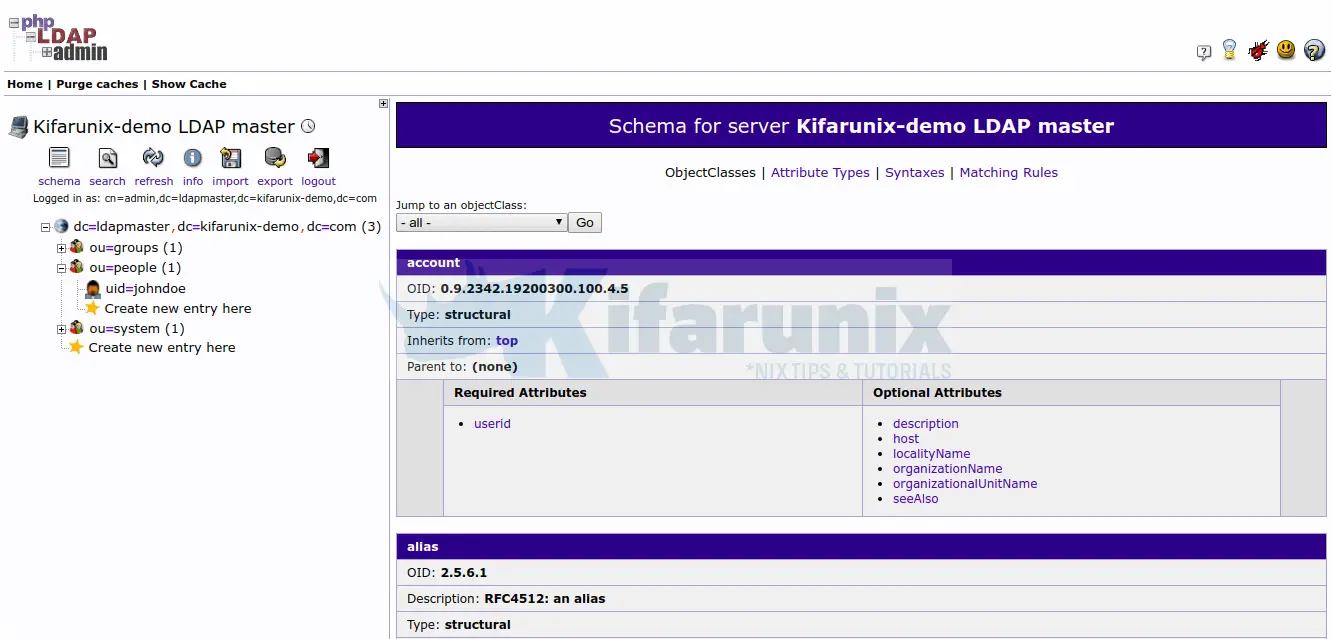
Upon successful login, you should be able to see your LDAP structure.

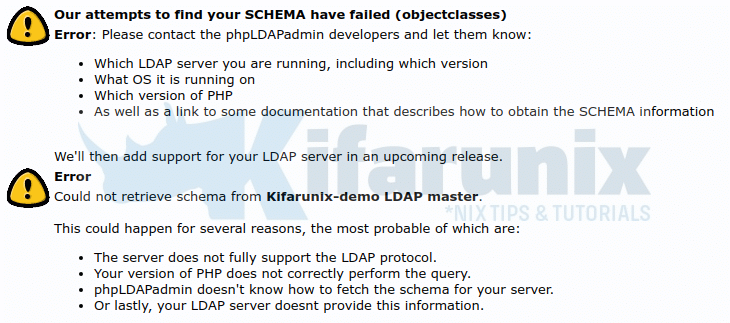
If by clicking the schema you get the error below;
Our attempts to find your SCHEMA have failed (objectclasses)

Then you need to enable anonymous read access to Subschema on the frontend LDAP database in order to fix this.
If you followed our guide to install and setup OpenLDAP server on Rocky Linux 8 whose link is provided above, then our current access control lists on the frontend database are;
ldapsearch -Q -LLL -Y EXTERNAL -H ldapi:/// -b cn=config '(olcDatabase={-1}frontend)' olcAccessdn: olcDatabase={-1}frontend,cn=config
olcAccess: {0}to * by dn.base="gidNumber=0+uidNumber=0,cn=peercred,cn=externa
l,cn=auth" manage by * noneTo allow anyone to read the LDAP schema, you simply need to add the ACL below to frontend database as the first ACL.
to dn.base="cn=Subschema" by * readUse LDIF file to implement this change.
vim read-access-to-subschema.ldifdn: olcDatabase={-1}frontend,cn=config
changetype: modify
add: olcAccess
olcAccess: {0}to dn.base="cn=Subschema" by * readUpdate the database.
ldapadd -H ldapi:/// -Y EXTERNAL -f read-access-to-subschema.ldifList the access control lists again.
ldapsearch -Q -LLL -Y EXTERNAL -H ldapi:/// -b cn=config '(olcDatabase={-1}frontend)' olcAccessdn: olcDatabase={-1}frontend,cn=config
olcAccess: {0}to dn.base="cn=Subschema" by * read
olcAccess: {1}to * by dn.base="gidNumber=0+uidNumber=0,cn=peercred,cn=externa
l,cn=auth" manage by * noneRestart both LDAP and Apache Service.
systemctl restart httpd slapdYou should now be able to read your OpenLDAP schema and directory tree as well as administer OpenLDAP server from web using phpLDAPadmin.

That marks the end of our guide on how to install phpLDAPadmin.
Related OpenLDAP Tutorials
Configure SSSD for LDAP Authentication on Rocky Linux 8

