Want to create a free website or build your personal blog? Well then WordPress is what you are looking for. With CentOS 8 having been released, follow through this guide to learn how to install WordPress with Nginx and MySQL 8 on CentOS 8.
Are you using WordPress and looking for a professional WordPress website builder? Look no further since Elementor can help you create beautiful pages.
Installing WordPress with Nginx and MySQL 8 on CentOS
Prerequisites
In order to setup WordPress on CentOS 8 with Nginx and MySQL 8, there are a number of prerequisites that must be met;
Update System Packages
System packages can be updated and upgraded on CentOS 8 using the commands below;
dnf updatednf upgradeInstall LEMP Stack on CentOS 8
Next, ensure that you have LEMP stack installed. We have made a guide on how to install LEMP stack on CentOS 8 in our other tutorials. Follow the link below;
Install LEMP Stack on CentOS 8
Install Required PHP Extensions
There are other PHP extensions that are required to run WordPress on CentOS 8 that were not installed on the LEMP guide above.
dnf install php-cli php-json php-opcache php-xml php-gd php-curlCreate WordPress MySQL Database
Once you have your LEMP stack setup, proceed to create MySQL database and the database user for your WordPress blog.
Let us first the Database version installed.
mysql -Vmysql Ver 8.0.17 for Linux on x86_64 (Source distribution)Be sure to replace the name of the database, the database user and the password used accordingly.
Login to MySQL as root.
mysql -u root -pCreate a WordPress database.
create database wordpressdb;Create a WordPress database user and grant all privileges on the database.
create user wpadmin@localhost identified by 'StrongP@33#';grant all on wordpressdb.* to wpadmin@localhost;Reload the database privileges tables and exit the database.
flush privileges;quitInstall WordPress 5.x on CentOS 8
WordPress 5.3 is the latest version of the writing of this guide. To install the latest version, download WordPress archive from the WordPress downloads page. You can simply use the wget command.
dnf install wget -ywget https://wordpress.org/latest.tar.gzCreate your web root directory. Replace the names accordingly.
mkdir /usr/share/nginx/wp.kifarunix-demo.comNext, extract WordPress archive contents to the default Web root directory.
dnf install tartar xzf latest.tar.gz -C /usr/share/nginx/wp.kifarunix-demo.com/ --strip-components=1Verify that the WordPress files are in place.
ls /usr/share/nginx/wp.kifarunix-demo.com/index.php wp-activate.php wp-comments-post.php wp-cron.php wp-load.php wp-settings.php xmlrpc.php
license.txt wp-admin wp-config-sample.php wp-includes wp-login.php wp-signup.php
readme.html wp-blog-header.php wp-content wp-links-opml.php wp-mail.php wp-trackback.phpConfigure WordPress on CentOS 8
WordPress comes with a sample configuration, wp-config-sample.php. Rename the sample configuration file.
cp /usr/share/nginx/wp.kifarunix-demo.com/wp-config{-sample,}.phpNext, edit the configuration file and set the database connection details,
vi /usr/share/nginx/wp.kifarunix-demo.com/wp-config.phpReplace the DB_NAME, DB_USER, DB_PASSWORD with the values you set while creating the MySQL database for WordPress.
...
// ** MySQL settings - You can get this info from your web host ** //
/** The name of the database for WordPress */
define( 'DB_NAME', 'wordpressdb' );

/** MySQL database username */
define( 'DB_USER', 'wpadmin' );

/** MySQL database password */
define( 'DB_PASSWORD', 'StrongP@33#' );

/** MySQL hostname */
define( 'DB_HOST', 'localhost' );

/** Database Charset to use in creating database tables. */
define( 'DB_CHARSET', 'utf8' );
...
Next, generate authentication unique keys and salts. You can simply generate the keys and salts from WordPress Secret-Key service as follows;
curl -s https://api.wordpress.org/secret-key/1.1/salt/define('AUTH_KEY', 'B|#MIfD#LtT8].r0$gj[|&kn:?1r9=@,6fHeP(#u{Kg<q#E}4yuo$goGmF*qxv{}');
define('SECURE_AUTH_KEY', '<@v!aDzv+I65qI!om67Bc4QA=Wfb|HLr0XhZT;6nVS+`t{&8PI}y}kJ6U[#Hm-x_');
define('LOGGED_IN_KEY', 'JF*T}IXf=8tqx>+}Ao9N#z}UX8_Ms_o<-E6SJ#^z? ^{8$&H 8H+<a+1$[{$&p+');
define('NONCE_KEY', 'ah6{N4;Ms+CZfeU87+@Z_PO>W`?$^+2Jcvo=hV`e}v}u5+;hPyqw<2b;qyHkXOs$');
define('AUTH_SALT', '][WrFF`:-.#+}dEJQ.;Q%sl( RiY7:m(-[.sDd3dh|o8S+q>?ak[g6ltHo^V5|]5');
define('SECURE_AUTH_SALT', ')o|KHA^,~yH7S9-!vSS@vD[Al;ep$<$a$*emlV+h)l?T+Gc.a!LWZC {DZ buO[B');
define('LOGGED_IN_SALT', '$-W+/bVu[vkBeWrtu:R-6&cf{]N%z,PBomOP>R=lqCOEt%v]Y>}b]wGp(/yza=ux');
define('NONCE_SALT', ' VV(UM||}r]G:4#XT;T9:*$@>[`v(m.N383u8pEJ-w*2>h#mh5v`Kc9@}5c:Tc$]');Within the wp-config.php, replace the following lines with the above.
...
* @since 2.6.0
*/
define( 'AUTH_KEY', 'put your unique phrase here' );
define( 'SECURE_AUTH_KEY', 'put your unique phrase here' );
define( 'LOGGED_IN_KEY', 'put your unique phrase here' );
define( 'NONCE_KEY', 'put your unique phrase here' );
define( 'AUTH_SALT', 'put your unique phrase here' );
define( 'SECURE_AUTH_SALT', 'put your unique phrase here' );
define( 'LOGGED_IN_SALT', 'put your unique phrase here' );
define( 'NONCE_SALT', 'put your unique phrase here' );
/**#@-*/
...Your configuration should look like;
...
* @since 2.6.0
*/
/**
* define( 'AUTH_KEY', 'put your unique phrase here' );
* define( 'SECURE_AUTH_KEY', 'put your unique phrase here' );
* define( 'LOGGED_IN_KEY', 'put your unique phrase here' );
* define( 'NONCE_KEY', 'put your unique phrase here' );
* define( 'AUTH_SALT', 'put your unique phrase here' );
* define( 'SECURE_AUTH_SALT', 'put your unique phrase here' );
* define( 'LOGGED_IN_SALT', 'put your unique phrase here' );
* define( 'NONCE_SALT', 'put your unique phrase here' );
*/
define('AUTH_KEY',         'B|#MIfD#LtT8].r0$gj[|&kn:?1r9=@,6fHeP(#u{Kg<q#E}4yuo$goGmF*qxv{}');
define('SECURE_AUTH_KEY',  '<@v!aDzv+I65qI!om67Bc4QA=Wfb|HLr0XhZT;6nVS+`t{&8PI}y}kJ6U[#Hm-x_');
define('LOGGED_IN_KEY',    'JF*T}IXf=8tqx>+}Ao9N#z}UX8_Ms_o<-E6SJ#^z?  ^{8$&H 8H+<a+1$[{$&p+');
define('NONCE_KEY',        'ah6{N4;Ms+CZfeU87+@Z_PO>W`?$^+2Jcvo=hV`e}v}u5+;hPyqw<2b;qyHkXOs$');
define('AUTH_SALT',        '][WrFF`:-.#+}dEJQ.;Q%sl( RiY7:m(-[.sDd3dh|o8S+q>?ak[g6ltHo^V5|]5');
define('SECURE_AUTH_SALT', ')o|KHA^,~yH7S9-!vSS@vD[Al;ep$<$a$*emlV+h)l?T+Gc.a!LWZC {DZ buO[B');
define('LOGGED_IN_SALT',   '$-W+/bVu[vkBeWrtu:R-6&cf{]N%z,PBomOP>R=lqCOEt%v]Y>}b]wGp(/yza=ux');
define('NONCE_SALT',       ' VV(UM||}r]G:4#XT;T9:*$@>[`v(m.N383u8pEJ-w*2>h#mh5v`Kc9@}5c:Tc$]');
/**#@-*/
...Configure Nginx
Create an Nginx server block for your blog. You can make it the default (default_server) block if you are hosting just one block.
vi /etc/nginx/conf.d/wp.kifarunix-demo.com.confserver {
listen 80 default_server;
server_name wp.kifarunix-demo.com;
root /usr/share/nginx/wp.kifarunix-demo.com;
access_log /var/log/nginx/access_wp.kifarunix-demo.com.log;
error_log /var/log/nginx/error_wp.kifarunix-demo.com.log;
index index.php;
location / {
try_files $uri $uri/ /index.php?$args;
}
location ~ \.php$ {
fastcgi_pass unix:/run/php-fpm/www.sock;
fastcgi_param SCRIPT_FILENAME $document_root$fastcgi_script_name;
include fastcgi_params;
fastcgi_index index.php;
}
error_page 404 /404.html;
location = /40x.html {
}
error_page 500 502 503 504 /50x.html;
location = /50x.html {
}
}Next, set the user and group ownership of your site Nginx configuration to nginx user.
chown -R nginx:nginx /usr/share/nginx/wp.kifarunix-demo.com/If SELinux is running, execute the following commands to allow Nginx connect to DB, send mail and access WordPress configuration files.
setsebool -P httpd_can_network_connect_db=1setsebool -P httpd_can_sendmail=1chcon -Rt httpd_sys_content_t /usr/share/nginx/wp.kifarunix-demo.com/Disable the default Nginx site;
sed -i 's/80 default_server;/80;/' /etc/nginx/nginx.confCheck the syntax;
nginx -tnginx: the configuration file /etc/nginx/nginx.conf syntax is ok
nginx: configuration file /etc/nginx/nginx.conf test is successfulRestart Nginx, if the syntax is ok.
systemctl restart nginxFinalize WordPress Setup
Login to your WordPress and finalize your setup.
Access the your blog using the domain name or IP address; http://domain_name_or_IP.
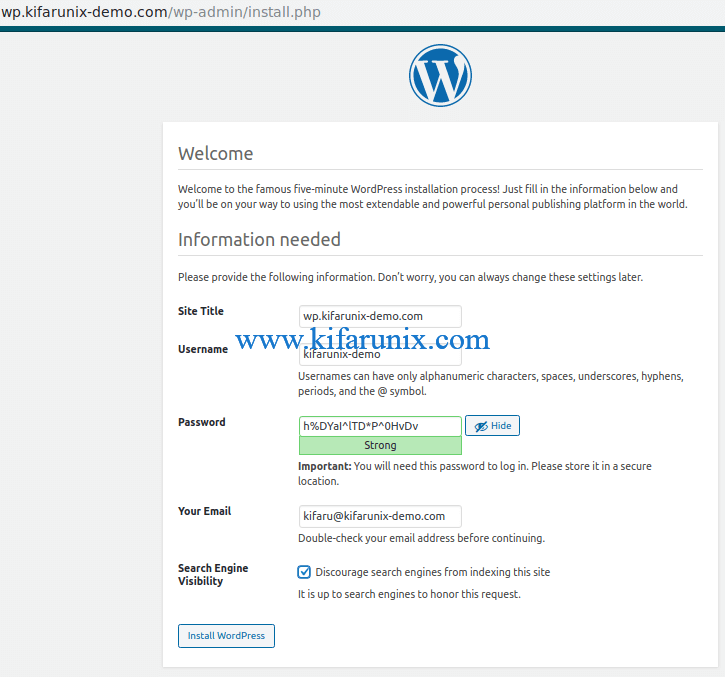
Go through the WordPress settings and configure them accordingly. See sample screenshot below;

Once done with settings, click Install WordPress to finalize the installation of WordPress on your CentOS 8 server. Be sure to copy the password and save it.

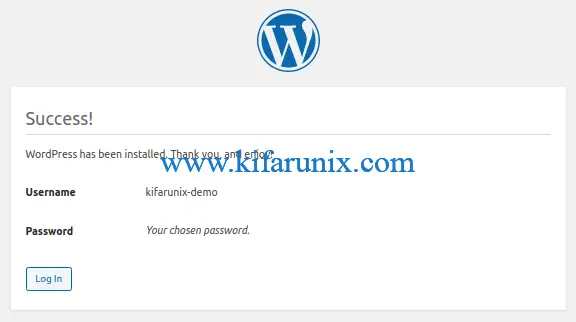
Once the installation is done, login to your WordPress with the user credentials you set up.

There you go. You have successfully installed WordPress.
Other Related Articles
Install LEMP Stack on Debian 10 Buster
Install LEMP Stack with MySQL 8 on Fedora 30/Fedora 29
How To Setup LEMP Stack (Nginx, MariaDB, PHP 7.2) on Ubuntu 18.04


Dear K:
These directions (at least using RHEL 9.1 and its default PHP of 8.02x) are incomplete. Following them does not get to the admin panel but instead a 404. I found, following these directions that fpm was missing and had to be installed. Furthermore once that was fixed NGINX failed! It complained:
Dec 06 19:19:17 172-104-197-118 systemd[1]: Starting The nginx HTTP and reverse proxy server…
Dec 06 19:19:17 172-104-197-118 nginx[5700]: nginx: [emerg] no port in upstream “php-fpm” in /etc/nginx/default.d/php.conf:15
Dec 06 19:19:17 172-104-197-118 nginx[5700]: nginx: configuration file /etc/nginx/nginx.conf test failed
Dec 06 19:19:17 172-104-197-118 systemd[1]: nginx.service: Control process exited, code=exited, status=1/FAILURE
Dec 06 19:19:17 172-104-197-118 systemd[1]: nginx.service: Failed with result ‘exit-code’.
Dec 06 19:19:17 172-104-197-118 systemd[1]: Failed to start The nginx HTTP and reverse proxy server.
…It could not find fpm despite having just installed it all and verified it was a good install and complete. This turned out to be a problem in ~/conf.d/php-fpm.conf. The location for fastcgi has the line:
fastcgi_pass php-fpm
…this causes NGINX to fail
It needs:
fastcgi_pass unix:/var/run/php-fm/www.sock;
Alas, there is no online documentation anywhere that points to this error. I also suspect that it is not much different in RHEL 8.
In any case, as your directions are quite clear I suspect others may follow them – and end up in similar straights. So…I thought I would let you know my (time-intensive!) experience at getting this all too work.
I also note a little lack of clarity in some of the instructions like when copying the sample file to the working wp-config.
Anyway, thank you for taking the time to post this material.
Best,
P
Thank you for the feedback, Pyrrhic