In this guide, we are going to learn how to install and setup Adiscon LogAnalyzer on CentOS 8. Adiscon LogAnalyzer is a web interface to syslog/Rsyslog and other network event data. It provides easy browsing, analysis of real time network events and reporting services.
Installing Adiscon LogAnalyzer on CentOS 8
In this demo, we will be collecting logs using Rsyslog and store them on a database, preferrably MariaDB from where LogAnalyzer will read and analyze them.
As such, step through this guide to setup Adiscon LogAnalyzer with Rsyslog and MariaDB on CentOS 8.
Run System Update
Resynchronize your system packages to their latest versions by running the command below;
dnf updateInstall LAMP Stack on CentOS 8
Almost every web application requires a L[AE]MP stack. LogAnalyzer is no exception. Follow the guide below to learn how to install LAMP stack on CentOS 8.
Install LAMP Stack on CentOS 8
Create LogAnalyzer Database and Database User
Once the LAMP stack is installed and setup, create LogAnalyzer database and database user. This step can be made simple by installing rsyslog-mysql package which provides a sample Rsyslog MySQL schema which can be just imported into MySQL/MariaDB server.
To install rsyslog-mysql package, run the command below;
dnf install rsyslog-mysql -yOnce the installation is done, import Rsyslog MySQL database schema, /usr/share/doc/rsyslog/mysql-createDB.sql, into MySQL/MariaDB.
mysql -u root -p < /usr/share/doc/rsyslog/mysql-createDB.sqlThis command will create a database called Syslog on MariaDB/MySQL db server.
If you want to use a different name of the database, simply edit the schema and make necessary changes.
Next, login to MySQL/MariaDB and create a LogAnalyzer database user with all the privileges granted on the database imported above
mysql -u root -pCheck available databases;
show databases;+--------------------+
| Database |
+--------------------+
| Syslog |
| information_schema |
| mysql |
| performance_schema |
+--------------------+
4 rows in set (0.001 sec)Replace the user and its password accordingly.
grant all on Syslog.* to logadmin@localhost identified by 'str0ngP@ssW0rd';Reload the privileges tables and quit the database.
flush privileges;quitConfigure Rsyslog
To begin with, configure Rsyslog to enable UDP and TCP syslog reception. This can be done by commenting out (removing comments, #) at the beginning of the following highlighted lines;
...
# Provides UDP syslog reception
# for parameters see http://www.rsyslog.com/doc/imudp.html
module(load="imudp")
input(type="imudp" port="514")
...
If you also want to receive logs via TCP, simply uncomment the following highlighted lines.
...
# Provides TCP syslog reception
# for parameters see http://www.rsyslog.com/doc/imtcp.html
module(load="imtcp")
input(type="imtcp" port="514")
Next, enable load the Rsyslog MySQL module to enable you to forward logs into MySQL/MariaDB database. This can be done by the use of ommysql Rsyslog module as shown below. See the highlighted lines;
Be sure to replace the server, serverport, database name, database user and password accordingly.
...
#### MODULES ####

module(load="imuxsock"    # provides support for local system logging (e.g. via logger command)
       SysSock.Use="off") # Turn off message reception via local log socket;
                          # local messages are retrieved through imjournal now.
module(load="imjournal"             # provides access to the systemd journal
       StateFile="imjournal.state") # File to store the position in the journal
#module(load="imklog") # reads kernel messages (the same are read from journald)
#module(load"immark") # provides --MARK-- message capability
# Enable MySQL Logging
module(load="ommysql")
action(type="ommysql" server="localhost" serverport="3306"
       db="Syslog" uid="logadmin" pwd="str0ngP@ssW0rd")
...
Rsyslog is now ready to receive logs and forward them to MySQL database. However, you might need to restrict log forwarding to Rsyslog using the $AllowedSender parameter.
This parameter takes the format;
$AllowedSender [UDP/TCP], ip[/bits], ip[/bits]Hence, to allow specific servers to send logs to Rsyslog server, you would simply add a line like as shown below under the ### GLOBAL DIRECTIVES ### section.
$AllowedSender UDP, 192.168.56.0/24, [::1]/128, *.kifarunix-demo.comTo define servers allowed for TCP syslog reception;
$AllowedSender TCP, 192.168.56.0/24, [::1]/128, servera.kifarunix-demo.comBasic Rsyslog configuration is done. Save the configuration and restart rsyslog;
systemctl restart rsyslogAllow Rsyslog remote connection via FirewallD;
firewall-cmd --add-port=514/{tcp,udp} --permanentfirewall-cmd --reloadInstall LogAnalyzer on CentOS 8
To install LogAnalyzer on CentOS 8, download the latest stable release version of LogAnalyzer from the downloads page. You can simply use wget command to pull the tarball as shown below;
wget http://download.adiscon.com/loganalyzer/loganalyzer-4.1.10.tar.gzExtract LogAnalyzer Tarball
Once the download is complete, extract LogAnalyzer tarball.
tar xzf loganalyzer-4.1.10.tar.gzInstall LogAnalyzer
Sine LogAnalyzer is a web application, you can install on your default web server root directory. You can however create LogAnalyzer directory under the web root directory.
mkdir /var/www/html/loganalyzerNext, upload all files from the loganalyzer/src/ folder to your web server root directory created above.
cp -r loganalyzer-4.1.10/src/* /var/www/html/loganalyzer/Next, copy the loganalyzer-4.1.10/contrib/configure.sh to the web root directory.
cp loganalyzer-4.1.10/contrib/configure.sh /var/www/html/loganalyzer/Next, execute the script to create a required empty, contrib.php file and set the necessary permissions.
cd /var/www/html/loganalyzer/bash configure.shEdit the default Apache configuration and set the adjust the web root directory appropriately.
vim /etc/httpd/conf/httpd.conf# DocumentRoot "/var/www/html"
DocumentRoot "/var/www/html/loganalyzer"Save the configurations, quit and restart Apache;
httpd -tsystemctl restart httpdConfigure SELinux
Unify HTTPD handling of all content files;
setsebool -P httpd_unified 1Allow httpd network connection
setsebool -P httpd_can_network_connect 1Allow httpd to graceful shutdown
setsebool -P httpd_graceful_shutdown 1Allow httpd network relay connection
setsebool -P httpd_can_network_relay 1Finalize LogAnalyzer Setup on Browser
LogAnalyzer is now setup. You can access it via the address http://server_IP_OR_Hostname
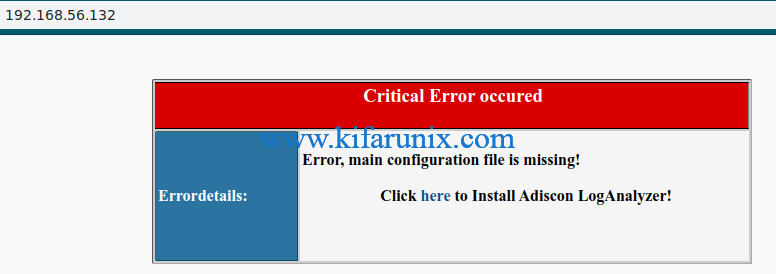
When you encounter the error, shown below, simply click here to proceed.

Click Next to check if all the required prereqs are met.

Ensure that the config.php file is writeable.
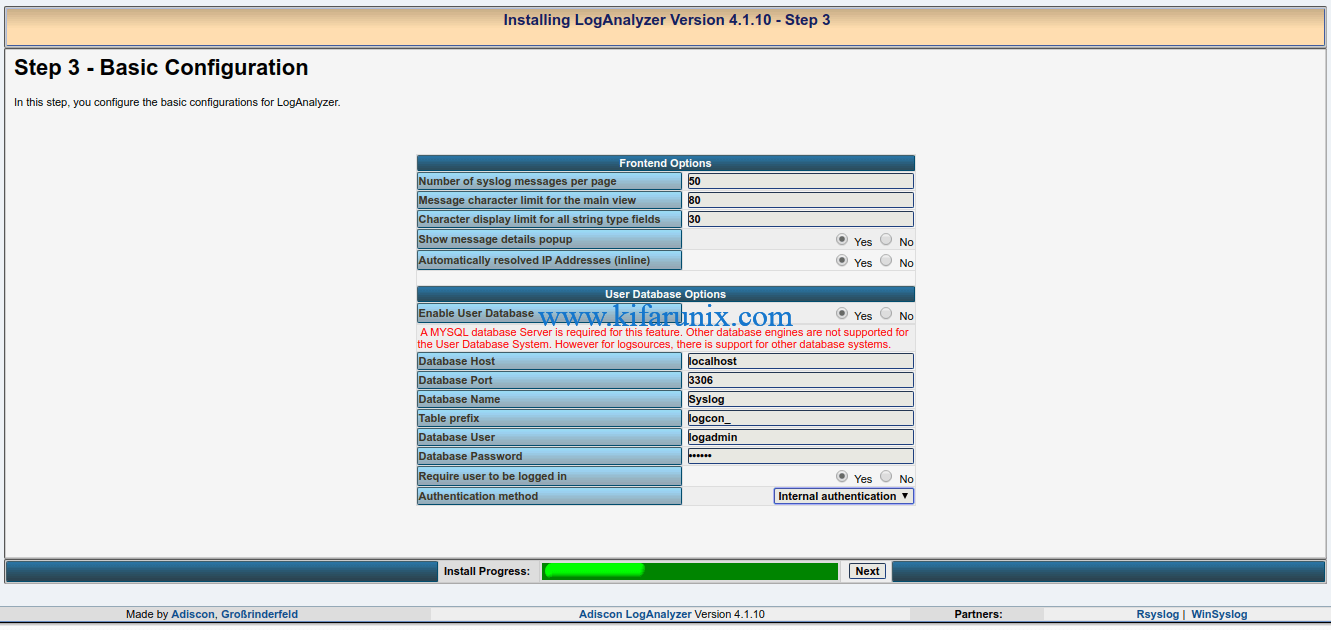
Under Basic configuration, enable User database and set the right database connection details.

Click Next to create the necessary database tables used by the LogAnalyzer User System.

Ensure that all queries execute successfully on Step 5.
Create LogAnalyzer Administrator User Account.

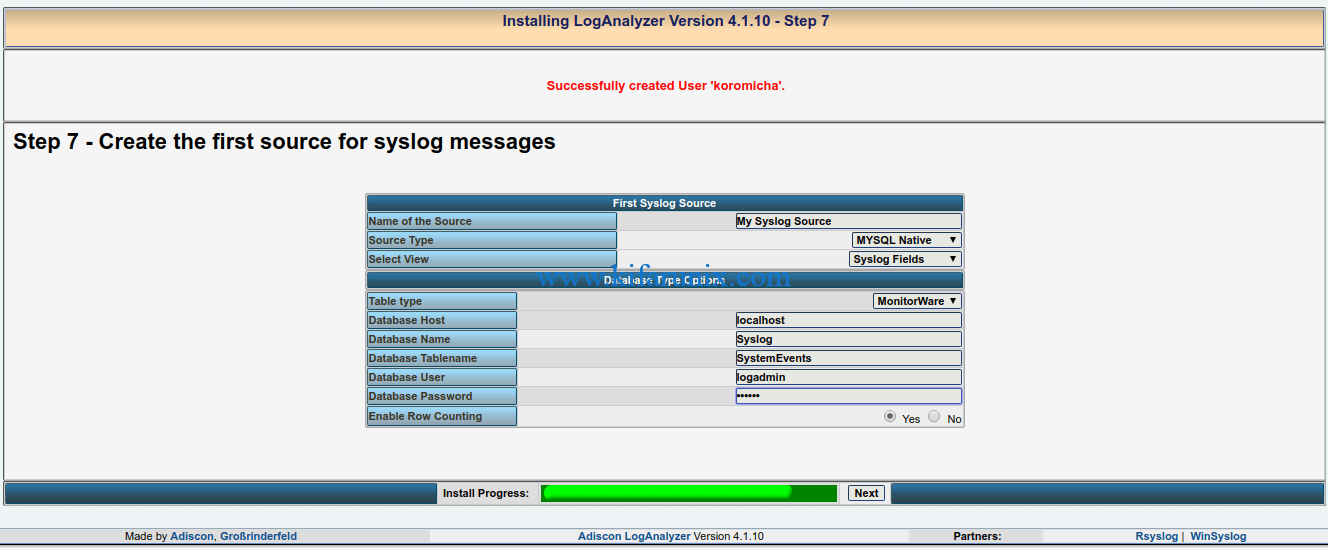
Create the first source for syslog messages. In this case, select MySQL native and provide the correct database connection details. Note the following default Database and Table names;
CREATE DATABASE Syslog;
USE Syslog;
CREATE TABLE SystemEvents
...
Click Next to finalize the LogAnalyzer setup.
When you click Finish, it takes you to LogAnalyzer login page.
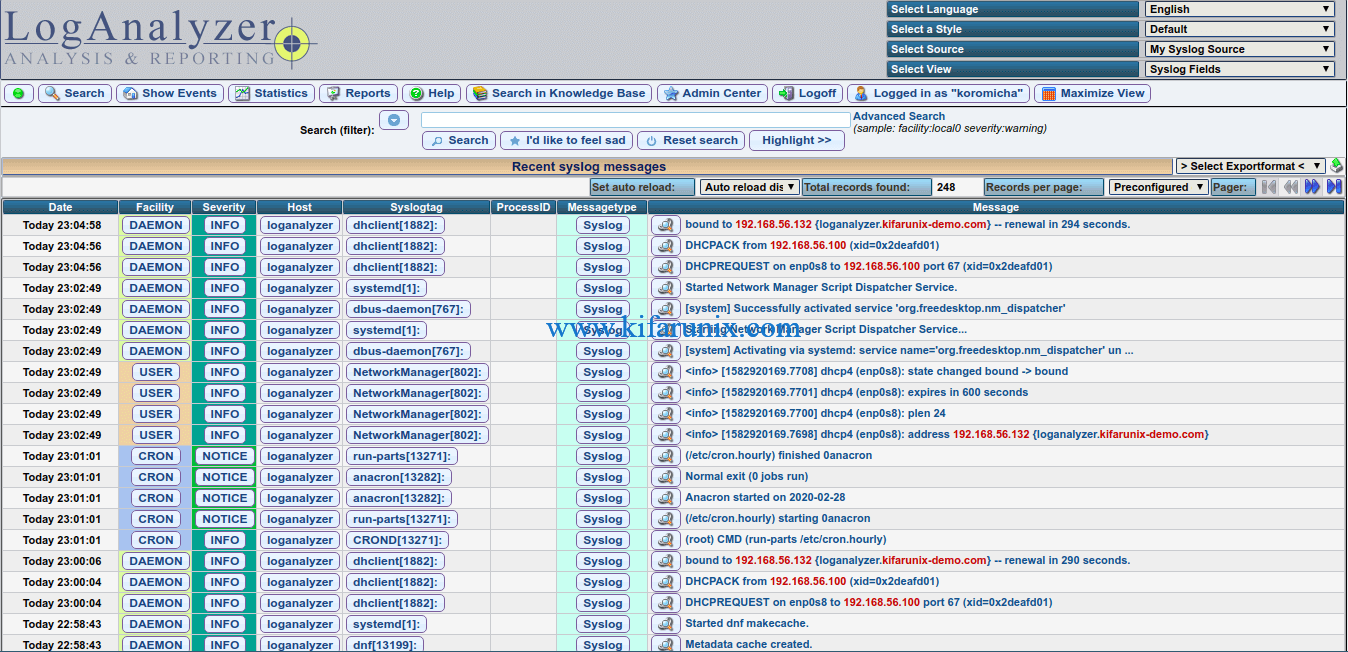
Login as administrator user you created on Step 6. Upon successful login, boom, you land on the dashboard.

If you want to enable auto refresh for realtime streaming, see screenshot below;

You have successfully installed LogAnalyzer. That marks the end of our tutorial on how to installing Adiscon LogAnalyzer on CentOS 8.
Read more on LogAnalyzer INSTALL ReadMe
Related Tutorials;
Configure NXLog to Forward System Logs to Rsyslog Server on Ubuntu 18.04
Configure Rsyslog on Solaris 11.4 to Send logs to Remote Log Server
How to Configure Remote Logging with Rsyslog on Ubuntu 18.04

