In this tutorial, you will learn how to configure NTP server on pfSense. pfSense software is a free, open source customized distribution of FreeBSD specifically tailored for use as a firewall and router that is entirely managed via web interface. In addition to being a powerful, flexible firewalling and routing platform, it includes a long list of related features and a package system allowing further expandability. One these features being the ability to provide NTP services.
NTP, the Network Time Protocol, is used to keep computer clocks accurate by synchronizing them over the Internet or a local network, or by following an accurate hardware receiver that interprets GPS, DCF-77, NIST or similar time signals.
Configuring NTP Server on pfSense
By default, pfSense ships with NTP daemon, which controls time synchronization with connected devices. As such, with minimal configurations, pfSense can function as an NTP server.
Configure pfSense Time Synchronization
Before it is able to provide accurate time services to the connec, it is wise to ensure that pfSense time is synchronized with other time servers and its time is accurate.
To achieve this, head over to pfSense web interface and navigate to System > General Setup.
Under the Localization configuration section;
- Set your correct timezone (geographic region) e.g, our zone is Europe/Nicosia.
- Define your time servers. In this case, we go with the default pfSense NTP pool server, 2.pfsense.pool.ntp.org.
- If you use hostname for a time server, ensure that you have DNS setup in your pfSense for name resolution.

Configuring NTP Server
Once your pfSense time is synchronized, you can now proceed to configure it to provide time services for your network devices.
On pfSense web interface, navigate to Services > NTP.
On the default Settings tab, is the NTP Server Configuration options.
Select NTP Service Interface
Select an Interface on which NTP service daemon will listen or bind to. Such an interface will be used by the pfSense NTP server to sent out time queries from remote hosts as well as server the NTP clients. We use the three Interfaces here; LAN, OPT1, localhost.

To select more than on Interface, press and hold Ctrl button while selecting.
Configure NTP Time Servers
In this section, you need to configure the time servers from which your pfSense NTP service will query for time synchronization. The servers defined here are usually pre-populated from the time servers defined on the System > General Setup, localization section.
It is recommended that you define at least three time servers to ensure time accuracy.
In this tutorial, we are going to add the following public pool time servers;
0.europe.pool.ntp.org
1.europe.pool.ntp.org
2.europe.pool.ntp.org
3.europe.pool.ntp.org
Basically, these are the servers located in our region for that matter. You can find a list of NTP pool time servers for your region/continent on NTP Public Pool Time Servers.
Therefore, click the Add button to enter the NTP pool hostnames of your preferred region.
While adding the time servers, there are options to either, set your preferred time server over all defined servers (Prefer), disable the use of a specific time server (No Check) and whether the server is a pool of time servers (pool).
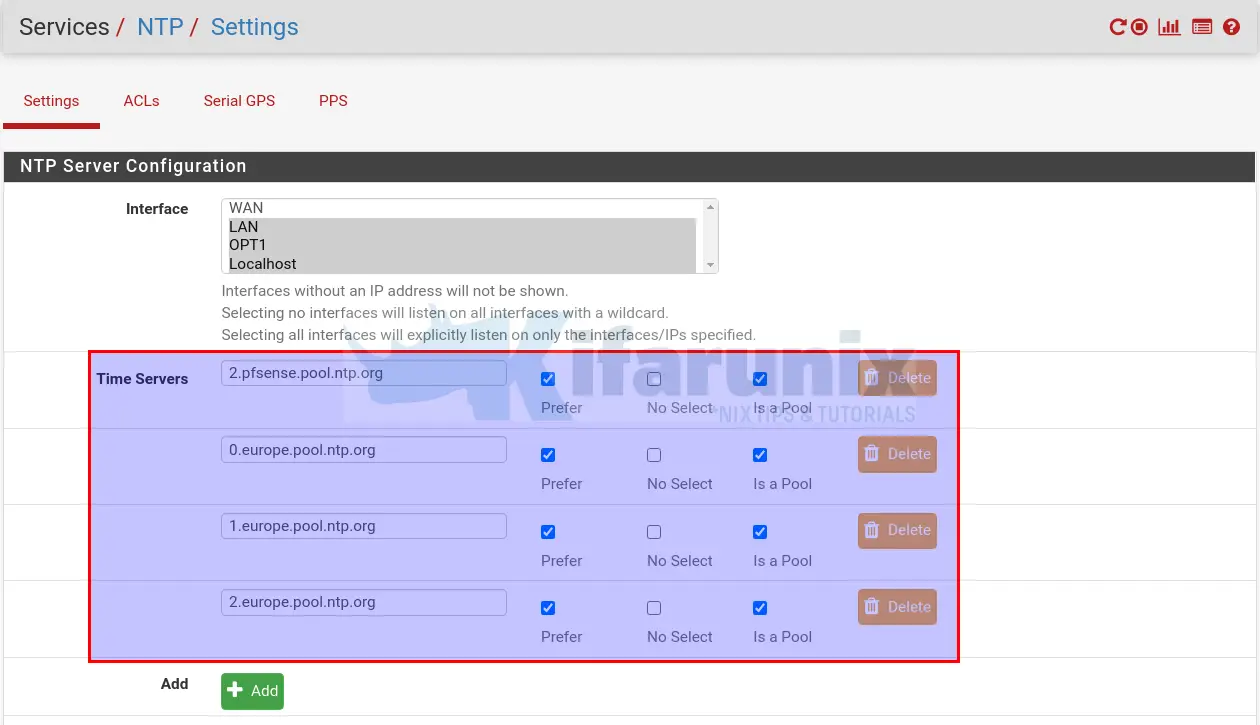
NOTE: In regards to selecting a preferred time server, even if you select all of the defined time servers as Prefer, only the first prefer is retained upon hitting the Save button.
For the other configuration options, we will enable logging and RRD graphs for NTP statistics and leave the options with the default settings.
Note that:
- the Orphan mode allows the system clock to be used when no other clocks are available. The number set defines the stratum position of the live time servers.
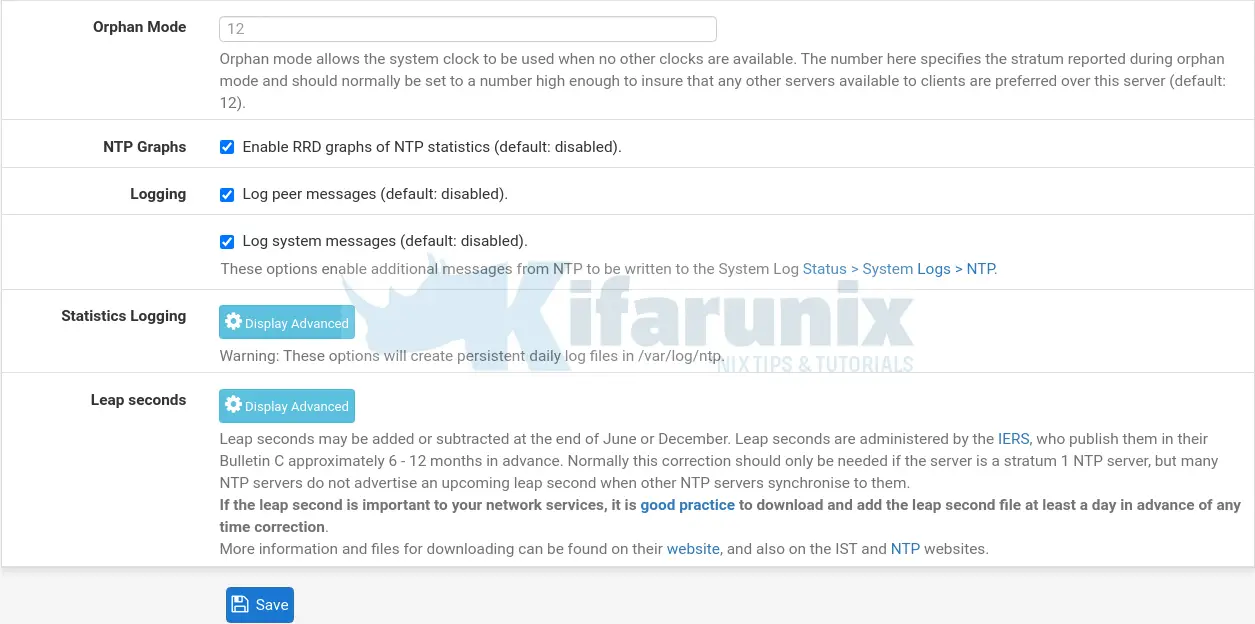
Click Save to save the changes.
Configure Access Control to NTP Service
Click on the ACLs tab to define how NTP clients are allowed to interact with NTP server. Some of the default access restriction options include;
Kiss-o'-Death (KoD): rate-limits NTP client requests that are sent very frequentlynomodify: prevents any changes to the configuration via the ntpq and ntpdc queries. This can be used to prevent against amplification attacks.notrap: preventsntpdccontrol message protocol traps.nopeer: disables any new peer association formation.noquery: deniesntpqandntpdcqueries, but not time queries, from being answered. This however, disables the NTP status page.
Define network access restrictions to allow specific set of servers to obtain time services from your pfSense NTP server. To add more networks/hosts, simply click the Add button. Note that for every network/host defined, you can specify their specific restriction options.
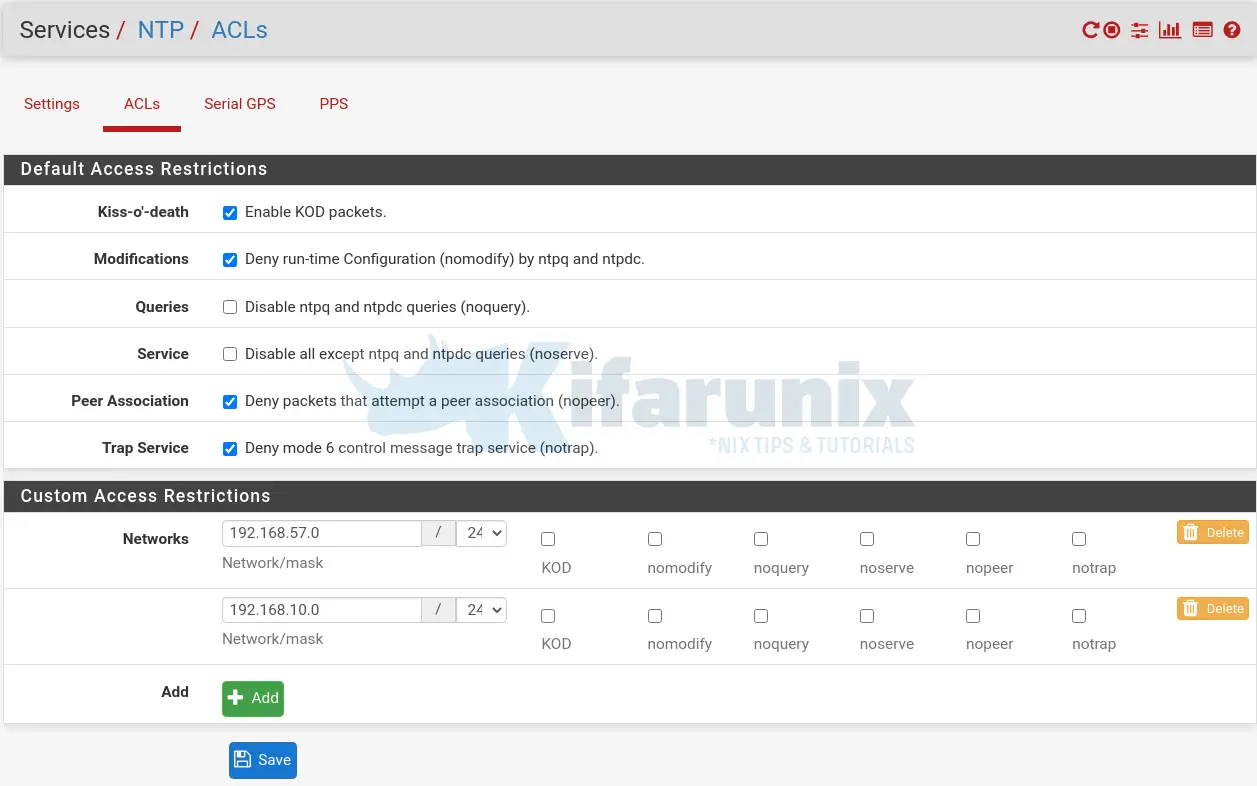
For the GPS and Pulse Per Second (PPS) configuration options, we will go with the default.
Configure NTP Client
Next, you can now configure your client systems to query and synchronize their time services with your pfSense time server.
In this tutorial, we are using Ubuntu 20.04 system as out test NTP client.
Check the current time on the client before synchronization.
timedatectl status
               Local time: Fri 2020-06-12 22:55:20 EEST
           Universal time: Fri 2020-06-12 19:55:20 UTC
                 RTC time: Fri 2020-06-12 19:55:20
                Time zone: Asia/Nicosia (EEST, +0300)
System clock synchronized: no
              NTP service: inactive
          RTC in local TZ: no
As you can see, the time is almost one month behind.
Synchronize time manually using ntpdate
Run the command below to install ntpdate on Ubuntu 18.04
apt install ntpdate -yTo manually synchronize time with NTP server using ntpdate;
ntpdate 192.168.57.10014 Jul 22:24:35 ntpdate[7189]: adjust time server 192.168.57.100 offset -0.003687 secWell, seems all is well with manual time synchronization.
If you however, get such an output instead;
14 Jul 22:32:39 ntpdate[7205]: no server suitable for synchronization foundThen most probably your firewall is blocking you. To find out, Navigate to Status > System logs > Firewall. Click on the Dynamic view and click on the filter icon. Enter the IP address of your client system as the source IP address, se the destination port to NTP port 123 and protocol to UDP.
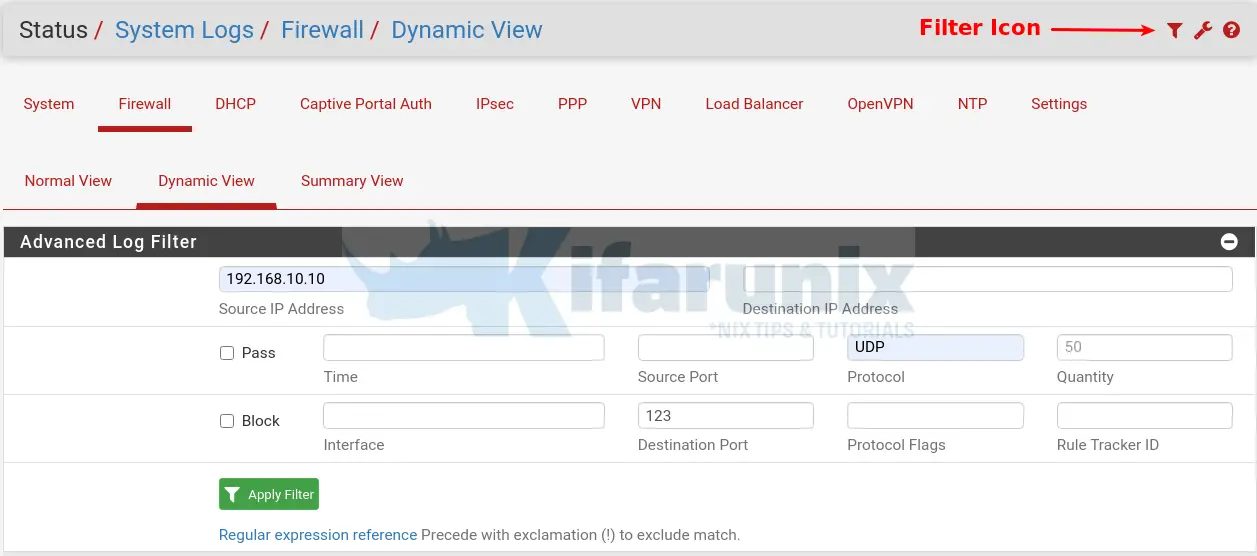
Then click Apply Filter.
Next, re-run the ntpdate command above. At the bottom, of the firewall logs filter, you should see if there is any denied entry. See example below;

If the requests are denied, adjust your firewall rules to allow access to NTP server port 123/UDP.
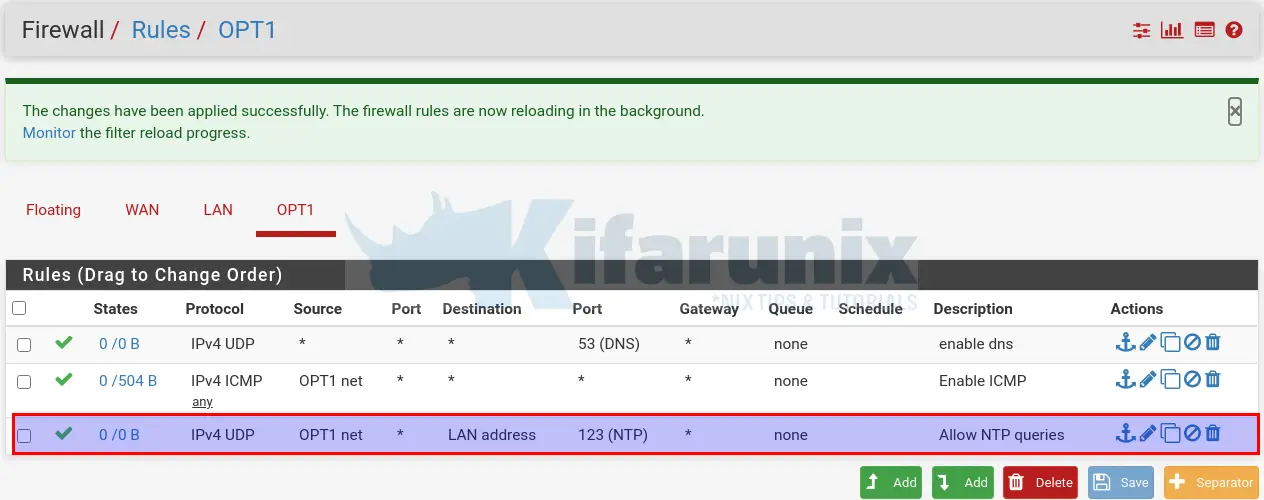
Synchronize time automatically with NTP
Run the command below to install ntp;
apt install ntp -yEdit the NTP configuration file and set the pfSense NTP Interface address as the NTP server address.
vim /etc/ntp.confComment out the default NTP servers and add your pfSense server interface IP address.
...
#pool 0.ubuntu.pool.ntp.org iburst
#pool 1.ubuntu.pool.ntp.org iburst
#pool 2.ubuntu.pool.ntp.org iburst
#pool 3.ubuntu.pool.ntp.org iburst
#
## Use Ubuntu's ntp server as a fallback.
#pool ntp.ubuntu.com
server 192.168.57.100
...
Save and exit the configuration.
Restart NTP service daemon.
systemctl restart ntpVerify time synchronization
ntpq -p remote refid st t when poll reach delay offset jitter
==============================================================================
*192.168.57.100 129.242.234.4 2 u 20 64 1 0.574 -17.818 0.873Recheck the time on your client;
timedatectl status
               Local time: Tue 2020-07-14 23:17:25 EEST
           Universal time: Tue 2020-07-14 20:17:25 UTC
                 RTC time: Fri 2020-06-12 20:17:05
                Time zone: Asia/Nicosia (EEST, +0300)
System clock synchronized: no
              NTP service: inactive
          RTC in local TZ: no
And there you go.
You might be wondering why timedatectl status shows as clock not synchronized and ntp service inactive. This is because, we are not using Systemd timesyncd for NTP synchronization.
Further Reading
pfSense NTP server configuration
Related Tutorials
Setup NTP Server using Chrony on CentOS 8
Setup NTP server Using NTPd on Debian 10 Buster
Configure NTP Server using NTPd on Fedora 30
How to Install and Configure NTP Server Using NTPd on Fedora 29/Fedora 28
How to Install and Configure NTP Server Using Chrony on Fedora 29/Fedora 28

