Follow through this tutorial to learn how to create virtual/secondary IP addresses on an interface in Linux. This enables you to assign multiple IP addresses to a single interface.
Creatin Virtual IP addresses on a Linux Interface
You can create virtual IP addresses on an interface temporarily or permanently.
Create Temporary Virtual IP addresse
To create temporary virtual/secondary IP addresses on an interface in Linux, you can use commands such as ip, ifconfig.
To use ip command to create/add secondary IP addresses to an interface, see the examples below.
In our example server, we have an interface called enp0s8.
Checking the current IP address of the interface;
ip add show dev enp0s8
3: enp0s8:  mtu 1500 qdisc fq_codel state UP group default qlen 1000
    link/ether 08:00:27:c4:23:c9 brd ff:ff:ff:ff:ff:ff
    inet 192.168.56.108/24 brd 192.168.56.255 scope global noprefixroute enp0s8
       valid_lft forever preferred_lft forever
    inet6 fe80::d524:3777:b321:5ed/64 scope link noprefixroute
       valid_lft forever preferred_lft forever
The primary IP address assigned to the interface is 192.168.56.108.
Assuming we want to temporarily assign a secondary IP address, 192.168.56.109, to the interface using the ip command;
ip addr add 192.168.56.109/24 br 192.168.56.255 dev enp0s8The addr and br are abbreviations for address and broadcast respectively.
Confirming the secondary IP address assignment;
ip add show dev enp0s8
3: enp0s8:  mtu 1500 qdisc fq_codel state UP group default qlen 1000
    link/ether 08:00:27:c4:23:c9 brd ff:ff:ff:ff:ff:ff
    inet 192.168.56.108/24 brd 192.168.56.255 scope global dynamic noprefixroute enp0s8
       valid_lft 394sec preferred_lft 394sec
    inet 192.168.56.109/24 brd 192.168.56.255 scope global secondary enp0s8
       valid_lft forever preferred_lft forever
    inet6 fe80::d524:3777:b321:5ed/64 scope link noprefixroute
       valid_lft forever preferred_lft forever
If you restart the networking/take the interface up and down or reboot your server, you will loose the assigned IP address.
Create Permanent Virtual IP addresses
Create secondary IP addresses using nmcli command
On CentOS and Similar derivatives, you can use simply use the NetworkManager command line tool, nmcli.
The command may not be available by default on Ubuntu/Debian systems. If so and want to use it, then install the network manager package (network-manager).
First confirm the interface connection name;
nmcli con showcon is an abbreviation for connection.
Sample output;
NAME                UUID                                  TYPE      DEVICE
enp0s8              e59e1c2f-bda2-4704-9f4a-67e8cce636d9  ethernet  enp0s8
Wired connection 1  a7d294d4-05d9-3724-832e-6b80dc288a24  ethernet  enp0s3
In this case, we want to add virtual/secondary IP to interface enp0s8, connection name enp0s8.
This can be done using nmcli command as follows. Pay attention to plus(+)ipv4.addresses.
nmcli con mod enp0s8 +ipv4.addresses 192.168.56.109/24mod is an abbreviation for modify.
Take down and bring up the interface. I Assume you are directly logged in via console and not via ssh.
nmcli con down enp0s8 && nmcli con up enp0s8Confirm the secondary IP address assignment.
ip add show dev enp0s8
3: enp0s8:  mtu 1500 qdisc fq_codel state UP group default qlen 1000
    link/ether 08:00:27:c4:23:c9 brd ff:ff:ff:ff:ff:ff
    inet 192.168.56.108/24 brd 192.168.56.255 scope global noprefixroute enp0s8
       valid_lft forever preferred_lft forever
    inet 192.168.56.109/24 brd 192.168.56.255 scope global secondary noprefixroute enp0s8
       valid_lft forever preferred_lft forever
    inet6 fe80::d524:3777:b321:5ed/64 scope link noprefixroute
       valid_lft forever preferred_lft forever
To remove the secondary IP address using nmcli command, just use minus(-)ipv4.addresses.
nmcli con mod enp0s8 -ipv4.addresses 192.168.56.109/24nmcli con down enp0s8 && nmcli con up enp0s8Create Secondary IP addresses using nmtui (Network Manager GUI)
nmtui is available if you have installed Network manager package.
Launch nmtui from the terminal (you can use tab key to navigate through the settings);
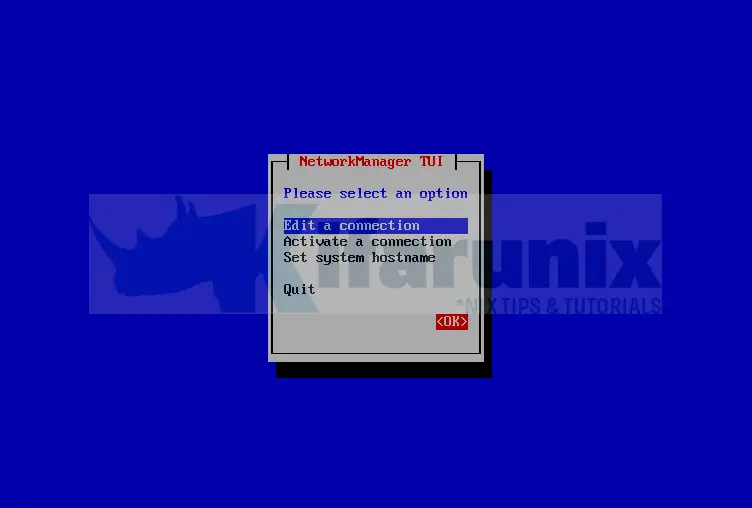
nmtuiSelect Edit a connection and click Ok.

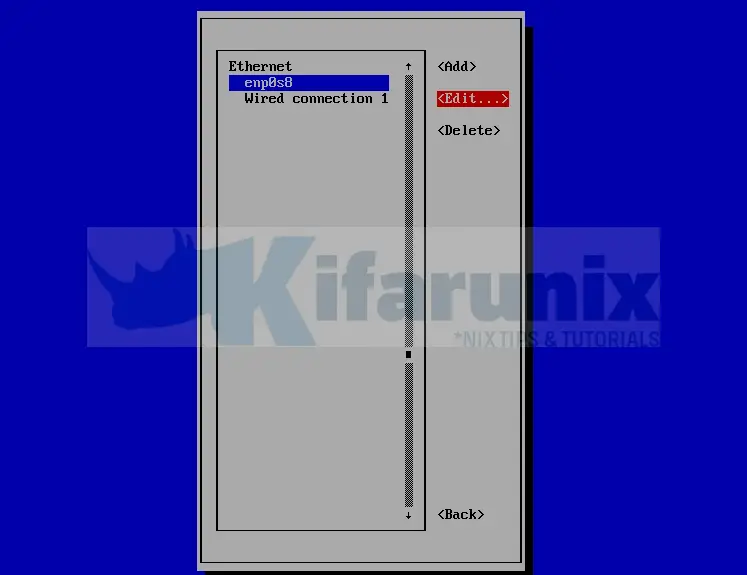
Select the Interface to edit, which in this example is enp0s8 and click Edit;

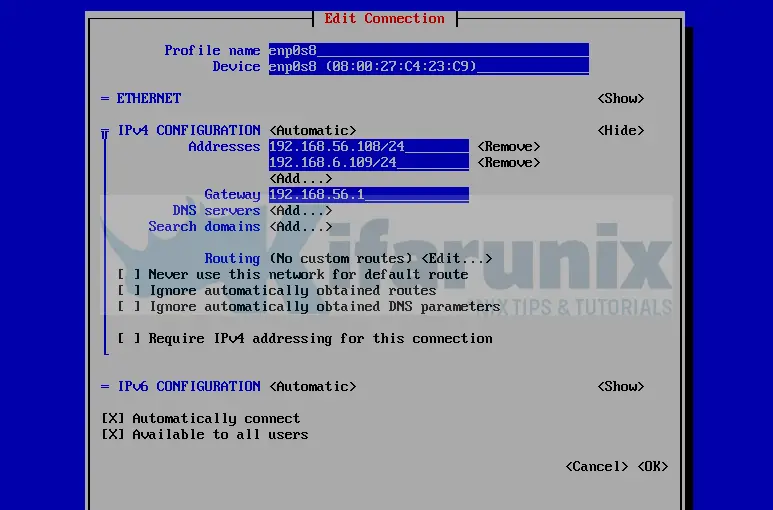
Scroll down to IPV4 configuration and click Add and enter your IP address.

Next, click Ok at the bottom > Back > Activate a connection > Ok.
Select and deactivate the interface.

Select the interface and activate it again.

Select Back > Quit.
Confirm the IP address assignment.
ip add show dev enp0s8ip add show dev enp0s8
3: enp0s8:  mtu 1500 qdisc fq_codel state UP group default qlen 1000
    link/ether 08:00:27:c4:23:c9 brd ff:ff:ff:ff:ff:ff
    inet 192.168.56.108/24 brd 192.168.56.255 scope global noprefixroute enp0s8
       valid_lft forever preferred_lft forever
    inet 192.168.56.109/24 brd 192.168.56.255 scope global secondary noprefixroute enp0s8
       valid_lft forever preferred_lft forever
    inet6 fe80::d524:3777:b321:5ed/64 scope link noprefixroute
       valid_lft forever preferred_lft forever
You can similarly remove this using nmcli command or right from the nmtui tool.
Create Secondary IP address on Ubuntu
To create a permanent IP address on Ubuntu 18.04/Ubuntu 20.04 systems, which uses netplan to manage the network interfaces, then you can proceed as follows;
Check the current IP address for the interface;
ip add show dev enp0s8
3: enp0s8:  mtu 1500 qdisc fq_codel state UP group default qlen 1000
    link/ether 08:00:27:56:39:94 brd ff:ff:ff:ff:ff:ff
    inet 192.168.59.14/24 brd 192.168.59.255 scope global enp0s8
       valid_lft forever preferred_lft forever
    inet6 fe80::a00:27ff:fe56:3994/64 scope link
       valid_lft forever preferred_lft forever
The current netplan configuration for my interfaces;
cat /etc/netplan/00-installer-config.yaml
network:
  ethernets:
    enp0s3:
      dhcp4: true
    enp0s8:
      dhcp4: no
      addresses: [192.168.59.14/24]
      routes:
              - to: 0.0.0.0/0
                via: 192.168.59.1
                metric: 101
      nameservers:
              addresses: [8.8.8.8]
  version: 2
To add a secondary IP address to the interface, edit the configuration file
cp /etc/netplan/00-installer-config.yaml{,.old}vim /etc/netplan/00-installer-config.yamland update the line;
addresses: [192.168.59.14/24]Such that it may look like;
addresses: [192.168.59.14/24, 192.168.59.15/24]The config now looks like;
network:
  ethernets:
    enp0s3:
      dhcp4: true
    enp0s8:
      dhcp4: no
      addresses: [192.168.59.14/24, 192.168.59.15/24]
      routes:
              - to: 0.0.0.0/0
                via: 192.168.59.1
                metric: 101
      nameservers:
              addresses: [8.8.8.8]
  version: 2
Apply the configuration changes;
netplan applyThe confirm the IP address assignment
ip add show dev enp0s8Create Secondary IP address on Debian systems
Similarly, update the interfaces as follows, to add the secondary IP address.
Sample interface configurations;
cat /etc/network/interfaces
source /etc/network/interfaces.d/*

# The loopback network interface
auto lo
iface lo inet loopback

# The primary network interface
allow-hotplug enp0s3
iface enp0s3 inet dhcp

auto enp0s8
iface enp0s8 inet static
	address 192.168.58.22
	netmask 255.255.255.0
	gateway 192.168.58.1
	broadcast 192.168.58.255
	dns-nameservers 8.8.8.8
To add a secondary IP address;
cp /etc/network/interfaces{,.old}update the config as follows
vim /etc/network/interfaces
source /etc/network/interfaces.d/*

# The loopback network interface
auto lo
iface lo inet loopback

# The primary network interface
allow-hotplug enp0s3
iface enp0s3 inet dhcp

auto enp0s8
iface enp0s8 inet static
	address 192.168.58.22
	netmask 255.255.255.0
	gateway 192.168.58.1
	broadcast 192.168.58.255
	dns-nameservers 8.8.8.8
auto enp0s8:0
iface enp0s8:0 inet static
	address 192.168.58.23
	netmask 255.255.255.0
see the added configs;
auto enp0s8:0
iface enp0s8:0 inet static
	address 192.168.58.23
	netmask 255.255.255.0
Save and exit the config and restart the networking;
systemctl restart networkingConfirm IP address;
ip add show dev enp0s8
3: enp0s8:  mtu 1500 qdisc pfifo_fast state UP group default qlen 1000
    link/ether 08:00:27:2b:b4:61 brd ff:ff:ff:ff:ff:ff
    inet 192.168.58.22/24 brd 192.168.58.255 scope global enp0s8
       valid_lft forever preferred_lft forever
    inet 192.168.58.23/24 brd 192.168.58.255 scope global secondary enp0s8:0
       valid_lft forever preferred_lft forever
    inet6 fe80::a00:27ff:fe2b:b461/64 scope link
       valid_lft forever preferred_lft forever
Other Tutorials
Connect to WiFi in Linux Using NMCLI command
Assign Static IP Addresses for OpenVPN Clients
Configure Static IP Addresses using Netplan on Ubuntu 20.04/18.04

