In this guide, we are going to learn how to install and Setup Kolide Fleet on Ubuntu 18.04. Kolide Fleet is an opensource Osquery manager that expand Osquery capabilities from a single machine to your entire fleet. It queries a dynamic sets of hosts and watch the data stream in for immediate analysis and investigation.
Kolide Fleet has retired. Check the new replacement, the Fleetdm Fleet.
Install Fleet Osquery Manager on Ubuntu 20.04
Install and Setup Kolide Fleet on Ubuntu 18.04
Run system update
Resynchronize your system packages to their latest versions.
apt updateDownload Kolide Fleet BInary Installer
Kolide Fleet application is distributed as a single static binary which serves the Fleet web interface, the Fleet application API endpoints and the osquery TLS server API endpoints.
To download the latest Kolide Fleet binary, simply execute the command below;
wget https://github.com/kolide/fleet/releases/latest/download/fleet.zipInstall and Setup Kolide Fleet on Ubuntu 18.04
Once the Fleet binary is downloaded, extract the Kolide Fleet binaries for Linux platform.
unzip fleet.zip 'linux/*' -d fleetThe command above extracts the Kolide Fleet binaries, the fleet and fleetctl binaries to fleet/linux directory.
ls fleet/linux/fleet fleetctlThe installation of Kolide Fleet binaries is therefore as easy as copying them to binary directories e.g /usr/bin.
cp fleet/linux/* /usr/bin/Kolide Fleet is now installed;
ls /usr/bin/fleet*/usr/bin/fleet /usr/bin/fleetctlInstall and Setup Kolide Fleet Dependencies on Ubuntu 18.04
Kolide Fleet requires MySQL/MariaDB for its database and Redis server for ingesting and queueing the results of distributed queries, cache data, etc.
Install MariaDB 10.4 Database on Ubuntu 18.04
Create MariaDB 10.4 APT repository
apt install software-properties-commonapt-key adv --recv-keys --keyserver hkp://keyserver.ubuntu.com:80 0xF1656F24C74CD1D8add-apt-repository 'deb [arch=amd64,arm64,ppc64el] http://sfo1.mirrors.digitalocean.com/mariadb/repo/10.4/ubuntu bionic main'Update your package cache.
apt updateRun the command install MariaDB server.
apt install mariadb-server mariadb-clientRunning MariaDB
MariaDB server is started and enabled to run on system boot upon installation. You can check the status;
systemctl status mariadbsystemctl is-enabled mariadbRun the initial MySQL security script, mysql_secure_installation, to remove anonymous database users, test tables, disable remote root login.
mysql_secure_installationCreate Kolide Fleet Database and Database User
By default, MariaDB 10.4 uses unix_socket for authentication by default and hence, can login by just running, mysql -u root. If have however enabled password authentication, simply run;
mysql -u root -pNext, create the Kolide database.
Note: the database database names used here are not standard. Choose any name of your preference.
create database kolide;Create Kollide Fleet database user with all grants on Kolide DB created above.
grant all on kolide.* to kolideadmin@localhost identified by 'StrongP@SS';Reload privileges tables and exit the database;
flush privileges;
exit
Install Redis on Ubuntu 18.04
Run the command below to install Redis on Ubuntu 18.04.
apt install redisRedis is set to start and enabled on system boot upon installation.
Running Kolide Fleet Server on Ubuntu 18.04
Initialize Kolide Fleet Database
To initialize Fleet infrastructure after installing and setting up all the requirements above, use the fleet prepare db as follows;
fleet prepare db --mysql_address=127.0.0.1:3306 --mysql_database=kolide --mysql_username=kolideadmin --mysql_password=StrongP@SSIf the initialization is complete, you should get the output,
Migrations completed.Generate SSL/TLS Certificates
Fleet serve is used to run the main HTTPS server. Hence, run the command below to generate self-signed certificates.
NOTE: If you are using Self Signed Certificates as in this demo, DO NOT use wildcards or enrollment of hosts won’t work.
openssl req -x509 -nodes -days 365 -newkey rsa:2048 -keyout /etc/ssl/private/kolide.key -out /etc/ssl/certs/kolide.cert -subj "/CN=kolide.kifarunix-demo.com/"If you can, use the commercial TLS certificates from your preferred trusted CA.
Generate Json Web Token
Generate a random Json Web Token (JWT) key for signing and verify session tokens. This will be required when running the fleet serve command for use with –auth_jwt_key option. Fleet server won’t start without this option.
To help with auto-generating the token, simply run the fleet server command without this option.
fleet serve --mysql_address=127.0.0.1:3306 \
--mysql_database=kolide --mysql_username=kolideadmin --mysql_password=StrongP@SS \
--server_cert=/etc/ssl/certs/kolide.cert --server_key=/etc/ssl/private/kolide.key \
--logging_json
The command fails and auto-generates a random key for you;
################################################################################
# ERROR:
#   A value must be supplied for --auth_jwt_key. This value is used to create
#   session tokens for users.
#
#   Consider using the following randomly generated key:
#   WS+Q2v6RyJdZgJDCHFWgak5HtxzPDhH8
################################################################################
Testing Kolide Fleet
Once you get a random key, rerun the command with the option and the key provided.
Kolide Fleet is setup and thus you need to run the command below to verify that it can run successfully using the fleet serve command as shown below.
fleet serve --mysql_address=127.0.0.1:3306 \
--mysql_database=kolide --mysql_username=kolideadmin --mysql_password=StrongP@SS \
--server_cert=/etc/ssl/certs/kolide.cert --server_key=/etc/ssl/private/kolide.key \
--logging_json --auth_jwt_key=WS+Q2v6RyJdZgJDCHFWgak5HtxzPDhH8
If all is well, you should see that Fleet server is now running on 0.0.0.0:8080 and hence can be accessed on https://<server-IP>:8080.
{"component":"service","err":null,"method":"ListUsers","took":"921.991µs","ts":"2020-04-12T07:06:41.184166743Z","user":"none"}
{"address":"0.0.0.0:8080","msg":"listening","transport":"https","ts":"2020-04-12T07:06:41.185827799Z"}
Press Ctrl+c to stop Kolide Fleet server.
Create Kolide Fleet Systemd Service Unit on Ubuntu 18.04
Once you have verified that Kolide Fleet is running fine, create a systemd service file.
vim /etc/systemd/system/kolide-fleet.service[Unit]
Description=Kolide Fleet Osquery Fleet Manager
After=network.target
[Service]
LimitNOFILE=8192
ExecStart=/usr/bin/fleet serve \
--mysql_address=127.0.0.1:3306 \
--mysql_database=kolide \
--mysql_username=kolideadmin \
--mysql_password=StrongP@SS \
--redis_address=127.0.0.1:6379 \
--server_cert=/etc/ssl/certs/kolide.cert \
--server_key=/etc/ssl/private/kolide.key \
--auth_jwt_key=WS+Q2v6RyJdZgJDCHFWgak5HtxzPDhH8 \
--logging_json
ExecStop=/bin/kill -15 $(ps aux | grep "fleet serve" | grep -v grep | awk '{print$2}')
[Install]
WantedBy=multi-user.targetSave and exit the file.
Reload systemd configurations.
systemctl daemon-reloadStart and enable Kolide Fleet service.
systemctl enable --now kolide-fleetCheck the status;
systemctl status kolide-fleet● kolide-fleet.service - Kolide Fleet Osquery Fleet Manager
Loaded: loaded (/etc/systemd/system/kolide-fleet.service; enabled; vendor preset: enabled)
Active: active (running) since Sun 2020-04-12 10:23:44 EAT; 3s ago
Main PID: 6777 (fleet)
Tasks: 6 (limit: 1108)
CGroup: /system.slice/kolide-fleet.service
└─6777 /usr/bin/fleet serve --mysql_address=127.0.0.1:3306 --mysql_database=kolide --mysql_username=kolideadmin --mysql_password=StrongP@SS
Apr 12 10:23:44 u18 systemd[1]: Started Kolide Fleet Osquery Fleet Manager.
Apr 12 10:23:44 u18 fleet[6777]: {"component":"service","err":null,"method":"ListUsers","took":"218.912µs","ts":"2020-04-12T07:23:44.414494933Z","user"
Apr 12 10:23:44 u18 fleet[6777]: {"address":"0.0.0.0:8080","msg":"listening","transport":"https","ts":"2020-04-12T07:23:44.418368662Z"}Access Kolide Fleet Web Interface
Kolide Fleet can be accessed on the browser using the URL https://<server-IP_OR_hostname>:8080.
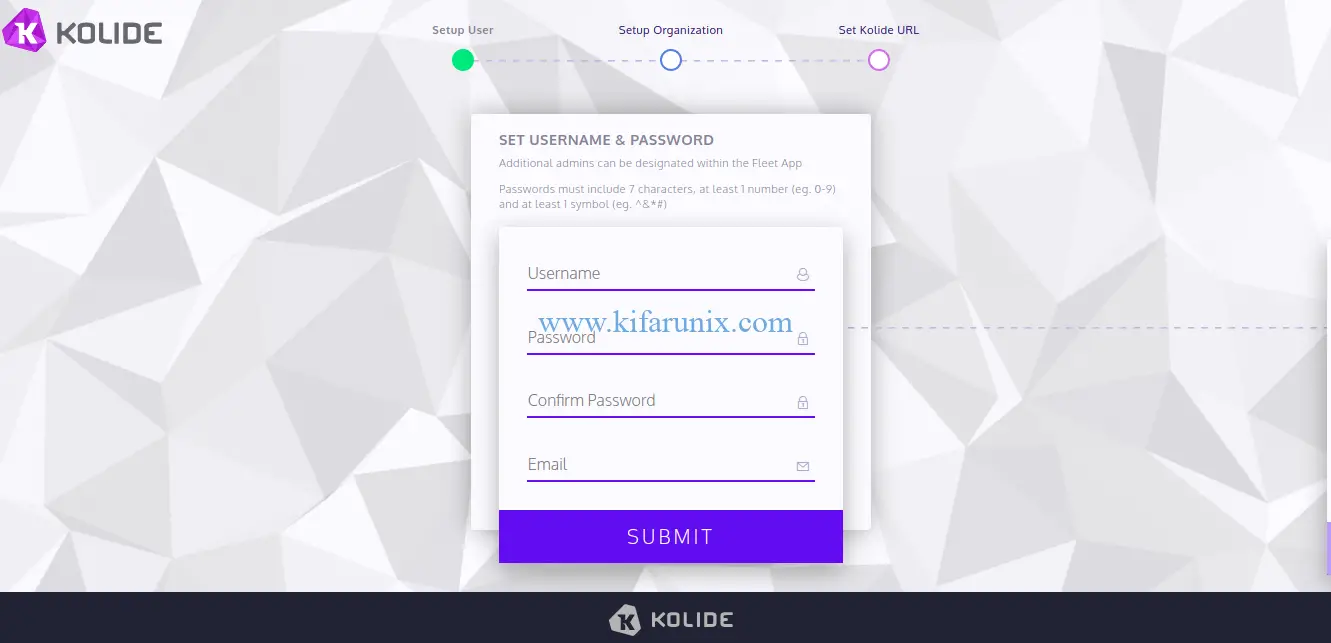
Setup your username, password, email, organization details and proceed to Kollide Web interface.
Adding New Hosts to Kolide Fleet
Next, install osquery on the host servers you want to enroll. We have already covered the installation of osquery on Debian 10 and Ubuntu 18.04 in our previous guide, see the links below;
How to Install Osquery on Ubuntu 18.04
Install Osquery on Debian 10 Buster
Once osquery is installed, add your host to Kolide by navigating to Hosts > Add New Hosts.
When you click Add new host, a wizard like in below pops up with the instructions on how to add hosts to fleet instance.
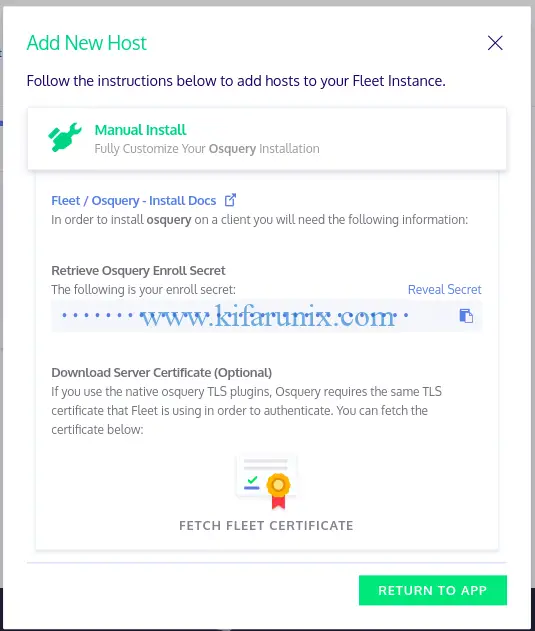
To enroll your osquery hosts, you need the secret key and the TLS certificate. Hence, Copy the secret key and click Fetch Fleet Certificate to download.
On the host to enroll to the Kolide Fleet, install the secret key and the certificate as follows;
echo "qzAJao+jKVsoZi6Ck1OgheS5VPhfqPRc" > /var/osquery/secretCopy the TLS certificate to the host being enrolled on Kolide Fleet. Replace host-address with the host IP/address.
scp kolide.kifarunix-demo.com_8080.pem koromicha@host-address:kolide.kifarunix-demo.com.pemsudo cp kolide.kifarunix-demo.com.pem /var/osquery/On the host being enrolled, verify the TLS server certificate;
openssl s_client -connect kolide.kifarunix-demo.com:8080 -CAfile /var/osquery/kolide.kifarunix-demo.com.pem---
SSL handshake has read 1353 bytes and written 391 bytes
Verification: OK
---Next, stop the osqueryd if it is running;
systemctl stop osquerydRun osqueryd with the following options on the host being enrolled, replacing the –enroll_secret_path and –tls_server_certs accordingly.
/usr/bin/osqueryd --enroll_secret_path=/var/osquery/secret \
--tls_server_certs=/var/osquery/kolide.kifarunix-demo.com.pem \
--tls_hostname=kolide.kifarunix-demo.com:8080 \
--host_identifier=uuid \
--enroll_tls_endpoint=/api/v1/osquery/enroll \
--config_plugin=tls \
--config_tls_endpoint=/api/v1/osquery/config \
--config_refresh=10 \
--disable_distributed=false \
--distributed_plugin=tls \
--distributed_interval=3 \
--distributed_tls_max_attempts=3 \
--distributed_tls_read_endpoint=/api/v1/osquery/distributed/read \
--distributed_tls_write_endpoint=/api/v1/osquery/distributed/write \
--logger_plugin=tls \
--logger_tls_endpoint=/api/v1/osquery/log \
--logger_tls_period=10
If all goes well, you should see some output similar to;
I0412 12:13:40.467630 15162 events.cpp:863] Event publisher not enabled: auditeventpublisher: Publisher disabled via configuration
I0412 12:13:40.467813 15162 events.cpp:863] Event publisher not enabled: syslog: Publisher disabled via configuration
I0412 12:13:40.498387 15175 distributed.cpp:117] Executing distributed query: kolide_detail_query_network_interface: select ia.interface, address, mask, broadcast, point_to_point,
                               id.interface, mac, id.type, mtu, metric, ipackets, opackets,
                               ibytes, obytes, ierrors, oerrors, idrops, odrops, last_change
                        from interface_details id join interface_addresses ia
                               on ia.interface = id.interface where length(mac) > 0
                               order by (ibytes + obytes) desc
I0412 12:13:40.501811 15175 distributed.cpp:117] Executing distributed query: kolide_detail_query_os_version: select * from os_version limit 1
I0412 12:13:40.503866 15175 distributed.cpp:117] Executing distributed query: kolide_detail_query_osquery_flags: select name, value from osquery_flags where name in ("distributed_interval", "config_tls_refresh", "config_refresh", "logger_tls_period")
I0412 12:13:40.506964 15175 distributed.cpp:117] Executing distributed query: kolide_detail_query_osquery_info: select * from osquery_info limit 1
I0412 12:13:40.509542 15175 distributed.cpp:117] Executing distributed query: kolide_detail_query_system_info: select * from system_info limit 1
I0412 12:13:40.518357 15175 distributed.cpp:117] Executing distributed query: kolide_detail_query_uptime: select * from uptime limit 1
I0412 12:13:40.522809 15175 distributed.cpp:117] Executing distributed query: kolide_label_query_6: select 1;
I0412 12:13:40.526031 15175 distributed.cpp:117] Executing distributed query: kolide_label_query_8: select 1 from os_version where platform = 'ubuntu';
I0412 12:13:40.528300 15175 distributed.cpp:117] Executing distributed query: kolide_label_query_9: select 1 from os_version where platform = 'centos' or name like '%centos%'
Your host should now be enrolled on your Kolide Fleet Server.
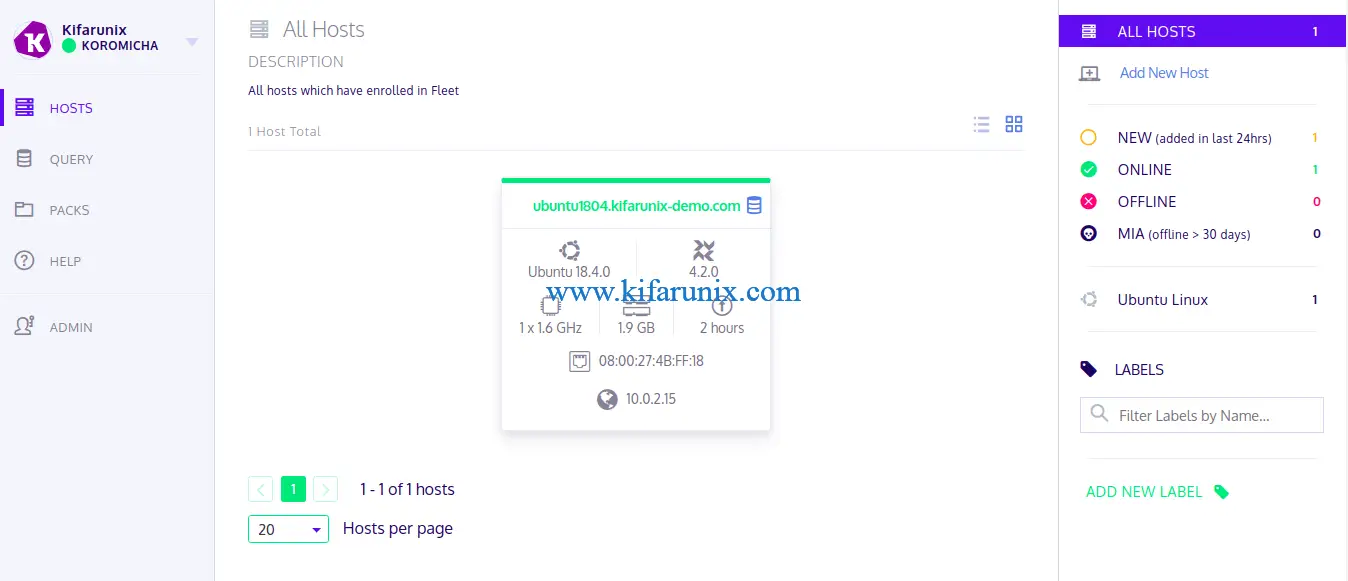
To run Osquery with the details enrollment details above, edit its service file such that it looks like as in below;
vim /etc/systemd/system/osqueryd.service[Unit]
Description=The osquery Daemon
After=network.service syslog.service
[Service]
TimeoutStartSec=0
EnvironmentFile=/etc/default/osqueryd
ExecStartPre=/bin/sh -c "if [ ! -f $FLAG_FILE ]; then touch $FLAG_FILE; fi"
ExecStartPre=/bin/sh -c "if [ -f $LOCAL_PIDFILE ]; then mv $LOCAL_PIDFILE $PIDFILE; fi"
ExecStart=/usr/bin/osqueryd \
--flagfile $FLAG_FILE \
--config_path $CONFIG_FILE \
--enroll_secret_path=/var/osquery/secret \
--tls_server_certs=/var/osquery/server.pem \
--tls_hostname=kolide.kifarunix-demo.com:8080 \
--host_identifier=uuid \
--enroll_tls_endpoint=/api/v1/osquery/enroll \
--config_plugin=tls \
--config_tls_endpoint=/api/v1/osquery/config \
--config_refresh=10 \
--disable_distributed=false \
--distributed_plugin=tls \
--distributed_interval=3 \
--distributed_tls_max_attempts=3 \
--distributed_tls_read_endpoint=/api/v1/osquery/distributed/read \
--distributed_tls_write_endpoint=/api/v1/osquery/distributed/write \
-logger_plugin=tls \
--logger_tls_endpoint=/api/v1/osquery/log \
--logger_tls_period=10
Restart=on-failure
KillMode=process
KillSignal=SIGTERM
[Install]
WantedBy=multi-user.targetReload system daemons.
systemctl daemon-reloadStart osqueryd.
systemctl start osquerydCheck status;
systemctl status osqueryd● osqueryd.service - The osquery Daemon
Loaded: loaded (/etc/systemd/system/osqueryd.service; disabled; vendor preset: enabled)
Active: active (running) since Sun 2020-04-12 12:31:14 EAT; 9s ago
Process: 15281 ExecStartPre=/bin/sh -c if [ -f $LOCAL_PIDFILE ]; then mv $LOCAL_PIDFILE $PIDFILE; fi (code=exited, status=0/SUCCESS)
Process: 15279 ExecStartPre=/bin/sh -c if [ ! -f $FLAG_FILE ]; then touch $FLAG_FILE; fi (code=exited, status=0/SUCCESS)
Main PID: 15282 (osqueryd)
Tasks: 18 (limit: 2315)
CGroup: /system.slice/osqueryd.service
├─15282 /usr/bin/osqueryd --flagfile /etc/osquery/osquery.flags --config_path /etc/osquery/osquery.conf --enroll_secret_path=/var/osquery/se
└─15284 /usr/bin/osqueryd
...Querying Host from Kolide Fleet Osquery Manager
Once the hosts are enrolled, you can query them directly from Kolide Fleet.
For example, to query non system users with the query:
select username,directory,uid,gid,shell from users where uid >= 1000;Click Query on the left panel > Create new query. Define the Name of the Query, the query itself, Description, the target host.
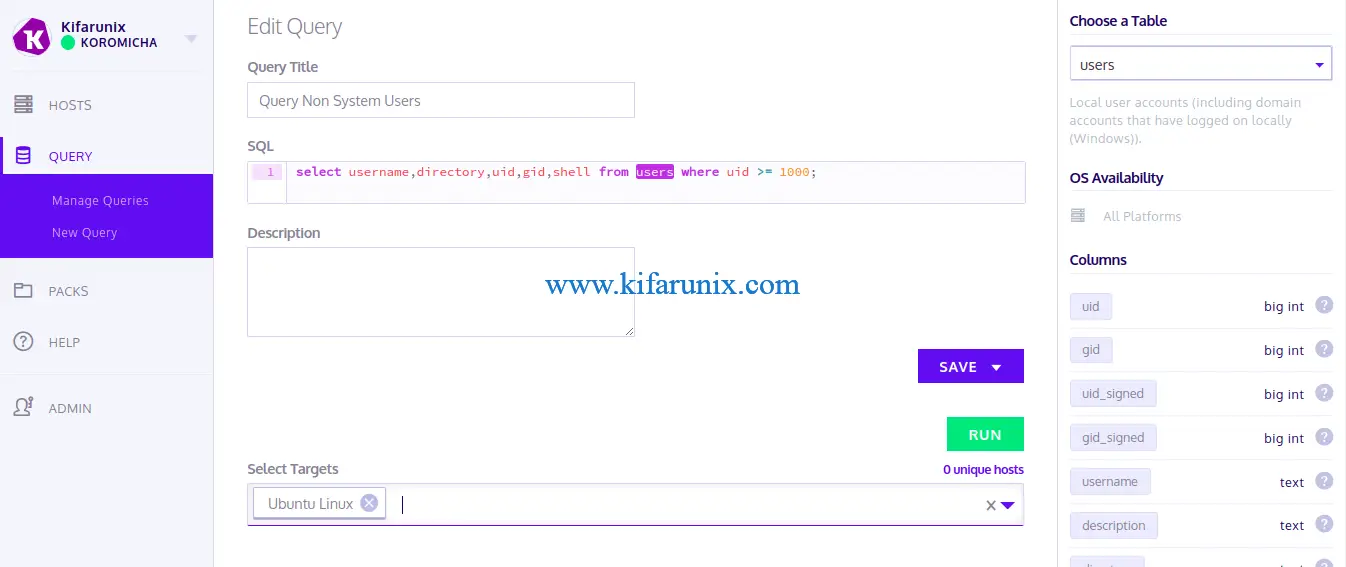
Click RUN to execute the query. You can save the query if you want.
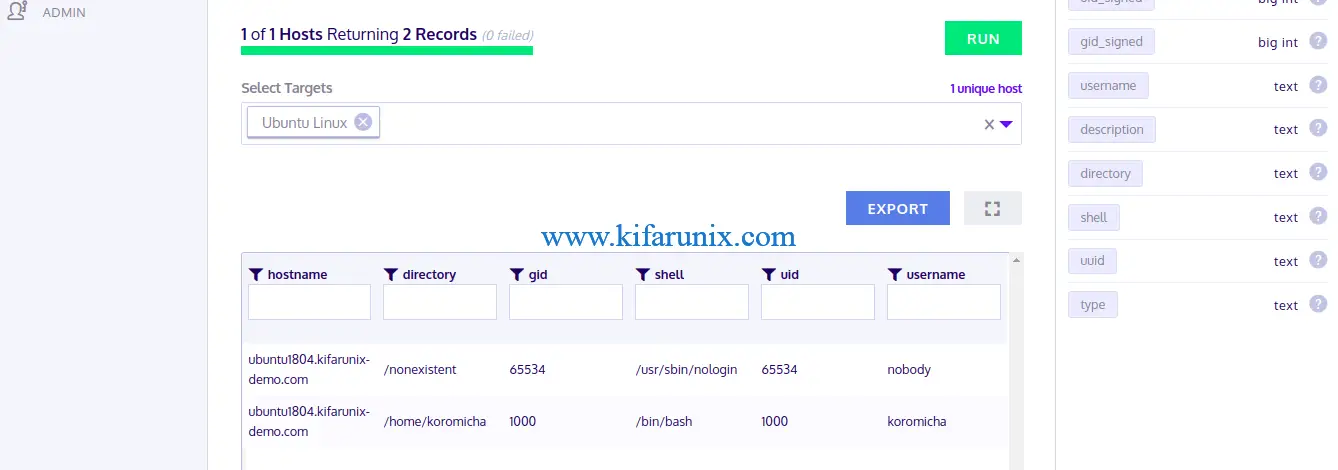
And Boom!!! You got Kolide Fleet working on Ubuntu 18.04 and is able to query remote hosts running Osquery. That marks the end of your guide on how to install and setup Kolide Fleet on Ubuntu 18.04.
Related Tutorials
Install Kolide Fleet Osquery Fleet Manager on Debian 10
Install GLPI ITSM Tool on CentOS 8


