Today, we are going to learn how to connect to VPN automatically on Ubuntu 20.04/18.04. There are various scenarios in which you might want to connect to VPN automatically when system boots. In this guide, you will learn how to connect to VPN automatically on Ubuntu 20.04/Ubuntu 18.04 desktop systems, OpenVPN clients.
Connecting to VPN Automatically on Ubuntu
One of important assumptions we make before we can proceed is that you already have your VPN client configuration file.
You can see a sample OpenVPN client configuration file in our previous guide by following the link below;
Configure OpenVPN Client on CentOS 8/Ubuntu 18.04
There are two ways in which you can connect to VPN automatically on system boot on Ubuntu 20.04/18.04;
- Running OpenVPN client as a service.
- Configure Network Manager to automatically connect to VPN using specific network connection.
Install Required Packages
The following command installs the packages that we will need to configure automatic VPN connection on Ubuntu 20.04/Ubuntu 18.04.
apt install network-manager-openvpn network-manager-openvpn-gnome openvpn openvpn-systemd-resolved -yRunning OpenVPN Client as Service on Ubuntu 20.04/18.04
When you install openvpn package, it creates a /etc/openvpn/client/ directory into which you can place the OpenVPN client configuration file.
Therefore, copy your OpenVPN configuration file, either .conf or .ovpn, into the OpenVPN client configurations directory.
Note that the configuration files under the /etc/openvpn/client/ directory should have the .conf suffix. Hence, if the original file is .ovpn, rename it in the destination directory to .conf as shown below.
sudo cp ~/gentoo.ovpn /etc/openvpn/client/gentoo.confRun OpenVPN Client as a Service
Once the client configuration file is in place, you then start OpenVPN client service. Note that, it is possible to have multiple OpenVPN client configuration files in this directory.
As such, you can use the service, openvpn-client@{Client-config}.service to start your OpenVPN client service using a specific configuration file placed on the /etc/openvpn/client/ directory.
Replace the {Client-config} with the name of your OpenVPN client configuration file, without the suffix, .conf or .ovpn.
For example, to start OpenVPN client service using the gentoo.ovpn, run the service as follows;
systemctl start [email protected]To check the status;
systemctl status [email protected]● [email protected] - OpenVPN tunnel for gentoo
Loaded: loaded (/lib/systemd/system/[email protected]; indirect; vendor preset: enabled)
Active: active (running) since Sun 2020-06-14 12:30:56 EAT; 5s ago
Docs: man:openvpn(8)
https://community.openvpn.net/openvpn/wiki/Openvpn24ManPage
https://community.openvpn.net/openvpn/wiki/HOWTO
Main PID: 5556 (openvpn)
Status: "Initialization Sequence Completed"
Tasks: 1 (limit: 2315)
CGroup: /system.slice/system-openvpn\x2dclient.slice/[email protected]
└─5556 /usr/sbin/openvpn --suppress-timestamps --nobind --config gentoo.conf
Jun 14 12:30:57 amos openvpn[5556]: ROUTE_GATEWAY 10.0.2.2/255.255.255.0 IFACE=enp0s3 HWADDR=08:00:27:4b:ff:18
Jun 14 12:30:57 amos openvpn[5556]: TUN/TAP device tun0 opened
Jun 14 12:30:57 amos openvpn[5556]: TUN/TAP TX queue length set to 100
Jun 14 12:30:57 amos openvpn[5556]: do_ifconfig, tt->did_ifconfig_ipv6_setup=0
Jun 14 12:30:57 amos openvpn[5556]: /sbin/ip link set dev tun0 up mtu 1500
Jun 14 12:30:57 amos openvpn[5556]: /sbin/ip addr add dev tun0 10.8.0.2/24 broadcast 10.8.0.255
Jun 14 12:30:57 amos openvpn[5556]: /sbin/ip route add 192.168.57.6/32 via 10.0.2.2
Jun 14 12:30:57 amos openvpn[5556]: /sbin/ip route add 0.0.0.0/1 via 10.8.0.1
Jun 14 12:30:57 amos openvpn[5556]: /sbin/ip route add 128.0.0.0/1 via 10.8.0.1
Jun 14 12:30:57 amos openvpn[5556]: Initialization Sequence CompletedIf you see the line, Initialization Sequence Completed then your vpn connection has been established successfully.
Checking the assigned address;
ip add s tun06: tun0: <POINTOPOINT,MULTICAST,NOARP,UP,LOWER_UP> mtu 1500 qdisc fq_codel state UNKNOWN group default qlen 100
link/none
inet 10.8.0.2/24 brd 10.8.0.255 scope global tun0
valid_lft forever preferred_lft forever
inet6 fe80::6b22:1d7f:5ef2:1db3/64 scope link stable-privacy
valid_lft forever preferred_lft foreverEnable the service to run on system boot to ensure that the VPN connection is initiated automatically on system boot.
sudo systemctl enable [email protected]Reboot your system and check the status again to confirm.
Automatically Connect to VPN with Network-Manager
To be able to connect to VPN using Network Manager, ensure that you have created a VPN connection profile via Network Manager.
Follow the guide below to learn how to connect to OpenVPN server via the Network Manager;
Connect to OpenVPN using Network Manager on CentOS 8/Ubuntu 18.04
Open Network Manager Connection Editor
Click on the connection icon at the top right corner on your Ubuntu system and click Edit Connections.
You can as well launch the network manager connection editor by running the command below;
nm-connection-editorThis opens the connection editor wizard.

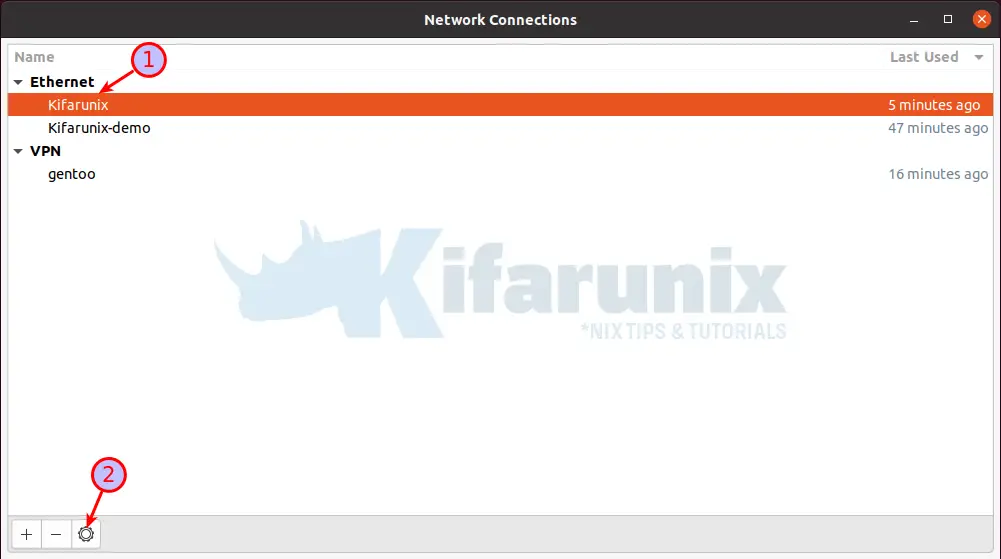
Select the network connection profile under which you want to initiate automatic VPN connection with. For example, in my case, if I want to use the first ethernet connection, Kifarunix, simply select it and click the settings gear at the bottom.

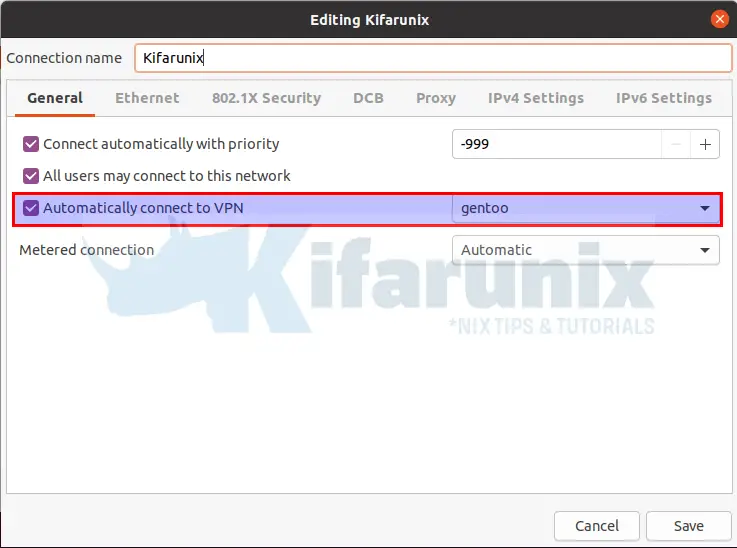
This opens up the specific connection editor. Click on the General tab and select Automatically connect to VPN and choose your VPN connection profile you created before, in our case, it is gentoo.

Click Save to update the changes.
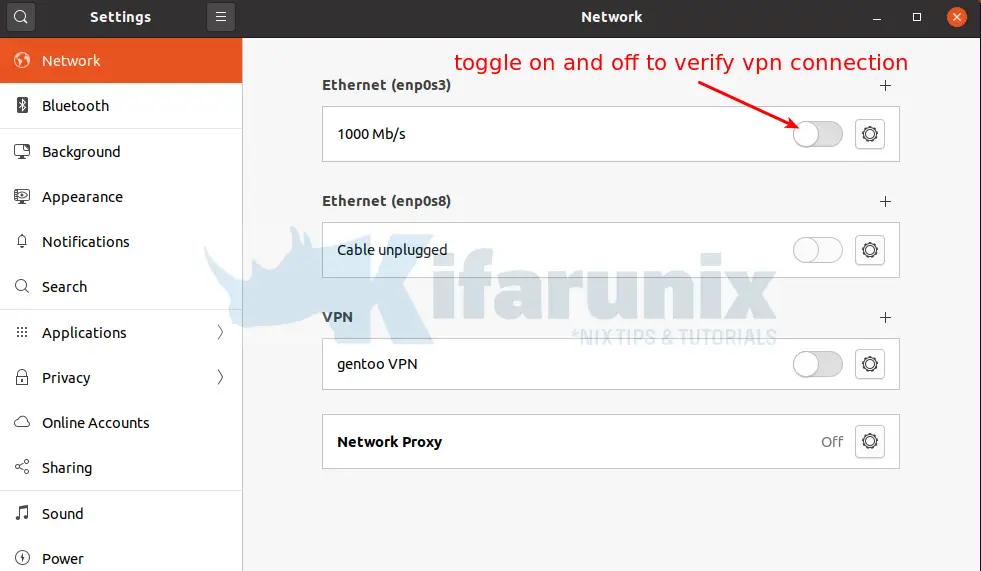
Verify this by toggling the connection on and off. Notice that, when you turn on, the VPN connection is also turned on.

Similarly, you can verify the same by rebooting your system and checking your assigned VPN address.
Related Tutorials
Install and Setup OpenVPN Server on Ubuntu 20.04
Configure OpenVPN LDAP Based Authentication


protonvpn says they cannot make it start on boot but it has something called openvpn in the list of stuff you get from apt. I have it working but I don’t know what anything does, and don’t want to start messing with files and screw something up. does this work with protonvpn?
Hey Drake. Haven’t tried protonvpn but should work. If you have the Protonvpn configuration file, then just import it and check.
Thank you! worked like a charm!