In this guide, we are going to learn how to install and configure BIND DNS server using Webmin on CentOS 8.
Install Webmin on CentOS 8
Before you can proceed, you first need to install Webmin on CentOS 8. Follow the link below to learn how to install Webmin on CentOS 8.
Configure BIND DNS Server using Webmin on CentOS 8
Once you have Webmin up and running, proceed to configure Bind DNS server using Webmin on CentOS 8.
Login Webmin as Privileged User
In this demo, we will be configuring Bind DNS server setup on Webmin as a root user. Therefore, login as root user.

Update System Packages
To begin with, ensure that your system packages are up-to-date. Well, you can update your system packages from the Webmin gui (System > Software Package Updates) or simply launch the terminal, Alt+k and run the package update command.
dnf update -y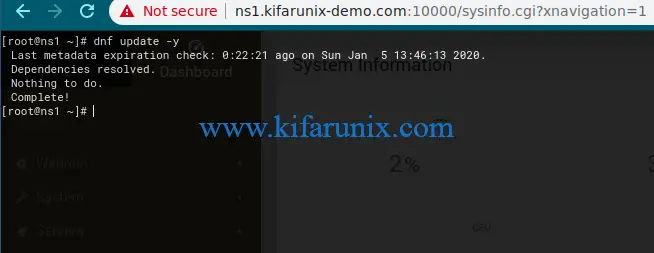
Install Bind DNS Server Module
Once the system package update is done, proceed to install BIND DNS server modules. on Webmin interface, navigate to Un-used Modules > BIND DNS Server.
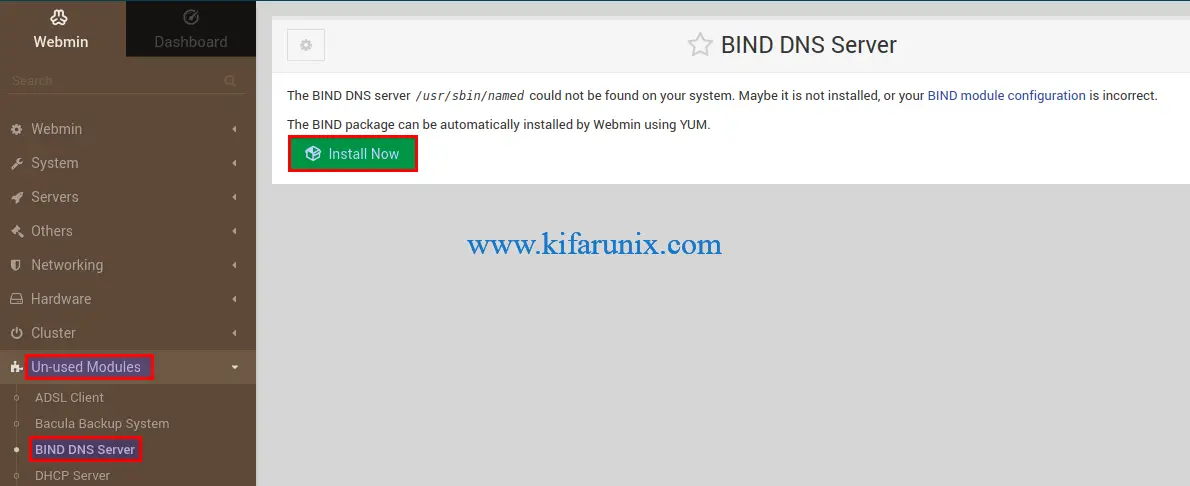
Click Install Now to build and install Bind packages.
Configuring BIND DNS Server Using Webmin on CentOS 8
After the Bind packages are installed, navigate to BIND DNS Server configuration interface by clicking Return to BIND DNS Server below the screen.
Configure DNS Server Access Control List
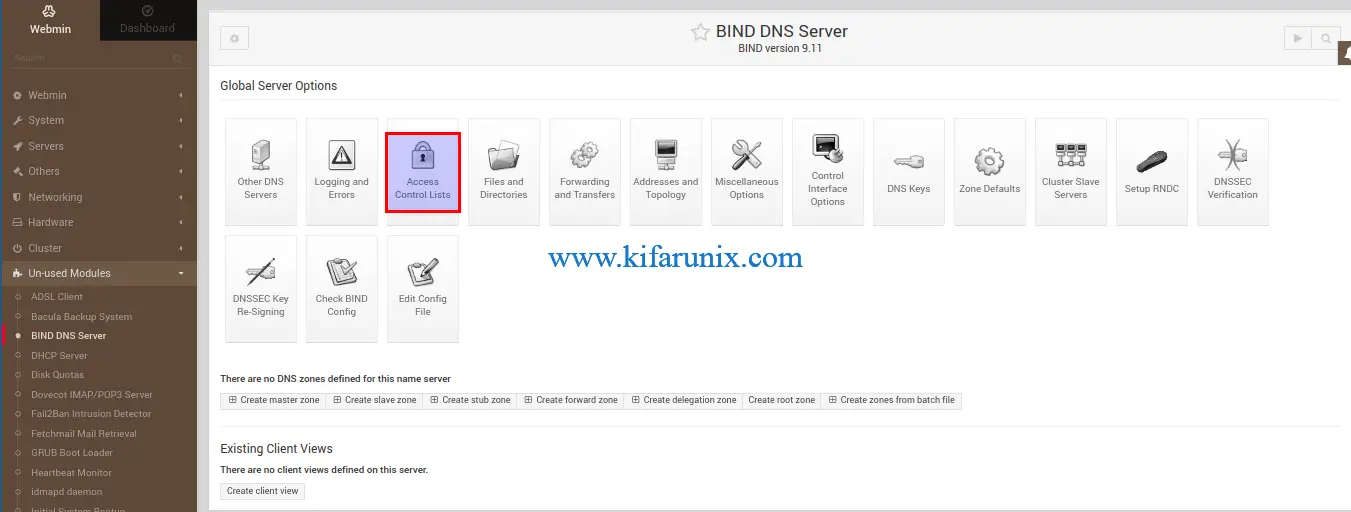
Setup an ACL to define a list on networks or IP addresses of the servers that are allowed to query your DNS server by clicking on Access Control Lists under the Global Server Options.
Next, create your ACL.
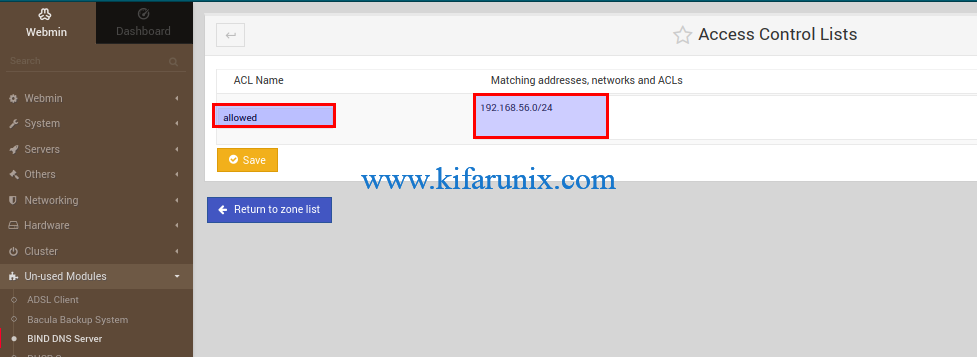
The ACL created above is called allowed and defines a network of hosts, 192.168.56.0/24, allowed to query our DNS server.
Define global server configuration options
The options statement is used to set up global DNS server options to be used by BIND. For example, defining the hosts that are allowed to ask ordinary DNS questions, specify the location of the named working directory, the types of queries allowed, specify which hosts are allowed to make recursive queries through the DNS server etc.
These configurations can be made on the /etc/named.conf configuration file.
From BIND DNS Server interface, click Edit Config File. By default, you will see the /etc/named.conf configuration file selected.
We will leave most of the configuration options with the default settings. However, in this demo;
- we have set the listening interface for DNS server,
listen-on. and disable listening on IPv6 network interfaces. - defined the list of hosts (allowed as defined on the ACL) that are allowed to query the nameserver for authoritative resource records as specified by the
allow-queryoptions.
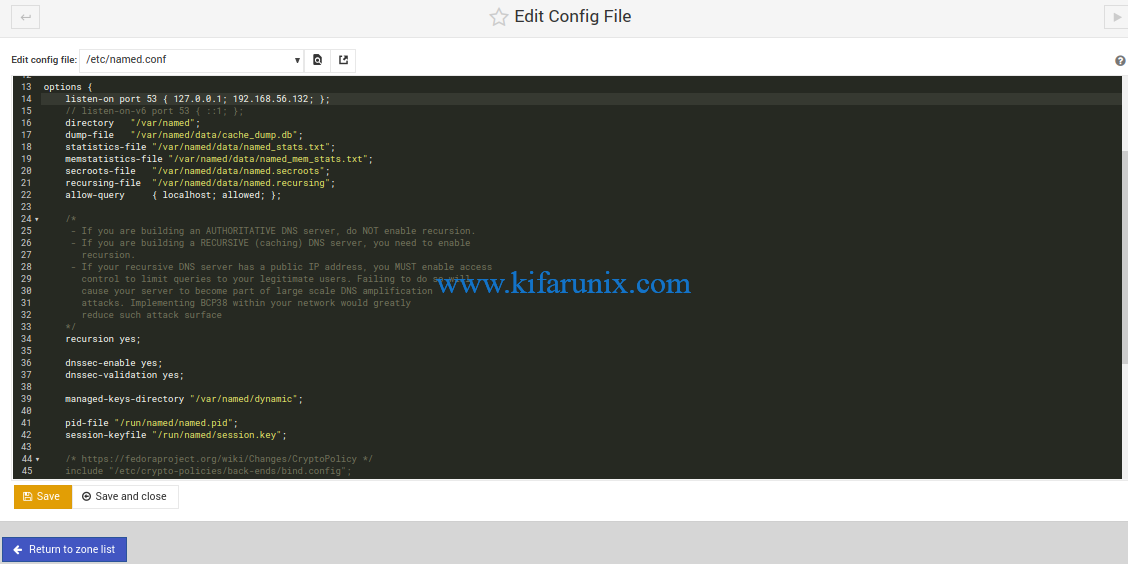
Once done making changes, click Save and close to save the configuration options changes made.
Verify the Bind Configuration
To ensure that there are no typos or any syntax errors on the Bind configuration, click Check BIND Config under the global server options. If there are no errors, you should get an output similar to.

Create BIND DNS Server Zone Statements
Next, create the forward and reverse DNS zones. Click Create Master Zone.
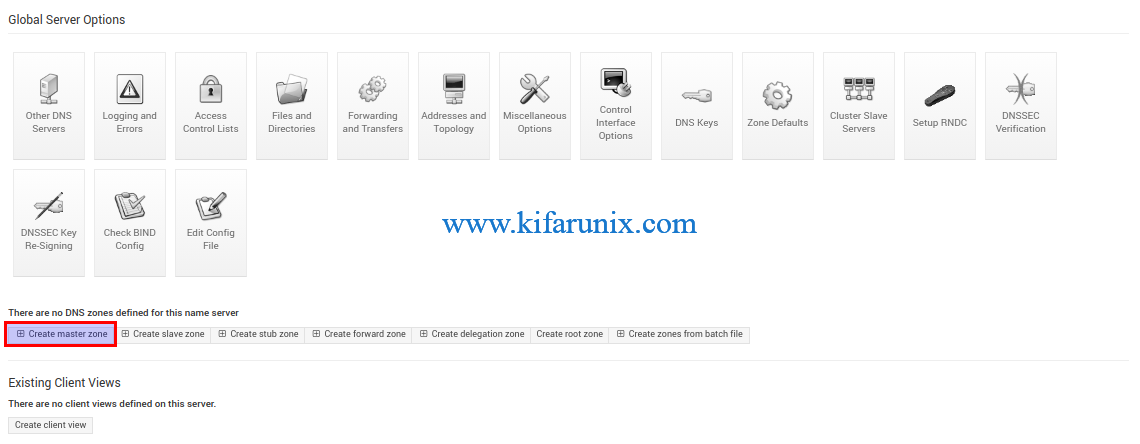
Create the Forward zone statement
On the page that opens up, the option for creating the forward zone statements is selected by default, (Forward: Names to Addresses). Enter your DNS server details such that it looks like as shown in the screenshot below;
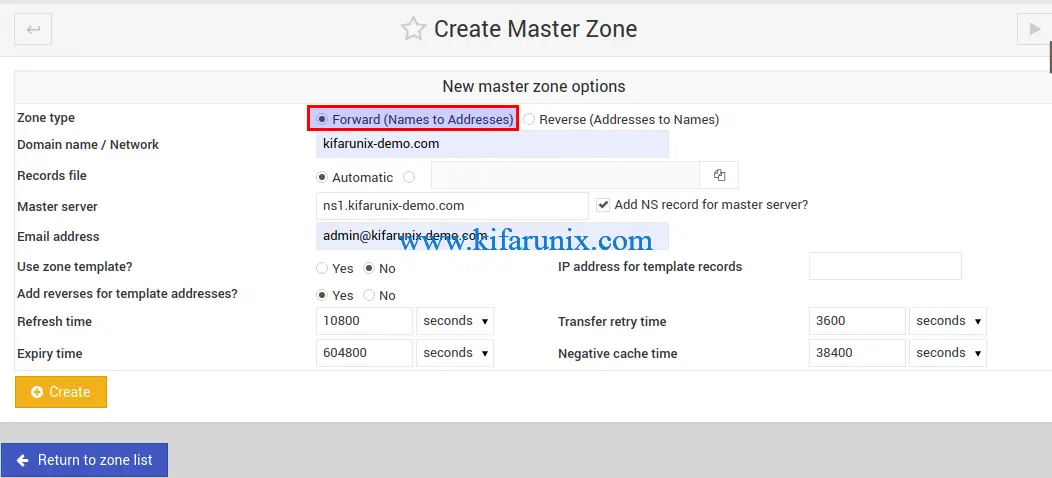
Once done setting the options, click Create to create the forward zone statement. After creating, you are taken to zone editing page.
Create the Reverse zone statement
On the Forward Zone editing page, click Return to zone list. Under Existing DNS Zones, click Create master zone and select Reverse: Addresses to Names.
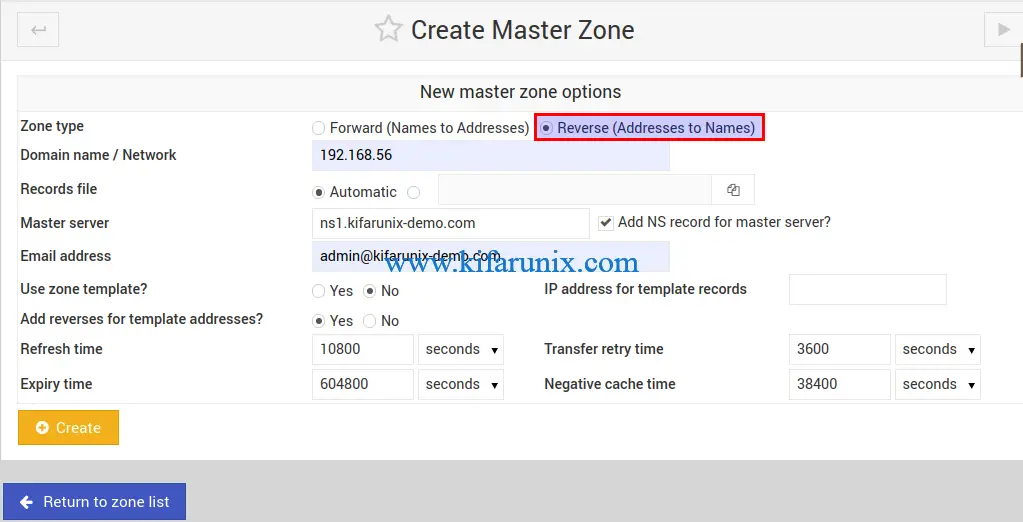
Click Create to create the master reverse zone statement.
Create DNS A Records
Under the Existing DNS Zones, click your forward zone statement.
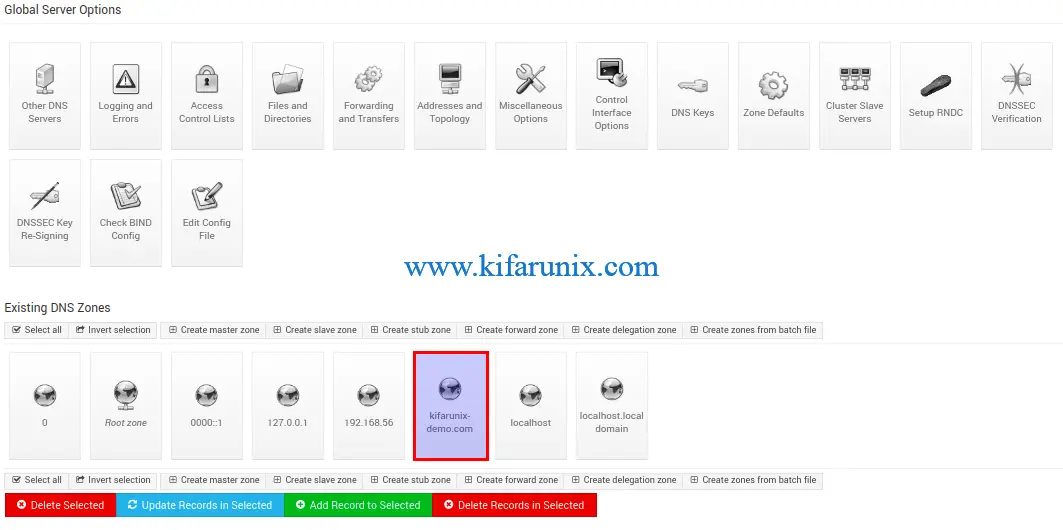
Click Addresses to add address records. Ensure that Update reverse is set to yes to automatically update the reverse zone statement.
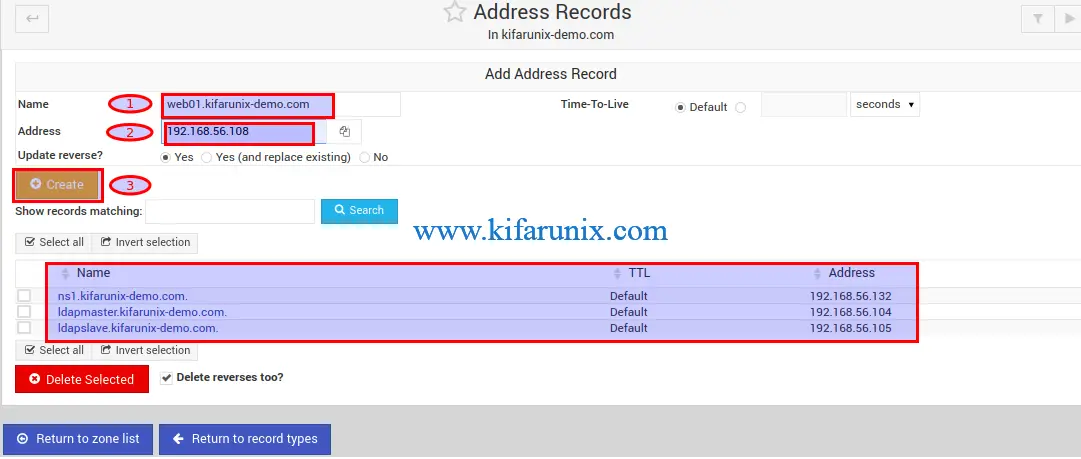
After adding all the A records as per your needs, click Return to records type.
Create DNS Name Server (NS) Records
Under Edit Master Zone page, click Name Server configuration option and create the Name Server (NS) records, if it is not already set.
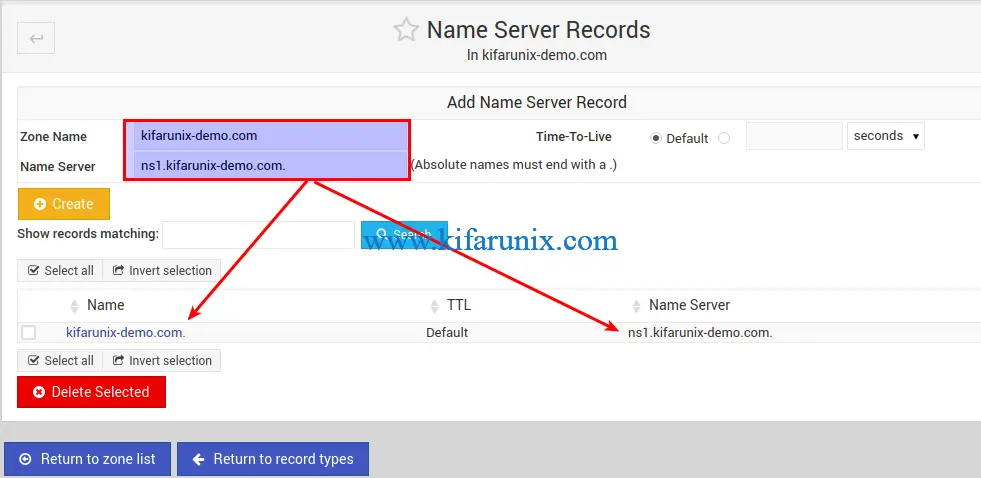
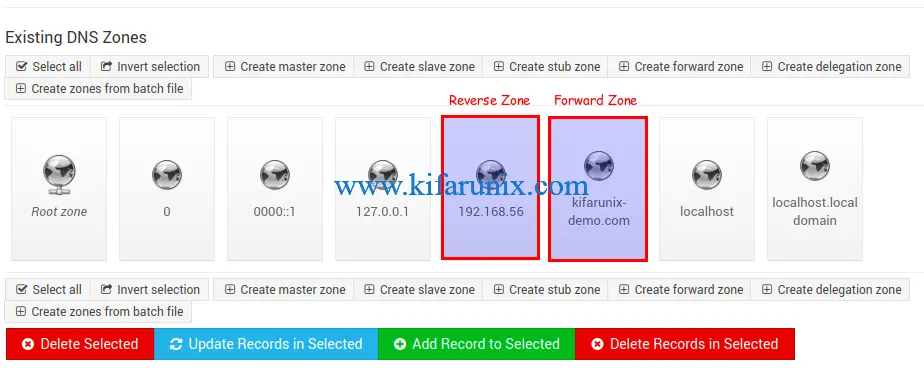
Once done, click Return to zone list. You should now have two zones created, the forward and the reverse zones.
Verify Zone Configuration Syntax
Just as you would from the command line, you can check the zone configurations for any syntactical errors by clicking Check BIND Configs under the Global Server Options.
Running BIND on Webmin CentOS 8
To start BIND on webmin, simply click the play button on the BIND server configurations page.

To enable BIND to run on system boot, simply open the shell and run;
systemctl enable namedFirewall Configuration
Open 53/TCP and 53/UDP on firewalld for both DNS zone transfer and dns queries. You can simply use the DNS service. Thus open the shell (Alt+k).
firewall-cmd --add-service=dns --permanentfirewall-cmd --reloadVerify if BIND is Working
The BIND on Webmin, in its simplest,basic setup, configuration is done. You can configure your end points networking and define the correct nameservers.
In this demo, we are using Debian 10 Buster server to verify our DNS server IP/Hostname resolution.
Install BIND utilities;
apt install dnsutilsEdit interfaces and add the DNS server details on your server interface;
vim /etc/network/interfacesauto enp0s8
iface enp0s8 inet static
address 192.168.58.110
netmask 255.255.255.0
dns-nameservers 192.168.56.132
dns-domain kifarunix-demo.comSave the configuration and restart networking;
systemctl restart networkingCheck the DNS details of the interface;
less /etc/resolv.conf# Dynamic resolv.conf(5) file for glibc resolver(3) generated by resolvconf(8)
# DO NOT EDIT THIS FILE BY HAND -- YOUR CHANGES WILL BE OVERWRITTEN
nameserver 192.168.56.132
search kifarunix-demo.com
To verify that our DNS server works, we will do IP and address resolution of the entries we added to the DNS server above.
Forward Resolution
dig ns1.kifarunix-demo.com; <<>> DiG 9.11.5-P4-5.1-Debian <<>> ns1.kifarunix-demo.com
;; global options: +cmd
;; Got answer:
;; ->>HEADER<<- opcode: QUERY, status: NOERROR, id: 56103
;; flags: qr aa rd ra; QUERY: 1, ANSWER: 1, AUTHORITY: 1, ADDITIONAL: 1
;; OPT PSEUDOSECTION:
; EDNS: version: 0, flags:; udp: 4096
; COOKIE: 188a5dde2ec0b0e57831f0f95e5ebbe2a4b39eb95075d882 (good)
;; QUESTION SECTION:
;ns1.kifarunix-demo.com. IN A
;; ANSWER SECTION:
ns1.kifarunix-demo.com. 38400 IN A 192.168.56.132
;; AUTHORITY SECTION:
kifarunix-demo.com. 38400 IN NS ns1.kifarunix-demo.com.
;; Query time: 0 msec
;; SERVER: 192.168.56.132#53(192.168.56.132)
;; WHEN: Tue Mar 03 15:19:46 EST 2020
;; MSG SIZE rcvd: 109nslookup ldapmaster.kifarunix-demo.comServer: 192.168.56.132
Address: 192.168.56.132#53
Name: ldapmaster.kifarunix-demo.com
Address: 192.168.56.104host ldapslave.kifarunix-demo.comldapslave.kifarunix-demo.com has address 192.168.56.105Reverse Resolution
dig -x 192.168.56.132; <<>> DiG 9.11.5-P4-5.1-Debian <<>> -x 192.168.56.132
;; global options: +cmd
;; Got answer:
;; ->>HEADER<<- opcode: QUERY, status: NOERROR, id: 55416
;; flags: qr aa rd ra; QUERY: 1, ANSWER: 1, AUTHORITY: 1, ADDITIONAL: 2
;; OPT PSEUDOSECTION:
; EDNS: version: 0, flags:; udp: 4096
; COOKIE: 9d8537b403d6d29f267bd8065e5ebc30515a18a241c1e0e5 (good)
;; QUESTION SECTION:
;132.56.168.192.in-addr.arpa. IN PTR
;; ANSWER SECTION:
132.56.168.192.in-addr.arpa. 38400 IN PTR ns1.kifarunix-demo.com.
;; AUTHORITY SECTION:
56.168.192.in-addr.arpa. 38400 IN NS ns1.kifarunix-demo.com.
;; ADDITIONAL SECTION:
ns1.kifarunix-demo.com. 38400 IN A 192.168.56.132
;; Query time: 1 msec
;; SERVER: 192.168.56.132#53(192.168.56.132)
;; WHEN: Tue Mar 03 15:21:04 EST 2020
;; MSG SIZE rcvd: 150nslookup 192.168.56.104104.56.168.192.in-addr.arpa name = ldapmaster.kifarunix-demo.com.host 192.168.56.105105.56.168.192.in-addr.arpa domain name pointer ldapslave.kifarunix-demo.com.And there you go. BIND is successfully setup for forward and reverse resolution. That marks the end of our guide on how to configure BIND DNS Server using Webmin on CentOS 8.
Related Tutorials
Setup Bind DNS Using Webmin on Debian 10
Configure BIND as Slave DNS Server on Ubuntu 18.04
Configure BIND as DNS Server on Ubuntu 18.04

