Welcome to our tutorial on how to install and setup Bind DNS using Webmin on Debian 10. Webmin is a web-based control panel that allows system administrators to administer system administration tasks from web user interface. This guide assumes that you have already installed Webmin on your Debian 10 server. If not, you can follow the link below.
Or, you can work with a Philadelphia it company to take care of the setup process for you.
Install and Configure Bind DNS Using Webmin on Debian 10
Once you have installed and configured Webmin on your Debian 10 Buster, proceed to install and setup Bind DNS using Webmin on your Debian 10 server.
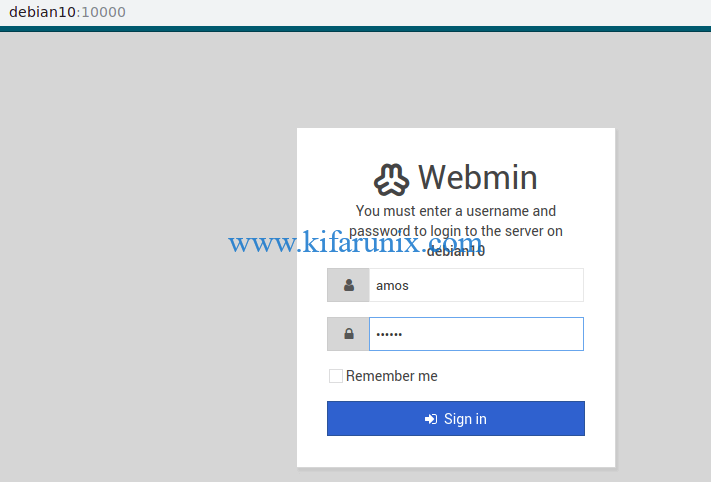
Login to Webmin as Administrative User
Since we are going to run system update as well as other system administrative tasks such as package installation via Webmin, login as a root user or a user with sudo rights.
Run System Update
Launch the terminal by pressing Alt+k. Next, run system package update command.
apt update -yInstall Bind DNS Server Module
Next, you need to install Bind DNS server module. This can be done from the Webmin interface. Hence, on the dashboard, navigate to Un-used Modules > BIND DNS Server and click “Click here” to build Bind package and required dependencies for installation.

Click Install Now to install the Bind packages and all required dependencies.
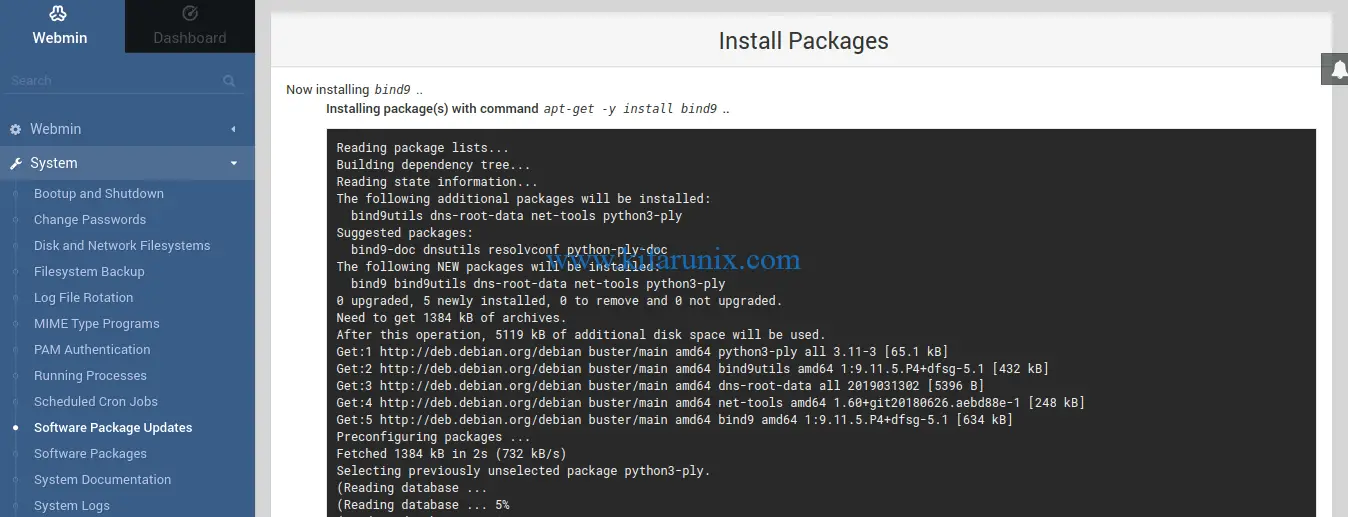
Configuring BIND DNS Server Using Webmin
Once the installation is complete, click Return to BIND DNS Server below the screen to go back to BIND DNS Server configuration interface.
Configure Access Control List
To begin with, create an access control list for your DNS server to specify the IP addresses or networks to deny or allow to query the DNS server.
To create the ACL, Click Access Control Lists and set the name of the ACL and the IP addresses or the networks.

For example, we created an ACL called allowed to define the networks (192.168.56.0/24) of the hosts allowed to query our DNS server. Save the changes and click Return to zone list.
Define global server configuration options
Next, you need to configure BIND global configuration options. The options statement is used to set up global options to be used by BIND such as define the hosts are allowed to ask ordinary DNS questions, specify the location of the named working directory, the types of queries allowed, specify which hosts are allowed to make recursive queries through the DNS server
These configurations can be mode on the /etc/bind/named.conf.options configuration file.
From BIND DNS Server interface, click Edit Config File. By default, you will see the /etc/bind/named.conf configuration file selected.
Hence, click on the drop down menu and select the /etc/bind/named.conf.options configuration file. Make the changes on the file as shown in screenshot below;
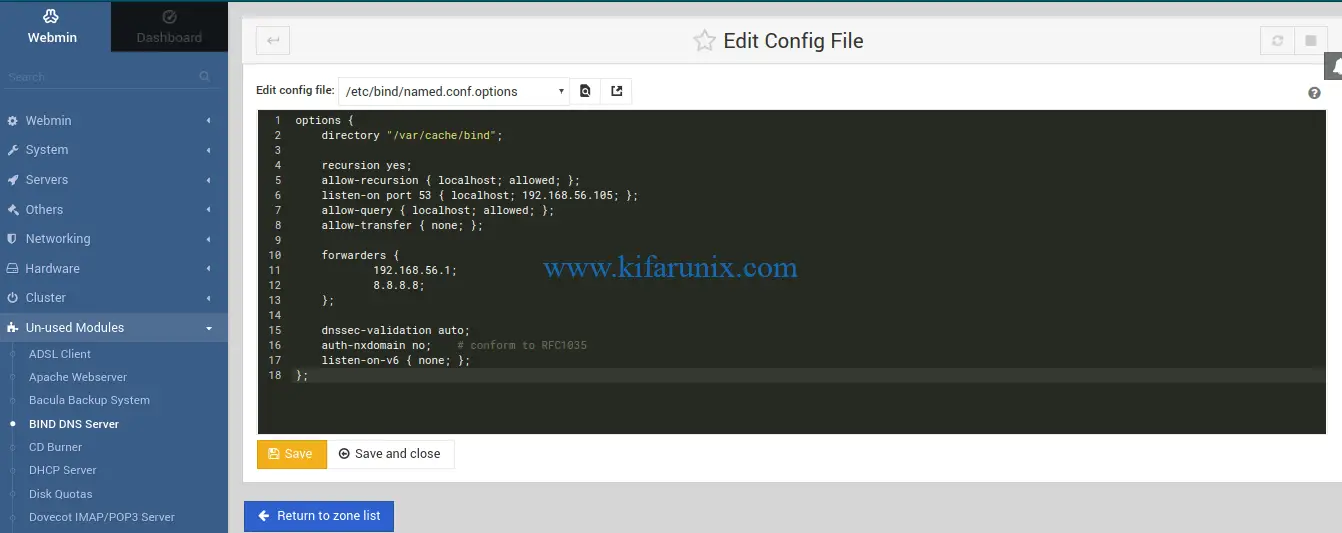
Click save and close to return to zone list.
Some of the configuration options used above are;
- recursion – Specifies whether to act as a recursive server.
- allow-recursion – Defines hosts to allow recursive queries from.
- listen-on – Specifies the
IPv4network interface on which to listen for queries. - allow-query – Specifies which hosts are allowed to query the nameserver for authoritative resource records.
- allow-transfer – Specifies which secondary servers are allowed to request a transfer of the zone’s information.
- forwarders – Defines one or more IP addresses of name servers to query.
- dnssec-validation – Specifies whether to prove that resource records are authentic through DNSSEC. The default option is
yes. - auth-nxdomain – defines whether the server should answer authoritatively.
- listen-on-v6 – Specifies the
IPv6network interface on which to listen for queries.
Next, test the options configuration file we edited above by clicking on Check BIND Config under the Bind DNS server global server options.
If there is no syntax error with the configuration file, you will see such an output.

Create BIND DNS Server Master Zone Statements
Next, you need to create the master forward and reverse zone statements. Click Create master zone on the BIND DNS server interface. This will open up a wizard where you can define the zone statement details.
To begin with, create the forward zone statement (Forward: Names to Addresses) as shown in the screenshot below. Note, the @ in the email address will be converted to dot (.) in SOA records.
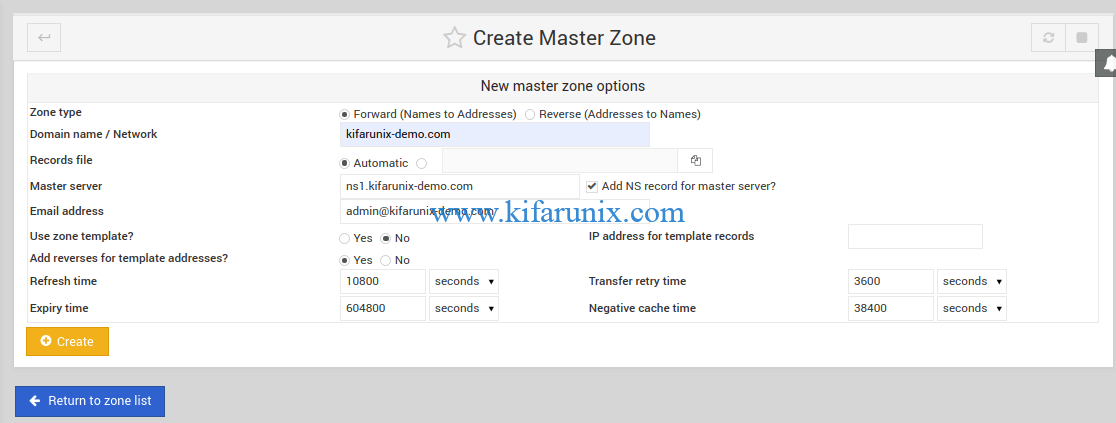
Click Create to create the master forward zone statement.
Next, create reverse zone statement by clicking Return to zone list > Create master zone. This time round, select Reverse: Addresses to Names.
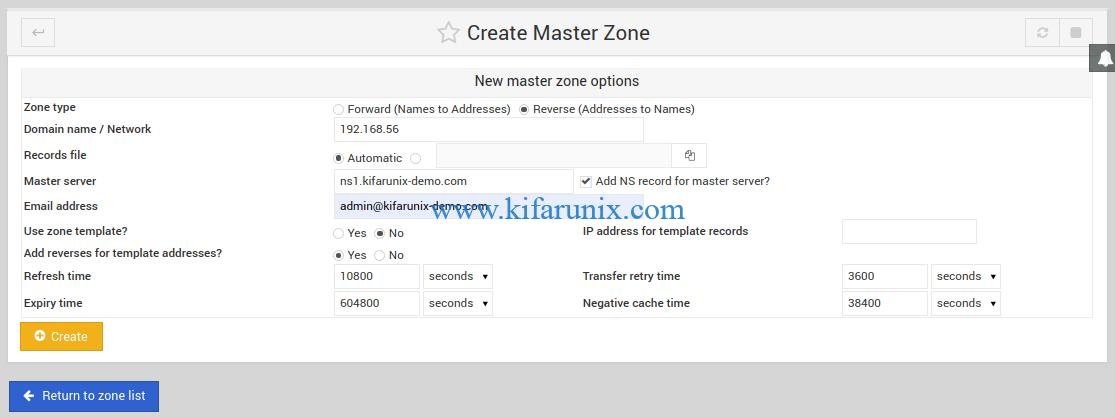
Click Create to create the master reverse zone statement.
Set the A Records
On the master zone configuration page, click Addresses. To begin with, set the A record for your DNS server.
Click Create to set the DNS server address A record. Next, you can add more addresses for other hosts.
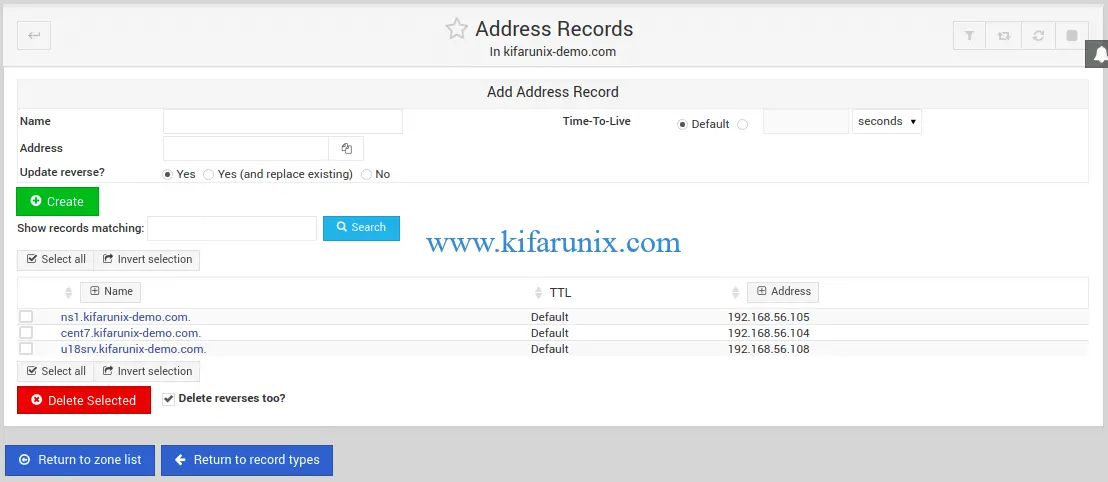
Once done, click Return to records type.
Create Name Server (NS) Records
Click Name Server on Master zone configuration page. If the name server record is not already set, for the zone name, enter the your domain for example, kifarunix-demo.com and for Name Server enter the FQDN of the DNS server, e.g ns1.kifarunix-demo.com.
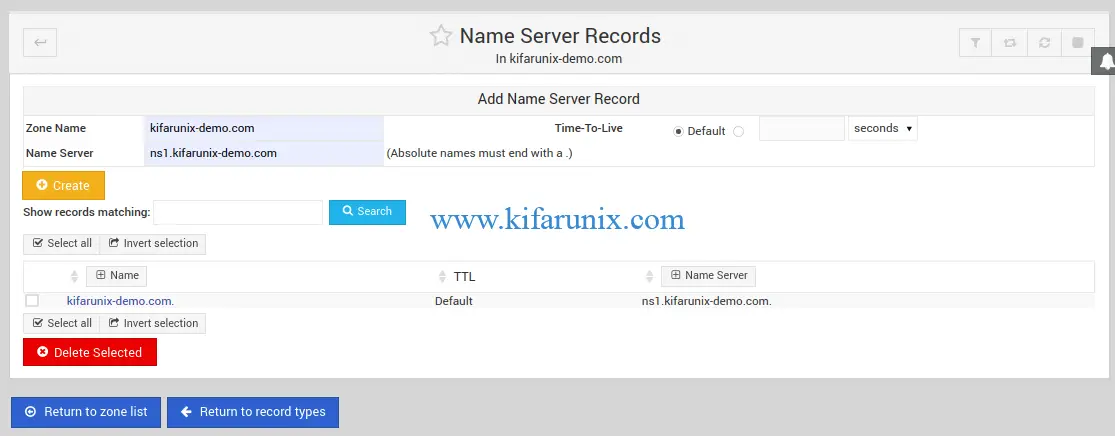
Click Create to add the name server records. Once done, click Return to zone list
You should now have two master zones set (forward and reverse zones) with each having defined A records and PTR records respectively.
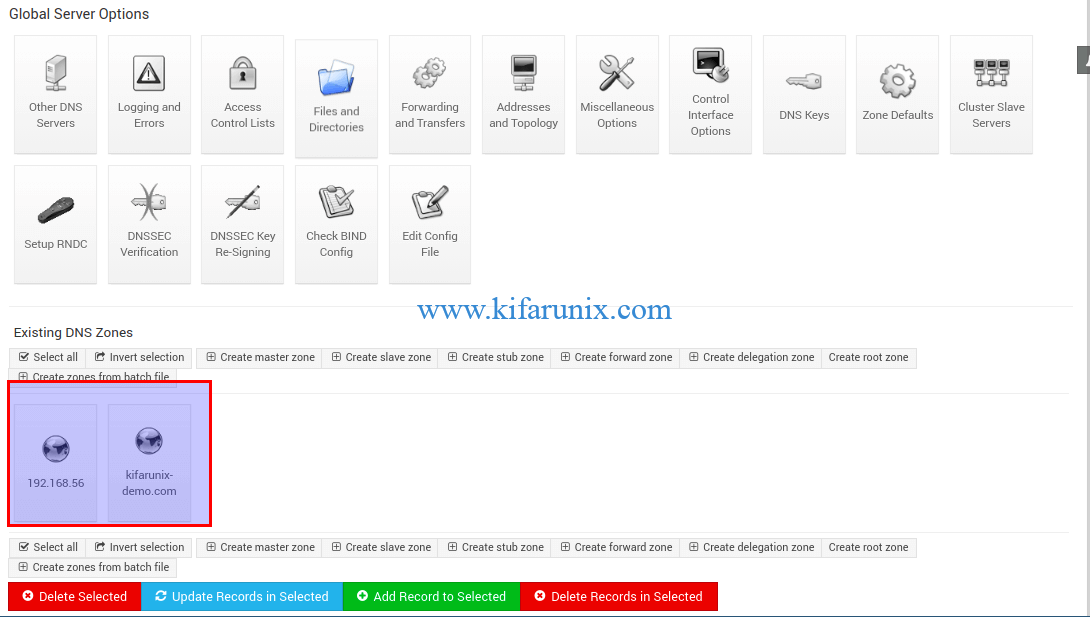
Verify Zone Configuration Syntax
To check the validity of the zone configuration, click on Check BIND config.
Running BIND
To restart BIND on the web interface, stop and start it by clicking the stop and play buttons on the top right corner of the interface. See the highlighted section in the screenshot below.

If UFW is running, simply open the terminal (Alt+k) and run the command below to allow BIND.
ufw allow Bind9Verify if BIND is Working
To check if our DNS is working, we are going to use Fedora 30. Hence, login and create the interfaces IP addresses and DNS server details as shown below.
nmcli con add type ethernet ifname enp0s8 con-name enp0s8 ipv4.addresses 192.168.56.114/24 connection.autoconnect yesnmcli con mod enp0s8 ipv4.method manualSet the DNS Server
nmcli con mod enp0s8 ipv4.dns 192.168.56.105Set the DNS search domain.
nmcli con mod enp0s8 ipv4.dns-search kifarunix-demo.comBring up the interface.
nmcli con up enp0s8Check the DNS Server.
nmcli dev show enp0s8 | grep -i dns
IP4.DNS[1]:                             192.168.56.105
Next, try to ping our host server (u18srv) that we added to the DNS server while setting the A records.
ping u18srv -c 4PING u18srv.kifarunix-demo.com (192.168.56.108) 56(84) bytes of data.
64 bytes from 192.168.56.108 (192.168.56.108): icmp_seq=1 ttl=64 time=0.871 ms
64 bytes from 192.168.56.108 (192.168.56.108): icmp_seq=2 ttl=64 time=0.377 ms
64 bytes from 192.168.56.108 (192.168.56.108): icmp_seq=3 ttl=64 time=0.792 ms
64 bytes from 192.168.56.108 (192.168.56.108): icmp_seq=4 ttl=64 time=0.818 ms
--- u18srv.kifarunix-demo.com ping statistics ---
4 packets transmitted, 4 received, 0% packet loss, time 109ms
rtt min/avg/max/mdev = 0.377/0.714/0.871/0.198 msTry to resolve the DNS server hostnames using dig command.
dig ns1.kifarunix-demo.com; <<>> DiG 9.11.9-RedHat-9.11.9-1.fc30 <<>> ns1.kifarunix-demo.com
;; global options: +cmd
;; Got answer:
;; ->>HEADER<<- opcode: QUERY, status: NOERROR, id: 30425
;; flags: qr aa rd ra; QUERY: 1, ANSWER: 1, AUTHORITY: 1, ADDITIONAL: 1
;; OPT PSEUDOSECTION:
; EDNS: version: 0, flags:; udp: 4096
; COOKIE: 3f9abdac800a3185f47f59b45d8a6bdb9febaa9aa9179802 (good)
;; QUESTION SECTION:
;ns1.kifarunix-demo.com. IN A
;; ANSWER SECTION:
ns1.kifarunix-demo.com. 38400 IN A 192.168.56.105
;; AUTHORITY SECTION:
kifarunix-demo.com. 38400 IN NS ns1.kifarunix-demo.com.
;; Query time: 2 msec
;; SERVER: 192.168.56.105#53(192.168.56.105)
;; WHEN: Tue Sep 24 22:17:50 EAT 2019
;; MSG SIZE rcvd: 109Resolve Ubuntu 18 hostname;
dig u18srv.kifarunix-demo.com; <<>> DiG 9.11.9-RedHat-9.11.9-1.fc30 <<>> u18srv.kifarunix-demo.com
;; global options: +cmd
;; Got answer:
;; ->>HEADER<<- opcode: QUERY, status: NOERROR, id: 445
;; flags: qr aa rd ra; QUERY: 1, ANSWER: 1, AUTHORITY: 1, ADDITIONAL: 2
;; OPT PSEUDOSECTION:
; EDNS: version: 0, flags:; udp: 4096
; COOKIE: b0214a69bddd5d265abd78305d8a6c17ee60809d19c6e347 (good)
;; QUESTION SECTION:
;u18srv.kifarunix-demo.com. IN A
;; ANSWER SECTION:
u18srv.kifarunix-demo.com. 38400 IN A 192.168.56.108
;; AUTHORITY SECTION:
kifarunix-demo.com. 38400 IN NS ns1.kifarunix-demo.com.
;; ADDITIONAL SECTION:
ns1.kifarunix-demo.com. 38400 IN A 192.168.56.105
;; Query time: 2 msec
;; SERVER: 192.168.56.105#53(192.168.56.105)
;; WHEN: Tue Sep 24 22:18:50 EAT 2019
;; MSG SIZE rcvd: 132Perform Reverse Lookup (PTR Records)
dig -x 192.168.56.104; <<>> DiG 9.11.9-RedHat-9.11.9-1.fc30 <<>> -x 192.168.56.104
;; global options: +cmd
;; Got answer:
;; ->>HEADER<<- opcode: QUERY, status: NOERROR, id: 9727
;; flags: qr aa rd ra; QUERY: 1, ANSWER: 1, AUTHORITY: 1, ADDITIONAL: 2
;; OPT PSEUDOSECTION:
; EDNS: version: 0, flags:; udp: 4096
; COOKIE: c6bc69eca7e20dca47e4e3b95d8a757a39ffb62e91345fa4 (good)
;; QUESTION SECTION:
;104.56.168.192.in-addr.arpa. IN PTR
;; ANSWER SECTION:
104.56.168.192.in-addr.arpa. 38400 IN PTR cent7.kifarunix-demo.com.
;; AUTHORITY SECTION:
56.168.192.in-addr.arpa. 38400 IN NS ns1.kifarunix-demo.com.
;; ADDITIONAL SECTION:
ns1.kifarunix-demo.com. 38400 IN A 192.168.56.105
;; Query time: 1 msec
;; SERVER: 192.168.56.105#53(192.168.56.105)
;; WHEN: Tue Sep 24 22:58:53 EAT 2019
;; MSG SIZE rcvd: 156Using host command;
host u18srv.kifarunix-demo.comu18srv.kifarunix-demo.com has address 192.168.56.108Reverse Lookup of DNS Server hostname.
host 192.168.56.105105.56.168.192.in-addr.arpa domain name pointer ns1.kifarunix-demo.com.Well, there you go.
Related Tutorials
Configure BIND as Slave DNS Server on Ubuntu 18.04
Configure BIND as DNS Server on Ubuntu 18.04
Install PowerDNS with MariaDB Backend on Fedora 30/29/CentOS 7


When you say:
Next, you need to install Bind DNS server module. This can be done from the Webmin interface. Hence, on the dashboard, navigate to Un-used Modules > BIND DNS Server and click “Click here” to build Bind package and required dependencies for installation.
What button is “click here” button?
it means when you navigate to Un-used Modules > BIND DNS Server, you should see a Click here button the interface.