This tutorial will cover how to automate OpenShift Deployments with GitLab CI/CD pipelines. By integrating these tools, you’ll be able to streamline your deployment process, ensuring faster and more reliable updates to your applications running on OpenShift clusters. We’ll walk through the steps to set up GitLab CI/CD pipelines, configure them for OpenShift, and automate the process from code commit to deployment.
Table of Contents
Automate OpenShift Deployments with GitLab CI/CD Pipelines
Why Use GitLab CI/CD with OpenShift 2025?
While the industry has increasingly moved towards cloud-native CI/CD solutions like Tekton Pipelines and OpenShift GitOps using Argo CD, which are specifically designed for Kubernetes environments, understanding GitLab CI/CD remains crucial for several reasons. Many organizations still rely on GitLab as their primary DevOps platform, and learning GitLab CI/CD provides essential concepts that translate to any CI/CD system. Similarly, GitLab provides an all-in-one solution including source code management, CI/CD, security scanning, and project management under a single platform, that makes it really easy to manage, among other several reasons.
Prerequisites
Before starting this tutorial, ensure you have:
Technical Requirements:
- OpenShift Cluster: Access to OpenShift 4.x cluster
- GitLab: Access to GitLab server (we are using self-hosted GitLab instance)
- Docker Knowledge: Basic understanding of containers and Dockerfiles
- OpenShift CLI:
occommand-line tool installed and configured - Git: Basic Git knowledge and local Git installation
Access and Permissions:
- OpenShift permissions to install required items.
- OpenShift project/namespace creation permissions
- GitLab repository creation and CI/CD configuration access
- Ability to create service accounts and role bindings in OpenShift
Project Architecture Overview
Our demo application follows a modern polyrepo architecture with three distinct components:
Application Components:
- Frontend: React.js application served via nginx (Port 3000)
- Backend: Node.js REST API with Express framework (Port 5000)
- Database: MongoDB for data persistence (Port 27017)
GitLab Repository Structure:
tree ..
├── backend
│ ├── docker-compose.yaml
│ ├── Dockerfile
│ ├── package.json
│ ├── README.md
│ └── server.js
├── frontend
│ ├── docker-compose.yaml
│ ├── Dockerfile
│ ├── nginx.conf
│ ├── package.json
│ ├── public
│ │ └── index.html
│ ├── README.md
│ └── src
│ ├── App.css
│ ├── App.js
│ └── index.js
└── mongo
├── docker-compose.yaml
├── Dockerfile
└── README.md
We have already setup the project both on the local system and on the GitLab repository.
Ignore the docker-compose file as this was used to test the app on the local system.
Setting Up the Environment
Create an OpenShift Project for CI/CD
To isolate our CI/CD workflows and resources, let’s create a dedicated OpenShift project. A project in OpenShift acts as a namespace where you can manage resources like builds, deployments, and CI/CD pipelines.
To create a project from OpenShift web console:
- Login to the OpenShift web console and navigate to:
- Administrator view: Home > Projects > Create Project.
- Or, Developer view: +Add > Create Project.
- Provide a name for your project and click Create.
To create a project from CLI, login to the OpenShift with username/password or a token if you already have it;
To login with username/password;
oc login https://api.<cluster-name>.example.com:6443 -u <your-username>The command will prompt for the password. For example;
oc login https://api.ocp.kifarunix-demo.com:6443 -u kubeadminIf you have an API token (e.g., from the OpenShift web console under “User Management” or “Copy Login Command”), use:
oc login https://api.<cluster-name>.example.com:6443 --token=<your-token>Or if you have a kubeconfig file (e.g., ~/auth/kubeconfig or provided by your admin), you can specify it:
oc login --kubeconfig=/path/to/kubeconfigOnce you are logged in, run the following command (replace PROJECT_NAME with your desired project name):
oc new-project PROJECT_NAMEWe named our project as gitlab-cicd.
Create a Service Account (SVC) for GitLab CI/CD
For GitLab CI/CD, you’ll need a ServiceAccount with permissions to deploy resources. You can create a service account from OpenShift web console or from the CLI using oc command.
We will use the CLI to make it quick.
If you haven’t, switch to the project (Replace the project name accordingly);
oc project gitlab-cicdThen run the command below to create a SVC account for your project (Replace the gitlab-cicd with your preferred service name);
oc create sa gitlab-cicdAssign the Necessary Roles to the Service Account
To ensure that the service account can deploy resources (like pods, deployments, etc.), you need to bind appropriate roles to it. For deploying, you usually need at least the edit role or the admin role depending on the level of permissions required.
We will use edit role in this setup. The edit role allows the service account to create and update most resources (pods, deployments, etc.) within the namespace but does not provide cluster-wide access.
Run the command below to assign the service account, gitlab-cicd, edit permissions on the gitlab-cicd project.
oc adm policy add-role-to-user edit -z gitlab-cicdSimilarly, for the account to write or push an image to local image registry, it needs to have system:image-builder role.
oc policy add-role-to-user system:image-builder -z gitlab-cicdUpdate OpenShift SCCs to Allow MongoDB to Run
When deploying MongoDB in an OpenShift cluster, permission issues can prevent the pod from performing operations like writing to the /data/db/ directory (default Mongo Data Directory), leading to errors such as: “Error creating journal directory”,”attr”:{“directory”:”/data/db/”}.
This is due to the use of default restricted-v2 SCC.
To circumvent this, you can create a custom SCC for MongoDB service as described in the guide below;
Update Security Context Constraints (SCC) to Allow MongoDB to Run
Once you create the SCC, run the command below to grant the gitlab-cicd service account permission to run containers using the mongodb SCC.
oc adm policy add-scc-to-user mongodb -z gitlab-cicdNow, you need to ensure that your MongoDB deployment is configured to use this service account. By default, the default service account is used, which is associated with the restricted-v2 SCC. This may prevent MongoDB from running properly.
You would specify the service account under the deployment spec as shown below;
spec:
  template:
    spec:
      serviceAccountName: gitlab-cicd
Hence, see sample deployment manifest file below on how the service account is defined;
apiVersion: apps/v1
kind: Deployment
metadata:
  name: mongo
  namespace: gitlab-cicd
  labels:
    app: mongo
spec:
  replicas: 1
  selector:
    matchLabels:
      app: mongo
  template:
    metadata:
      labels:
        app: mongo
    spec:
      serviceAccountName: gitlab-cicd
      containers:
        - name: mongo
          image: image-registry.openshift-image-registry.svc:5000/gitlab-cicd/mongo:latest
          imagePullPolicy: Always
          ports:
            - containerPort: 27017
              protocol: TCP
Get Service Account Token
Once the service account is created and the edit role is assigned, you need to get the token for the service account. Thus, run the command below to generate the service account token.
oc create token SERVICE_ACCOUNT_NAME [options]For example:
oc create token gitlab-cicd --duration=4320hThis generates a 180-day access token for the gitlab-cicd service account.
The token generated and displayed on stdout is not saved in Kubernetes secrets. It is not recoverable after creation. If you lose it, you must re-run the command to generate a new one.
Save this token as you’ll need it for GitLab CI/CD configuration.
You can write the token to a file for easy retrieval;
oc create token gitlab-cicd --duration=4320h > ~/gitlab-cicd.jsonConfigure Git Repository Access for OpenShift Builds
To allow OpenShift to clone the private GitLab repository during the build process, you need to create a secret containing your GitLab credentials and reference it in the BuildConfig.
We will use basic authentication via HTTPs using GitLab Project Access Token.
Our demo project reside under one group in our GitLab server. As such, we will create Project Access Tokens instead of Personal Access Token as Project Access Token allows access to only specific project.
Therefore to create the token on GitLab server:
- Go to the project group in GitLab e.g
https://gitlab.examle.com/<project-group> - In the left sidebar, click on Settings > Access Tokens > Add new Token.
- Under Add a group access token, fill in:
- Name of the token
- Description (optional)
- Token expiry date (optional): Pick an expiration date or leave blank for no expiration.
- Token role: Choose a role like
Reporter(enough for cloning) - Under Scopes, give read_repository. This grants read access (pull) to all repositories within a group.
- Click Create group access token.
- Click on the eye icon to display the token. Copy and save it safely as it will be shown again.
Create OpenShift GitLab Access Secret
Next, login to OpenShift CLI and create a secret for the GitLab access using the token created above.
oc create secret generic <secret-name> \
  --from-literal=username=<your-gitlab-username> \
  --from-literal=password=<your-gitlab-token> \
  -n <project-name>
For example:
oc create secret generic gitlab-booksvaultdemo-pat \
  [email protected] \
  --from-literal=password=glpat-sv-ktjEuKR7cFPUwCKw- \
  -n gitlab-cicd
You now have a secret that you can reference in the BuildConfig manifest.
See below how I referenced the secret in my sample build config file.
...
spec:
  source:
    type: Git
    git:
      uri: https://gitlab.kifarunix.com/booksvault-demo-app/frontend.git
      ref: master
    contextDir: /
    sourceSecret:
      name: gitlab-booksvaultdemo-pat
  strategy:
    type: Docker
    dockerStrategy:
      dockerfilePath: Dockerfile
...
Adjust your buildconfig file accordingly.
Install GitLab Runner on GitLab Server
GitLab Runner is a lightweight service that executes CI/CD jobs defined in a project’s .gitlab-ci.yml file. It polls your GitLab instance for new jobs, runs them in its configured environment (called an executor), and reports the results back to GitLab. There are different types of environments, or executors, that determine where and how your jobs run. Each executor provides a specific way to execute the job scripts depending on your infrastructure and needs.
Common executors include:
- Shell executor, which runs jobs directly on the machine’s command line interface (such as Bash on Linux or PowerShell on Windows). If specific shell command is required to run your jobs, be sure to make it available.
- Docker executor, which runs each job inside an isolated Docker container, ensuring a clean and consistent environment. Ensure Docker is installed and running.
- Kubernetes executor, which schedules each job as a pod inside a Kubernetes or OpenShift cluster, ideal for scalable cloud-native deployments. This is better used if running the runner directly on Kubernetes or OpenShift cluster.
- Custom executor, which allows you to define a custom environment for running your jobs, offering maximum flexibility.
If you’re running a self-hosted GitLab instance, one of the most straightforward ways to get your CI/CD pipelines up and running is to install a GitLab Runner directly on the same server.
To install a GitLab runner, you can obtain the installation commands from GitLab web as follows:
- Navigate to GitLab UI > Admin > CI/CD > Runners.
- Beside the Create Instance Runner option, click the three dots (⋮).
- Click Show runner installation and registration instructions.
- Choose the installation instructions for your specific system architecture (e.g., Linux, macOS, Windows, Docker, Kubernetes, AWS). The instructions will guide you through the process of installing GitLab Runner on your machine.
- Since we are running GitLab server on an AlmaLinux node, we will simply execute these commands to install the runner.
sudo -i

curl -L --output /usr/local/bin/gitlab-runner https://gitlab-runner-downloads.s3.amazonaws.com/latest/binaries/gitlab-runner-linux-amd64

chmod +x /usr/local/bin/gitlab-runner

useradd --comment 'GitLab Runner' --create-home gitlab-runner --shell /bin/bash

gitlab-runner install --user=gitlab-runner --working-directory=/home/gitlab-runner

gitlab-runner start

gitlab-runner status
Register a GitLab Runner on GitLab Server
GitLab Runners execute CI/CD jobs and need to be registered with your GitLab instance. Therefore, login to your GitLab server with the a user that has the right permissions.
GitLab Runner has the different types of runners based on scope and availability:
- Instance runners are available to all groups and projects in a GitLab instance. Use instance runners for general-purpose CI/CD pipelines to maximize resource utilization and simplify management.
- Group runners are available to all projects and subgroups in a group. Opt for group runners when multiple related projects require a consistent build environment.
- Project runners are associated with specific projects. Typically, project runners are used by one project at a time. Implement project runners for projects with unique requirements or sensitive data to ensure isolation and security.
We will create an instance runner for our demo project in this guide. Note that when you create a runner, it is assigned a runner authentication token that you use to register it. The runner uses the token to authenticate with GitLab when picking up jobs from the job queue.
Thus, create an instance runner in GitLab UI:
- Go to Admin > CI/CD > Runners in the left sidebar.
- Click Create instance runner or Create a new runner link.
- Add tags for job filtering. Be sure to specify the respective tags on the GitLab CI/CD pipelines configuration file, .gitlab-ci.yml. This is how we will reference the tags in our pipelines.
See CICD pipelines configuration below.tags:
- gitlab-cicd-ocp - Set a runner description (Optional).
- Click Create runner.
- A page with Runner registration instructions now opens up. Follow the provided instructions for your respective OS to register the GitLab runner.
- To register GitLab runner therefore;
- Select the GitLab respective OS and on Step 1, copy the provided command for installing the Runner. (The authentication token is temporarily shown for registration and is stored in the
config.tomlfile after registration).sudo gitlab-runner register \
--url https://gitlab.kifarunix.com \
--token glrt-7yVwTNXlZtEiEHyFkG2W2nQ6MQp1OjIH.01.0w1x1juoi - Copy and run the command on the GitLab server terminal.
- Select the GitLab respective OS and on Step 1, copy the provided command for installing the Runner. (The authentication token is temporarily shown for registration and is stored in the
- When the GitLab runner registration command is executed, you will be prompted to:
- Provide the GitLab server URL address
- Provide the name of the Runner
- Choose an executor. An executor is simply the environment type that the runner uses to run those jobs. In our case, we will choose the shell executor. As such, you need to have the OpenShift CLI command (oc) installed on the GitLab server.
- Your Runner configs will now be saved to /etc/gitlab-runner/config.toml.
- Sample Runner registration output;
Runtime platform arch=amd64 os=linux pid=319930 revision=2b813ade version=18.1.1
Running in system-mode.
Enter the GitLab instance URL (for example, https://gitlab.com/):
[https://gitlab.kifarunix.com]:
Verifying runner... is valid correlation_id=01JZRGYY3NCPT46Z7VKGZX20AJ runner=7yVwTNXlZ
Enter a name for the runner. This is stored only in the local config.toml file:
[gitlab.kifarunix.com]: gitlab-cicd-ocp
Enter an executor: custom, parallels, docker, docker-windows, kubernetes, docker-autoscaler, instance, shell, ssh, virtualbox, docker+machine:
shell
Runner registered successfully. Feel free to start it, but if it's running already the config should be automatically reloaded!
Configuration (with the authentication token) was saved in "/etc/gitlab-runner/config.toml"
- Sample Runner registration output;
- Normally, you would run the command sudo gitlab-runner run to confirm if the runner is able to pick the jobs. But since we are running as system service, this is not needed.
- Go back to the UI and click View Runners on the GitLab runner registration page.
- The runner is now online and ready for the job! You can also view from Admin > CICD > Runners.
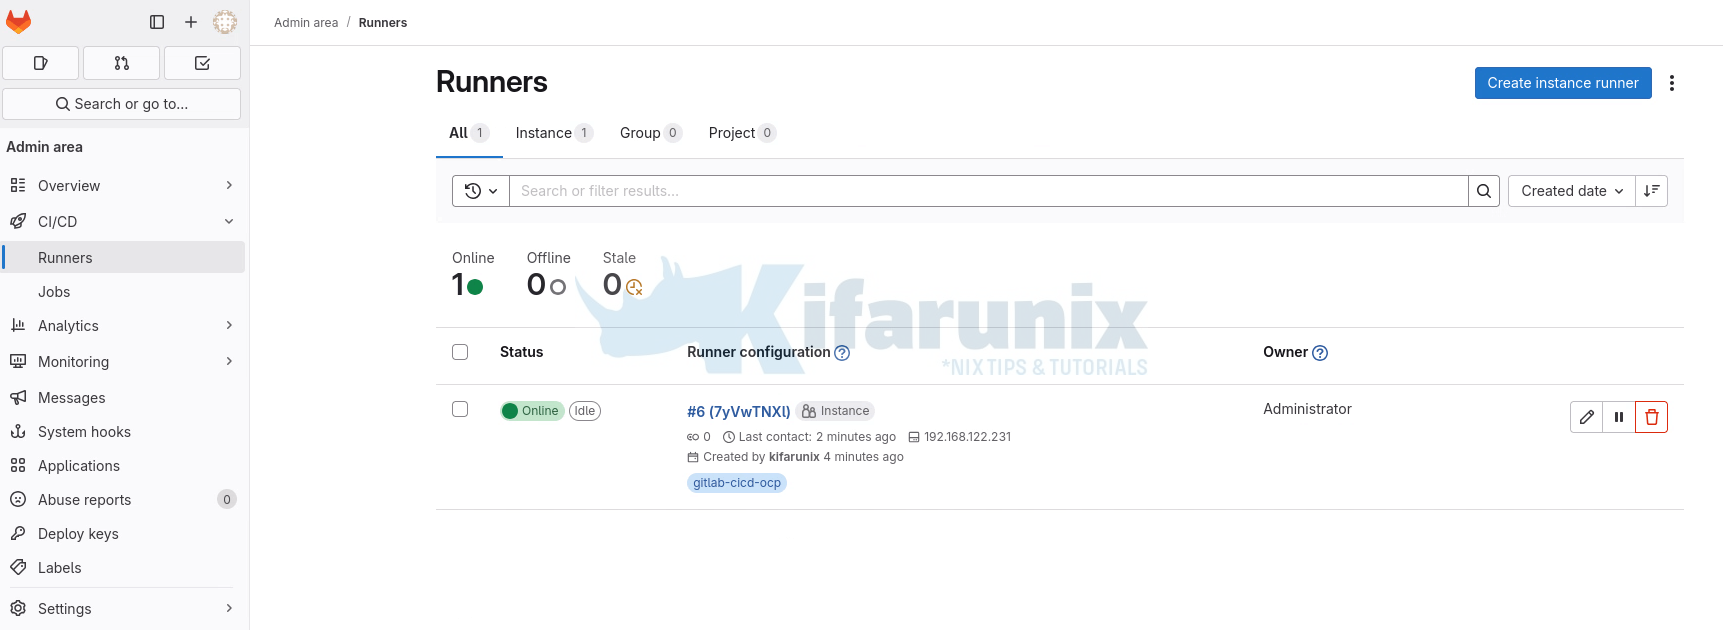
Note, if you ever want to unregister your runners, simply use the command (Get the value of NAME_OF_RUNNER via gitlab-runner list command);
sudo gitlab-runner unregister -n NAME_OF_RUNNEROr un-register all;
sudo gitlab-runner unregister --all-runnersAnd then of course, delete them from the UI.
Next, if not already done, install oc CLI on your GitLab server:
curl -LO https://mirror.openshift.com/pub/openshift-v4/clients/ocp/latest/openshift-client-linux.tar.gztar xf openshift-client-linux.tar.gzsudo mv oc /usr/local/bin/Check that the oc command is installed correctly;
oc --helpOpenShift Client
This client helps you develop, build, deploy, and run your applications on any
OpenShift or Kubernetes cluster. It also includes the administrative
commands for managing a cluster under the 'adm' subcommand.
Basic Commands:
login Log in to a server
new-project Request a new project
new-app Create a new application
status Show an overview of the current project
project Switch to another project
projects Display existing projects
explain Get documentation for a resource
Build and Deploy Commands:
rollout Manage the rollout of a resource
rollback Revert part of an application back to a previous deployment
new-build Create a new build configuration
start-build Start a new build
cancel-build Cancel running, pending, or new builds
import-image Import images from a container image registry
tag Tag existing images into image streams
Application Management Commands:
create Create a resource from a file or from stdin
apply Apply a configuration to a resource by file name or stdin
get Display one or many resources
describe Show details of a specific resource or group of resources
edit Edit a resource on the server
set Commands that help set specific features on objects
label Update the labels on a resource
annotate Update the annotations on a resource
expose Expose a replicated application as a service or route
delete Delete resources by file names, stdin, resources and names, or by resources and label selector
scale Set a new size for a deployment, replica set, or replication controller
autoscale Autoscale a deployment config, deployment, replica set, stateful set, or replication controller
secrets Manage secrets
Troubleshooting and Debugging Commands:
logs Print the logs for a container in a pod
rsh Start a shell session in a container
rsync Copy files between a local file system and a pod
port-forward Forward one or more local ports to a pod
debug Launch a new instance of a pod for debugging
exec Execute a command in a container
proxy Run a proxy to the Kubernetes API server
attach Attach to a running container
run Run a particular image on the cluster
cp Copy files and directories to and from containers
wait Experimental: Wait for a specific condition on one or many resources
events List events
Advanced Commands:
adm Tools for managing a cluster
replace Replace a resource by file name or stdin
patch Update fields of a resource
process Process a template into list of resources
extract Extract secrets or config maps to disk
observe Observe changes to resources and react to them (experimental)
policy Manage authorization policy
auth Inspect authorization
image Useful commands for managing images
registry Commands for working with the registry
idle Idle scalable resources
api-versions Print the supported API versions on the server, in the form of "group/version"
api-resources Print the supported API resources on the server
cluster-info Display cluster information
diff Diff the live version against a would-be applied version
kustomize Build a kustomization target from a directory or URL
Settings Commands:
get-token Experimental: Get token from external OIDC issuer as credentials exec plugin
logout End the current server session
config Modify kubeconfig files
whoami Return information about the current session
completion Output shell completion code for the specified shell (bash, zsh, fish, or powershell)
Other Commands:
plugin Provides utilities for interacting with plugins
version Print the client and server version information
Usage:
oc [flags] [options]
Use "oc --help" for more information about a given command.
Use "oc options" for a list of global command-line options (applies to all commands).
Define OpenShift App Deployment Resources
In this setup, we will use declarative resources to define and manage our OpenShift application deployments. That means we will store Kubernetes/OpenShift manifests (e.g., Deployment, Service, Route, etc.) as version-controlled YAML files in our GitLab repository.
This declarative approach allows us to:
- Track changes over time using Git versioning
- Collaborate effectively across teams with code reviews
- Ensure consistency across environments (dev, test, prod)
- Enable rollback and auditability, as all changes are documented
Rather than issuing imperative commands to create or update resources manually, our GitLab CI/CD pipelines will apply these YAML manifests using commands like oc apply -f, treating infrastructure and configuration as code.
We are working with a 3-project polyrepo setup where each application resides in its own repository. For each project, we will create a dedicated GitLab CI/CD pipeline responsible for:
- Managing the project’s OpenShift resource definitions
- Applying those resources to the target OpenShift namespace
- Automating deployments through version-controlled manifests
Initially, as you can see in my project directory structure above, we do not have any OpenShift resource.
We have now added the following resources to each project directory:
- Deployment.yaml: Defines a
Deploymentspecifying how to run and manage application pods, including replicas, container specs… - buildconfig.yaml: defines how to build images from source code.
- service.yaml: Defines a
Serviceresource to expose deployed pods within the cluster. - is.yaml: Represents an
ImageStreamresource. - route.yaml: Found only in the
frontendapplication directory; defines aRouteresource to expose services externally via OpenShift’s routing layer.
My project directory now looks like;
tree ..
├── backend
│ ├── buildconfig.yaml
│ ├── deployment.yaml
│ ├── docker-compose.yaml
│ ├── Dockerfile
│ ├── is.yaml
│ ├── package.json
│ ├── README.md
│ ├── server.js
│ └── service.yaml
├── frontend
│ ├── buildconfig.yaml
│ ├── deployment.yaml
│ ├── docker-compose.yaml
│ ├── Dockerfile
│ ├── is.yaml
│ ├── nginx.conf
│ ├── package.json
│ ├── public
│ │ └── index.html
│ ├── README.md
│ ├── route.yaml
│ ├── service.yaml
│ └── src
│ ├── App.css
│ ├── App.js
│ └── index.js
└── mongo
├── buildconfig.yaml
├── deployment.yaml
├── docker-compose.yaml
├── Dockerfile
├── is.yaml
├── README.md
└── service.yaml
So, just to show how I have set up these OpenShift resources, see below for the frontend service. They are more-less similar for the backend and mongo DB projects as well.
cat frontend/deployment.yamlapiVersion: apps/v1
kind: Deployment
metadata:
name: frontend
namespace: gitlab-cicd
labels:
app: frontend
spec:
replicas: 1
selector:
matchLabels:
app: frontend
template:
metadata:
labels:
app: frontend
spec:
containers:
- name: frontend
image: image-registry.openshift-image-registry.svc:5000/gitlab-cicd/frontend:latest
imagePullPolicy: Always
ports:
- containerPort: 8080
protocol: TCP
cat frontend/service.yamlapiVersion: v1
kind: Service
metadata:
name: frontend
namespace: gitlab-cicd
labels:
app: frontend
spec:
selector:
app: frontend
ports:
- port: 8080
targetPort: 8080
protocol: TCP
type: ClusterIP
cat frontend/buildconfig.yamlapiVersion: build.openshift.io/v1
kind: BuildConfig
metadata:
name: frontend
namespace: gitlab-cicd
spec:
source:
type: Git
git:
uri: https://gitlab.kifarunix.com/booksvault-demo-app/frontend.git
ref: master
contextDir: /
sourceSecret:
name: gitlab-booksvaultdemo-pat
strategy:
type: Docker
dockerStrategy:
dockerfilePath: Dockerfile
output:
to:
kind: ImageStreamTag
name: frontend:latest
triggers: []
The route only applies to Frontend service as this is the application that is exposed to the world!
cat frontend/route.yamlapiVersion: route.openshift.io/v1
kind: Route
metadata:
name: frontend
namespace: gitlab-cicd
labels:
app: frontend
spec:
host: booksvault.apps.ocp.kifarunix-demo.com
to:
kind: Service
name: frontend
weight: 100
port:
targetPort: 8080
wildcardPolicy: None
That is just a sample of the resources I have. There are more for backend, and MongoDB.
Create CI/CD Pipeline Config .gitlab-ci.yml for Projects
The .gitlab-ci.yml file defines the CI/CD pipeline for a project in GitLab. It should be created in the root directory of each project repository (frontend, backend, MongoDB, etc.). This YAML file instructs GitLab on how to build, deploy, and manage your application using defined stages, scripts, and environment variables. In this case, it automates deployment to OpenShift, performing actions like applying configuration files and monitoring rollouts.
Consider our frontend application .gitlab-ci.yaml file below;
cat frontend/.gitlab-ci.yaml##############
# STAGES
##############
stages:
- build
- deploy
##############
# Common variables
##############
variables:
OPENSHIFT_PROJECT: gitlab-cicd
before_script:
- echo "Logging into OpenShift..."
- set -e
- oc login --token="$OPENSHIFT_TOKEN" --server="$OPENSHIFT_API_URL" --insecure-skip-tls-verify || { echo "Login failed"; exit 1; }
- oc project "$OPENSHIFT_PROJECT" || { echo "Project selection failed"; exit 1; }
##############
# BUILD STAGE
##############
build_frontend:
stage: build
image: quay.io/openshift/origin-cli:latest
  tags:
    - gitlab-cicd-ocp
script:
- oc apply -f is.yaml || { echo "ImageStream apply failed"; exit 1; }
- oc apply -f buildconfig.yaml || { echo "BuildConfig apply failed"; exit 1; }
- oc start-build frontend --follow || { echo "Build failed"; exit 1; }
only:
- master
artifacts:
paths: [build-logs.txt]
expire_in: 1 week
after_script:
- oc logs build/$(oc get builds -l buildconfig=frontend -o jsonpath="{.items[-1].metadata.name}") -n $OPENSHIFT_PROJECT > build-logs.txt || true
##############
# DEPLOY STAGE
##############
deploy_frontend:
stage: deploy
image: quay.io/openshift/origin-cli:latest
tags:
- gitlab-cicd-ocp
script:
- oc apply -f deployment.yaml || { echo "Deployment apply failed"; exit 1; }
- oc apply -f service.yaml || { echo "Service apply failed"; exit 1; }
- oc apply -f route.yaml || { echo "Route apply failed"; exit 1; }
- oc rollout status deployment/frontend -n $OPENSHIFT_PROJECT || { echo "Rollout failed"; exit 1; }
- ROUTE_URL=$(oc get route frontend -o jsonpath="{.spec.host}")
- curl -f http://$ROUTE_URL || { echo "Frontend not reachable"; exit 1; }
environment:
name: production
url: http://booksvault.apps.ocp.kifarunix-demo.com
only:
- master
dependencies:
- build_frontend
In summary, the configuration:
- Defines two pipeline stages:
buildanddeploy - Sets
OPENSHIFT_PROJECTas a common variable - Logs into OpenShift in
before_scriptusing token and server api variables - Switches to the specified OpenShift project
The build stage (build_frontend):
- Uses
quay.io/openshift/origin-cli:latestimage - Applies
is.yamlandbuildconfig.yamlresources - Starts and follows the
frontendbuild - Runs only on current commit branch
- Saves latest build logs to
build-logs.txtafter the script. Can be accessed on GitLab pipeline artefacts. - Stores
build-logs.txtas an artifact for 1 week
The deploy stage (deploy_frontend):
- Runs only on current commit branch
- Uses
quay.io/openshift/origin-cli:latestimage - Applies
deployment.yaml,service.yaml, androute.yaml - Waits for frontend deployment rollout to complete
- Fetches and validates the frontend route with
curl - Sets environment name as
productionand static URL - Depends on
build_frontend
For Backend and MongoDB Projects or similar, these are our pipeline configurations:
cat ../backend/.gitlab-ci.yml##############
# STAGES
##############
stages:
- build
- deploy
##############
# Common variables
##############
variables:
OPENSHIFT_PROJECT: gitlab-cicd
before_script:
- echo "Logging into OpenShift..."
- set -e
- oc login --token="$OPENSHIFT_TOKEN" --server="$OPENSHIFT_API_URL" --insecure-skip-tls-verify || { echo "Login failed"; exit 1; }
- oc project "$OPENSHIFT_PROJECT" || { echo "Project selection failed"; exit 1; }
##############
# BUILD STAGE
##############
build_backend:
stage: build
image: quay.io/openshift/origin-cli:latest
tags:
- gitlab-cicd-ocp
script:
- oc apply -f is.yaml || { echo "ImageStream apply failed"; exit 1; }
- oc apply -f buildconfig.yaml || { echo "BuildConfig apply failed"; exit 1; }
- oc start-build backend --follow || { echo "Build failed"; exit 1; }
only:
- master
artifacts:
paths: [build-logs.txt]
expire_in: 1 week
after_script:
- oc logs build/$(oc get builds -l buildconfig=backend -o jsonpath="{.items[-1].metadata.name}") -n $OPENSHIFT_PROJECT > build-logs.txt || true
##############
# DEPLOY STAGE
##############
deploy_backend:
stage: deploy
image: quay.io/openshift/origin-cli:latest
tags:
- gitlab-cicd-ocp
script:
- oc apply -f deployment.yaml || { echo "Deployment apply failed"; exit 1; }
- oc apply -f service.yaml || { echo "Service apply failed"; exit 1; }
- oc rollout status deployment/backend -n $OPENSHIFT_PROJECT || { echo "Rollout failed"; exit 1; }
environment:
name: production
only:
- master
dependencies:
- build_backend
cat ../mongo/.gitlab-ci.yml##############
# STAGES
##############
stages:
- build
- deploy
##############
# Common variables
##############
variables:
OPENSHIFT_PROJECT: gitlab-cicd
before_script:
- echo "Logging into OpenShift..."
- set -e
- oc login --token="$OPENSHIFT_TOKEN" --server="$OPENSHIFT_API_URL" --insecure-skip-tls-verify || { echo "Login failed"; exit 1; }
- oc project "$OPENSHIFT_PROJECT" || { echo "Project selection failed"; exit 1; }
##############
# BUILD STAGE
##############
build_mongo:
stage: build
image: quay.io/openshift/origin-cli:latest
tags:
- gitlab-cicd-ocp
script:
- oc apply -f is.yaml || { echo "ImageStream apply failed"; exit 1; }
- oc apply -f buildconfig.yaml || { echo "BuildConfig apply failed"; exit 1; }
- oc start-build mongo --follow || { echo "Build failed"; exit 1; }
only:
- master
artifacts:
paths: [build-logs.txt]
expire_in: 1 week
after_script:
- oc logs build/$(oc get builds -l buildconfig=mongo -o jsonpath="{.items[-1].metadata.name}") -n $OPENSHIFT_PROJECT > build-logs.txt || true
##############
# DEPLOY STAGE
##############
deploy_mongo:
stage: deploy
image: quay.io/openshift/origin-cli:latest
tags:
- gitlab-cicd-ocp
script:
- oc apply -f deployment.yaml || { echo "Deployment apply failed"; exit 1; }
- oc apply -f service.yaml || { echo "Service apply failed"; exit 1; }
- oc rollout status deployment/mongo -n $OPENSHIFT_PROJECT || { echo "Rollout failed"; exit 1; }
environment:
name: production
only:
- master
dependencies:
- build_mongo
As you can see, we have defined some variables in the pipeline configuration. For sensitive credentials used for OpenShift authentication like OPENSHIFT_TOKEN and OPENSHIFT_API_URL, we need to create the GitLab server under Settings > CI/CD > Variables to ensure security (masked, protected) and centralized management across the projects frontend, backend, and MongoDB repositories.
The OPENSHIFT_TOKEN is the token for the service account created above under Get Service Account Token.
To extract the API URL, if you are logged to OpenShift CLI, just run;
oc whoami --show-serverSample output;
https://api.ocp.kifarunix-demo.com:6443
When you have these details:
- Navigate to GitLab UI and select your project and go to Settings > CICD > Variables.
- Select the default minimum role to use in new projects, to run a new pipeline with pipeline variables. Since these are sensitive credentials, you can set the role to Maintainer or Owner. Anyone with these roles can edit/create them but anyone with Developer role can only use them but cannot edit.
- If you changed the role, click Save Changes.
- Click Add Variable to create the variable:
- Type: Select the variable type:
- Variable – Regular key-value pair.
- File – Used when the value is file content (e.g., JSON, PEM keys).
- Environments: Scope the variable to a specific environment (e.g.,
production,staging). We go with the default. Variable will only be available in jobs targeting that environment. - Visibility:
- Visible – Value appears in job logs.
- Masked – Hidden in logs (
****); value can still be viewed in settings; must meet masking rules. - Masked and hidden – Hidden in logs and cannot be viewed after saving.
- Flags:
- Protect variable – Exposes variable only to pipelines running on protected branches/tags.
- Expand variable reference – Allows use of other variables inside this one (e.g.,
$TOKEN_PATH).
- Description (optional): Text field to describe the purpose or usage of the variable.
- Key: The variable name (e.g.,
OPENSHIFT_TOKEN). Be careful of naming conflicts; same-name variables can overwrite each other depending on precedence. - Value: The actual value or secret (e.g., tokens, passwords, paths).
- Type: Select the variable type:
- Save the variable and create the others.
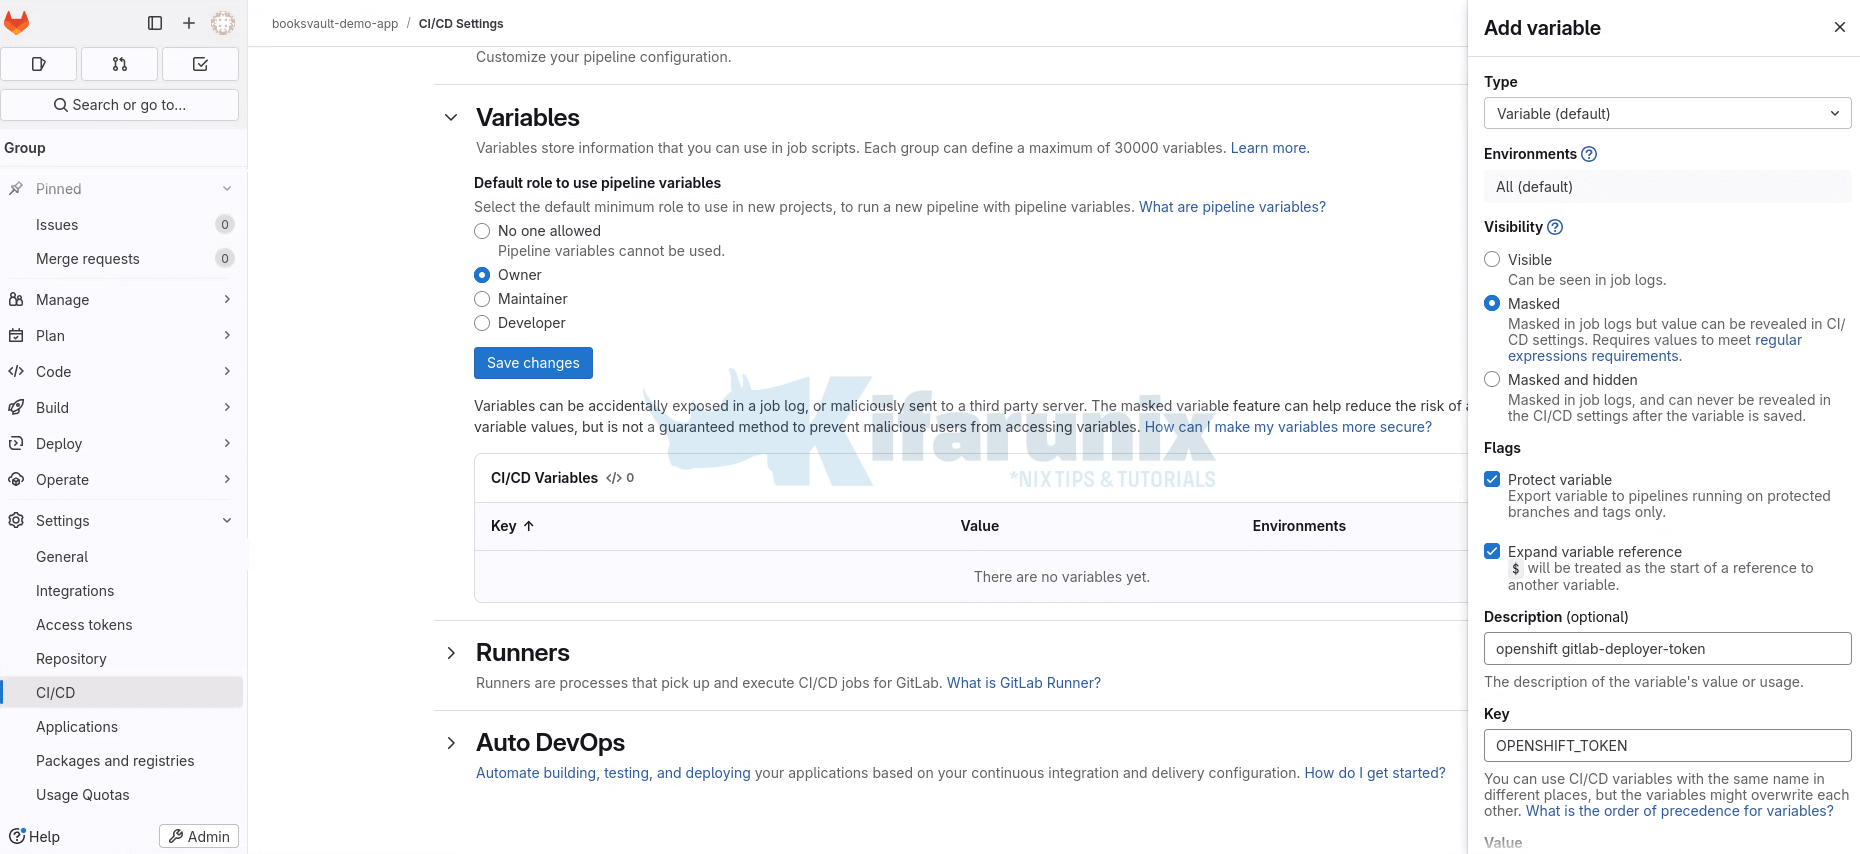
Finally, your variables will appear as:

Push .gitlab-ci.yml and OpenShift Manifests to Upstream Repository
Now that you have created the OpenShift resource manifest yaml files and the GitLab CI/CD pipeline for each project, you need to push them to the upstream git repository for each project so they are available to the pipelines.
For example, let’s check the frontend local repo;
cd frontendCheck status;
git statusOn branch master
Your branch is up to date with 'origin/master'.
Untracked files:
(use "git add <file>..." to include in what will be committed)
.gitlab-ci.yaml
buildconfig.yaml
deployment.yaml
is.yaml
route.yaml
service.yaml
nothing added to commit but untracked files present (use "git add" to track)
Add the new files.
git add ./buildconfig.yaml ./deployment.yaml ./is.yaml ./route.yaml ./service.yaml ./.gitlab-ci.yamlThe commit and push;
git commit -m "Added OpenShift deployment resources and CICD pipeline"Push the changes to the remote repository;
git pushPush the changes for the other projects.
Test the GitLab CI/CD Pipeline
To ensure that the GitLab CI/CD pipeline is functioning correctly, start by making a minimal, non-breaking change to the project such as updating a documentation file. This allows you to test the pipeline end-to-end without affecting the application logic. Once the change is committed and pushed, GitLab will automatically trigger the pipeline. You can then monitor the pipeline stages (build, deploy…) in the GitLab interface to confirm that each job executes as expected across the MongoDB database, backend, and frontend services.
So, let’s begin by testing the deployment of MongoDB on OpenShift via GitLab CI/CD through application updates on the Git repository.
Before we can proceed, there is no resource running on our OpenShift project;
oc get allSample output, ignore the warning. No resources in the project;
Warning: apps.openshift.io/v1 DeploymentConfig is deprecated in v4.14+, unavailable in v4.10000+
No resources found in gitlab-cicd namespace.
In that case, let’s watch the events so we can see when the build/deployment process begins;
oc get events -wNow, on GitLab server CLI, let’s create a simple application change beginning with MongoDB project;
cd mongoecho -e "\n# Testing CICD Pipeline" >> README.mdStage, commit, and push the change:
git add README.mdgit commit -m "Test CI/CD pipeline trigger"git push origin masterVerify the changes, from GitLab Server, under the Project > Build > Pipelines:
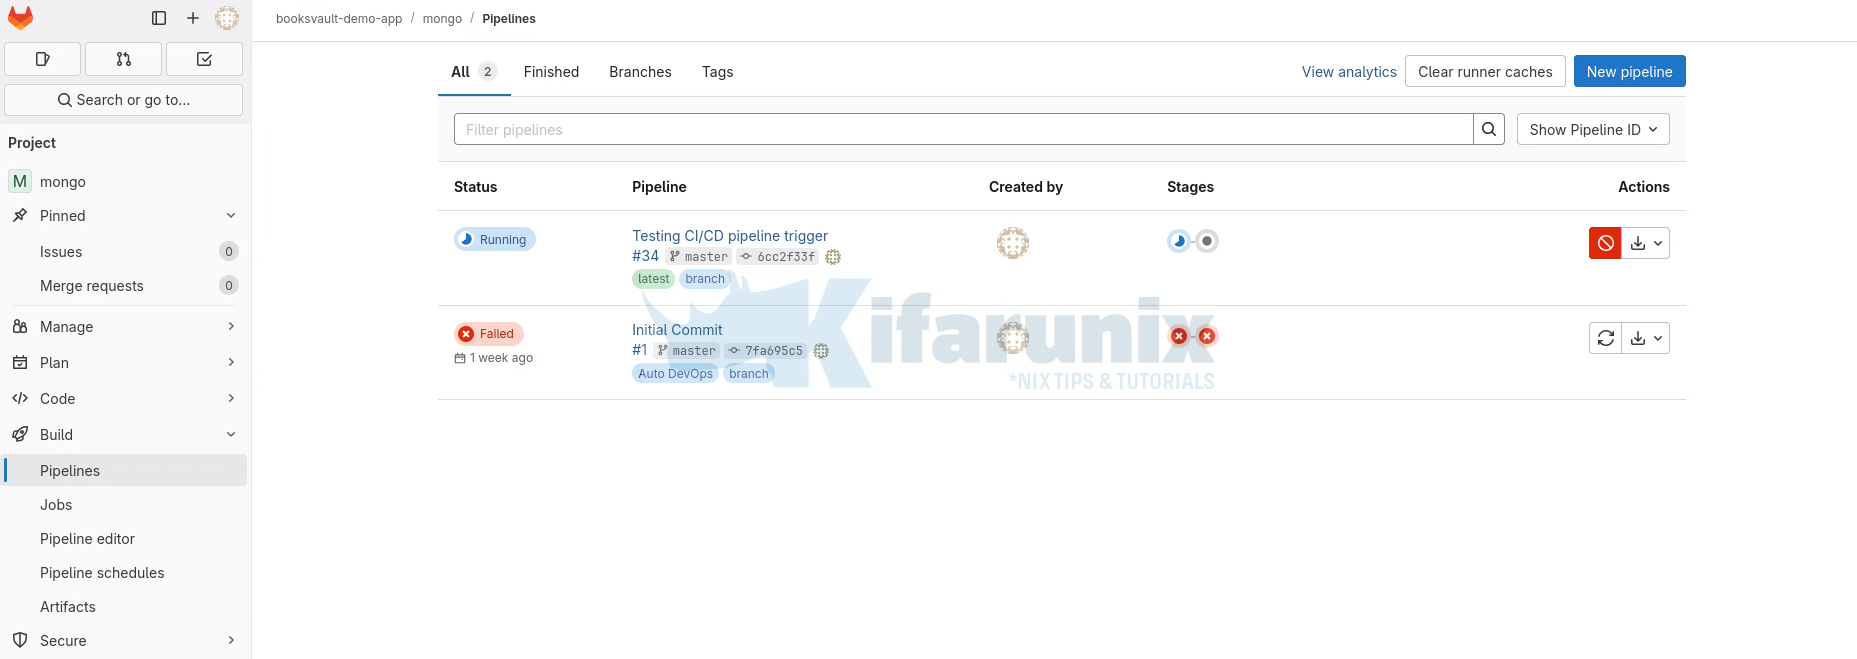
Click on the Pipeline to see more details:
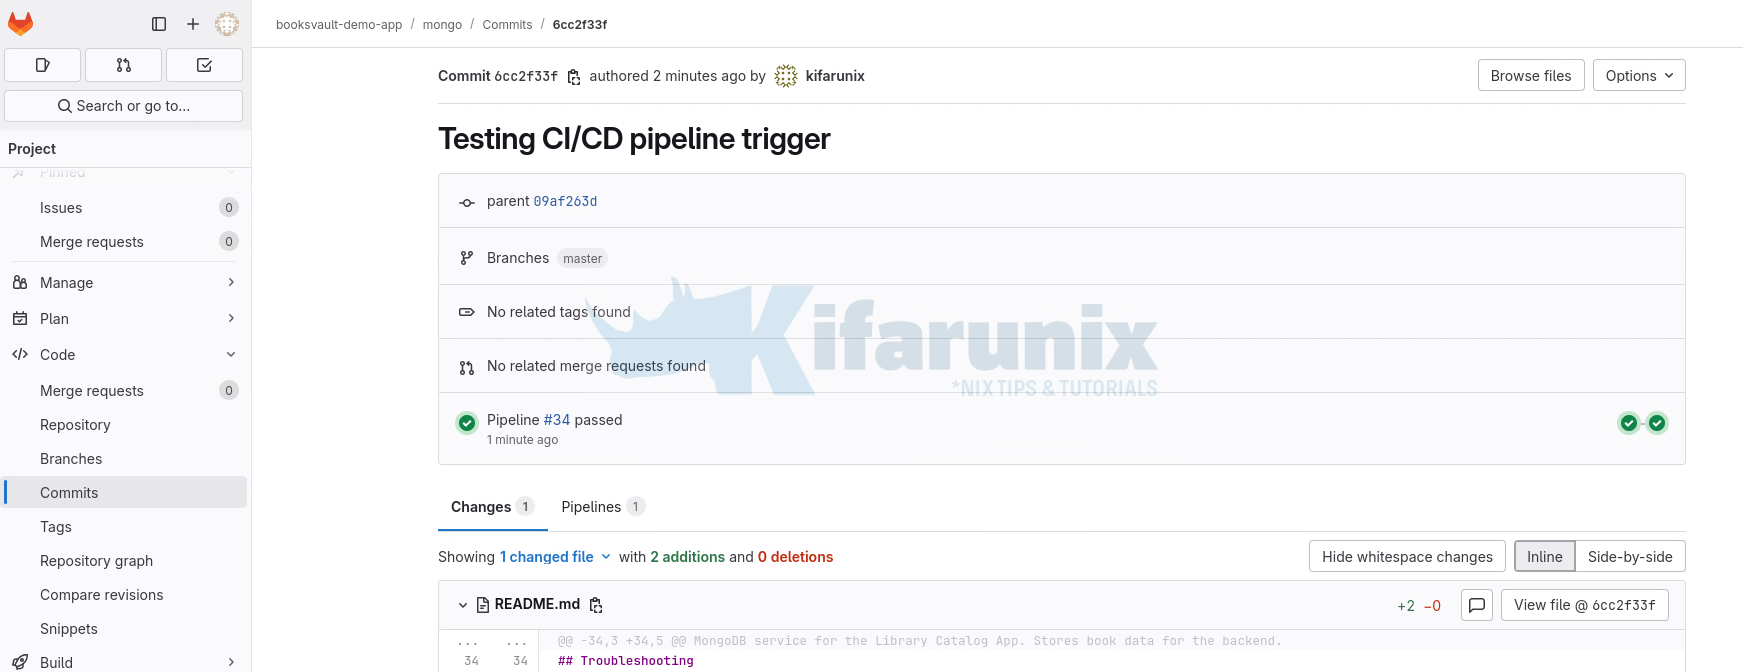
As you can see, the jobs already completed! that means MongoDB is already deployed on OpenShift.
Let’s switch over to our OpenShift CLI to check the events on the terminal. And there you go!

If you check the resources deployed:
oc get allSample MongoDB resources:
Warning: apps.openshift.io/v1 DeploymentConfig is deprecated in v4.14+, unavailable in v4.10000+
NAME                         READY   STATUS      RESTARTS   AGE
pod/mongo-1-build            0/1     Completed   0          5m2s
pod/mongo-6989dd9588-czkxp   1/1     Running     0          4m27s

NAME            TYPE        CLUSTER-IP       EXTERNAL-IP   PORT(S)     AGE
service/mongo   ClusterIP   172.30.164.129           27017/TCP   4m27s

NAME                    READY   UP-TO-DATE   AVAILABLE   AGE
deployment.apps/mongo   1/1     1            1           4m27s

NAME                               DESIRED   CURRENT   READY   AGE
replicaset.apps/mongo-6989dd9588   1         1         1       4m27s

NAME                                   TYPE     FROM         LATEST
buildconfig.build.openshift.io/mongo   Docker   Git@master   1

NAME                               TYPE     FROM          STATUS     STARTED         DURATION
build.build.openshift.io/mongo-1   Docker   Git@6cc2f33   Complete   5 minutes ago   30s

NAME                                   IMAGE REPOSITORY                                                     TAGS     UPDATED
imagestream.image.openshift.io/mongo   image-registry.openshift-image-registry.svc:5000/gitlab-cicd/mongo   latest   4 minutes ago
Let’s go back to GitLab to verify the jobs and see more details. Completion status, Passed.

Check each Pipeline job for more details. For example, the MongoDB image build Job;
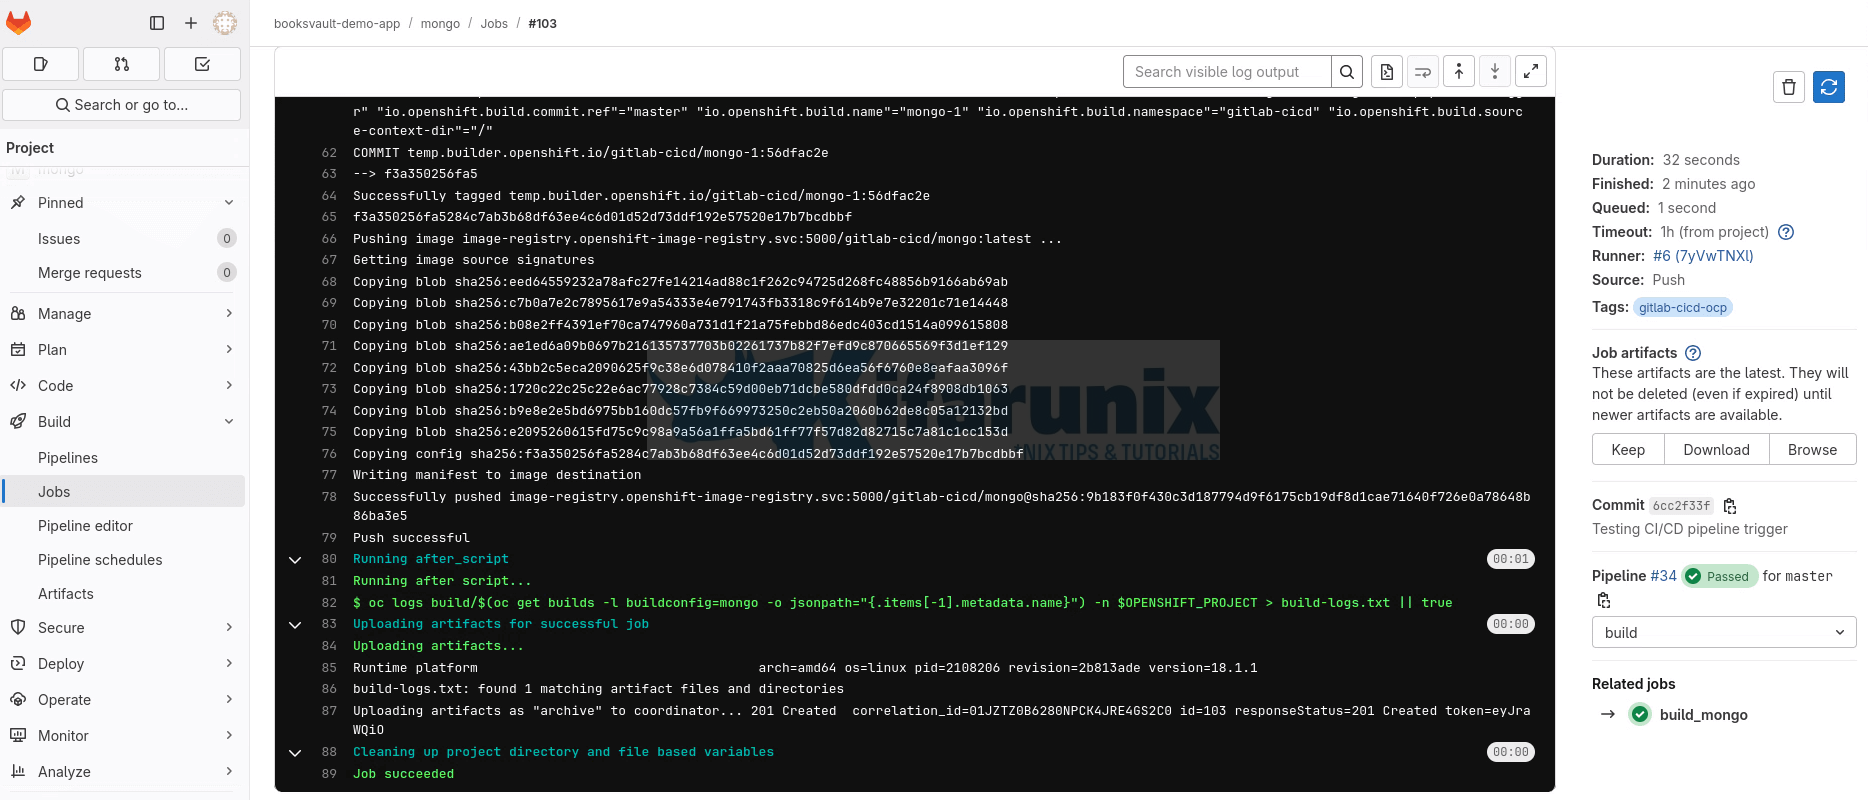
That is great!
Deploy job.
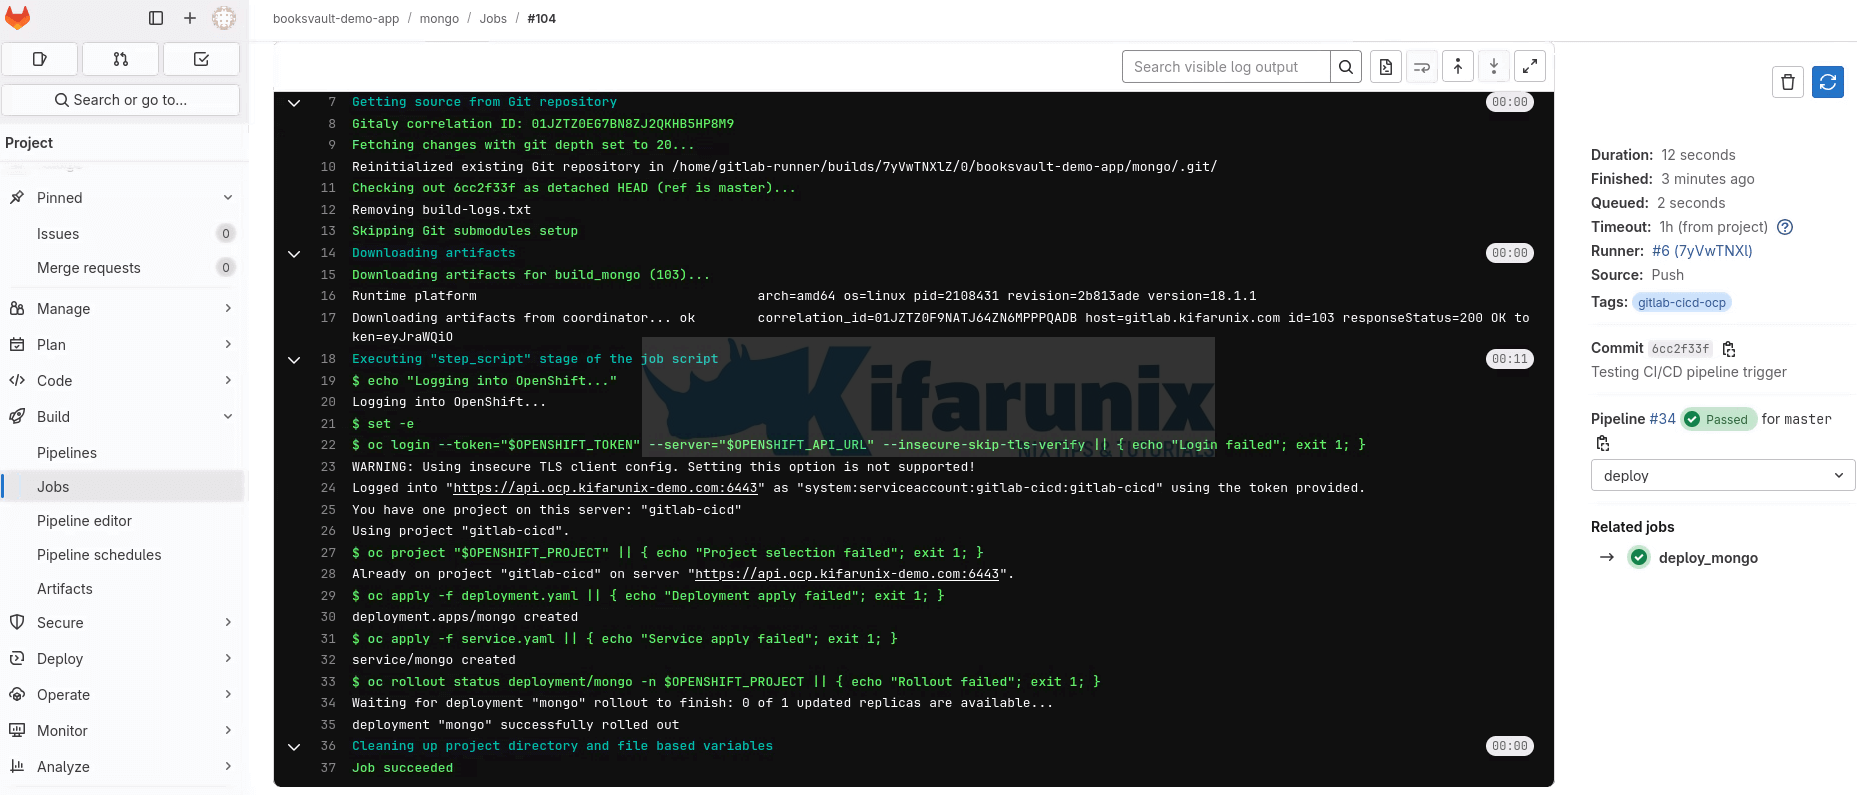
And that confirms that the GitLab CI/CD pipelines have been well integrated with OpenShift.
So, proceed to make commits on your other projects if applicable and test your pipelines.
These are our Frontend and Backend pipelines status.
Backend Pipelines status:

Frontend pipelines status:
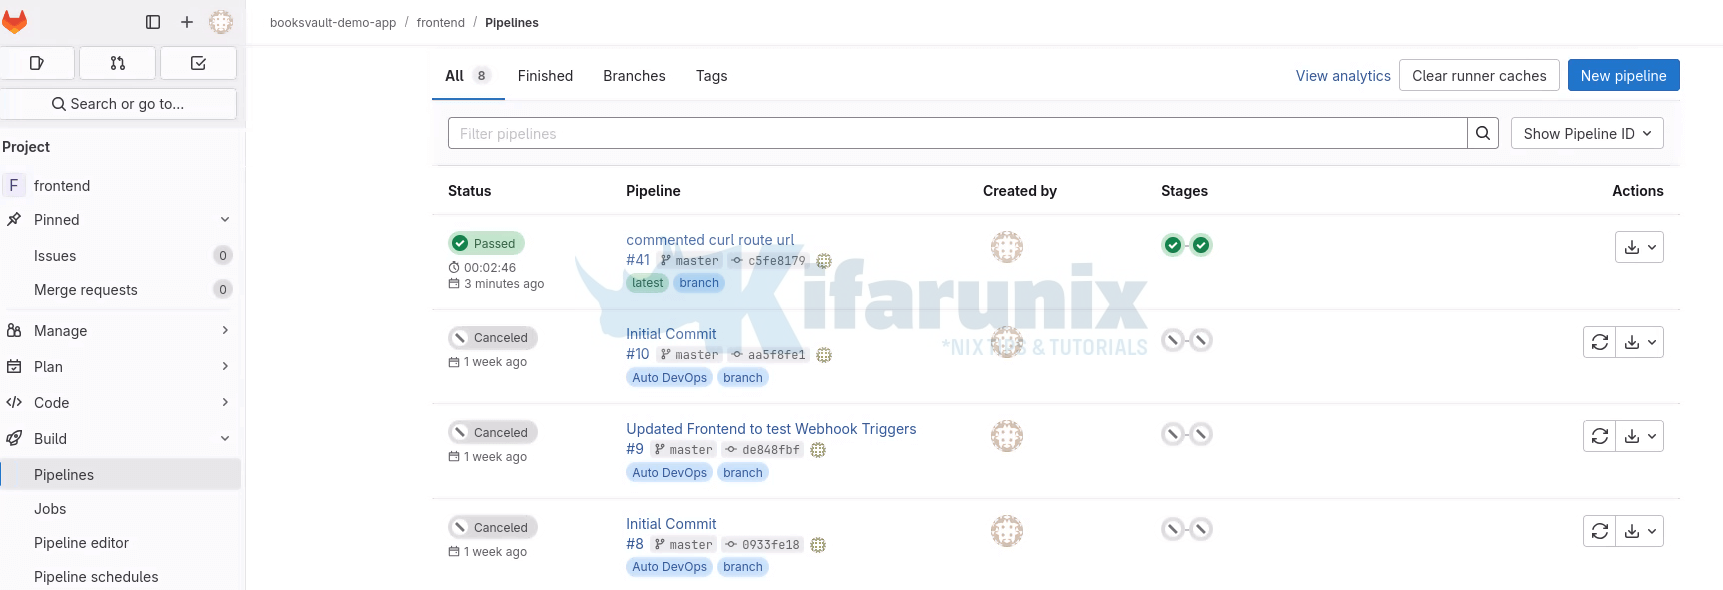
And that confirms our GitLab CI/CD pipelines to automate deployment of application on OpenShift are working as expected.
That marks the end of our demo on how to automate OpenShift deployments with GitLab CI/CD pipelines.
As part of recommendations and next steps, consider implementing the following enhancements to improve the reliability, observability, and maintainability of your deployments:
- Enable Automatic Rollbacks & Health Checks: Utilize OpenShift’s readiness and liveness probes to automatically detect unhealthy pods. Combine this with
oc rolloutstrategies to enable automated rollback in case of failed deployments. Adding health verification steps to your CI/CD test stage can also help catch issues early. - Add Monitoring and Logging: Integrate OpenShift’s built-in monitoring stack (Prometheus, Alertmanager, Grafana) or external tools to track resource usage, performance, and application health. Use centralized logging with Elasticsearch, Fluentd, and Kibana (EFK) or Loki to capture and analyze logs from all services, including CI/CD activity.
- Secure Your Secrets and Tokens: Ensure that service account tokens, image pull credentials, and database passwords are stored securely using GitLab’s CI/CD variables or OpenShift Secrets. Avoid hardcoding sensitive data in pipeline configs or manifests.
- Support Multiple Environments: Extend your pipeline to support dev, staging, and production environments using GitLab’s
rules, environment variables, and branching strategies. - Add Quality Gates: Consider incorporating tools like SonarQube, Trivy, or GitLab’s built-in SAST/DAST scanners to perform automated security and quality checks before deployment.
Conclusion
By integrating GitLab CI/CD with OpenShift, you’ve built a powerful and automated deployment pipeline that supports your applications. With the ability to build, deploy, and test code changes reliably, your team can now iterate faster while maintaining confidence in production readiness. As a next step, implementing robust monitoring, automated rollback strategies, and security controls will further harden your deployment workflow and prepare it for scaling across teams and environments.

