Follow through this tutorial to learn how to install TheHive on Ubuntu 22.04/Ubuntu 20.04 server. TheHive, according to their documentation page, is a scalable, open source and free Security Incident Response Platform designed to make life easier for SOCs, CSIRTs, CERTs and any information security practitioner dealing with security incidents that need to be investigated and acted upon swiftly.
Install TheHive on Ubuntu 22.04/Ubuntu 20.04
TheHive Components
TheHive is made up of different components;
- TheHive application itself
- Database and Data Indexing engines such as Apache Cassandra and Elasticsearch.
- File Storage components.
Every component is independent of each other and thus, TheHive can be deployed as a standalone node or in a clustered manner.
In this tutorial, we will install TheHive on Ubuntu as a standalone node.
System Resource Requirements
Depending on the number of users and how they will be using TheHive, various system resources are required. Consult the requirements page for more details.
If you are however deploying TheHive as a standalone node, then you need to provide at least 4 cores and 16 GB of RAM.
For the disk, it will depend on the data you expect to receive for analysis. Hence provide enough. We get started with 50GB of disk in this demo.
Install TheHive on Ubuntu
There are different versions of TheHive that you can install. The most recent ones are TheHive 4 and TheHive 5.
TheHive 5 is the latest release. We be installing TheHive 5 in this guide.
You can install TheHive on Ubuntu;
- hustle free by downloading and executing the install script.
- manually by installing each component separately;
Note that TheHive 5 is available as both a community version and a commercial version. We are installing a community version in this guide.
Install TheHive 5 using Install Script
Simply download the script and execute it to install TheHive automatically on Ubuntu.
wget -q -O /tmp/install.sh https://archives.strangebee.com/scripts/install.shsudo bash /tmp/install.shManually by installing each component separately;
- Install required packages;
sudo apt updatesudo apt install wget gnupg apt-transport-https git ca-certificates curl jq software-properties-common lsb-release python3-pip iproute2- Install Java;
sudo apt install openjdk-11-jre-headlessSet JAVA_HOME variable
echo JAVA_HOME="/usr/lib/jvm/java-11-openjdk-amd64" | sudo tee -a /etc/environment echo ES_JAVA_HOME="/usr/lib/jvm/java-11-openjdk-amd64" | sudo tee -a /etc/environment source /etc/environmentIf you have multiple versions of Java installed, then set Java 11 as the default Java version to use;
sudo update-java-alternatives --jre-headless -s java-1.11.0-openjdk-amd64- Install Apache Cassandra Database
Run the commands below to install Apache Cassandra Database on Ubuntu;
wget -qO - https://downloads.apache.org/cassandra/KEYS | \
sudo gpg --dearmor  > /etc/apt/trusted.gpg.d/cassandra-archive.gpg
echo "deb https://downloads.apache.org/cassandra/debian 40x main" | \
sudo tee -a /etc/apt/sources.list.d/cassandra.sources.listsudo apt updatesudo apt install cassandra- Configuring Apache Cassandra Database
By default, this is how the config looks like (with comment lines removed);
sudo grep -vE "^.*#|^$" /etc/cassandra/cassandra.yamlcluster_name: 'Test Cluster'
num_tokens: 16
allocate_tokens_for_local_replication_factor: 3
hinted_handoff_enabled: true
hinted_handoff_throttle_in_kb: 1024
max_hints_delivery_threads: 2
hints_flush_period_in_ms: 10000
max_hints_file_size_in_mb: 128
batchlog_replay_throttle_in_kb: 1024
authenticator: AllowAllAuthenticator
authorizer: AllowAllAuthorizer
role_manager: CassandraRoleManager
network_authorizer: AllowAllNetworkAuthorizer
roles_validity_in_ms: 2000
permissions_validity_in_ms: 2000
credentials_validity_in_ms: 2000
partitioner: org.apache.cassandra.dht.Murmur3Partitioner
data_file_directories:
- /var/lib/cassandra/data
commitlog_directory: /var/lib/cassandra/commitlog
cdc_enabled: false
disk_failure_policy: stop
commit_failure_policy: stop
prepared_statements_cache_size_mb:
key_cache_size_in_mb:
key_cache_save_period: 14400
row_cache_size_in_mb: 0
row_cache_save_period: 0
counter_cache_size_in_mb:
counter_cache_save_period: 7200
saved_caches_directory: /var/lib/cassandra/saved_caches
commitlog_sync: periodic
commitlog_sync_period_in_ms: 10000
commitlog_segment_size_in_mb: 32
seed_provider:
- class_name: org.apache.cassandra.locator.SimpleSeedProvider
parameters:
- seeds: "127.0.0.1:7000"
concurrent_reads: 32
concurrent_writes: 32
concurrent_counter_writes: 32
concurrent_materialized_view_writes: 32
memtable_allocation_type: heap_buffers
index_summary_capacity_in_mb:
index_summary_resize_interval_in_minutes: 60
trickle_fsync: false
trickle_fsync_interval_in_kb: 10240
storage_port: 7000
ssl_storage_port: 7001
listen_address: localhost
start_native_transport: true
native_transport_port: 9042
native_transport_allow_older_protocols: true
rpc_address: localhost
rpc_keepalive: true
incremental_backups: false
snapshot_before_compaction: false
auto_snapshot: true
snapshot_links_per_second: 0
column_index_size_in_kb: 64
column_index_cache_size_in_kb: 2
concurrent_materialized_view_builders: 1
compaction_throughput_mb_per_sec: 64
sstable_preemptive_open_interval_in_mb: 50
read_request_timeout_in_ms: 5000
range_request_timeout_in_ms: 10000
write_request_timeout_in_ms: 2000
counter_write_request_timeout_in_ms: 5000
cas_contention_timeout_in_ms: 1000
truncate_request_timeout_in_ms: 60000
request_timeout_in_ms: 10000
slow_query_log_timeout_in_ms: 500
endpoint_snitch: SimpleSnitch
dynamic_snitch_update_interval_in_ms: 100
dynamic_snitch_reset_interval_in_ms: 600000
dynamic_snitch_badness_threshold: 1.0
server_encryption_options:
internode_encryption: none
enable_legacy_ssl_storage_port: false
keystore: conf/.keystore
keystore_password: cassandra
require_client_auth: false
truststore: conf/.truststore
truststore_password: cassandra
require_endpoint_verification: false
client_encryption_options:
enabled: false
keystore: conf/.keystore
keystore_password: cassandra
require_client_auth: false
internode_compression: dc
inter_dc_tcp_nodelay: false
tracetype_query_ttl: 86400
tracetype_repair_ttl: 604800
enable_user_defined_functions: false
enable_scripted_user_defined_functions: false
windows_timer_interval: 1
transparent_data_encryption_options:
enabled: false
chunk_length_kb: 64
cipher: AES/CBC/PKCS5Padding
key_alias: testing:1
key_provider:
- class_name: org.apache.cassandra.security.JKSKeyProvider
parameters:
- keystore: conf/.keystore
keystore_password: cassandra
store_type: JCEKS
key_password: cassandra
tombstone_warn_threshold: 1000
tombstone_failure_threshold: 100000
replica_filtering_protection:
cached_rows_warn_threshold: 2000
cached_rows_fail_threshold: 32000
batch_size_warn_threshold_in_kb: 5
batch_size_fail_threshold_in_kb: 50
unlogged_batch_across_partitions_warn_threshold: 10
compaction_large_partition_warning_threshold_mb: 100
audit_logging_options:
enabled: false
logger:
- class_name: BinAuditLogger
diagnostic_events_enabled: false
repaired_data_tracking_for_range_reads_enabled: false
repaired_data_tracking_for_partition_reads_enabled: false
report_unconfirmed_repaired_data_mismatches: false
enable_materialized_views: false
enable_sasi_indexes: false
enable_transient_replication: false
enable_drop_compact_storage: false
There are only a few things we are going to change on the Cassandra configuration and that is the cluster name.
sudo sed -i '/cluster_name/s/Test Cluster/thehive/' /etc/cassandra/cassandra.yamlNext, if the service was started just after the installation, you need to remove previous data written just after it was started after installation.
First of all, check if Cassandra service is started after the installation;
systemctl status cassandraIf not running, then it is fine.
Otherwise, stop and delete the its data;
sudo systemctl stop cassandrasudo rm -rf /var/lib/cassandra/*The Start Cassandra service again;
sudo systemctl start cassandraCheck status;
systemctl status cassandra● cassandra.service - LSB: distributed storage system for structured data
Loaded: loaded (/etc/init.d/cassandra; generated)
Active: active (running) since Thu 2022-10-27 16:10:44 UTC; 11s ago
Docs: man:systemd-sysv-generator(8)
Process: 37345 ExecStart=/etc/init.d/cassandra start (code=exited, status=0/SUCCESS)
Tasks: 52 (limit: 4610)
Memory: 1.2G
CGroup: /system.slice/cassandra.service
└─37457 /usr/bin/java -ea -da:net.openhft... -XX:+UseThreadPriorities -XX:+HeapDumpOnOutOfMemoryError -Xss256k -XX:+AlwaysPreTouch -XX:-UseBiasedLocking -XX:+>
Oct 27 16:10:44 ubuntu20 systemd[1]: Starting LSB: distributed storage system for structured data...
Oct 27 16:10:44 ubuntu20 systemd[1]: Started LSB: distributed storage system for structured data.
On Standalone nodes, it is recommended to remove any Cassandra tombstones. Whenever data is deleted from Cassandra, it is not immediately purged from the system. They are added a value called tombstone to mark data as deleted.
Tombstones need to be removed in a number of tables. To find out which tables to remove tombstones from;
cqlsh -u cassandra -p cassandra -e "SELECT table_name,gc_grace_seconds FROM system_schema.tables WHERE keyspace_name='thehive'"Tombstones can be removed by setting the value of gc_grace_seconds to 0 on the respective table.
- Install Elasticsearch 7.x (the only version currently supported)
wget -qO - https://artifacts.elastic.co/GPG-KEY-elasticsearch | \
sudo gpg --dearmor > /etc/apt/trusted.gpg.d/elasticsearch-keyring.gpg
echo "deb https://artifacts.elastic.co/packages/7.x/apt stable main" | \
sudo tee /etc/apt/sources.list.d/elastic-7.x.listsudo apt updatesudo apt install elasticsearch- Configure Elasticsearch
There is only a few changes we are going to make on the default Elasticsearch config. That is the cluster name.
sudo sed -i '/cluster.name/s/^#//;s/my-application/thehive/' /etc/elasticsearch/elasticsearch.ymlUpdate JVM heap size based on the system memory (not more than 50% of total RAM).
Also, disable message formatting;
sudo tee -a /etc/elasticsearch/jvm.options.d/jvm.options << 'EOL'
-Xms1g
-Xmx1g
-Dlog4j2.formatMsgNoLookups=true
EOL
Remove any previous Elasticsearch data, restart and enable it to run on system boot;
sudo rm -rf /var/lib/elasticsearch/*sudo systemctl restart elasticsearchsudo systemctl enable elasticsearchConfirm it is running;
systemctl status elasticsearch● elasticsearch.service - Elasticsearch
Loaded: loaded (/lib/systemd/system/elasticsearch.service; enabled; vendor preset: enabled)
Active: active (running) since Thu 2022-10-27 17:24:45 UTC; 5s ago
Docs: https://www.elastic.co
Main PID: 43754 (java)
Tasks: 73 (limit: 4610)
Memory: 1.3G
CGroup: /system.slice/elasticsearch.service
├─43754 /usr/share/elasticsearch/jdk/bin/java -Xshare:auto -Des.networkaddress.cache.ttl=60 -Des.networkaddress.cache.negative.ttl=10 -XX:+AlwaysPreTouch -Xss>
└─43957 /usr/share/elasticsearch/modules/x-pack-ml/platform/linux-x86_64/bin/controller
Oct 27 17:24:26 ubuntu20 systemd[1]: Starting Elasticsearch...
Oct 27 17:24:45 ubuntu20 systemd[1]: Started Elasticsearch.
Confirm!
sudo ss -altnp | grep :9200LISTEN 0 1024 [::ffff:127.0.0.1]:9200 *:*
LISTEN 0 1024 [::1]:9200 [::]:*- Install TheHive 5 on Ubuntu 22.04/Ubuntu 20.04
Next, install TheHive 5 on Ubuntu as follows;
wget -qO- https://archives.strangebee.com/keys/strangebee.gpg | \
sudo gpg --dearmor > /etc/apt/trusted.gpg.d/strangebee-archive-keyring.gpg
echo 'deb https://deb.strangebee.com thehive-5.x main' | \
sudo tee /etc/apt/sources.list.d/strangebee.listsudo apt updatesudo apt install thehive- Configure TheHive 5 on Ubuntu
The default configurations are good enough for the standalone deployments;
sudo grep -vE "^.*#|^$" /etc/thehive/application.confinclude "/etc/thehive/secret.conf"
db.janusgraph {
storage {
backend = cql
hostname = ["127.0.0.1"]
cql {
cluster-name = thp
keyspace = thehive
}
}
index.search {
backend = elasticsearch
hostname = ["127.0.0.1"]
index-name = thehive
}
}
storage {
provider = localfs
localfs.location = /opt/thp/thehive/files
}
play.http.parser.maxDiskBuffer = 1GB
play.http.parser.maxMemoryBuffer = 10M
application.baseUrl = "http://localhost:9000"
play.http.context = "/"
scalligraph.modules += org.thp.thehive.connector.cortex.CortexModule
scalligraph.modules += org.thp.thehive.connector.misp.MispModule
However, let’s make a few changes;
Update Cassandra cluster to match what is defined on the cluster;
sed -i 's/cluster-name = thp/cluster-name = thehive/' /etc/thehive/application.confThat is just it for now.
Please note that Cortex and MISP modules are enabled by default;
scalligraph.modules += org.thp.thehive.connector.cortex.CortexModule
scalligraph.modules += org.thp.thehive.connector.misp.MispModuleStart and enable TheHive;
sudo systemctl start thehive
sudo systemctl enable thehive
Check the status;
● thehive.service - Scalable, Open Source and Free Security Incident Response Solutions
     Loaded: loaded (/lib/systemd/system/thehive.service; enabled; vendor preset: enabled)
     Active: active (running) since Thu 2022-10-27 18:08:37 UTC; 10s ago
       Docs: https://thehive-project.org
   Main PID: 47824 (java)
      Tasks: 55 (limit: 4610)
     Memory: 375.4M
     CGroup: /system.slice/thehive.service
             └─47824 java -Dconfig.file=/etc/thehive/application.conf -Dlogger.file=/etc/thehive/logback.xml -Dpidfile.path=/dev/null -cp /opt/thehive/lib/org.thp.thehive->

Oct 27 18:08:37 ubuntu20 systemd[1]: Started Scalable, Open Source and Free Security Incident Response Solutions.
Accessing TheHive Web User Interface
TheHive is now up and running.
You can access the web interface via http://IP-OR-Hostname:9000.
The default login credentials for TheHive are;
- Username: [email protected]
- Password: secret
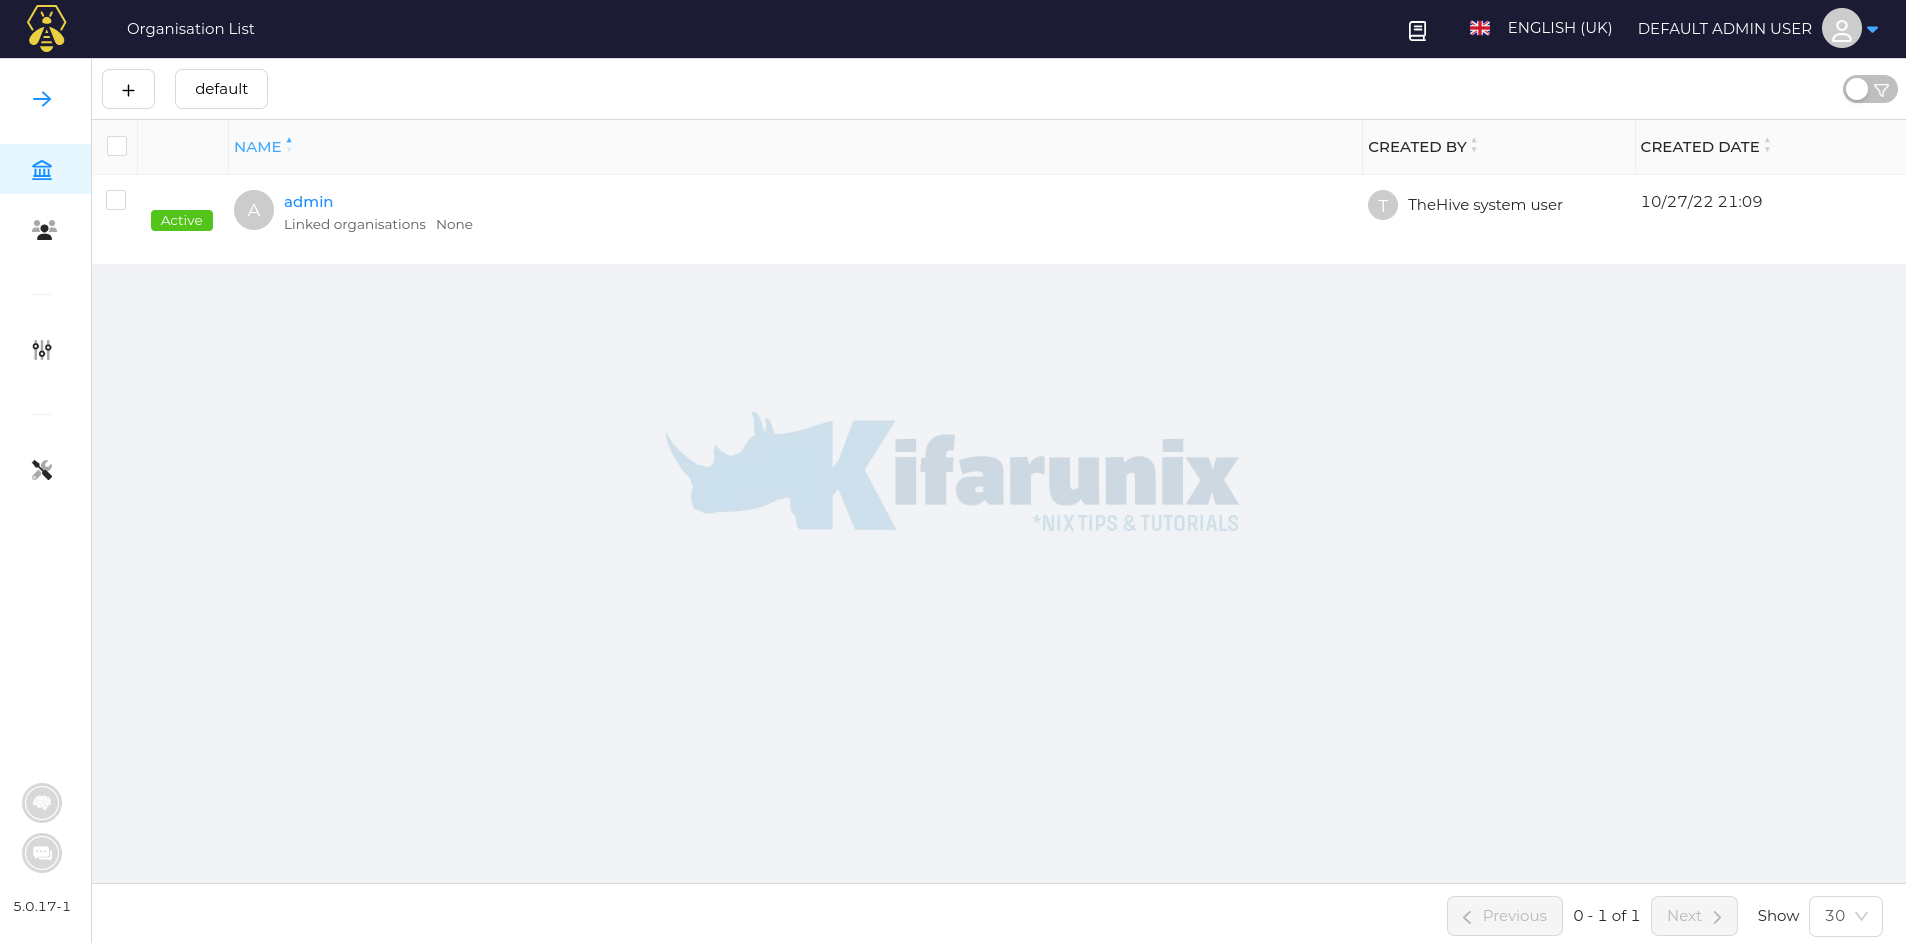
Once you login, you land on TheHive administrative web interface, Organizations menu.
You can reset the default admin password from the account settings.
- Click Users menu on the left pane.
- Hover your mouse over the admin user entry and click Preview.

- This opens up User settings page.
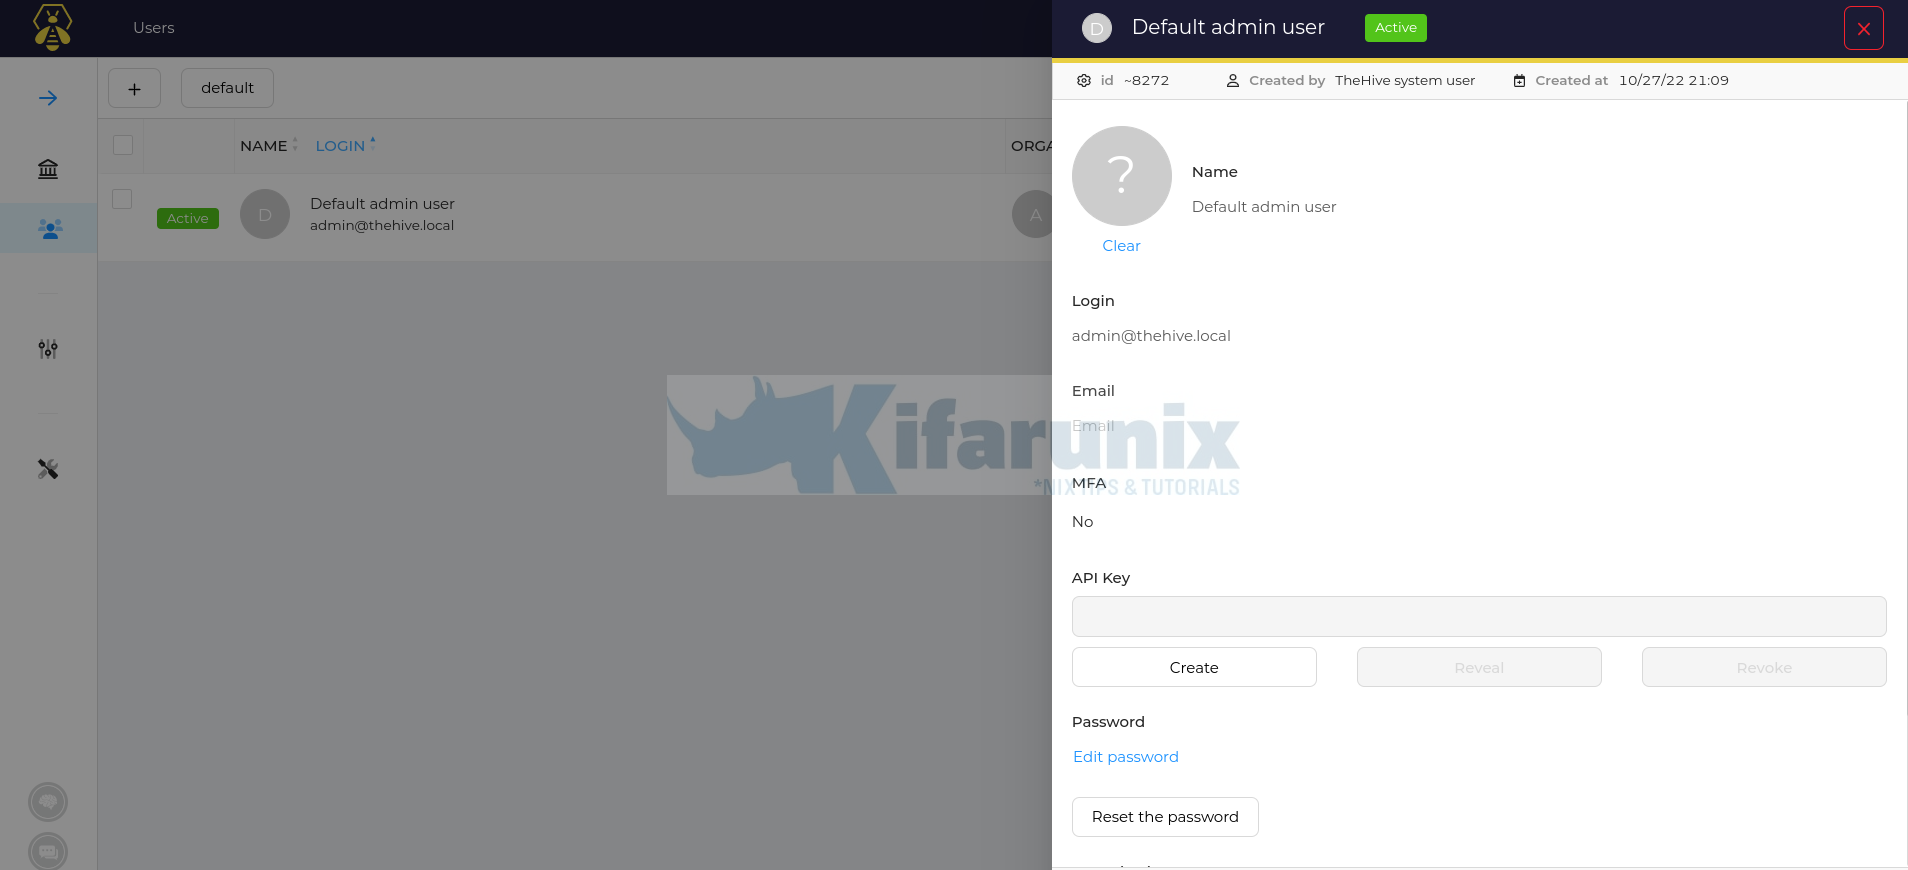
- Click Edit Password
- Enter your new password
- Click Confirm to save the password.
- Log out and login again using your new password.
You can as well add another system wide administrative user.
Creating an Organization on TheHive
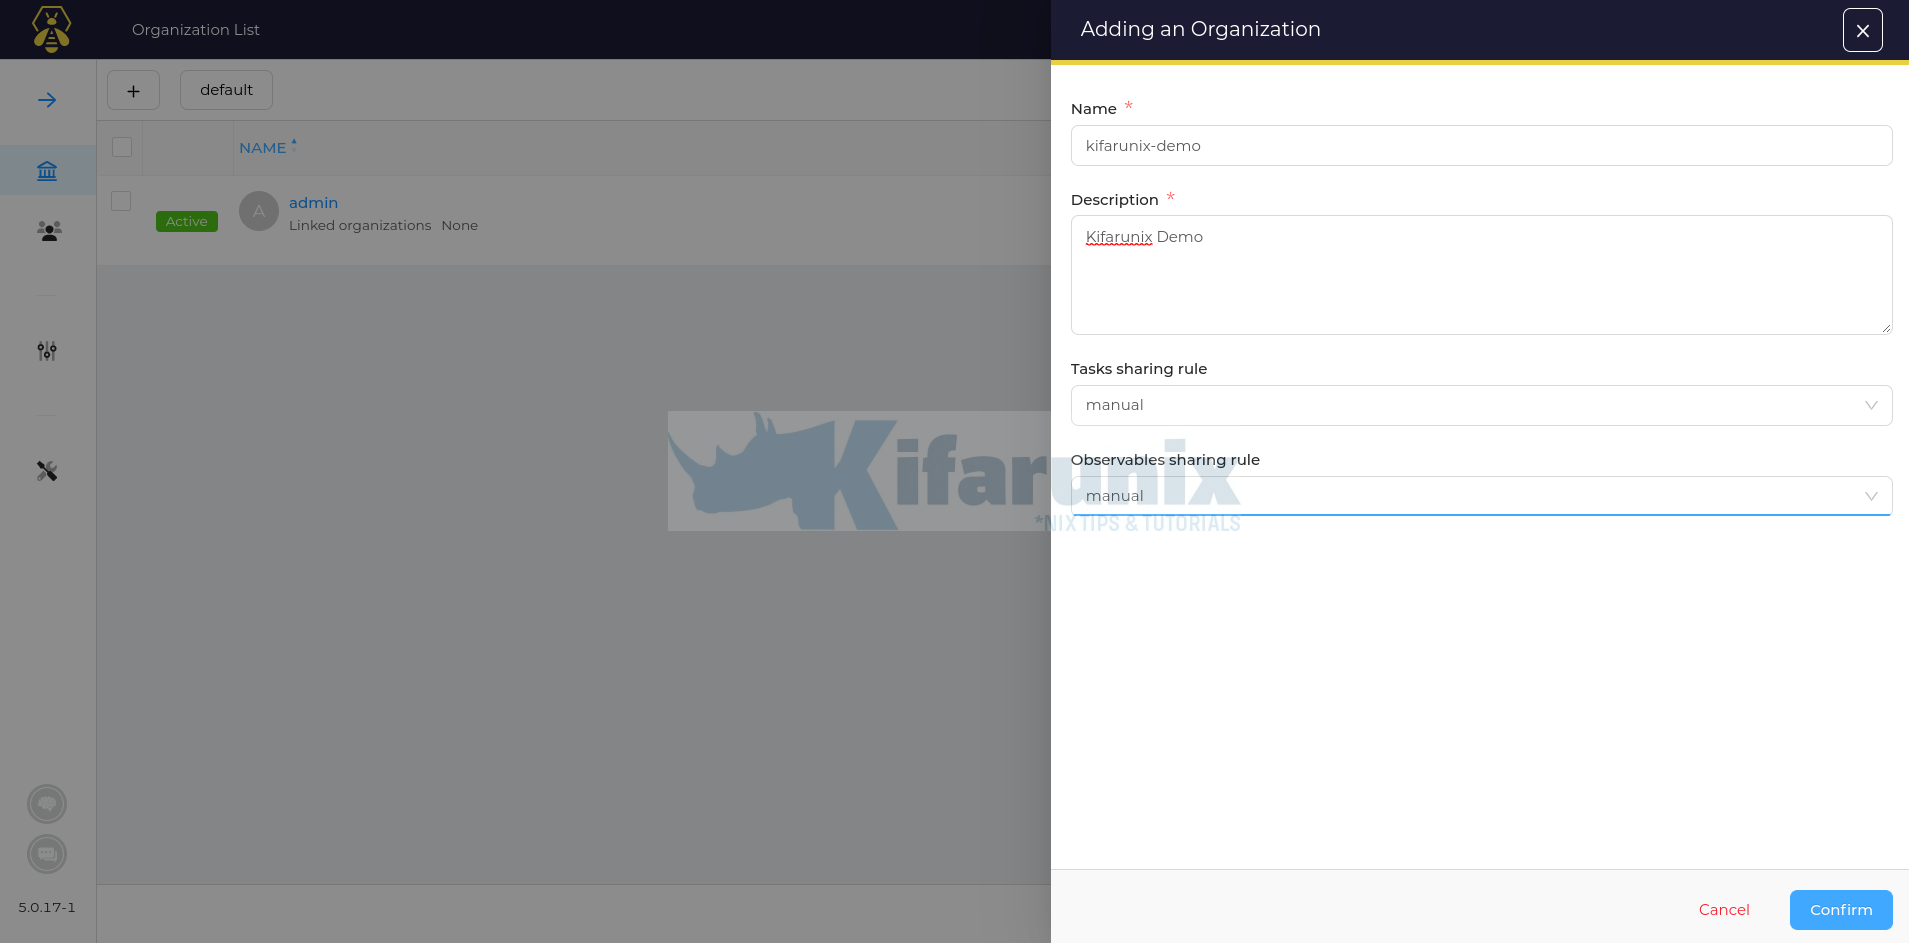
On the Organizations menu, click + button to add an organization.
Enter the name, description and you can leave the rest of the options with default values.
Click Confirm to add an organization.
Create TheHive Organization Administrative User
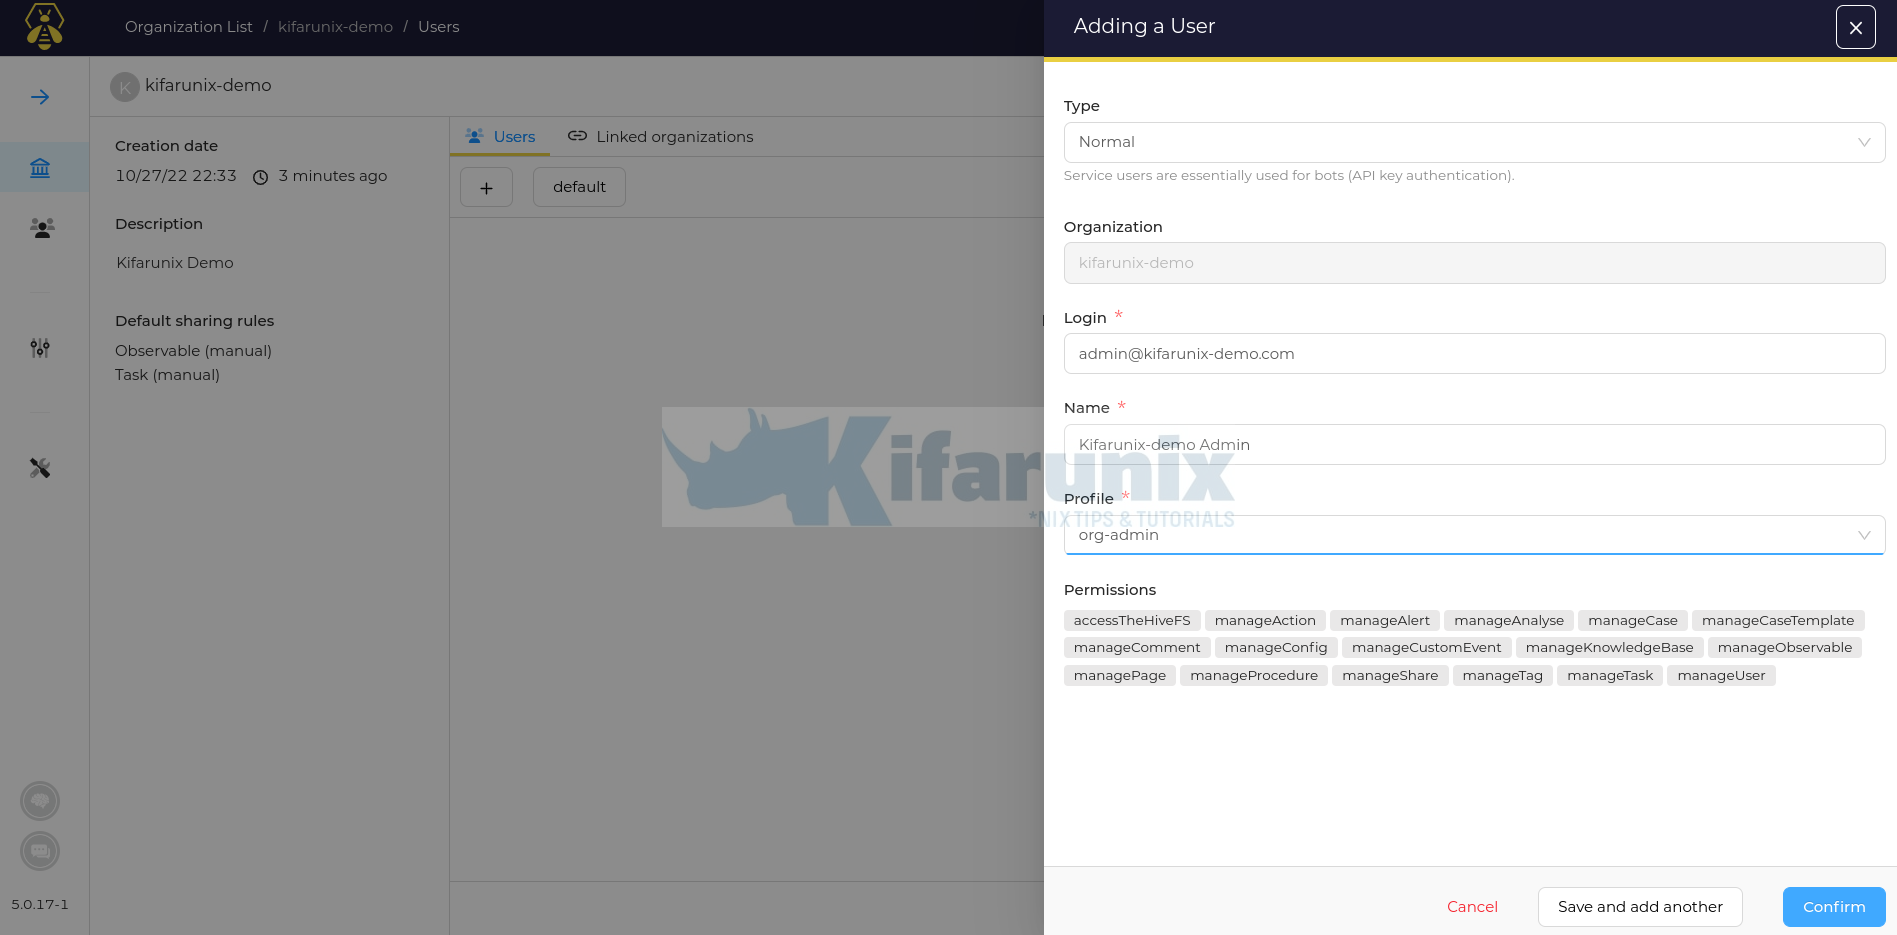
Create your Organization admin user by clicking on the specific Organization > Users > +;
Enter the login username, the name and choose the privileges (org-admin).
You can save and add another or confirm the addition of the current users.
You can see the user on the Users menu;
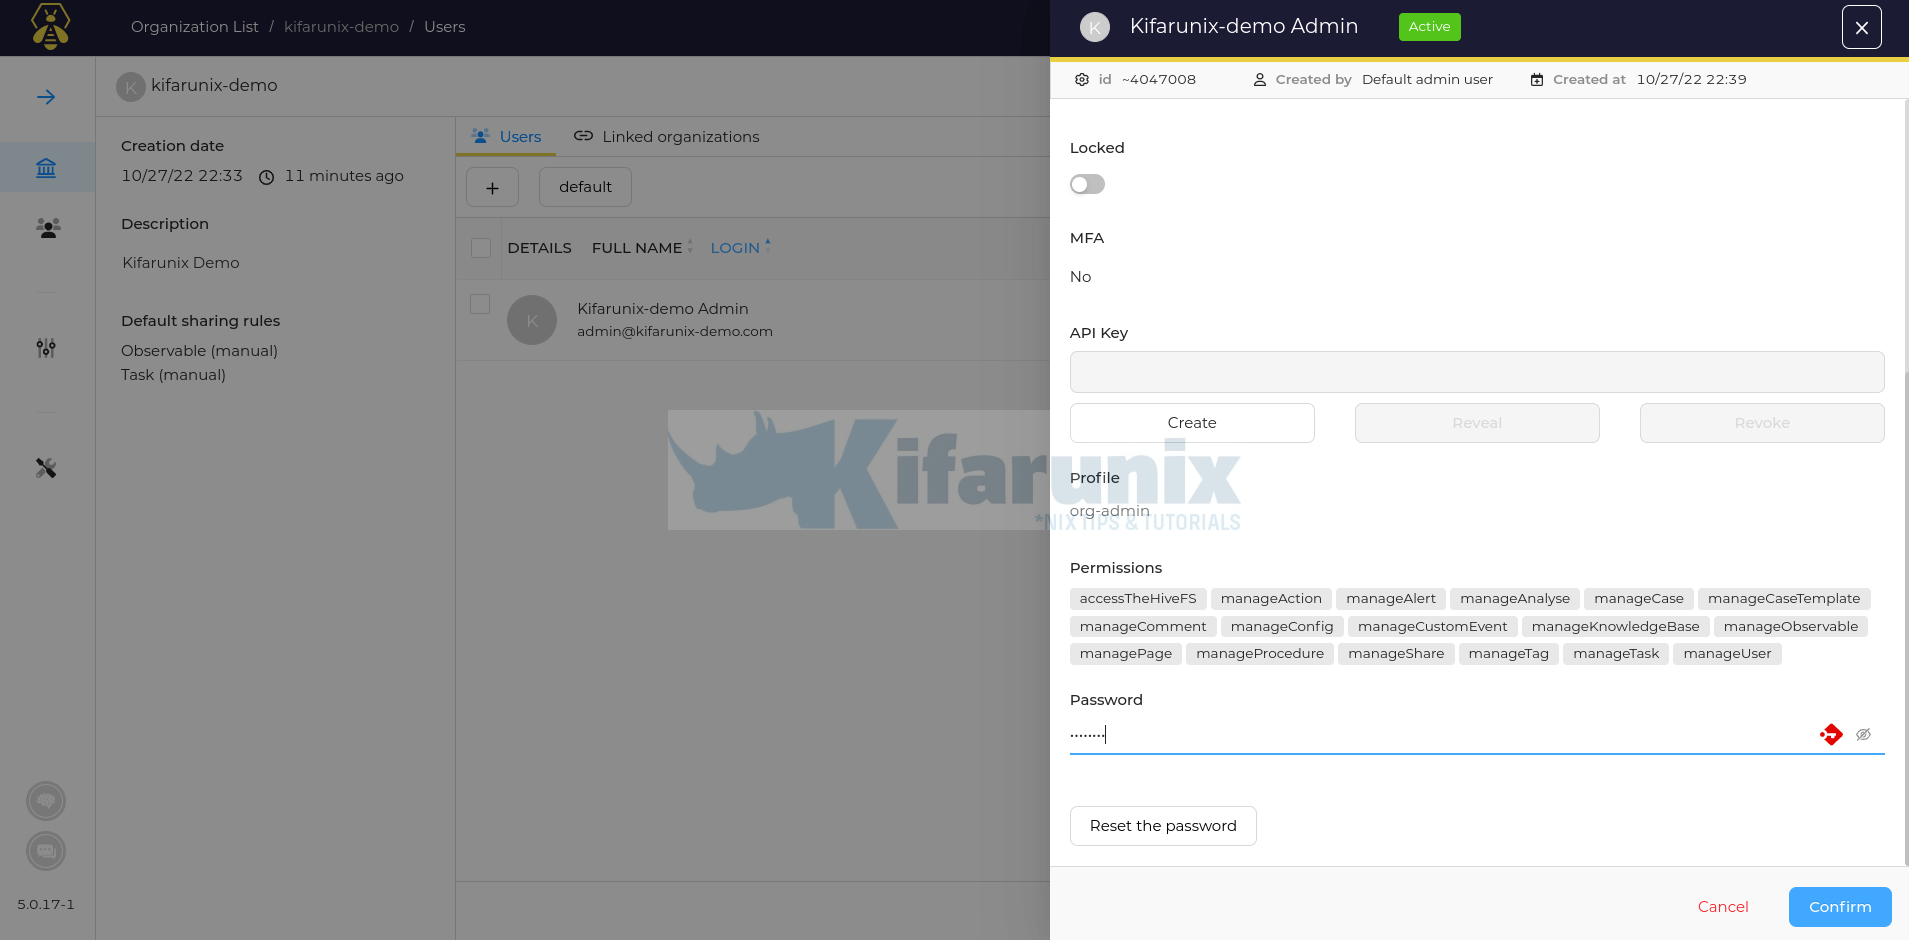
To set the users password, hover your mouse over the user and click preview.
Scroll down the preview page and set the password.
You should then be able to login as the new user to access your organization and see a different dashboard as before/
That closes our guide on installing TheHive on Ubuntu.
In the meantime, you can explore TheHive further.






Hi,
The auto script at the start will not work on ubuntu 22.
Thanks
Hi,
Also, will not work.
sudo sed -i ‘/cluster.name/s/^#//;s/my-application/thehive/’ /etc/elasticsearch/elasticsearch.yml
okay, do you have a command that works? Please share in the comments