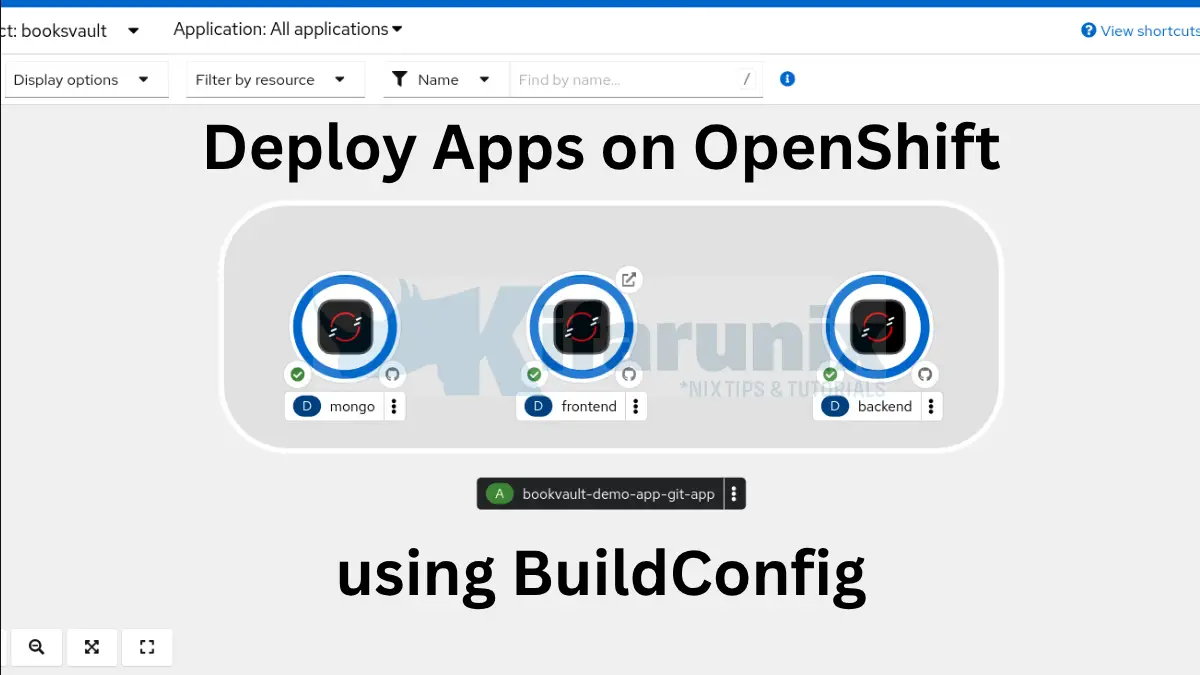
In this tutorial, I will walk you through how to deploy apps on OpenShift using BuildConfig. OpenShift has become the go-to platform for enterprise-grade Kubernetes deployments. One of its most powerful features is the BuildConfig object, a declarative way to efficiently automate the process of building application images directly from source code repositories. In this step-by-step guide, we’ll walk you through how to deploy a multi-tier web application on OpenShift using BuildConfig, focusing on a Docker-based project.
This tutorial uses a sample Book Library Catalog App with three tiers: React frontend, Node.js backend, and MongoDB database hosted on a Github repository. By the end of this guide, you’ll understand how to build and deploy each component using OpenShift BuildConfigs.
Table of Contents
How to Deploy Apps on OpenShift Using BuildConfig
Prerequisites
Before we begin, ensure you have:
- Access to OpenShift cluster. We are running OpenShift cluster v4.18.
- Access to oc CLI tool
- Git repository with your application code. We are using our own private Git repository for demo.
- Docker knowledge (basic understanding of Dockerfiles)
- Access tokens for private Git repositories
Understanding OpenShift BuildConfig
A BuildConfig in OpenShift defines how to build application images from source code. It automates pulling code from repositories, building it using strategies like Docker builds or Source-to-Image (S2I), and optionally triggering new deployments.
Key BuildConfig components:
- Source Code Location/Source: specifies the location of the source code
- Build Triggers: Automatically initiate builds on GitHub commits, image changes, or manual start.
- Build Strategies: Docker, S2I, or Custom build options.
- Output: Points to an OpenShift ImageStream where the built image is stored.
We have extensively covered the essentials of OpenShift BuildConfig and build process. Read more on the link below;
OpenShift Builds and BuildConfig Essentials: A Comprehensive Guide
Git Project Structure
Below is the structure of our project hosted on a private Git repository;
├── backend
│   ├── Dockerfile           # Docker image definition for the backend API service
│   ├── package.json         # Backend dependencies and scripts
│   └── server.js            # Main backend server application code
├── docker-compose.yml       # Compose file for local multi-container setup
├── frontend
│   ├── Dockerfile           # Docker image definition for the frontend web app
│   ├── nginx.conf           # Nginx configuration to serve frontend assets
│   ├── package.json         # Frontend dependencies and scripts
│   ├── public
│   │   └── index.html       # Main HTML file for the frontend app
│   └── src                  # React application source code
│       ├── App.css          # Styling for the frontend app
│       ├── App.js           # Main React app component
│       └── index.js         # React app entry point
├── mongo
│   └── Dockerfile           # Custom Dockerfile for MongoDB database container
└── README.md                # Project documentation and instructions
As already mentioned, this project consists of three main components:
- the backend API
- the frontend React application, and
- a MongoDB database
Each component is containerized with its own Dockerfile to enable independent building and deployment. The included docker-compose.yml facilitates easy local development by orchestrating all services together. This structure is designed to support seamless deployment to OpenShift, where each component is built and deployed separately using BuildConfigs and their respective context directories.
restricted-v2 SecurityContextConstraints (SCC).
How OpenShift Automates App Deployment from Git
When you import an application from Git in OpenShift, OpenShift automatically generates all the necessary resources to build, deploy, and expose your application. This automation eliminates the need to manually create builds, deployments, or services. Instead, OpenShift handles it for you based on your source repository and selected options.
The following resources are created automatically:
- BuildConfig: Defines how the application should be built (e.g., using a Dockerfile or Source-to-Image).
- Build: A build is triggered immediately based on the BuildConfig to produce a runnable container image.
- ImageStream: Stores the built image in OpenShift’s internal image registry and tracks versions.
- Deployment: Deploys your application using the most recent image from the ImageStream.
- Service: Exposes your application internally within the cluster via a stable DNS name and port.
- Route (optional): Exposes the service externally so the app can be accessed over HTTP or HTTPS.
This allows you to go from code to a running application with minimal effort, especially when working with common application patterns.
Let’s now see that in action by deploying each tier of our application.
Deploy a 3-Tier Application on OpenShift using BuildConfigs
Step 1: Create OpenShift Project
Create a separate namespace to isolate your application components. We will create a project named, booksvault. You can use any suitable name for your project.
You can create project from OpenShift web console or from CLI using oc command.
To create a project from web console, login to OpenShift web and navigate to Administrator view > Home > Projects > Create Project. You can also do it from Developer view > +Add > create a Project.
Set the name of the project and optionally define the display name and the description.
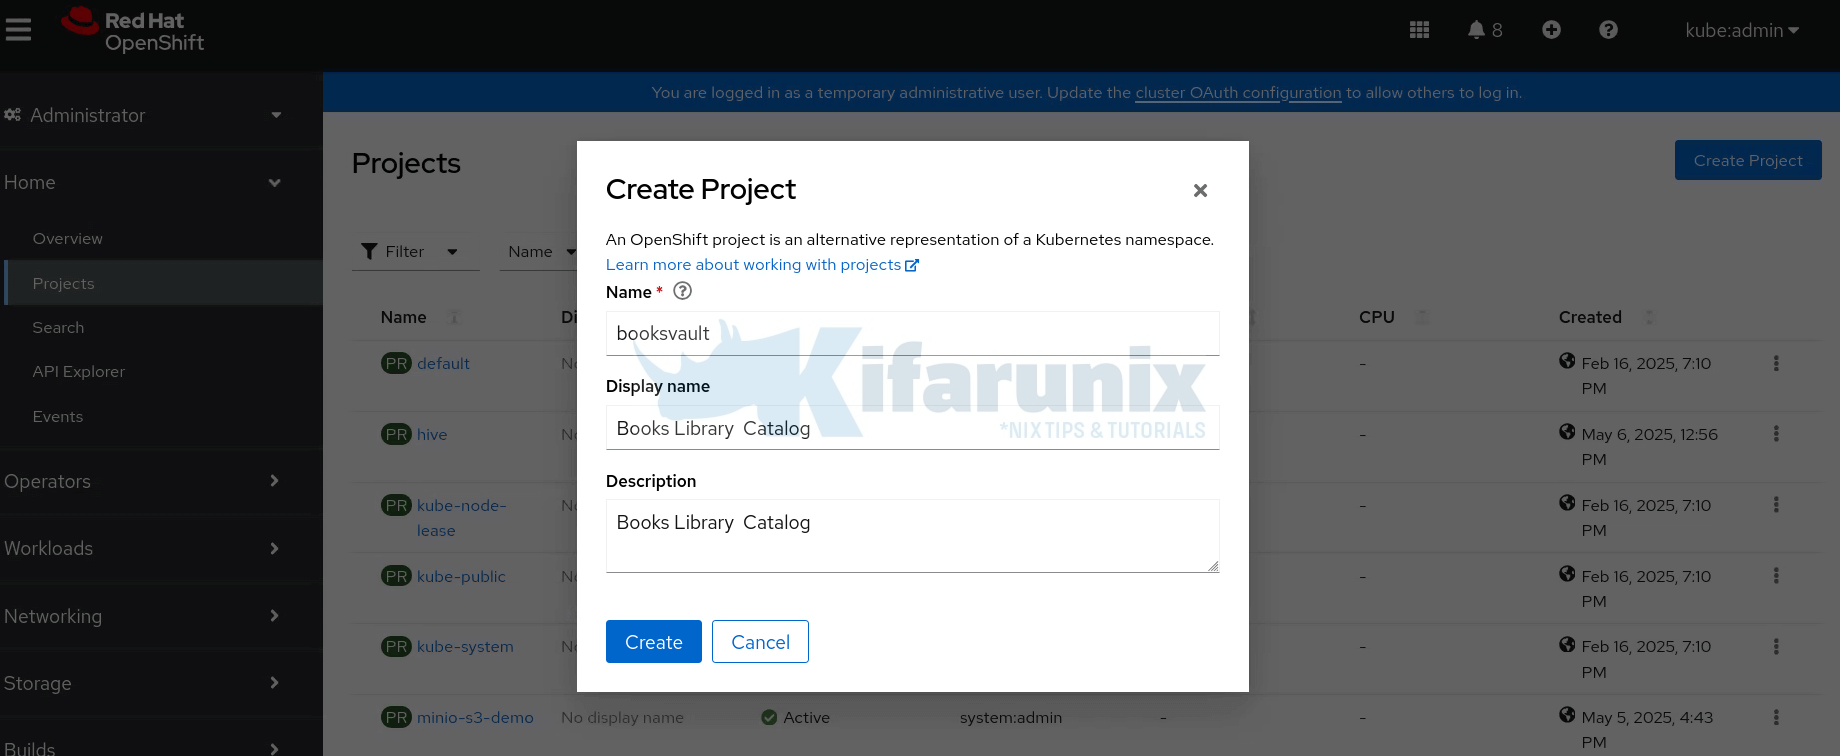
Click Create to create the project.
You can create a project from CLI (Replace PROJECT_NAME with your suitable name):
oc new-project PROJECT_NAMEStep 2: Update Security Context Constraints (SCC) to Allow MongoDB to Run
When deploying MongoDB in an OpenShift cluster, permission issues can prevent the pod from performing operations like writing to the /data/db/ directory (default Mongo Data Directory), leading to errors such as: “Error creating journal directory”,”attr”:{“directory”:”/data/db/”}. This often happens because OpenShift’s default restricted-v2 SCC enforces a random user ID, which may not match the MongoDB container’s default user, mongodb (UID 999). While granting the anyuid SCC to the default service account allows MongoDB to run as UID 999, a more secure approach is to create a custom SCC that permits only UID 999. This limits the container’s privileges to exactly what MongoDB needs, following the principle of least privilege.
Read more about SCCs here:
Understanding OpenShift Security Context Constraints: The Complete Guide
Control OpenShift Pod Permissions with SCCs and Service Accounts
Since this is a demo task, we’ll use the default service account in the project (namespace) to manage our deployments. To allow MongoDB to run as UID 999, we’ll create a custom SCC and assign it to the default service account. This gives MongoDB the specific permissions it needs without granting broader privileges like the anyuid SCC would.
Here is the manifest of our custom SCC:
cat mongo-scc.yamlapiVersion: security.openshift.io/v1
kind: SecurityContextConstraints
metadata:
name: mongodb
allowHostDirVolumePlugin: false
allowHostIPC: false
allowHostNetwork: false
allowHostPID: false
allowHostPorts: false
allowPrivilegeEscalation: false
allowPrivilegedContainer: false
allowedCapabilities:
- NET_BIND_SERVICE
defaultAddCapabilities: null
fsGroup:
type: MustRunAs
readOnlyRootFilesystem: false
requiredDropCapabilities:
- ALL
runAsUser:
type: MustRunAs
uid: 999
seLinuxContext:
type: MustRunAs
seccompProfiles:
- runtime/default
supplementalGroups:
type: RunAsAny
users: []
groups: []
volumes:
- configMap
- csi
- downwardAPI
- emptyDir
- ephemeral
- persistentVolumeClaim
- projected
- secret
Create the SCC:
oc apply -f mongo-scc.yamlAs already mentioned, we are using the default service account. Therefore, bind the SCC created above to the default service account on your respective project:
Switch to the Project:
oc project booksvaultBind the SCC to the default service account.
oc adm policy add-scc-to-user mongodb -z defaultThis should now allow MongoDB to run seamlessly on OpenShift.
Step 3: Deploy the Database Tier
MongoDB is our application database. In the Git repository, the MongoDB Dockerfile is located under mongo/Dockerfile. As such, /mongo will be our Git source context directory.
To deploy the DB therefore, from the UI, switch to Developer view > +Add > select your Project from the list > Git Repository > Import from Git.
Next, obtain the HTTPs link to your application Git repository and paste as the value to Git Repo URL:
- If the application resides in separate directory within the main repository, you need to specify the path
- If the repository is private, you need to set the access tokens.
- If you are building from specific branch, tag or commit, you need to specify the same Git reference.
You can access all these options by clicking Show advanced Git options.
If you have not created the secret yet, under advanced Git options, select the secret source > Create new secret:
- Set the name of the secret
- Set the authentication type (We use basic authentication here)
- Set the username and access token. The user account must have access to the repository.
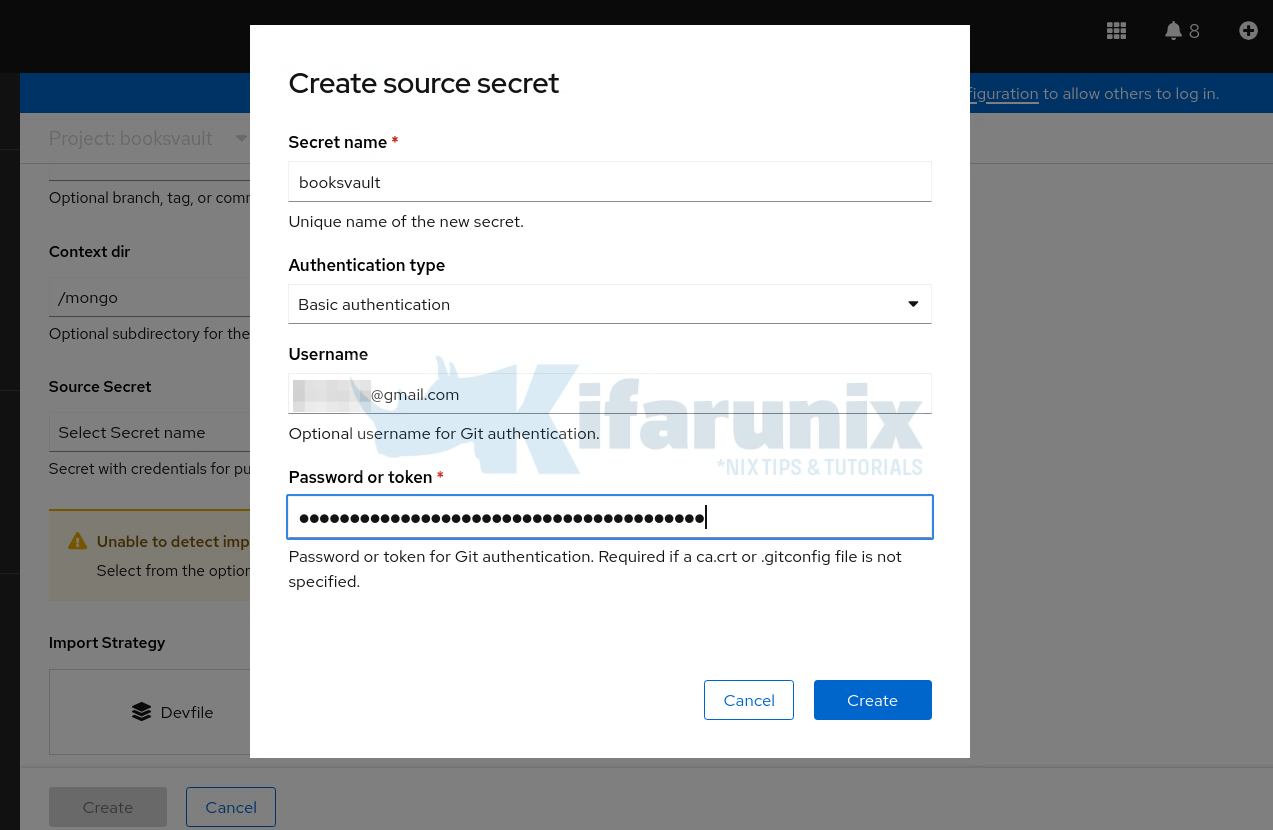
Click Create to create the secret.
So far, your import from Git deployment now looks like:
Git Options (Github):
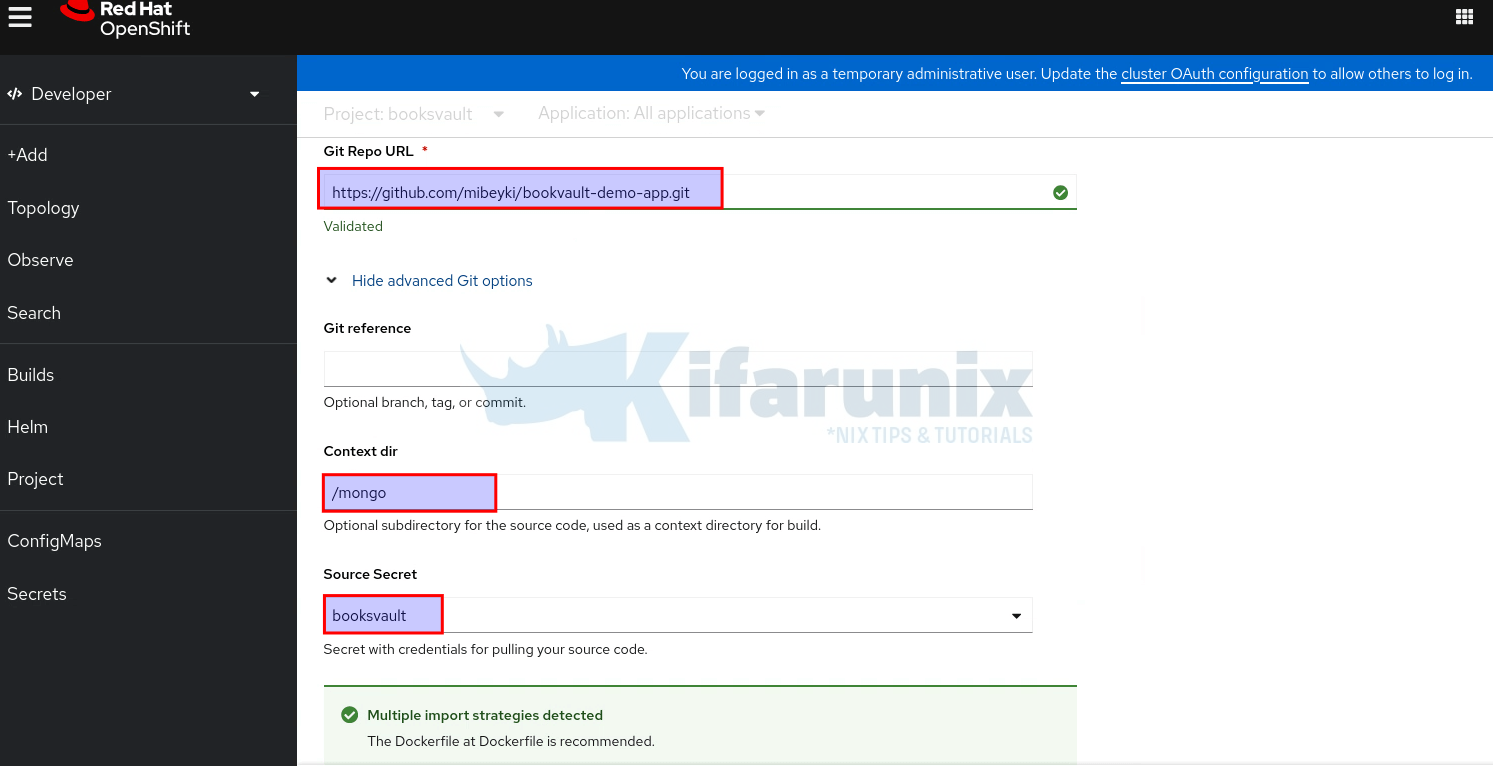
As you can see, multiple build strategies are detected, but since we have a Dockerfile in the application context directory, Docker build strategy becomes the default.
Git Options (Gitlab):
If you were connecting to your local Gitlab server:
- Enter the Git repo url
- Select GitLab under Git type.

Next, expand the Show Advanced Git options:
- define your source code branch (optional) for Git reference (ref).
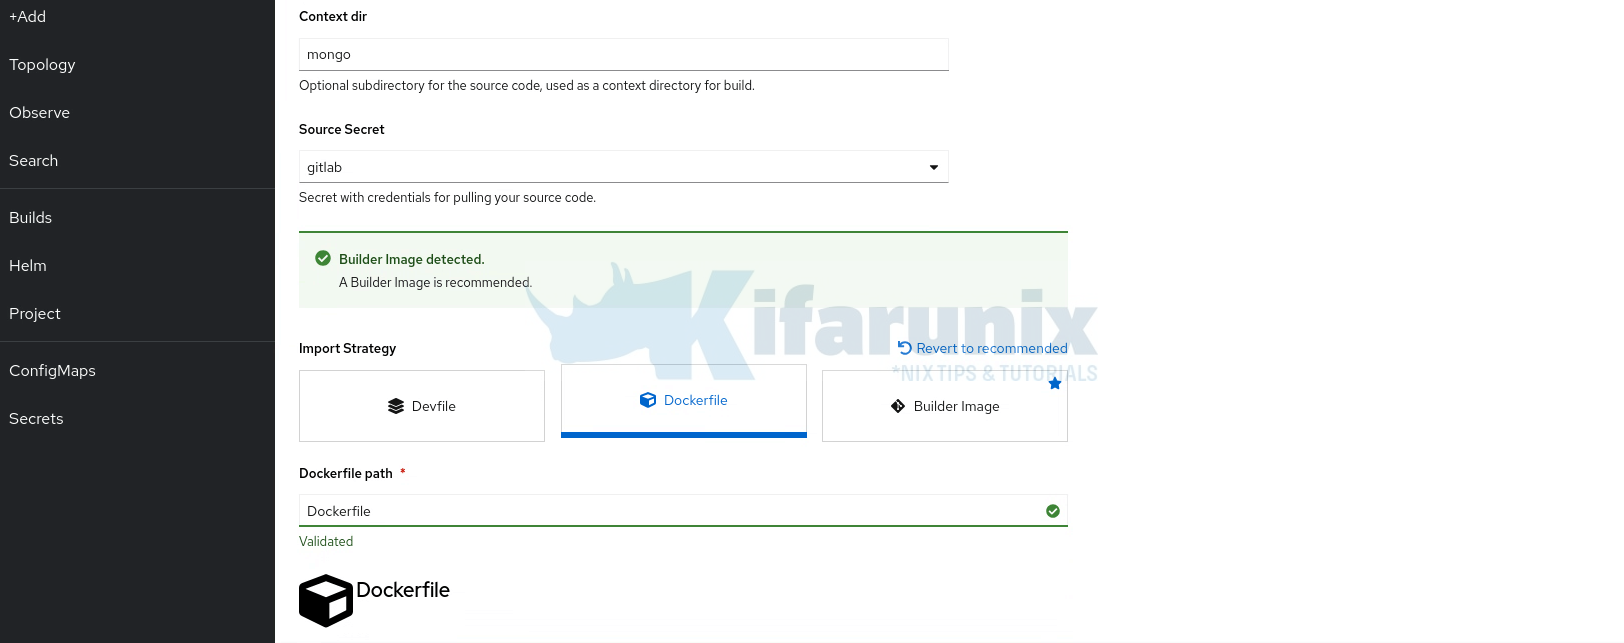
- define your contextDir. This is a directory in the git repo containing your project code. For example, mongo. This is where in this guide, we have a Dockerfile.
- select the secret to access your Gitlab repository. If you have not created it, create one and proceed.
- If by any chance a right build strategy is not detected (usually happens when using monorepo for multiple projects), for example, in my case, Builder (S2I) is detected yet I have a Dockerfile in my project contextDir:
- scroll down and Edit Import Strategy.
- Select your correct strategy, e.g Dockerfile strategy
- Select the Dockerfile, devfile or your builder image depending on your chosen strategy.
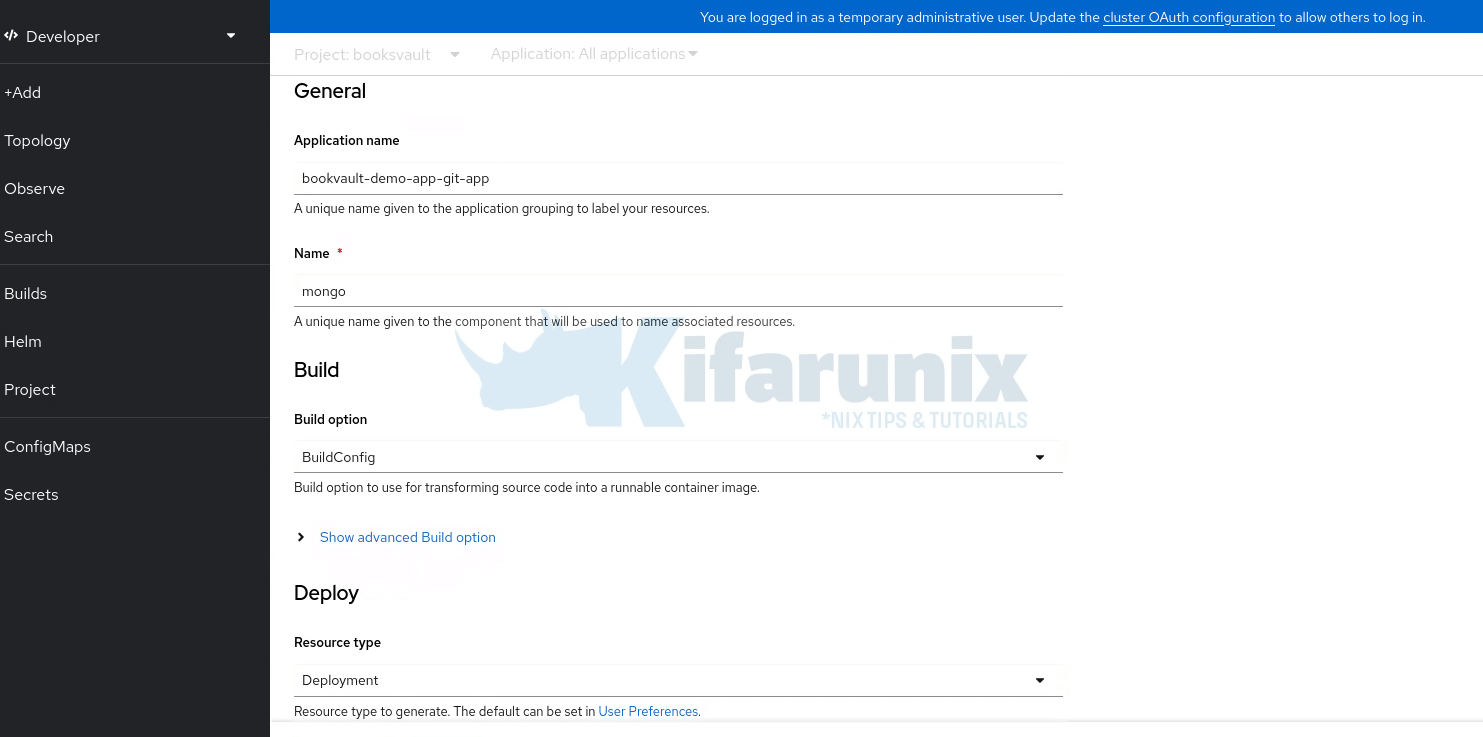
Under the General options:
- Define the Application Name. You can leave the default name or use any of your choice. This will be used to group your related app components.
- Set the Name of the specific component you are deploying. This is paramount as it must match whatever you have configured your other application components to use for connecting to this component. For example, my API backend is configured to connect to MongoDB via the name, mongo. Hence, the component name has to be mongo here.
Under the Build options, leave the default BuildConfig. This will ensure that a BuildConfig is created based on the options you have defined. To see more build options, Show advanced Build option.
Under the Deploy option, leave Deployment as the resource type (default). Deployment for the application component will be created automatically. You can see more options by clicking Show advanced Deployment option.
Under Advanced Options:
- The Target Port will automatically filled based on what is defined in the Dockerfile.
- Uncheck the Create a route option. This is because we are not exposing the DB externally.
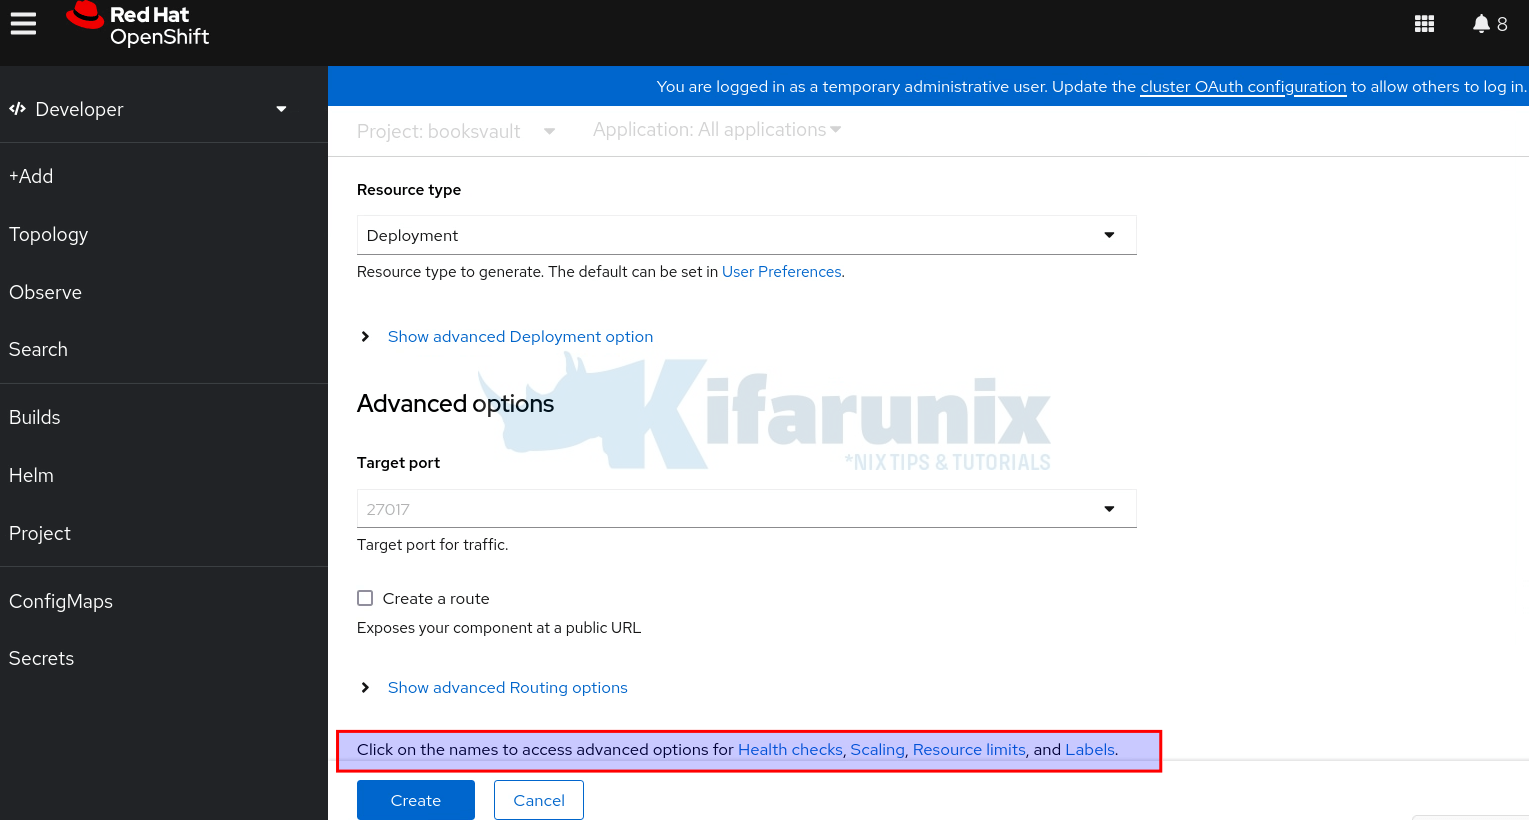
See the highlighted advanced options: You can define the health checks for your application, define the number of replicas (scaling), set resource limits, or even labels.
Click Create when done with configurations.
Immediately, the build process begins.
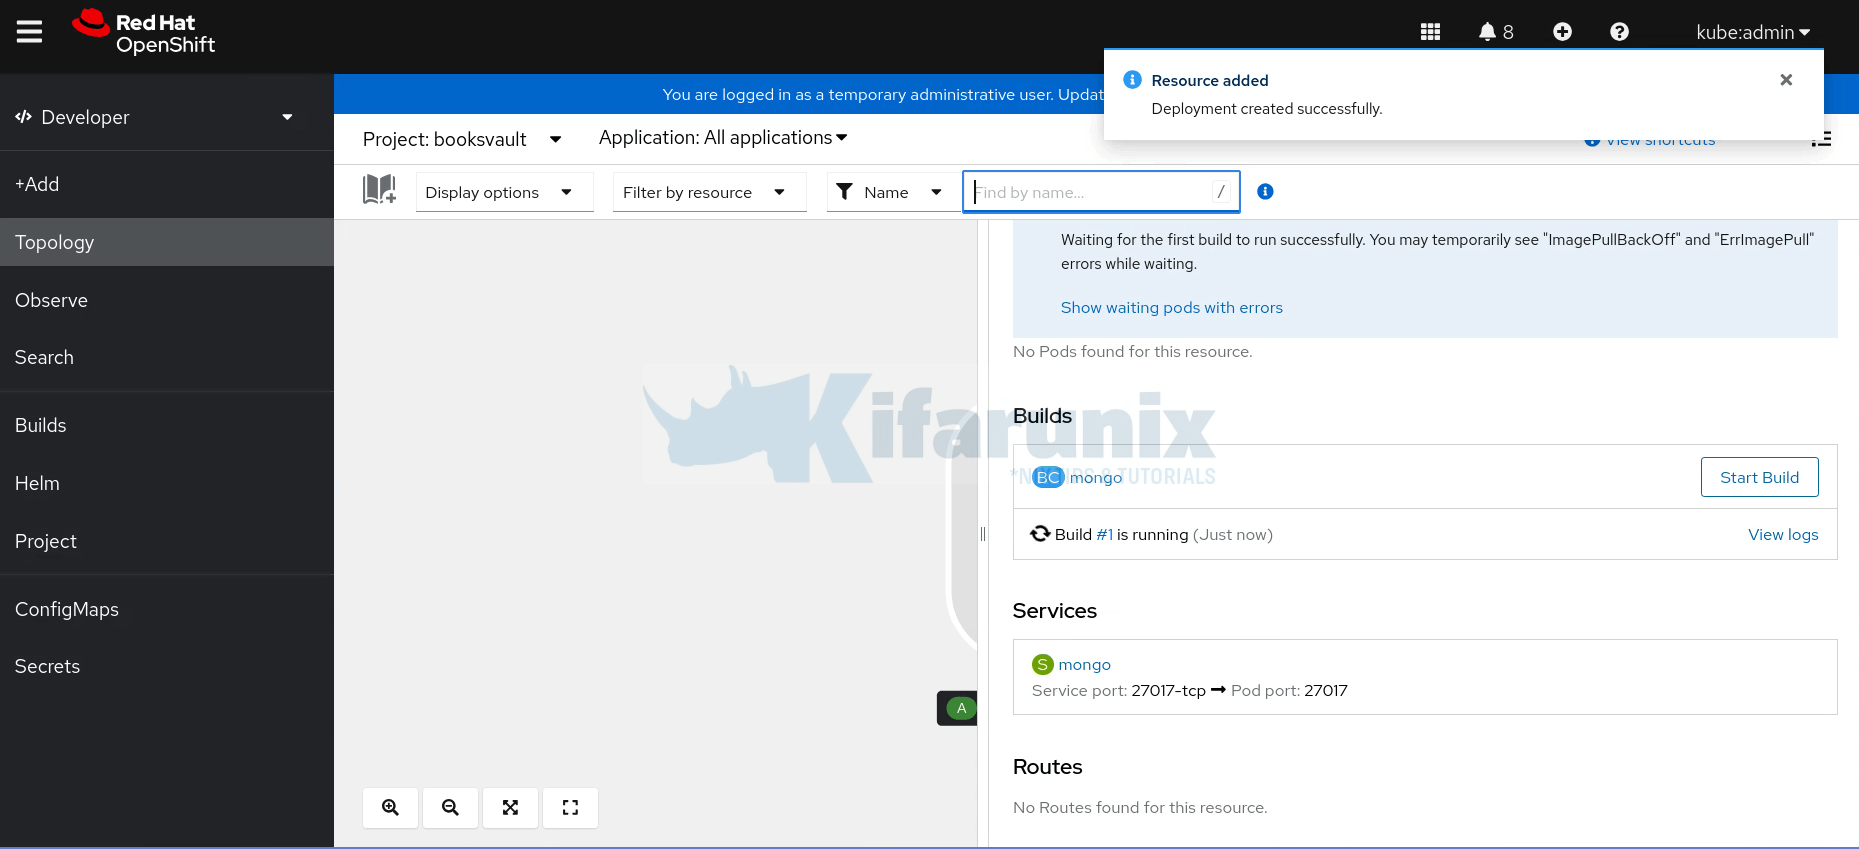
You can view the build logs by clicking View logs.
If all goes well, your deployment should be ready in a few!
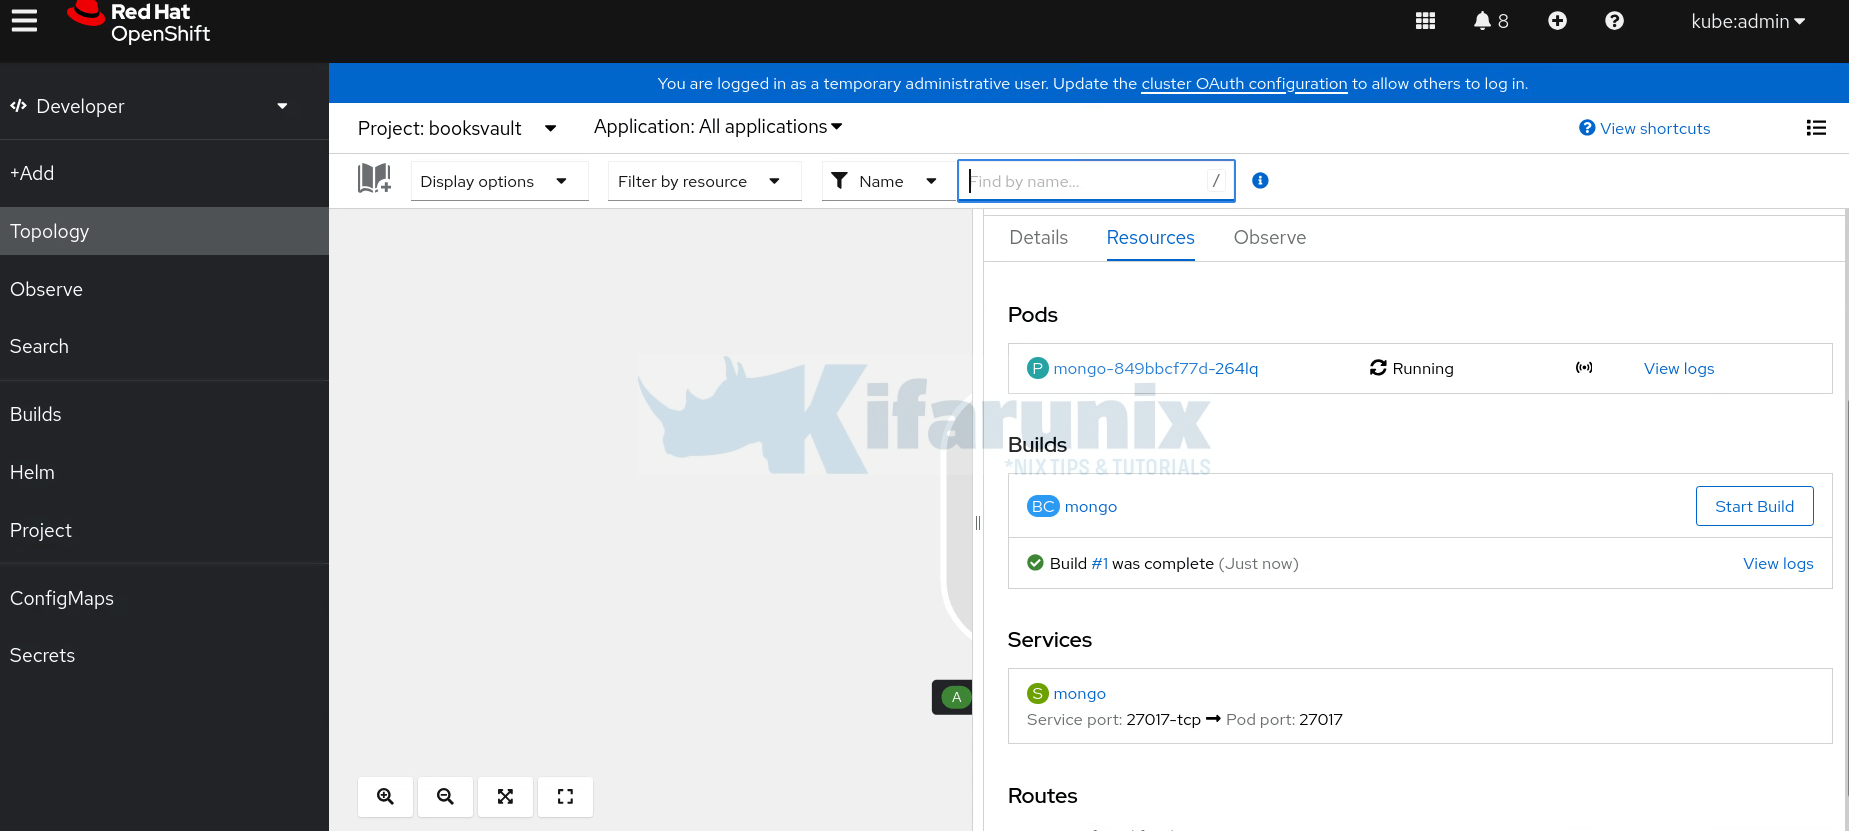
You can close the details side pane to see the deployment.
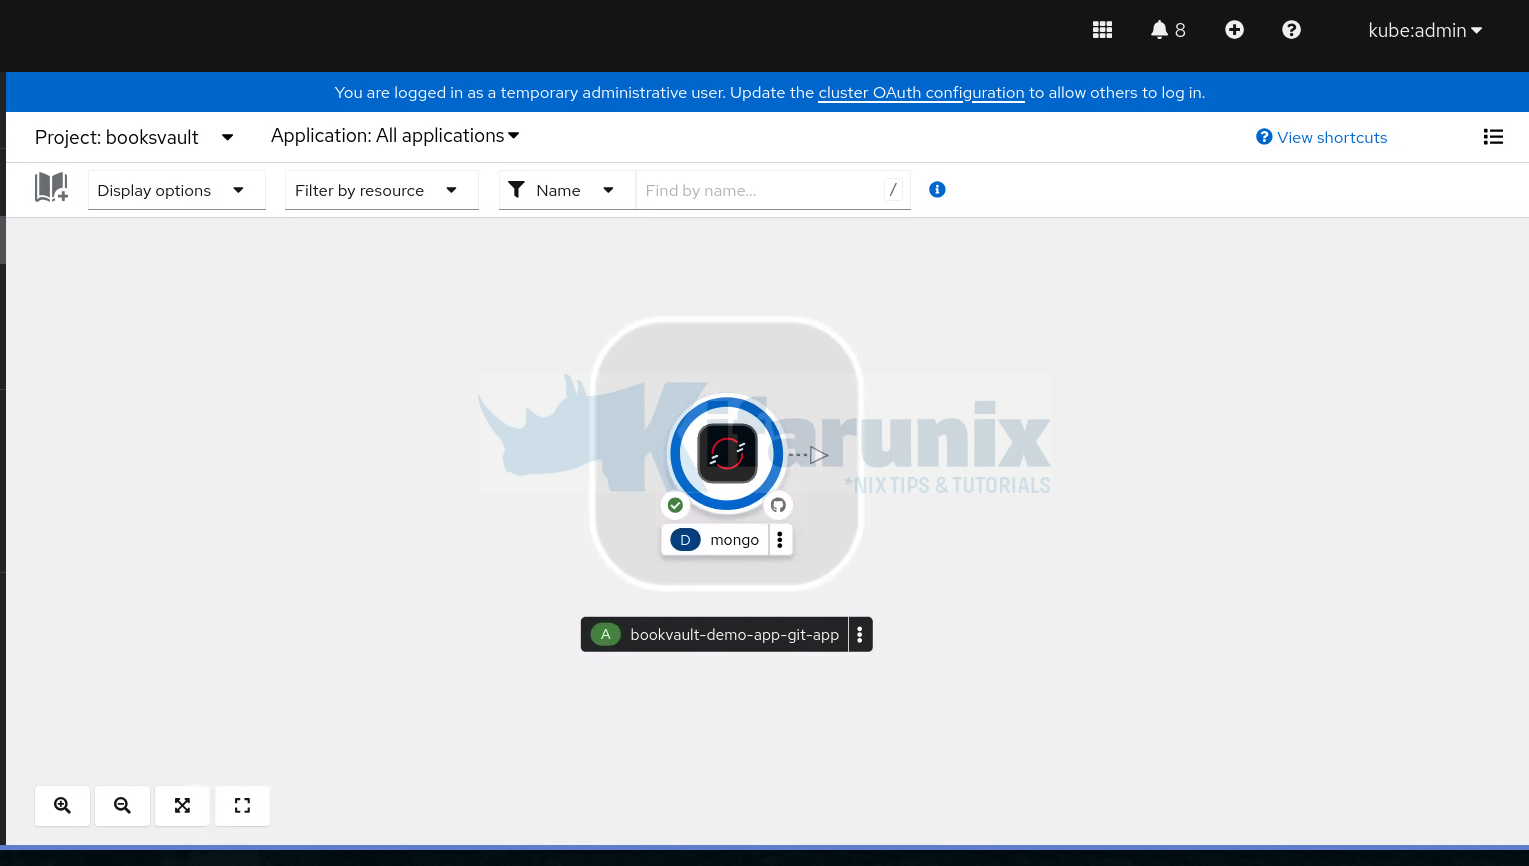
You can also verify from the CLI:
oc get all -n booksvaultWarning: apps.openshift.io/v1 DeploymentConfig is deprecated in v4.14+, unavailable in v4.10000+
NAME READY STATUS RESTARTS AGE
pod/mongo-1-build 0/1 Completed 0 56m
pod/mongo-849bbcf77d-264lq 1/1 Running 0 55m
NAME TYPE CLUSTER-IP EXTERNAL-IP PORT(S) AGE
service/mongo ClusterIP 172.30.159.165 27017/TCP 56m
NAME READY UP-TO-DATE AVAILABLE AGE
deployment.apps/mongo 1/1 1 1 56m
NAME DESIRED CURRENT READY AGE
replicaset.apps/mongo-5c4f5479d9 0 0 0 56m
replicaset.apps/mongo-849bbcf77d 1 1 1 55m
NAME TYPE FROM LATEST
buildconfig.build.openshift.io/mongo Docker Git 1
NAME TYPE FROM STATUS STARTED DURATION
build.build.openshift.io/mongo-1 Docker Git@d2b4431 Complete 56 minutes ago 26s
NAME IMAGE REPOSITORY TAGS UPDATED
imagestream.image.openshift.io/mongo image-registry.openshift-image-registry.svc:5000/booksvault/mongo latest 55 minutes ago
You can see all the resources:
- Deployment
- Services
- Pods
- ImageStream
- BuildConfig
- Builds
- …
To see how the BuildConfig is setup;
oc get bc mongo -o yamlapiVersion: build.openshift.io/v1
kind: BuildConfig
metadata:
annotations:
app.openshift.io/vcs-ref: ""
app.openshift.io/vcs-uri: https://github.com/mibeyki/bookvault-demo-app.git
openshift.io/generated-by: OpenShiftWebConsole
creationTimestamp: "2025-06-25T07:49:31Z"
generation: 2
labels:
app: mongo
app.kubernetes.io/component: mongo
app.kubernetes.io/instance: mongo
app.kubernetes.io/name: mongo
app.kubernetes.io/part-of: bookvault-demo-app-git-app
name: mongo
namespace: booksvault
resourceVersion: "38083285"
uid: a1136048-995c-4613-9224-d1a9c88e406b
spec:
failedBuildsHistoryLimit: 5
nodeSelector: null
output:
to:
kind: ImageStreamTag
name: mongo:latest
postCommit: {}
resources: {}
runPolicy: Serial
source:
contextDir: /mongo
git:
uri: https://github.com/mibeyki/bookvault-demo-app.git
sourceSecret:
name: booksvault
type: Git
strategy:
dockerStrategy:
dockerfilePath: Dockerfile
type: Docker
successfulBuildsHistoryLimit: 5
triggers:
- generic:
secretReference:
name: mongo-generic-webhook-secret
type: Generic
- github:
secretReference:
name: mongo-github-webhook-secret
type: GitHub
- type: ConfigChange
status:
lastVersion: 1
Github webhooks for the BuildConfigs are automatically created based on source of the code (Github). From the output above, you can see that Webhook secrets (reference to the Secret is shown above) are also generated to secure the webhook, ensuring only authorized requests trigger builds.
You can control whether to create a Webhook or not under advanced BuildConfig options:
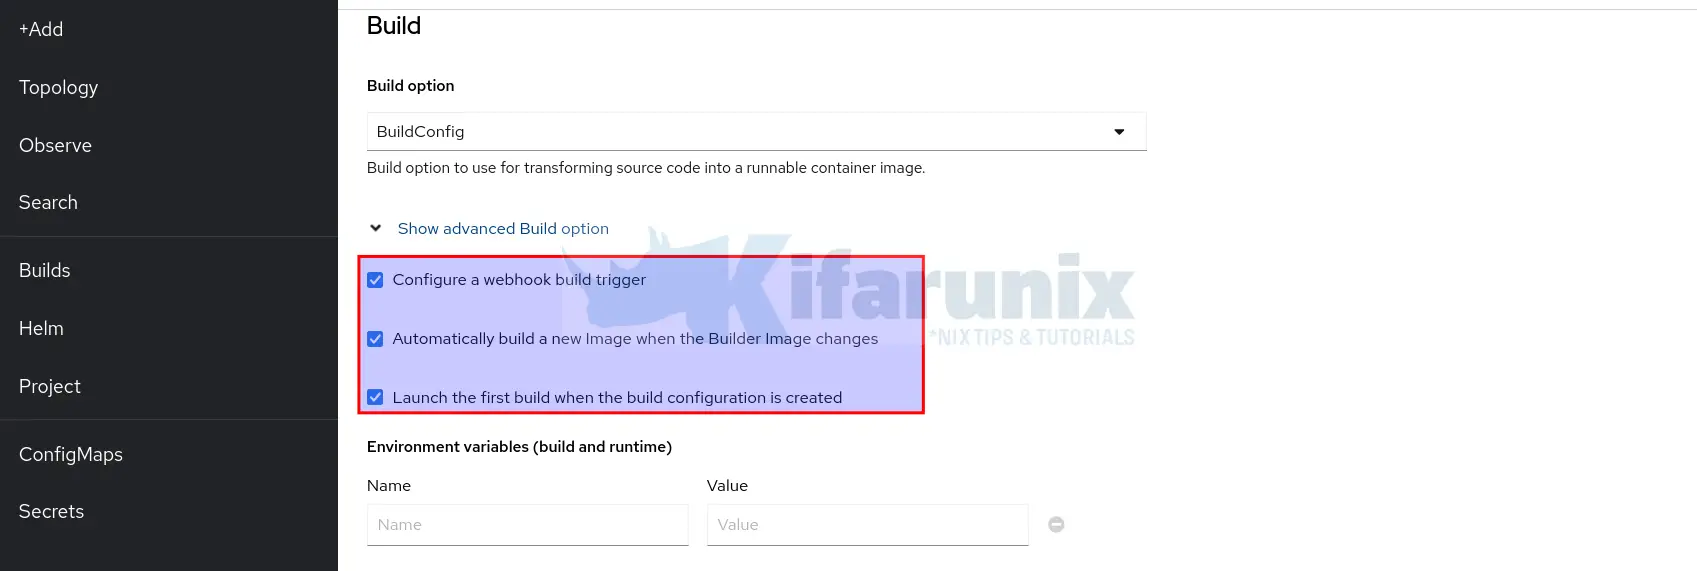
To get more details of a BuildConfig;
oc describe bc mongoName: mongo
Namespace: booksvault
Created: 33 hours ago
Labels: app=mongo
app.kubernetes.io/component=mongo
app.kubernetes.io/instance=mongo
app.kubernetes.io/name=mongo
app.kubernetes.io/part-of=bookvault-demo-app-git-app
Annotations: app.openshift.io/vcs-ref=
app.openshift.io/vcs-uri=https://github.com/mibeyki/bookvault-demo-app.git
openshift.io/generated-by=OpenShiftWebConsole
Latest Version: 1
Strategy: Docker
URL: https://github.com/mibeyki/bookvault-demo-app.git
ContextDir: /mongo
Source Secret: booksvault
Dockerfile Path: Dockerfile
Volumes: <none>
Output to: ImageStreamTag mongo:latest
Build Run Policy: Serial
Triggered by: Config
Webhook Generic:
URL: https://api-int.ocp.kifarunix-demo.com:6443/apis/build.openshift.io/v1/namespaces/booksvault/buildconfigs/mongo/webhooks/<secret>/generic
AllowEnv: false
Webhook GitHub:
URL: https://api-int.ocp.kifarunix-demo.com:6443/apis/build.openshift.io/v1/namespaces/booksvault/buildconfigs/mongo/webhooks/<secret>/github
Builds History Limit:
Successful: 5
Failed: 5
Build Status Duration Creation Time
mongo-1 complete 26s 2025-06-25 07:49:31 +0000 UTC
Events: <none>
So when configuring Webhook on the Git(lab,hub) you can use the Webhook URL provided.
Note that the <secret> in the URL is a unique token generated by OpenShift for each BuildConfig’s webhook trigger. It’s not a literal string like; you need to retrieve its actual value from the respective secret reference.
How about the Build itself?
oc get build mongo-1 -o yamlapiVersion: build.openshift.io/v1
kind: Build
metadata:
annotations:
openshift.io/build-config.name: mongo
openshift.io/build.number: "1"
openshift.io/build.pod-name: mongo-1-build
creationTimestamp: "2025-06-25T07:49:31Z"
generation: 2
labels:
app: mongo
app.kubernetes.io/component: mongo
app.kubernetes.io/instance: mongo
app.kubernetes.io/name: mongo
app.kubernetes.io/part-of: bookvault-demo-app-git-app
buildconfig: mongo
openshift.io/build-config.name: mongo
openshift.io/build.start-policy: Serial
name: mongo-1
namespace: booksvault
ownerReferences:
- apiVersion: build.openshift.io/v1
controller: true
kind: BuildConfig
name: mongo
uid: a1136048-995c-4613-9224-d1a9c88e406b
resourceVersion: "38083483"
uid: aa2582ad-02fb-4bba-99c8-50469f8eb73f
spec:
nodeSelector: null
output:
pushSecret:
name: builder-dockercfg-qv49t
to:
kind: ImageStreamTag
name: mongo:latest
postCommit: {}
resources: {}
revision:
git:
author:
email: [email protected]
name: username
commit: d2b443101027dfc0e05a8759eeca6930bce21581
committer:
email: [email protected]
name: username
message: updated mongo healthcheck
type: Git
serviceAccount: builder
source:
contextDir: /mongo
git:
uri: https://github.com/username/bookvault-demo-app.git
sourceSecret:
name: booksvault
type: Git
strategy:
dockerStrategy:
dockerfilePath: Dockerfile
type: Docker
triggeredBy:
- message: Build configuration change
status:
completionTimestamp: "2025-06-25T07:49:57Z"
conditions:
- lastTransitionTime: "2025-06-25T07:49:32Z"
lastUpdateTime: "2025-06-25T07:49:32Z"
status: "False"
type: New
- lastTransitionTime: "2025-06-25T07:49:32Z"
lastUpdateTime: "2025-06-25T07:49:32Z"
status: "False"
type: Pending
- lastTransitionTime: "2025-06-25T07:49:57Z"
lastUpdateTime: "2025-06-25T07:49:57Z"
status: "False"
type: Running
- lastTransitionTime: "2025-06-25T07:49:57Z"
lastUpdateTime: "2025-06-25T07:49:57Z"
status: "True"
type: Complete
config:
kind: BuildConfig
name: mongo
namespace: booksvault
duration: 26000000000
output:
to:
imageDigest: sha256:a188dbeef00b983ee929a9f948bf5b50c807a80788da71fce53680bdf8688c75
outputDockerImageReference: image-registry.openshift-image-registry.svc:5000/booksvault/mongo:latest
phase: Complete
stages:
- durationMilliseconds: 778
name: FetchInputs
startTime: "2025-06-25T07:49:33Z"
steps:
- durationMilliseconds: 778
name: FetchGitSource
startTime: "2025-06-25T07:49:33Z"
- durationMilliseconds: 18274
name: PullImages
startTime: "2025-06-25T07:49:36Z"
steps:
- durationMilliseconds: 18274
name: PullBaseImage
startTime: "2025-06-25T07:49:36Z"
- durationMilliseconds: 375
name: Build
startTime: "2025-06-25T07:49:54Z"
steps:
- durationMilliseconds: 375
name: DockerBuild
startTime: "2025-06-25T07:49:54Z"
- durationMilliseconds: 271
name: PushImage
startTime: "2025-06-25T07:49:54Z"
steps:
- durationMilliseconds: 271
name: PushDockerImage
startTime: "2025-06-25T07:49:54Z"
startTimestamp: "2025-06-25T07:49:31Z"
Similarly, you can use the same approach to check how the Deployment and respective service was created!
Step 4: Deploy Backend API
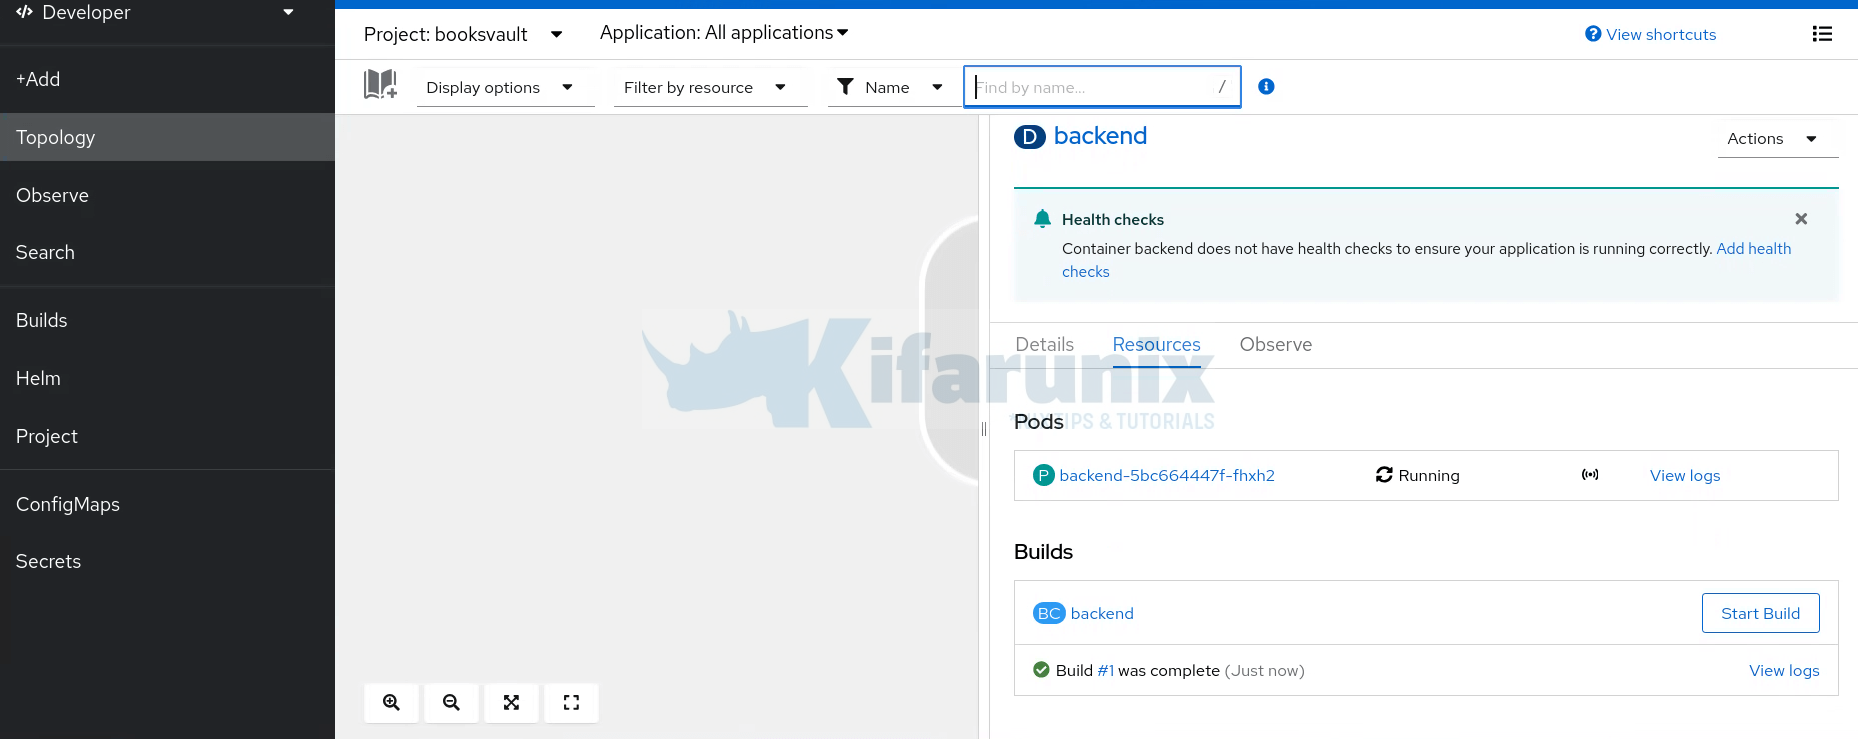
Next, I will deploy the next component of my app from the Git repository; the backend. The backend resides under /backend context directory of the Git repository.
Therefore, click the three dots on the deployment group and select Add to application > Import from Git.
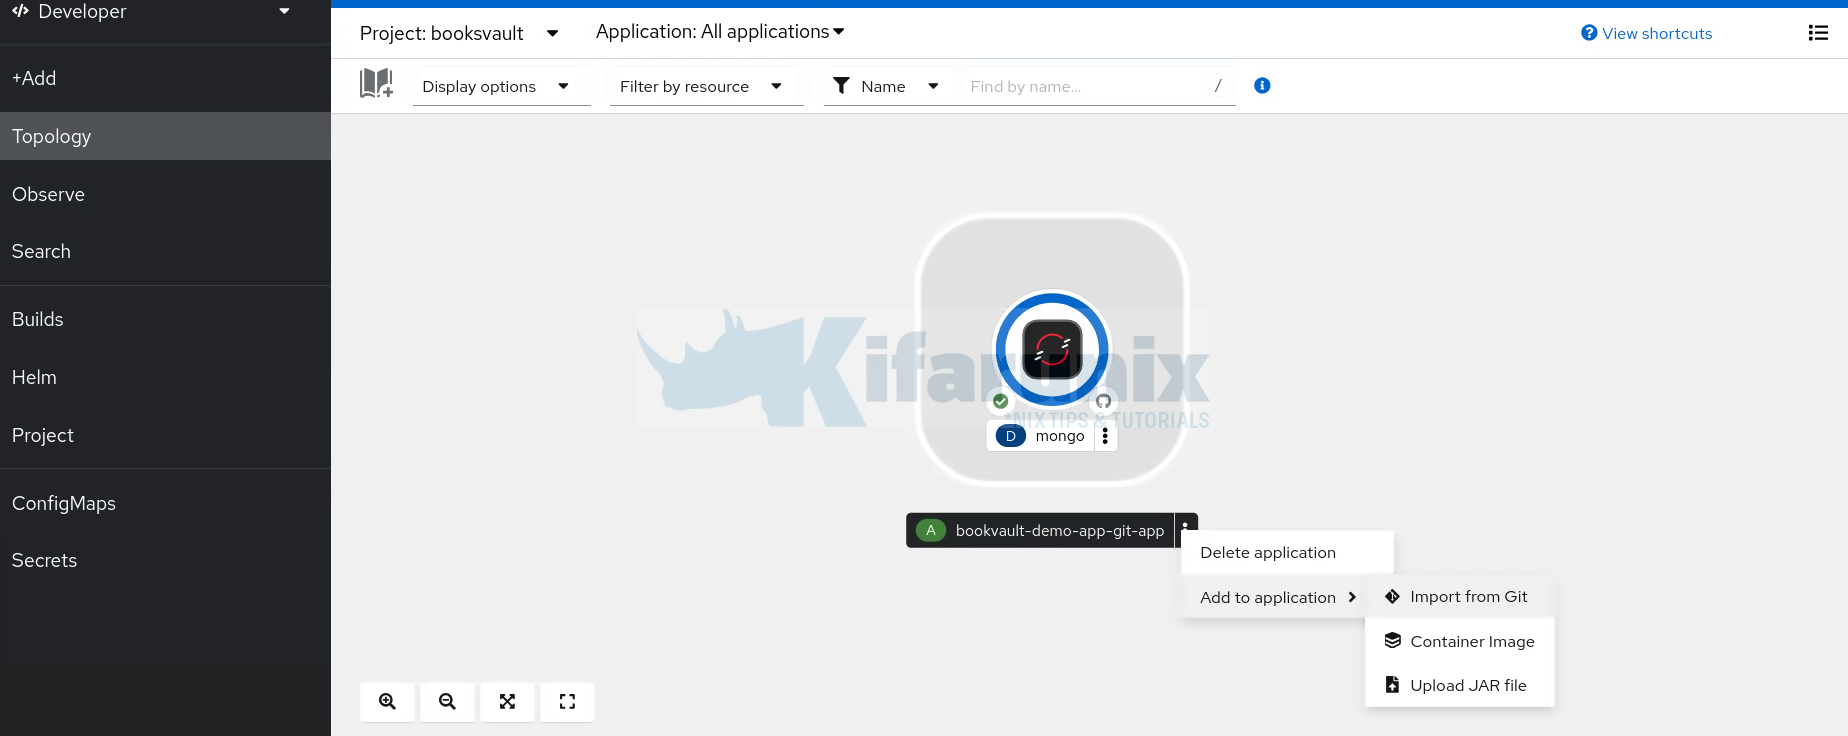
So, follow the same procedure as above defining your respective configuration options for the application.
If all goes well, your Deployment should built successfully in no time.
Step 5: Deploy Frontend Tier
And now, this is the last component of our 3-tier simple application.
Use the same approach as used in step 4 to add the application to the group.
Since this is our Frontend application, we will need to create a route that exposes the service externally, hence, this time round, do not uncheck the Create a route option.
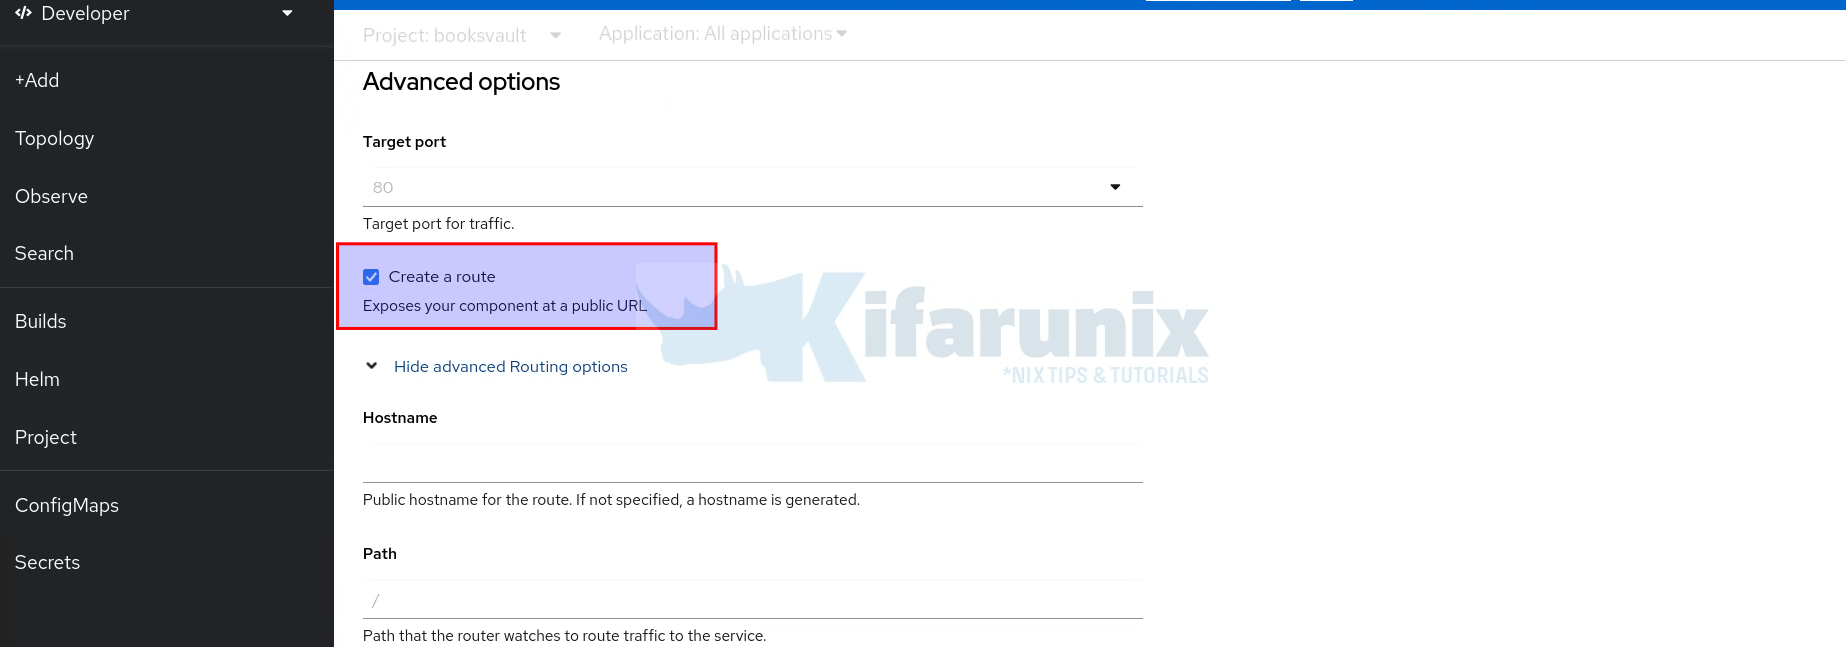
And one more thing, this is a demo env, hence, no use of SSL/TLS certificates. Therefore, click on the Show Advanced Routing options and under Security, uncheck Secure Route option.
When done, click Create to initiate the build process from the Git repository.
While building, you can click View logs to see the build process;
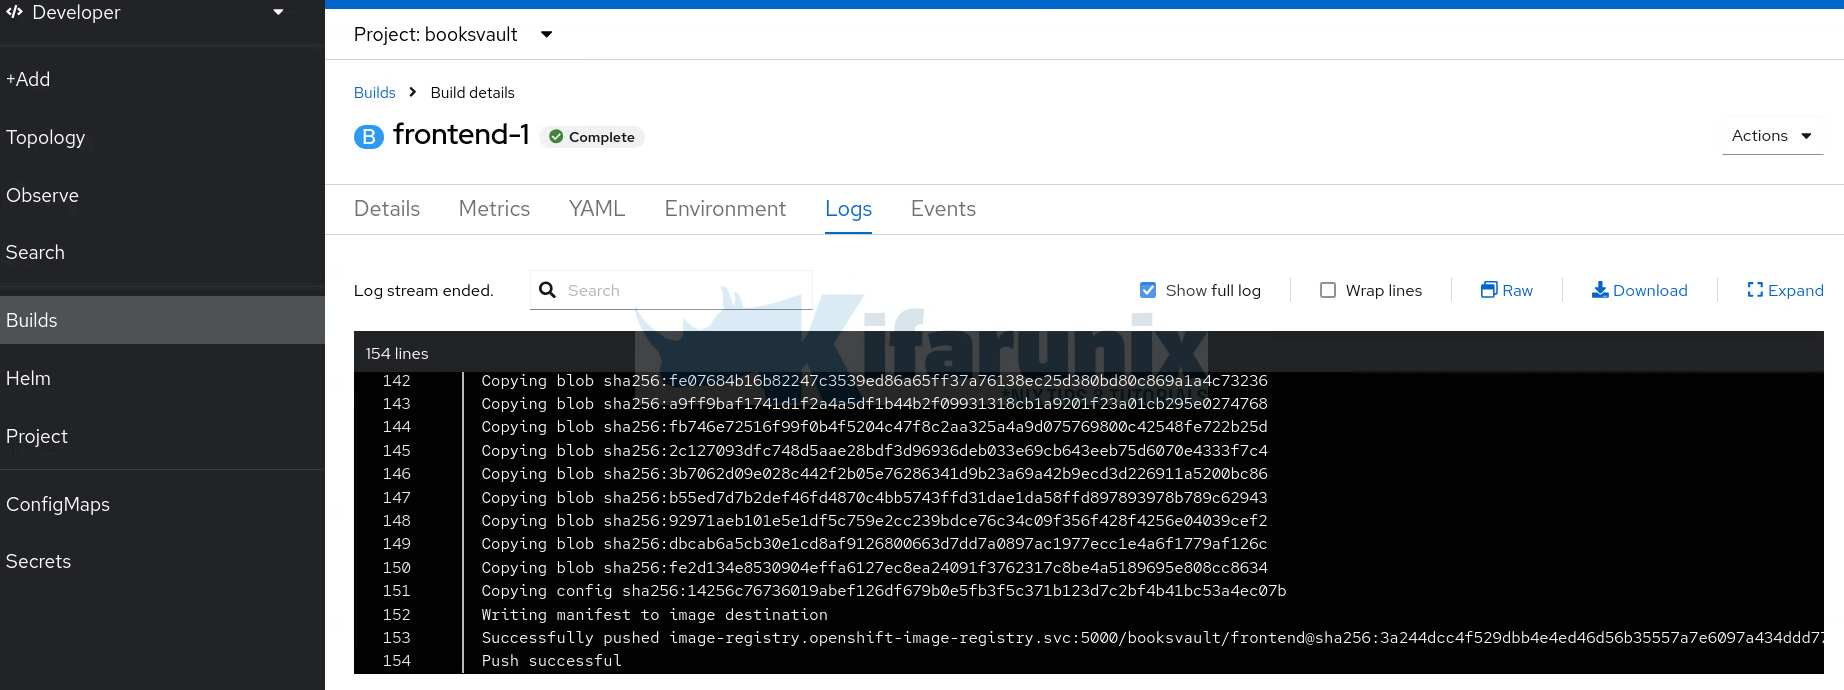
As you can see, build is complete!
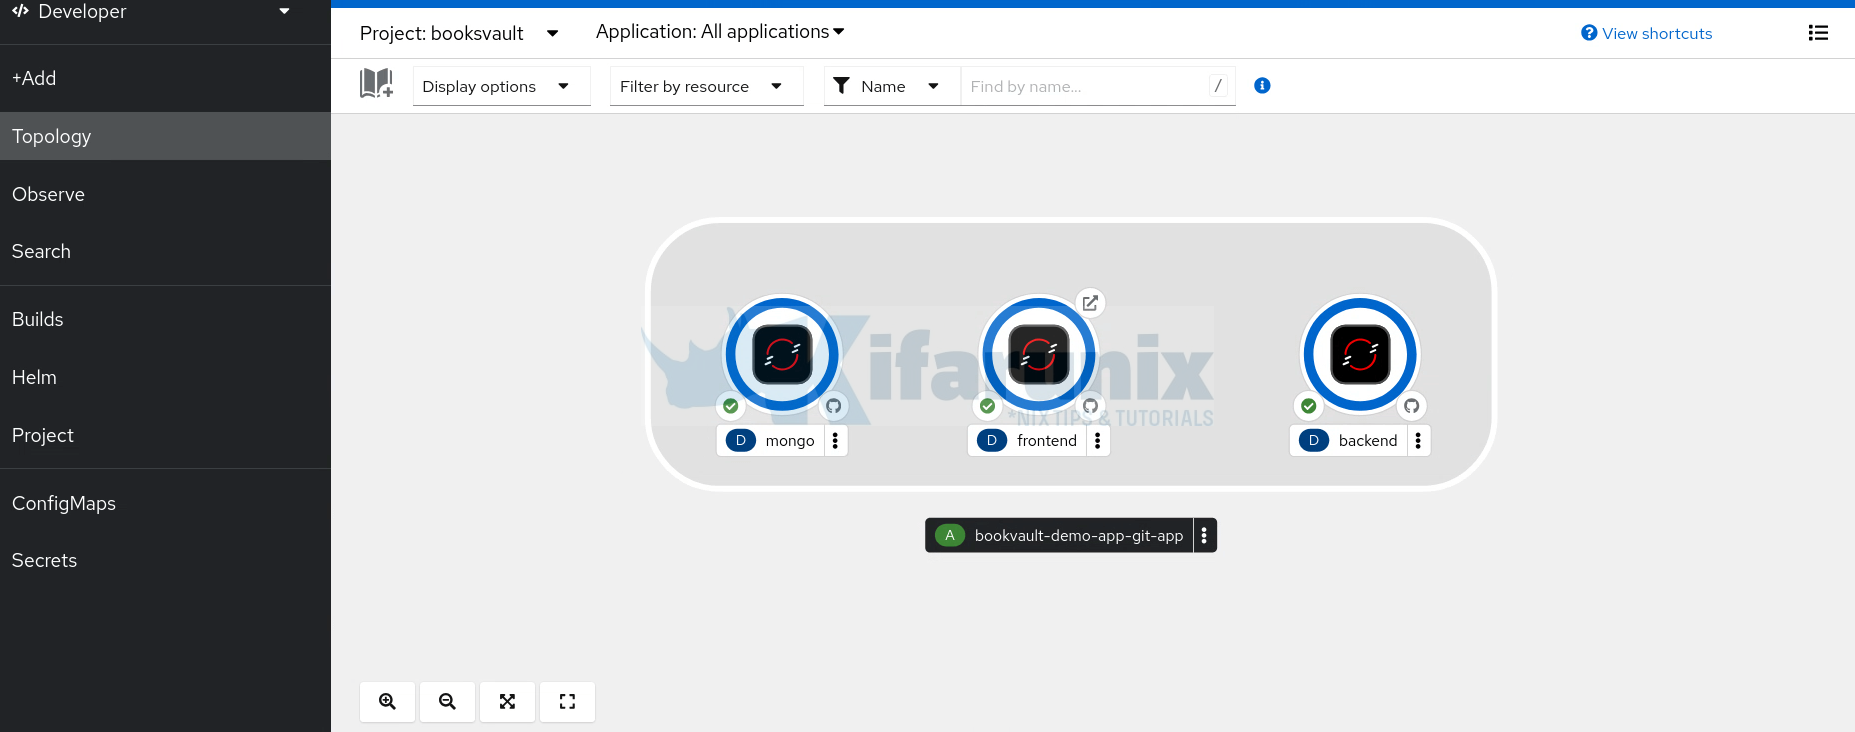
And of course, the deployment is ready!
Step 6: Access the Application
As you can see, the frontend app has an external route defined. You can click on the icon with arrow facing up to open the application URL on browser.
Similarly, you can click on the frontend deployment and under routes, you should see the full URL to the application.
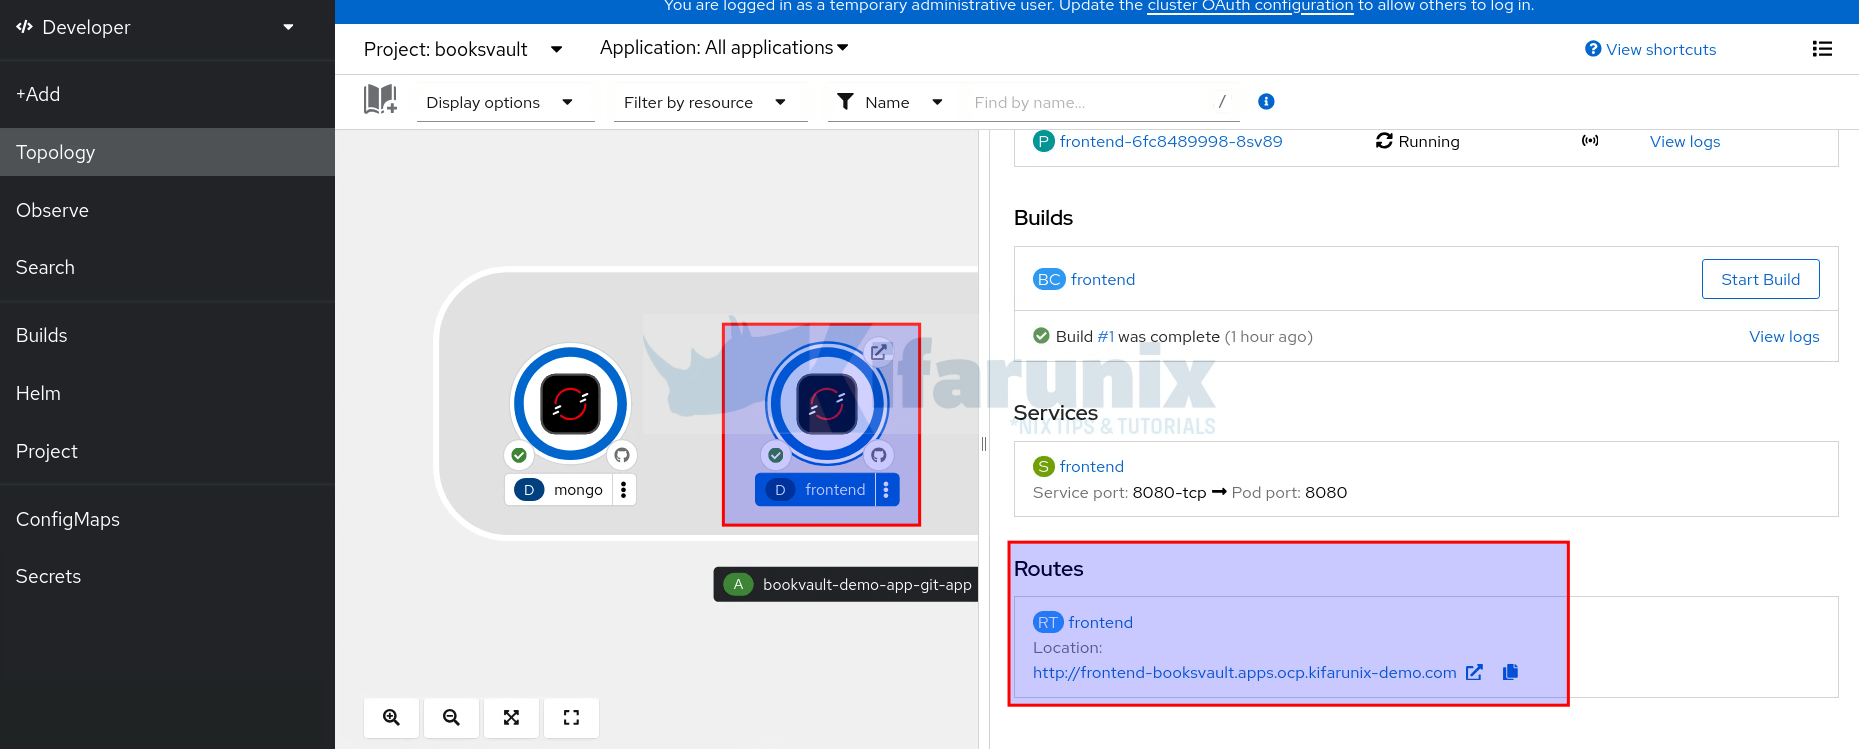
Ensure that the DNS entry is defined for the address. Otherwise, map it to the OpenShift Loadbalancer IP on your /etc/hosts file.
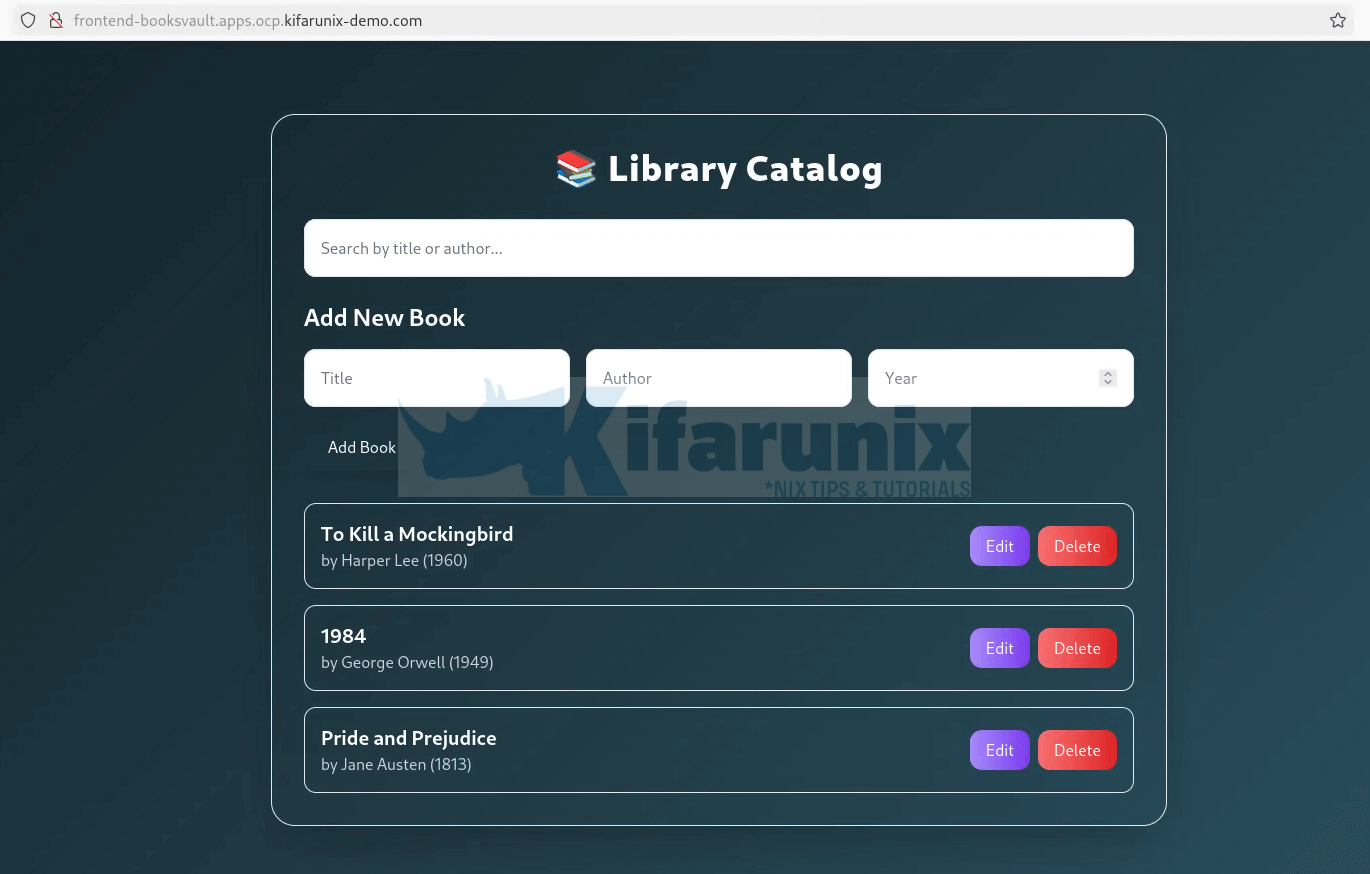
This is how our simple app, running on OpenShift and build directly from the source code, looks like:
Post-Deployment: What’s Running in Your Project
Now that the application has been successfully deployed, you can verify that each tier, the database, backend, and frontend, has its own deployment, service, and running pod. Additionally, each component should have an associated BuildConfig and ImageStream managing its builds and container images.
You can verify the same from OpenShift console or via the CLI.
Let’s do this from CLI:
Make sure you’re in the correct project (replace your project name accordingly):
oc project booksvaultYou can view all resources;
oc get allOr check individual resources.
Check BuildConfigs (bc) and builds
oc get bc,buildNAME TYPE FROM LATEST
buildconfig.build.openshift.io/backend Docker Git 1
buildconfig.build.openshift.io/frontend Docker Git 1
buildconfig.build.openshift.io/mongo Docker Git 1
NAME TYPE FROM STATUS STARTED DURATION
build.build.openshift.io/mongo-1 Docker Git@d2b4431 Complete 5 hours ago 26s
build.build.openshift.io/backend-1 Docker Git@d2b4431 Complete 4 hours ago 47s
build.build.openshift.io/frontend-1 Docker Git@9b543c2 Complete 2 hours ago 2m16s
View ImageStream details:
oc get is,istagoc get is,istag
NAME IMAGE REPOSITORY TAGS UPDATED
imagestream.image.openshift.io/backend image-registry.openshift-image-registry.svc:5000/booksvault/backend latest 4 hours ago
imagestream.image.openshift.io/frontend image-registry.openshift-image-registry.svc:5000/booksvault/frontend latest 2 hours ago
imagestream.image.openshift.io/mongo image-registry.openshift-image-registry.svc:5000/booksvault/mongo latest 5 hours ago
NAME IMAGE REFERENCE UPDATED
imagestreamtag.image.openshift.io/backend:latest image-registry.openshift-image-registry.svc:5000/booksvault/backend@sha256:10db8ab3c990f681770813f4c73ae24f2f29e59a79c66962eb0e3f689f97fc4f 4 hours ago
imagestreamtag.image.openshift.io/frontend:latest image-registry.openshift-image-registry.svc:5000/booksvault/frontend@sha256:73d2e7406a5a774763ce27855cf128d946128d6c3ce7de3f16b1670e589fe7c4 2 hours ago
imagestreamtag.image.openshift.io/mongo:latest image-registry.openshift-image-registry.svc:5000/booksvault/mongo@sha256:a188dbeef00b983ee929a9f948bf5b50c807a80788da71fce53680bdf8688c75 5 hours ago
Verify deployments and pods;
oc get deploy,podNAME READY UP-TO-DATE AVAILABLE AGE
deployment.apps/backend 1/1 1 1 3h55m
deployment.apps/frontend 1/1 1 1 127m
deployment.apps/mongo 1/1 1 1 5h
NAME READY STATUS RESTARTS AGE
pod/backend-1-build 0/1 Completed 0 3h55m
pod/backend-5bc664447f-fhxh2 1/1 Running 0 3h54m
pod/frontend-1-build 0/1 Completed 0 127m
pod/frontend-6fc8489998-8sv89 1/1 Running 0 125m
pod/mongo-1-build 0/1 Completed 0 5h
pod/mongo-849bbcf77d-264lq 1/1 Running 0 4h59m
Check services and routes:
oc get svc,routeNAME TYPE CLUSTER-IP EXTERNAL-IP PORT(S) AGE
service/backend ClusterIP 172.30.17.228 5000/TCP 3h57m
service/frontend ClusterIP 172.30.15.119 8080/TCP 129m
service/mongo ClusterIP 172.30.159.165 27017/TCP 5h2m
NAME HOST/PORT PATH SERVICES PORT TERMINATION WILDCARD
route.route.openshift.io/frontend frontend-booksvault.apps.ocp.kifarunix-demo.com frontend 8080-tcp None
You can get details of each and every item using the usual commands; oc get or oc describe. Replace:
<resource-type>: the kind of resource (e.g.,pod,deployment,service, etc.)<resource-name>: the name of the specific resource<namespace>: the OpenShift project or namespace where the resource lives
oc get <resource-type> <resource-name> -n <namespace> -o yamloc describe <resource-type> <resource-name> -n <namespace>Automate Builds with Git Webhooks
In real-world development workflows, it’s critical to keep your deployed applications in sync with your source code changes. Manually triggering builds every time you push code is not only inefficient but also prone to error. That’s where Git webhooks come in.
By configuring a webhook, you can automatically trigger a new build in OpenShift whenever you push changes to your Git repository enabling continuous integration and smoother collaboration across teams.
However, in environments where OpenShift is not exposed to the Internet (such as internal networks or air-gapped clusters), integrating with GitHub or GitLab directly isn’t always straightforward. In our next guide, we’ll walk you through how to configure Git webhooks for OpenShift using a local Gitlab server setup, so you can automate builds even in restricted or offline environments.
Conclusion
In this guide, you’ve learned how to deploy a complete 3-tier application on OpenShift using BuildConfig, starting from a Git repository. We walked through each step — from setting up your project and updating security constraints, to deploying the database, backend, and frontend tiers, and finally validating that everything was successfully deployed. Along the way, you also gained insight into how OpenShift automates application deployment and manages the underlying resources. With this foundation in place, you’re now well-equipped to build, customize, and scale your own applications on OpenShift.

