In this tutorial, you will learn how to install Wazuh agent on Rocky Linux 8. Our previous setup was on setting up Wazuh server with ELK on Rocky Linux. The Wazuh agent is multi-platform and runs on the hosts that the user wants to monitor. It communicates with the Wazuh manager, sending data in near real time through an encrypted and authenticated channel.
In our previous guide, we learnt how to install Wazuh server on Rocky Linux 8.
Install Wazuh Server on Rocky Linux 8
Table of Contents
Installing Wazuh Agent on Rocky Linux 8
In this tutorial, we are going to install the Wazuh agent in another Rocky Linux 8 Desktop acting at the end point from which we are collecting logs.
Create the Wazuh Repository
Run the command below to create the Wazuh 4.x repository on Rocky Linux 8.
cat > /etc/yum.repos.d/wazuh.repo << 'EOL'
[wazuh_repo]
gpgcheck=1
gpgkey=https://packages.wazuh.com/key/GPG-KEY-WAZUH
enabled=1
name=Wazuh repository
baseurl=https://packages.wazuh.com/4.x/yum/
protect=1
EOL
Import the Wazuh repository GPG key
rpm --import http://packages.wazuh.com/key/GPG-KEY-WAZUHInstall Wazuh Agent
Once the repos are in place, you can install Wazuh agent by running the command below;
dnf -y install wazuh-agentThe installation is now complete.
You can also specify the Wazuh manager from the command line. Replace the IP appropriately.
WAZUH_MANAGER="192.168.60.19" dnf install wazuh-agentThe next step is to enable the agent to communicate with the manager.
Add Wazuh Agent on Wazuh Server
Login to Wazuh manager, and run the command below to add the agent to the server.
/var/ossec/bin/manage_agents
Wazuh v4.1.5 Agent manager. *
The following options are available: *

(A)dd an agent (A).
(E)xtract key for an agent (E).
(L)ist already added agents (L).
(R)emove an agent (R).
(Q)uit.
Choose your action: A,E,L,R or Q: A
Select add an agent (A) and press enter.
Provide a name for the agent(in our case RockyLinux8Desktop) and IP of the agent and confirm.
- Adding a new agent (use '\q' to return to the main menu).
  Please provide the following:
   * A name for the new agent: RockyLinux8Desktop
   * The IP Address of the new agent: 192.168.60.18
Confirm adding it?(y/n): y
Agent added with ID 001.
Note the ID given to the agent, 001, in our case.
If you want to add more agents, please do so.
To automatically add the agent, Wazuh from the command line, simply use the command below;
/var/ossec/bin/manage_agents -a <agent_IP> -n <agent_name>For example, to add the second agent to Wazuh server;
/var/ossec/bin/manage_agents -a 192.168.60.20 -n Ubuntu20Sample output;
****************************************
* Wazuh v4.1.5 Agent manager.          *
* The following options are available: *
****************************************
   (A)dd an agent (A).
   (E)xtract key for an agent (E).
   (L)ist already added agents (L).
   (R)emove an agent (R).
   (Q)uit.
Choose your action: A,E,L,R or Q:
- Adding a new agent (use '\q' to return to the main menu).
  Please provide the following:
   * A name for the new agent:    * The IP Address of the new agent: Confirm adding it?(y/n): Agent added with ID 002.

manage_agents: Exiting.
You can list the agents using the command below;
/var/ossec/bin/manage_agents -lSample output;
Available agents:
ID: 001, Name: RockyLinux8Desktop, IP: 192.168.60.18
ID: 002, Name: Ubuntu20, IP: 192.168.60.20
Register Wazuh Agents
For an agent to communicate with the manager, you need to register the the agent key from the server and install it on the agent.
There are two ways in which you can register Wazuh agents.
Manual Wazuh Agent Registration
To manually register Wazuh agents, login to the server and extract the registration key for the specific Wazuh agent. You can use the /var/ossec/bin/manage_agents command manually or automatically as shown below;
Manual agent key extraction;
/var/ossec/bin/manage_agents
When command runs, select option E and specify the agent ID and press Enter.
****************************************
* Wazuh v4.1.5 Agent manager.          *
* The following options are available: *
****************************************
   (A)dd an agent (A).
   (E)xtract key for an agent (E).
   (L)ist already added agents (L).
   (R)emove an agent (R).
   (Q)uit.
Choose your action: A,E,L,R or Q: E

Available agents:
   ID: 001, Name: RockyLinux8Desktop, IP: 192.168.60.18
   ID: 002, Name: Ubuntu20, IP: 192.168.60.20
Provide the ID of the agent to extract the key (or '\q' to quit): 001

Agent key information for '001' is:
MDAxIFJvY2t5TGludXg4RGVza3RvcCAxOTIuMTY4LjYwLjE4IDhmYjY5OGNjMTRmMGI4Zjg1NjIxZDk2ODgxOTM1M2JkODA5ZTE3NTRiZjA5MGQ4NTdlY2E5ZjgxZmEzMDBjMzM=

** Press ENTER to return to the main menu.
...
Automatic agent Key extraction:
/var/ossec/bin/manage_agents -e <agent-id>For example:
/var/ossec/bin/manage_agents -e 001Sample output;
Agent key information for '001' is:
MDAxIFJvY2t5TGludXg4RGVza3RvcCAxOTIuMTY4LjYwLjE4IDhmYjY5OGNjMTRmMGI4Zjg1NjIxZDk2ODgxOTM1M2JkODA5ZTE3NTRiZjA5MGQ4NTdlY2E5ZjgxZmEzMDBjMzM=
Copy the key and paste it in an accessible place as we will be using in the next step.
Set the Wazuh Server Address on Wazuh Agent
On the agent, edit the file /var/ossec/etc/ossec.conf and add the Wazuh manager IP/resolvable hostname.
vim /var/ossec/etc/ossec.conf...
<ossec_config>
<client>
<server>
<address>192.168.60.19</address>
<port>1514</port>
<protocol>tcp</protocol>
</server>
...Save and quit
Import the Wazuh Agent Key extracted above
/var/ossec/bin/manage_agentsPress I to import the key previously generated from the manager.
****************************************
* Wazuh v4.1.5 Agent manager.          *
* The following options are available: *
****************************************
   (I)mport key from the server (I).
   (Q)uit.
Choose your action: I or Q: I

* Provide the Key generated by the server.
* The best approach is to cut and paste it.
*** OBS: Do not include spaces or new lines.

Paste it here (or '\q' to quit): MDAxIFJvY2t5TGludXg4RGVza3RvcCAxOTIuMTY4LjYwLjE4IDhmYjY5OGNjMTRmMGI4Zjg1NjIxZDk2ODgxOTM1M2JkODA5ZTE3NTRiZjA5MGQ4NTdlY2E5ZjgxZmEzMDBjMzM=

Agent information:
   ID:001
   Name:RockyLinux8Desktop
   IP Address:192.168.60.18

Confirm adding it?(y/n): y
Added.
...
Quit and restart the agent.
/var/ossec/bin/ossec-control restartAutomatic Wazuh Agent Registration
With the automatic agent registration, run the command below on Wazuh agent server.
/var/ossec/bin/agent-auth -m 192.168.60.19 -A RockyLinux8Desktop -I 192.168.60.18Consult /var/ossec/bin/agent-auth -h for more info on command line options used.
Sample output of the command;
2021/07/10 15:51:15 agent-auth: INFO: Started (pid: 19633).
2021/07/10 15:51:15 agent-auth: INFO: Requesting a key from server: 192.168.60.19
2021/07/10 15:51:15 agent-auth: INFO: No authentication password provided
2021/07/10 15:51:15 agent-auth: INFO: Using agent name as: RockyLinux8Desktop
2021/07/10 15:51:15 agent-auth: INFO: Waiting for server reply
2021/07/10 15:51:15 agent-auth: INFO: Valid key received
Restart Wazuh agent;
systemctl restart wazuh-agentList Active Wazuh Agents on Wazuh Server
Run the command below on Wazuh server to check agent status;
/var/ossec/bin/agent_control -lWazuh agent_control. List of available agents:
ID: 000, Name: localhost.localdomain (server), IP: 127.0.0.1, Active/Local
ID: 001, Name: RockyLinux8Desktop, IP: 192.168.60.18, Active
ID: 002, Name: Ubuntu20, IP: 192.168.60.20, Never connected
List of agentless devices:Verify Agent Data Reception on Kibana
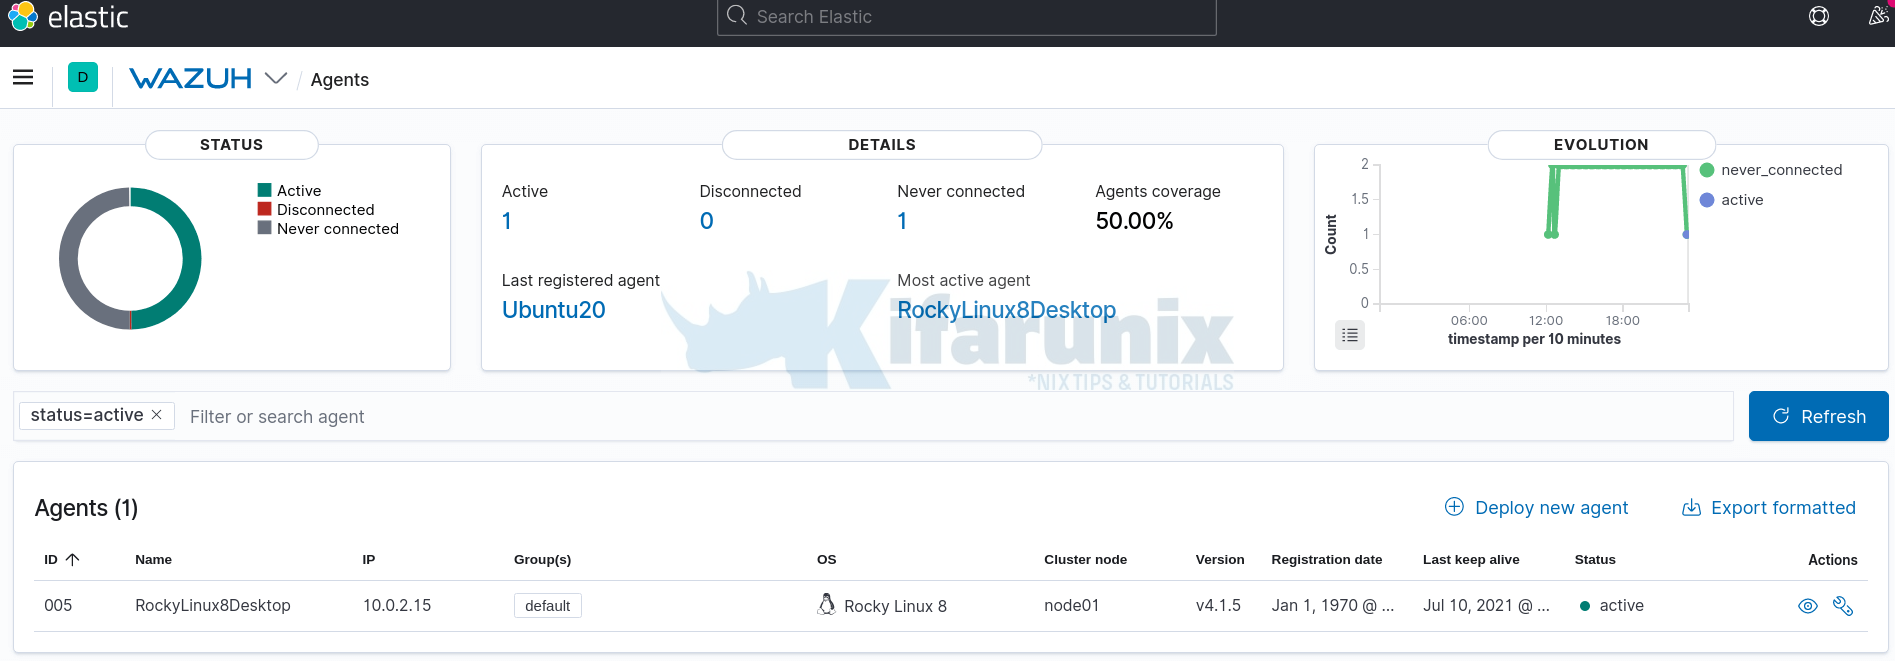
The agent registration is complete.
Check that the agents are now active. Note, we only connected a single agent in this setup.

To see more information, click on Active agents options.

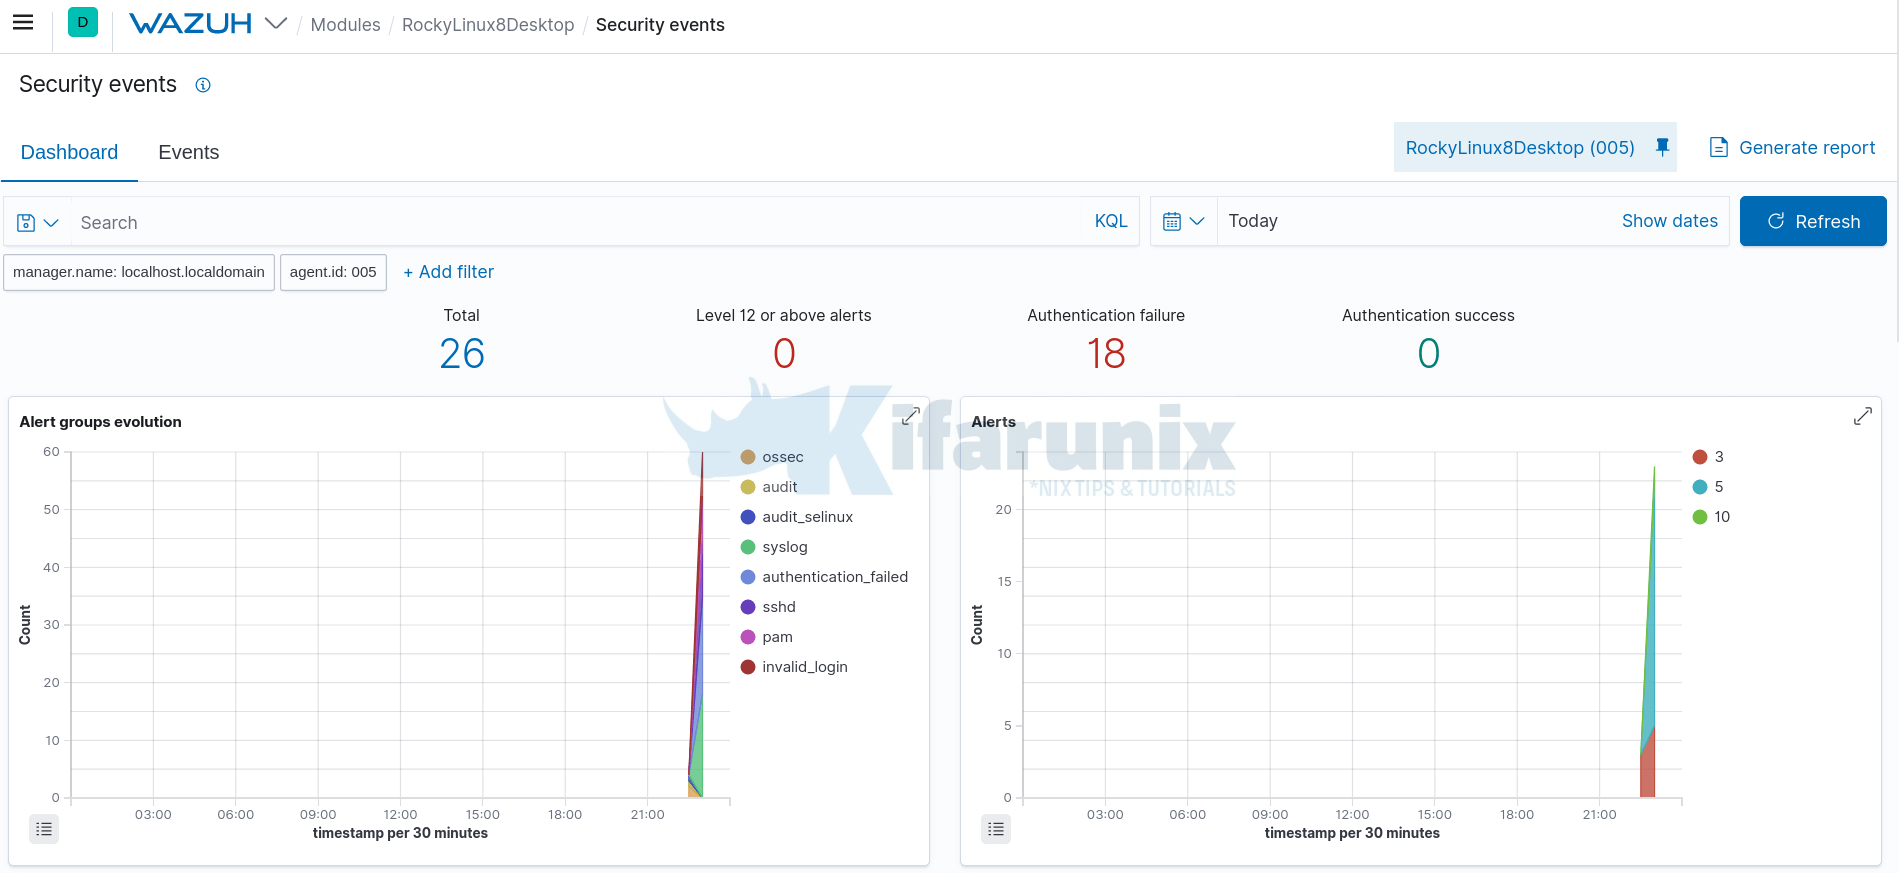
Navigate to Wazuh>Modules>Security Events to view security related events and dashboards.

You can explore more on the modules such as Auditing and Policy Monitoring,Regulatory Compliance and Threat Detection and Response.
That concludes our guide on how to install Wazuh agent.
Reference
Wazuh Agent installation
Other Tutorials
Install OSSEC Agent on Rocky Linux 8

