In this tutorial, you will learn how to setup secure SSH access on Linux servers using Teleport. In our previous guide, we learnt how to install and setup Teleport access plan on Linux, specifically Ubuntu 20.04 system.
Install and Setup Teleport Access Plane on Linux
Setup Secure SSH Access on Linux Servers using Teleport
To install Teleport;
Add Remote SSH Server to Teleport Cluster Server
There are two ways in which you can add remote ssh Linux servers into the Teleport cluster server to enable you to securely SSH into them:
- Automatically add SSH servers into Teleport Cluster Server
- Manually add SSH servers into Teleport Cluster Server
Automatically add SSH servers into Teleport Cluster Server
On the Teleport server, you can generate a script that can be executed on an SSH server you want to add to Teleport server.
The script will automatically install Teleport client and automatically enrolls the remote SSH server into the Teleport server.
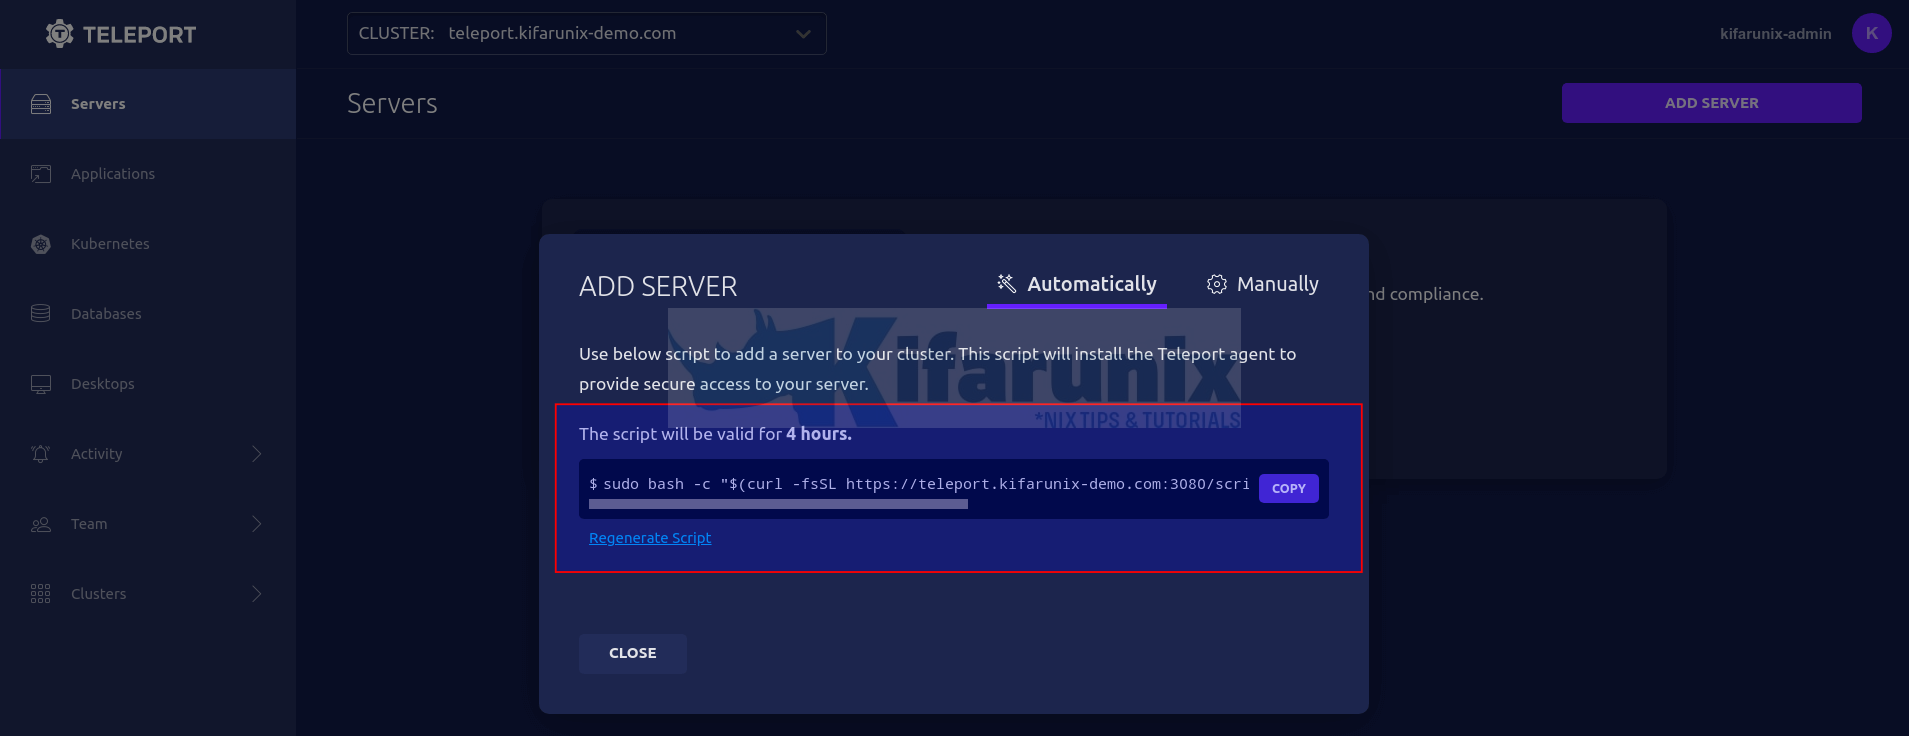
To get the script, login to Teleport server web interface and click Add Server under the servers menu tab.
You will then see such a wizard with a script that is valid for 4 hours generated.
Copy the script and execute on the remote host to add to the Teleport cluster Server.
Ensure that you can connect to Teleport server remotely.
For example, on my remote Ubuntu server, check connection to Teleport server port;
nc -vz teleport.kifarunix-demo.com 443Sample command output;
Connection to teleport.kifarunix-demo.com 443 port [tcp/*] succeeded!Next, execute the command generated on the Teleport server on the host to add it to the server;
sudo bash -c "$(curl -fsSL https://teleport.kifarunix-demo.com/scripts/4c4562439fe63111bf439011960aaa3d/install-node.sh)"If you are using Self-signed SSL certs, be sure to disable certificate peer verify by adding option -k/--insecure to curl command.
sudo bash -c "$(curl -kfsSL https://teleport.kifarunix-demo.com/scripts/4c4562439fe63111bf439011960aaa3d/install-node.sh)"When you run the script, this is the sample output;
2022-03-19 20:30:03 CET [teleport-installer] TELEPORT_VERSION: 9.0.1
2022-03-19 20:30:03 CET [teleport-installer] TARGET_HOSTNAME: teleport.kifarunix-demo.com
2022-03-19 20:30:03 CET [teleport-installer] TARGET_PORT: 443
2022-03-19 20:30:03 CET [teleport-installer] JOIN_TOKEN: 86fe4487700dd68963947575a0ab1061
2022-03-19 20:30:03 CET [teleport-installer] CA_PIN_HASHES: sha256:d16c9ee6fd3188787d04b80905a5607ac0c38f7d6c12f3a29bd9962762914065
2022-03-19 20:30:03 CET [teleport-installer] Checking TCP connectivity to Teleport server (teleport.kifarunix-demo.com:443)
2022-03-19 20:30:03 CET [teleport-installer] Connectivity to Teleport server (via nc) looks good
2022-03-19 20:30:03 CET [teleport-installer] Detected host: linux-gnu, using Teleport binary type linux
2022-03-19 20:30:03 CET [teleport-installer] Detected arch: x86_64, using Teleport arch amd64
2022-03-19 20:30:03 CET [teleport-installer] Detected distro type: debian
2022-03-19 20:30:03 CET [teleport-installer] Using Teleport distribution: deb
2022-03-19 20:30:03 CET [teleport-installer] CrCETed temp dir /tmp/teleport-v4FsTm6AhJ
2022-03-19 20:30:03 CET [teleport-installer] Downloading Teleport deb release 9.0.1
2022-03-19 20:30:03 CET [teleport-installer] Running curl -fsSL --retry 5 --retry-delay 5 https://get.gravitational.com/teleport_9.0.1_amd64.deb
2022-03-19 20:30:03 CET [teleport-installer] Downloading to /tmp/teleport-v4FsTm6AhJ/teleport_9.0.1_amd64.deb
2022-03-19 20:31:00 CET [teleport-installer] Downloaded file size: 92653228 bytes
2022-03-19 20:31:00 CET [teleport-installer] Will use shasum -a 256 to validate the checksum of the downloaded file
2022-03-19 20:31:02 CET [teleport-installer] The downloaded file's checksum validated correctly
2022-03-19 20:31:02 CET [teleport-installer] Using dpkg to install /tmp/teleport-v4FsTm6AhJ/teleport_9.0.1_amd64.deb
Selecting previously unselected package teleport.
(Reading database ... 104426 files and directories currently installed.)
Preparing to unpack .../teleport_9.0.1_amd64.deb ...
Unpacking teleport (9.0.1) ...
Setting up teleport (9.0.1) ...
2022-03-19 20:31:20 CET [teleport-installer] Found: Teleport v9.0.1 git:v9.0.1-0-g7bbe6f15c go1.17.7
2022-03-19 20:31:20 CET [teleport-installer] Writing Teleport node service config to /etc/teleport.yaml
2022-03-19 20:31:20 CET [teleport-installer] Host is using systemd
2022-03-19 20:31:20 CET [teleport-installer] Starting Teleport via systemd. It will automatically be started whenever the system reboots.

Teleport has been started.

View its status with 'sudo systemctl status teleport.service'
View Teleport logs using 'sudo journalctl -u teleport.service'
To stop Teleport, run 'sudo systemctl stop teleport.service'
To start Teleport again if you stop it, run 'sudo systemctl start teleport.service'

You can see this node connected in the Teleport web UI or 'tsh ls' with the name 'cms.kifarunix-demo.com'
Find more details on how to use Teleport here: https://goteleport.com/docs/user-manual/
If you are using self-signed SSL/TLS certs, be sure to update the Teleport service unit file to disable peer certificate verification when running Teleport service.
sed -i 's/start/start --insecure/' /lib/systemd/system/teleport.servicesystemctl daemon-reloadRestart the Teleport agent;
sudo systemctl restart teleport.serviceCheck the status;
systemctl status teleport.service
● teleport.service - Teleport SSH Service
   Loaded: loaded (/lib/systemd/system/teleport.service; enabled; vendor preset: enabled)
   Active: active (running) since Sat 2022-03-19 20:40:36 EAT; 2s ago
 Main PID: 2599 (teleport)
    Tasks: 9 (limit: 2317)
   CGroup: /system.slice/teleport.service
           └─2599 /usr/local/bin/teleport start --insecure --pid-file=/run/teleport.pid

Mar 19 20:40:36 cms.kifarunix-demo.com teleport[2599]: 2022-03-19T20:40:36+03:00 INFO [AUDIT:1]   Creating directory /var/lib/teleport/log/upload. service/service.go:2115
Mar 19 20:40:36 cms.kifarunix-demo.com teleport[2599]: 2022-03-19T20:40:36+03:00 INFO [AUDIT:1]   Creating directory /var/lib/teleport/log/upload/sessions. service/service.
Mar 19 20:40:36 cms.kifarunix-demo.com teleport[2599]: 2022-03-19T20:40:36+03:00 INFO [AUDIT:1]   Creating directory /var/lib/teleport/log/upload/sessions/default. service/
Mar 19 20:40:36 cms.kifarunix-demo.com teleport[2599]: 2022-03-19T20:40:36+03:00 INFO [AUDIT:1]   Creating directory /var/lib/teleport/log. service/service.go:2115
Mar 19 20:40:36 cms.kifarunix-demo.com teleport[2599]: 2022-03-19T20:40:36+03:00 INFO [AUDIT:1]   Creating directory /var/lib/teleport/log/upload. service/service.go:2115
Mar 19 20:40:36 cms.kifarunix-demo.com teleport[2599]: 2022-03-19T20:40:36+03:00 INFO [AUDIT:1]   Creating directory /var/lib/teleport/log/upload/streaming. service/service
Mar 19 20:40:36 cms.kifarunix-demo.com teleport[2599]: 2022-03-19T20:40:36+03:00 INFO [AUDIT:1]   Creating directory /var/lib/teleport/log/upload/streaming/default. service
Mar 19 20:40:36 cms.kifarunix-demo.com teleport[2599]: 2022-03-19T20:40:36+03:00 INFO [NODE:1]    Service is starting in tunnel mode. service/service.go:2025
Mar 19 20:40:36 cms.kifarunix-demo.com teleport[2599]: 2022-03-19T20:40:36+03:00 INFO [PROC:1]    The new service has started successfully. Starting syncing rotation status
Mar 19 20:40:36 cms.kifarunix-demo.com teleport[2599]: 2022-03-19T20:40:36+03:00 [NODE:PROX] INFO Connected. addr:192.168.100.131:60784 remote-addr:192.168.100.129:443 leas...
Your remote server should now be available under servers tab on Teleport server.
Note that if you had created Teleport user with no defined usernames that they can use to login to remote servers (tctl users add --roles=editor,access kifarunix-admin), the servers wont show up on the servers tab.
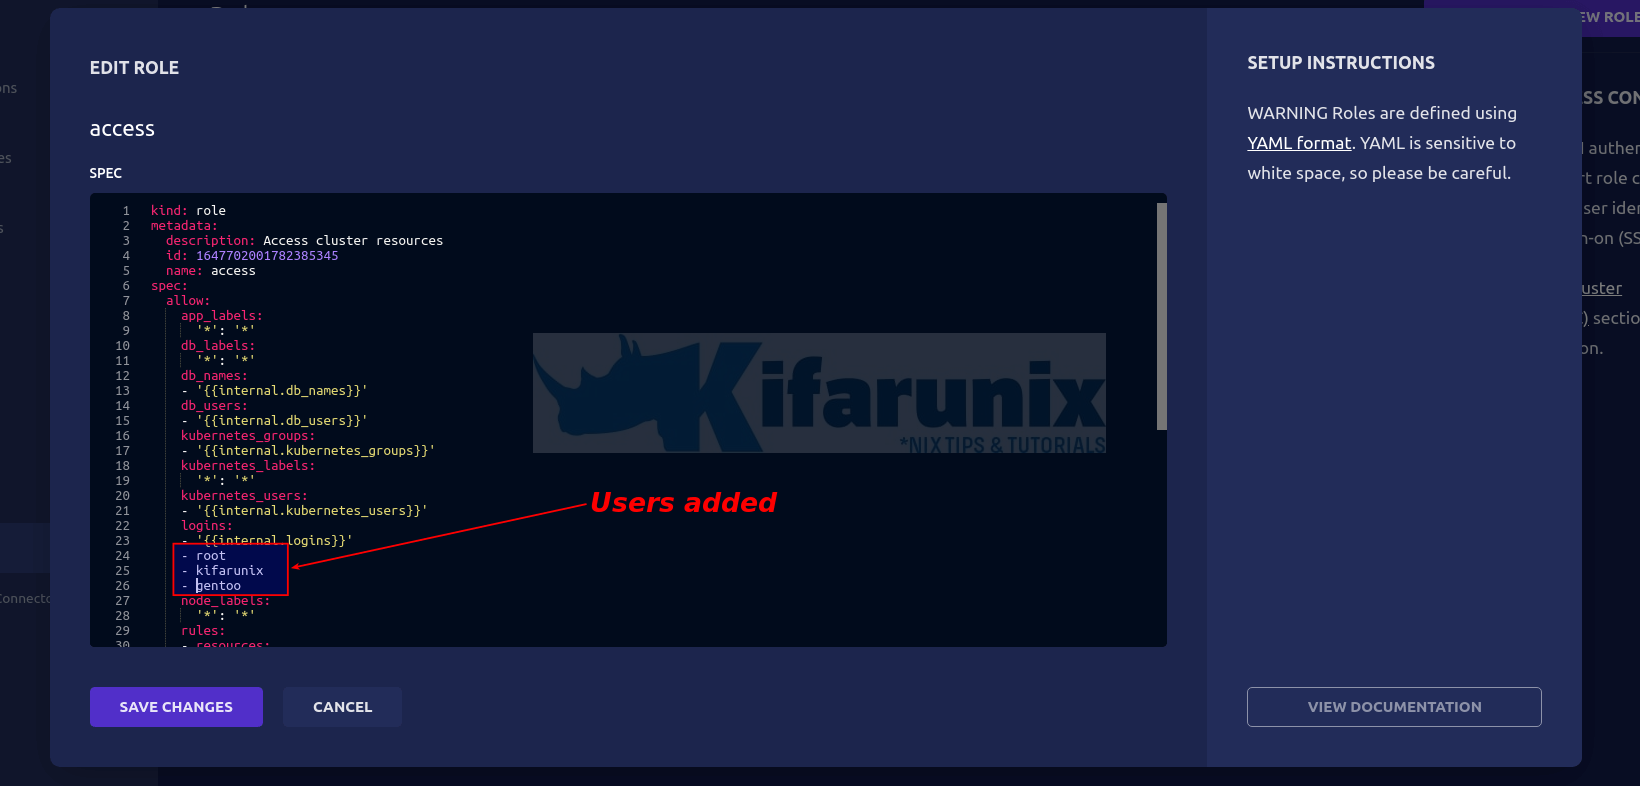
Hence, navigate to Team > Roles. Under access role, click OPTIONS and edit the role.
Under the logins option, you need to define all the users that the user can use to login to remote systems with. See screenshot below.
Save the changes when done. Refresh the servers tab again.
Manually add SSH servers into Teleport Cluster Server
On the remote Linux nodes you want to secure SSH to, login and install Teleport.
In this example setup, we have two remote Linux systems for demo. One is an Ubuntu system and the other is Rocky Linux system.
To install Teleport on an Ubuntu/Debian systems;
- Install Teleport Repositories
wget -qO- https://deb.releases.teleport.dev/teleport-pubkey.asc \
| gpg --dearmor > /etc/apt/trusted.gpg.d/teleport.gpg
echo "deb https://deb.releases.teleport.dev/ stable main" > /etc/apt/sources.list.d/teleport.list- Run system package cache and install Teleport on Ubuntu/Debian systems
apt updateapt install teleportTo install Teleport on an RHEL systems;
- Install Teleport on Rocky Linux/CentOS
On Rocky Linux and newer distros;
dnf config-manager --add-repo https://rpm.releases.teleport.dev/teleport.repoOn CentOS 7 or other older distros;
yum-config-manager --add-repo https://rpm.releases.teleport.dev/teleport.repo- Install Teleport on Rocky Linux/CentOS systems;
yum install teleportNext, on the main Teleport Cluster Web interface, navigate to Server menu > click add server > manually and copy the generated teleport start command.
Execute the command on the remote SSH nodes you want to securely connect to Teleport Server.
teleport start --roles=node --token=1c6c4165d4e3667704cacf79844cc24b --auth-server=teleport.kifarunix-demo.com:443 If you are using self signed ssl certs, be sure to use --insecure option.
teleport start --insecure --roles=node --token=1c6c4165d4e3667704cacf79844cc24b --auth-server=teleport.kifarunix-demo.com:443 When executed, sample output;
INFO [PROC:1]    Joining the cluster with a secure token. service/connect.go:382
WARNING: You are using insecure connection to SSH proxy https://teleport.kifarunix-demo.com:443
INFO [PROC:1]    Node has obtained credentials to connect to the cluster. service/connect.go:416
INFO [PROC:1]    The process successfully wrote the credentials and state of Node to the disk. service/connect.go:457
INFO [PROC:1]    Node: features loaded from auth server: Kubernetes:true App:true DB:true Desktop:true  service/connect.go:71
INFO [AUDIT:1]   Creating directory /var/lib/teleport/log. service/service.go:2115
INFO [AUDIT:1]   Creating directory /var/lib/teleport/log/upload. service/service.go:2115
INFO [AUDIT:1]   Creating directory /var/lib/teleport/log/upload/sessions. service/service.go:2115
INFO [AUDIT:1]   Creating directory /var/lib/teleport/log/upload/sessions/default. service/service.go:2115
INFO [AUDIT:1]   Creating directory /var/lib/teleport/log. service/service.go:2115
INFO [AUDIT:1]   Creating directory /var/lib/teleport/log/upload. service/service.go:2115
INFO [AUDIT:1]   Creating directory /var/lib/teleport/log/upload/streaming. service/service.go:2115
INFO [AUDIT:1]   Creating directory /var/lib/teleport/log/upload/streaming/default. service/service.go:2115
INFO [NODE:1]    Service is starting in tunnel mode. service/service.go:2025
INFO [PROC:1]    The new service has started successfully. Starting syncing rotation status with period 10m0s. service/connect.go:469
The remote server should now show up on Teleport server servers tab.
To run the Teleport agent as a service, press ctrl+c to stop the start command above.
Next, create Teleport configuration file by running the command below and updating the token and nodename values accordingly.
cat > /etc/teleport.yaml << 'EOL'
teleport:
  nodename: rocky8
  auth_token: 1c6c4165d4e3667704cacf79844cc24b
  auth_servers:
  - teleport.kifarunix-demo.com:443
  log:
    output: stderr
    severity: INFO
auth_service:
  enabled: no
ssh_service:
  enabled: yes
proxy_service:
  enabled: no
EOL
Create Teleport agent systemd service unit file if not already existing;
cat > /lib/systemd/system/teleport.service << 'EOL'
[Unit]
Description=Teleport SSH Service
After=network.target

[Service]
Type=simple
Restart=on-failure
EnvironmentFile=-/etc/default/teleport
ExecStart=/usr/local/bin/teleport start --pid-file=/run/teleport.pid
ExecReload=/bin/kill -HUP $MAINPID
PIDFile=/run/teleport.pid
LimitNOFILE=8192

[Install]
WantedBy=multi-user.target
EOL
If using self-signed TLS certs, update the service file by executing the command below;
sed -i 's/start/start --insecure/' /lib/systemd/system/teleport.serviceReload systemd unit files and start and enable Teleport to run on boot;
systemctl daemon-reload
systemctl enable --now teleport
You can also add the nodes manually from command line;
tctl nodes add --ttl=120m --roles=nodeSSH to Remote Linux Servers using Teleport
Now that you have the remote servers added to the Teleport, you can securely SSH into them using the accounts assigned to the user you are logged into Teleport Server as.
You can secure SSH into remote hosts from UI or from the command line;
To login to remote system from Teleport server UI;
- click Servers menu tab and select server from the list.
- Click drop-down button on CONNECT and choose a user to login as.
- Example login interface to a remote system as user gentoo.
To login to remote system from Teleport server command line;
- Login to Teleport server on command line. Replace the proxy node and the user accordingly.
tsh login --proxy=teleport.kifarunix-demo.com:443 --auth=local --user=kifarunix-adminSample output;
Enter password for Teleport user kifarunix-admin:
Enter your OTP token:
690485
WARNING: You are using insecure connection to SSH proxy https://teleport.kifarunix-demo.com:443
> Profile URL:        https://teleport.kifarunix-demo.com:443
  Logged in as:       kifarunix-admin
  Cluster:            kifarunix-demo.com
  Roles:              access, editor
  Logins:             root, kifarunix, gentoo
  Kubernetes:         enabled
  Valid until:        2022-03-20 06:49:39 +0000 UTC [valid for 12h0m0s]
  Extensions:         permit-agent-forwarding, permit-port-forwarding, permit-pty
- You can list the available servers using
tsh lscommand.
tsh ls
Node Name                   Address        Labels
--------------------------- -------------- ------------------------------------------------
cms.kifarunix-demo.com      ⟵ Tunnel
rocky8                      ⟵ Tunnel
teleport.kifarunix-demo.com 127.0.0.1:3022 env=example,hostname=teleport.kifarunix-demo.com
- Next, login to remote server
tsh ssh kifarunix@rocky8
[kifarunix@rocky8 ~]$ pwd
/home/kifarunix
[kifarunix@rocky8 ~]$ whoami
kifarunix
[kifarunix@rocky8 ~]$ id
uid=1000(kifarunix) gid=1000(kifarunix) groups=1000(kifarunix),10(wheel) context=system_u:system_r:unconfined_service_t:s0
[kifarunix@rocky8 ~]$
And that is all on how to secure SSH access on Linux servers using Teleport.
Reference
Getting Started with Teleport Server Access
Other Tutorials
Monitor Process Creation Events on Windows Systems using Wazuh and ELK stack


