
In this tutorial, you will learn how to install NixOS with Gnome Desktop on VirtualBox. NixOS, a Linux distribution based on the purely functional package management system Nix, that is composed using modules and packages defined in the Nixpkgs project.
Table of Contents
Installing NixOS with Gnome Desktop on VirtualBox
Download NixOS Installation ISO file
Navigate to NixOS Downloads page and grab ISO file.
You can simply get the ISO link and pull with wget/curl commands;
wget -c https://channels.nixos.org/nixos-23.05/latest-nixos-gnome-x86_64-linux.isoCreate New VirtualBox VM
Launch VirtualBox and create a new VM.
Next, step through the new vm wizard creation to create NixOS VirtualBox VM;
Virtual Machine Name and Operating System
- Set the name of the NixOS vm.
- Select the VirtualBox installation folder
- Attach the installation ISO file you downloaded above.
- Select the type and version of the OS, if available.

Virtual Machine Hardware
Assign the VM enough RAM and vCPUs. 2GB and 2 vCPUs to start it can do.
Virtual Hard Disk
Create a virtual hard disk of the size of your choice for the NixOS with Gnome Desktop vm say 20GB.
Next, review the settings of the VM and click finish.
Enable NixOS Processor Extended Features
To successfully boot NixOS, you need to enable Processor features.
To begin with, run the command on the terminal to enable “VT-x/AMD-V” acceleration.
vboxmanage modifyvm nixos2305 --nested-hw-virt onReplace nixos2305 with the name of your NixOS.
Next, from the VirtualBox manager, select the NixOS vm and open the settings and enable processor PAE/NX.

Update NixOS Graphics Controller
Under Display, change the graphics controller to VMSVGA.

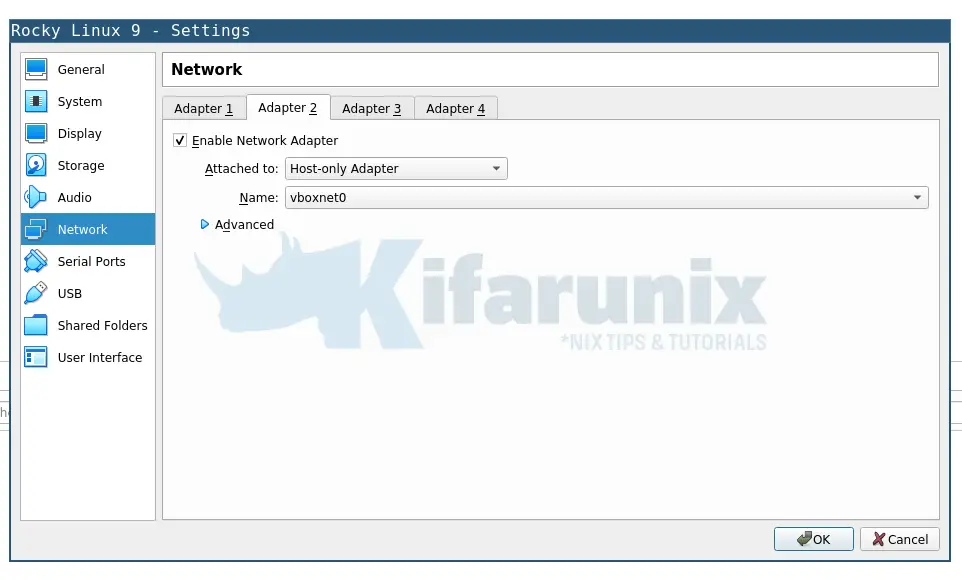
Update Vm Network Settings
Under Network, you can also add other network interfaces for example;
- Adapter 1 set it to NAT to allow the VM to access Internet via the host system.
- Adapter 2 you can set it to host only just in case you want it to communicate with other vms on your host machine and even facilitate easy access from the host system.

Click Ok when done updating the NixOS vm settings.
Installing NixOS with Gnome Desktop
Start the NixOS VM
Once you have setup your VM and attached the ISO file, and done updating other settings, click the start button to power on the vm and begin the installation.

Choose the Installation Language,
Choose your installation language.
Set your Location
Select your location.
Choose Keyboard Layout
Select your appropriate keyboard.
Create User Accounts

You can choose to set a different administrator password or use the same as the one for the user created.
Choose Desktop Environment
We choose GNOME. You can choose whichever you want.

We skip unfree software option.
Select System Partition Scheme
Select how you want to partition the disk.
Next, go through the installation summary.
Install NixOS on VirtualBox
Click Install to install NixOS;

When it is all done, shutdown the VM and be sure to detach installation ISO file.
Login to NixOS with Gnome Desktop on VirtualBox
Start your NixOS VM on virtualbox after detaching the installation ISO file.

When it is booted completely, login to your NixOS with Gnome Desktop;

That is all about how to install NixOS with Gnome Desktop on VirtualBox.
Extras
Enable SSH Service on NixOS
You can check if SSH port is opened once you login to your NixOS vm;
ss -altnp | grep :22If no output, then chances are SSH is not enabled.
Check if SSH daemon is enabled;
grep ssh /etc/nixos/configurations.nixSample output;
# services.openssh.enable = true;As you can see, it is disabled.
So, to enable SSH service on NixOS, edit the /etc/nixos/configurations.nix configuration file;
sed -i '/openssh/s/#//' /etc/nixos/configurations.nixConfirm the enablement;
grep ssh /etc/nixos/configurations.nixSample output;
services.openssh.enable = true;Apply the changes;
sudo nixos-rebuild switchOnce the changes are applied, SSH service should now be running.
Check status;
systemctl status sshd