Welcome to our guide on yet another enterprise file sync and share solution. We will learn how to install Nextcloud with Nginx and SSL/TLS Certificates on CentOS 8.
Want to try ownCloud? Check our guide on setting up ownCloud server on CentOS 8 by following the link below;
Install ownCloud Server on CentOS 8
Installing Nextcloud with Nginx and SSL/TLS on CentOS 8
To install Nextcloud with Nginx and SSL/TLS, these are the steps that were used in our environment. Feel free to modify the steps to suit your environment.
Run System Update
Ensure that your system packages are up-to-date.
dnf updateInstall LEMP Stack
To run Nextcloud with Nginx, you first need to setup LEMP stack. We have provided a guide on how to setup LEMP stack on CentOS 8 in our previous guide. Follow the link below;
Install LEMP Stack on CentOS 8
Install Other Required PHP Modules
To install other required PHP modules and other packages, run the commands below;
dnf install php-gd php-json php-curl php-mbstring php-intl php-xml php-zip php-pear php-soapInstall other required packages;
dnf install zip wget tar policycoreutils-python-utilsConfigure PHP
Edit the /etc/php.ini and set the value of cgi.fix_pathinfo to 0.
vim /etc/php.ini...
;cgi.fix_pathinfo=1
cgi.fix_pathinfo=0
...Edit the /etc/php-fpm.d/www.conf and make the following changes;
vim /etc/php-fpm.d/www.conf...
user = nginx
group = nginx
...
# Uncomment these lines by removing the ; at the beginning of the lines.
env[HOSTNAME] = $HOSTNAME
env[PATH] = /usr/local/bin:/usr/bin:/bin
env[TMP] = /tmp
env[TMPDIR] = /tmp
env[TEMP] = /tmp
...Create Nextcloud Database and Database User
Before you can create MariaDB/MySQL database for Nextcloud ensure that InnoDB is the default storage engine;
mysql -u root -pshow engines;+--------------------+---------+----------------------------------------------------------------------------------+--------------+------+------------+
| Engine | Support | Comment | Transactions | XA | Savepoints |
+--------------------+---------+----------------------------------------------------------------------------------+--------------+------+------------+
...
...
| InnoDB | DEFAULT | Supports transactions, row-level locking, foreign keys and encryption for tables | YES | YES | YES |
...Ensure that the support is set to DEFAULT.
Next, create Nextcloud database (The names of the database and database user used here are not standard, use whatever names you like).
create database ncdb;Create Nextcloud database user with full privileges granted on the Nextcloud database.
grant all privileges on ncdb.* to ncadmin@localhost identified by 'P@ssW0rd';Reload privileges tables and exit the DB.
flush privileges;
quit
Download and Install Nextcloud
In this guide, we are going to install Nextcloud from the source. As such, download the latest stable release version of Nextcloud, v17.0.2, as of this writing from the releases page.
wget https://download.nextcloud.com/server/releases/latest.zipExtract Nextcloud to Web Root Directory
Since we are using Nginx as our Web server, we are gonna place the Nextcloud files and configurations under, /usr/share/nginx/html/nextcloud. The path might be different for your case.
unzip latest.zip -d /usr/share/nginx/html/Generate SSL/TLS Certificates
Well, to setup Nextcloud with SSL/TLS certificates, you first need to generate the certificates. This guide uses self signed certificates for demonstration purposes. If you are running Nextcloud in production environments, consider using the publicly trusted certificates from your preferred CA.
openssl req -x509 -nodes -days 365 -newkey rsa:2048 -keyout /etc/pki/tls/nc-selfsigned.key -out /etc/pki/tls/nc-selfsigned.crtConfiguring Nginx for Nextcloud
Nextcloud provides a sample Nginx configuration code for Nextcloud. You can simply grab the configuration and adjust it to suit your environment setting.
vim /etc/nginx/conf.d/nextcloud.confBe sure to replace the server name, the web root directory, the path to the SSL/TLS certificates accordingly.
upstream php-handler {
    server unix:/run/php-fpm/www.sock;
}

server {
    listen 80;
    server_name nextcloud.kifarunix-demo.com;
    # enforce https
    return 301 https://$server_name:443$request_uri;
}

server {
    listen 443 ssl http2;
    server_name nextcloud.kifarunix-demo.com;

    ssl_certificate /etc/pki/tls/nc-selfsigned.crt;
    ssl_certificate_key /etc/pki/tls/nc-selfsigned.key;

    add_header Referrer-Policy "no-referrer" always;
    add_header X-Content-Type-Options "nosniff" always;
    add_header X-Download-Options "noopen" always;
    add_header X-Frame-Options "SAMEORIGIN" always;
    add_header X-Permitted-Cross-Domain-Policies "none" always;
    add_header X-Robots-Tag "none" always;
    add_header X-XSS-Protection "1; mode=block" always;

    fastcgi_hide_header X-Powered-By;

    # Path to the root of your installation
    root /usr/share/nginx/html/nextcloud;

    access_log /var/log/nginx/nc_access_log;
    error_log /var/log/nginx/nc_error_log;

    location = /robots.txt {
        allow all;
        log_not_found off;
        access_log off;
    }

    location = /.well-known/carddav {
      return 301 $scheme://$host:$server_port/remote.php/dav;
    }
    location = /.well-known/caldav {
      return 301 $scheme://$host:$server_port/remote.php/dav;
    }

    # set max upload size
    client_max_body_size 512M;
    fastcgi_buffers 64 4K;

    # Enable gzip but do not remove ETag headers
    gzip on;
    gzip_vary on;
    gzip_comp_level 4;
    gzip_min_length 256;
    gzip_proxied expired no-cache no-store private no_last_modified no_etag auth;
    gzip_types application/atom+xml application/javascript application/json application/ld+json application/manifest+json application/rss+xml application/vnd.geo+json application/vnd.ms-fontobject application/x-font-ttf application/x-web-app-manifest+json application/xhtml+xml application/xml font/opentype image/bmp image/svg+xml image/x-icon text/cache-manifest text/css text/plain text/vcard text/vnd.rim.location.xloc text/vtt text/x-component text/x-cross-domain-policy;

    location / {
        rewrite ^ /index.php;
    }

    location ~ ^\/(?:build|tests|config|lib|3rdparty|templates|data)\/ {
        deny all;
    }
    location ~ ^\/(?:\.|autotest|occ|issue|indie|db_|console) {
        deny all;
    }

    location ~ ^\/(?:index|remote|public|cron|core\/ajax\/update|status|ocs\/v[12]|updater\/.+|oc[ms]-provider\/.+)\.php(?:$|\/) {
        fastcgi_split_path_info ^(.+?\.php)(\/.*|)$;
        set $path_info $fastcgi_path_info;
        try_files $fastcgi_script_name =404;
        include fastcgi_params;
        fastcgi_param SCRIPT_FILENAME $document_root$fastcgi_script_name;
        fastcgi_param PATH_INFO $path_info;
        fastcgi_param HTTPS on;
        fastcgi_param modHeadersAvailable true;
        fastcgi_param front_controller_active true;
        fastcgi_pass php-handler;
        fastcgi_intercept_errors on;
        fastcgi_request_buffering off;
    }

    location ~ ^\/(?:updater|oc[ms]-provider)(?:$|\/) {
        try_files $uri/ =404;
        index index.php;
    }

    location ~ \.(?:css|js|woff2?|svg|gif|map)$ {
        try_files $uri /index.php$request_uri;
        add_header Cache-Control "public, max-age=15778463";
        add_header Referrer-Policy "no-referrer" always;
        add_header X-Content-Type-Options "nosniff" always;
        add_header X-Download-Options "noopen" always;
        add_header X-Frame-Options "SAMEORIGIN" always;
        add_header X-Permitted-Cross-Domain-Policies "none" always;
        add_header X-Robots-Tag "none" always;
        add_header X-XSS-Protection "1; mode=block" always;

        access_log off;
    }

    location ~ \.(?:png|html|ttf|ico|jpg|jpeg|bcmap)$ {
        try_files $uri /index.php$request_uri;
        access_log off;
    }
}
Save and quit the configuration file.
Create Nextcloud data directory;
mkdir /usr/share/nginx/html/nextcloud/dataSet the user and group ownership of the Nextcloud directory to nginx.
chown -R nginx:nginx /usr/share/nginx/html/nextcloudSet proper permissions for Nextcloud directories and files.
find /usr/share/nginx/html/nextcloud/ -type d -exec chmod 750 {} \;find /usr/share/nginx/html/nextcloud/ -type f -exec chmod 640 {} \;Set the ownership of PHP session directory to nginx.
chown nginx:nginx -R /var/lib/php/session/Verify Nginx for syntax errors.
nginx -tnginx: the configuration file /etc/nginx/nginx.conf syntax is ok
nginx: configuration file /etc/nginx/nginx.conf test is successfulRestart Nginx and PHP-FPM.
systemctl restart nginx php-fpmAllow Nginx HTTP/HTTPS traffic on FirewallD
If firewallD is running, run the command below to open both port 80 and 443.
firewall-cmd --add-port={80,443}/tcp --permanentfirewall-cmd --reloadConfigure SELinux
Also, Nextcloud provide SELinux configurations that should at least fix the permission issues with Nextcloud. Run the commands below and be sure to replace the Nextcloud installation paths accordingly.
semanage fcontext -a -t httpd_sys_rw_content_t '/usr/share/nginx/html/nextcloud/data(/.*)?'
semanage fcontext -a -t httpd_sys_rw_content_t '/usr/share/nginx/html/nextcloud/config(/.*)?'
semanage fcontext -a -t httpd_sys_rw_content_t '/usr/share/nginx/html/nextcloud/apps(/.*)?'
semanage fcontext -a -t httpd_sys_rw_content_t '/usr/share/nginx/html/nextcloud/.htaccess'
semanage fcontext -a -t httpd_sys_rw_content_t '/usr/share/nginx/html/nextcloud/.user.ini'
semanage fcontext -a -t httpd_sys_rw_content_t '/usr/share/nginx/html/nextcloud/3rdparty/aws/aws-sdk-php/src/data/logs(/.*)?'

restorecon -Rv '/usr/share/nginx/html/nextcloud/'
Finalize Nextcloud Setup on Browser
You can now access Nextcloud from the browser to finalize the installation and setup. Note that we have configured HTTP redirection to HTTPS hence, if you access Nextcloud using the URL, nextcloud.kifarunix-demo.com (replace accordingly), you will be redirected to HTTPS and since we are using the the self signed SSL/TLS certificates, skip the warning;
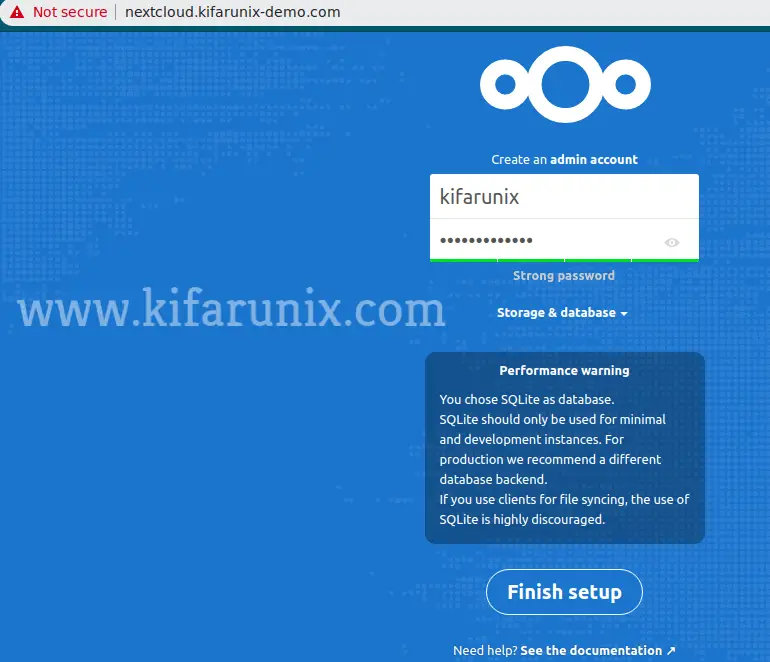
On the Nextcloud user interface, enter the name and password for the Nextcloud admin user.

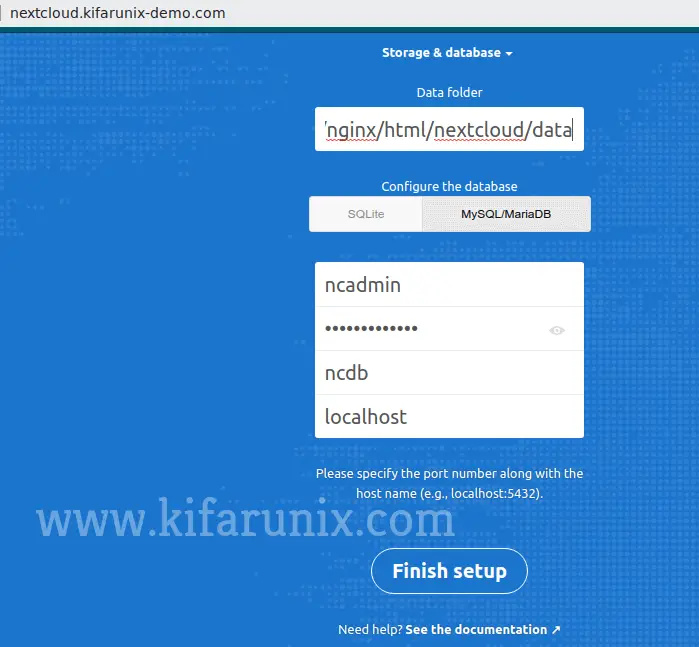
Next, you need to define your backend database and the connection details. In this demo, we are using MariaDB and click on the storage and database drop down, set the Nextcloud data directory, choose MySQL/MariaDB as the database and set the connection details as create above.

Click Finish setup to complete the configuration.
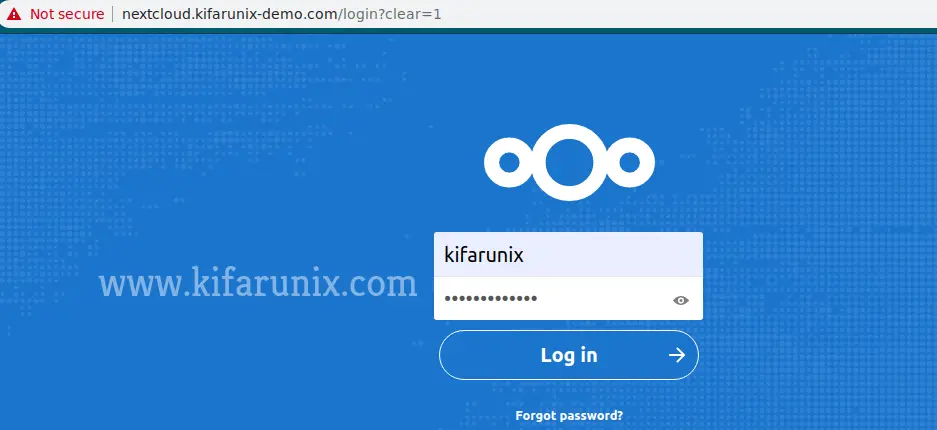
Once the setup is done, you will be welcomed by a login window.

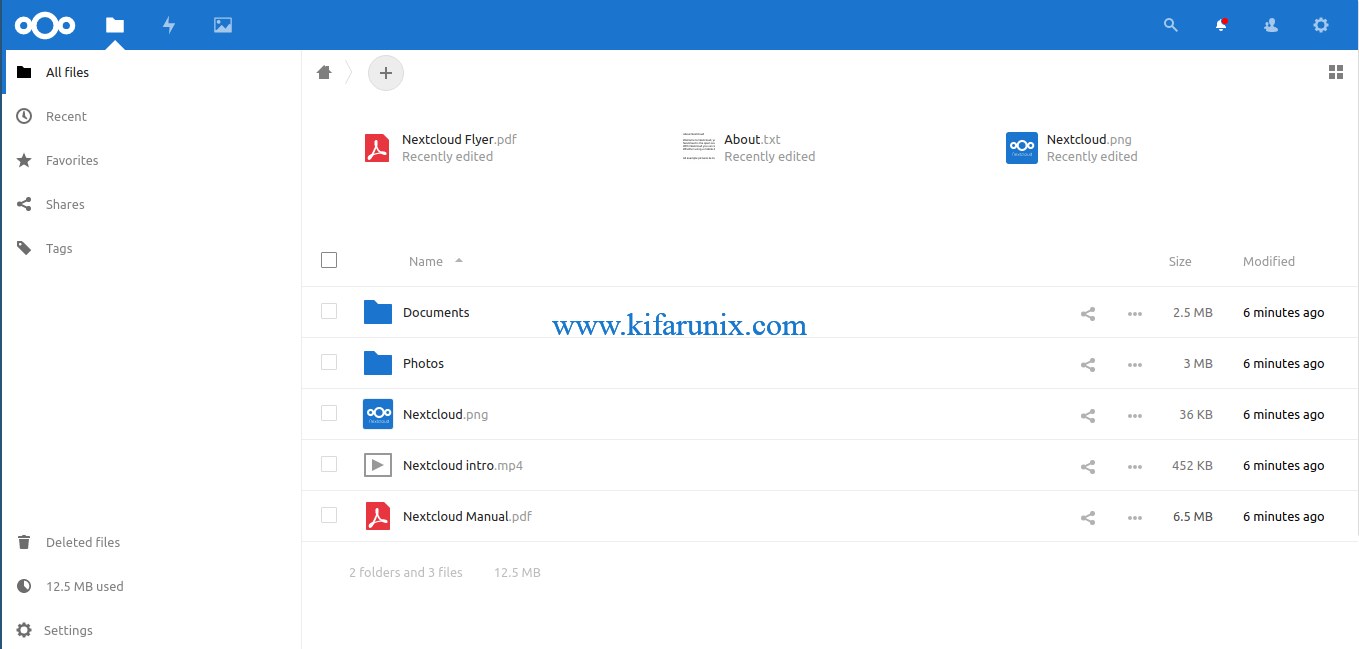
Enter the admin credentials created during setup and login to Nextcloud.

That marks the end of our tutorial. You can now further explore this awesome tool.
Reference
Nextcloud latest administration manual
Related Tutorials
Configure ownCloud OpenLDAP Authentication
Install ownCloud Server on Debian 10 Buster


Hi Thanks for this tuto, quite usefull! And i wonder, if there’s a lot of change to be made for a setup of Owncloud with nginx and LetsEncrypt cerficate, for the https ? Thanks again appreciated
Yeah do also look for an NGINX with ssl for Owncloud.