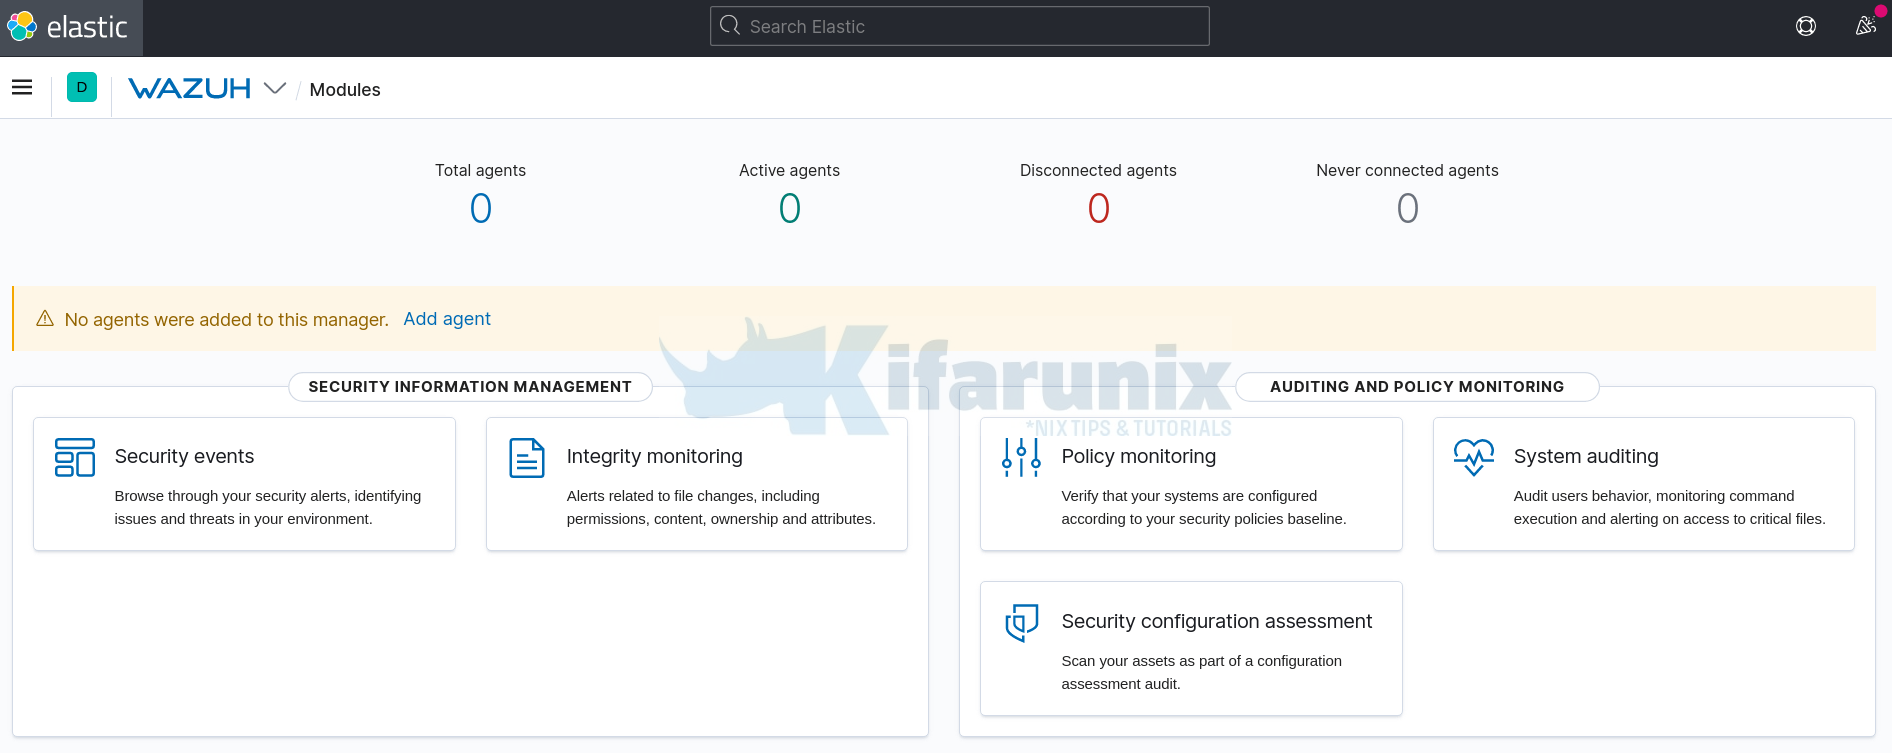
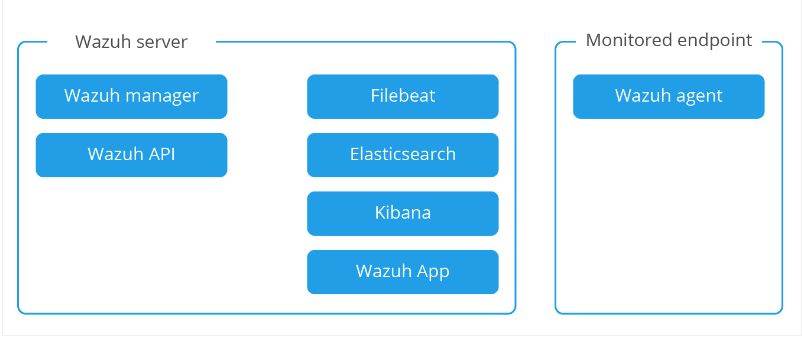
In this tutorial, you will learn how to install and setup Wazuh server in CentOS 8/Fedora 32. Wazuh is an open-source tool for visibility, security detection, and compliance. It is a fork of OSSEC HIDS with additional integration with ELK stack and OpenSCAP. The Wazuh stack consists of the Wazuh server (manager), the ELK stack, and the Wazuh agents as shown in the image below.
As of this writing, the current latest and stable version is of Wazuh is v4.4.1.
Table of Contents
Install Wazuh Server on CentOS 8/Fedora 32
The Wazuh server has the primary functions of agent registration, data analysis, and managing of agents.
Deployment Architecture
There are two different deployment architectures for Wazuh server;
- All-in-one: The Wazuh server and Elastic Stack are installed on the same host.
- Distributed: Each component is installed on a separate host as a single-node or multi-node cluster. This type of deployment provides high availability and scalability of the product, and it is convenient for large working environments.
In this tutorial, we will use the All-in-one deployment architecture.
System Requirements
Consult the documentation for the recommended system requirements.
Install Wazuh Server on CentOS 8/Fedora 32
Add Wazuh to repository
You first have to add Wazuh repository to the server by running the command below.
cat > /etc/yum.repos.d/wazuh.repo << 'EOL'
[wazuh_repo]
gpgcheck=1
gpgkey=https://packages.wazuh.com/key/GPG-KEY-WAZUH
enabled=1
name=Wazuh repository
baseurl=https://packages.wazuh.com/4.x/yum/
protect=1
EOL
Import the Wazuh repository GPG key
rpm --import https://packages.wazuh.com/key/GPG-KEY-WAZUHInstall Wazuh Server on CentOS 8/Fedora 32
Run the following command to install wazuh server. on CentOS 8/Fedora 32
dnf -y install wazuh-managerWhen the installation process is complete, start Wazuh Manager.
systemctl start wazuh-manager
You can check the status as shown below;
systemctl status wazuh-manager
● wazuh-manager.service - Wazuh manager
   Loaded: loaded (/usr/lib/systemd/system/wazuh-manager.service; disabled; vendor preset: disabled)
   Active: active (running) since Tue 2023-05-09 14:15:02 EDT; 6s ago
  Process: 6018 ExecStart=/usr/bin/env /var/ossec/bin/wazuh-control start (code=exited, status=0/SUCCESS)
    Tasks: 99 (limit: 17668)
   Memory: 204.5M
   CGroup: /system.slice/wazuh-manager.service
           ├─6077 /var/ossec/framework/python/bin/python3 /var/ossec/api/scripts/wazuh-apid.py
           ├─6117 /var/ossec/bin/wazuh-authd
           ├─6132 /var/ossec/bin/wazuh-db
           ├─6157 /var/ossec/bin/wazuh-execd
           ├─6171 /var/ossec/bin/wazuh-analysisd
           ├─6223 /var/ossec/bin/wazuh-syscheckd
           ├─6238 /var/ossec/bin/wazuh-remoted
           ├─6251 /var/ossec/bin/wazuh-logcollector
           ├─6262 /var/ossec/bin/wazuh-monitord
           └─6301 /var/ossec/bin/wazuh-modulesd

May 09 14:14:54 rocky9 env[6018]: Started wazuh-db...
May 09 14:14:55 rocky9 env[6018]: Started wazuh-execd...
May 09 14:14:56 rocky9 env[6018]: Started wazuh-analysisd...
May 09 14:14:57 rocky9 env[6018]: Started wazuh-syscheckd...
May 09 14:14:58 rocky9 env[6018]: Started wazuh-remoted...
May 09 14:14:58 rocky9 env[6018]: Started wazuh-logcollector...
May 09 14:14:59 rocky9 env[6018]: Started wazuh-monitord...
May 09 14:15:00 rocky9 env[6018]: Started wazuh-modulesd...
May 09 14:15:02 rocky9 env[6018]: Completed.
May 09 14:15:02 rocky9 systemd[1]: Started Wazuh manager.
To avoid issues on version control and updates, it is recommended you disable the repository.
sed -i "s/enabled=1/enabled=0/" /etc/yum.repos.d/wazuh.repoInstall Elastic Stack on CentOS 8/Fedora 32
Next, you need to install Elasticsearch, Kibana, Filebeat and Wazuh APP to be able to use Wazuh-manager to its full potential.
Before you can proceed, you need to ensure that the Elastic components being installed are compatible with the version of Wazuh-manager installed.
In this demo, Wazuh-manager 4.4.1 is installed:
rpm -qa wazuh-managerwazuh-manager-4.4.1-1.x86_64Based on the Wazuh compatibility matrix, Wazuh 4.4.1 is compatible with Elastic 7.17.9, as of this writing.
Create Elastic Repository
cat > /etc/yum.repos.d/elasticstack.repo << EOL
[elasticsearch]
name=Elasticsearch repository for 7.x packages
baseurl=https://artifacts.elastic.co/packages/7.x/yum
gpgcheck=1
gpgkey=https://artifacts.elastic.co/GPG-KEY-elasticsearch
enabled=1
autorefresh=1
type=rpm-md
EOL
Install Elasticsearch, Kibana and Filebeat
Based on the compatibility matrix for Wazuh 4.4.1, install Elasticsearch 7.17.9, Kibana 7.17.9 and Filebeat 7.17.9 by running the command below;
dnf install elasticsearch-7.17.9 kibana-7.17.9 filebeat-7.17.9Sample output;
Dependencies resolved.
===================================================================================================================================================================================================================
 Package                                               Architecture                                   Version                                          Repository                                             Size
===================================================================================================================================================================================================================
Installing:
 elasticsearch                                         x86_64                                         7.17.9-1                                         elasticsearch                                         301 M
 filebeat                                              x86_64                                         7.17.9-1                                         elasticsearch                                          34 M
 kibana                                                x86_64                                         7.17.9-1                                         elasticsearch                                         261 M

Transaction Summary
===================================================================================================================================================================================================================
Install  3 Packages

Total download size: 595 M
Installed size: 1.3 G
Is this ok [y/N]: y
Configuring Elasticsearch
There are only a few changes we are going to make in regards to configuring Elasticsearch.
You can optionally set the Elastic cluster name;
sed -i 's/#cluster.name: my-application/cluster.name: wazuh-elastic/' /etc/elasticsearch/elasticsearch.ymlNext, configure JVM heap size to no more than half the size of your memory. In this case, our test server has 2G RAM and the heap size is set to 512M for both maximum and minimum sizes.
echo '-Xms512m
-Xmx512m' > /etc/elasticsearch/jvm.options.d/jvm-memory.options
Start and enable ES to run on system boot.
systemctl daemon-reloadsystemctl enable --now elasticsearchVerify that Elasticsearch is running as expected.
curl -XGET localhost:9200
{
  "name" : "rocky9",
  "cluster_name" : "wazuh-elastic",
  "cluster_uuid" : "-bJbTqm8S2OVWpgka0RSnQ",
  "version" : {
    "number" : "7.17.9",
    "build_flavor" : "default",
    "build_type" : "rpm",
    "build_hash" : "ef48222227ee6b9e70e502f0f0daa52435ee634d",
    "build_date" : "2023-01-31T05:34:43.305517834Z",
    "build_snapshot" : false,
    "lucene_version" : "8.11.1",
    "minimum_wire_compatibility_version" : "6.8.0",
    "minimum_index_compatibility_version" : "6.0.0-beta1"
  },
  "tagline" : "You Know, for Search"
}
Configure Filebeat
Create a backup of the Filebeat configuration file.
mv /etc/filebeat/filebeat.yml{,.original}In our setup, we use the Filebeat configuration file below. You can configure it to your liking.
cat > /etc/filebeat/filebeat.yml << 'EOL'
# Wazuh - Filebeat configuration file
output.elasticsearch:
  hosts: ["localhost:9200"]
setup.template.json.enabled: true
setup.template.json.path: '/etc/filebeat/wazuh-template.json'
setup.template.json.name: 'wazuh'
setup.ilm.overwrite: true
setup.ilm.enabled: false

filebeat.modules:
  - module: wazuh
    alerts:
      enabled: true
    archives:
      enabled: false

logging.level: info
logging.to_files: true
logging.files:
  path: /var/log/filebeat
  name: filebeat
  keepfiles: 7
  permissions: 0644
EOL
Then download the alerts template for ELK
curl -so /etc/filebeat/wazuh-template.json \
https://raw.githubusercontent.com/wazuh/wazuh/4.4/extensions/elasticsearch/7.x/wazuh-template.json
chmod go+r /etc/filebeat/wazuh-template.jsonTest Filebeat connection to Elasticsearch
filebeat test outputSample output;
elasticsearch: http://localhost:9200...
  parse url... OK
  connection...
    parse host... OK
    dns lookup... OK
    addresses: ::1, 127.0.0.1
    dial up... OK
  TLS... WARN secure connection disabled
  talk to server... OK
  version: 7.17.9
Install the Wazuh module for Filebeat:
curl -s https://packages.wazuh.com/4.x/filebeat/wazuh-filebeat-0.2.tar.gz | \
tar -xz -C /usr/share/filebeat/module
Start and enable Filebeat to run on system boot;
systemctl daemon-reloadsystemctl enable --now filebeatFilebeat will write logs to /var/log/filebeat/ just in case you need to check something.
Configure Kibana
Define the address to which the Kibana server will bind. By IP addresses and host names are both valid values. localhost is the default value.
In my case, the IP address of my Wazuh server is 192.168.56.145. Hence, I will configure Kibana to listen on this address.
sed -i -e '/server.host:/s/^#//' -e '/server.host:/s/localhost/192.168.56.145/' /etc/kibana/kibana.ymlTo configure Kibana to listen on any interface IP, replace the IP above with 0.0.0.0. For example;
sed -i -e '/server.host:/s/^#//' -e '/server.host:/s/localhost/0.0.0.0/' /etc/kibana/kibana.ymlInstall Wazuh App Kibana Plugin
mkdir /usr/share/kibana/datachown -R kibana: /usr/share/kibana/datachown -R kibana: /usr/share/kibana/pluginsBefore you download and install the plugin, get the tag for your specific version of Wazuh;
sudo -u kibana /usr/share/kibana/bin/kibana-plugin install \
https://packages.wazuh.com/4.x/ui/kibana/wazuh_kibana-4.4.1_7.17.9-1.zip
You can list installed plugins;
sudo -u kibana /usr/share/kibana/bin/kibana-plugin listOutput;
[email protected]Start Kibana;
systemctl enable --now kibanaRestart Elasticsearch and Wazuh manager;
systemctl restart elasticsearch wazuh-managerOpen Ports on Firewall
Read about Wazuh Server ports on Required Wazuh Ports page.
You need to allow some ports on firewall. These include;
- 5601/tcp for external access to Kibana
- 1514/udp/tcp to allow collection of events from agents (when configured for UDP, TCP is used by default).
- 1515/udp for Agents registration service
firewall-cmd --add-port=5601/tcp --permanentfirewall-cmd --add-port={1514,1515}/udp --permanentfirewall-cmd --add-port={1514,1515}/tcp --permanent
Then reload the firewall
firewall-cmd --reloadAccessing Wazuh App on Kibana Web Interface
You can now access Kibana web interface via the address http://server-IP-or-hostname:5601.
Wazuh App dashboard
In the next section, we will learn how to push event data/logs to Elasticsearch via the Wazuh agents.
Sending Events/Data to Wazuh Server using Wazuh Agents
Wazuh agents can be installed on client servers or workstations from which logs are collected. Agents are available for both Windows and UNIX systems.
Manually Install Wazuh Agent on CentOS 8/Fedora 32
In this tutorial, we are going to install the Wazuh agent in another CentOS 8 server acting at the end point from which we are collecting logs.
Create the Wazuh Repository
Copy and paste the following content to add Wazuh repository on a CentOS 8 agent.
rpm --import http://packages.wazuh.com/key/GPG-KEY-WAZUH
cat > /etc/yum.repos.d/wazuh.repo << 'EOF'
[wazuh_repo]
gpgcheck=1
gpgkey=https://packages.wazuh.com/key/GPG-KEY-WAZUH
enabled=1
name=Wazuh repository
baseurl=https://packages.wazuh.com/4.x/yum/
protect=1
EOF
Install Wazuh Agents on CentOS 8/Fedora 32
Once the repos are in place, you can install Wazuh agent by running the command below;
dnf -y install wazuh-agentThe installation is now complete. The next step is to enable the agent to communicate with the manager.
Add Wazuh Agent on Wazuh Server
On Wazuh manager, run the command:
/var/ossec/bin/manage_agentsSelect add an agent (A) and press enter.
Wazuh v4.4.1 Agent manager. *
The following options are available: *

(A)dd an agent (A).
(E)xtract key for an agent (E).
(L)ist already added agents (L).
(R)emove an agent (R).
(Q)uit.
Choose your action: A,E,L,R or Q: A
Provide a name for the agent(in our case RHAgent) and IP of the agent and confirm.
Note the ID given to the agent.
Adding a new agent (use '\q' to return to the main menu).
Please provide the following:
A name for the new agent: RHAgent
The IP Address of the new agent: 192.168.56.130
Confirm adding it?(y/n): y
Agent added with ID 002.
Extract Wazuh Agent Key
For an agent to communicate with the manager, the agent needs a key. Proceed to extract agent key by typing E.Select the ID of the Agent (002 in this case).
Choose your action: A,E,L,R or Q: E
Available agents:
ID: 001, Name: centos8, IP: 192.168.56.103
ID: 002, Name: RHAgent, IP: 192.168.56.130
Provide the ID of the agent to extract the key (or '\q' to quit): 002
Agent key information for '002' is:
MDAyIFJIQWdlbnQgMTkyLjE2OC41Ni4xMzAgMzFjNTVjOGNiMzU2YmJkOTcyYzE2YjVhMDZiNzNkMGNmYTFhYmJlYWM4OTZmMGE0OWY3NzdjNjEwNTJiMGZjMQ==
Copy the key and paste it in an accessible place as we will be using in the next step.
Set the Wazuh Server Address on Wazuh Agent
On the agent, edit the file /var/ossec/etc/ossec.conf and add the Wazuh manager IP/resolvable hostname.
vim /var/ossec/etc/ossec.conf
...
<server>
      <address>192.168.56.145</address>
      <port>1514</port>
      <protocol>udp</protocol>
    </server>
...
Save and quit
Navigate to /var/ossec/bin and run manage_agents script to import the agent key.
/var/ossec/bin/manage_agentsPress I to import the key previously generated from the manager.
Provide the Key generated by the server.
The best approach is to cut and paste it.
*** OBS: Do not include spaces or new lines.
Paste it here (or '\q' to quit): PASTE THE AGENT KEY HERE
Agent information:
ID:002
Name:RHAgent
IP Address:192.168.56.130
Confirm adding it?(y/n): y
Added.
Quit and restart the agent.
/var/ossec/bin/ossec-control restartAutomatically Install Wazuh Agent on CentOS/Fedora
You can automatically add and install Wazuh agents on CentOS/Fedora systems;
- Navigate to Wazuh app on Kibana,
- head over to agents
- Deploy a new agent
- Choose the operating system (CentOS)
- Choose the OS version (CentOS 7+)
- Choose the architecture, for example x86_64
- Wazuh server address (e.g 192.168.56.145)
- Assign a name and a group to the agent
- Copy the installation command, execute on the host where the agent is being installed to install and enroll the Wazuh agent

Start and enable to agent to run on system boot;
sudo systemctl daemon-reloadsudo systemctl enable --now wazuh-agentVerify Wazuh Agent Data Reception on Kibana
The agent registration is complete. Let us check its data from the Wazuh module in Kibana.
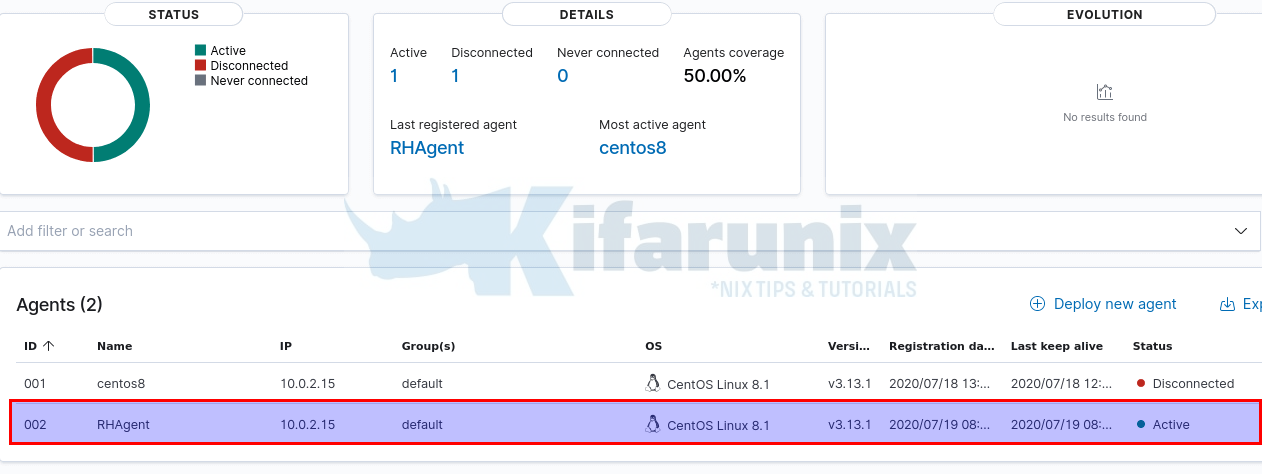
Navigate to Wazuh>Modules>Security Events to view security related events and dashboards.

You can explore more on the modules such as Auditing and Policy Monitoring,Regulatory Compliance and Threat Detection and Response.
Further Reading
Installing Wazuh Server on CentOS
Related Tutorials
Install OSSEC Agent on CentOS 8

