In this guide, we are going to learn how to set system wide proxy in Ubuntu 18.04. Imagine you are in a local network environment where access to the Internet is also possible when you are going through a proxy server. Well, in this guide we are gonna learn how to configure system wide proxy settings on your Ubuntu 18.04 server or desktop so that you can be able to access the Internet.
Setting System Wide Proxy in Ubuntu 18.04
Set System Wide Proxy using Environment Variables
One of the ways of configuring system wide proxy settings on Ubuntu 18.04 system is by using environment variables especially if you are running an headless server. Proxy environment variables depend on the protocol handlers used by your proxy server. This can either be http, https, ftp or socks.
Hence to set http or https proxy environment variables, use the export command.
export http_proxy=http://192.168.43.100:3128
export https_proxy=https://192.168.43.100:3128
Note that the export command sets temporarily environment variables that are only persistent on the shell you created the variable and the user who created the variable.
Hey, you want to learn how to configure Squid proxy and Squid Proxy authentication on CentOS 7/Fedora 29? Check the links below;
How to Install and Configure Squid Proxy on Fedora 29/Fedora 28/CentOS 7
Setup Squid Proxy Authentication on Ubuntu 18.04/Fedora 29/28/CentOS 7
To set the proxy environment variables to apply to all the system users or persistent across all shells, you can append these lines to /etc/environment.
echo -e "http_proxy=http://192.168.43.100:3128/\nhttps_proxy=https://192.168.43.100:3128/" | sudo tee -a /etc/environment
http_proxy=http://192.168.43.100:3128/
https_proxy=https://192.168.43.100:3128/
Note that these settings will only take effect on login again since the /etc/environment is read on system login. However, you can still use netplan command to apply the settings.
sudo netplan apply
To test this out, try to download anything from the terminal or run the system update. You will see that the connections is happening through the proxy server.
wget google.com
--2019-03-23 12:34:05--  http://google.com/
Connecting to 192.168.43.100:3128...
sudo apt update
0% [Connecting to 192.168.43.100 (192.168.43.100)] [Connecting to 192.168.43.100 (192.168.43.100)]...
To configure proxy settings for APT only, you can simply create proxy configuration file under /etc/apt/apt.conf.d/.
echo -e 'Acquire::http::Proxy "http://192.168.43.100:3128/";\nAcquire::https::Proxy "https://192.168.43.100:3128/";' | sudo tee /etc/apt/apt.conf.d/02proxy
Acquire::http::Proxy "http://192.168.43.100:3128/";
Acquire::https::Proxy "https://192.168.43.100:3128/";
If your proxy server requires username/password authentication, then the environment variables would set as below;
http_proxy=http://Username:Password@192.168.43.100:3128/
https_proxy=https://Username:Password@192.168.43.100:3128/
For APT;
Acquire::http::Proxy "http://Username:Password@192.168.43.100:3128/";
Acquire::https::Proxy "https://Username:Password@192.168.43.100:3128/";
If you are looking at running at command for just that moment via proxy, you may prefix apt command with proxy settings as shown below;
sudo 'http_proxy=http://192.168.43.100:3128' apt update
or
sudo 'http_proxy=http://Username:[email protected]:3128' apt update
You can also set system wide proxy settings under /etc/profile.d. Follow the link below to check how to set system wide proxy settings under the /etc/profile.d.
Set system wide proxy settings on /etc/profile.d.
Set System Proxy on Ubuntu 18.04 Network Settings
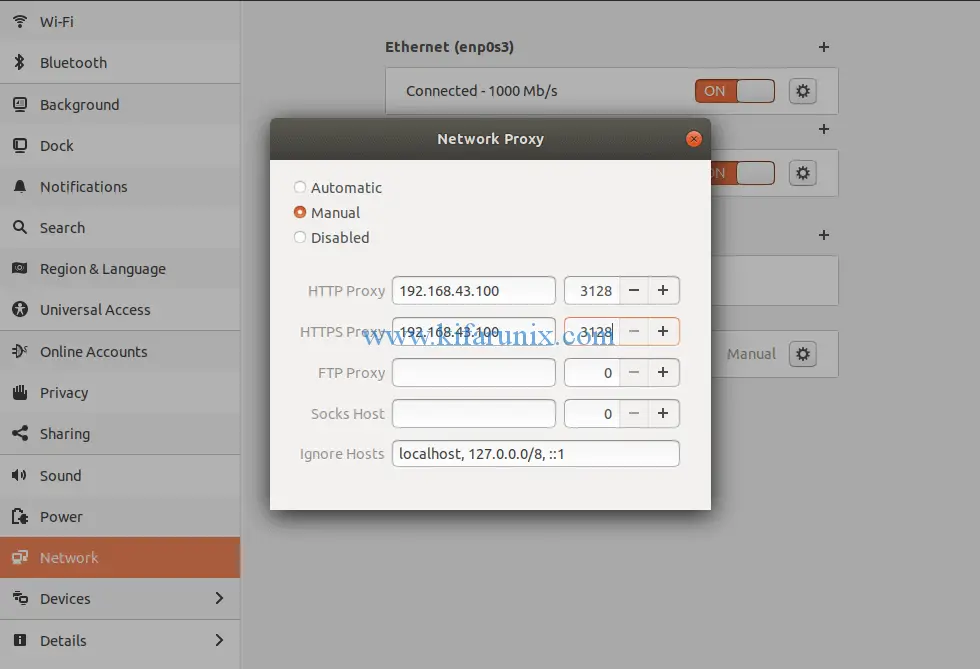
You can also set system proxy on Ubuntu 18.04 desktop Network settings. However, this may not apply system wide. Proxy is disabled by default.

Hence click the settings icon and select manual. Enter the Proxy server details, IP address and the port.

Once done, close the settings icon.
That is all about how to set system wide proxy on Ubuntu 18.04. Enjoy.
Other Related Tutorials
Install and Setup Squid Proxy on pfSense
Configure Squid Proxy OpenLDAP Authentication on pfSense
Install and Setup Squid Proxy on Ubuntu 20.04


Great ! Thank you ! I dont however to configure proxy to Docker
The original file for apt proxy seems to be: /etc/apt/apt.conf.d/90curtin-aptproxy
Mhh, does it exist by default?
How to remove the proxy file because i cannot connect to other wifi in my home ?
Hello there.
– Comment (by adding # to the beginning of the line) every proxy line added to /etc/environment file,
– Unset the environment variables set e.g unset http_proxy
My name is Terry. I have an old ever used MacBook Pro that was no longer excepting Apple updates etc. my IT guy that lives in Connecticut and I live now in Colorado erase the entire system updated the memory and install the Lenox Ubuntu 18.04.4 LTS. I made a decision to move away from a browser google Google Chrome and thought that fire fox would be the best bet. Once I get all that went through the rhythm room restarted the computer it was seems to be going on is that I am missing some obvious previously installed programs to connect to the Internet as well as a few other missing items that I’m not even sure what they are. I cannot for the life of me connect to the Internet I have spent hours going over and over punching what commands unsuccessful if anybody can help this somewhat office illiterate computer guy to Linux operating system I would be so appreciated on how to possibly figure out where those programs are where they went to accessible this is very difficult to download anything from the Internet because proxy server etc. are not anywhere to be found constantly showing up failed to download package files check your Internet connection. Any help would be appreciated I hope that you have a great holiday and I look forward to possibly Getting this figured out. Thank you so much for your time