Can I setup Tailscale on Linux systems? Yes, this guide will take you though how to install and setup Tailscale VPN on Debian 12. What is Tailscale? According to the documentation page, “Tailscale is a VPN service that makes the devices and applications you own accessible anywhere in the world, securely and effortlessly. It enables encrypted point-to-point connections using the open source WireGuard protocol, which means only devices on your private network can communicate with each other.“
Table of Contents
Installing Tailscale VPN on Debian 12
Tailscale Plans and Pricing
Tailscale is available on various plans and pricing. In this guide, we will be using a free version of Tailscale for demonstration purposes. Read more about Tailscale plans and pricing.
Signup for Tailscale Account
In order to be able to use Tailscale, you need to create an account for it. It supports various SSO providers including Gmail, Apple, Microsoft, Okta, OneLogin e.t.c. So, if you already have an account with the supported providers, you can simply just navigate to login page and login using your preferred SSO provider. We use Gmail account in this setup.

Install Tailscale on Debian 12
Next, installation of Tailscale on Debian 12 is as easy as just copying and executing the installation command on the Tailscale web dashboard as shown above;
For example, see command below. Note that sh is prefixed with sudo since am running it as standard user with sudo rights.
sudo apt install curlcurl -fsSL https://tailscale.com/install.sh | sudo shSample installation command output;
Installing Tailscale for debian bookworm, using method apt
+ mkdir -p --mode=0755 /usr/share/keyrings
+ + tee /usr/share/keyrings/tailscale-archive-keyring.gpg
curl -fsSL https://pkgs.tailscale.com/stable/debian/bookworm.noarmor.gpg
+ + tee /etc/apt/sources.list.d/tailscale.list
curl -fsSL https://pkgs.tailscale.com/stable/debian/bookworm.tailscale-keyring.list
# Tailscale packages for debian bookworm
deb [signed-by=/usr/share/keyrings/tailscale-archive-keyring.gpg] https://pkgs.tailscale.com/stable/debian bookworm main
+ apt-get update
Get:1 https://dl.google.com/linux/chrome/deb stable InRelease [1,825 B]
Get:2 https://linux.teamviewer.com/deb stable InRelease [11.9 kB]
Get:3 https://dl.google.com/linux/chrome/deb stable/main amd64 Packages [1,078 B]
Hit:4 http://deb.debian.org/debian bookworm InRelease
Get:5 http://security.debian.org/debian-security bookworm-security InRelease [48.0 kB]
Get:6 https://linux.teamviewer.com/deb stable/main amd64 Packages [5,079 B]
Get:7 http://deb.debian.org/debian bookworm-updates InRelease [52.1 kB]
Get:8 https://pkgs.tailscale.com/stable/debian bookworm InRelease
Get:9 http://security.debian.org/debian-security bookworm-security/main Sources [17.4 kB]
Get:10 https://pkgs.tailscale.com/stable/debian bookworm/main all Packages [354 B]
Get:11 http://security.debian.org/debian-security bookworm-security/main amd64 Packages [41.3 kB]
Get:12 http://security.debian.org/debian-security bookworm-security/main Translation-en [17.2 kB]
Get:13 https://pkgs.tailscale.com/stable/debian bookworm/main amd64 Packages [8,434 B]
Fetched 211 kB in 2s (129 kB/s)
Reading package lists... Done
+ apt-get install -y tailscale tailscale-archive-keyring
Reading package lists... Done
Building dependency tree... Done
Reading state information... Done
The following NEW packages will be installed:
  tailscale tailscale-archive-keyring
0 upgraded, 2 newly installed, 0 to remove and 29 not upgraded.
Need to get 23.7 MB of archives.
After this operation, 44.0 MB of additional disk space will be used.
Get:1 https://pkgs.tailscale.com/stable/debian bookworm/main amd64 tailscale amd64 1.44.0 [23.7 MB]
Get:2 https://pkgs.tailscale.com/stable/debian bookworm/main all tailscale-archive-keyring all 1.35.181 [3,082 B]
Fetched 23.7 MB in 17s (1,430 kB/s)
Selecting previously unselected package tailscale.
(Reading database ... 205670 files and directories currently installed.)
Preparing to unpack .../tailscale_1.44.0_amd64.deb ...
Unpacking tailscale (1.44.0) ...
Selecting previously unselected package tailscale-archive-keyring.
Preparing to unpack .../tailscale-archive-keyring_1.35.181_all.deb ...
Unpacking tailscale-archive-keyring (1.35.181) ...
Setting up tailscale-archive-keyring (1.35.181) ...
Setting up tailscale (1.44.0) ...
Created symlink /etc/systemd/system/multi-user.target.wants/tailscaled.service → /lib/systemd/system/tailscaled.service.
+ [ false = true ]
+ set +x
Installation complete! Log in to start using Tailscale by running:

tailscale up
Start using Tailscale on Debian 12
Tailscale command line usage
The above commands installs a command line utility that you can use to control your Tailscale network.
To see basic usage of the command;
tailscale --help
USAGE
  tailscale [flags]  [command flags]

For help on subcommands, add --help after: "tailscale status --help".

This CLI is still under active development. Commands and flags will
change in the future.

SUBCOMMANDS
  up         Connect to Tailscale, logging in if needed
  down       Disconnect from Tailscale
  set        Change specified preferences
  login      Log in to a Tailscale account
  logout     Disconnect from Tailscale and expire current node key
  switch     Switches to a different Tailscale account
  configure  [ALPHA] Configure the host to enable more Tailscale features
  netcheck   Print an analysis of local network conditions
  ip         Show Tailscale IP addresses
  status     Show state of tailscaled and its connections
  ping       Ping a host at the Tailscale layer, see how it routed
  nc         Connect to a port on a host, connected to stdin/stdout
  ssh        SSH to a Tailscale machine
  funnel     Turn on/off Funnel service
  serve      Serve content and local servers
  version    Print Tailscale version
  web        Run a web server for controlling Tailscale
  file       Send or receive files
  bugreport  Print a shareable identifier to help diagnose issues
  cert       Get TLS certs
  lock       Manage tailnet lock
  licenses   Get open source license information

FLAGS
  --socket string
    	path to tailscaled socket (default /var/run/tailscale/tailscaled.sock)
Connect First Device (Debian 12) to Tailscale Network
One the installation command completes, you are given a command, tailscale up, that you need to execute to start Tailscale so you can start using it.
Thus, execute the command;
sudo tailscale upSample output;
To authenticate, visit:

	https://login.tailscale.com/a/abe7be8a71B7
So, copy the URL above and paste the browser to login to Tailscale dashboard. Note you can copy the URL and login from any other device. It doesn’t have to be on the same device on which you installed/executed tailscale up command.
Confirm that you want to connect the device to tailscale network!
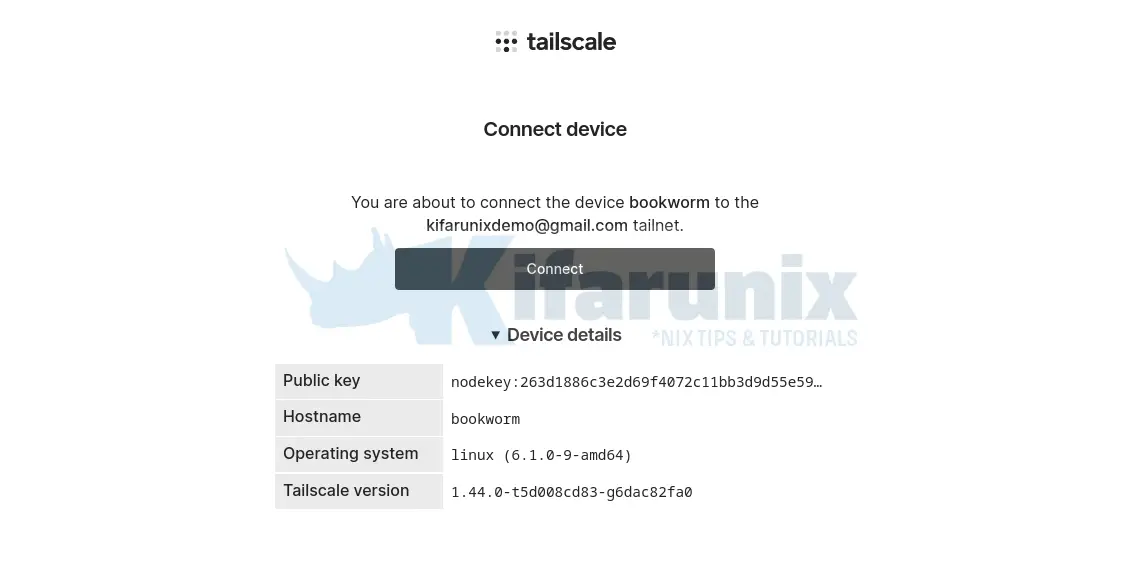
When you successfully logged in using the url above, you should see Success both on the browser and on the command line where you executed the tailscale up command.

on command line
To authenticate, visit:

	https://login.tailscale.com/a/abe7be8a71d7

Success.
On the dashboard, you should see your device;
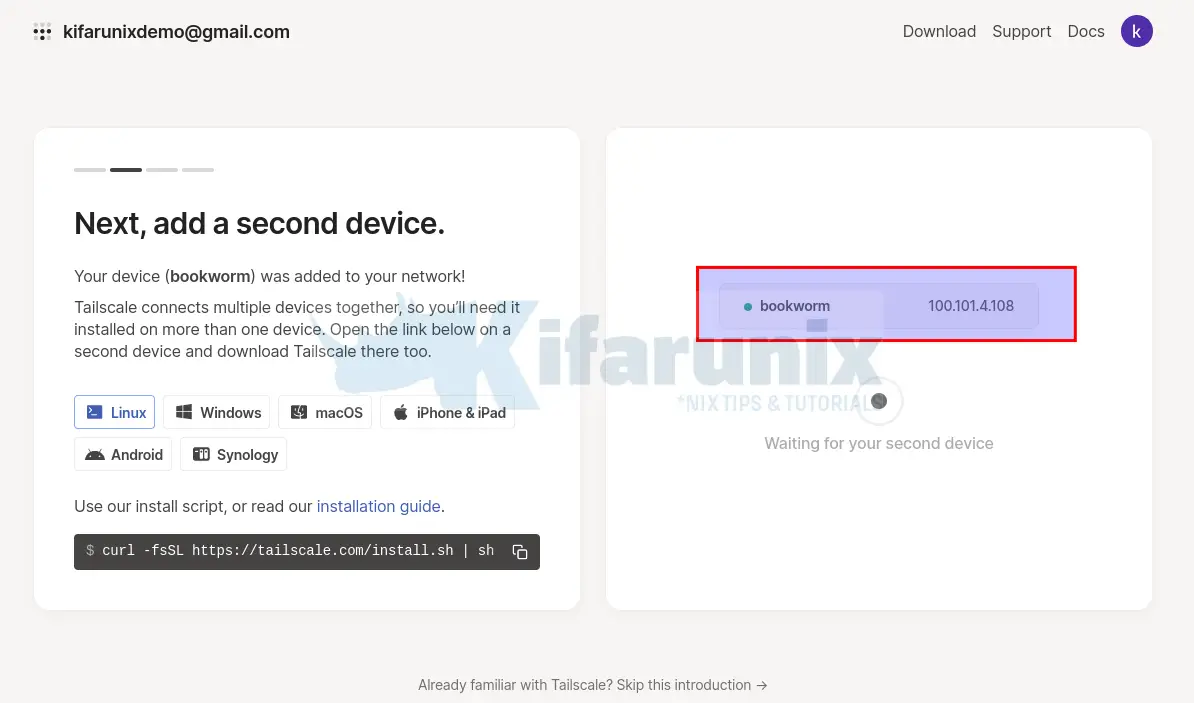
This will also create a tailscale interface on your server and assign a Tailscale IP address;
ip a
6: tailscale0:  mtu 1280 qdisc fq_codel state UNKNOWN group default qlen 500
    link/none
    inet 100.101.4.108/32 scope global tailscale0
       valid_lft forever preferred_lft forever
    inet6 fd7a:115c:a1e0:ab12:4843:cd96:6265:46c/128 scope global
       valid_lft forever preferred_lft forever
    inet6 fe80::3f83:6676:7959:32d3/64 scope link stable-privacy
       valid_lft forever preferred_lft forever
Add Second Device to Tailscale Network
Tailscale connects multiple devices together, so you’ll need it installed on more than one device. Thus, from the dashboard, choose any other device from the available list and download Tailscale installer.
In my case, my second device is a Linux system, (Debian 12 headless server). So, I will go ahead and copy and execute the Linux installer.
sudo apt install curlcurl -fsSL https://tailscale.com/install.sh | sudo shSimilarly, when the installation is done, you need to start Tailscale;
sudo tailscale up
To authenticate, visit:

	https://login.tailscale.com/a/5a05ecb0d374
Similarly, get the login url and login to tailscale dashboard to connect your device.
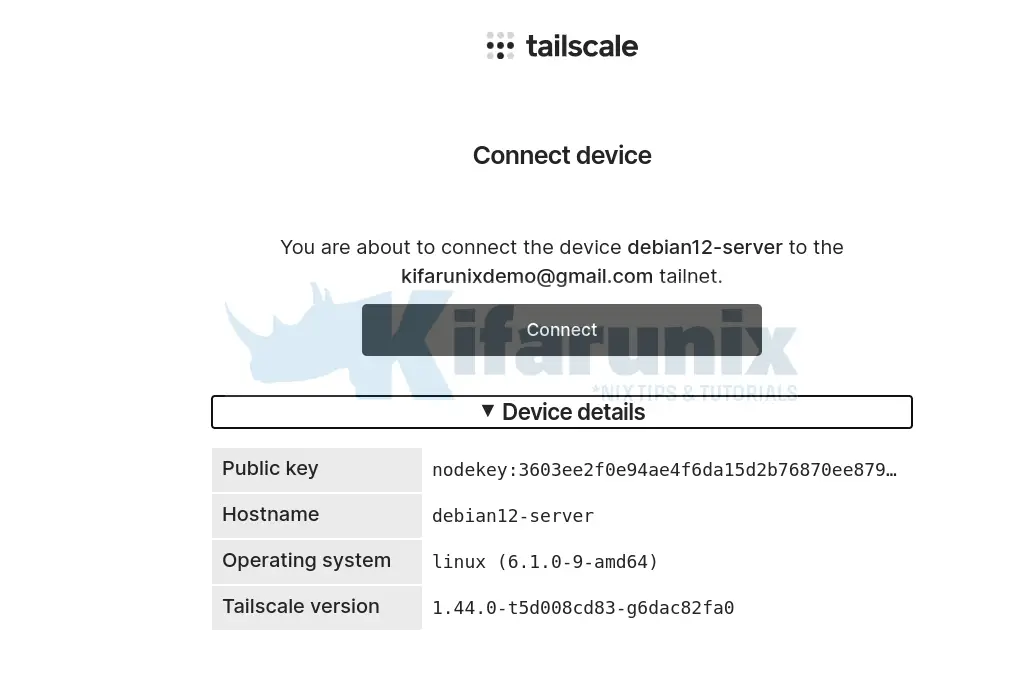
Upon successful login to Tailscale dashboard, you should now see your second device added.
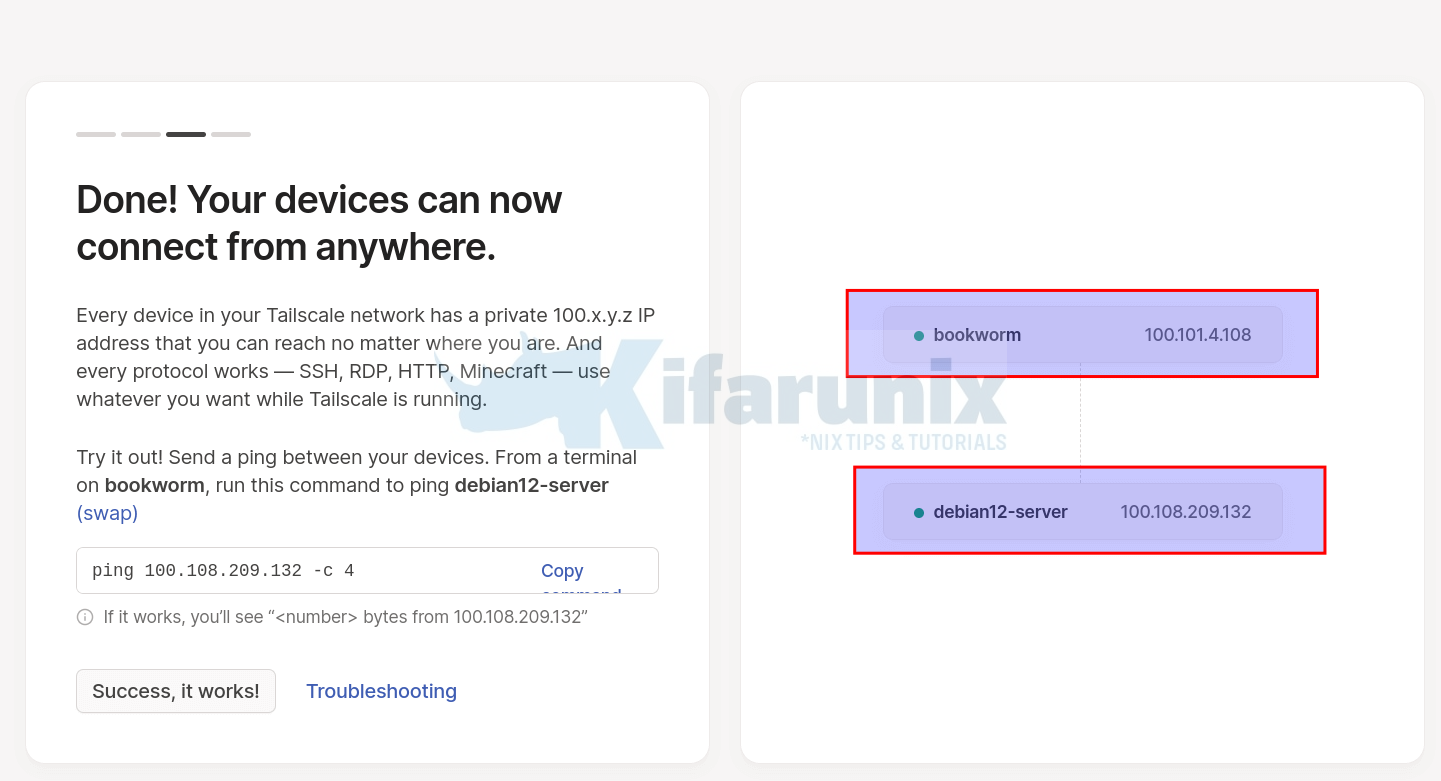
Test Connection Between Devices
You can run a ping test between two devices to confirm reach-ability. For example from the first device (bookworm), ping your second device (debian12-server);
ping 100.108.209.132 -c 4
PING 100.108.209.132 (100.108.209.132) 56(84) bytes of data.
64 bytes from 100.108.209.132: icmp_seq=1 ttl=64 time=35.7 ms
64 bytes from 100.108.209.132: icmp_seq=2 ttl=64 time=4.14 ms
64 bytes from 100.108.209.132: icmp_seq=3 ttl=64 time=2.17 ms
64 bytes from 100.108.209.132: icmp_seq=4 ttl=64 time=0.632 ms

--- 100.108.209.132 ping statistics ---
4 packets transmitted, 4 received, 0% packet loss, time 3006ms
rtt min/avg/max/mdev = 0.632/10.668/35.732/14.523 ms
Similarly, run ping test from the second device (debian12-server) to your first device (bookworm);
ping 100.101.4.108 -c 4
PING 100.101.4.108 (100.101.4.108) 56(84) bytes of data.
64 bytes from 100.101.4.108: icmp_seq=1 ttl=64 time=5.99 ms
64 bytes from 100.101.4.108: icmp_seq=2 ttl=64 time=2.92 ms
64 bytes from 100.101.4.108: icmp_seq=3 ttl=64 time=2.33 ms
64 bytes from 100.101.4.108: icmp_seq=4 ttl=64 time=2.86 ms

--- 100.101.4.108 ping statistics ---
4 packets transmitted, 4 received, 0% packet loss, time 3004ms
rtt min/avg/max/mdev = 2.331/3.527/5.994/1.442 ms
Managing Devices from Tailscale Dashboard
From the device connection test page above, you can simply click Success, it works! button to confirm the connection and go to, What is next page;
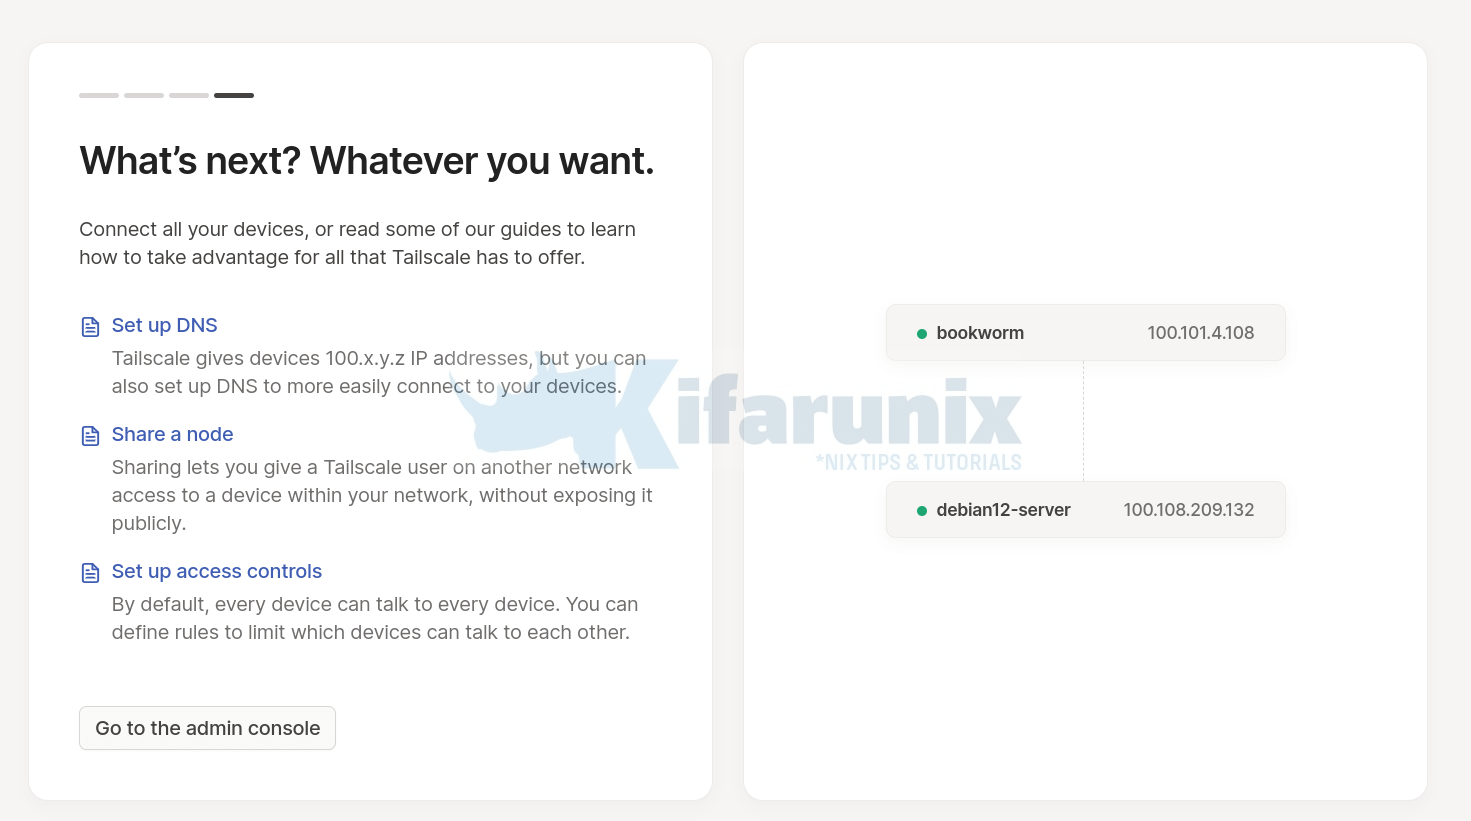
Click Go to admin console page to manage your devices;
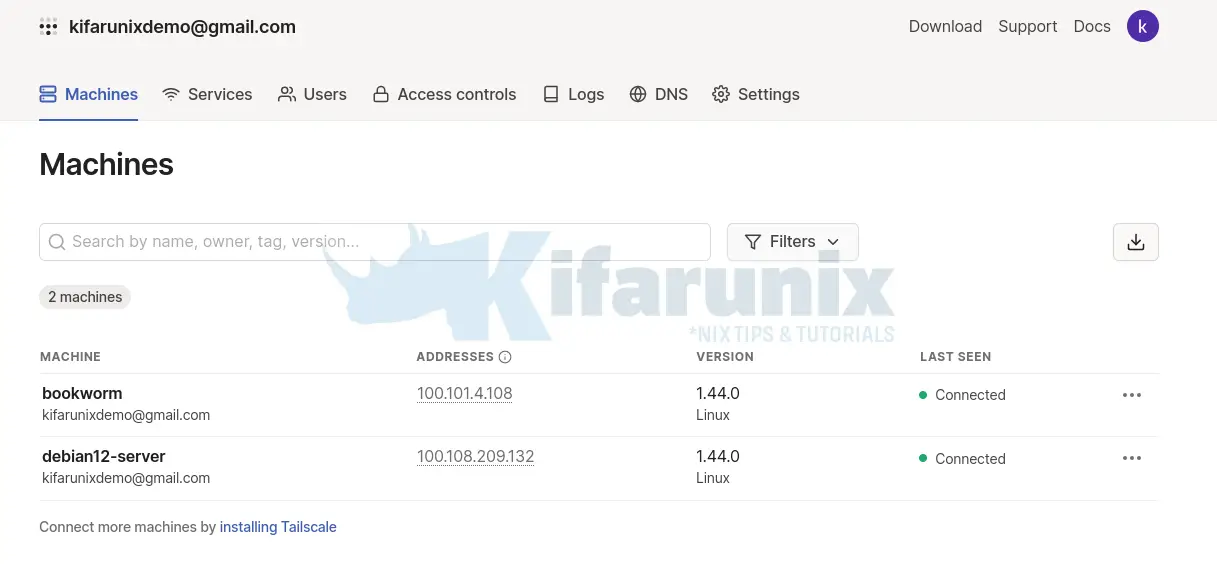
Click on the three dots to check more device settings.
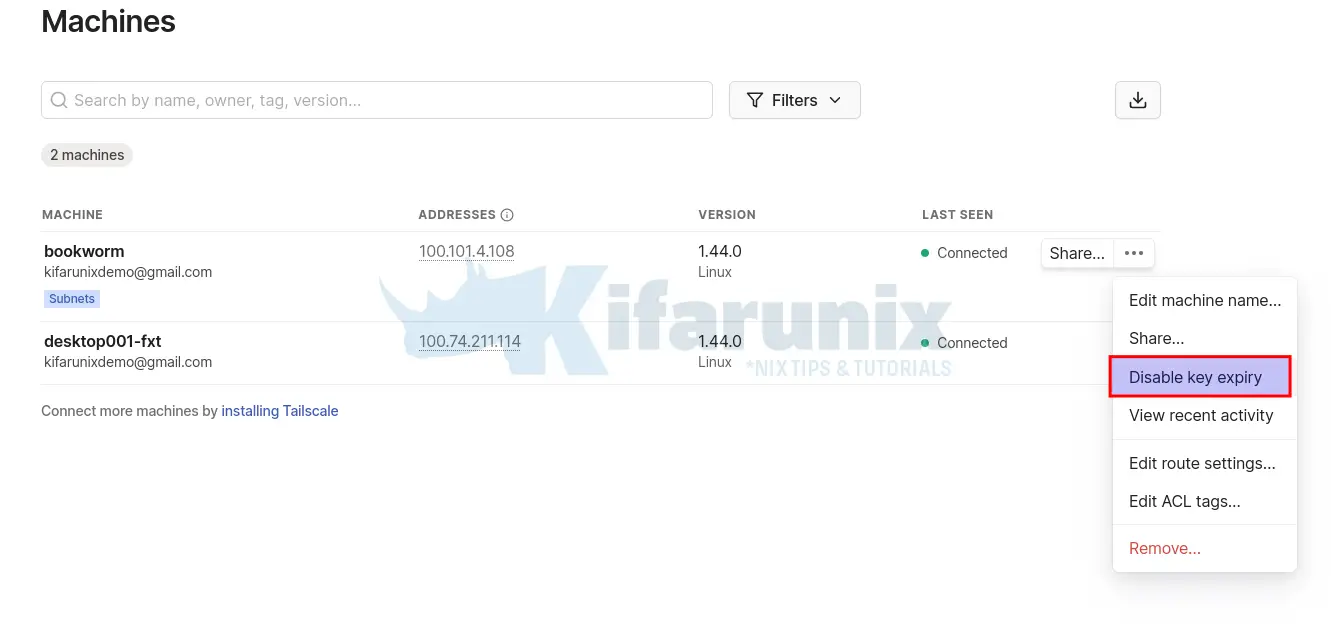
If the device you added is a server or remotely-accessed device, you may want to consider disabling key expiry to prevent the need to periodically re-authenticate.
Configure Tailscale Subnet Router
What if you have multiple devices including network devices such as switches, printers that it becomes impractical to install Tailscale on each of them?
Well, Tailscale provides the ability to setup a subnet router as an alternative. With subnet router, one of the machines that access to your other LAN networks can be configured to act as a gateway, relaying traffic from your Tailscale network onto your physical subnet.
Consider our network below;
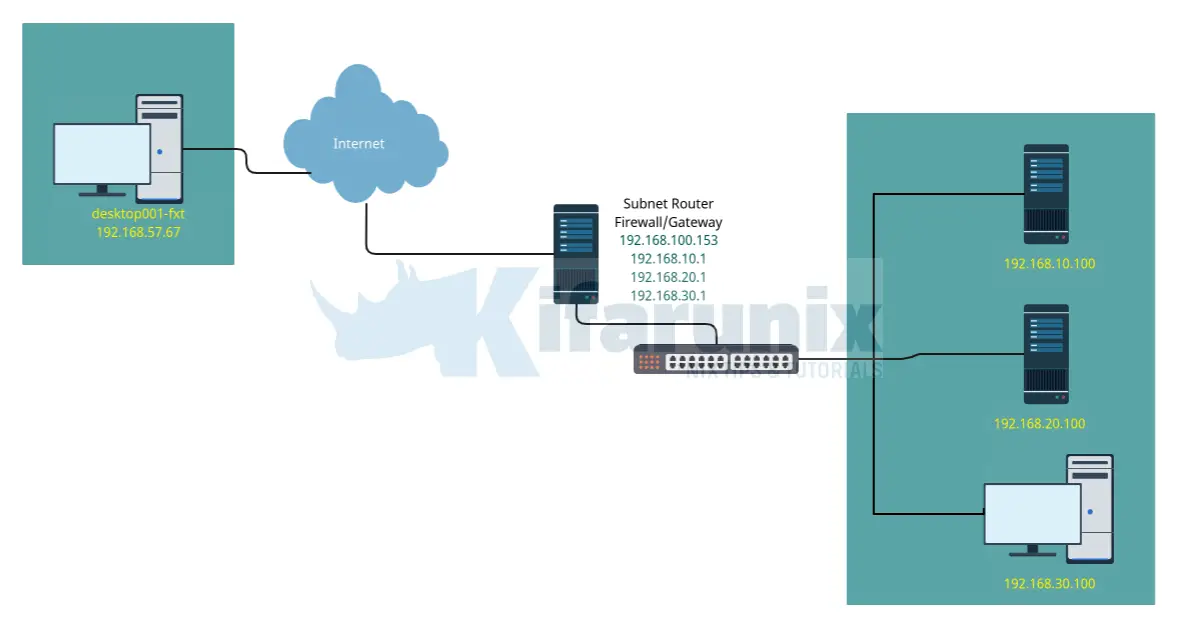
So, in this setup, we have a Linux server which will act as a subnet router to connect to internal networks, 192.168.10,20,30.0/24. We also have a remote desktop to use to connect to remote LAN.
Install Tailscale on Subnet Router
In this setup, we will install Tailscale only on the subnet router and on the remote desktop, 192.168.57.67 using the same installation methods above.
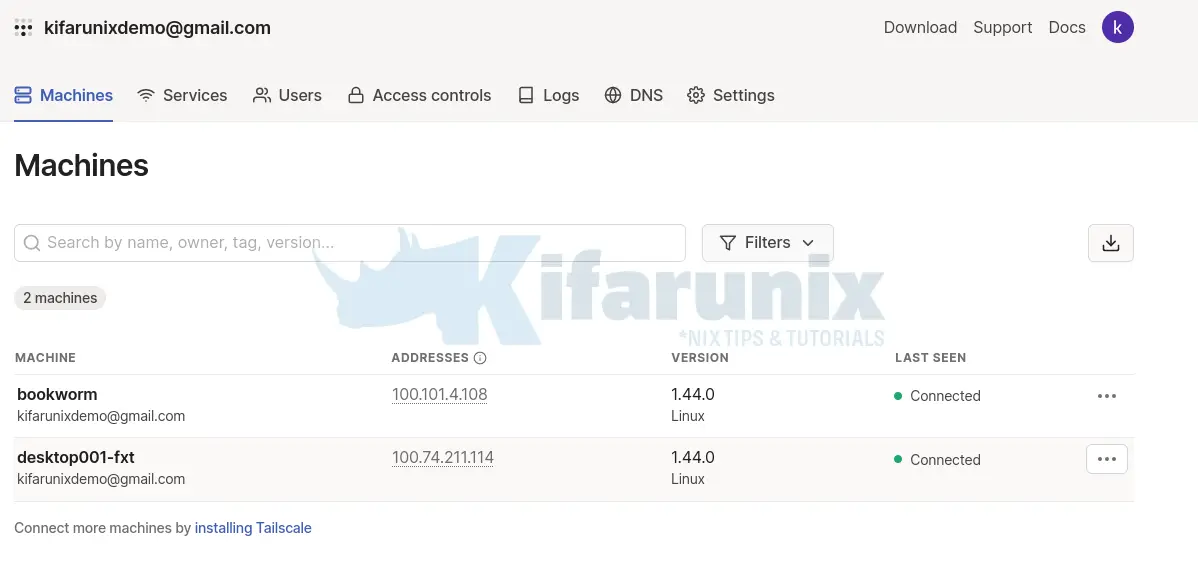
So, how can we configure the subnet router so as to allow our FXT desktop to communicate with remote LAN?
You need to configure that system to be able to route traffic as shown below;
Enable IP Forwarding on Subnet Router
Enable IP Forwarding on Subnet Router;
echo 'net.ipv4.ip_forward = 1' | sudo tee -a /etc/sysctl.d/99-tailscale.confecho 'net.ipv6.conf.all.forwarding = 1' | sudo tee -a /etc/sysctl.d/99-tailscale.confsudo sysctl -p /etc/sysctl.d/99-tailscale.confEnable IP Masquerade on Subnet Router
Enable IP masquerading (we are using iptables here);
sudo apt install iptablesGet default gateway interface;
ip route | grep defaultdefault via 192.168.100.1 dev enp0s3Enable IP masquerading in NAT table of iptables to allowing packets from the internal network to be masqueraded with the IP address of the interface default gateway;
iptables -t nat -A POSTROUTING -o <default-gw-interface> -j MASQUERADEiptables -t nat -A POSTROUTING -o enp0s3 -j MASQUERADEiptables-save > /etc/iptables/rules.v4Read more on how to Configure Ubuntu as Linux Router.
Start/Restart Tailscale on Subnet Router
Restart Tailscale on Subnet router and advertise the remote subnets;
sudo tailscale up --advertise-routes=192.168.10.0/24,192.168.20.0/24,192.168.30.0/24Approve Advertised Subnets on Subnet Router
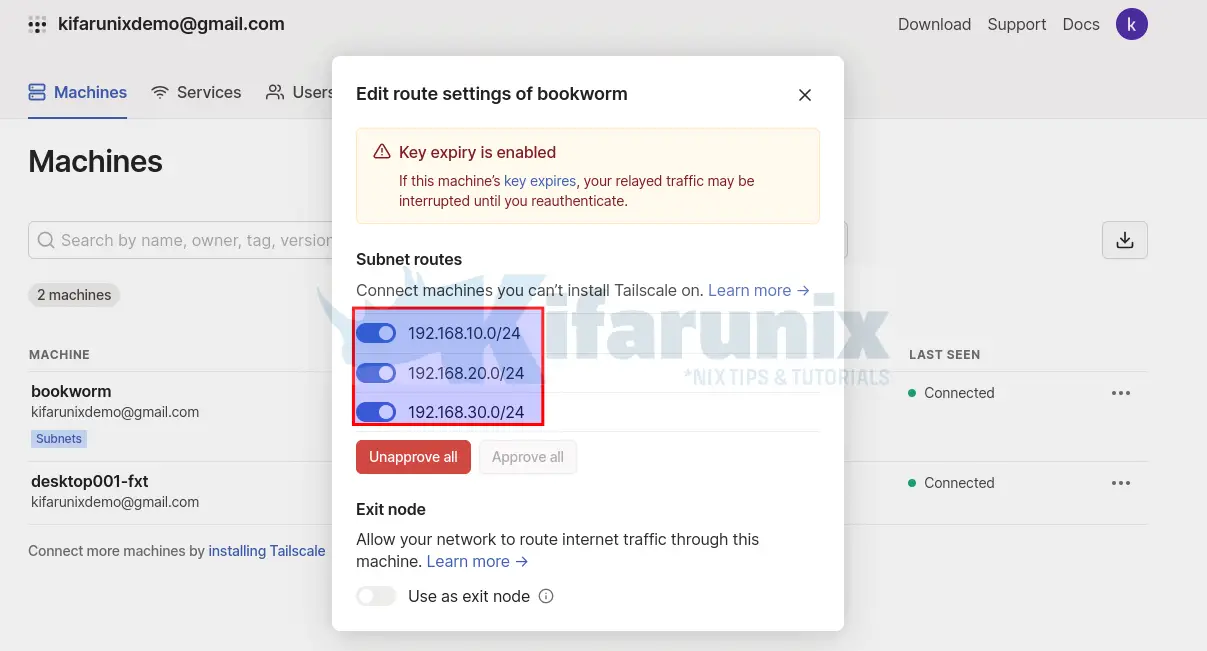
Next, login to Tailscale dashboard and approve the advertised subnets.
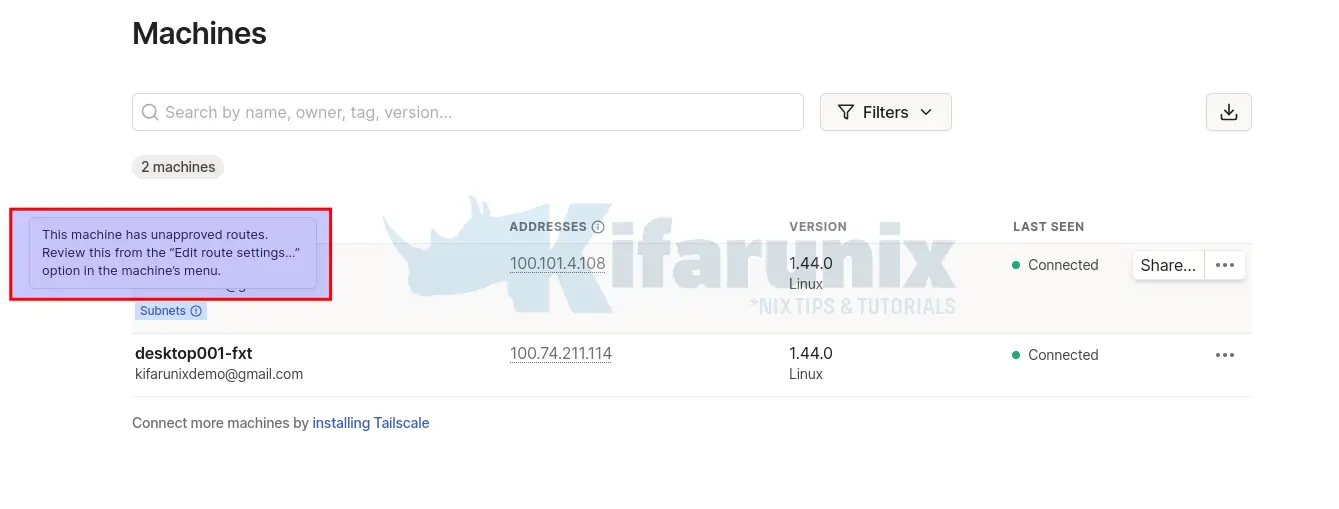
Approved;
You can disable key expiry to ensure continuous connectivity.
Install the Tailscale Routes to Local Subnets
On the remote desktop you are using to connect to remote local LAN, you need to accept the Tailscale routes if you are using Linux system. Clients on Windows, macOS, iOS, and Android will automatically pick up your new subnet routes.
Thus, on my desktop FXT, this is the command to accept the routes;
sudo tailscale up --accept-routesTest Connection Between Remote Systems
Everything should now be okay, but just confirm the connection between the remote systems.
From desktop fxt, let’s ping the remote networks;
tailscale ping 192.168.10.100pong from bookworm (100.101.4.108) via 192.168.100.153:41641 in 1mstailscale ping 192.168.20.100pong from bookworm (100.101.4.108) via 192.168.100.153:41641 in 1mstailscale ping 192.168.30.100pong from bookworm (100.101.4.108) via 192.168.100.153:41641 in 1msLooks good. You can also just us usual ping command;
ping 192.168.10.100 -c 4 -R
PING 192.168.10.100 (192.168.10.100) 56(124) bytes of data.
64 bytes from 192.168.10.100: icmp_seq=1 ttl=63 time=1.37 ms
RR: 	100.74.211.114
	192.168.10.1
	192.168.10.100
	192.168.10.100
	100.101.4.108
	100.74.211.114

64 bytes from 192.168.10.100: icmp_seq=2 ttl=63 time=1.46 ms	(same route)
64 bytes from 192.168.10.100: icmp_seq=3 ttl=63 time=1.47 ms	(same route)
64 bytes from 192.168.10.100: icmp_seq=4 ttl=63 time=1.25 ms	(same route)

--- 192.168.10.100 ping statistics ---
4 packets transmitted, 4 received, 0% packet loss, time 3007ms
rtt min/avg/max/mdev = 1.245/1.385/1.466/0.089 ms
Try SSH into remote host;
ssh [email protected]
The authenticity of host '192.168.30.100 (192.168.30.100)' can't be established.
ED25519 key fingerprint is SHA256:Ubdu4hNBMf4EAtBHxIsjTT8Qz2V6E+0g972wXGVYXTY.
This key is not known by any other names.
Are you sure you want to continue connecting (yes/no/[fingerprint])? yes
Warning: Permanently added '192.168.30.100' (ED25519) to the list of known hosts.
[email protected]'s password:
Welcome to Ubuntu 22.04 LTS (GNU/Linux 5.15.0-72-generic x86_64)

 * Documentation:  https://help.ubuntu.com
 * Management:     https://landscape.canonical.com
 * Support:        https://ubuntu.com/advantage

  System information as of Mon Jul  3 08:12:27 PM UTC 2023

  System load:  0.18798828125      Processes:               121
  Usage of /:   27.3% of 36.59GB   Users logged in:         1
  Memory usage: 14%                IPv4 address for enp0s3: 192.168.30.100
  Swap usage:   0%

 * Strictly confined Kubernetes makes edge and IoT secure. Learn how MicroK8s
   just raised the bar for easy, resilient and secure K8s cluster deployment.

   https://ubuntu.com/engage/secure-kubernetes-at-the-edge

102 updates can be applied immediately.
To see these additional updates run: apt list --upgradable


The list of available updates is more than a week old.
To check for new updates run: sudo apt update
Failed to connect to https://changelogs.ubuntu.com/meta-release-lts. Check your Internet connection or proxy settings


Last login: Mon Jul  3 19:03:24 2023
kifarunix@node03:~$ w
 20:12:43 up  1:46,  3 users,  load average: 0.15, 0.17, 0.12
USER     TTY      FROM             LOGIN@   IDLE   JCPU   PCPU WHAT
kifaruni tty1     -                19:03    1:09m  0.13s  0.02s -bash
kifaruni pts/0    -                19:03    1:08m  0.04s  0.06s sudo su -
kifaruni pts/1    192.168.30.1     20:12    1.00s  0.03s  0.01s w
From the remote subnets, then you can access the FXT desktop via the Tailscale IP.
And that is just about it. There is a lot more about Tailscale, except that we can discuss everything in a single guide.
Refer to the documentation for more information.
That completes our guide on how to install and setup Tailscale VPN on Debian 12.

