In this tutorial, we are going to learn how to install and configure AlienVault HIDS agent on a Linux host. AlienVault uses OSSEC HIDS agents for Host Intrusion Detection. To actively monitor all aspects of system activity; file integrity monitoring, log monitoring, rootcheck, and process monitoring, OSSEC agents that collect all these information and reports back to the server via encrypted message protocol needs to be installed.
Table of Contents
Install AlienVault HIDs Agent on a Linux Host
Import or Add Hosts into AlienVault OSSIM
Before you can monitor any host, you need to import the hosts to AlienVault OSSIM server. Check the guide below to learn how to import the assets using CSV file.
Import Assets to AlienVault USM/OSSIM using a CSV file
Add HIDS Agent to OSSIM Server
Once the host is imported, add the HIDS agent for every host to OSSIM server as described below;
- Login to OSSIM server web dashboard and navigate to Environment > Detection.
- Under Detection, navigate to HIDS > Agents > Agent Control > Add Agent.
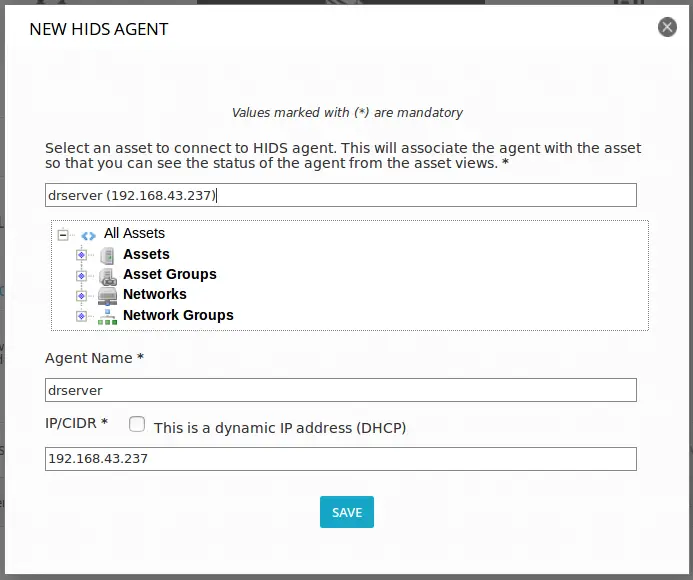
- When you click on ADD AGENTS, a NEW HIDS AGENT windows opens up.

- Enter the hostname/IP address of the host on search bar or select it from asset tree.
- When you select a host, the Agent Name and IP address fields are populated automatically.
- Click Save to save the agent information.
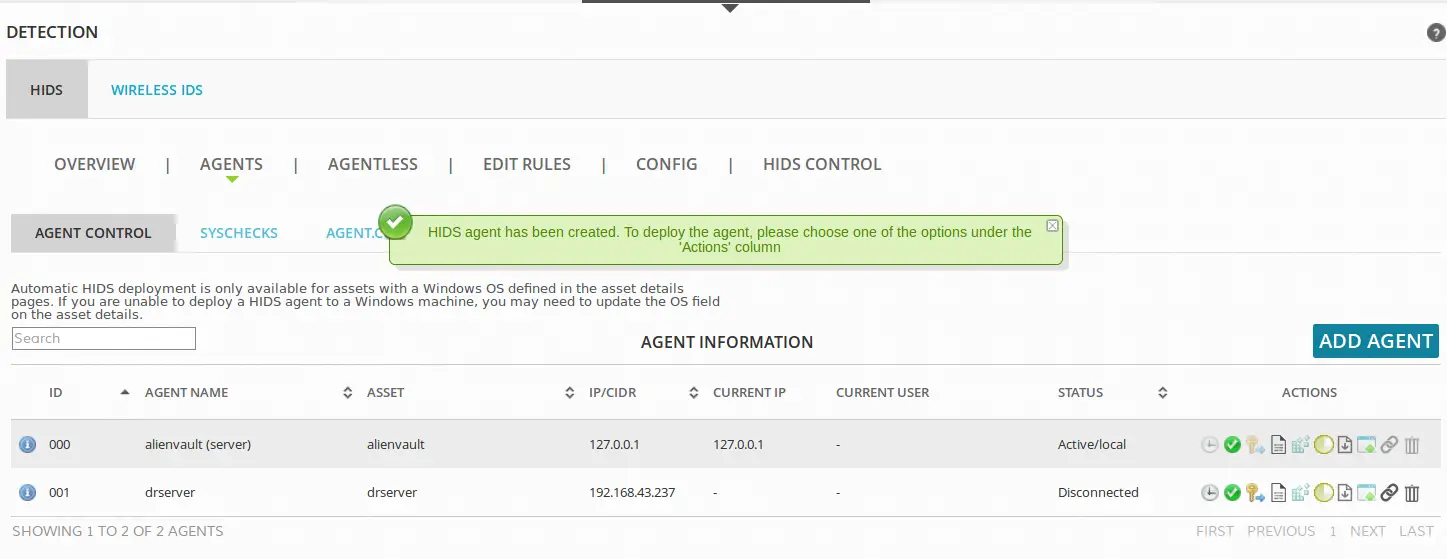
- Once the agent is added, you can see the Agent Information. For instance the agent we just added is the first one and has an ID of 001.

Install OSSEC HIDS agent on a Linux Host
Install Required Packages
On CentOS and similar derivatives, run the command below to install required OSSEC HIDS agent build tools;
yum install gcc make libevent-devel zlib-devel openssl-devel pcre2-devel wget systemd-devel tar -yOn Ubuntu/Debian systems;
apt install gcc make libevent-dev zlib1g-dev libssl-dev libpcre2-dev wget tar libsystemd-dev -yDownload OSSEC HIDS Installer Archive
Login to your Linux host and download the latest OSSEC HIDS agent installer from here and extract it as shown below.
wget https://github.com/ossec/ossec-hids/archive/3.7.0.tar.gz -P /tmp/Extract and Install OSSEC HIDS agent on Linux
Extract the OSSEC HIDS archive;
cd /tmp/
tar xzf 3.7.0.tar.gz
Once you have extracted, Navigate to extracted agent directory and execute the installation script.
cd ossec-hids-3.7.0/./install.shWhen the installation launches, you will be prompted to provide some input. In most of those cases, just press ENTER to accept the default values.
The first prompts asks you to select the installation language which by default is English abbreviated as [en]. Press Enter to accept the default.
The next prompt asks you verify the type of installation for which in our case, we are installing ossec-hids agent.
1- What kind of installation do you want (server, agent, local, hybrid or help)? agentOnce you chose the type of installation, press enter to continue. For the next prompt, chose /var/ossec as the installation environment.
2- Setting up the installation environment.

 - Choose where to install the OSSEC HIDS [/var/ossec]: ENTER

    - Installation will be made at  /var/ossec .
Next, enter the IP address of the server.
3- Configuring the OSSEC HIDS.

  3.1- What's the IP Address or hostname of the OSSEC HIDS server?: 192.168.43.101

   - Adding Server IP 192.168.43.101
For the next prompts, press ENTER to accept defaults. You may need to dsiable Active Response for now;
  3.2- Do you want to run the integrity check daemon? (y/n) [y]: y

   - Running syscheck (integrity check daemon).

  3.3- Do you want to run the rootkit detection engine? (y/n) [y]: y

   - Running rootcheck (rootkit detection).

  3.4 - Do you want to enable active response? (y/n) [y]: n

   - Active response disabled.

  3.5- Setting the configuration to analyze the following logs:
    -- /var/log/messages
    -- /var/log/secure
    -- /var/log/maillog

 - If you want to monitor any other file, just change
   the ossec.conf and add a new localfile entry.
   Any questions about the configuration can be answered
   by visiting us online at http://www.ossec.net .


   --- Press ENTER to continue ---
If installation is successful, you should get this output:
 - System is Redhat Linux.
 - Init script modified to start OSSEC HIDS during boot.

 - Configuration finished properly.

 - To start OSSEC HIDS:
      /var/ossec/bin/ossec-control start

 - To stop OSSEC HIDS:
      /var/ossec/bin/ossec-control stop

 - The configuration can be viewed or modified at /var/ossec/etc/ossec.conf


    Thanks for using the OSSEC HIDS.
    If you have any question, suggestion or if you find any bug,
    contact us at https://github.com/ossec/ossec-hids or using
    our public maillist at
    https://groups.google.com/forum/#!forum/ossec-list

    More information can be found at http://www.ossec.net

    ---  Press ENTER to finish (maybe more information below). ---


 - You first need to add this agent to the server so they
   can communicate with each other. When you have done so,
   you can run the 'manage_agents' tool to import the
   authentication key from the server.

   /var/ossec/bin/manage_agents

   More information at:
   http://www.ossec.net/docs/docs/programs/manage_agents.html
Extract Agent Registration Key from OSSIM Server
Once the agent is installed, you need to Import the key for the agent from the server.
Login to server web dashboard and navigate to Environment > Detection > HIDS > Agent and extract the key of specific agent by clicking on the key button, and copy the key.
Import and Connect HIDS agent into OSSIM Server
On the host, run the following command to import the key, enter option I, paste the key and confirm adding the key. Then enter Q to exit.
/var/ossec/bin/manage_agents
****************************************
* OSSEC HIDS v3.7.0 Agent manager. *
* The following options are available: *
****************************************
(I)mport key from the server (I).
(Q)uit.
Choose your action: I or Q: I

* Provide the Key generated by the server.
* The best approach is to cut and paste it.
*** OBS: Do not include spaces or new lines.

Paste it here (or '\q' to quit): MDAxIGRyc2VydmVyIDE5Mi4xNjguNDMuMjM3IGM5MmVmZTBlMmY5ODMyNzc3ZjhmOGJhYTNhNzk4OGI1MzllZTIxYzMxMmYyZmNiNjZkYzA3ODU0NGI0M2MzOTI=

Agent information:
ID:001
Name:drserver
IP Address:192.168.43.237

Confirm adding it?(y/n): y
Added.
Start HIDS Agent
Start and Enable OSSEC agent to start on system reboot
systemctl enable ossec
systemctl start ossec
You can verify that the agent is communicating with the server by checking the ossec agent logs as shown below.
tail /var/ossec/logs/ossec.log
2023/05/13 17:18:17 ossec-agentd: INFO: Started (pid: 3677).
2023/05/13 17:18:17 ossec-agentd: INFO: Server 1: 192.168.43.101
2023/05/13 17:18:17 ossec-agentd: INFO: Trying to connect to server 192.168.43.101, port 1514.
2023/05/13 17:18:17 INFO: Connected to 192.168.43.101 at address 192.168.43.101, port 1514
Restart OSSIM Server OSSEC HIDS
On the Server, restart OSSEC HIDS.
Navigate to Environment > Detection > HIDS > HIDS Control > HIDS service is UP > RESTART.
Verify Agent Status on OSSIM Server
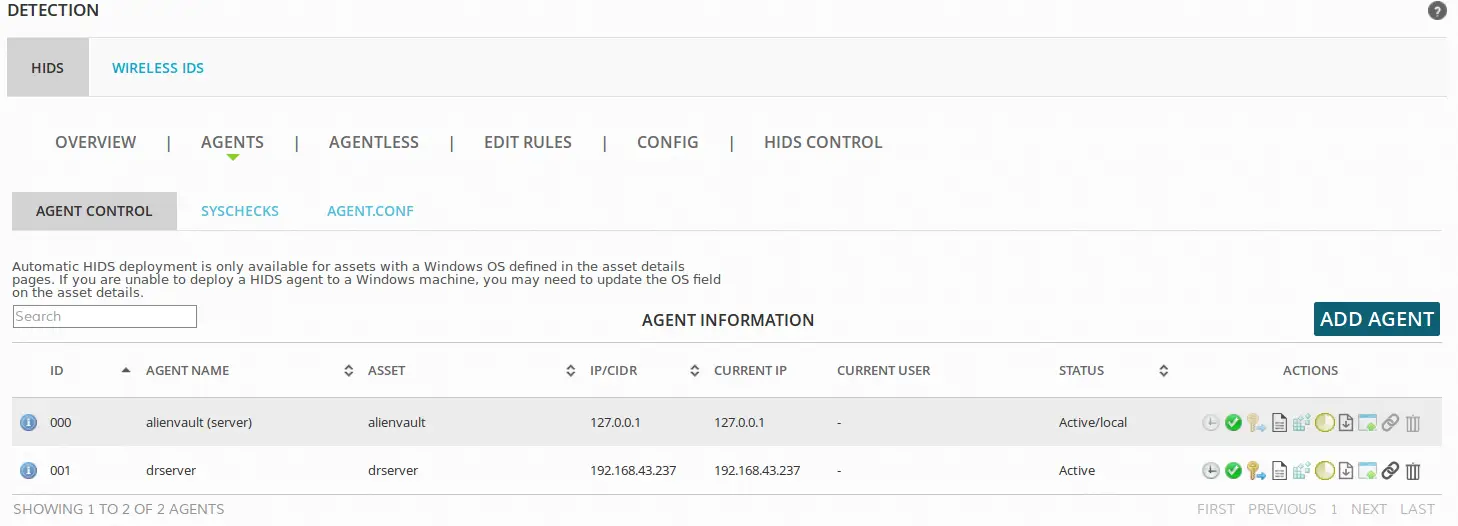
If you check the status of the agent on Environment > Detection > HIDS > Agent, it should be active and it should now be able to send logs to OSSIM server.

In case you experience any hitch, you can use the log path mentioned above to find out what the issue is.
You can also check HIDS logs from the server, Environment > Detection > HIDS > HIDS Control > HIDS LOG.
You have now successfully installed and set up OSSEC HIDS agent on a Linux host and should be able to monitor the host.
Other Tutorials
Install and Configure AlienVault HIDs Agent on Windows System Host


Hello- followed your steps and can not get installed. I get the below after entering all the questions. Ubuntu 19.04 server.
5- Installing the system
– Running the Makefile
./install.sh: 105: ./install.sh: make: not found
Error 0x5.
Building error. Unable to finish the installation.
Kindly install make utility.
Also make sure you have the gcc installed.
apt install make gcc