In this tutorial, we’ll guide you through how to create users and user roles in OpenStack. User accounts are crucial for effective cloud management, allowing individuals to access and utilize OpenStack resources based on their roles and responsibilities. Segmentation of roles becomes necessary to ensure a secure and organized environment, granting specific permissions to different users.
Table of Contents
Creating Users and User Roles in OpenStack
List Available Users in OpenStack
To begin with, let’s see what are the available user accounts in OpenStack. You can list available users using the command line or from the OpenStack horizon.
List Available Users in OpenStack on Horizon
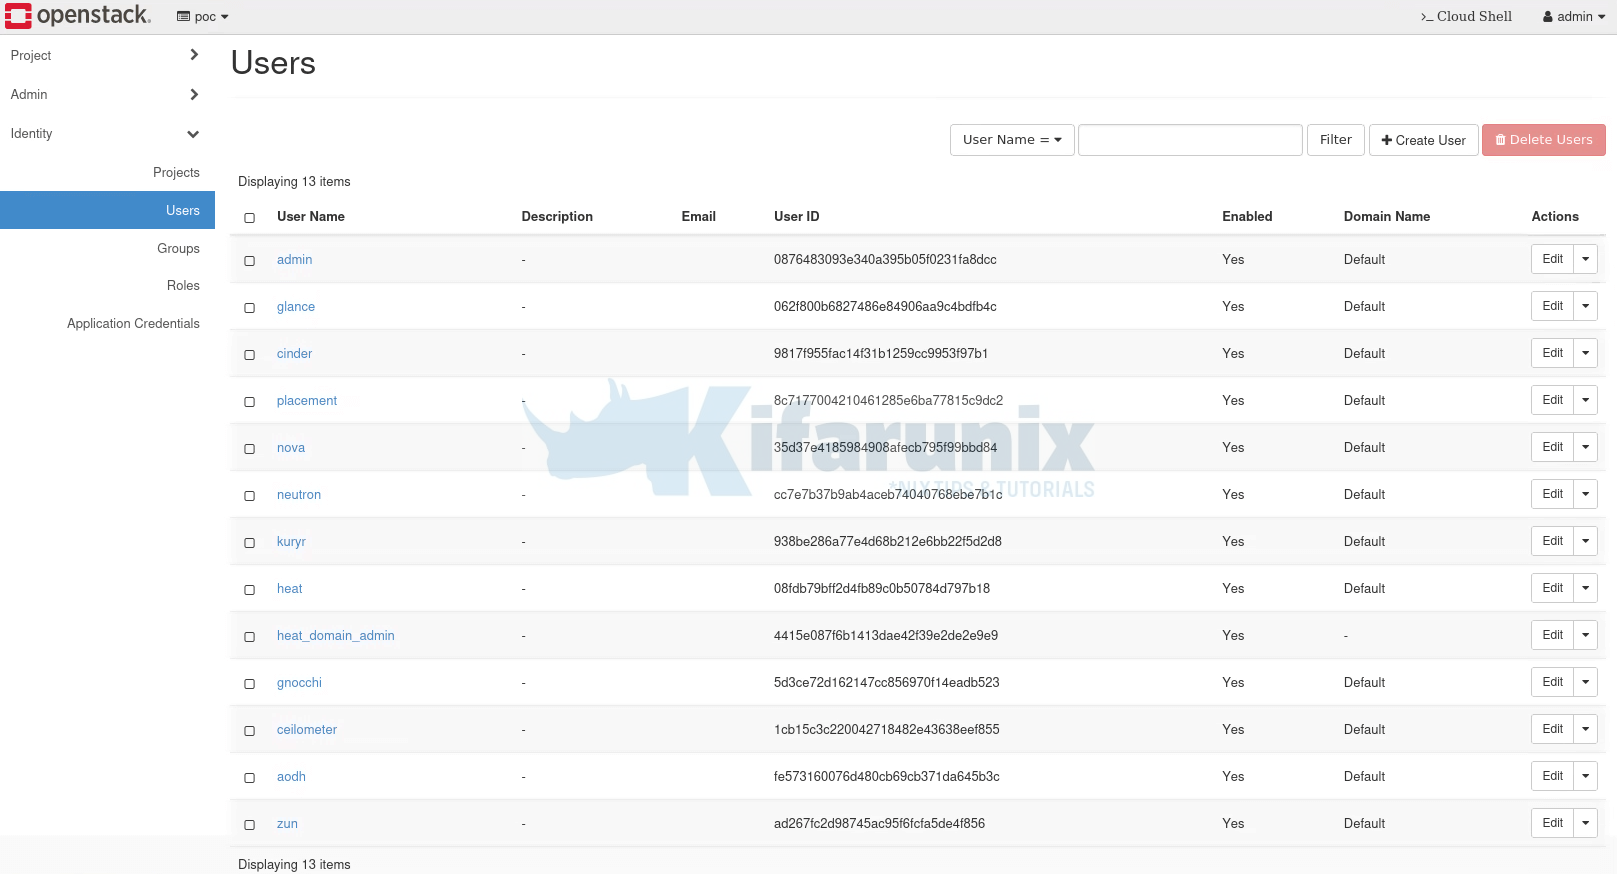
To view available users from the Horizon, simply login as admin and navigate to Identity > Users.

Kindly note that I am using OpenStack deployed using Kolla-ansible, just in case!
List Available Users in OpenStack on Command Line
You can also list user from the command line using openstack command. Note that before you can use openstack commands, you need to load the environment variables and credentials required to authenticate as an administrative user (often referred to as the “admin” user) into your OpenStack.
The way to load the credentials varies with the OpenStack deployment methods. Since I am using OpenStack deployed with Kolla-ansible, this is how I have to load the credentials;
source $HOME/kolla-ansible/bin/activatesource /etc/kolla/admin-openrc.shOnce you load your OpenStack credentials, you should now be able to execute the OpenStack commands.
For example, to list available user accounts on Openstack from the command line;
openstack user list --long+----------------------------------+-------------------+----------------------------------+----------------------------------+-------------+-------+---------+
| ID | Name | Project | Domain | Description | Email | Enabled |
+----------------------------------+-------------------+----------------------------------+----------------------------------+-------------+-------+---------+
| 0876483093e340a395b05f0231fa8dcc | admin | | default | | | True |
| 062f800b6827486e84906aa9c4bdfb4c | glance | 2668477725d44e79837747f67e387a62 | default | | | True |
| 9817f955fac14f31b1259cc9953f97b1 | cinder | 2668477725d44e79837747f67e387a62 | default | | | True |
| 8c7177004210461285e6ba77815c9dc2 | placement | 2668477725d44e79837747f67e387a62 | default | | | True |
| 35d37e4185984908afecb795f99bbd84 | nova | 2668477725d44e79837747f67e387a62 | default | | | True |
| cc7e7b37b9ab4aceb74040768ebe7b1c | neutron | 2668477725d44e79837747f67e387a62 | default | | | True |
| 938be286a77e4d68b212e6bb22f5d2d8 | kuryr | 2668477725d44e79837747f67e387a62 | default | | | True |
| 08fdb79bff2d4fb89c0b50784d797b18 | heat | 2668477725d44e79837747f67e387a62 | default | | | True |
| 4415e087f6b1413dae42f39e2de2e9e9 | heat_domain_admin | | a5a28733689a4f3a8f02edcf36343324 | | | True |
| 5d3ce72d162147cc856970f14eadb523 | gnocchi | 2668477725d44e79837747f67e387a62 | default | | | True |
| 1cb15c3c220042718482e43638eef855 | ceilometer | 2668477725d44e79837747f67e387a62 | default | | | True |
| fe573160076d480cb69cb371da645b3c | aodh | 2668477725d44e79837747f67e387a62 | default | | | True |
| ad267fc2d98745ac95f6fcfa5de4f856 | zun | 2668477725d44e79837747f67e387a62 | default | | | True |
+----------------------------------+-------------------+----------------------------------+----------------------------------+-------------+-------+---------+
Some of the available accounts are service accounts.
List Available Users Roles in OpenStack
Similarly, you can check available user roles from Horizon by navigating to Identity > Roles or from command line using the command below;
openstack role list+----------------------------------+------------------+
| ID | Name |
+----------------------------------+------------------+
| 314720ae3c6740bfb5161135e1d5bc33 | heat_stack_user |
| 51ce12e789a241b4b22485dd3677b031 | heat_stack_owner |
| b8bceeaf45c2489fb1195989904f7ba7 | reader |
| e59baa553db042db9303cb80c33b2b55 | admin |
| ed97cdde758d41708528617e6579973f | member |
+----------------------------------+------------------+
Starting from the Rocky release, Keystone offers three default roles: admin, member, and reader. OpenStack admins have the ability to assign these roles to any entity, such as a group or user, across various scopes, including system, domain, or project.
In the 2023.2 (Bobcat) release and onward, Keystone has introduced the service role as one of the default options in addition to admin, member, and reader roles. Administrators can leverage this role for service-to-service API calls, providing an alternative to using the admin role for the same purpose. Importantly, the service role is distinct from the admin, member, and reader roles, and its assignment does not impact any of these existing roles.
What are the Permissions/Privileges Associated with OpenStack Roles?
So, you might be wondering, what permissions do these OpenStack roles have? Worry not, because, you can read more about thise on the roles definitions page.
Create User Account in OpenStack
Create User Account via Horizon
If you want to add additional users into OpenStack for the management of various tasks, you can create their accounts either from command line or from the OpenStack horizon.
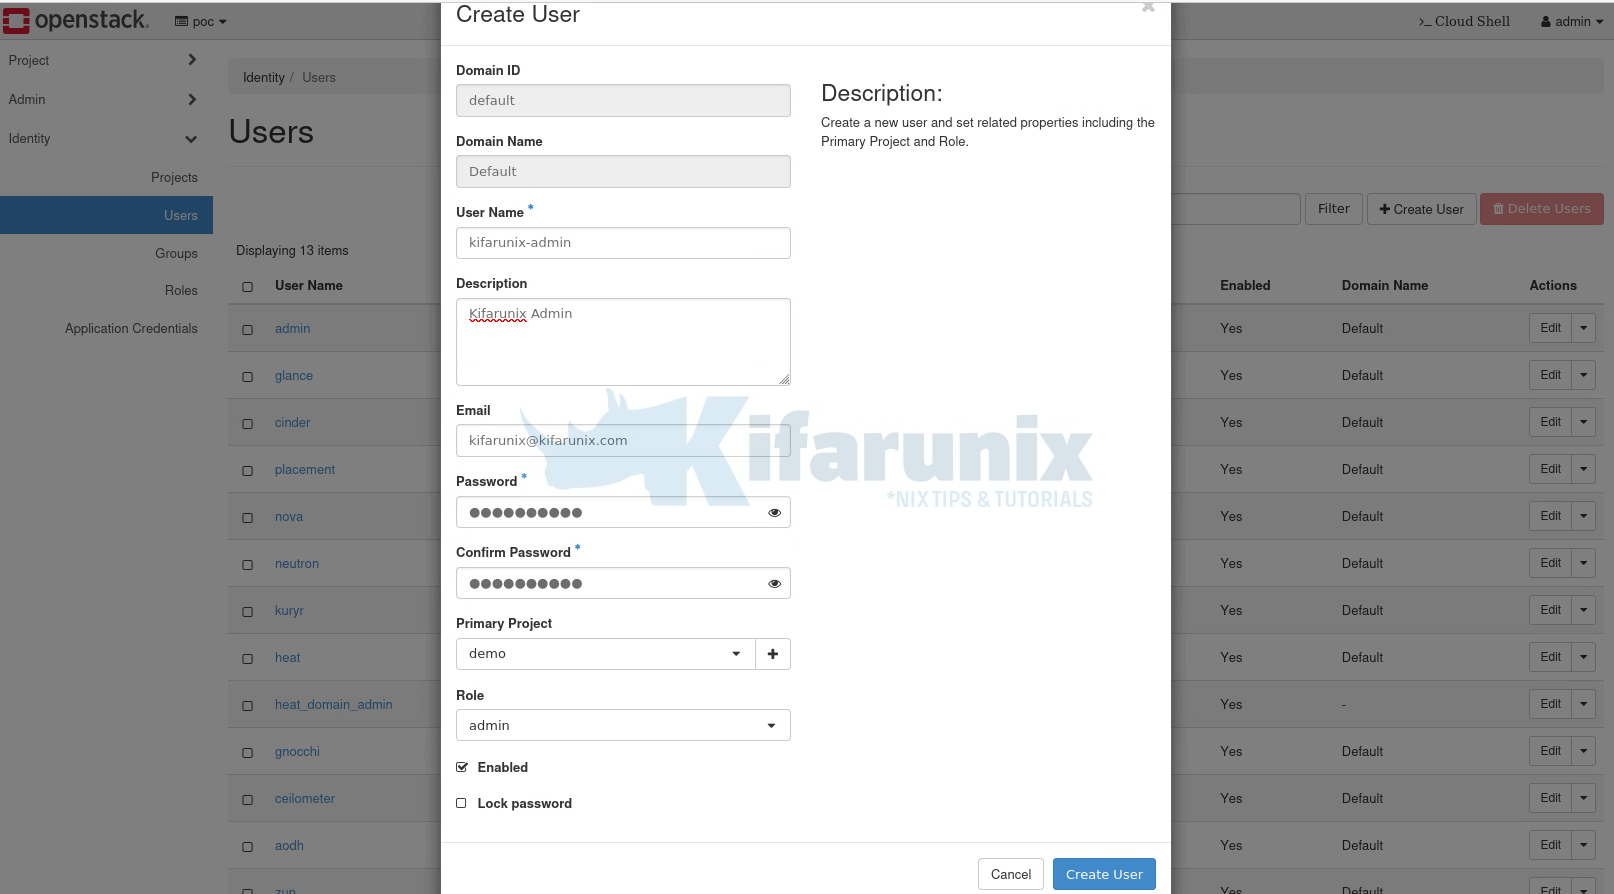
To create user account in OpenStack from the horizon, simply navigate to Horizon > Identity > Users > Create User.
Some of the details required for the user account include the username, description of the user, email address, the user password, the primary project to assign a user to, the role a user has on assigned project, account status (enabled or disabled), password state (lock/unlock). The details marked with * are required, the rest are optional.

Click Create User to create the account.
Once done, you should see the user listed under users page.
Create User Account via Command Line
For the CLI centric admins, you can use the openstack user create command.
openstack user create -hFor example;
openstack user create --project poc \
	--email [email protected] \
	--description "Kifarunix POC User" \
	--password-prompt \
	--enable \
	kifarunix-poc
The command doesn’t assign roles to the user automatically. See below on how to assign user some roles.
Update User Account on OpenStack
You can modify a number of things on the user account either from the horizon or from command line.
On the horizon, you can update user details by navigating to Identity > Users > Select specific user to update and click edit to make updates.
From command line, you can use the command openstack user set. Read more on;
openstack user set -hDelete User Account on OpenStack
If you want to delete user account on OpenStack, you can do it from the command line or from horizon.
To delete user from horizon, login as administrator and navigate to Identity > Users > Select User > Under Actions column, click drop down > Delete User.
You can as well use command line with the command, openstack user delete.
openstack user delete -hAssign Roles to a User on OpenStack
When you create a user from Horizon, you will get an option to assign them some roles. However, when you create a user from the command line, you have to run a seperate command to add them some roles.
So, for examole, once you have created a user account, you need to assign them some role using the openstack role add command.
openstack role add -hFor example;
openstack role add --user kifarunix-poc --project poc readerList Assigned User Roles on OpenStack
How can you verify roles assigned to a user? You can verify user roles from the horizon or from command line.
To verify user roles from the command line, simply navigate to Identity page > Users > Click on the respective username > Role assignments.

To verify user assigned roles from the command line, use the command, openstack role assignment list.
openstack role assignment list -hFor example;
openstack role assignment list --user kifarunix-demo+----------------------------------+----------------------------------+-------+----------------------------------+--------+--------+-----------+
| Role | User | Group | Project | Domain | System | Inherited |
+----------------------------------+----------------------------------+-------+----------------------------------+--------+--------+-----------+
| b8bceeaf45c2489fb1195989904f7ba7 | 5579e7303f164ae8b1a76b6781845b3a | | 18914ea6f4014305818cdb1ec8df8daf | | | False |
+----------------------------------+----------------------------------+-------+----------------------------------+--------+--------+-----------+
Show more details about the role, use the openstack role show command;
openstack role show -hFor example, find out more about the role above;
openstack role show b8bceeaf45c2489fb1195989904f7ba7+-------------+----------------------------------+
| Field | Value |
+-------------+----------------------------------+
| description | None |
| domain_id | None |
| id | b8bceeaf45c2489fb1195989904f7ba7 |
| name | reader |
| options | {'immutable': True} |
+-------------+----------------------------------+
You can see it is reader role.
Remove User Roles on OpenStack
You can update a user and remove their roles using the command, openstack role remove.
openstack role remove -hFor example, to remove the reader role from the user kifarunix-poc in the poc project.
openstack role remove --user kifarunix-poc --project poc readerCreate Custom Roles in OpenStack
Well, it is also possible to create custom roles in OpenStack. You can use the command, openstack role create.
openstack role create -husage: openstack role create [-h] [-f {json,shell,table,value,yaml}] [-c COLUMN] [--noindent] [--prefix PREFIX] [--max-width ] [--fit-width]
[--print-empty] [--description ] [--domain ] [--or-show] [--immutable | --no-immutable]
Create new role
positional arguments:
New role name
options:
-h, --help show this help message and exit
--description
Add description about the role
--domain
Domain the role belongs to (name or ID)
--or-show Return existing role
--immutable Make resource immutable. An immutable project may not be deleted or modified except to remove the immutable flag
--no-immutable Make resource mutable (default)
output formatters:
output formatter options
-f {json,shell,table,value,yaml}, --format {json,shell,table,value,yaml}
the output format, defaults to table
-c COLUMN, --column COLUMN
specify the column(s) to include, can be repeated to show multiple columns
json formatter:
--noindent whether to disable indenting the JSON
shell formatter:
a format a UNIX shell can parse (variable="value")
--prefix PREFIX
add a prefix to all variable names
table formatter:
--max-width
Maximum display width, <1 to disable. You can also use the CLIFF_MAX_TERM_WIDTH environment variable, but the parameter takes precedence.
--fit-width Fit the table to the display width. Implied if --max-width greater than 0. Set the environment variable CLIFF_FIT_WIDTH=1 to always enable
--print-empty Print empty table if there is no data to show.
You can then assign the users a role.
OpenStack Implied Roles
In OpenStack, implied roles refer to a concept where certain roles automatically grant the permissions associated with other roles without explicitly assigning them. This is a way to simplify role management and ensure that users with specific roles also inherit the capabilities of related roles.
Take for example, the admin role implies the member role, and the member role implies the reader role. These implications mean users with the admin role automatically have the member and reader roles. Additionally, users with the member role automatically have the reader role.
Role implications only go one way, from a “prior” role to an “implied” role. Therefore assigning a user the member will not grant them the admin role.
Listing Implied roles;
openstack implied role list+----------------------------------+-----------------+----------------------------------+-------------------+
| Prior Role ID | Prior Role Name | Implied Role ID | Implied Role Name |
+----------------------------------+-----------------+----------------------------------+-------------------+
| e59baa553db042db9303cb80c33b2b55 | admin | ed97cdde758d41708528617e6579973f | member |
| ed97cdde758d41708528617e6579973f | member | b8bceeaf45c2489fb1195989904f7ba7 | reader |
+----------------------------------+-----------------+----------------------------------+-------------------+
To create an implied role, use the command, openstack implied role create.
openstack implied role create -hThat marks the end of our guide on creating users and user roles in OpenStack.

