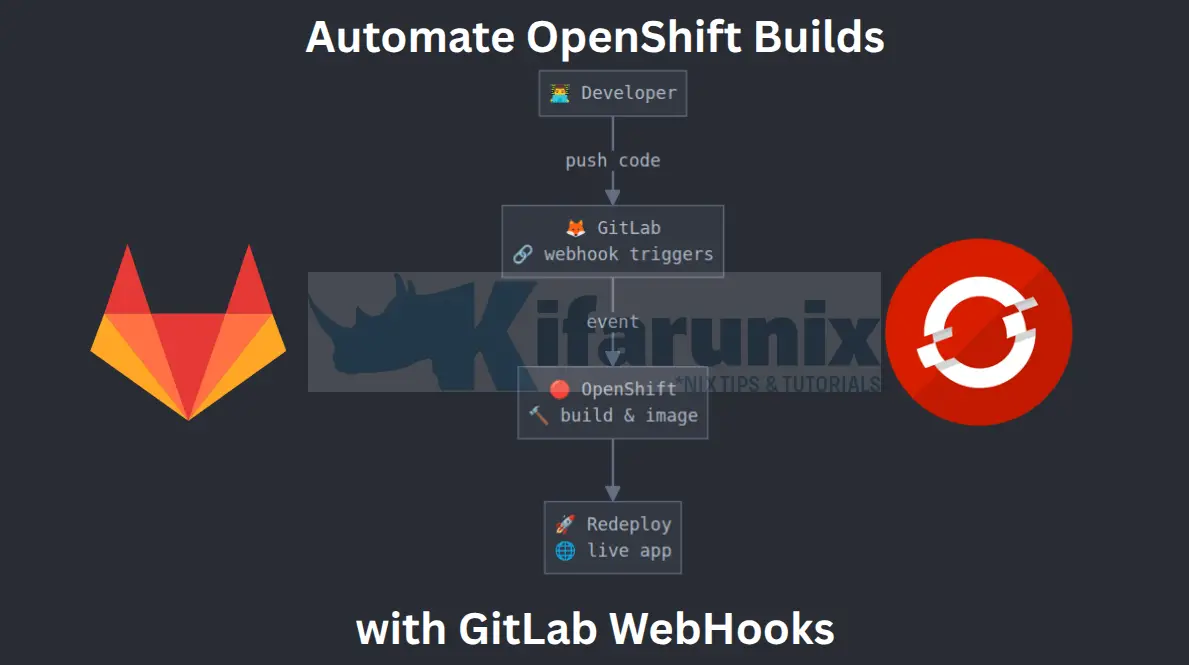
In this guide, you will learn how to automate OpenShift Builds with Git webhooks. Automating builds in OpenShift with Git webhooks streamlines your CI/CD pipelines, enabling faster deployments and reducing manual effort. You will learn how to set up webhooks automation between a GitLab server and an OpenShift cluster to automatically trigger builds when code is pushed to your repository.
Table of Contents
How to Automate OpenShift Builds with Git Webhooks
Understanding OpenShift Build Automation
OpenShift supports multiple strategies for building container images, including Source-to-Image (S2I), Docker builds, and custom builds. These strategies allow you to take application source code and produce runnable container images directly within the OpenShift platform.
If your project is hosted on a Git-based source code management (SCM) platform like GitLab or GitHub, you can automate your OpenShift builds using webhooks. A webhook is a lightweight HTTP callback that is triggered by specific events in your repository, such as a code push or merge request.
When properly configured, a webhook can notify OpenShift API endpoint of these changes, triggering a new build automatically. This enables a seamless CI/CD workflow, ensuring your container images stay up-to-date with the latest code.
In our previous guides, we extensively covered how OpenShift builds work as well how to deploy apps on OpenShift using BuildConfig.
OpenShift Builds and BuildConfig Essentials: A Comprehensive Guide
How to Deploy Apps on OpenShift Using BuildConfig: A Step-by-Step Guide (2025)
This guide therefore builds on that foundation by showing you how to automate OpenShift builds using Git webhooks specifically with GitLab. You’ll learn how to configure webhooks so that every code push to your repository automatically triggers a new image build on OpenShift, streamlining your CI/CD workflow.
Prerequisites and Environment Setup
In order to follow along, ensure that you have:
- Right permissions to access OpenShift cluster Web or CLI
- Access to Gitlab and enough permissions to access the project and create webhooks
- Network connectivity between your GitLab and OpenShift
You can check our guides on how to deploy Gitlab on Linux;
How to install and configure Gitlab
Create a BuildConfig with Git Webhook Trigger
In OpenShift, a BuildConfig defines how to build a container image from your application source code. It includes the source code location such as a Git repository along with the build strategy (e.g., Docker or S2I), output image configuration, and triggers that tell OpenShift when to initiate a new build.
One of the most powerful triggers is the webhook trigger, which enables automation by letting external systems like GitLab or GitHub to notify OpenShift when code changes occur.
OpenShift supports different types of webhook triggers for example:
- GitHub: If importing project from Github
- GitLab: If importing project from Gitlab
- Generic (for other systems or custom integrations)
- etc…
In our previous guide, How to Deploy Apps on OpenShift Using BuildConfig, we covered in detail how to deploy applications by importing source code from a GitLab or GitHub repository.
Until now, I had been using a monorepo to manage the three project components. However, to enable more granular webhook triggers and ensure that build and deployment processes can be executed independently without one component affecting the others, i have transitioned the project into a polyrepo structure. This change allows each component to have its own git repository, CI/CD pipeline, and release workflow, improving modularity, maintainability, and deployment isolation.
So, we have created a new group and have each component (frontend, backend and db) as separate projects on GitLab to make it easy to create Webhook triggers for each application component:

As noted, when you import an application from a source code repository, OpenShift automatically creates a BuildConfig for that application.
Consider our application deployed in the previous guide.
Switch to your project/namespace:
oc project booksvaultThen list the build configurations:
oc get bcYou should see output similar to:
NAME       TYPE     FROM   LATEST
backend    Docker   Git    1
frontend   Docker   Git    1
mongo      Docker   Git    1
As shown above, there are three BuildConfig objects corresponding to the apps imported from Git.
Similarly, when configuring a BuildConfig, OpenShift can automatically generate a webhook trigger based on the specified source code location (e.g., a GitLab or GitHub repository).
To verify whether a webhook has been configured for your BuildConfig, run:
oc describe bc <buildconfig-name> -n <namespace>For example, let’s check our build configurations above if they have any webhooks generated for them;
oc describe bc mongoName: mongo
Namespace: booksvault
Created: 3 hours ago
Labels: app=mongo
app.kubernetes.io/component=mongo
app.kubernetes.io/instance=mongo
app.kubernetes.io/name=mongo
app.kubernetes.io/part-of=bookvault-demo-app
Annotations: app.openshift.io/vcs-ref=
app.openshift.io/vcs-uri=https://gitlab.kifarunix.com/kifarunix/bookvault-demo-app.git
openshift.io/generated-by=OpenShiftWebConsole
Latest Version: 1
Strategy: Docker
URL: https://gitlab.kifarunix.com/kifarunix/bookvault-demo-app.git
ContextDir: mongo
Source Secret: gitlab
Dockerfile Path: Dockerfile
Volumes: <none>
Output to: ImageStreamTag mongo:latest
Build Run Policy: Serial
Triggered by: Config
Webhook GitLab:
	URL:	https://api-int.ocp.kifarunix-demo.com:6443/apis/build.openshift.io/v1/namespaces/booksvault/buildconfigs/mongo/webhooks/<secret>/gitlab
Webhook Generic:
URL: https://api-int.ocp.kifarunix-demo.com:6443/apis/build.openshift.io/v1/namespaces/booksvault/buildconfigs/mongo/webhooks/<secret>/generic
AllowEnv: false
Builds History Limit:
Successful: 5
Failed: 5
Build Status Duration Creation Time
mongo-1 complete 26s 2025-06-26 17:05:25 +0000 UTC
Events: <none>
As you can see, we have two webhooks generated, a Gitlab and a generic one. We are more interested in the Gitlab one.
Webhook GitLab:
URL: https://api-int.ocp.kifarunix-demo.com:6443/apis/build.openshift.io/v1/namespaces/booksvault/buildconfigs/mongo/webhooks/<secret>/gitlab
The webhook URL is what we need and we will use it in the next steps.
oc new-app or oc new-build or even from Web console, OpenShift automatically includes webhook triggers for GitHub, GitLab, and Generic types, as long as a Git source is provided.
However, if for any reason a webhook trigger isn’t added during creation, you can manually add or modify one using the oc set triggers command. The general syntax for oc set triggers:
oc set triggers RESOURCE/NAME [--from-config|--from-image|--from-github|--from-gitlab|--from-webhook] [--auto|--manual] [flags] [options]oc set triggers --helpoc set triggers bc/my-app --from-gitlaboc get secrets command.
Like already mentioned, secrets are also auto generated. See the secrets from my project;
oc get secretsSample output;
NAME                              TYPE                       DATA   AGE
backend-generic-webhook-secret    Opaque                     1      167m
backend-gitlab-webhook-secret     Opaque                     1      167m
booksvault                        kubernetes.io/basic-auth   2      2d
builder-dockercfg-qv49t           kubernetes.io/dockercfg    1      2d1h
default-dockercfg-ckrn8           kubernetes.io/dockercfg    1      2d1h
deployer-dockercfg-ghrt5          kubernetes.io/dockercfg    1      2d1h
frontend-generic-webhook-secret   Opaque                     1      165m
frontend-gitlab-webhook-secret    Opaque                     1      165m
gitlab                            kubernetes.io/basic-auth   2      4h59m
mongo-generic-webhook-secret      Opaque                     1      3h5m
mongo-gitlab-webhook-secret       Opaque                     1      3h5m
From the secrets list, any secret with gitlab in its name (e.g. mongo-gitlab-webhook-secret) is associated with the GitLab webhook trigger for that BuildConfig.
Enable Webhook Authentication on OpenShift
When GitLab (or any external system) sends a webhook to OpenShift, it does not authenticate with a user account but rather makes the request as an anonymous (system:anonymous) user. In OpenShift, an unauthenticated request is assigned the user identity system:anonymous, which belongs to the system:unauthenticated group.
So for OpenShift to accept and process the webhook requests, it needs to explicitly allow system:unauthenticated group to create webhook-triggered builds. This access is granted through a special role called system:webhook.
oc get clusterrolePermissions for the role;
oc describe clusterrole system:webhookName: system:webhook
Labels:
Annotations: rbac.authorization.kubernetes.io/autoupdate: true
PolicyRule:
Resources Non-Resource URLs Resource Names Verbs
--------- ----------------- -------------- -----
buildconfigs/webhooks [] [] [create get]
buildconfigs.build.openshift.io/webhooks [] [] [create get]
Two ways to grant access:
- You can give system:unauthenticated group access to the system:webhook role in a specific namespace:
oc policy add-role-to-group system:webhook system:unauthenticated -n <your-namespace>If you are already within the project/namespace, no need to specify the namespace on CLI;
oc policy add-role-to-group system:webhook system:unauthenticatedYou may get a warning like as shown below;
Warning: Group 'system:unauthenticated' not found
clusterrole.rbac.authorization.k8s.io/system:webhook added: "system:unauthenticated"
This is because OpenShift’s oc command-line tool attempts to validate whether the specified group exists in the system’s identity provider or user management system before creating the role binding. The system:unauthenticated group is a virtual group in Kubernetes/OpenShift, meaning it is not explicitly defined in the cluster’s identity provider (e.g., LDAP, OAuth, or OpenID Connect) or stored as a tangible group object in the API. Instead, it is a special, built-in group that the Kubernetes/OpenShift API server automatically assigns to requests that lack valid authentication credentials.
- Alternatively, you can grant access to all namespaces by giving it the
system:webhookcluster role:
oc adm policy add-cluster-role-to-group system:webhook system:unauthenticatedHowever, while granting cluster-wide access is easier, it is less secure. It allows unauthenticated webhooks to trigger builds across the entire cluster (if webhooks exist). Hence, trade carefully!
Obtain Webhook Secret Value
If you have noticed, the URL has a secret token place value, <secret>. You need to replace that with the actual value to form the complete Webhook URL.
To the exact secret reference name for your Webhook trigger, get the details of the respective BuildConfig;
oc get bc mongo -o yamlUnder triggers section, you should see the secret reference:
...
  triggers:
  - generic:
      secretReference:
        name: mongo-generic-webhook-secret
    type: Generic
  - gitlab:
      secretReference:
        name: mongo-gitlab-webhook-secret
    type: GitLab
  - type: ConfigChange
...
We are interested in the Gitlab secret reference, which is named as mongo-gitlab-webhook-secret.
To see the details of the secret;
oc get secret mongo-gitlab-webhook-secret -o yamlThe key of the webhook secret is called WebHookSecretKey, and its value is the token used to authenticate webhook requests.
apiVersion: v1
data:
  WebHookSecretKey: OTU0NDdlMWQ3MmFiM2E0Mg==
kind: Secret
metadata:
  creationTimestamp: "2025-06-26T17:05:25Z"
  labels:
    app: mongo
    app.kubernetes.io/component: mongo
    app.kubernetes.io/instance: mongo
    app.kubernetes.io/name: mongo
    app.kubernetes.io/part-of: bookvault-demo-app
  name: mongo-gitlab-webhook-secret
  namespace: booksvault
  resourceVersion: "38602260"
  uid: 4d18daa9-9e95-42fd-bc36-e7c1eb3db804
type: Opaque
To get the secret value, you need to decode it from base64;
oc get secret mongo-gitlab-webhook-secret -o jsonpath="{.data.WebHookSecretKey}" | base64 -d;echoSample output;
95447e1d72ab3a42Configure Webhook in GitLab for each Repository
Test the Connection to API Endpoint
Before proceeding to configure the webhook in GitLab, it’s a good practice to first test the connectivity to webhook endpoint in OpenShift. This ensures that the URL is reachable and the BuildConfig is correctly set up to accept incoming webhook requests.
You can do this by manually triggering the webhook using a simple curl command, which simulates a GitLab push event.
From above, our Webhook URL for our MongoDB Deployment on OpenShift is:
https://api-int.ocp.kifarunix-demo.com:6443/apis/build.openshift.io/v1/namespaces/booksvault/buildconfigs/mongo/webhooks/<secret>/gitlabWhile configuring the Webhook URL on GitLab, you will need to replace the <secret> with the actual Webhook secret value (Covered below).
To test the connection to this API endpoint from Gitlab, login to the Gitlab server terminal and run the curl command below (Note that my OpenShift endpoint uses self signed ssl certs since it an internal test env hence why I used option -k in the curl command below);
curl -XPOST 'https://api-int.ocp.kifarunix-demo.com:6443/apis/build.openshift.io/v1/namespaces/booksvault/buildconfigs/mongo/webhooks/95447e1d72ab3a42/gitlab' -kSample command output;
{
  "kind": "Status",
  "apiVersion": "v1",
  "metadata": {},
  "status": "Failure",
  "message": "non-parseable Content-Type  (mime: no media type)",
  "reason": "BadRequest",
  "code": 400
}
Although a 400 BadRequest error appears, it confirms that the endpoint is reachable. If the endpoint is not accessible, check your network or firewall settings.
Configure GitLab Webhooks Outbound Requests
Setting up GitLab webhooks to talk to OpenShift’s build API is simple but you need to be aware of access restrictions and default behavior to make it work correctly and securely, especially in private networks.
So, if you have tried to add new webhook only to be slapped with invalid url given error, then it is because of the Gitlab outbound requests restrictions.
GitLab enforces restrictions on where webhooks can send traffic to, so as to:
- Prevents SSRF (Server-Side Request Forgery) attacks
- Ensures webhooks cannot call local/internal services (like
localhost,127.0.0.1,10.x.x.x, etc.) by default
In self-hosted OpenShift + GitLab setups, your OpenShift API endpoint is usually on a private IP (e.g., 10.0.0.10 or openshift.local), which will be blocked unless explicitly allowed
By default, GitLab blocks Webhook requests to internal networks. You can check and adjust the settings under Admin > Settings > Network > Outbound requests.
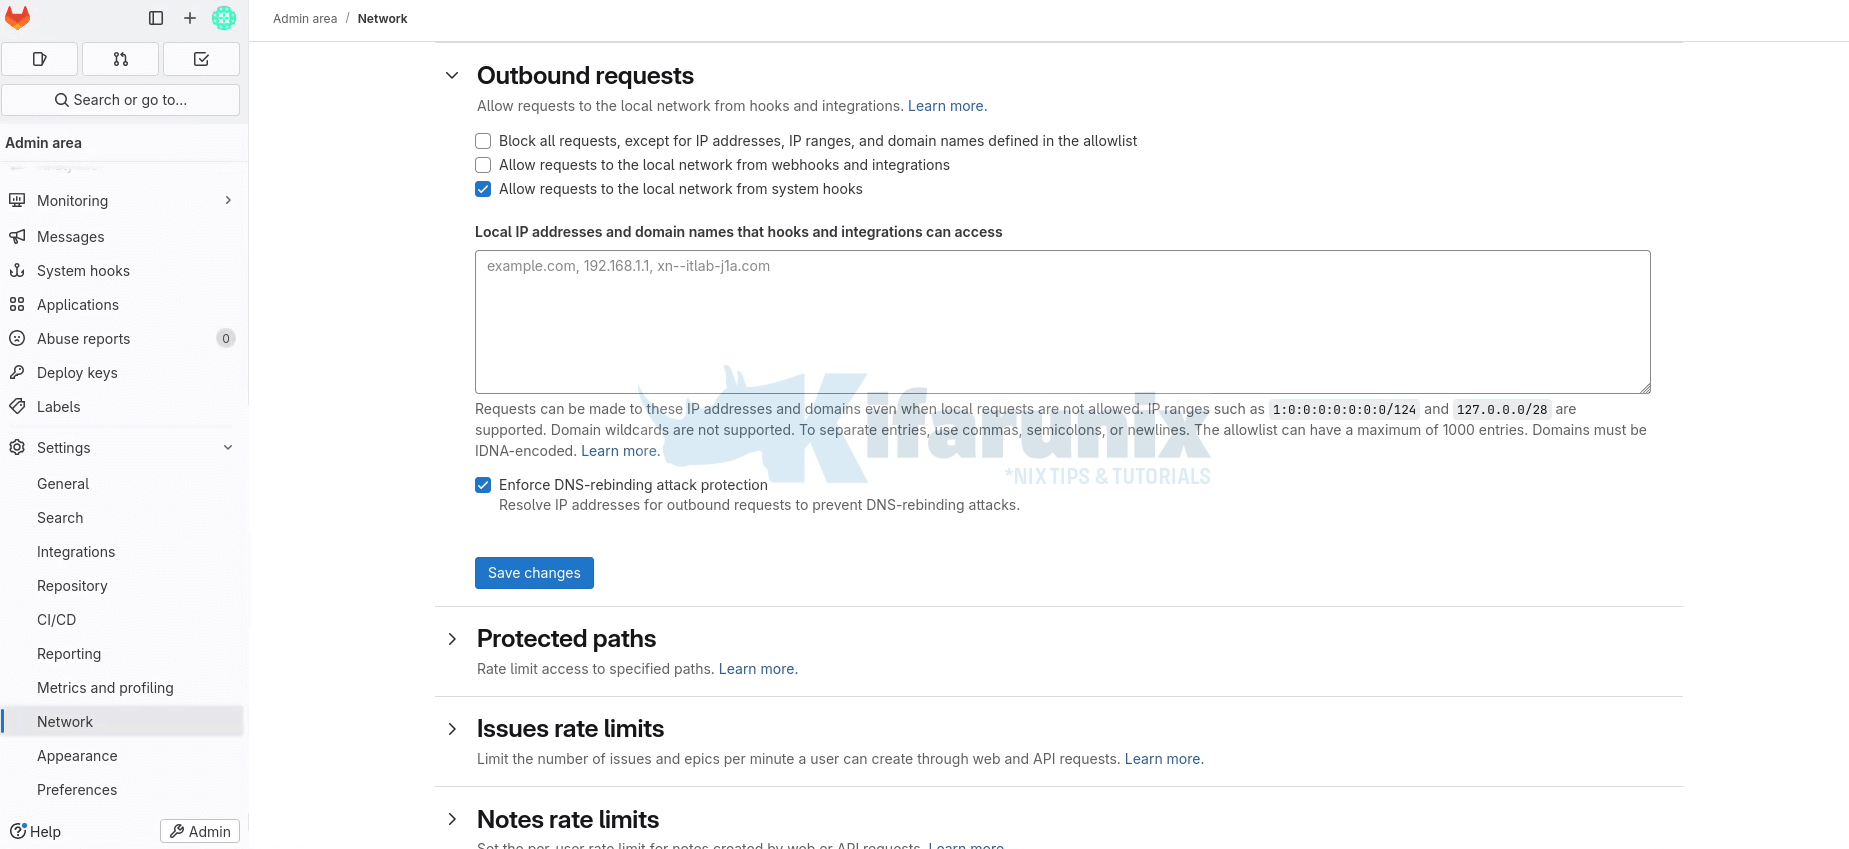
Therefore, to allow Gitlab to make outbound connection requests to local/internal network via webhooks and integrations, enable the Allow requests to the local network from webhooks and integrations by checking the box.
Save the changes when done.
Add OpenShift BuildConfig Webhook to GitLab
Now that we have confirmed that GitLab is able to reach the OpenShift API endpoint, let’s proceed to configure the OpenShift Builds Webhook URL for our GitLab projects.
Therefore, login to the Gitlab web interface and navigate to your GitLab project repository.
Navigate to project Settings > Webhooks.
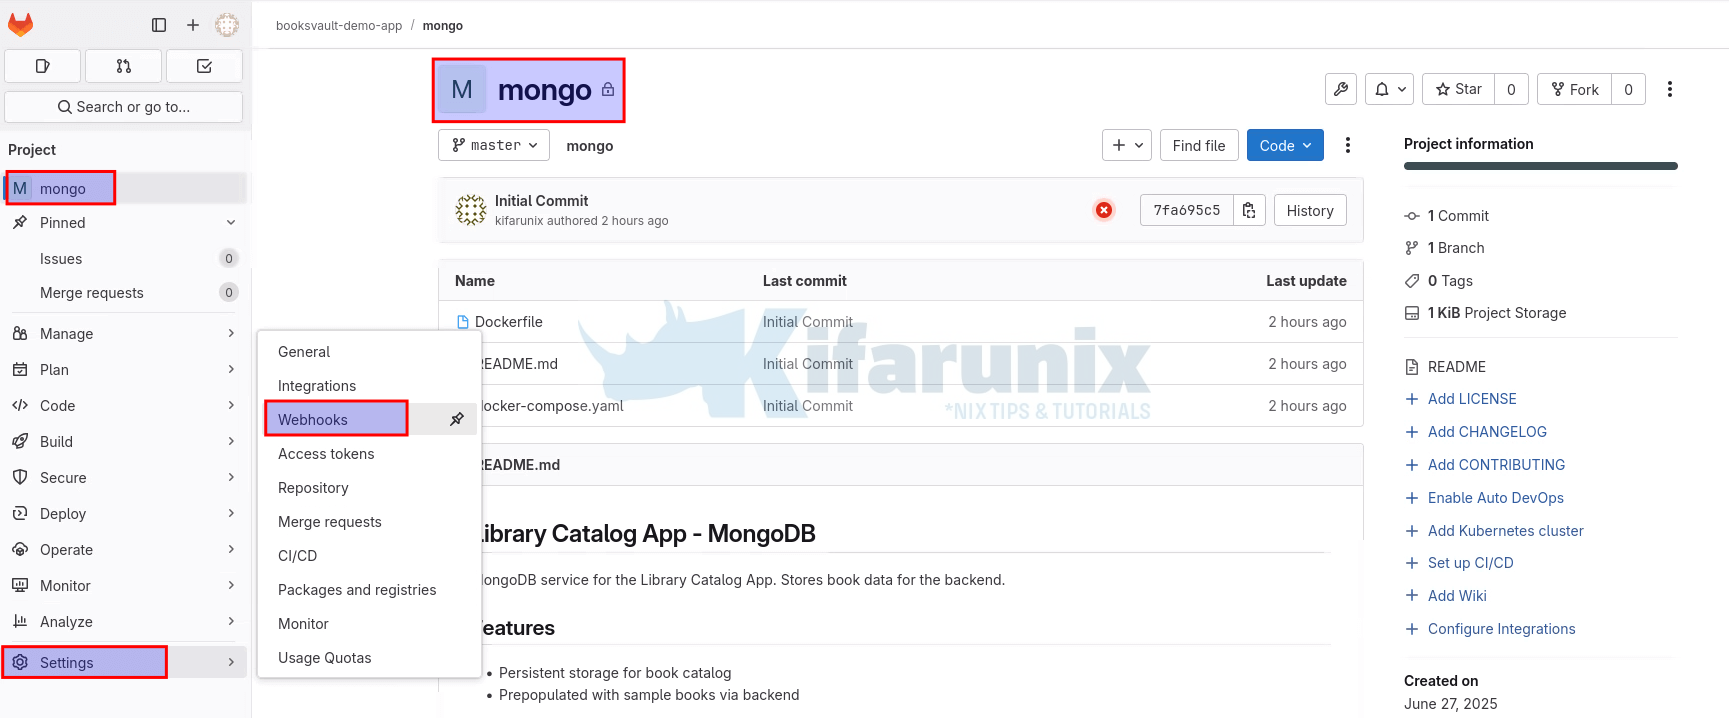
From the Webhook configuration page, click Add new webhook.
Therefore, to configure the Webhook URL:
- Set the name of the Webhook (optional)
- Define the description (optional)
- Webhook URL: Now, since you have the value of the secret, then your Webhook URL becomes (replace your values accordingly);
https://api-int.ocp.kifarunix-demo.com:6443/apis/build.openshift.io/v1/namespaces/booksvault/buildconfigs/mongo/webhooks/95447e1d72ab3a42/gitlab- Secret Token field (Optional): 95447e1d72ab3a42
- Under Trigger, select Push events (or add others like Merge request events if needed).
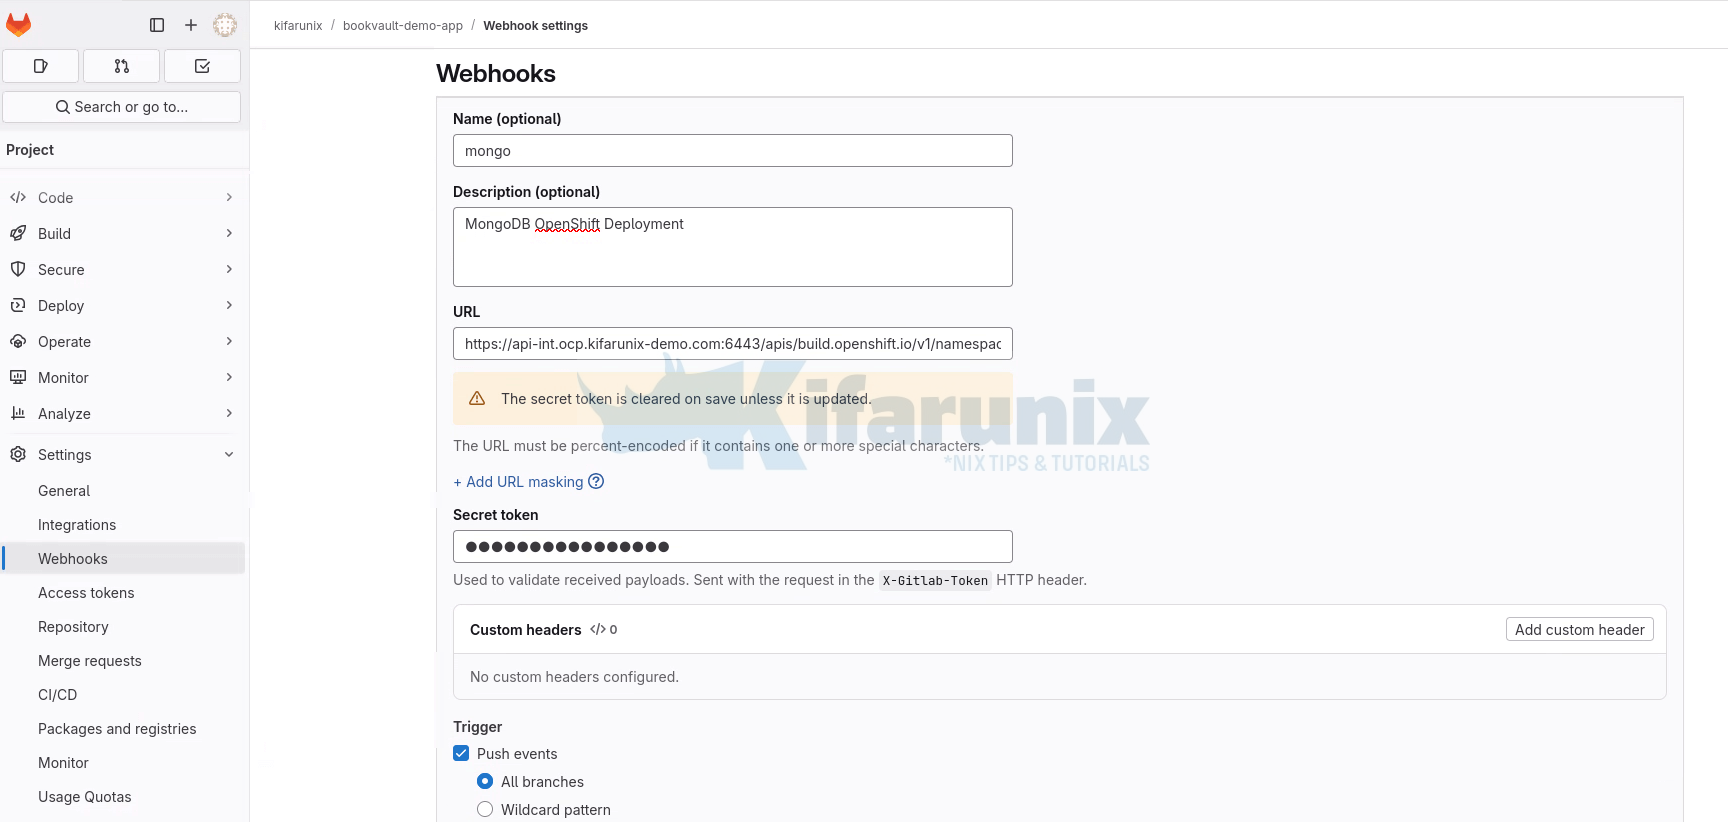
- Uncheck Enable SSL verification if your local OpenShift cluster uses a self-signed certificate.
- Click Add webhook.
Upon successful addition, you should now see your Webhook under Webhooks:
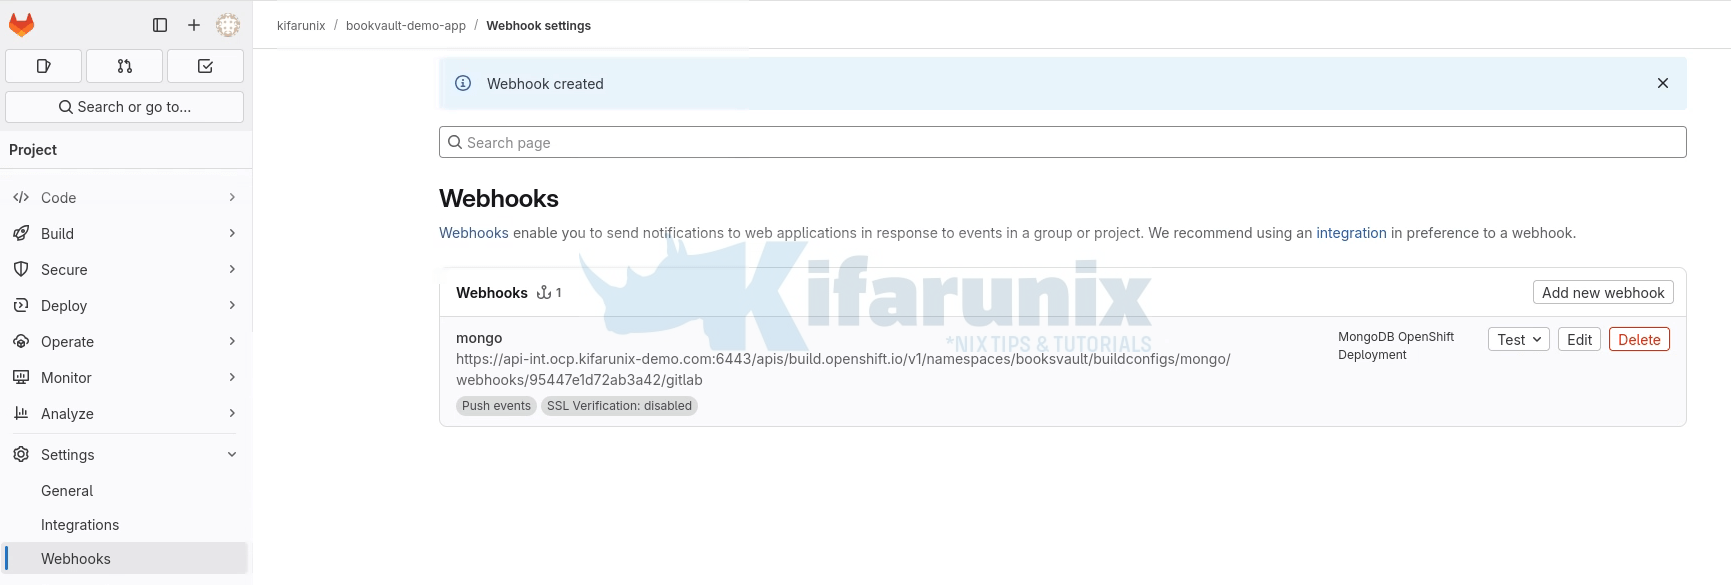
You can add Webhooks for other projects.
Test the OpenShift BuildConfig Webhook on GitLab
A created Webhook has a test button on the right. Click Test > Push events to simulate a webhook call.
Check the response. A 200 OK status indicates success; otherwise, troubleshoot connectivity or URL issues.

Test the Webhook Automation: Trigger and Verify the Builds
As per my demo application, I had three components; frontend, backend API and DB (MongoDB).
The application is deployed on OpenShift. For now, this is how the application look like from Web;

Some of the changes that I need to make to the Frontend to demonstrate how webhooks can automate builds due to code changes, is to reduce the Year input box size, move the Add book option to just be on the same line as other input boxes as well as make the button visible.
To proceed:
Prepare to Watch for Incoming Builds on OpenShift
Before pushing any code changes, login to OpenShift, if you have access to CLI, open a terminal and start watching OpenShift for triggered builds. You can watch from Web console if you do not have CLI access.
Login to the CLI and run the command:
Switch to your project (Replace your project name accordingly)
oc project booksvaultWatch new builds:
oc get builds -wThe command will continuously show new builds as they’re triggered by GitLab via the webhook.
In my case, this is the current status of the builds;
oc get builds -w
NAME         TYPE     FROM          STATUS     STARTED          DURATION
mongo-1      Docker   Git@7fa695c   Complete   55 minutes ago   26s
backend-1    Docker   Git@a247f2e   Complete   48 minutes ago   43s
frontend-1   Docker   Git@31457c5   Complete   33 minutes ago   2m13s
Once the build has started, you can as well stream logs of the build as it happens:
oc logs -f bc/<your-buildconfig-name>
For example, I have three BuildConfigs as shown above. So, to monitor build logs for frontend BuildConfig for example
oc logs -f bc/frontendYou can only sees if the build process has started!
Make a Change to Your Code
You can either:
- Edit a file directly in GitLab (e.g. app source code), or
- Make changes in your local Git repository.
In my case, I have updated the Frontend page to look better.
git statusOn branch master
Your branch is up to date with 'origin/master'.
Changes not staged for commit:
(use "git add <file>..." to update what will be committed)
(use "git restore <file>..." to discard changes in working directory)
modified: src/App.js
no changes added to commit (use "git add" and/or "git commit -a")
Stage the changes for commit:
git add src/App.jsCommit and Push the Changes
Commit the changes and push the commit to the branch that your OpenShift BuildConfig is tracking (e.g., main, master, etc.):
git commit -m "Updated Frontend to test Webhook Triggers"We are already on the master branch;
git branch* master
So, we will just now push the changes!
git pushSample output;
Enumerating objects: 7, done.
Counting objects: 100% (7/7), done.
Delta compression using up to 4 threads
Compressing objects: 100% (4/4), done.
Writing objects: 100% (4/4), 684 bytes | 684.00 KiB/s, done.
Total 4 (delta 2), reused 0 (delta 0), pack-reused 0 (from 0)
To https://gitlab.kifarunix.com/booksvault-demo-app/frontend.git
   aa5f8fe..fc57ee5  master -> master
Immediately I pushed the code, I see new builds spawned for the frontend app on OpenShift;
oc get build -wNAME TYPE FROM STATUS STARTED DURATION
mongo-1 Docker Git@7fa695c Complete About an hour ago 26s
backend-1 Docker Git@a247f2e Complete About an hour ago 43s
frontend-1 Docker Git@31457c5 Complete 47 minutes ago 2m13s
frontend-2 Docker Git@fc57ee5 New
frontend-2 Docker Git@fc57ee5 Pending
frontend-2 Docker Git@fc57ee5 Running 1 second ago
frontend-2 Docker Git@fc57ee5 Running 1 second ago
frontend-2 Docker Git@fc57ee5 Running 2 minutes ago
frontend-2 Docker Git@fc57ee5 Running 2 minutes ago
frontend-2 Docker Git@fc57ee5 Complete 2 minutes ago 2m20s
Verify the changes from the application that has been redeployed.
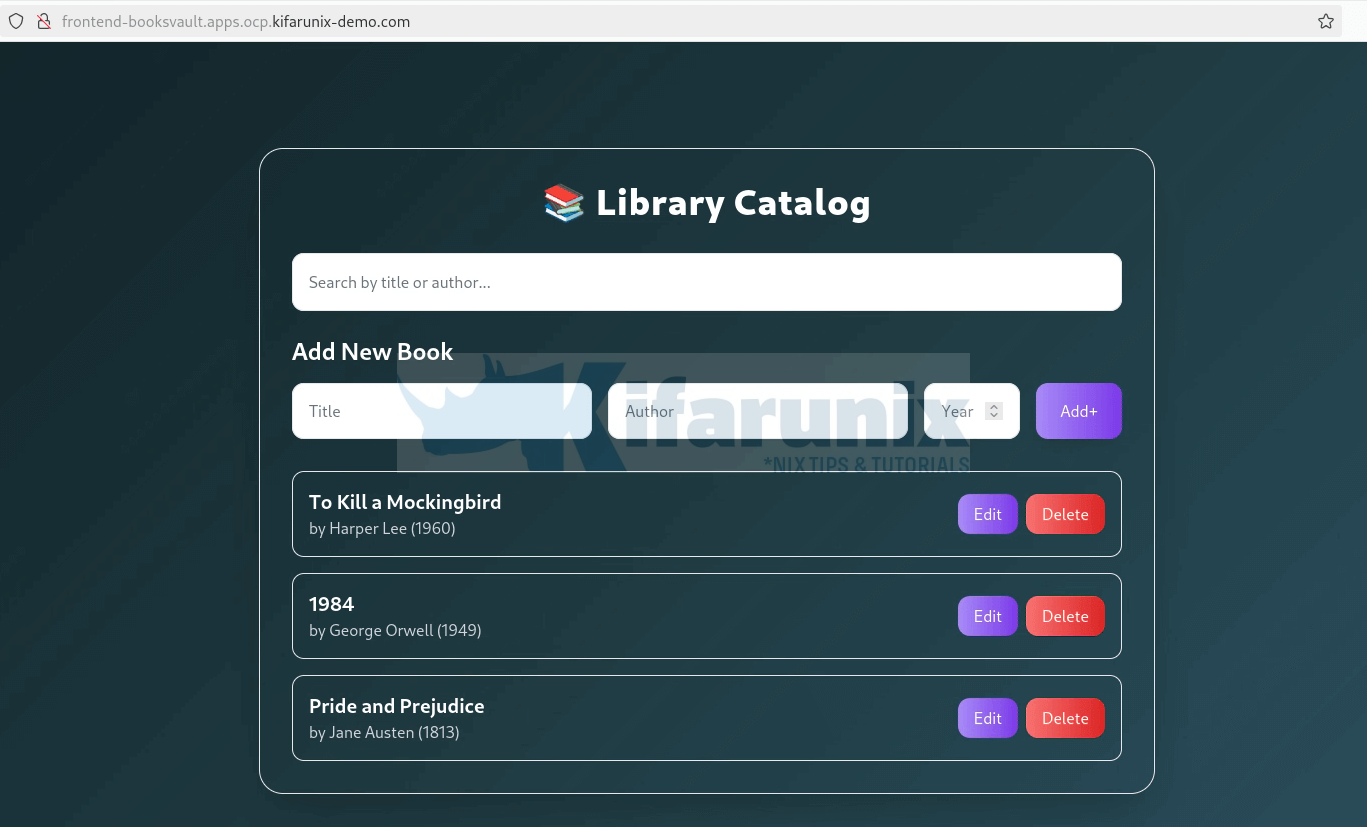
And there we go!! The new application is up with no manual interventions whatsoever. Awesome!
In case of anything, check GitLab Webhook logs:
- In GitLab, go to Settings > Webhooks > Click on the webhook > Edit > Scroll to bottom > Recent Deliveries.
- Ensure the webhook request was sent and received a 200 OK response.
Common Issues and Fixes:
Some of the commonly encountered issues include (but not limited to):
- Webhook Not Triggering: Verify the webhook URL, network connectivity, and secret token. Ensure port forwarding is active if used. Also check network outbound rules.
- 403 Forbidden: Check if the secret token matches in OpenShift and GitLab.
- SSL Errors: Disable SSL verification in GitLab for self-signed certificates, or configure a trusted certificate in OpenShift.
- Build Fails: Check build logs (oc logs) for errors in the BuildConfig or source code.
- etc..
Conclusion
Automating OpenShift builds with Git webhooks creates a robust, efficient CI/CD pipeline that responds instantly to code changes. This setup reduces manual intervention, minimizes deployment errors, and accelerates your development workflow.
The configuration outlined in this guide provides a solid foundation for automated builds while maintaining security and reliability. As your needs grow, the advanced configuration options allow for sophisticated deployment strategies across multiple environments.
As part of best practices, always remember to regularly review and update your webhook configurations, rotate secrets, and monitor build performance to maintain an optimal automation pipeline. Similarly, subscribe only to necessary GitLab events (e.g., Push events) to reduce server load.

