How do I set up a local certificate authority server on Linux? Well, in this tutorial you will learn how to setup a Local CA Server on Ubuntu. You might want to setup a Local CA server for various reasons including to issue private certificates for your users and applications. This will also see you cut costs on the purchases of public certs required for your local usage, as well as giving you control over the digital certificates you issue for local use.
Setting up a Local CA Server on Ubuntu
In order to setup a local CA (Certificate Authority) server on Linux:
Install OpenSSL on Ubuntu
OpenSSL part of the OpenSSL project’s implementation of the SSL and TLS cryptographic protocols for secure communication over the
Internet. It contains the general-purpose command line binary /usr/bin/openssl, useful for cryptographic operations such as:
- creating RSA, DH, and DSA key parameters;
- creating X.509 certificates, CSRs, and CRLs;
- calculating message digests;
- encrypting and decrypting with ciphers;
- testing SSL/TLS clients and servers;
- handling S/MIME signed or encrypted mail.
The OpenSSL command line binary is usually installed on Linux systems by default. You can check if the binary is available by running the command;
which opensslIt should list the path to binary if the package is installed;
/usr/bin/opensslIf for some unknown reasons the binary is not available, then you can install it by running the command below;
sudo apt updatesudo apt install opensslCreate Directories and Configuration files for your CA
OpenSSL uses openssl.cnf configuration file to define and specify various settings and options when generating digital certificates, private keys, and other cryptographic objects.
First of all, create a root CA directory to store your CA issued certificates, CA’s private key, certificate requests…
mkdir -p /etc/ssl/kifarunixCA/{certs,private,crl,newcerts,csr}Update some OpenSSL CA Settings in openssl.cnf file
We need to make a few customizations of OpenSSL CA settings such as;
- Default certificate and private key locations
- Default certificate authority (CA) information
- Default encryption algorithms and key lengths
- Default certificate signing request (CSR) options
- etc
Thus, copy the default openssl.cnf configuration file to your directory;
cp /etc/ssl/openssl.cnf /etc/ssl/kifarunixCA/Open your custom openssl.cnf file and edit the [ CA_default ], [ req ], [ req_distinguished_name ] and [ usr_cert ] sections. See our customized sections below;
vim /etc/ssl/kifarunixCA/openssl.cnf[ ca ]
default_ca = CA_default
[ CA_default ]
dir = /etc/ssl/kifarunixCA
certs = $dir/certs
crl_dir = $dir/crl
database = $dir/index.txt
new_certs_dir = $dir/newcerts
certificate = $dir/cacert.pem
serial = $dir/serial
crlnumber = $dir/crlnumber
crl = $dir/crl.pem
private_key = $dir/private/cakey.pem
x509_extensions = usr_cert
name_opt = ca_default
cert_opt = ca_default
default_days = 3650
default_crl_days= 30
default_md = default
preserve = no
policy = policy_match
...
[ req ]
default_bits = 4096
...
[ req_distinguished_name ]
countryName = Country Name (2 letter code)
countryName_default = US
countryName_min = 2
countryName_max = 2
stateOrProvinceName = State or Province Name (full name)
stateOrProvinceName_default = California
localityName = Locality Name (eg, city)
localityName_default = San Francisco
0.organizationName = Organization Name (eg, company)
0.organizationName_default = Kifarunix, Inc.
organizationalUnitName = Organizational Unit Name (eg, section)
organizationalUnitName_default = IT Department
commonName = Common Name (e.g. server FQDN or YOUR name)
commonName_max = 64
emailAddress = Email Address
emailAddress_max = 64
...
[ usr_cert ]
basicConstraints=CA:FALSE
keyUsage = nonRepudiation, digitalSignature, keyEncipherment, dataEncipherment
subjectKeyIdentifier=hash
authorityKeyIdentifier=keyid,issuer
subjectAltName = @alt_names
[alt_names]
DNS.1 = *.kifarunix.com
We also customized the req_distinguished_name section to update the default information about our CA entity. You can leave it so you can supply the information manually or via the -subj openssl command line option e.g;
-subj "/C=US/ST=CA/L=San Francisco/O=Kifarunix, Inc./CN=kifarunix.com"Save and exit the file. Refer to OpenSSL Docs for more info.
Initialize the CA Database
Initialize the serial (Contains the serial number for the next certificate) file and create the index.txt (Used as a database to track certificates that have been issued);
echo 01 > /etc/ssl/kifarunixCA/serialtouch /etc/ssl/kifarunixCA/index.txtNote, the index.txt file must initially be completely empty with no white space.
Generate CA/Root Private Key
In order to sign your certificates as your local CA, you will need to generate the CA private key. This can be generated using the command below;
Then, generate and protect the CA root private key and store them in the above directory;
openssl genrsa -aes256 -out /etc/ssl/kifarunixCA/private/cakey.pem 4096You will be prompted to enter and confirm your passphrase.
Enter PEM pass phrase: PASSPHRASE
Verifying - Enter PEM pass phrase: RE-ENTER PASSPHRASE
You will need to keep this passphrase secured. If it falls on wrong hands, malicious actors may compromise your PKI infrastructure and issue bogus certificates.
Generate CA/Root Certificate
Next, you need to generate your self-signed X.509 CA/Root certificate using the Root private key generated above;
openssl req -new -x509 -sha256 \
-config /etc/ssl/kifarunixCA/openssl.cnf \
-key /etc/ssl/kifarunixCA/private/cakey.pem \
-out /etc/ssl/kifarunixCA/cacert.pem \
-subj "/C=US/ST=California/L=San Francisco/O=Kifarunix, Inc./CN=Kifarunix Inc CA"
You will be prompted to enter the Root private key passphrase. We also provided other CA certificate issuer information using the -subj option.
You can review your CA certificate using the command below;
openssl x509 -in /etc/ssl/kifarunixCA/cacert.pem -textGenerate your Local SSL/TLS Certificate Signing Request (CSR)
You can now generate your local SSL/TLS certificates and sign them using your local CA.
Thus, generate the certificate private key and the Certificate signing request (CSR);
Generate the key for our domain, kifarunix.com;
openssl genrsa -out /etc/ssl/kifarunixCA/private/kifarunix.com.key 4096You are prompted for a pass-phrase for the key. Provide is and press ENTER to proceed.
Next, generate the CSR;
openssl req -new -key /etc/ssl/kifarunixCA/private/kifarunix.com.key \
-out /etc/ssl/kifarunixCA/csr/kifarunix.com.csr \
-config /etc/ssl/kifarunixCA/openssl.cnf
Sample output;
Enter pass phrase for /etc/ssl/kifarunixCA/private/kifarunix.com.key:
You are about to be asked to enter information that will be incorporated
into your certificate request.
What you are about to enter is what is called a Distinguished Name or a DN.
There are quite a few fields but you can leave some blank
For some fields there will be a default value,
If you enter '.', the field will be left blank.
-----
Country Name (2 letter code) [US]:
State or Province Name (full name) [California]:
Locality Name (eg, city) [San Francisco]:
Organization Name (eg, company) [Kifarunix, Inc.]:
Organizational Unit Name (eg, section) [IT Department]:
Common Name (e.g. server FQDN or YOUR name) []:*.kifarunix.com
Email Address []:

Please enter the following 'extra' attributes
to be sent with your certificate request
A challenge password []:
An optional company name []:
Sign Certificate Requests Using Your CA and Generate TLS Certificates
Next, sign the CSR with your local CA and generate the certificate;
openssl ca -config /etc/ssl/kifarunixCA/openssl.cnf \
 -in /etc/ssl/kifarunixCA/csr/kifarunix.com.csr \
-out /etc/ssl/kifarunixCA/certs/kifarunix-com.crt
When prompted, enter the root CA private key passphrase.
Enter pass phrase for /etc/ssl/kifarunixCA/private/cakey.pem:
Check that the request matches the signature
Signature ok
Certificate Details:
        Serial Number: 1 (0x1)
        Validity
            Not Before: Feb 26 06:07:33 2023 GMT
            Not After : Feb 23 06:07:33 2033 GMT
        Subject:
            countryName               = US
            stateOrProvinceName       = California
            organizationName          = Kifarunix, Inc.
            organizationalUnitName    = IT Department
            commonName                = *.kifarunix.com
        X509v3 extensions:
            X509v3 Basic Constraints:
                CA:FALSE
            X509v3 Subject Key Identifier:
                8E:F0:E8:AF:E5:AD:76:3E:C3:58:1D:DC:22:27:85:DC:33:7B:F6:D7
            X509v3 Authority Key Identifier:
                FD:C0:7C:4C:20:E7:32:0A:3B:F2:E4:96:89:28:A2:48:02:95:75:7E
Certificate is to be certified until Feb 23 06:07:33 2033 GMT (3650 days)
Sign the certificate? [y/n]:y


1 out of 1 certificate requests certified, commit? [y/n]y
Write out database with 1 new entries
Data Base Updated
You now have the SSL/TLS certificate and key (kifarunix.com.crt, kifarunix.com.key) that you can use configure your applications for secure communication.
Configure Web Server to Use your Local SSL/TLS Certificates
To demonstrate this, let’s install a basic apache web server on a test node and configure it to use SSL/TLS;
sudo apt install apache2 -yCopy the SSL/TLS certificates to your test node;
Create a simple web page;
vim /etc/apache2/sites-available/demo.kifarunix.com.conf<IfModule mod_ssl.c>
<VirtualHost _default_:443>
ServerName demo.kifarunix.com
ServerAdmin [email protected]
DocumentRoot /var/www/html
ErrorLog ${APACHE_LOG_DIR}/error.log
CustomLog ${APACHE_LOG_DIR}/access.log combined
SSLEngine on
SSLCertificateFile /etc/ssl/kifarunixCA/certs/kifarunix-com.crt
SSLCertificateKeyFile /etc/ssl/kifarunixCA/private/kifarunix.com.key
<FilesMatch "\.(cgi|shtml|phtml|php)$">
SSLOptions +StdEnvVars
</FilesMatch>
<Directory /usr/lib/cgi-bin>
SSLOptions +StdEnvVars
</Directory>
</VirtualHost>
</IfModule>
Enable the site and disable default;
a2dissite 000-default.confa2ensite demo.kifarunix.com.confenable SSL module;
a2enmod sslRestart Apache;
systemctl restart apache2Install Root CA Certificate into your Systems
Next, copy the root CA certificate, in our case it is cacert.pem to your systems.
The certificate has to be in CRT format. Hence you can save it on the remote local host as .crt.
cacert.crtWe have already copied this file in CRT format into our local systems.
Install Local CA Root Certificate on your Systems
At this point, you are now ready to generate the SSL/TLS certificates signed by your local CA. However, to ensure that the certificates are trusted by your systems, you need to install the CA Root certificate on them.
Install local CA Root certificate on Ubuntu/Debian Systems;
In Unix-based systems, /usr/local/share/ca-certificates directory is used to store additional CA (Certificate Authority) certificates that are trusted by the system. Any custom CA certificate, you can them here.
To install local CA root certificate on Ubuntu/Debian systems;
sudo apt install -y ca-certificatesCopy your root CA certificate file into the /usr/local/share/ca-certificates directory;
sudo cp ~/cacert.crt /usr/local/share/ca-certificates/Once you have copied, you need to update the certificate store.
sudo update-ca-certificatesSample output;
Updating certificates in /etc/ssl/certs...
rehash: warning: skipping ca-certificates.crt,it does not contain exactly one certificate or CRL
1 added, 0 removed; done.
Running hooks in /etc/ca-certificates/update.d...
done.
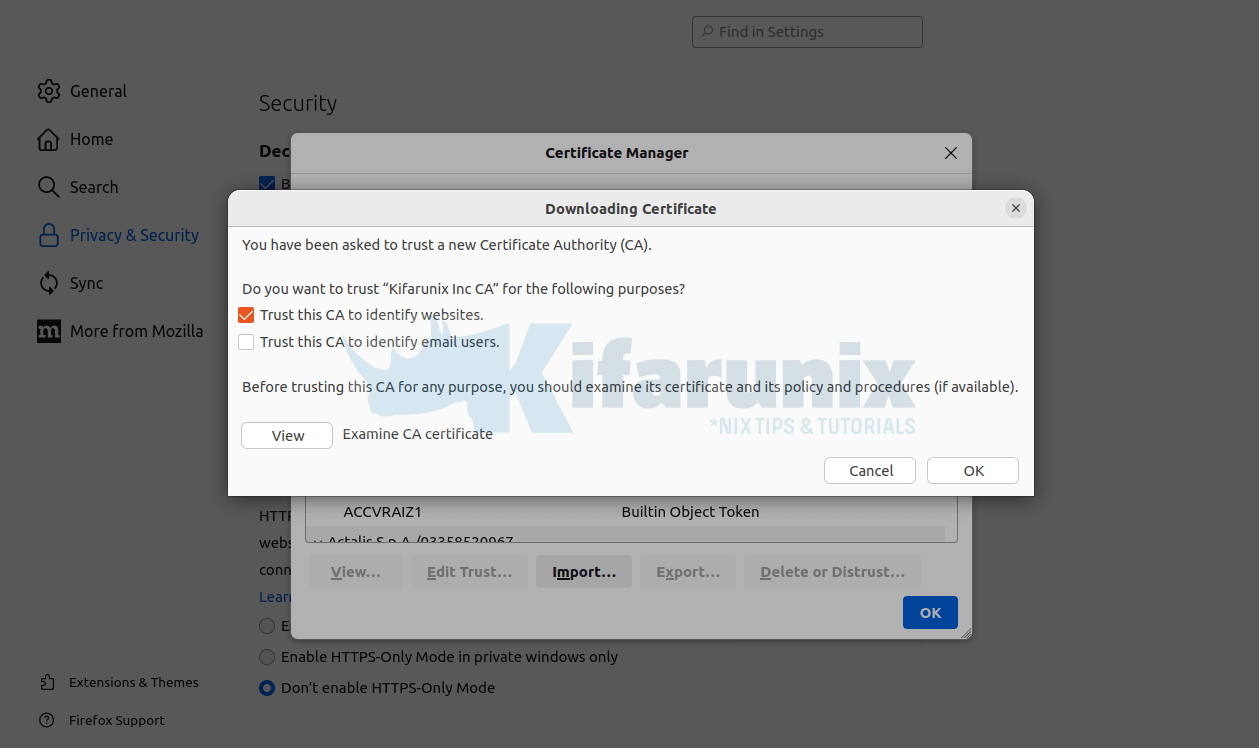
On Firefox on Ubuntu, you have to import the certificate manually into the Mozilla Trust store;
Navigate to Settings > Privacy & Security > View Certificates > Import.
Search for the CA certificate on the directory you place and import it and use enable it to Trust this CA to identify websites.
Click Ok to import the CA cert.
Restart Browser.
On Chrome, you also need to import the CA certificate. Thus on Chrome URL space space, enter, chrome://settings/certificates;
Click Authorities > Import > search for your CA certificate and import it.
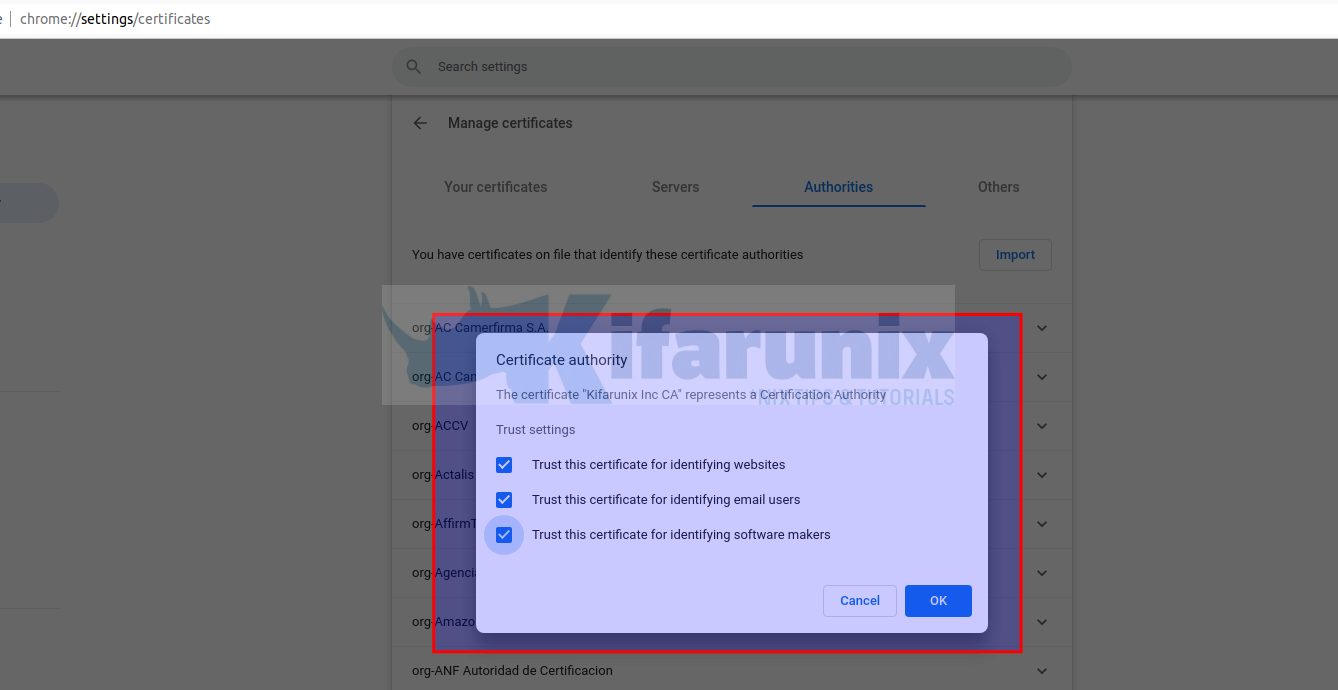
Click Ok to import.
Restart Chrome browser there after.
Install local CA Root certificate on RHEL Based Systems;
Install ca-certificartes package which contains the set of CA certificates chosen by the Mozilla Foundation for use with the Internet PKI.
sudo yum install ca-certificatesInstall custom CA Root certificate on RHEL systems by copying your CA certificate file into /etc/pki/ca-trust/source/anchors/ store.
sudo cp cacert.crt /etc/pki/ca-trust/source/anchors/sudo update-ca-trustTried Firefox browser and it seems to use the system wide trust store on Oracle Linux. Must be same for other RHEL based systems.
Install local CA Root certificate on Windows Systems;
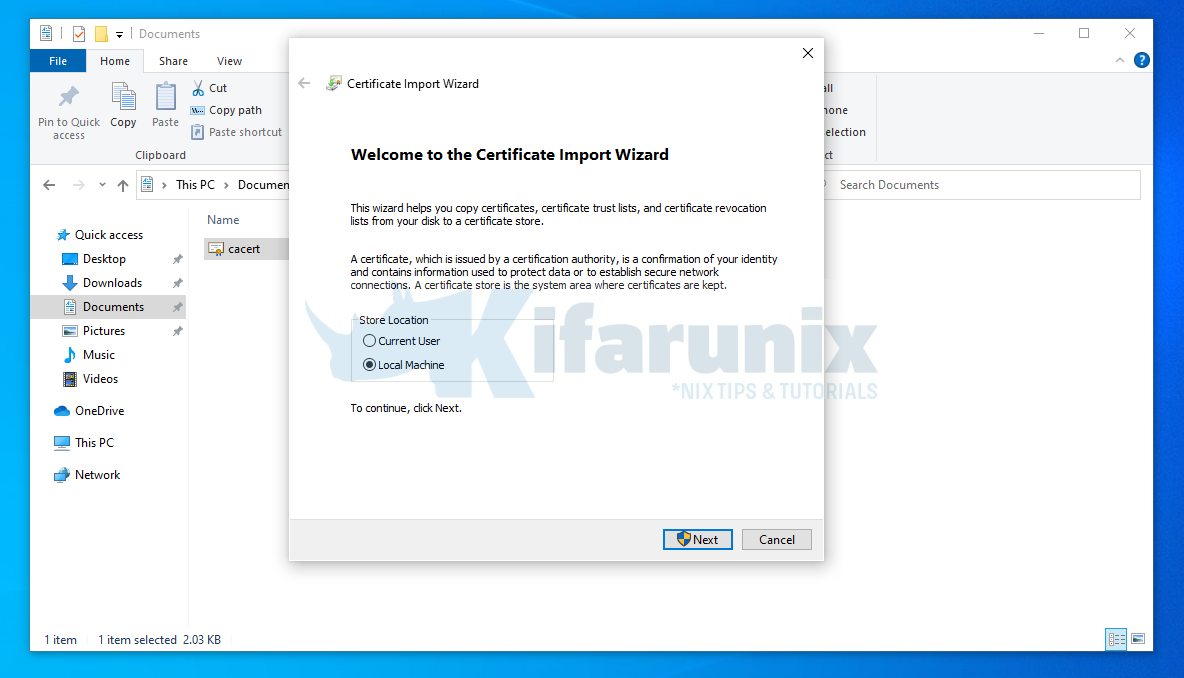
You can install a root CA (Certificate Authority) certificate in Windows by just right clicking the certificate (CRT format) and click Install Certificate;
This opens up import wizard;
- Store Location: Local Machine
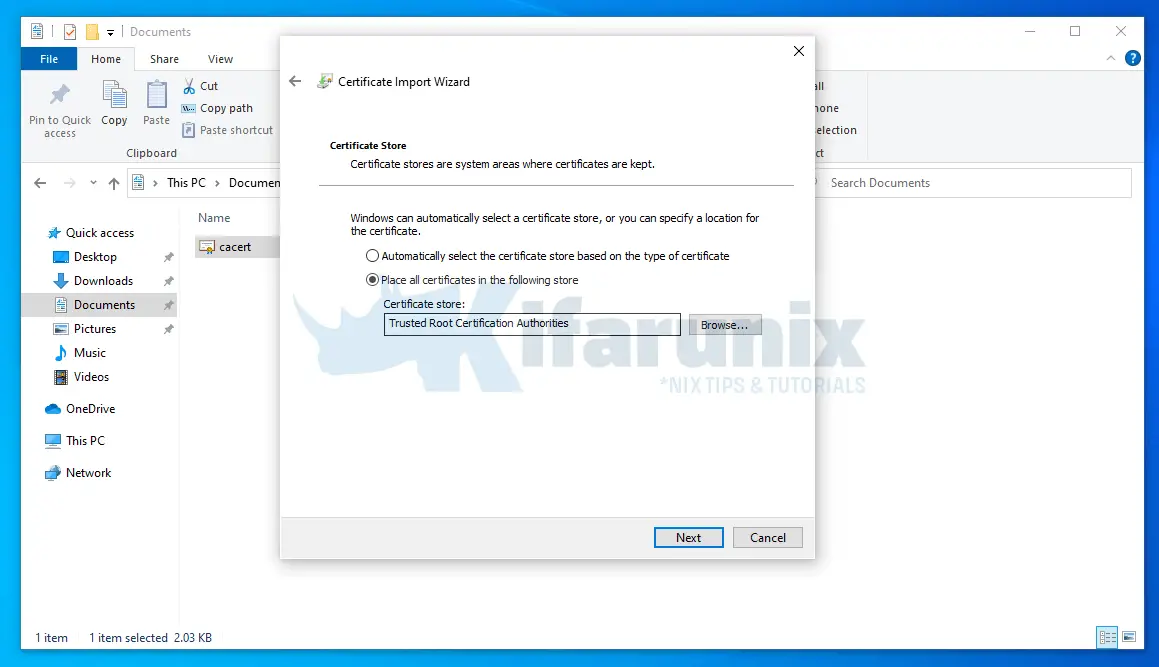
- Click Next, select Place all certificates in the following store and choose Trusted Root Certification Authorities.
- Click Next to finish importation of the CA cert.
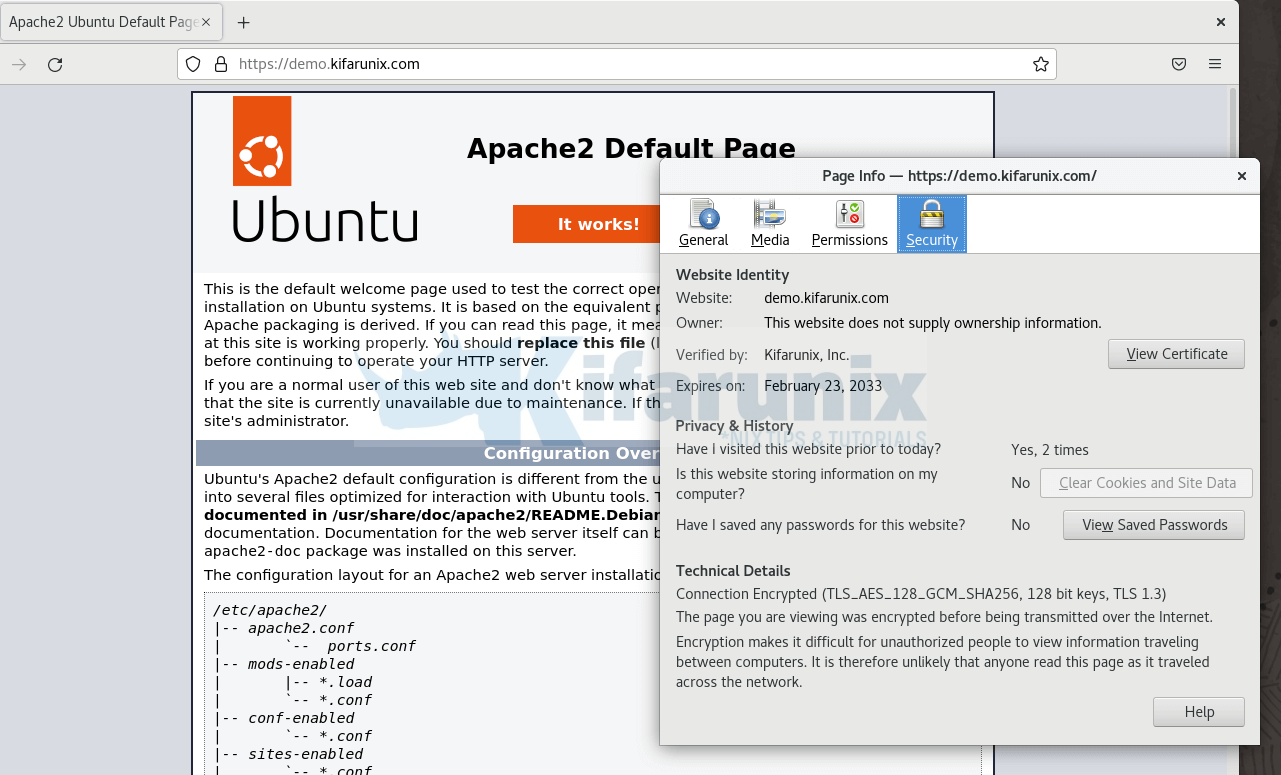
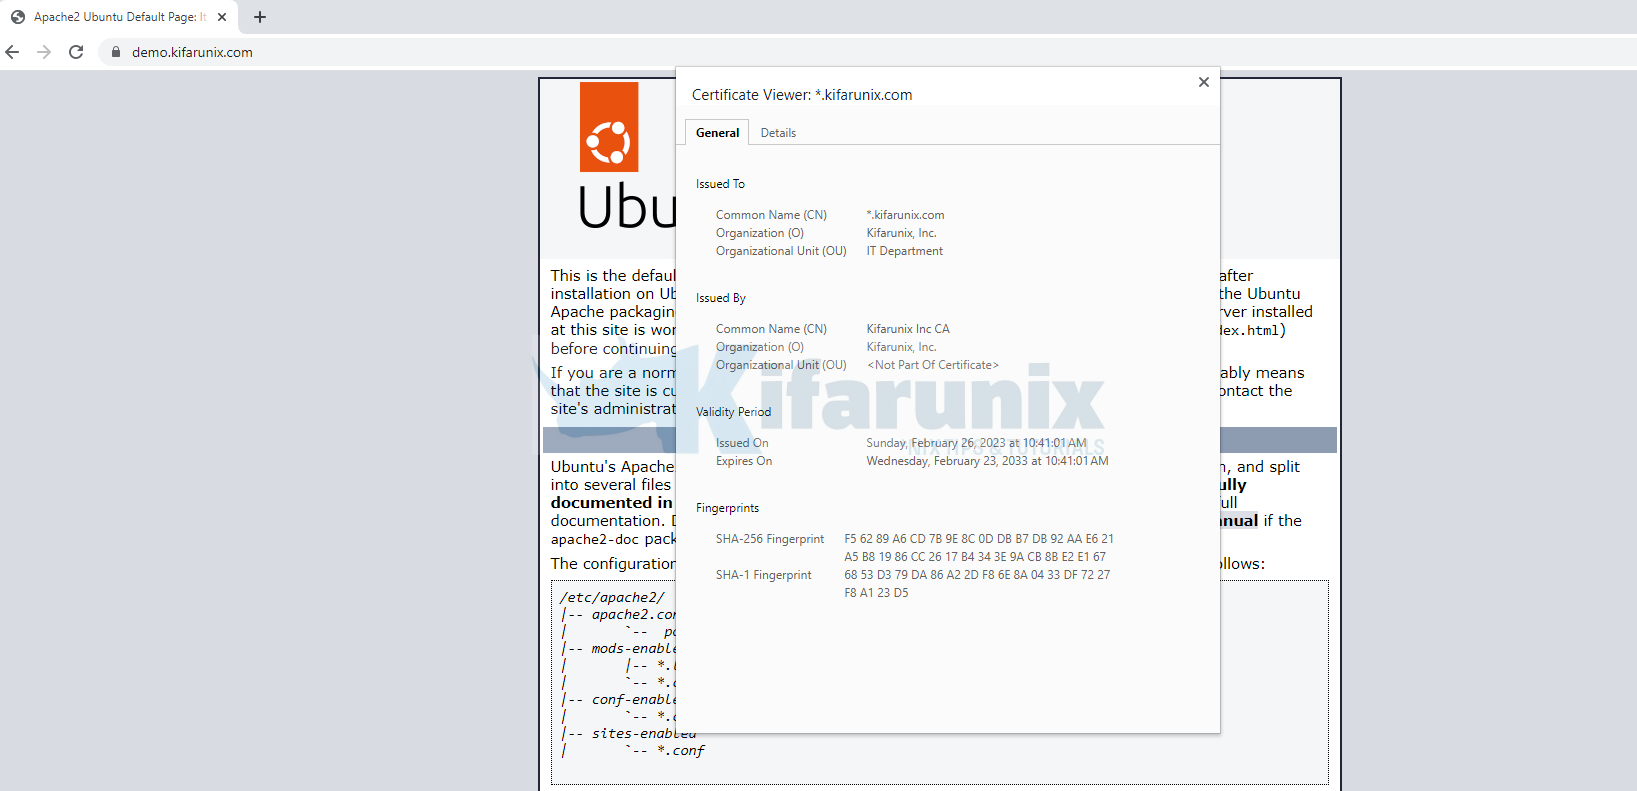
Access your HTTPS site and confirm that your system can trust the SSL/TLS certs used;
And that is it on how to configure a Local CA Server on Ubuntu.
You can now generate your local certificates that can be trusted by your local systems for development purposes.
Other Tutorials
Create Locally Trusted SSL Certificates with mkcert on Ubuntu 20.04

