You want to connect to Cisco VPN using Cisco Systems VPN Client and you have been provided with a profile configuration file (PCF) file. How do you connect to the VPN using the PCF file on Ubuntu/Linux? In this guide, you will learn how to Connect to Cisco VPN Using PCF file on Ubuntu or other Debian based Linux systems.
Connecting to Cisco VPN Using PCF file on Ubuntu
Install Cisco-compatible VPN client
To use PCF file while connecting to Cisco VPN Ubuntu and other Debian derivatives, you need to install Cisco-compatible VPN client (vpnc) and GNOME GUI plugin for VPNC. This can be done by simply executing the command below;
apt install vpnc network-manager-vpnc-gnomeConnecting to Cisco VPN using PCF File
Well, we have installed two Cisco-compatible VPN clients above. vpnc, can be used to connect to the Cisco VPN from command line? How is this possible?
Convert .PCF file to .CONF file
If you have a preconfigure Cisco VPN profile configuration file (PCF), you just need to convert it to .conf file by using the pcf2vpnc command. (Replace the names of the configuration files accordingly).
pcf2vpnc kifarunix-demo.pcf kifarunix-demo.confConnect to Cisco VPN from Command Line
Once you have the profile configuration file in .conf format, you can simply initiate the connect to the VPN by executing the command below if you are in the directory where the configuration file is located;
sudo vpnc ./kifarunix-demo.confOtherwise, you can specify a path to the configuration file;
sudo vpnc /path/to/kifarunix-demo.confWhen run, you will be prompted to enter the password for the connection username.
Enter password for [email protected]: ENTER PASSWORD
VPNC started in background (pid: 25502)...
You can verify that you have the VPN IP address assigned.
ip add show dev tun08: tun0: <POINTOPOINT,MULTICAST,NOARP,UP,LOWER_UP> mtu 1412 qdisc pfifo_fast state UNKNOWN group default qlen 500
link/none
inet 192.168.30.139/32 scope global tun0
valid_lft forever preferred_lft forever
inet6 fe80::2a8b:fd6e:c8da:cb45/64 scope link flags 800
valid_lft forever preferred_lft foreverYou can as well run the command interactively;
sudo vpncTo disconnect the VPN connection, simply run;
sudo vpnc-disconnectConnect to Cisco VPN using PCF File from GUI
Create Cisco VPN Connection Profile
Create the Cisco VPN connection profile by clicking the Network connection icon and Edit the Connections.
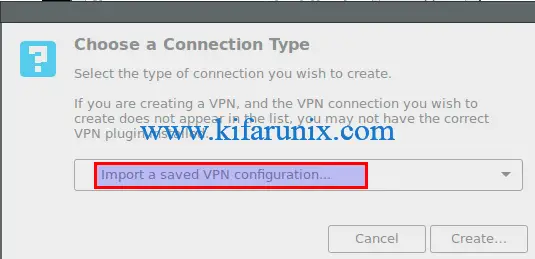
Next, on the Network connection settings, Click Add and choose Import a saved VPN configuration under the VPN connections section.

Click Create to import your Cisco PCF configuration file. Choose the PCF file and click it to import.
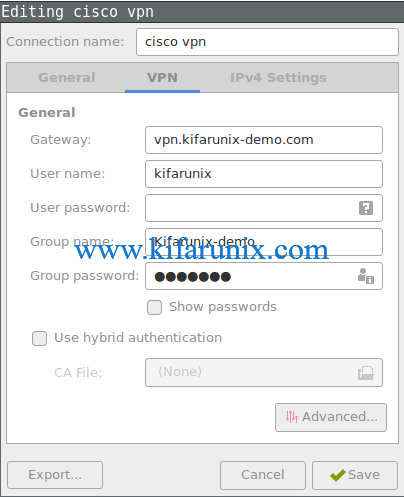
Once imported, you are presented with a Wizard to edit your connection. Make the necessary changes like setting the connection name, etc and click Save to save the changes.
For the password settings, click the question mark on the password bar and choose how you want to be entering the connection password.
Your profile is now created. Proceed to connect to the VPN.
Connect to Cisco VPN on Ubuntu Linux
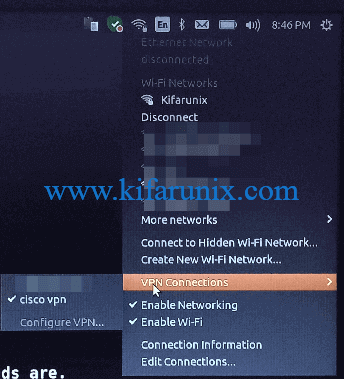
To connect to the VPN after creating the profile connection, click on the Network connections icon and under the VPN Connections, choose the newly created VPN profile to connect to it.
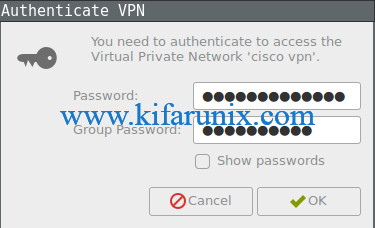
If you choose to enter the username password every time a connection is initiated, you will be prompted to enter a connection user password.
If the provided credentials work, then the connection to the VPN will be established.
Once the connection is successful, you should now be able to see a tunneling interface created with IP address assigned.
ip add...
10: tun0: <POINTOPOINT,MULTICAST,NOARP,UP,LOWER_UP> mtu 1412 qdisc pfifo_fast state UNKNOWN group default qlen 500
link/none
inet 192.168.30.141/25 brd 192.168.30.255 scope global tun0
valid_lft forever preferred_lft forever
inet6 fe80::90e4:ec12:6c22:3e62/64 scope link flags 800
valid_lft forever preferred_lft foreverOther VPN Tutorials
Configure IPSEC VPN using StrongSwan on Ubuntu 18.04


Uncomment Lines in a File using SED in Linux