In this guide, we are going to learn how to install WordPress 5 with Nginx on Debian 10 Buster.
Are you using WordPress and looking for a professional WordPress website builder? Look no further since Elementor can help you create beautiful pages.
Installing WordPress 5 with Nginx on Debian 10 Buster
Run system update
apt update
apt upgrade
Install LAMP Stack on Debian 10 Buster
In order to run WordPress, you need to have either LEMP or LAMP stack installed already. You use LEMP stack if you want to run WordPress 5 with Nginx. If you want to use Apache, you need to use LAMP stack.
To install LEMP stack on Debian 10 Buster, follow the link below;
Install LEMP Stack on Debian 10 Buster
Create WordPress Database and User
This guide uses MariaDB 10 for WordPress Database. If you need to use MySQL 8, see the link below on how to install MySQL 8 on Debian 10 Buster.
Install MySQL 8 on Debian 10 Buster
Login to your database server and create WordPress database and a privileged database user.
mysql -u root -pcreate database kifarunixdemo;
create user demouser@localhost identified by 'Str0nGPassword';
grant all privileges on kifarunixdemo.* to demouser@localhost;
flush privileges;
quitInstall Extra PHP Extensions
While installing LEMP stack as in the link above, a few PHP modules were installed. To install other required php extensions, execute the command below;
apt install php-curl php-gd php-intl php-mbstring php-soap php-xml php-xmlrpc php-zipConfigure Nginx
While configuring LEMP stack, you might have created an Nginx configuration file for your site. However, for the purposes of this demo, we are going to create a demo configuration file under, /etc/nginx/sites-available/ as shown below.
vim /etc/nginx/sites-available/kifarunix-demoNext, put the content below on the configuration file. Besure to make appropriate adjustments.
server {
	listen 80;
	root /var/www/html/kifarunix-demo;
	server_name kifarunix-demo.com;

	location / {
	    index	index.php index.html;
	    try_files	$uri $uri/ /index.php?$args;
	}

	location ~ \.php$ {
		include snippets/fastcgi-php.conf;
		fastcgi_pass unix:/run/php/php7.3-fpm.sock;
		fastcgi_param   SCRIPT_FILENAME $document_root$fastcgi_script_name;
	}
}
Save the configuration file and enable you site configuration by creating a symbolic link to the enabled sites directory.
ln -s /etc/nginx/sites-available/kifarunix-demo /etc/nginx/sites-enabled/Verify Nginx configuration.
nginx -tnginx: the configuration file /etc/nginx/nginx.conf syntax is ok
nginx: configuration file /etc/nginx/nginx.conf test is successfulReload Nginx
systemctl reload nginxDownload WordPress 5
Download the latest WordPress archive by running the command below;
wget https://wordpress.org/latest.tar.gz -P /tmpOnce the download is done, extract WordPress to your web root directory, /var/www/html/kifarunix-demo, in this demo.
mkdir /var/www/html/kifarunix-demotar xzf /tmp/latest.tar.gz --strip-components=1 -C /var/www/html/kifarunix-demoConfigure WordPress
Copy the sample WordPress configuration file and rename it as follows.
cp /var/www/html/kifarunix-demo/wp-config{-sample,}.phpNext, you need to set the database connection settings and authentication keys and Salts.
The database connection details (database, database user and password) are created above while configuring the database.
The Authentication Keys and Salts can be generated by running the command below;
curl -s https://api.wordpress.org/secret-key/1.1/salt/define('AUTH_KEY', '|WYo279FcL.j_ G$DOn;TXsH/wP=[$[1i^+~`|;!w|!KIa1$R5`D,0<V5prPa;m4');
define('SECURE_AUTH_KEY', 'ojU%olj}N`1<DgV_F?P=Xrc[z|j*TH@Ll+.Xh>=V|FM*K`@C^RWSPv{V./k){s ]');
define('LOGGED_IN_KEY', 't[8x41+V0D>_jO4=#g*u{o|?Hy_$A(u?@-`0G5R6-n$i;Q=u!8+:0tT/5:Q=8<Vg');
define('NONCE_KEY', 'z}yPWE]g=uo1Ex0rPS3S~kQ1A#.yBHi5W h^P)i}>;_[P`Zx,B%d5}.{q>ZPMmLu');
define('AUTH_SALT', 'MA) ~|J?G!X)uI+k@yT(*mUZBWsQiNPS]*^x-<cp+DYA=J:N]7O+t_rU(^)@+kqv');
define('SECURE_AUTH_SALT', 'Zjl&O}$qz|f(sRSe%ZT*@SkCg.`Sm/e0Z/CEW<|vRwOl}qbR!nzA-D>X%eKGcV2E');
define('LOGGED_IN_SALT', 'GBp!7=U*T~#-%Ly?FnS$qgYEzGnX1w3!Bo_ ]$o]EDj{wh,fe1NJK9VkI_n ;hTD');
define('NONCE_SALT', 'fdTm,$h?vjzLS(yMKj!rR]0aZ*f(Q(/t|cS|;o)%{GqCK4IxG-+fyL_Yan~ns4XF');Do NOT copy the Keys above. Be sure to use your own unique keys and salts.
Hence, open the WordPress configuration file and edit it as shown below;
vim /var/www/html/kifarunix-demo/wp-config.php...
// ** MySQL settings - You can get this info from your web host ** //
/** The name of the database for WordPress */
define( 'DB_NAME', 'kifarunixdemo' );
/** MySQL database username */
define( 'DB_USER', 'demouser' );
/** MySQL database password */
define( 'DB_PASSWORD', 'Str0nGPassword' );
/** MySQL hostname */
define( 'DB_HOST', 'localhost' );
/** Database Charset to use in creating database tables. */
define( 'DB_CHARSET', 'utf8' );
/** The Database Collate type. Don't change this if in doubt. */
define( 'DB_COLLATE', '' );
...Replace this;
...
define( 'AUTH_KEY', 'put your unique phrase here' );
define( 'SECURE_AUTH_KEY', 'put your unique phrase here' );
define( 'LOGGED_IN_KEY', 'put your unique phrase here' );
define( 'NONCE_KEY', 'put your unique phrase here' );
define( 'AUTH_SALT', 'put your unique phrase here' );
define( 'SECURE_AUTH_SALT', 'put your unique phrase here' );
define( 'LOGGED_IN_SALT', 'put your unique phrase here' );
define( 'NONCE_SALT', 'put your unique phrase here' );
...With (generated above);
define('AUTH_KEY',         '|WYo279FcL.j_ G$DOn;TXsH/wP=[$[1i^+~`|;!w|!KIa1$R5`D,0<V5prPa;m4');
define('SECURE_AUTH_KEY',  'ojU%olj}N`1<DgV_F?P=Xrc[z|j*TH@Ll+.Xh>=V|FM*K`@C^RWSPv{V./k){s ]');
define('LOGGED_IN_KEY',    't[8x41+V0D>_jO4=#g*u{o|?Hy_$A(u?@-`0G5R6-n$i;Q=u!8+:0tT/5:Q=8<Vg');
define('NONCE_KEY',        'z}yPWE]g=uo1Ex0rPS3S~kQ1A#.yBHi5W h^P)i}>;_[P`Zx,B%d5}.{q>ZPMmLu');
define('AUTH_SALT',        'MA) ~|J?G!X)uI+k@yT(*mUZBWsQiNPS]*^x-<cp+DYA=J:N]7O+t_rU(^)@+kqv');
define('SECURE_AUTH_SALT', 'Zjl&O}$qz|f(sRSe%ZT*@SkCg.`Sm/e0Z/CEW<|vRwOl}qbR!nzA-D>X%eKGcV2E');
define('LOGGED_IN_SALT',   'GBp!7=U*T~#-%Ly?FnS$qgYEzGnX1w3!Bo_ ]$o]EDj{wh,fe1NJK9VkI_n ;hTD');
define('NONCE_SALT', 'fdTm,$h?vjzLS(yMKj!rR]0aZ*f(Q(/t|cS|;o)%{GqCK4IxG-+fyL_Yan~ns4XF');Save the configuration and quit.
The WordPress configuration files should be owned the Web Server user. In this guide, we are using the default web server user, www-data.
chown -R www-data:www-data /var/www/html/kifarunix-demoFinalize WordPress installation on Debian 10 Buster
The backend setup is done. Now to complete the installation of WordPress, navigate the browser and access WordPress using the address, http://<server-domain_OR_IP>.
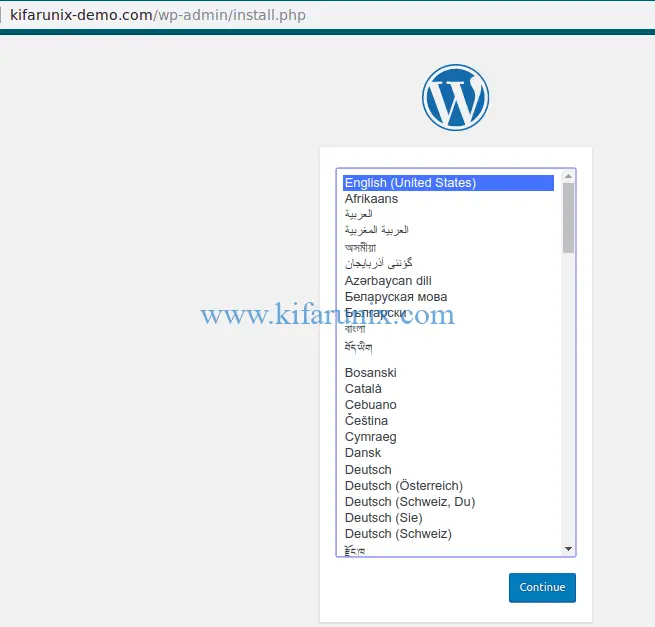
Choose the installation language and proceed.
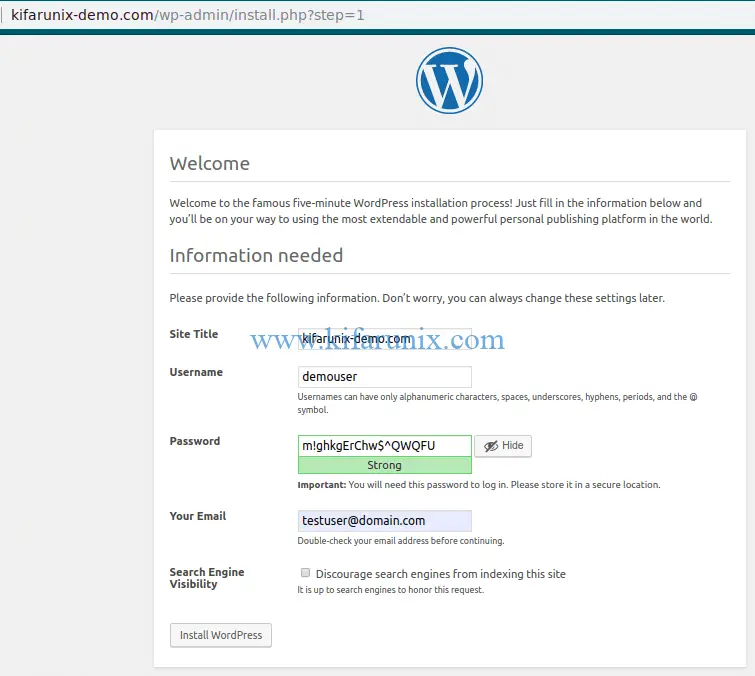
Next, set your Site title, username, password, email address and whether or not to allow search engines to index your website.
Once you done, click install WordPress.
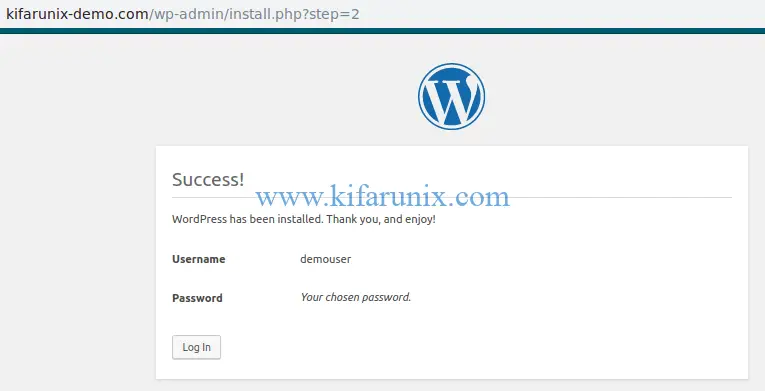
A WordPress successful installation with login prompt opens up. Click login and supply your username/email and password.

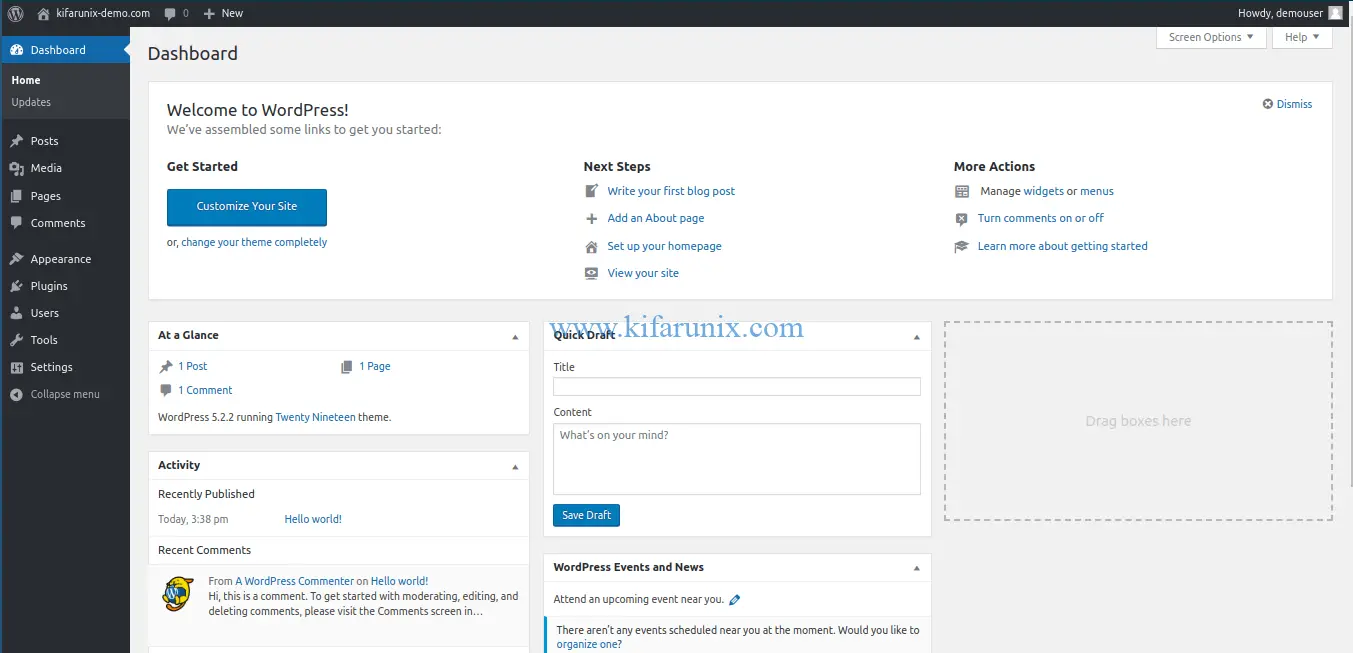
After successful authentication, you will land on WordPress dashboard.

There you go. You have successfully installed WordPress 5 with Nginx on Debian 10 Buster.
Other Tutorials;
Install WordPress 5 with Nginx on Fedora 30/Fedora 29
Install WordPress 5.0 with Apache on Fedora 29/Fedora 28
How to Install and Use WPScan WordPress Vulnerability Scanner Ubuntu 18.04


