Welcome to our guide on how to install latest WordPress with LAMP Stack on Ubuntu 20.04. As may already know, WordPress is a free and open-source content management system written in PHP and is mostly used to create free websites or build personal blogs.
Are you using WordPress and looking for a professional WordPress website builder? Look no further since Elementor can help you create beautiful pages.
Installing WordPress with LAMP Stack on Ubuntu 20.04
Prerequsites
Before you can install WordPress on Ubuntu 20.04, there are a few prerequisites that must be set in place before you can proceed.
Run System update
Ensure that your system packages are up-to-date.
apt update
apt upgrade
Install LAMP/LEMP Stack
WordPress is a PHP based application and thus, it requires a LAMP or LEMP stack installed to function properly. In this demo, we run WordPress with LAMP stack; Ubuntu 20.04 as the Linux OS, PHP 7.4, MySQL 8, and Apache as the web server.
Follow the link below to install LAMP Stack on Ubuntu 20.04;
Install LAMP Stack on Ubuntu 20.04
Next, install other required PHP modules if not already installed;
apt install php7.4-{mysql,cli,json,opcache,xml,gd,curl}Create WordPress MySQL Database
Login to MySQL and create WordPress database;
mysql -u root -pCreate a WordPress database. Replace the database and database user accordingly.
create database wpdb;Create a WordPress database user and grant all privileges on the database.
create user wpadmin@localhost identified by 'StrongP@33#';grant all on wpdb.* to wpadmin@localhost;Reload the database privileges tables and exit the database.
flush privileges;quitInstall WordPress (5.x)
WordPress 5.4.1 is the latest version of the writing of this guide. Download the latest version WordPress archive from the WordPress downloads page.
wget https://wordpress.org/latest.tar.gzCreate your web root directory where to install WordPress. Replace the names accordingly.
mkdir /var/www/html/wp.kifarunix-demo.comNext, extract WordPress archive contents to your Web root directory created above.
tar xzf latest.tar.gz -C /var/www/html/wp.kifarunix-demo.com --strip-components=1Verify that the WordPress files are in place.
ls /var/www/html/wp.kifarunix-demo.comindex.php wp-activate.php wp-comments-post.php wp-cron.php wp-load.php wp-settings.php xmlrpc.php
license.txt wp-admin wp-config-sample.php wp-includes wp-login.php wp-signup.php
readme.html wp-blog-header.php wp-content wp-links-opml.php wp-mail.php wp-trackback.phpConfigure WordPress on Ubuntu 20.04
WordPress comes with a sample configuration, wp-config-sample.php. Rename the sample configuration file.
cp /var/www/html/wp.kifarunix-demo.com/wp-config{-sample,}.phpNext, edit the configuration file and set the database connection details,
vim /var/www/html/wp.kifarunix-demo.com/wp-config.phpReplace the DB_NAME, DB_USER, DB_PASSWORD with the values you set while creating the MySQL database for WordPress.
...
// ** MySQL settings - You can get this info from your web host ** //
/** The name of the database for WordPress */
define( 'DB_NAME', 'wpdb' );

/** MySQL database username */
define( 'DB_USER', 'wpadmin' );

/** MySQL database password */
define( 'DB_PASSWORD', 'StrongP@33#' );

/** MySQL hostname */
define( 'DB_HOST', 'localhost' );

/** Database Charset to use in creating database tables. */
define( 'DB_CHARSET', 'utf8' );
...
Next, generate authentication unique keys and salts. You can simply generate the keys and salts from WordPress Secret-Key service as follows;
curl -s https://api.wordpress.org/secret-key/1.1/salt/define('AUTH_KEY', 'BkIM1nZ`;ni.E(^HO@,R{bG%7oq@iwI=~=-];h%|bA{idi ^BTT|[7,l_L&i5UY');
define('SECURE_AUTH_KEY', 'WAgvv#q|d_EOhWk|;kKhE2&jO{h-G#oMz4,W;O)xH}VB63a2FV^*?oR$5w[tP0=h');
define('LOGGED_IN_KEY', '?|&6H,|v3}-_-(m[*m Kd<|3|m3QMLW5|>Tr=[I|b9q)! g*=H9vD<O6fqe>pg(@');
define('NONCE_KEY', '&yq9[1N^f,P l IVMse<?QXJb+W3ImG@1,yFkP!fE;<Q296_vEs t%ZVdT.f&j:9');
define('AUTH_SALT', '-pE?xU-<w-|Y7S~<Bm+HXCVr$b~$vt]KLNd|Za-__]Io#,,gN4y6l.H|$r=6amZ!');
define('SECURE_AUTH_SALT', '+V(D|4%|d$J!D|McEDFOl=x*YTtha4We;=HjkRzHz#(0(YZPIK,!0vI9e{ZBV/=]');
define('LOGGED_IN_SALT', 'hLc|}}b8YjjaRawp={[)},xZkwX%Uun_<>_|+r[uD-?sbJQp|_e0?eXxtP~|$#8E');
define('NONCE_SALT', 'x!Tc@i|+Hg;-w++_l;>-NL>+xB&r{FfQ*@E|ti/TAV-THER@UFapaUS7ejboTCi]');Note, Do not use the above keys. Generate yours, 🙂
Within the wp-config.php, replace the following lines with the above.
...
* @since 2.6.0
*/
define( 'AUTH_KEY', 'put your unique phrase here' );
define( 'SECURE_AUTH_KEY', 'put your unique phrase here' );
define( 'LOGGED_IN_KEY', 'put your unique phrase here' );
define( 'NONCE_KEY', 'put your unique phrase here' );
define( 'AUTH_SALT', 'put your unique phrase here' );
define( 'SECURE_AUTH_SALT', 'put your unique phrase here' );
define( 'LOGGED_IN_SALT', 'put your unique phrase here' );
define( 'NONCE_SALT', 'put your unique phrase here' );
/**#@-*/
...Your configuration should look like;
...
* @since 2.6.0
*/
/**
* define( 'AUTH_KEY', 'put your unique phrase here' );
* define( 'SECURE_AUTH_KEY', 'put your unique phrase here' );
* define( 'LOGGED_IN_KEY', 'put your unique phrase here' );
* define( 'NONCE_KEY', 'put your unique phrase here' );
* define( 'AUTH_SALT', 'put your unique phrase here' );
* define( 'SECURE_AUTH_SALT', 'put your unique phrase here' );
* define( 'LOGGED_IN_SALT', 'put your unique phrase here' );
* define( 'NONCE_SALT', 'put your unique phrase here' );
*/
define('AUTH_KEY',         'BkIM1nZ`;ni.E(^HO@,R{bG%7oq@iwI=~=-];h%|bA{idi  ^BTT|[7,l_L&i5UY');
define('SECURE_AUTH_KEY',  'WAgvv#q|d_EOhWk|;kKhE2&jO{h-G#oMz4,W;O)xH}VB63a2FV^*?oR$5w[tP0=h');
define('LOGGED_IN_KEY',    '?|&6H,|v3}-_-(m[*m Kd<|3|m3QMLW5|>Tr=[I|b9q)! g*=H9vD<O6fqe>pg(@');
define('NONCE_KEY',        '&yq9[1N^f,P l IVMse<?QXJb+W3ImG@1,yFkP!fE;<Q296_vEs t%ZVdT.f&j:9');
define('AUTH_SALT',        '-pE?xU-<w-|Y7S~<Bm+HXCVr$b~$vt]KLNd|Za-__]Io#,,gN4y6l.H|$r=6amZ!');
define('SECURE_AUTH_SALT', '+V(D|4%|d$J!D|McEDFOl=x*YTtha4We;=HjkRzHz#(0(YZPIK,!0vI9e{ZBV/=]');
define('LOGGED_IN_SALT',   'hLc|}}b8YjjaRawp={[)},xZkwX%Uun_<>_|+r[uD-?sbJQp|_e0?eXxtP~|$#8E');
define('NONCE_SALT',       'x!Tc@i|+Hg;-w++_l;>-NL>+xB&r{FfQ*@E|ti/TAV-THER@UFapaUS7ejboTCi]');
/**#@-*/
...Save and exit the configuration file.
Configure Apache Web Server
Create an Apache virtual host configuration for your WordPress site.
vim /etc/apache2/sites-available/wordpress.conf<VirtualHost *:80>
ServerAdmin [email protected]
ServerName wp.kifarunix-demo.com
DocumentRoot /var/www/html/wp.kifarunix-demo.com
<Directory /var/www/html/wp.kifarunix-demo.com>
AllowOverride All
</Directory>
ErrorLog /var/log/apache2/wp.error.log
CustomLog /var/log/apache2/wp.access.log combined
</VirtualHost>Save and exit the config file.
Set the user and group ownership of your site configuration to Apache user, www-data.
chown -R www-data:www-data /var/www/html/wp.kifarunix-demo.comCheck Apache syntac errors;
apachectl -tIf you get, Syntax OK, proceed to enable WordPress site configuration.
a2ensite wordpress.confDisable the default Apache site;
a2dissite 000-default.confRestart Apache;
systemctl restart apache2If UFW is running, open port 80/tcp to allow external access.
ufw allow 80/tcpFinalize WordPress Setup on Ubuntu 20.04
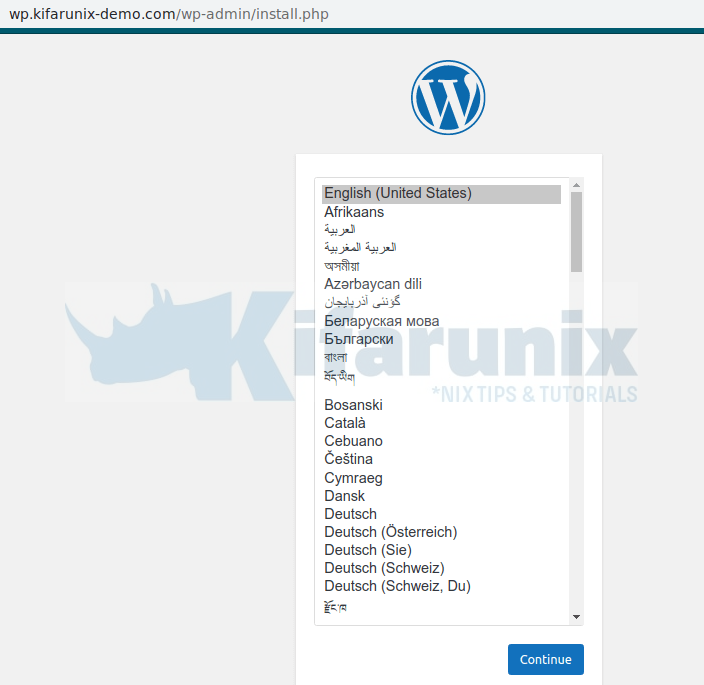
To complete setting up WordPress on Ubuntu 20.04, navigate to the browser and access your WordPress site, http://<server-IP-Or-hostname>.
Choose your WordPress installation language and click Continue.

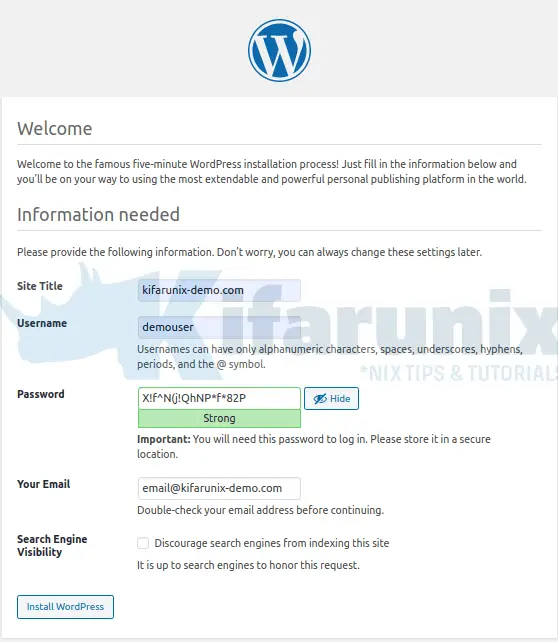
Setup your site title, your username, password, email address, choose whether to disable or enable site indexing and install WordPress on Ubuntu 20.04.

Once the installation is done, login to your WordPress using the username and password you just created. And there you go. Your WordPress is setup successfully.

You can now write and publish your stuff on your WordPress blog. That brings us to the end of our guide.
Related Tutorials
Install phpMyAdmin on Ubuntu 20.04
How to fix WordPress could not establish a secure connection to WordPress.org


Dear Koromicha,
I have been struggling with several guides on the internet and have enjoyed your tutorial on setting up a server for wordpress. I have some issues and was hoping you could help resolve them with me by sharing your knowledge and helping me troubleshoot. I recently moved from a hosting site to my own server. I can’t get my page to load locally or from external to my web server. I had it working partially but the plugins and other parts of the page weren’t loading and nothing would load pass the home page as it wanted to go from http to https and this is causing issues as well. Would you be willing to take a few minutes from your busy schedule and assist with this process as I’m curious as to what I have might missed in setting up my server and configuring the settings?
Hello Brandon,
On behalf of Koromicha, I would suggest that;
1. Install and setup LAMP stack with all required PHP modules on the new server.
2. dump the wp database on your previous host server and copy and restore on the new server.
3. Copy the wordpress configurations directory on the current hot server to the new server.
4. Copy your site virtualhost on the current host server to the new server.
5. With that, your site should simply work on your new host