Welcome to our guide on how to install and configure apt-caching server using Apt-Cacher NG on Ubuntu 20.04 server. Apt-Cacher NG is special caching proxy for Debian based distributions that creates a local cache of Debian-based mirrors as well as other Linux distributions. This means that whenever a package is pulled from the official repositories, an APT cache server caches them such that if any other local machine would want to install the same package, it just pulls it from the local caching server. This helps eliminates the bottlenecks of slow internet connections.
Apt-Cacher NG has been designed from scratch as a replacement for apt-cacher, but with a focus on maximizing throughput with low system resource requirements. It can also be used as replacement for apt-proxy and approx with no need to modify clients’ sources.list files.
Some of the features of Apt-Cacher NG include;
- It is lightweight and can run on systems with low memory and processing power
- It supports internal threading thus avoids process forking, kludges for pseudo-thread synchronization nor rely on special file system features for internal operations
- Supports HTTP pipelining and thus reduction of resource overhead and minimization of possible points of failure
Setup APT-Caching Server Using Apt-Cacher NG on Ubuntu 20.04
Run system package cache update.
apt updateInstalling Apt-Cacher NG on Ubuntu 20.04
Apt-Cacher NG is available on the default Ubuntu universe repositories by default;
apt-cache policy apt-cacher-ngapt-cacher-ng:
Installed: (none)
Candidate: 3.3.1-2build1
Version table:
3.3.1-2build1 500
500 http://ke.archive.ubuntu.com/ubuntu focal/universe amd64 PackagesYou can therefore install it using the package manager by running the command below;
apt install apt-cacher-ngDuring the installation, the installer will prompt you whether to allow HTTP tunnels through Apt-Cacher NG. This feature is usually disabled by default. Hence, select No to keep it disabled.
Running Apt-Cacher NG Service on Ubuntu 20.04
An Apt-cacher-ng systemd service unit is created when the apt-cacher-ng package is installed. The service is started and enabled to run on system boot;
systemctl is-enabled apt-cacher-ngenabledsystemctl status apt-cacher-ng● apt-cacher-ng.service - Apt-Cacher NG software download proxy
Loaded: loaded (/lib/systemd/system/apt-cacher-ng.service; enabled; vendor preset: enabled)
Active: active (running) since Wed 2020-09-09 17:48:46 UTC; 31min ago
Main PID: 2785 (apt-cacher-ng)
Tasks: 1 (limit: 2282)
Memory: 2.1M
CGroup: /system.slice/apt-cacher-ng.service
└─2785 /usr/sbin/apt-cacher-ng -c /etc/apt-cacher-ng ForeGround=1
Sep 09 17:48:45 ubuntu20 systemd[1]: Starting Apt-Cacher NG software download proxy...
Sep 09 17:48:46 ubuntu20 systemd[1]: Started Apt-Cacher NG software download proxy.You can control the service as you would any systemd service.
Apt-Cacher NG also listens on port 3142/TCP by default.
ss -altnp | grep aptLISTEN 0 250 0.0.0.0:3142 0.0.0.0:* users:(("apt-cacher-ng",pid=2785,fd=10))
LISTEN 0 250 [::]:3142 [::]:* users:(("apt-cacher-ng",pid=2785,fd=11))Open Apt-Cacher NG Server Port on Firewall
If UFW is enabled and running, you need to open Apt-Cacher NG server port on Firewall to allow remote connection.
ufw allow 3142/tcpConfiguring Apt-Cacher NG Server on Ubuntu 20.04
Once the Apt-cache-ng is installed, proceed to configure it to serve its purpose. On the server running the Apt-Cacher-NG, the main configuration file /etc/apt-cacher-ng/acng.conf. The file is highly commented and in most cases, it can just run well with the default configuration options.
Basically, the following are the some of the parameters that are enabled by default in the Apt-Cacher NG configuration file.
grep -vE "^#|^$" /etc/apt-cacher-ng/acng.confCacheDir: /var/cache/apt-cacher-ng
LogDir: /var/log/apt-cacher-ng
SupportDir: /usr/lib/apt-cacher-ng
Remap-debrep: file:deb_mirror*.gz /debian ; file:backends_debian # Debian Archives
Remap-uburep: file:ubuntu_mirrors /ubuntu ; file:backends_ubuntu # Ubuntu Archives
Remap-cygwin: file:cygwin_mirrors /cygwin # ; file:backends_cygwin # incomplete, please create this file or specify preferred mirrors here
Remap-sfnet: file:sfnet_mirrors # ; file:backends_sfnet # incomplete, please create this file or specify preferred mirrors here
Remap-alxrep: file:archlx_mirrors /archlinux # ; file:backend_archlx # Arch Linux
Remap-fedora: file:fedora_mirrors # Fedora Linux
Remap-epel: file:epel_mirrors # Fedora EPEL
Remap-slrep: file:sl_mirrors # Scientific Linux
Remap-gentoo: file:gentoo_mirrors.gz /gentoo ; file:backends_gentoo # Gentoo Archives
Remap-secdeb: security.debian.org ; security.debian.org deb.debian.org/debian-security
ReportPage: acng-report.html
ExThreshold: 4
LocalDirs: acng-doc /usr/share/doc/apt-cacher-ngServing HTTPS Repositories with Apt-Cacher NG
By default, Apt-cacher NG do not server HTTPS repositories. To enable it to server HTTPs repos, you need to configure HTTPS connection tunneling through the Apt-Cacher proxy by uncommenting the line, # PassThroughPattern: .* # this would allow CONNECT to everything in /etc/apt-cacher-ng/acng.conf such that it looks like;
vim /etc/apt-cacher-ng/acng.conf...
# the server name with port and must be correctly formatted and terminated.
# Examples:
# PassThroughPattern: private-ppa\.launchpad\.net:443$
PassThroughPattern: .* # this would allow CONNECT to everything
#
# Default: ^(bugs\.debian\.org|changelogs\.ubuntu\.com):443$
# PassThroughPattern: ^(bugs\.debian\.org|changelogs\.ubuntu\.com):443$
...The downside for this is that the apt-cacher-ng will proxy but doesn’t cache objects stored on SSL/TLS repositories.
Restart Apt-Cacher NG Service
Everytime you make any configuration changes, you need to restart Apt-Cacher-NG in order for the changes to take effect by running the command;
systemctl restart apt-cacher-ngRestrict Access to Apt-Cacher NG
As a security measure, you need to define hosts that are only allowed to download packages via the Apt-Cacher NG. Apt-Cache-ng supports Access Control Lists using TCP wrappers. Therefore, you can use the /etc/hosts.allow and /etc/hosts.deny files to whitelist or blacklist certain hosts respectively.
For example;
To allow host 192.168.57.17 and all hosts on the network 192.168.57.0/24 to use Apt-Cacher NG server, put the following line in /etc/hosts.allow
apt-cacher-ng : 192.168.57.17 192.168.57.0/24To block all hosts on the network 192.168.43.0/24 except the host 192.168.57.27;
- put the following line in
/etc/hosts.deny
apt-cacher-ng : 192.168.57.0/24- and the following line in the
/etc/hosts.allow
apt-cacher-ng : 192.168.57.27Configure Client to use Apt-Cacher NG
Once you are done customizing your Apt-Cacher NG server configurations, you need to configure your clients so that they do package installation via the Apt-Cacher NG server.
There are two ways in which clients can be configured to download packages through the Apt-Cacher.
- Specifying the caching machine as HTTP Proxy for the client
- Replacing all mirror hostnames with Caching host in sources.list
Specifying the caching machine as HTTP Proxy for the client
In this method, you need to create the proxy configuration file pointing to the Apt-Caching-NG server in /etc/apt/apt.conf.d as shown below;
echo 'Acquire::http::Proxy "http://192.168.57.6:3142";' > /etc/apt/apt.conf.d/00aptproxyWhere 192.168.57.6 is your Apt-cacher-NG server IP address.
Replacing all mirror hostnames with Caching host in sources.list
In this case, you need to replace all mirror hostnames/urls with the Apt-cacher-NG server IP address in /etc/apt/sources.list. For example a mirror like
deb http://us.archive.ubuntu.com/ubuntu/ focal universeWould be formatted like;
deb http://192.168.57.6:3142/us.archive.ubuntu.com/ubuntu/ focal universeThe first method is more convenient as compared to the second method.
Verify the use of Apt-Cacher NG Server
To verify the use of Apt-Cacher NG server, on your Debian/Ubuntu, run a command to update and upgrade the packages.
Before that, on the Apt-Cacher NG server, tail the logs;
tail -f /var/log/apt-cacher-ng/apt-cacher.logThen on the client, run system update.
apt update
apt upgradeOn the server, you should be able to see the clients connection thr the Apt-Cacher NG on the apt-cacher.log file.
...
1599680058|O|218|192.168.57.8|uburep/dists/focal/InRelease
1599680058|O|226|192.168.57.8|uburep/dists/focal-updates/InRelease
1599680058|O|228|192.168.57.8|uburep/dists/focal-backports/InRelease
1599680058|O|227|192.168.57.8|uburep/dists/focal-security/InRelease
1599680216|O|218|192.168.57.8|uburep/dists/focal/InRelease
1599680216|O|226|192.168.57.8|uburep/dists/focal-updates/InRelease
1599680217|O|228|192.168.57.8|uburep/dists/focal-backports/InRelease
1599680217|O|227|192.168.57.8|uburep/dists/focal-security/InRelease
1599680226|I|2927|192.168.57.8|uburep/pool/main/u/ubuntu-meta/ubuntu-server_1.450.2_amd64.deb
1599680226|O|3011|192.168.57.8|uburep/pool/main/u/ubuntu-meta/ubuntu-server_1.450.2_amd64.deb
1599680226|I|60913|192.168.57.8|uburep/pool/main/b/base-files/base-files_11ubuntu5.2_amd64.deb
...
Apt-Cacher NG Command and Control Page
Apt-Cacher NG comes installed with a web server that enables it to proxy the HTTP package downloads.
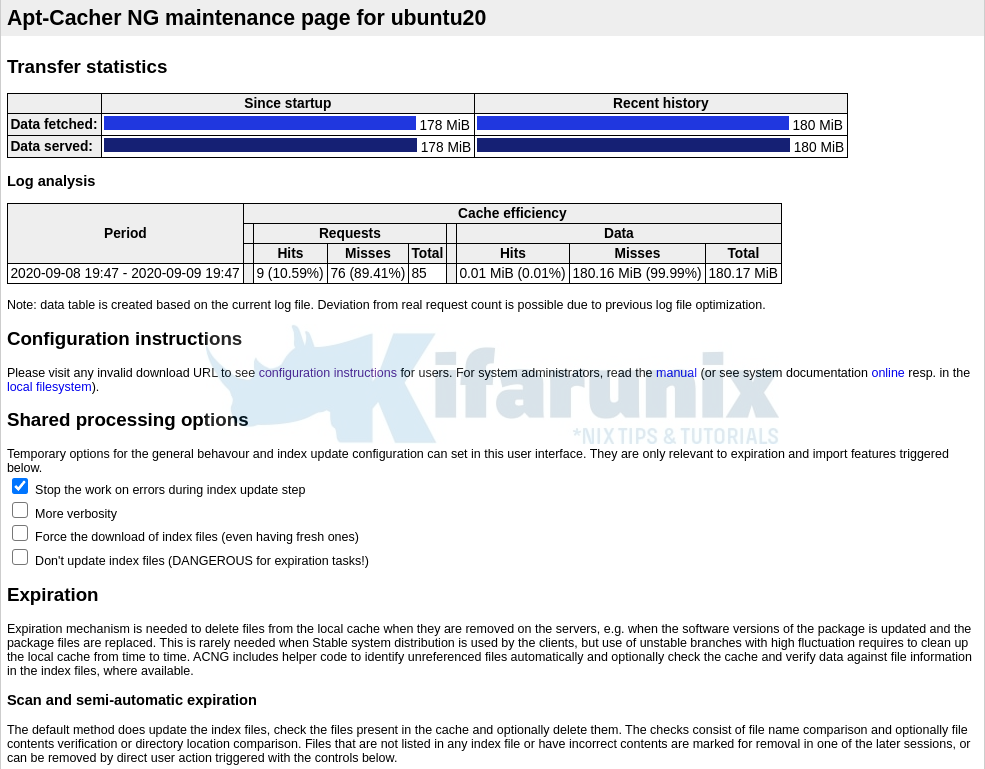
The web server can also be used to perform other tasks administrative tasks such as reporting. For example, you can access the Apt-Cacher NG report by navigating to http://<apt-cacher-ng-server-IP>:3142/acng-report.html.

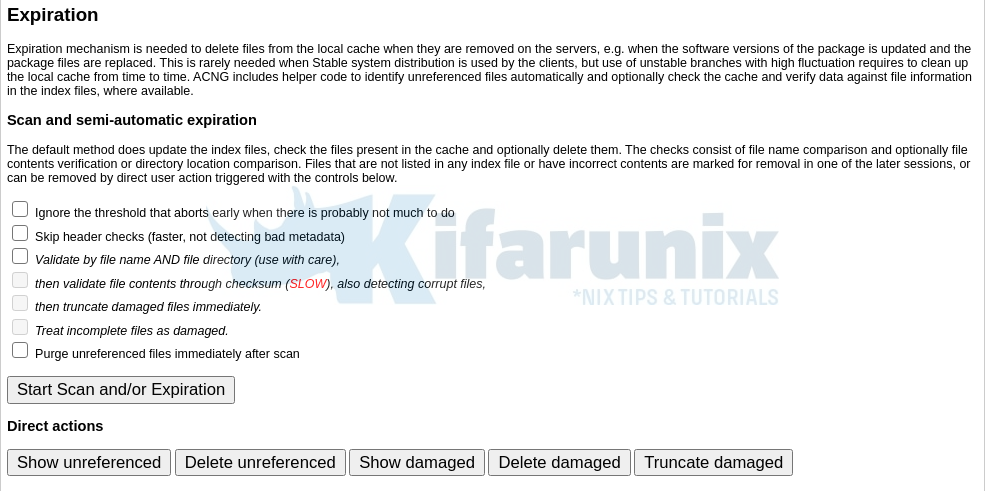
To save on storage, you may want to clean cache from time to time. Apt-Cacher NG, installs a cron job along with itself that is run daily to clear the stale files from the cache;
/etc/cron.daily/apt-cacher-ngYou can as well be able to do this from the reporting page. Click on Start Scan and/or Expiration.

Reference/Further Reading
Other Tutorials
Install and Configure AIDE on Ubuntu 20.04
Install and Setup NetData on Ubuntu 20.04/18.04
Install and Setup Lynis Security Auditing tool on Ubuntu 20.04

