In this tutorial, we are going to learn about how to create LVM logical volumes in Linux. LVM is a standard feature in most modern Linux distributions that allows you to create and manage logical volumes. In this tutorial, we will show you how to create and manage LVM logical volumes in Linux, using command-line tools. We will cover the basic concepts of LVM, including physical volumes, volume groups, and logical volumes, and demonstrate how to create filesystem on logical volumes in Linux.
Table of Contents
Creating LVM Logical Volumes in Linux
Before we dive deeper, let us have a look at LVM architecture.
LVM Architecture Overview
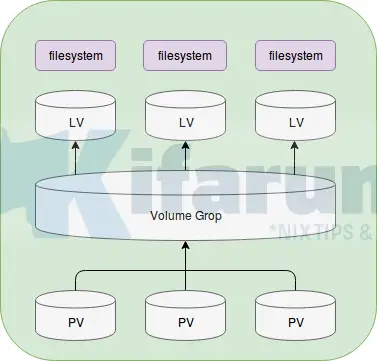
The structure of an LVM disk environment is simply illustrated in the figure below.

LVM Logical Volumes Components
The underlying structure of an LVM environment is a block device such as partition or a whole disk which is initialized a Physical Volume (PV). A single or multiple block devices can be grouped together to form a PV.
The physical volumes can be combined into a Volume Group (VG). This creates a pool of disk space out of which LVM logical volumes (LVs) can be allocated. A top logical volumes, regular file systems, such as ext4, xfs, etc. can then be created. This process is comparable to the how disks are divided into partitions.
So, basically, LVM disk environment is made up of three components:
- Physical Volume
- Volume Group
- Logical Volume
As depicted in the architecture above.
Creating LVM Logical Volumes in Linux
In order to create LVM logical volumes, here is a basic four step procedure:
- Create partitions to be used
- Initialize them as Physical Volumes
- Create a volume group
- Create a logical volume
- Create a file system on a logical volume
Create Disk Partitions to be Used
So before you can create any logical volume, attach extra drives yo your system. In our case, we have two uninitialized disks, /dev/sdb1 and /dev/sdc1 and we will be using both of them to create LVM logical volumes.
Initialize Partitions as Physical Volumes
First, let us initialize our disks as physical volume using the command, pvcreate.
pvcreate /dev/sdb1 /dev/sdc1Physical volume "/dev/sdb1" successfully created.
Physical volume "/dev/sdc1" successfully created.To confirm this, you can run the command, pvs, to display information about physical volumes.
pvs
PV            VG     Fmt Attr PSize PFree
/dev/sda2     centos lvm2 a-- <9.00g 0
/dev/sdb1            lvm2 --- <2.00g <2.00g
/dev/sdc1            lvm2 --- <2.00g <2.00g
As you can see, our two physical volumes have no volume group assigned to them yet.
Create Volume Group
Now, create a volume group that consists of the physical volumes created above. To create a volume group, run the command below;
vgcreate test_vol_group /dev/sdb1 /dev/sdc1
Volume group "test_vol_group" successfully createdwhere test_vol_group is the name of our volume group and /dev/sdb1, /dev/sdc1 are our physical volumes created above.
You can use the vgs command to display the attributes of the new volume group.
vgs
VG               #PV  #LV  #SN     Attr    VSize  VFree
centos            1     2     0    wz--n-  <9.00g   0
test_vol_group    2     0     0    wz--n-  3.99g  3.99g
Create Logical Volume
Now that we have the volume group, let us create a logical volume, test_log_volume, that will occupy 1G of the volume group space.
lvcreate -L 1G -n test_log_volume test_vol_group
Logical volume "test_log_group" created.where –L specifies the size and –n specifies the name of the logical volume. test_vol_group is our volume group created above.
You can use the lvs command to display the attributes of the new volume group.
lvs
LV             VG             Attr       LSize Pool Origin Data% Meta% Move Log Cpy%Sync Convert
root           centos         -wi-ao----  <8.00g
swap           centos         -wi-ao----   1.00g
test_log_group test_vol_group -wi-a-----   1.00g
Create Logical Volume Filesystem
So we now have a 1G logical volume. Let us make it usable by creating a file system on it. The following command creates a xfs file system on the logical volume. We will use mkfs.xfs command in its simplest form.
mkfs.xfs /dev/test_vol_group/test_log_groupNext,create a mount point and mount the logical volume.
mkdir /tmp/mntmount /dev/test_vol_group/test_log_group /tmp/mnt/Let us check the logical volume filesystem and disk space usage.
df -hT
Filesystem                                Type  Size Used Avail Use% Mounted on
/dev/mapper/centos-root                   xfs   8.0G  1.1G 7.0G 14% /
...
/dev/mapper/test_vol_group-test_log_group xfs   1014M 33M  982M 4% /tmp/mnt
Upto there, we have created a usable LVM logical volume.

