What is the quick and easy way to clone KVM virtual machines? In this guide, we’ll explore the step-by-step procedure for cloning KVM virtual machines using tools like virt-clone and virt-manager. Cloning KVM (Kernel-based Virtual Machine) virtual machines is a practical and efficient way to replicate existing VMs for various purposes, such as testing, scaling, or backup.
Table of Contents
Cloning KVM Virtual Machines
There are various ways in which you can clone KVM VMs;
Let us quickly see how you can clone virtual machines using either of the methods above.
Clone Virtual Machines using Virt-Manager
This involves using the KVM Virtual Machine Manager application to clone virtual machines.
Launch KVM Virt-Manager
In order to use this method, you need to launch the Virt-manager either from the system applications menu or directly from the terminal by running the command below;
virt-managerShutdown or Pause Virtual Machine to Clone
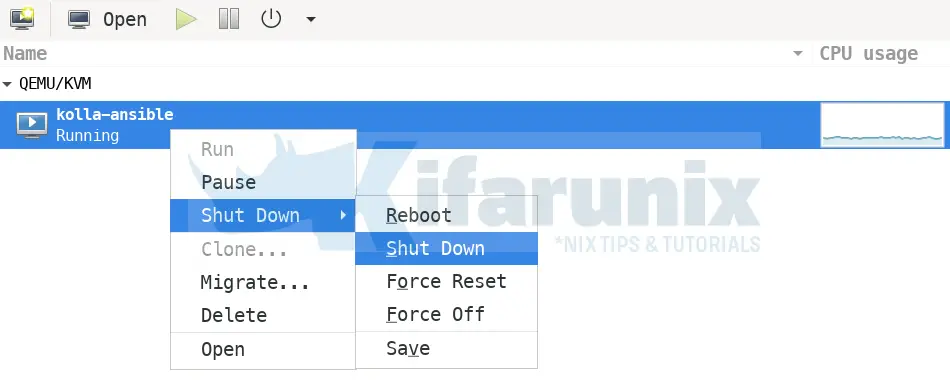
From the Virtual machine manager, simply select the vm in question and right click on it or simply click on the power to access the power menu to shutdown or pause a VM.

Clone the Virtual Machine
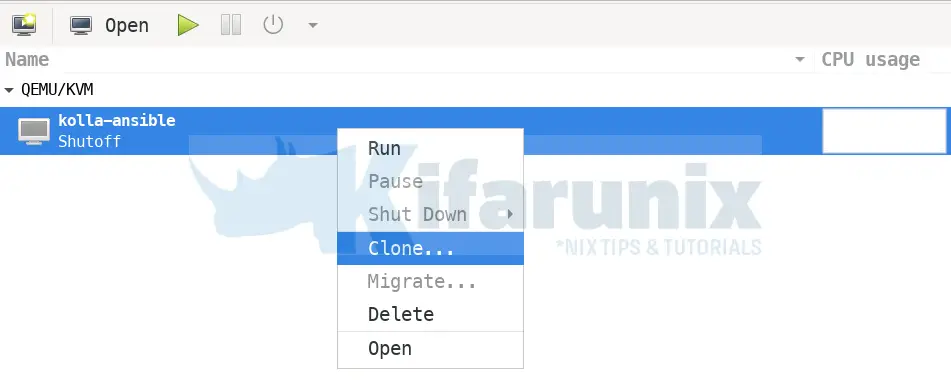
Once the machine is paused or shutdown, right click on it and click Clone to open the cloning window.

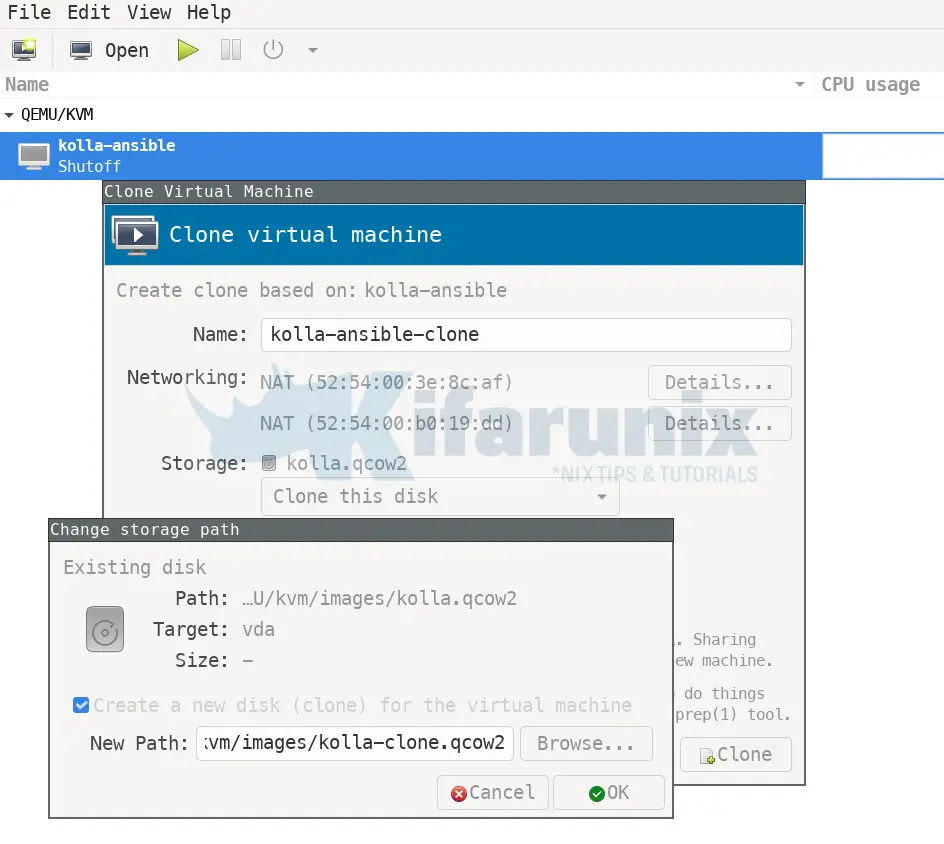
Configure the KVM Clone
Set the name of the new cloned virtual machine
Change the MAC address of each NIC by clicking on the Details button and enter the new MAC address. Usually generated by default. Click Ok when done.
For each disk attached to the virtual machine being cloned, you can choose to;
- Clone the disk so as to clone the disk for the new virtual machine
- Share the disks so as to share the existing disks between the new and the original virtual machine.
- Click Details for each option to be able to set a new path for the new cloned disk.

Once you are done configuring the KVM clone, click Clone to start the cloning process.
Clone KVM VMs using virt-clone command
You can as well clone KVM virtual machine using virt-clone command. According to man pages;
“virt-clone is a command line tool for cloning existing virtual machine images using the “libvirt” hypervisor management library. It will copy the disk images of any existing virtual machine, and define a new guest with an identical virtual hardware configuration. Elements which require uniqueness will be updated to avoid a clash between old and new guests.
By default, virt-clone will show an error if the necessary information to clone the guest is not provided. The –auto-clone option will generate all needed input, aside from the source guest to clone. Please note, virt-clone does not change anything _inside_ the guest OS, it only duplicates disks and does host side changes. So things like changing passwords, changing static IP address, etc are outside the scope of this tool. For these types of changes, please see virt-sysprep“
.To clone a virtual machine, get the name and shut it down.
For example, to list all KVM virtual machines, run the command;
virsh list --all
 Id   Name            State
--------------------------------
 -    kolla-ansible   shut off
 -    ubuntu20.04     shut off
If the virtual machine is running, then shut it down;
virsh shutdown <name here>
Once the vm is shutdown, use virt-clone command to clone it. For example, to clone a virtual machine called ubuntu20.04;
virt-clone --original ubuntu20.04 --auto-clone
--original: Name of the original guest to be cloned. This guest must be shut off or paused since it is not possible to safely clone active guests at this time.--auto-clone: Generate a new guest name, MAC address, and paths for new vm storage. If generated names collide with existing VMs or storage, a number is appended, e.g. foobar-clone-1.img
To clone KVM Virtual Machine and set new name, use the command;
virt-clone --connect=qemu:///system --original source_vm --name new_vm --auto-cloneWhere;
--connect=qemu:///system: Specifies the hypervisor connection URI. Adjust this based on your specific setup. This option is optional.--name new_vm: Specifies the desired name for the new virtual machine.
Clone KVM Virtual Machine with Multiple Disks using virt-clone
Cloning a virtual machine with multiple disks and specifying the custom name and path to new file/partition/logical partition for the new guest’s virtual disk is also possible. See example command below;
virt-clone --connect qemu:///system \
	--original demo --name newdemo \
	--file /var/lib/kvm/images/newdemo.img \
	--file /var/lib/kvm/images/newdata.img
Read more about using virt-clone on;
virt-clone --help
usage: virt-clone --original [NAME] ...

Duplicate a virtual machine, changing all the unique host side configuration like MAC address, name, etc.

The VM contents are NOT altered: virt-clone does not change anything _inside_ the guest OS, it only duplicates disks and does host side changes. So things like changing passwords, changing static IP address, etc are outside the scope of this tool. For these types of changes, please see virt-sysprep(1).

optional arguments:
  -h, --help            show this help message and exit
  --version             show program's version number and exit
  --connect URI         Connect to hypervisor with libvirt URI

General Options:
  -o ORIGINAL_GUEST, --original ORIGINAL_GUEST
                        Name of the original guest; The status must be shut off or paused.
  --original-xml ORIGINAL_XML
                        XML file to use as the original guest.
  --auto-clone          Auto generate clone name and storage paths from the original guest configuration.
  -n NEW_NAME, --name NEW_NAME
                        Name for the new guest
  --reflink             use btrfs COW lightweight copy

Storage Configuration:
  -f NEW_DISKFILE, --file NEW_DISKFILE
                        New file to use as the disk image for the new guest
  --force-copy TARGET   Force to copy devices (eg, if 'hdc' is a readonly cdrom device, --force-copy=hdc)
  --skip-copy SKIP_COPY
                        Skip copy of the device target. (eg, if 'vda' is a disk you don't want to copy and use the same path in the new VM, use --skip-copy=vda)
  --nonsparse           Do not use a sparse file for the clone's disk image
  --preserve-data       Do not clone storage, new disk images specified via --file are preserved unchanged
  --nvram NEW_NVRAM     New file to use as storage for nvram VARS

Networking Configuration:
  -m NEW_MAC, --mac NEW_MAC
                        New fixed MAC address for the clone guest. Default is a randomly generated MAC

Miscellaneous Options:
  --replace             Don't check name collision, overwrite any guest with the same name.
  --print-xml           Print the generated domain XML rather than create the guest.
  --check CHECK         Enable or disable validation checks. Example:
                        --check path_in_use=off
                        --check all=off
  -q, --quiet           Suppress non-error output
  -d, --debug           Print debugging information

See man page for examples and full option syntax.
Once the cloning is done, you list available vms to check;
virsh list --all
 Id   Name                State
------------------------------------
 -    kolla-ansible       shut off
 -    ubuntu20.04         shut off
 -    ubuntu20.04-clone   shut off
You can then start your cloned virtual machine and start setting it up including changing password, setting up IPs e.t.c.
virsh start ubuntu20.04-clone
And that is all on how to clone KVM virtual machine.

