In this tutorial, you will learn an easy way to decrease/shrink KVM virtual machine disk size. In most cases, there is always a need to expand/increase the size of a KVM virtual machine disk size. However, there are situations whereby you might assign a KVM virtual machine “too much” disk space than it is actually required. This may prompt you to want to reduce/shrink the disk size.
Table of Contents
Shrinking KVM Virtual Machine Disk Size
Well, I must say that decreasing/shrinking virtual machine disk size is not a walk in the park exercise. Any wrong move will make your virtual machine unusable. Be cautions, as you will solely take responsibility for what happens to your Virtual Machine!
Types of Partitions
In this tutorial, we have 2 virtual machines with different type of partitions;
- Disk with Primary and Extended/Logical Partitions
- LVM partitioned disk
Disk with Primary and Extended/Logical Partitions
Consider this one with primary, extended/logical partitions.
sudo fdisk -l /dev/vda
Disk /dev/vda: 20 GiB, 21474836480 bytes, 41943040 sectors
Units: sectors of 1 * 512 = 512 bytes
Sector size (logical/physical): 512 bytes / 512 bytes
I/O size (minimum/optimal): 512 bytes / 512 bytes
Disklabel type: dos
Disk identifier: 0xbc1d1b85

Device     Boot    Start      End  Sectors  Size Id Type
/dev/vda1  *        2048 39942143 39940096   19G 83 Linux
/dev/vda2       39944190 41940991  1996802  975M  5 Extended
/dev/vda5       39944192 41940991  1996800  975M 82 Linux swap / Solaris
lsblk
NAME   MAJ:MIN RM  SIZE RO TYPE MOUNTPOINTS
vda    254:0    0   20G  0 disk
├─vda1 254:1    0   19G  0 part /
├─vda2 254:2    0    1K  0 part
└─vda5 254:5    0  975M  0 part [SWAP]
LVM Partitioned Disk
Another one with just two primary partitions and a boot partition (LVM);
sudo fdisk -l /dev/vda
Disk /dev/sda: 39.06 GiB, 41943040000 bytes, 81920000 sectors
Disk model: QEMU HARDDISK
Units: sectors of 1 * 512 = 512 bytes
Sector size (logical/physical): 512 bytes / 512 bytes
I/O size (minimum/optimal): 512 bytes / 512 bytes
Disklabel type: gpt
Disk identifier: 55B779AD-FE40-4978-9911-787F868D006B

Device       Start      End  Sectors  Size Type
/dev/sda1     2048     4095     2048    1M BIOS boot
/dev/sda2     4096  3719167  3715072  1.8G Linux filesystem
/dev/sda3  3719168 81919966 78200799 37.3G Linux filesystem
lsblk
NAME                    MAJ:MIN RM  SIZE RO TYPE MOUNTPOINTS
sda                       8:0    0   20G  0 disk
├─sda1                    8:1    0  487M  0 part /boot
├─sda2                    8:2    0    1K  0 part
└─sda5                    8:5    0 19.5G  0 part
  ├─bookworm--vg-root   254:0    0 18.6G  0 lvm  /
  └─bookworm--vg-swap_1 254:1    0  980M  0 lvm  [SWAP]
As an example, the command below shows disk space consumption on the root filesystem;
df -hT -P /
Filesystem                    Type  Size  Used Avail Use% Mounted on
/dev/mapper/bookworm--vg-root ext4   19G  1.2G   16G   7% /
As you can see, the virtual machine is assigned 20GB of disk space while it is actually using less than 2GB.
Check the guide below to learn how to shrink LVM partitioned disk of a KVM virtual machine.
Shrink KVM Virtual Machine LVM Partitioned Disk
You can also get image information using qemu-img command (the vm using the image should be powered off to use this command);
sudo qemu-img info /path/to/image.qcow2E.g;
qemu-img info /media/kifarunix/vol02/kvm/images/bookworm.qcow2Sample output;
image: /media/kifarunix/vol02/kvm/images/bookworm.qcow2
file format: qcow2
virtual size: 20 GiB (21474836480 bytes)
disk size: 2.77 GiB
cluster_size: 65536
Format specific information:
    compat: 1.1
    lazy refcounts: true
    refcount bits: 16
    corrupt: false
In a situation where every shred of the disk space matters most, you might need to be allocating disk space on need basis.
In our demo system, 20GB is too much and we would like to decrease/shrink the disk space by 10GB to bring the total disk space allocated to the virtual machine to 10GB respectively.
To reduce KVM virtual machine disk size, there are steps you need to follow;
- Backup the virtual machine disk
- Decrease/Shrink the system partition
- Decrease/Shrink partition file-system to match to align with the partition
- Reduce/Shrink the disk size of the virtual machine to an appropriate size.
Backup the Virtual Machine Disk
If you are planning on taking this risky path of decreasing or shrinking your virtual machine root file-system partition, then the backup step is very much necessary, unless you are willing to start things off from the scratch and waste time all over again!
Thus, to backup up your virtual machine, you can simply clone it or just copy the image;
Thus, get the domain name of the virtual machine and power it off;
virsh list
 Id   Name       State
--------------------------
 6    bookworm   running
 7    jelly      running
Shut the respective virtual machine down;
Power off the virtual machine
sudo systemctl poweroffOr poweroff the virtual machine using virsh command;
e.g
virsh shutdown jellyYou can backup by either clone or copy;
cp jelly{,-copy}.qcow2or (replace vm-domain with the name of your virtual machine);
virt-clone --original vm-domain --auto-cloneUpdate FSTAB to use Device Instead of UUID
Once you have backed up your virtual machine, power it on, login to it so you can shrink your partition.
Next, before you can decrease or shrink the virtual machine partition, configure FSTAB to use device instead of UUID. When you shrink the partition, UUID may change and you wont be able to boot the virtual machine.
To get the device for each mapping, use the command below;
blkidSample output;
/dev/vda5: UUID="833fdaf3-5d1d-4f94-ba27-ad9607360385" TYPE="swap" PARTUUID="bc1d1b85-05"
/dev/vda1: UUID="e0a51bb6-1266-44b2-a4e2-67263548f77c" BLOCK_SIZE="4096" TYPE="ext4" PARTUUID="bc1d1b85-01"
Hence;
sudo vim /etc/fstabIt may look like this before the changes;
# /etc/fstab: static file system information.
#
# Use 'blkid' to print the universally unique identifier for a
# device; this may be used with UUID= as a more robust way to name devices
# that works even if disks are added and removed. See fstab(5).
#
# systemd generates mount units based on this file, see systemd.mount(5).
# Please run 'systemctl daemon-reload' after making changes here.
#
#
# / was on /dev/vda1 during installation
UUID=e0a51bb6-1266-44b2-a4e2-67263548f77c /               ext4    errors=remount-ro 0       1
# swap was on /dev/vda5 during installation
UUID=833fdaf3-5d1d-4f94-ba27-ad9607360385 none            swap    sw              0       0
The root partition is using UUID. You need to change this line therefore;
UUID=e0a51bb6-1266-44b2-a4e2-67263548f77c / ext4 errors=remount-ro 0 1
Similarly, comment the swap line, you can add swap later on;
# <file system> <mount point>   <type>  <options>       <dump>  <pass>
# / was on /dev/vda1 during installation
#UUID=e0a51bb6-1266-44b2-a4e2-67263548f77c /               ext4    errors=remount-ro 0       1
/dev/vda1 /               ext4    errors=remount-ro 0       1
# swap was on /dev/vda5 during installation
#UUID=833fdaf3-5d1d-4f94-ba27-ad9607360385 none            swap    sw              0       0
Save the file and exit;
Decrease/Shrink Virtual Machine Partition (Primary/Extended)
Attach and Boot Virtual Machine from GParted Editor Live ISO
Note that this is for the disk with primary and extended/logical partitions;
sudo fdisk -l /dev/vda
Disk /dev/vda: 20 GiB, 21474836480 bytes, 41943040 sectors
Units: sectors of 1 * 512 = 512 bytes
Sector size (logical/physical): 512 bytes / 512 bytes
I/O size (minimum/optimal): 512 bytes / 512 bytes
Disklabel type: dos
Disk identifier: 0xbc1d1b85

Device     Boot    Start      End  Sectors  Size Id Type
/dev/vda1  *        2048 39942143 39940096   19G 83 Linux
/dev/vda2       39944190 41940991  1996802  975M  5 Extended
/dev/vda5       39944192 41940991  1996800  975M 82 Linux swap / Solaris
Well, as you much you can use fdisk to shrink the partition, it can really mess you big time. Hence, I recommend using Gparted Live ISO to shrink the partition and subsequently update the file-system appropriately.
Thus, download Gparted Live ISO on to your Host system;
wget https://downloads.sourceforge.net/gparted/gparted-live-1.5.0-1-amd64.isoPoweroff the virtual machine
sudo systemctl poweroffOr poweroff the virtual machine using virsh command;
e.g
virsh shutdown bookwormLaunch the virt-manager;
- open the virtual machine details;
- Click Add hardware button at the bottom;
- Under storage, click select or create custom image;
- Click manage to select the ISO from your host machine and attach to the virtual machine;
- Ensure device type is Disk device and bus type is VirtIO.
- Click Finish to attach
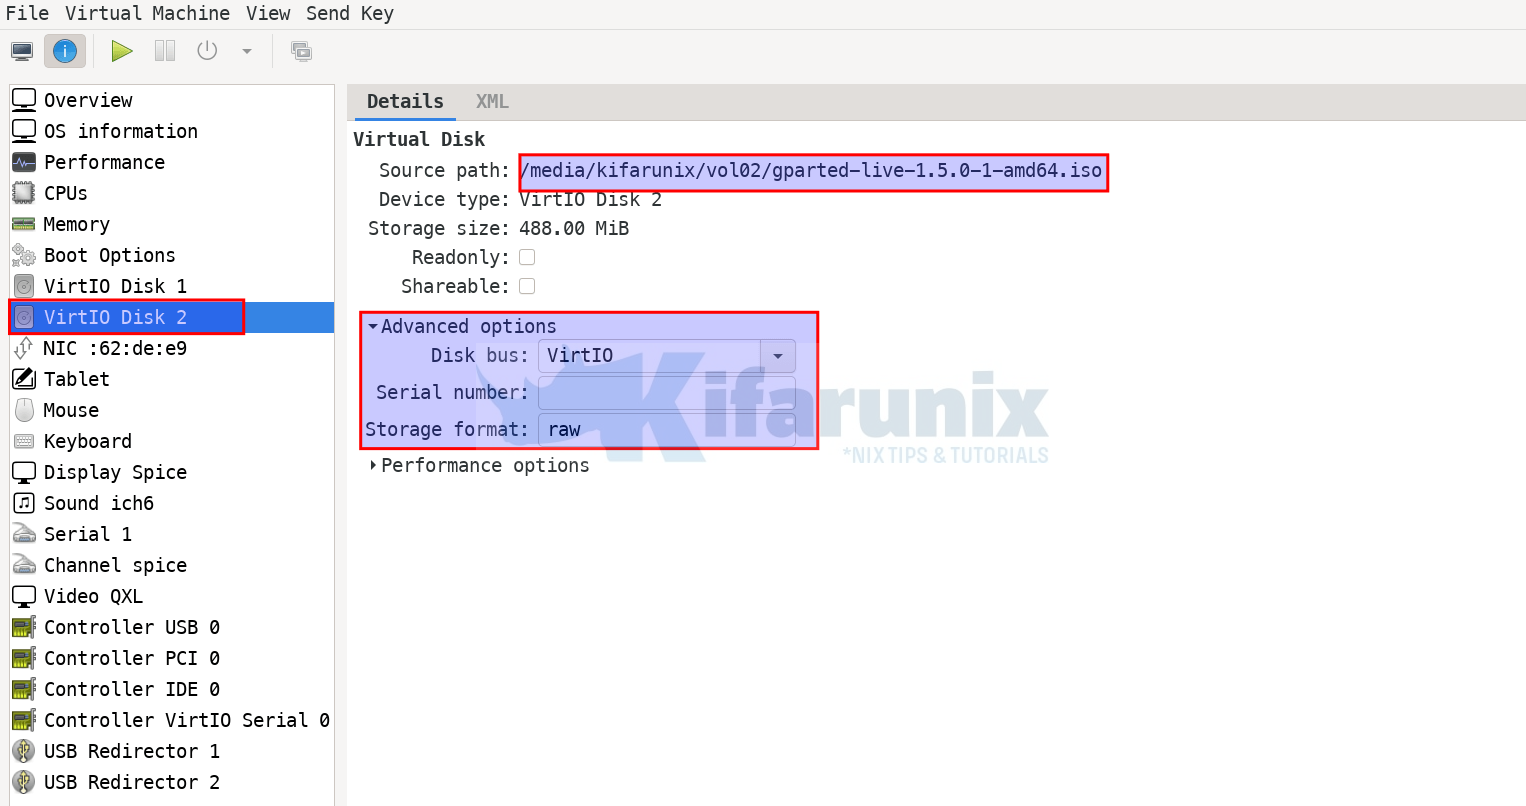
Configure the VM to boot using Gparted Live ISO under boot options (disk 2 as you can see in the screenshot above);
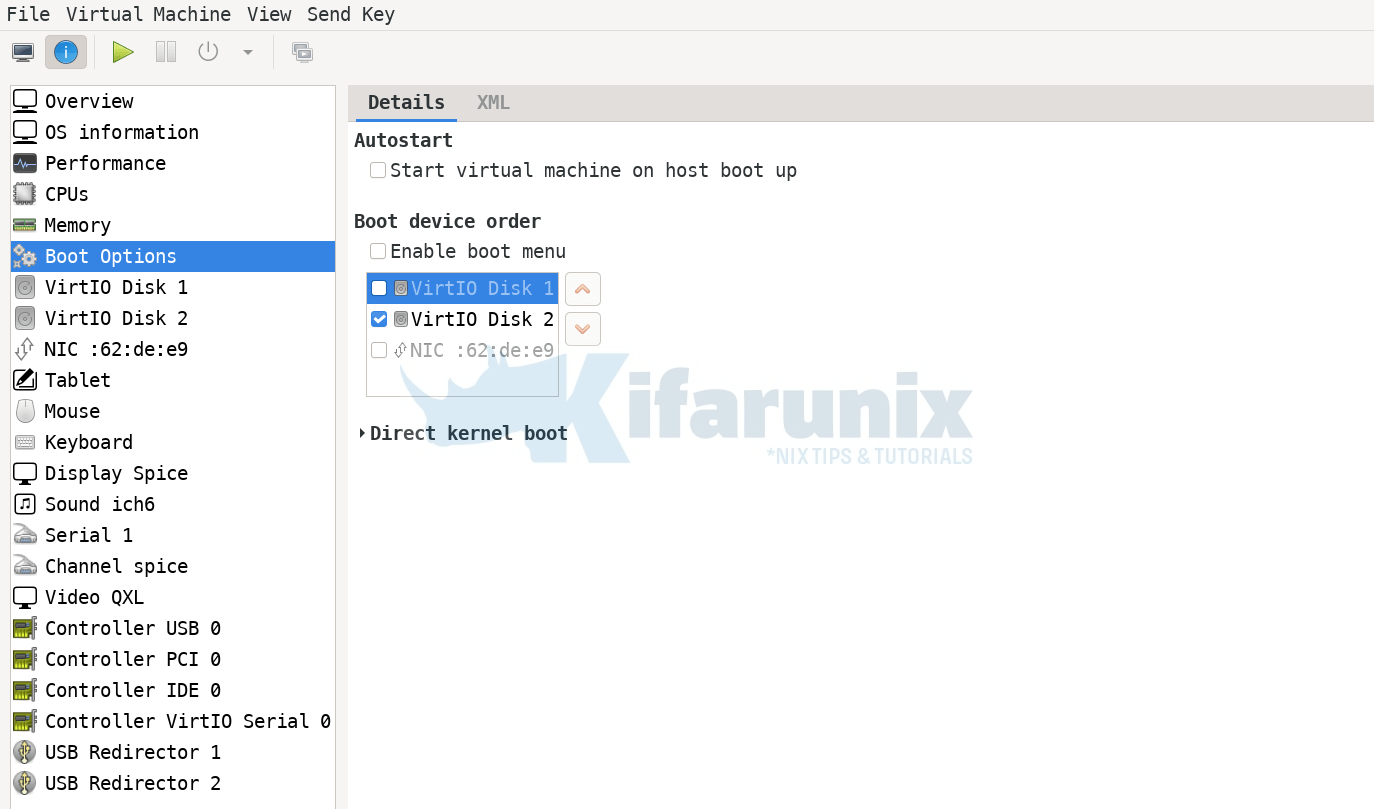
Apply the changes and start the virtual machine.
Open the graphical console of the vm and boot Gparted Live with default settings;
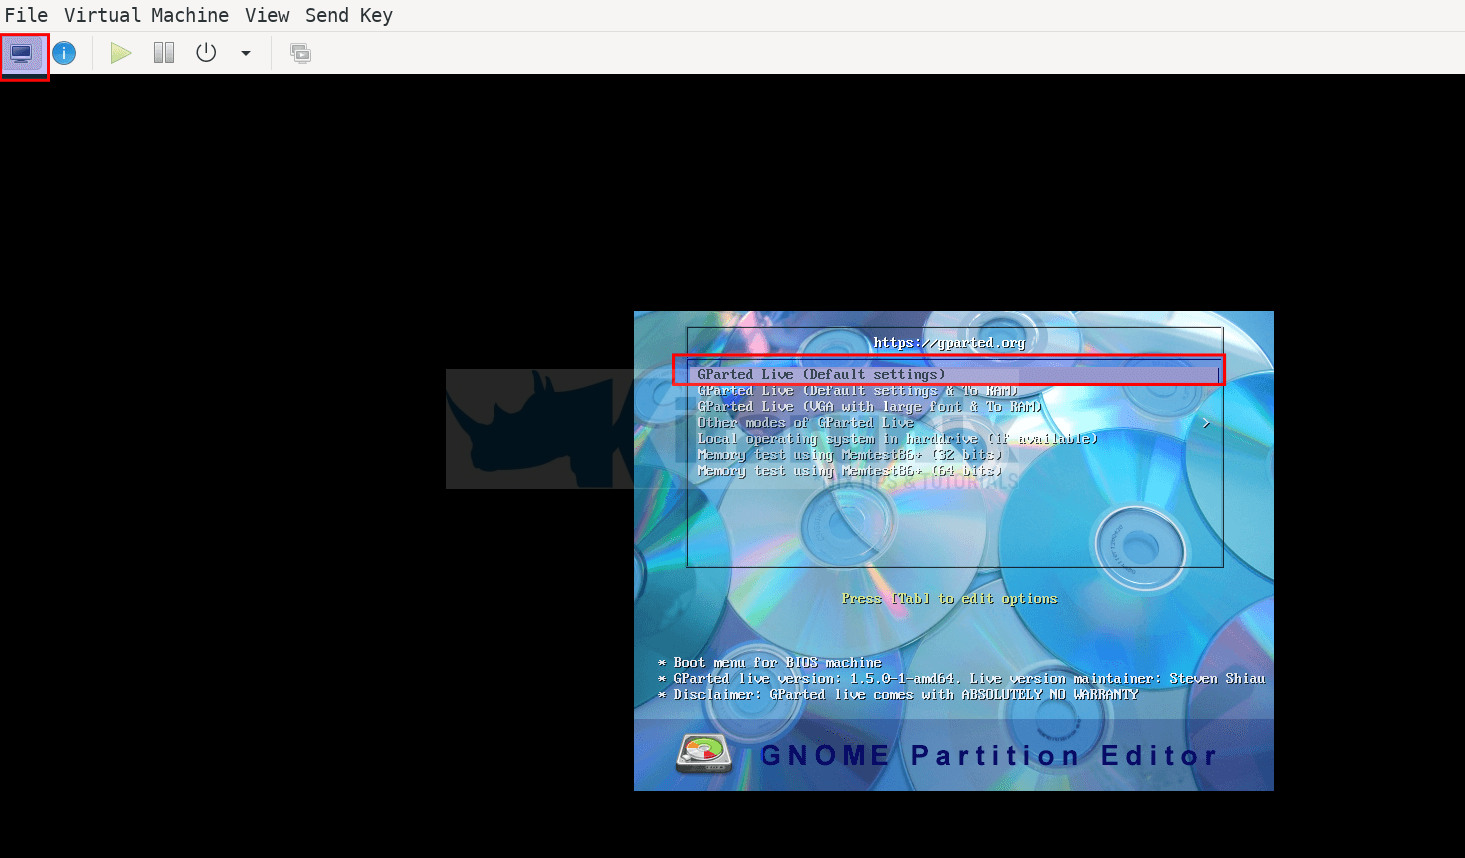
Press ENTER at any given prompt to accept the default settings. for the keymap (Dont touch keymap), the language and star X to use GParted automatically.
You should now land on GParted editor interface.
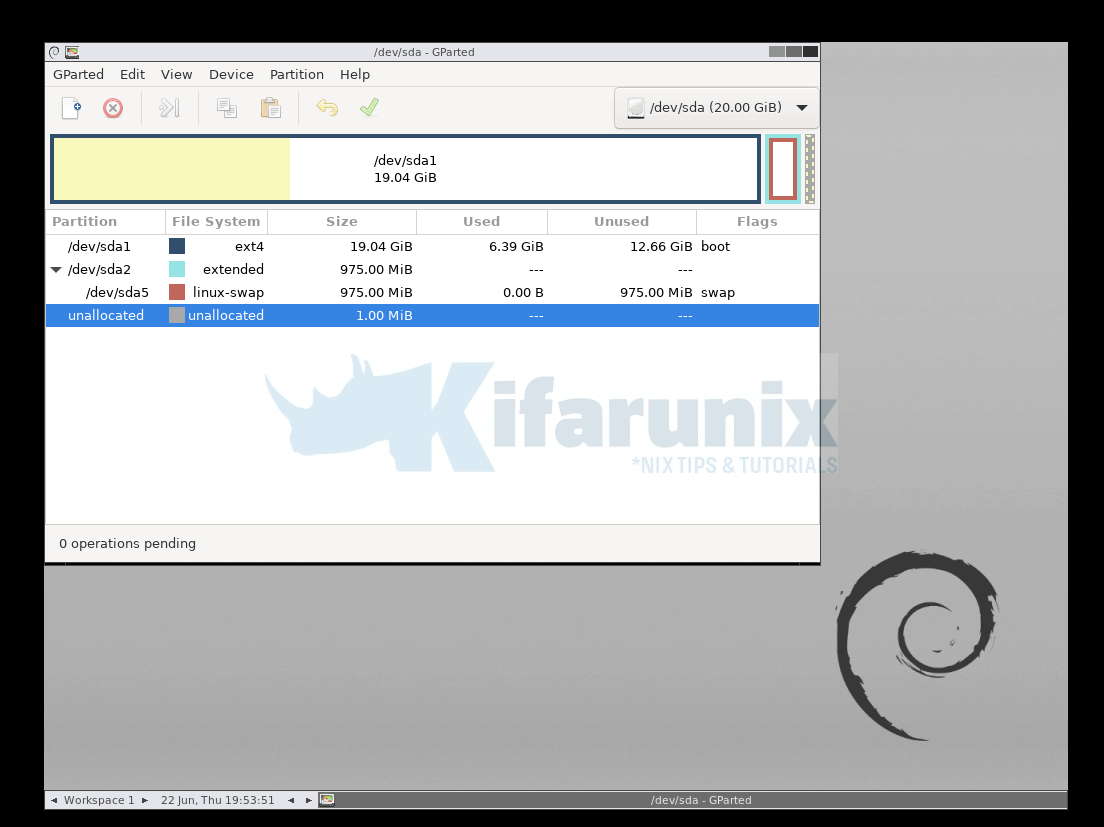
Decrease/Shrink Virtual Machine Partition and Filesystem on GParted Editor
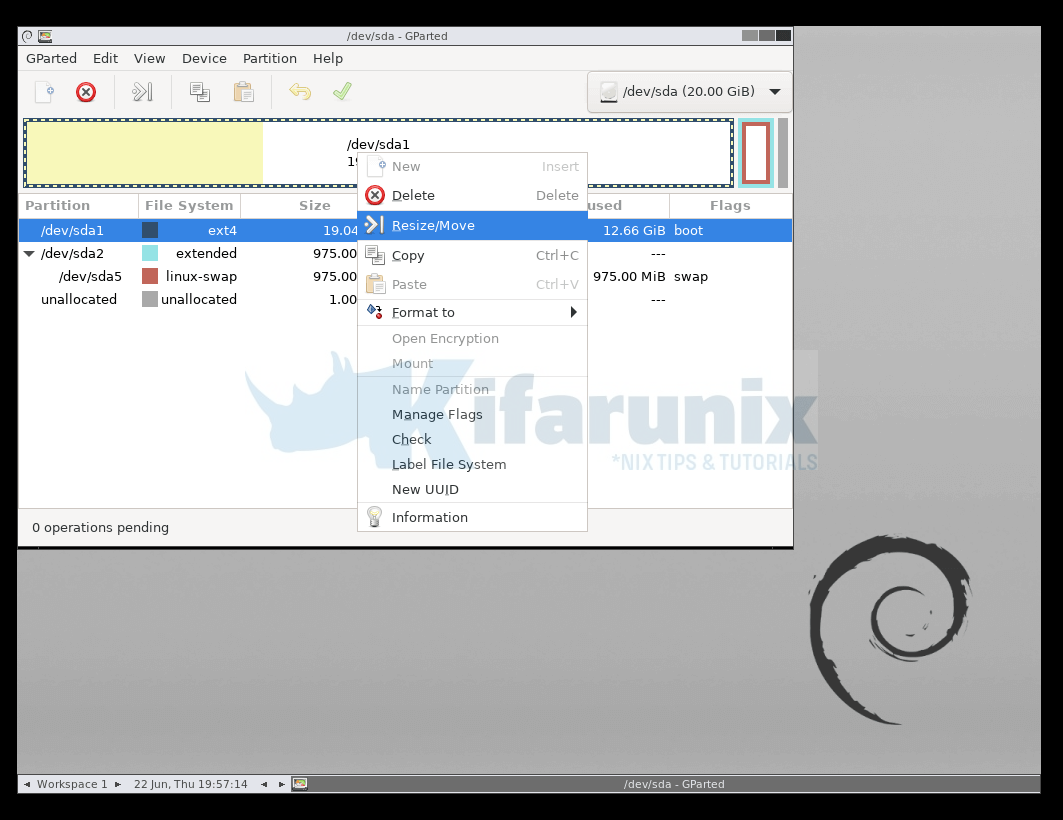
From the Gparted Interface, select the partition, right click and click Resize/Move.
Under the new size (MiB), enter size you want to reduce the disk to and press Enter. e.g in our case, we are reducing it to 10GB so new size is10240MiB (enter the size and click just outside the box);
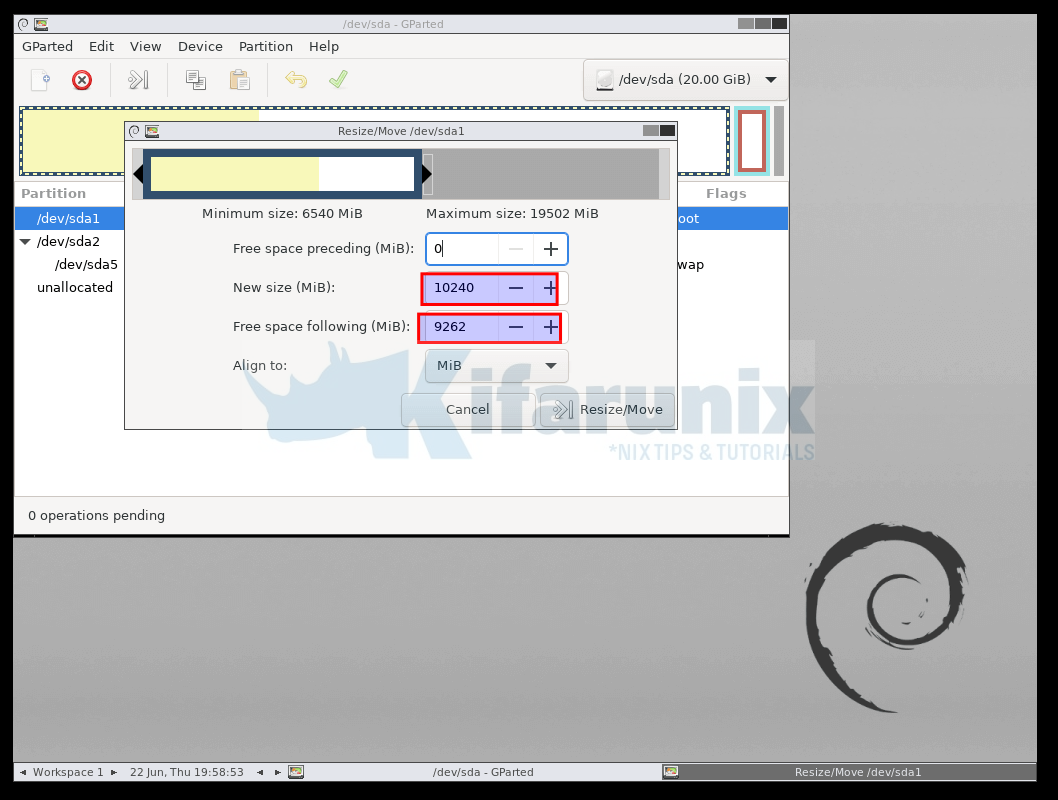
Click Resize/Move to resize the partition and you should can now see used and unused space.
You can also delete the swap partition.
To apply the changes, click the green tick at the top and apply. This will shrink the partition and update the filesystem accordingly.
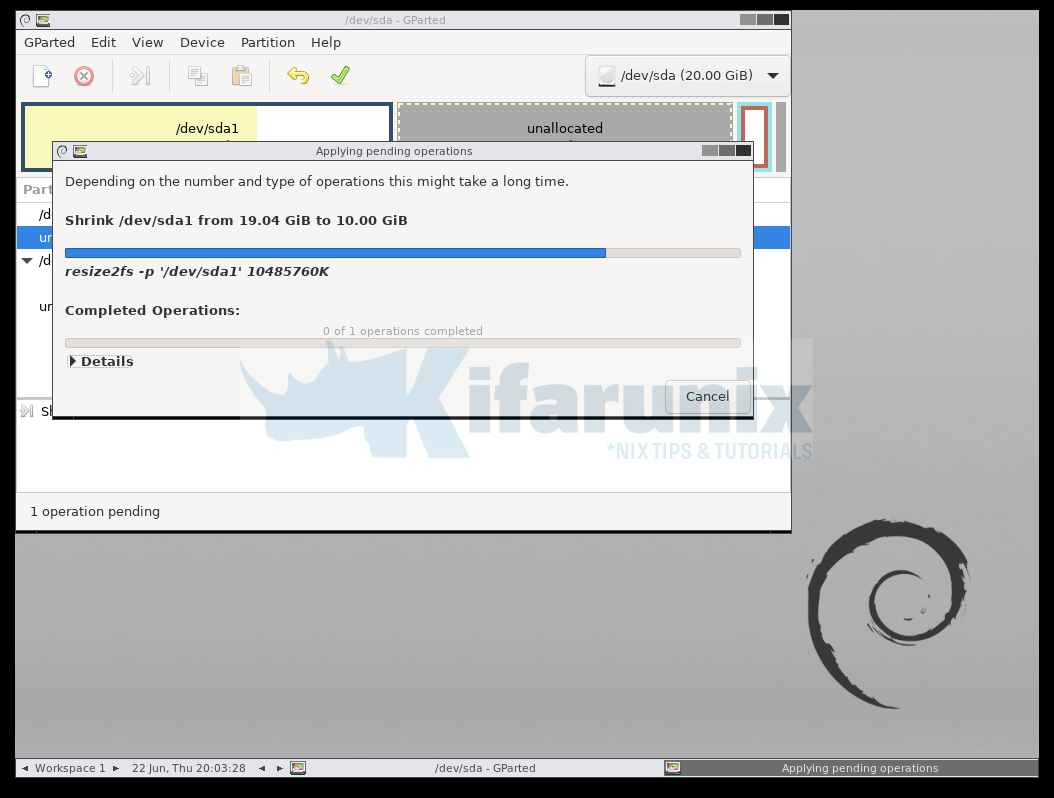
Poweroff the Virtual Machine
Once the changes are applied, shutdown the virtual machine.
Detach GParted Live ISO from the VM
Next, reconfigure the VM to boot from the main disk by detaching the GParted Live ISO file and apply the changes and start it.
Reduce/Shrink Disk size of the virtual machine to an appropriate size
Once the system boots, login and confirm the disk size;
df -hT -P /
Filesystem     Type  Size  Used Avail Use% Mounted on
/dev/vda1      ext4  9.7G  4.4G  4.9G  48% /
Down from 20G to ~10G, -:).
sudo fdisk -l /dev/sda
Disk /dev/vda: 20 GiB, 21474836480 bytes, 41943040 sectors
Units: sectors of 1 * 512 = 512 bytes
Sector size (logical/physical): 512 bytes / 512 bytes
I/O size (minimum/optimal): 512 bytes / 512 bytes
Disklabel type: dos
Disk identifier: 0xbc1d1b85

Device     Boot    Start      End  Sectors  Size Id Type
/dev/vda1  *        2048 20973567 20971520   10G 83 Linux
/dev/vda2       39944190 41940991  1996802  975M  5 Extended
/dev/vda5       39944192 41940991  1996800  975M 82 Linux swap / Solaris
As you can see, the filesystem has been shrinked to 10G but disk still shows 20G. Thus , on the host system, shrink the size of the virtual machine disk image using qemu-img command.
When shrinking with qemu-img command, do not use exact same size. Make it a little bigger!
Therefore, shutdown the VM again!
virsh shutdown <virtual-machine-name>E.g;
Shrink the disk size;
(Replace /path/to/image.qcow2 accordingly)
NOTE: You cannot shrink if the image has snapshots!
sudo qemu-img resize --shrink /path/to/image.qcow2 10752MWe are setting the total size to 10G (10240 MiB) but see, I added a 500M up;
qemu-img resize --shrink /media/kifarunix/vol02/kvm/images/bookworm.qcow2 10752MConfirm the virtual disk size;
qemu-img info /media/kifarunix/vol02/kvm/images/bookworm.qcow2
image: /media/kifarunix/vol02/kvm/images/bookworm.qcow2
file format: qcow2
virtual size: 10.5 GiB (11274289152 bytes)
disk size: 5.73 GiB
cluster_size: 65536
Format specific information:
    compat: 1.1
    lazy refcounts: true
    refcount bits: 16
    corrupt: false
See now, image is resized.
Hold your breathe and reboot the VM! If you get to the login page, then you are good to go, ninja!
Confirm Disk Shrinkage
Login and confirm!
sudo fdisk -l /dev/vda
Disk /dev/vda: 10.5 GiB, 11274289152 bytes, 22020096 sectors
Units: sectors of 1 * 512 = 512 bytes
Sector size (logical/physical): 512 bytes / 512 bytes
I/O size (minimum/optimal): 512 bytes / 512 bytes
Disklabel type: dos
Disk identifier: 0xbc1d1b85

Device     Boot Start      End  Sectors Size Id Type
/dev/vda1  *     2048 20973567 20971520  10G 83 Linux
And that is it!
That completes our guide on how to shrink KVM Virtual Machine disk size, especially on disks with primary and extended/logical partitions.

