In this tutorial, you’ll learn how to install and set up Active Directory on Windows Server 2025, including how to enable LDAPS for secure communication between directory services. Active Directory (AD) is Microsoft’s directory service used to manage users, devices, and resources in a centralized network environment. It allows administrators to control permissions, enforce policies, and streamline access across an organization.
Setting it up properly with LDAPS ensures encrypted communication between domain controllers and clients, improving the overall security of your infrastructure.
Table of Contents
STARTTLS vs LDAP over SSL/TLS
Before diving into the setup, it’s important to understand the difference between STARTTLS and LDAP over SSL/TLS (LDAPS). These are the two common methods used when securing LDAP communications for Active Directory on Windows Server 2025. Both methods aim to encrypt LDAP traffic, but they differ in implementation, port usage, and configuration. Below, we compare these approaches to help you understand their roles in securing Active Directory.
- Port Usage:
- STARTTLS: Uses the standard LDAP port (TCP 389). It starts with an unencrypted connection and upgrades to TLS encryption using the STARTTLS command.
- LDAPS: Operates on a dedicated port (TCP 636) and establishes a TLS/SSL-encrypted connection from the outset, similar to HTTPS.
- Connection Initiation:
- STARTTLS: Begins with a plaintext LDAP connection, then negotiates TLS encryption if both client and server support it. If STARTTLS fails, the connection may fall back to unencrypted LDAP, posing a security risk if not properly enforced.
- LDAPS: Initiates an encrypted connection immediately, ensuring no plaintext communication occurs. This makes LDAPS inherently more secure for environments requiring strict encryption.
- Configuration in Active Directory:
- STARTTLS: Supported by Windows Server 2025’s Active Directory but requires explicit client configuration to request TLS. The server must have a valid certificate installed, and clients must be configured to enforce STARTTLS to avoid fallback to plaintext.
- LDAPS: Requires a valid SSL/TLS certificate installed on the domain controller. Once configured, LDAPS is straightforward, as clients connect directly to port 636, and encryption is mandatory.
- Use Case Suitability:
- STARTTLS: Ideal for environments where legacy applications or clients use port 389 and support upgrading to TLS. It offers flexibility but requires careful configuration to prevent unencrypted fallback.
- LDAPS: Preferred for high-security environments where encryption must be guaranteed from the start. It’s commonly used in Active Directory setups for secure authentication and directory queries.
Securing LDAP: Can You Disable Port 389?
While LDAPS on port 636 provides secure communication, many administrators wonder if they can disable the standard LDAP port (389) to enforce encryption. Here’s a summary based on Microsoft’s documentation and best practices:
Can You Really Disable Port 389?
No, completely disabling port 389 (TCP and UDP) on an AD domain controller is not feasible without breaking core AD functionality. Port 389 is used for essential tasks like domain joins, user authentication, Group Policy updates, and DC replication. Blocking it via firewall or registry can cause login failures, replication issues, and broken tools like AD Users and Computers or PowerShell cmdlets.
What You Can Do Instead:
- Enforce LDAP Signing: Configure Group Policy to require LDAP signing, rejecting unsigned/plaintext binds on port 389. This secures LDAP traffic without closing the port.
- Enable Channel Binding: Use registry or GPO settings to prevent man-in-the-middle attacks on signed LDAP connections.
- Restrict Port 389 Access: Use firewalls to limit port 389 to internal trusted networks, forcing external clients to use LDAPS (port 636).
- Configure LDAPS for Authentication & Queries: While port 389 must remain open for AD’s essential operations (including administrative tools, some replication functions, and internal communications), configure applications, scripts, and services to use LDAPS (636) for authentication and directory lookups wherever possible.
- Monitor Unsigned Binds: Enable logging (Event ID 2889) to identify apps using plaintext LDAP and migrate them to LDAPS.
Install and Set Up Active Directory on Windows Server 2025 with LDAPS
Prerequisites
Before setting up Active Directory, make sure the following system, software, and network requirements are met:
- 64-bit processor (minimum 1.4 GHz; multi-core recommended)
- 2 GB RAM minimum (8 GB+ recommended)
- Enough disk space (SSD recommended for performance, we are using 100 GB)
- Windows Server 2025 (Standard or Datacenter edition)
- Administrative privileges required
- Static IP address configured
- Stable network connection
Step 1: Prepare the Server
Some of the settings that you can start on the server preparation step may include:
- Set Static IP:
- Open Network and Sharing Center (Control Panel or Settings).
- Go to Change adapter settings, right-click the adapter, select Properties.
- Choose IPv4, click Properties, and set static IP, subnet mask, gateway, and DNS (use server’s IP for DNS initially).
- Save.
- You can confirm by pinging from another system on the same network.
- Rename Server:
- Run
sysdm.cplfrom elevated CMD prompt. - Click Change.
- Set a new computer name (e.g., DC01)
- Reboot the server to apply the changes.
- Run
- Apply Updates:
- Go to Settings > Windows Update and install all updates if there any pending ones.
Step 2: Install Active Directory Domain Services (AD DS)
With prerequisites completed, the next step is to install the Active Directory Domain Services (AD DS) role on your Windows Server. You can do this using one of two methods:
- Using Server Manager (GUI): A graphical method ideal for users who prefer interacting through Windows Server’s built-in Server Manager interface.
- Using PowerShell (CLI): A command-line method suitable for automation or users comfortable with scripting.
Choose the method that suits your environment and preference. Both achieve the same result. Instructions for each are provided below.
To install AD DS via the server manager;
- Open Server Manager:
- Launch Server Manager from the Start menu.
- Add AD DS Role:
- Click Manage > Add Roles and Features.
- Click Next to proceed.
- Select Role-based or feature-based installation installation type
- On the next step, select the same target server from the list.
- On the Server roles step, check Active Directory Domain Services, click Add Features for tools.
- On the Features and AD DS, click next to move to the next step.
- On the Confirmation step, click Install to install the AD service.
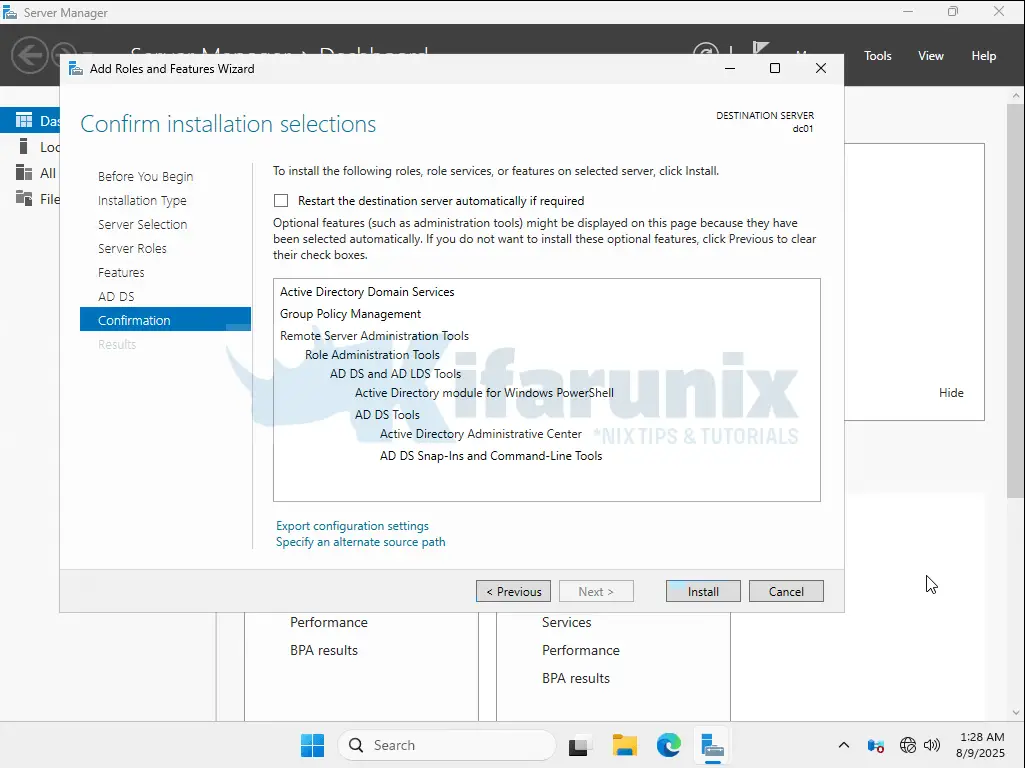
- Wait for completion. Close the installation wizard when done.
You can also automate the installation via PowerShell scripting.
Step 3: Promote the Server to Domain Controller
- Start Promotion:
- In Server Manager, click the notification flag and select Promote this server to a domain controller.
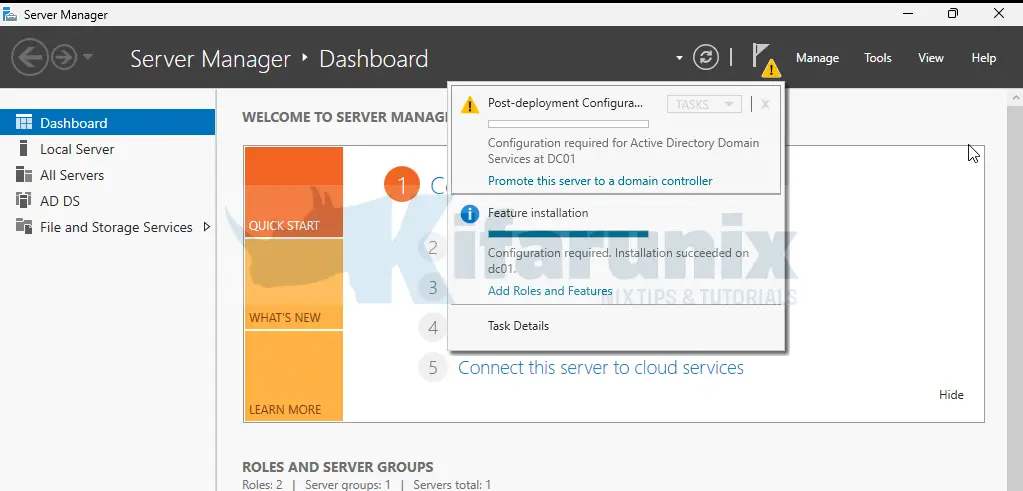
- On the Deployment Configuration, choose Add a new forest and enter your root domain name (e.g., example.com)
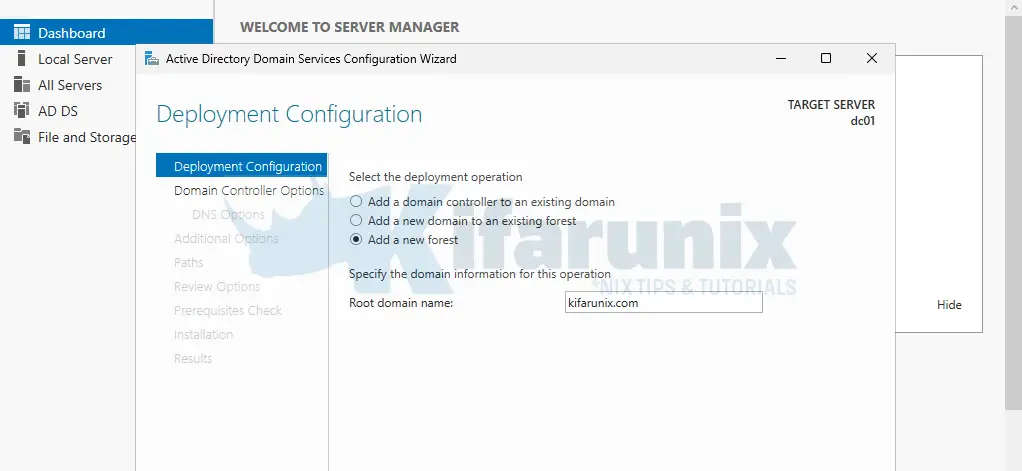
- Click Next.
- In Server Manager, click the notification flag and select Promote this server to a domain controller.
- Set Domain Controller Options:
- Set Forest and Domain Functional Level to Windows Server 2025.
- Ensure DNS server is checked.
- Set a Directory Services Restore Mode (DSRM) password
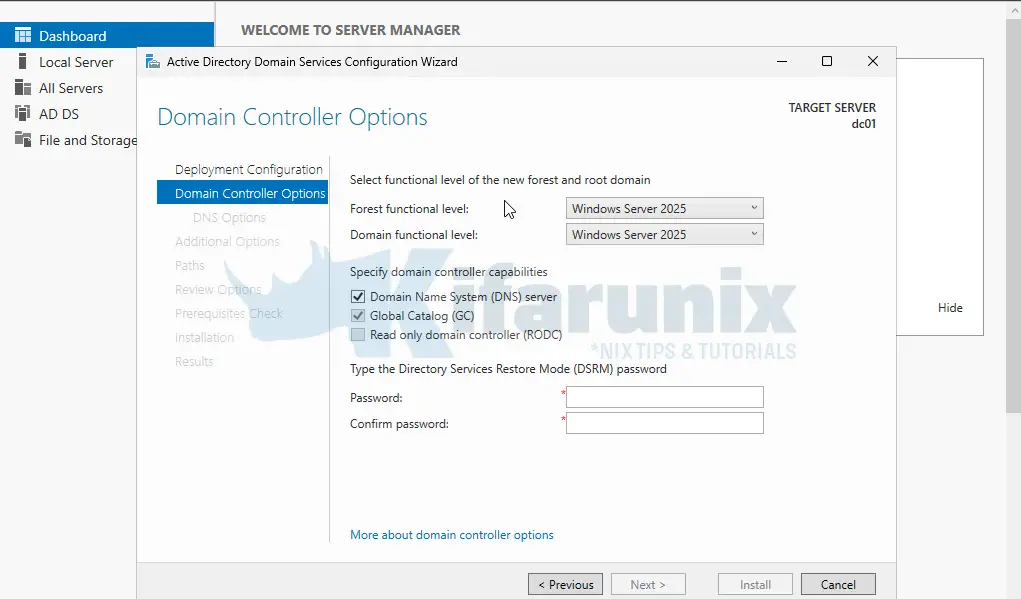
- click Next.
- DNS and NetBIOS:
- Skip DNS Options (for auto-configuration), hence, hit Next.
- Verify or set NetBIOS name (e.g., EXAMPLE) and click Next.
- Database Paths:
- Use default paths or specify a dedicated volume for production.
- Click Next.
- Review and Install:
- Review Options settings
- click Next if all is okay.
- Pass the prerequisites check, resolve any errors, then click Install.
- The server will reboot automatically after completion.
Step 4: Verify Installation
After the server reboots, you should verify that the Active Directory Domain Services (AD DS) role was successfully installed and that the server has been promoted to a Domain Controller.
The login prompt will now reflect the domain setup and display two key entries:
- The domain name in NetBIOS format, such as:
EXAMPLE\Administrator - An option labeled “Other user”, which allows you to manually enter domain credentials.
This change confirms that the system is now domain-joined and is functioning as a Domain Controller.
To log in, use domain admin credentials in either of the following formats:
EXAMPLE\Administrator[email protected]
If the domain is not shown automatically, click “Other user”, then enter your credentials using one of the formats above.
Some of the checks you can do include:
- Verify server roles. In the Server Manager, confirm AD DS and DNS Server are active.
- Test the DNS. Run nslookup against your base domain in Command Prompt to verify resolution.
- Check AD tools. Open Active Directory Users and Computers (dsa.msc) and verify domain structure.
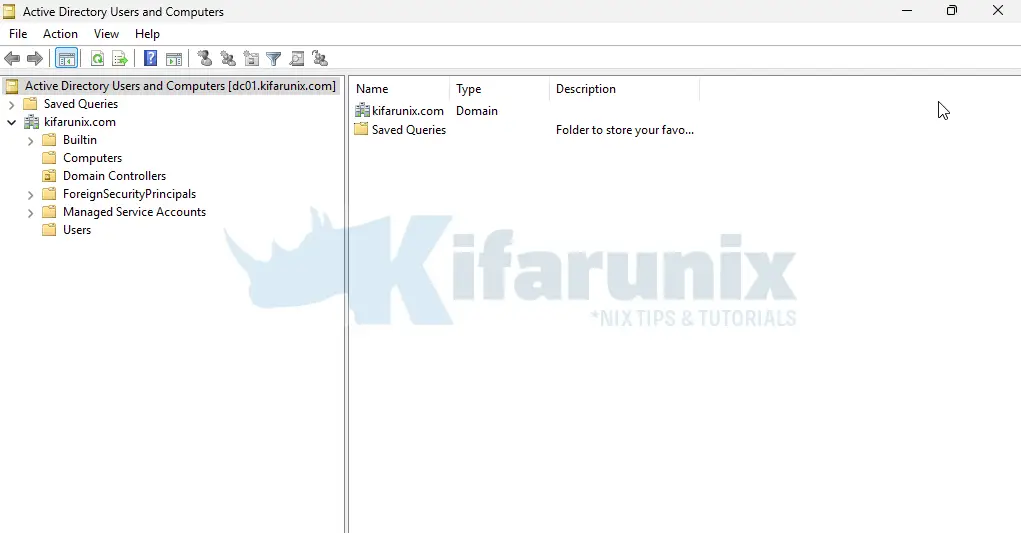
Step 5: Create Organizational Units, Users, and Groups
Once your Active Directory is up and running, the next step is to organize your directory by creating:
- Organizational Units (OUs) to structure your directory logically (e.g., by department)
- User accounts for employees or services
- Security groups to manage permissions and access
You can do this using either the GUI (for one-off tasks) or PowerShell (for bulk and automation).
Create OU, Users, and Groups Using the GUI
To manually set up Organizational Units (OUs), users, and groups through the graphical interface:
- Press Win + R, type dsa.msc, and press Enter to open Active Directory Users and Computers.
- Create Organization Units:
- In the left pane, right-click your domain (e.g.,
kifarunix.com), chooseNew>Organizational Unit, name it (e.g.,IT,HR, orTestUsersor whatever…), and clickOK.
- In the left pane, right-click your domain (e.g.,
- Create User Accounts:
- Right-click the OU you just created, select
New>User. - Enter the first name (
John), last name (Doe), and user logon name (john.doe). - Click
Next, set a password, and select options like “User must change password at next logon”. - Click Next to preview the settings and click Finish if all good, to create the user account.
- Right-click the OU you just created, select
- Create User Groups:
- Right-click the same OU again, select
New>Group. Enter the group name (e.g.,IT Admins), set the group scope toGlobaland the group type toSecurity, then clickOK.
- Right-click the same OU again, select
- Add Users to Groups:
- To add the user to the group, double-click the group you just created, go to the
Memberstab, clickAdd, type the username (e.g.,john.doe), and confirm by clickingOK.
- To add the user to the group, double-click the group you just created, go to the
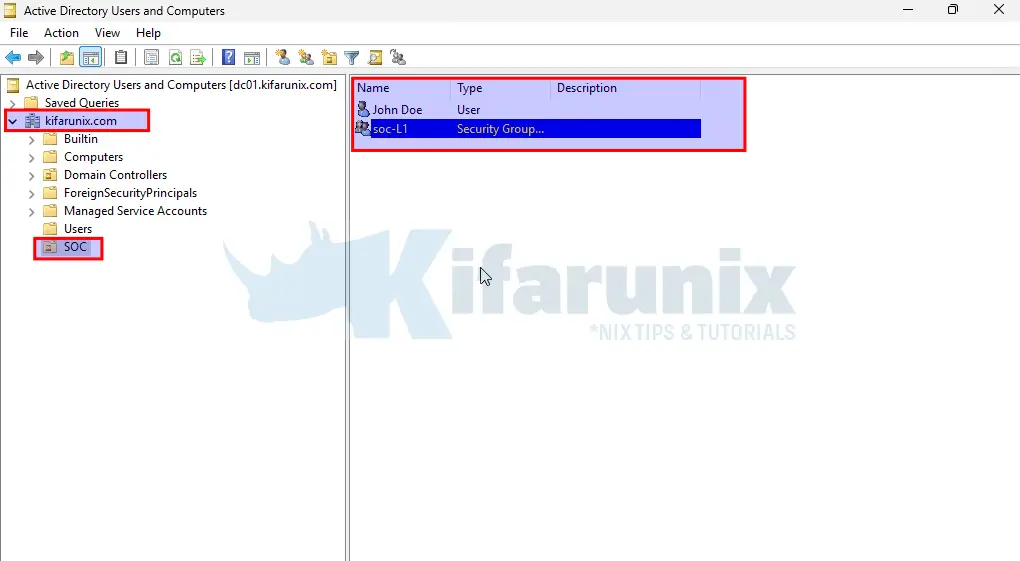
Create OU, Users, and Groups Using PowerShell
To create Organizational Units (OUs), users, and groups using PowerShell, you can follow the steps shown below. For larger setups or automation, you can write PowerShell scripts to streamline the entire process. However, this guide will focus on the PowerShell scripting part.
Therefore, launch PowerShell ad admin and begin to create the OUs. For example, to create an OU for a devops department;
New-ADOrganizationalUnit -Name "DevOps" -Path "DC=kifarunix,DC=com"Next, create users. If you have multiple users, you can put them in a CSV file, in the format below;
FirstName,LastName,Username,OU
Jane,Doe,j.doe2,DevOps
Alice,Smith,a.smith,DevOps
Bob,Colly,b.colly,DevOps
Then, you can run the command below, against the CSV, to create the user with randomly generated passwords.
Replace the C:\Path\To\users.csv accordingly.
# Generate random passwords for users
function Generate-RandomPassword {
    param(
        [int]$length = 12
    )

    $upper = [char[]]'ABCDEFGHIJKLMNOPQRSTUVWXYZ'
    $lower = [char[]]'abcdefghijklmnopqrstuvwxyz'
    $digits = [char[]]'0123456789'
    $special = [char[]]'!@#$%^&*()_-+=<>?'

    $passwordChars = @()
    $passwordChars += Get-Random -InputObject $upper
    $passwordChars += Get-Random -InputObject $lower
    $passwordChars += Get-Random -InputObject $digits
    $passwordChars += Get-Random -InputObject $special

    $allChars = $upper + $lower + $digits + $special
    for ($i = $passwordChars.Count; $i -lt $length; $i++) {
        $passwordChars += Get-Random -InputObject $allChars
    }

    $password = ($passwordChars | Sort-Object {Get-Random}) -join ''
    return $password
}

# Create Users on AD OU
Import-Csv "C:\Path\To\users.csv" | ForEach-Object {
    $ou = "OU=$($_.OU),DC=corp,DC=local"
    $name = "$($_.FirstName) $($_.LastName)"
    $sam = $_.Username
    $upn = "$($_.Username)@corp.local"
    $pwdPlain = Generate-RandomPassword -length 14
    $pwd = ConvertTo-SecureString $pwdPlain -AsPlainText -Force

    New-ADUser -Name $name -GivenName $_.FirstName -Surname $_.LastName `
               -SamAccountName $sam -UserPrincipalName $upn `
               -Path $ou -AccountPassword $pwd -Enabled $true `
               -PasswordNeverExpires $true

    Write-Output "Created user $sam with password $pwdPlain"
}
Update the script to suit your needs. If you want, make it a better script.
Sample output my example setup:
Created user j.doe2 with password (dpNX%nTVebFt9
Created user a.smith with password kG?8(_5fPf0MIc
Created user b.colly with password ^Y)7efI0>8#xOn
Create a group:
New-ADGroup -Name "DevOps-Admins" -GroupScope Global -GroupCategory Security -Path "OU=DevOps,DC=kifarunix,DC=com"Add users to the respective groups:
Add-ADGroupMember -Identity "DevOps-Admins" -Members j.doe2, b.collyYour users are now added:
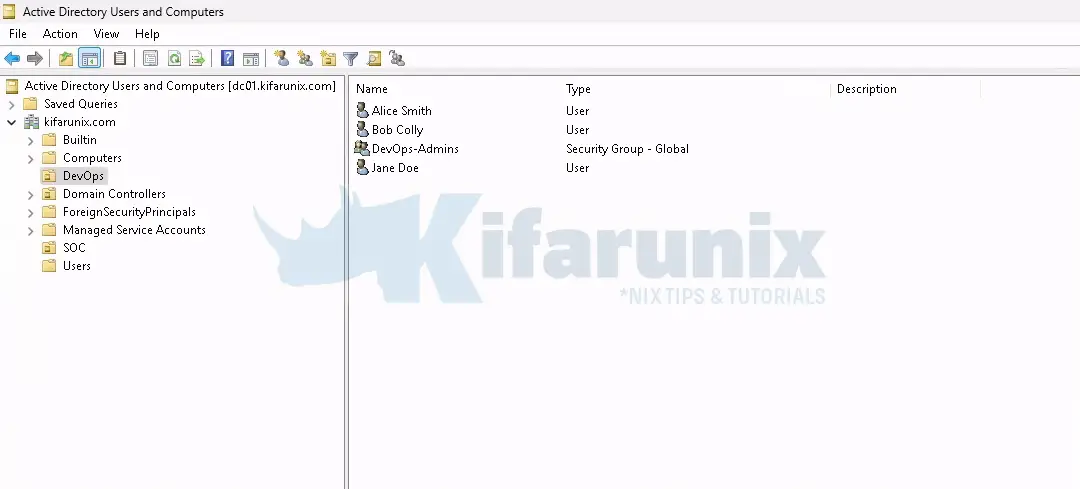
Create BIND DN User for Application Authentication
Many applications that integrate with LDAP/Active Directory such as Jenkins, Jira, GitLab, Red Hat OpenShift, VPN solutions, e.t.c need to authenticate users against AD, but they do not require the applications themselves to be joined to the domain. Instead, these applications typically use a BIND DN account to connect to Active Directory, perform read-only LDAP queries, and retrieve user details or group memberships.
A BIND DN is a dedicated, low-privileged Active Directory user account used solely for binding to the AD server and performing LDAP searches for users, groups, and other directory objects. It does not represent an actual end user logging in, but rather serves as a service account used by the application for directory access.
You can create the BIND DN account using either the GUI (Active Directory Users and Computers) or PowerShell.
Create BIND DN Account Using GUI (Active Directory Users and Computers)
Assuming you have already created an Organizational Unit (OU) where your BIND DN user will reside, for example, in our setup, we are using an OU called ServiceAccounts:
Get-ADOrganizationalUnit -Filter * | Select-Object Name, DistinguishedNameName DistinguishedName
---- -----------------
Domain Controllers OU=Domain Controllers,DC=kifarunix,DC=com
SOC OU=SOC,DC=kifarunix,DC=com
DevOps OU=DevOps,DC=kifarunix,DC=com
ServiceAccounts OU=ServiceAccounts,DC=kifarunix,DC=com
Then proceed as follows to create the BIND DN user under your respective OU:
- Open Active Directory Users and Computers (
dsa.msc) - Right-click your desired OU (e.g.,
ServiceAccounts) > New > User - Enter the following:
- First name: left blank
- Last name: left blank
- Full name: read-only
- Username (sAMAccountName): read-only
- On the next section, set a strong password and check:
- User cannot change password
- Password never expires
- Then click Finish to close the wizard.
Create BIND DN Account Using PowerShell
You can run the command below on PowerShell to create a BIND DN. Be sure to replace the username and domain name.
$password = Read-Host -AsSecureString "Enter password for the BIND DN user"

New-ADUser `
  -Name "read-only" `
  -SamAccountName "read-only" `
  -UserPrincipalName "[email protected]" `
  -Path "OU=ServiceAccounts,DC=kifarunix,DC=com" `
  -AccountPassword $password `
  -Enabled $true `
  -PasswordNeverExpires $true `
-CannotChangePassword $true- Open
gpmc.mscon the domain controller. - Expand Forest > Domains.
- Right-click on your domain and select Create a GPO in this domain, and Link it here…
- Name the GPO:
DenyLogon_BindAccountsand click OK. - Right-click on the newly created GPO and select Edit.
- Navigate to: Computer Configuration > Policies > Windows Settings > Security Settings > Local Policies > User Rights Assignment.
- Double-click each of the following:
- Deny log on locally
- Deny log on through Remote Desktop Services
- Then:
- Click Add User or Group
- Enter the BIND DN account (e.g.
yourdomain\username, such askifarunix.com\read-only) - Click Check Names then OK
- Click Apply and OK
- Close Group Policy Management Editor.
Step 6: Install Active Directory Certificate Services (AD CS) for LDAPS
To enable LDAPS (LDAP over SSL/TLS) on your Domain Controller, you need to install and configure Active Directory Certificate Services (AD CS). This provides the necessary Certification Authority (CA) to issue SSL certificates trusted by the domain.
To add the AD CS Role:
- Open Server Manager.
- Go to Manage > Add Roles and Features > Next.
- Select Role-based or feature-based installation installation type
- On the next step, select the same target server from the list.
- In the Roles section:
- Check Active Directory Certificate Services.
- Click Add Features when prompted.
- Click Next to proceed through the wizard and click Install.
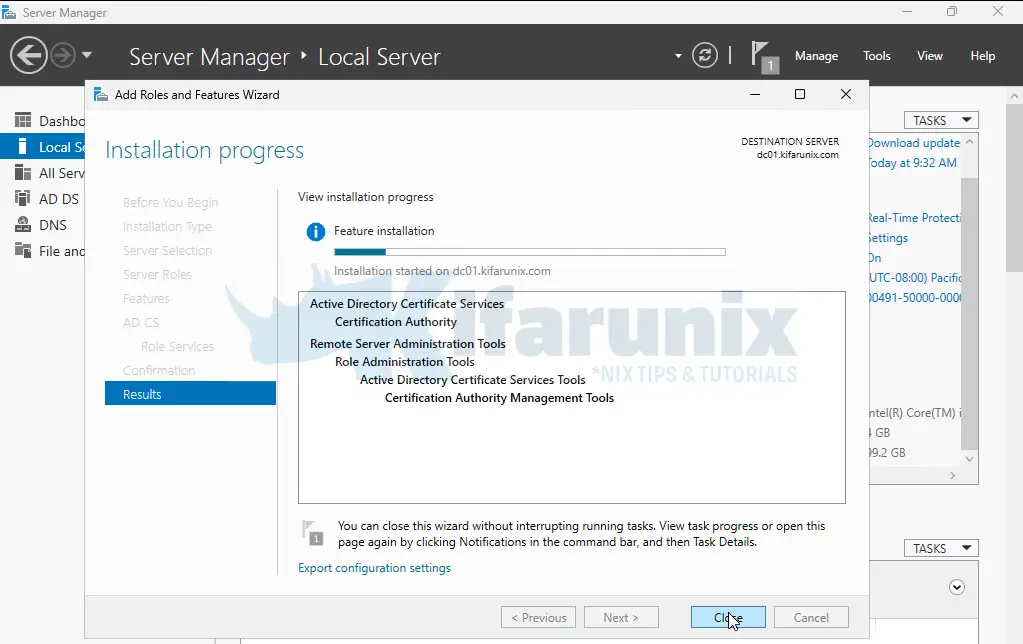
- Close the wizard when installation is done.
After the installation completes, you need to configure the Certification Authority (CA). Hence;
- Click the notification flag in Server Manager.
- Select “Configure Active Directory Certificate Services on the destination server”.
- Use the current admin credentials when prompted.
- On the Role Services page, check Certification Authority.
- For setup type, choose Enterprise CA.
- For CA type, select Root CA (Or choose Subordinate CA if you’re joining an existing CA hierarchy).
- On the Private Key page, choose Create a new private key.
- Set the Cryptographic Options:
- Key length: 2048 or higher
- Hash algorithm: SHA512 (for enhanced security)
- Name the CA e.g.,
example-CA.
- Complete the remaining steps and click Configure to finalize.
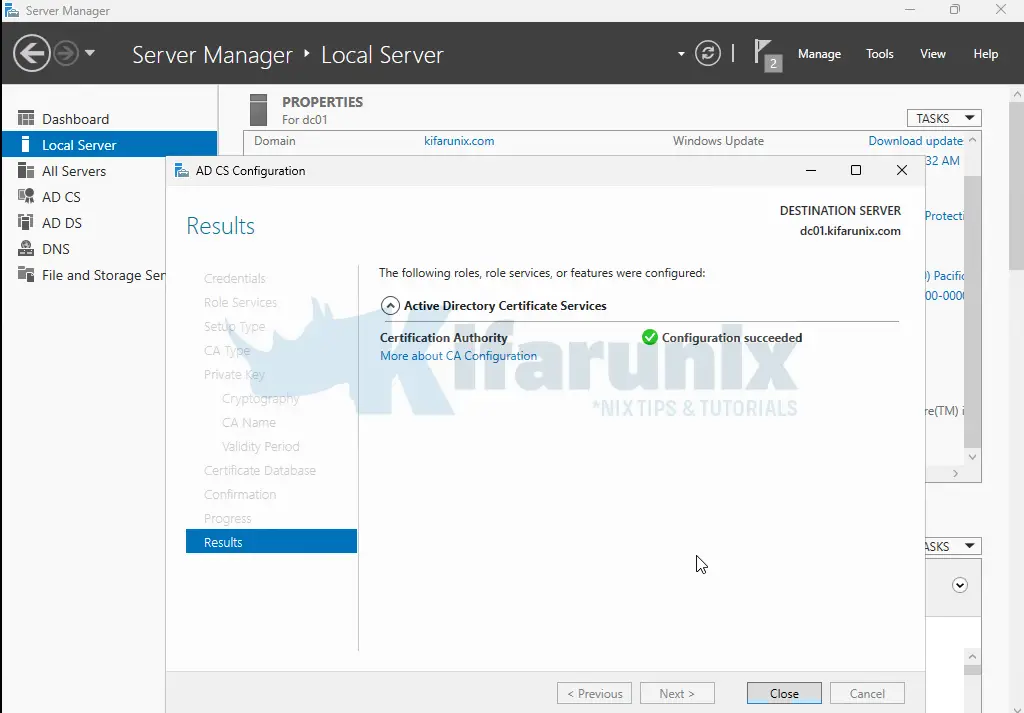
- Close the wizard.
Step 7: Configure LDAPS Certificate
To enable LDAPS (LDAP over SSL) on the Domain Controller, you’ll need to issue a certificate using the AD CS infrastructure set up in the previous step.
Duplicate the Certificate Template
This involves duplicating a certificate template, issuing it, and then requesting the certificate from the server. Thus:
- Open the Certification Authority console (Server Manager > Tools > Certificate Authority or
certsrv.msc). - Expand the CA just created
- Right-click Certificate Templates and select Manage.
- Locate the Kerberos Authentication template.
- Right-click it and choose Duplicate Template.
- In the Properties window:
- Under the General tab, set the name of the template e.g
LDAPS-Certificateand check Publish certificate in Active Directory. You can also update validity and renewal periods. - Under Request Handling, enable Allow private key to be exported.
- Under the Subject Name tab:
- Select Build from this Active Directory information.
- Choose Common Name for the format (or appropriate subject format).
- Enable DNS Name in the SAN options.
- Under the General tab, set the name of the template e.g
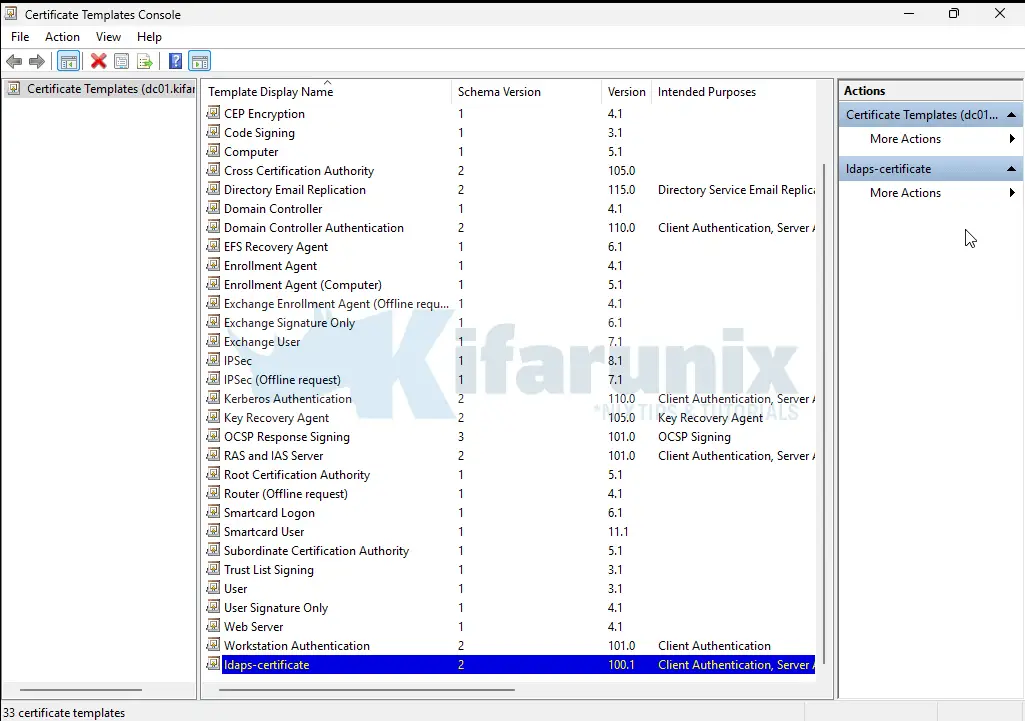
- Click OK to save the new template.
Issue the Certificate Template
Next, you have to issue the certificate. Hence:
- Return to the Certification Authority console.
- Right-click Certificate Templates > New > Certificate Template to Issue.
- Select the
LDAPS-Certificatetemplate you just created. - Click OK to publish it.
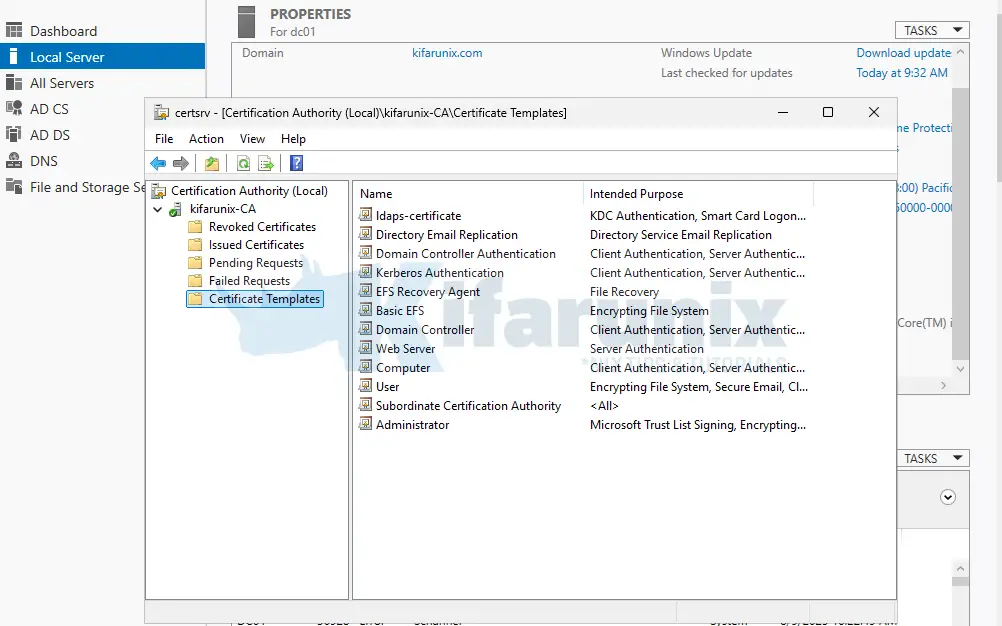
Request the Certificate (on the Domain Controller)
Next, you need to request the Certificate (on the Domain Controller). Hence:
- Open the MMC console (
mmc.exe). - Go to File > Add/Remove Snap-in.
- Select and add the Certificates snap-in and choose the Computer account (Local computer), and click Finish.
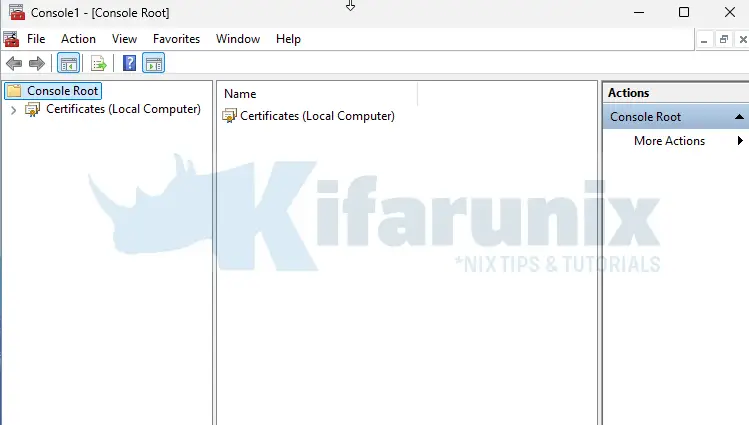
- Navigate to Certificates (Local Computer) > Personal > Certificates
- Right-click Certificates, go to All Tasks > Request New Certificate.
- In the wizard:
- Proceed to Active Directory Enrollment Policy.
- Select your certificate template.
- Click Finish.
- Once issued, the certificate will appear under Personal > Certificates and LDAPS will automatically start using it if the SAN includes the correct FQDN.
Step 8: Verify LDAPS Functionality
Once the certificate is installed, it’s essential to verify that LDAPS (LDAP over SSL) is working correctly on port 636.
To ensure the certificate is properly bound to the LDAP service:
- Reboot the server after the certificate enrollment.
- This allows the domain controller to bind the new certificate to the LDAP service on startup.
- Technically, a reboot isn’t always required as restarting the NTDS service can be enough but a full reboot ensures clean binding.
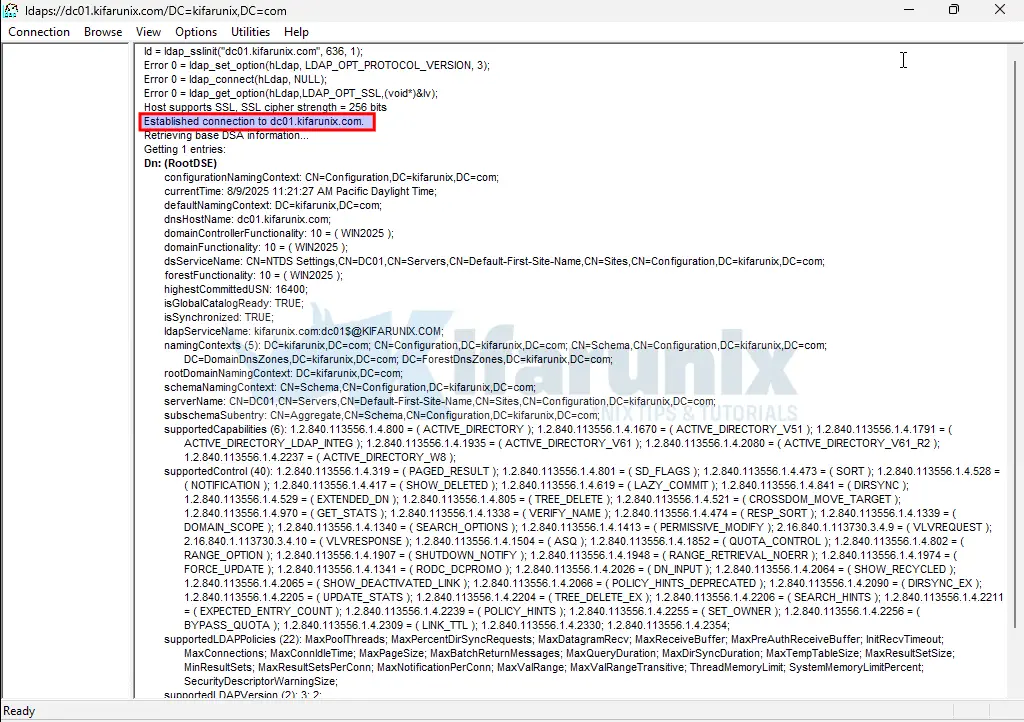
Once the server boots, you can verify LDAPS using ldp.exe, a built-in tool on Windows Server:
- Press
Win + R, typeldp.exe, and hit Enter. - In LDP, go to Connection > Connect.
- Enter:
- Server: the DC’s FQDN (e.g.,
dc01.example.com) - Port:
636 - Check: the SSL box
- Server: the DC’s FQDN (e.g.,
- Click OK to connect.
Successful Output:
- You should see a list of TLS handshake messages and “Established connection to…” without any errors.
- If there’s a certificate issue, LDP will display an error related to trust, handshake failure, or connection refusal.
Step 9: Open LDAPS Port on Firewall
To enable secure LDAP (LDAPS) communication, you need to allow inbound traffic on TCP port 636 through the Windows Defender Firewall. This allows LDAPS clients (like domain-joined machines, apps, or other servers) to securely connect to your LDAP server using SSL encryption.
There are a couple of ways to do this; through the:
- Windows Firewall GUI:
- Open Windows Defender Firewall with Advanced Security. You can simply launch by pressing
Win + R, typewf.msc, and press Enter. - Create a New Inbound Rule. In the left pane, click Inbound Rules.
- Then in the right pane, click New Rule…
- Select Rule Type. Choose Port and click Next.
- Specify Port and Protocol
- Select TCP
- Choose Specific local ports and enter:
636 - Click Next
- Choose the Action. Select Allow the connection and click Next
- Select the Profile. Choose all that apply: Domain, Private, and Public. (Select according to your environment)
- Name the Rule. Give the rule a meaningful name, such as:
Allow LDAPS Port 636 - Click Finish to apply the rule.
- Open Windows Defender Firewall with Advanced Security. You can simply launch by pressing
- via PowerShell/Command Prompt
- To open the port via PowerShell, launch PowerShell (as administrator) and run the command:
New-NetFirewallRule -DisplayName "Allow LDAPS Port 636" -Direction Inbound -Protocol TCP -LocalPort 636 -Action Allow - To open the port via CMD, run CMD (as administrator) and run the command:
netsh advfirewall firewall add rule name="Allow LDAPS Port 636" dir=in action=allow protocol=TCP localport=636
- To open the port via PowerShell, launch PowerShell (as administrator) and run the command:
Confirm the port is opened:
netstat -an | find ":636"Sample output;
TCP    0.0.0.0:636      0.0.0.0:0      LISTENING
TCP    [::]:636         [::]:0         LISTENING
Consider disabling external network access to LDAP (port 389) while keeping it open for internal, trusted networks ONLY.
Step 10: Test LDAPS Authentication from Clients
The next step is to verify that LDAPS authentication is working correctly from client systems. This involves ensuring secure connectivity to the directory server over port 636, validating the server’s SSL certificate, and confirming that user credentials can be authenticated successfully. This step ensures the integrity and security of your directory integration before moving the system into production or allowing broader access.
We will perform this verification using three different operating systems to ensure cross-platform compatibility:
- Ubuntu (Ubuntu 24.04 LTS)
- RHEL (Red Hat Enterprise Linux 9)
- Windows (Windows Server 2022)
For Ubuntu 24.04 systems, check how to Configure SSSD for Windows AD Authentication on Ubuntu 24.04.
Sample AD user login information on Ubuntu:
ssh [email protected]@10.184.10.33kifarunix@kifarunix-dev:~$ ssh [email protected]@10.184.10.33
[email protected]@10.184.10.33's password:
Creating directory '/home/[email protected]'.
Welcome to Ubuntu 24.04 LTS (GNU/Linux 6.8.0-63-generic x86_64)
* Documentation: https://help.ubuntu.com
* Management: https://landscape.canonical.com
* Support: https://ubuntu.com/pro
System information as of Mon Aug 18 04:16:48 PM UTC 2025
System load: 0.0 Processes: 156
Usage of /: 42.3% of 13.67GB Users logged in: 1
Memory usage: 10% IPv4 address for enp1s0: 10.184.10.33
Swap usage: 0%
Expanded Security Maintenance for Applications is not enabled.
176 updates can be applied immediately.
1 of these updates is a standard security update.
To see these additional updates run: apt list --upgradable
Enable ESM Apps to receive additional future security updates.
See https://ubuntu.com/esm or run: sudo pro status
1 updates could not be installed automatically. For more details,
see /var/log/unattended-upgrades/unattended-upgrades.log
*** System restart required ***
The programs included with the Ubuntu system are free software;
the exact distribution terms for each program are described in the
individual files in /usr/share/doc/*/copyright.
Ubuntu comes with ABSOLUTELY NO WARRANTY, to the extent permitted by
applicable law.
Last login: Mon Aug 18 16:15:37 2025 from 10.184.10.1
[email protected]@noble:~$ pwd
/home/[email protected]
[email protected]@noble:~$ id [email protected]
uid=71001108([email protected]) gid=71000513(domain [email protected]) groups=71000513(domain [email protected]),71001109([email protected])
[email protected]@noble:~$
For RHEL like OSes, check How to Join RHEL 8/9/10 to Windows AD with SSSD.
Sample AD user login information on RHEL:
kifarunix@kifarunix-dev:~$ ssh [email protected]
[email protected]'s password:
Register this system with Red Hat Insights: rhc connect

Example:
# rhc connect --activation-key  --organization

The rhc client and Red Hat Insights will enable analytics and additional
management capabilities on your system.
View your connected systems at https://console.redhat.com/insights

You can learn more about how to register your system
using rhc at https://red.ht/registration
Last login: Sat Aug 16 10:34:25 2025 from 10.184.10.1
a.smith@rhel10:~$ pwd
/home/a.smith
a.smith@rhel10:~$ id
uid=71001107(a.smith) gid=71000513(domain users) groups=71000513(domain users) context=unconfined_u:unconfined_r:unconfined_t:s0-s0:c0.c1023
Testing Windows Server 2022 AD Authentication:
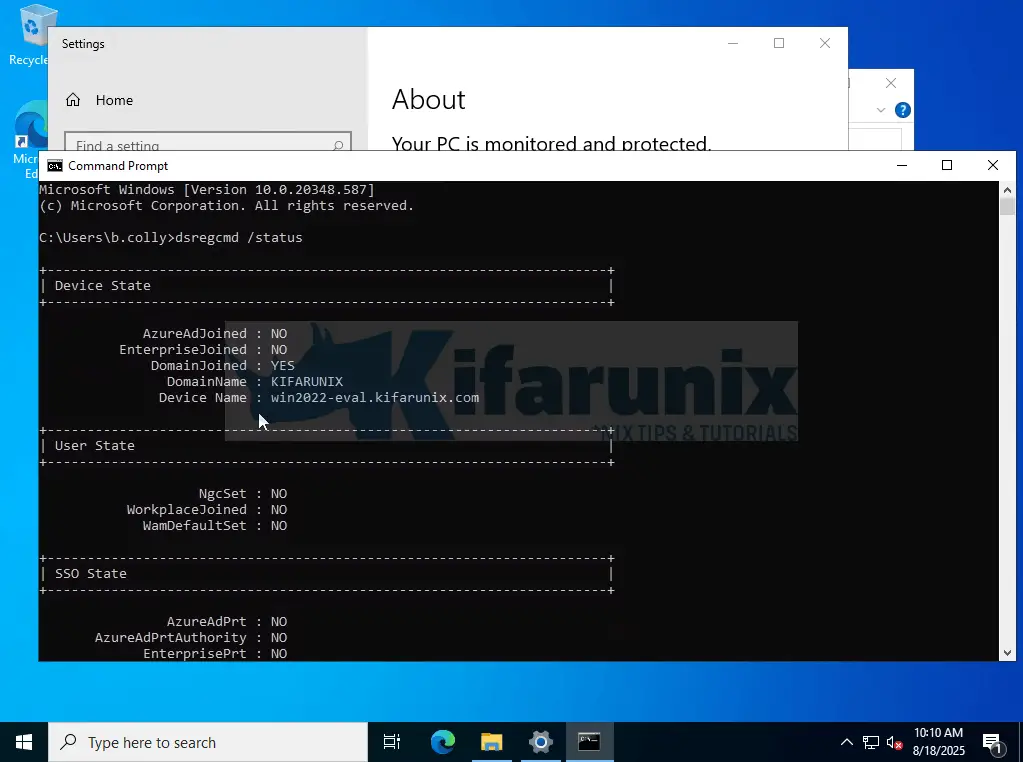
In our previous guides, we covered how to authenticated against LDAP using SSSD. You can check them out.
Additional Security Controls: LDAP Signing and Channel Binding
LDAP signing ensures LDAP traffic isn’t tampered with by requiring cryptographic signing, while LDAP channel binding links the secure TLS session to the authentication layer, blocking credential relay attacks.
Both features strengthen LDAP security beyond LDAPS, but may cause issues with older systems that don’t support them.
Before enforcing these controls:
- Audit your environment
- Test in a non-production setting
- Monitor for errors
- Roll out gradually to avoid disruptions
When used correctly, they greatly reduce your attack surface by securing both the integrity and trust of LDAP communications.
Conclusion
In this guide, you’ve learned how to set up Active Directory on Windows Server 2025 with LDAPS, securing LDAP communication over port 636. We covered installing AD DS, promoting your server to a domain controller, configuring AD CS for LDAPS, and creating users, groups, and a BIND DN account for secure app integration. You’ve also seen the difference between STARTTLS and LDAPS, with tips to enforce LDAP signing and limit port 389 access for better security. By testing LDAPS on platforms like Ubuntu, RHEL, and Windows, you ensure a robust setup. Keep your AD environment secure with regular certificate updates and monitoring.

