In this tutorial, you will learn how to set static routes via an interface/IP on CentOS/Ubuntu systems. In a network, a route is a path between networks. Routes through which a packet, in a packet-switching network, uses to travel from one network to the other is decided by a router in a specific network. So, how can one set static routes via an interface/IP on CentOS/Ubuntu systems?
Set Static Routes via an Interface/IP on CentOS/Ubuntu
Now, you may want to set static routes for one reason or another. This simple guide will show you how you can be able to set static routes via an interface/IP on CentOS/Ubuntu systems.
The following is the network architecture that we will use in this guide.
                                +-----------------+
                                | [ MAIN ROUTER ] |
           +--------------------+-------+---------+---------------+
           |                    | [ 11.12.13.1 ]  |               |
           +                    | [ 21.22.23.1 ]  |               |
           |                    +-----------------+               +
           |                                                      |
           |                                                      |
+----------+----------+                               +----------+---------+
|      ROUTER A       |                               |       ROUTER B     |
+   [ 11.12.13.10 ]   +                               +  [ 21.22.23.10 ]   +
|   [ 10.163.10.1 ]   |                               |  [ 172.16.10.1 ]   |
+----------+----------+                               +----------+---------+
           |                                                      |
           +                                                      +
           |                                                      |
           +                                                      +
           |                                                      |
 +---------+---------+                                  +---------+---------+
 |      [ LAN A ]    |                                  |     [ LAN B ]     |
 +  [ 10.163.10.10 ] +                                  +  [ 172.16.10.10 ] +
 +-------------------+                                  +-------------------+
So how can you set static routes via an interface/IP on CentOS/Ubuntu?
Considering an example network architecture above;
- Systems on Site A, LAN A cannot reach systems on Site B, LAN B. However, it can reach Site B Public router IP (21.22.23.10).
- Similarly, systems on Site B, LAN B cannot reach systems on Site A, LAN A, but it can reach Site A Public router IP (11.12.13.10).
- Main Router can only communicate with LAN B via Router B.
- Main Router can only communicate with LAN A via Router A
- Router A/LAN A can only communicate with LAN B via Main router.
- Router B/LAN B can only communicate with LAN A via Main router.
- Systems on LAN A can only know how to communicate to systems on LAN B via Router A.
- Systems on LAN B can only know how to communicate to systems on LAN A via Router B.
Therefore, for systems on Site A, LAN A and Site B, LAN B to communicate, static routes to each network need to be defined explicitly on the MAIN router’s routing table.
Note, all the routers we have in place are Linux based routers.
Add Static Routes to LAN A and LAN B on Main Router
Main router can only be able to communicate with LAN B (172.16.10.0/24) via Router B, 21.22.23.10. This will also means that, once the route to LAN B has added to the Main Router routing table, Router A and subsequently LAN A, can be able to communicate with LAN B.
The same applies to systems on LAN B. Once the route to LAN A is added to the Main Router, Router B and subsequently LAN B, can be able to communicate with LAN A.
There are different ways in which you can set static routes via an interface/IP on CentOS/Ubuntu systems;
- Using IP command
- Using NetworkManager (nmtui and nmcli)
- Using Netplan
- Via static configurations in /etc/network/interfaces file on Debian systems
- Via Static route definition in /etc/sysconfig/network-scripts/route-INT config on CentOS/RHEL systems
How to Set Static Routes using IP command
IP command can be used to set static routes on Linux system. Any configuration set using IP are temporary and can be lost by restarting network services, turning the interface off, or even system reboot.
As an example to show how to set static routes on Linux systems using IP command, consider our Main router above.
IP address configuration on Main Router;
ip -o -c -4 a | awk -v OFS='\t' '{print $1,$2,$3,$4}'1: lo inet 127.0.0.1/8
2: enp0s3 inet 10.0.2.15/24
3: enp0s8 inet 192.168.57.46/24
4: enp0s9 inet 11.12.13.1/24
5: enp0s10 inet 21.22.23.1/24Add static route to LAN B (172.16.10.0/24) via Router B on Main Router;
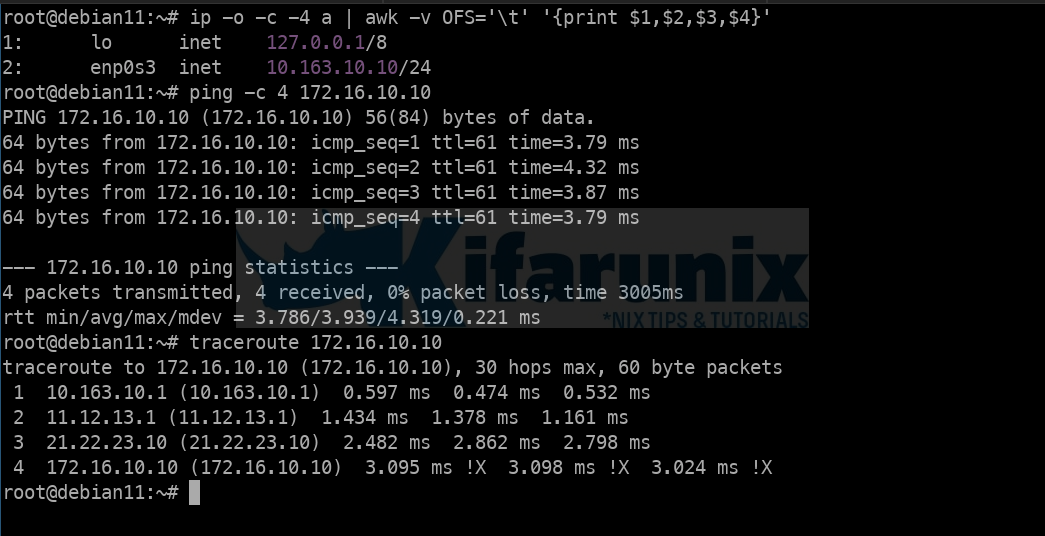
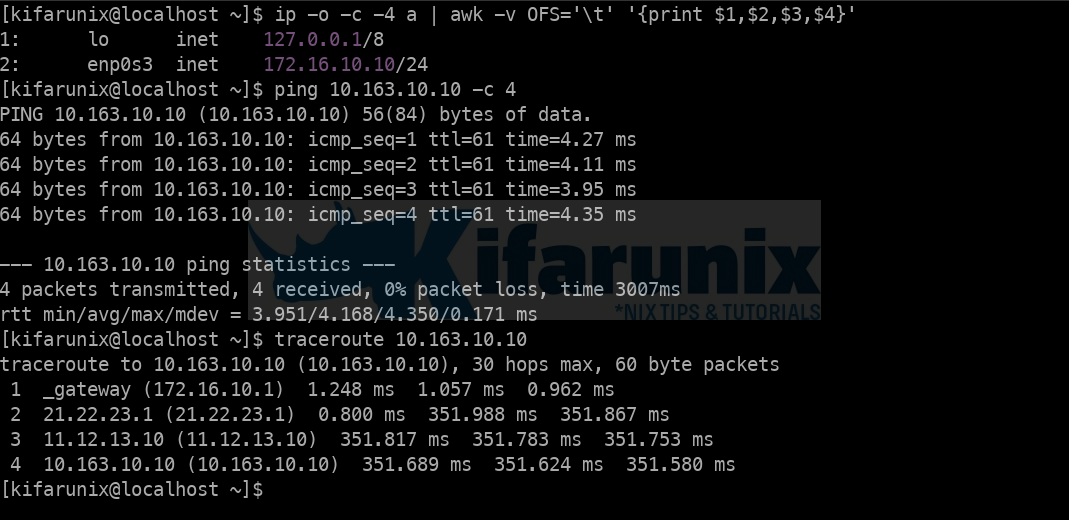
sudo ip route add 172.16.10.0/24 via 21.22.23.10Once you do this, LAN A, via Router A via Main Router via Router B can now connect to LAN B; See the output for ping, and traceroute commands below;
Add static route to LAN A (10.163.10.0/24) via Router A on Main Router;
sudo ip route add 10.163.10.0/24 via 11.12.13.10Similarly, once you do this, LAN B, via Router B via Main Router via Router A can now connect to LAN A; See the output for ping, and traceroute commands below;
You can list all the routes using the command below;
ip routeip rip route showip r sip r s <interface>And that is how to set static routes using IP command. You can delete the routes by just replacing add with delete in the above commands.
Set Static Routes using Using NetworkManager (nmtui and nmcli)
You can use the GUI NetworkManager or the command line nmcli tool to also set static routes to your specific network. The use of NetworkManger will require interfaces created and Managed using NetworkManager itself.
NetworkManager is installed by default on CentOS/RHEL distros.
On Ubuntu systems, you have to install it, sudo apt install network-manager.
You can launch NetworkManger GUI by just typing;
nmtuiIf it is not running, just start it, sudo systemctl start NetworkManager.
- When NetworkManager GUI tool launches, select Edit a connection and press Enter.
- Select and Interface to add the route via, for example, in our setup, to add a route to LAN B on Main Router, then select enp0s10 or enp0s9 for adding route to LAN A.
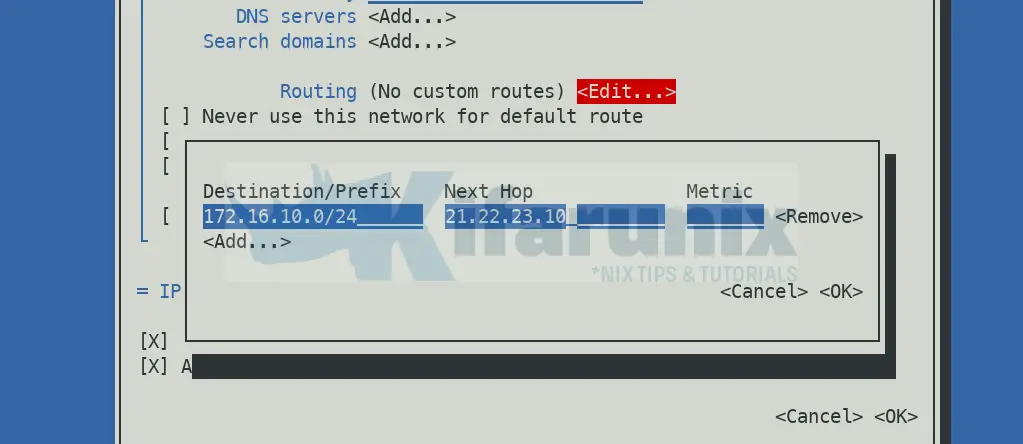
- Edit the interface and scroll down to Routing > Edit (to add custom routes) > Add;
- Click Ok > Ok and exit the TUI tool.
In desktop systems, you can edit the interface from network settings and add the route to your network.
In most cases, I would prefer the use of NMCLI command;
To use NMCLI command to set static routes;
First get the name of the connection associated with your interface;
nmcli con sSample output;
NAME    UUID                                  TYPE      DEVICE
...
...
enp0s9  9981365e-b8f2-4394-b508-1233b4f95315  ethernet  enp0s9
enp0s10  51292e4b-6b9a-4d07-9b89-3c6efea80f1d  ethernet  enp0s10
Now, modify the connection and add the route, for example to add route to LAN B;
sudo nmcli conection modify enp0s10 +ipv4.routes "172.16.10.0/24 21.22.23.10"To add route to LAN A;
sudo nmcli conection modify enp0s9 +ipv4.routes "10.163.10.0/24 11.12.13.10"You can then reload the connections to apply the changes;
sudo nmcli connection reloadSet Static Routes using Netplan
At least from Ubuntu 18.04 on-wards, network settings are now managed via netplan on command line. You can as well use the network setting wizard on desktop systems.
Edit the Netplan configuration file;
sudo vim /etc/netplan/00-installer-config.yamlAdd routes against each interface as follows;
# This is the network config written by 'subiquity'
network:
  version: 2
  ethernets:
    enp0s3:
      dhcp4: true
    enp0s8:
      dhcp4: false
      addresses:
              - 192.168.57.46/24
    enp0s9:
      dhcp4: false
      addresses:
              - 11.12.13.1/24
      routes:
              - to: 10.163.10.0/24
                via: 11.12.13.10
    enp0s10:
      dhcp4: false
      addresses:
              - 21.22.23.1/24
      routes:
              - to: 172.16.10.0/24
                via: 21.22.23.10
Save and apply the changes, (you can test with netplan try before saving the changes);
sudo netplan applyVia static configurations in /etc/network/interfaces file
On Debian systems, the network interface configs are defined in the /etc/network/interfaces file.
Thus, to add static routes, edit the file;
sudo vim /etc/network/interfaces
...
auto enp0s9
iface enp0s9 inet static
      address 10.11.12.1
      netmask 255.255.255.0
      up ip route add 10.163.10.0/24 via 11.12.13.10

auto enp0s10
iface enp0s10 inet static
      address 21.22.23.1
      netmask 255.255.255.0
      up ip route add 172.16.10.0/24 via 21.22.23.10
Save and exit the configuration.
Restart networking
sudo systemctl restart networking.service Via Static route definition in /etc/sysconfig/network-scripts/route-INT config on CentOS/RHEL systems
On CentOS and RHEL based systems, you can set static route by creating route configuration file and define the network and gateway to that network under /etc/sysconfig/network-scripts/. INT refers to the interface device name.
To use this approach, you need to install the old network-scripts package;
sudo yum install network-scriptssudo vim /etc/sysconfig/network-scripts/route-enp0s9ADDRESS0=172.16.10.0
NETMASK0=255.255.255.0
GATEWAY0=21.22.23.10It can also take the format;
172.16.10.0/24 via 21.22.23.10 dev enp0s10Save and exit the file.
Restart network service;
sudoc systemctl restart networkAnd that is how you can set static routes via an interface/IP on CentOS/Ubuntu systems.
Other Tutorials
Install and use NMCLI tool on Debian Linux
Connect to WiFi in Linux Using NMCLI command
Create Virtual/Secondary IP addresses on an Interface in Linux


