Follow through this guide to learn how to install MariaDB 10.8 on Ubuntu 20.04. MariaDB 10.8.2 is the current RC release version of MariaDB.
Install MariaDB 10.8 on Ubuntu 20.04
(DO NOT USE RC RELEASES IN PRODUCTION yet)
Install MariaDB APT Repositories
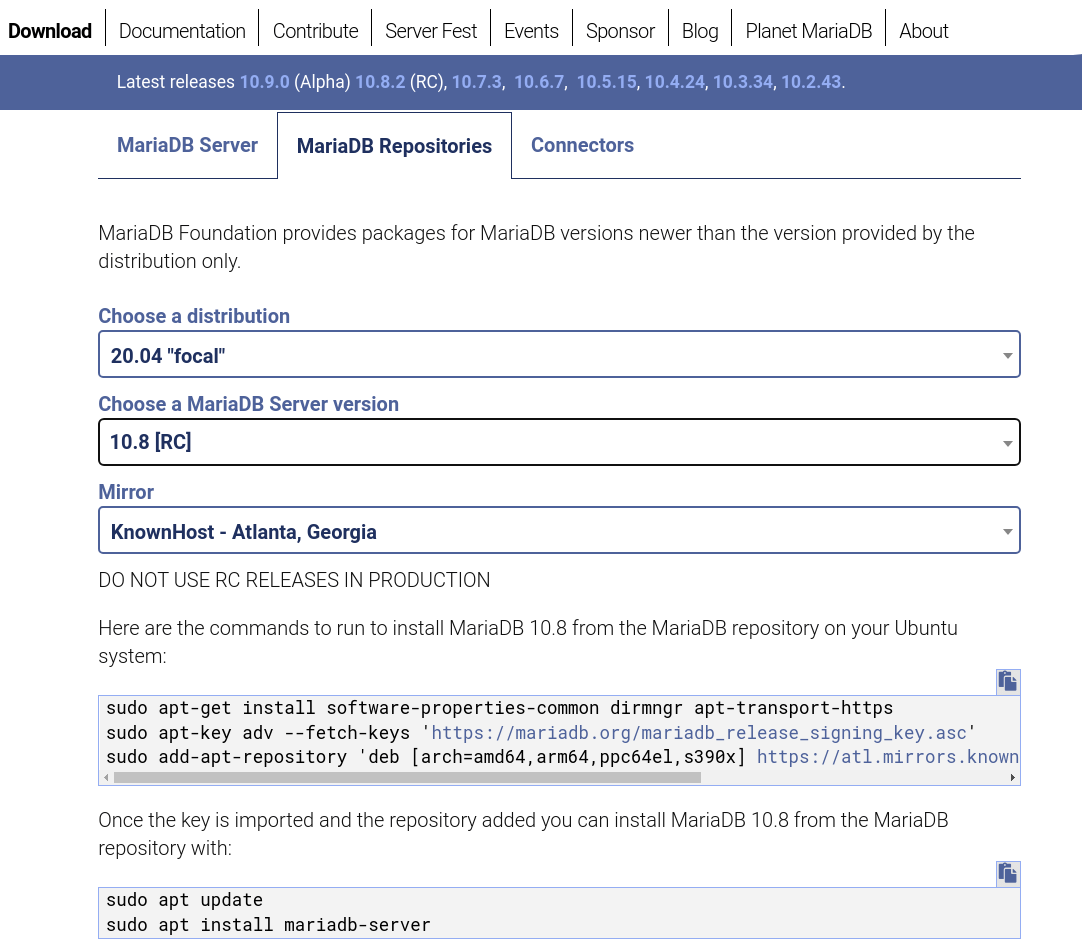
To install MariDB APT repos, head over to MariaDB repositories site to choose your mirrors.
Next, execute the commands below to install MariaDB APT repos on your Ubuntu 20.04 server.
apt updateapt install software-properties-common dirmngr apt-transport-https ca-certificates -ywget -qO- https://mariadb.org/mariadb_release_signing_key.asc |\
gpg --dearmor > /etc/apt/trusted.gpg.d/mariadb.gpgecho \
'deb [arch=amd64,arm64,ppc64el,s390x] https://atl.mirrors.knownhost.com/mariadb/repo/10.8/ubuntu focal main' > \
/etc/apt/sources.list.d/mariadb.listInstall MariaDB 10.8 on Ubuntu 20.04
Run system update and install MariaDB 10.8;
apt updateapt install mariadb-server mariadb-client -yYou can check the version of installed MariaDB using the command;
mysql -VSample output;
mysql Ver 15.1 Distrib 10.8.2-MariaDB, for debian-linux-gnu (x86_64) using readline 5.2Running MariaDB 10.8 on Ubuntu 20.04
Upon installation, MariaDB is started and enabled to run on system boot;
systemctl status mariadb
● mariadb.service - MariaDB 10.8.2 database server
     Loaded: loaded (/lib/systemd/system/mariadb.service; enabled; vendor preset: enabled)
    Drop-In: /etc/systemd/system/mariadb.service.d
             └─migrated-from-my.cnf-settings.conf
     Active: active (running) since Sat 2022-04-09 09:34:44 EAT; 8s ago
       Docs: man:mariadbd(8)
             https://mariadb.com/kb/en/library/systemd/
    Process: 39702 ExecStartPre=/usr/bin/install -m 755 -o mysql -g root -d /var/run/mysqld (code=exited, status=0/SUCCESS)
    Process: 39708 ExecStartPre=/bin/sh -c systemctl unset-environment _WSREP_START_POSITION (code=exited, status=0/SUCCESS)
    Process: 39718 ExecStartPre=/bin/sh -c [ ! -e /usr/bin/galera_recovery ] && VAR= ||   VAR=`cd /usr/bin/..; /usr/bin/galera_recovery`; [ $? -eq 0 ]   && systemctl set-e>
    Process: 39762 ExecStartPost=/bin/sh -c systemctl unset-environment _WSREP_START_POSITION (code=exited, status=0/SUCCESS)
    Process: 39764 ExecStartPost=/etc/mysql/debian-start (code=exited, status=0/SUCCESS)
   Main PID: 39750 (mariadbd)
     Status: "Taking your SQL requests now..."
      Tasks: 13 (limit: 2318)
     Memory: 58.5M
     CGroup: /system.slice/mariadb.service
             └─39750 /usr/sbin/mariadbd

Elb 09 09:34:44 ubuntu20.04 mariadbd[39750]: 2022-04-09  9:34:44 0 [Note] InnoDB: 10.8.2 started; log sequence number 42329; transaction id 14
Elb 09 09:34:44 ubuntu20.04 mariadbd[39750]: 2022-04-09  9:34:44 0 [Note] InnoDB: Loading buffer pool(s) from /var/lib/mysql/ib_buffer_pool
Elb 09 09:34:44 ubuntu20.04 mariadbd[39750]: 2022-04-09  9:34:44 0 [Note] Plugin 'FEEDBACK' is disabled.
Elb 09 09:34:44 ubuntu20.04 mariadbd[39750]: 2022-04-09  9:34:44 0 [Warning] You need to use --log-bin to make --expire-logs-days or --binlog-expire-logs-seconds work.
Elb 09 09:34:44 ubuntu20.04 mariadbd[39750]: 2022-04-09  9:34:44 0 [Note] InnoDB: Buffer pool(s) load completed at 220409  9:34:44
Elb 09 09:34:44 ubuntu20.04 mariadbd[39750]: 2022-04-09  9:34:44 0 [Note] Server socket created on IP: '127.0.0.1'.
Elb 09 09:34:44 ubuntu20.04 mariadbd[39750]: 2022-04-09  9:34:44 0 [Note] /usr/sbin/mariadbd: ready for connections.
Elb 09 09:34:44 ubuntu20.04 mariadbd[39750]: Version: '10.8.2-MariaDB-1:10.8.2+maria~focal'  socket: '/run/mysqld/mysqld.sock'  port: 3306  mariadb.org binary distribution
Elb 09 09:34:44 ubuntu20.04 systemd[1]: Started MariaDB 10.8.2 database server.
You can manage the service via systemctl command.
For example, to stop MariaDB service;
systemctl restart mariadbTo stop the service;
systemctl stop mariadbDisable the service from running on system boot;
systemctl disable mariadbSecuring MariaDB 10.8
MariaDB comes with a default security script, mysql_secure_installation that is used to improve the security of MariaDB installation by:
- Setting the password for root accounts (if need be).
- Disabling remote root login to the databases.
- Removing anonymous-user accounts.
- Removing the test database, which by default can be accessed by anonymous users.
Simply run the command below to launch the script.
mysql_secure_installationMariaDB Authentication
The new installations of MariaDB have two secure accounts are created during the installation.
The accounts are root@localhost and mysql@localhost.
Both accounts uses either of the unix_socket and the mysql_native_password authentication plugins.
unix_socket authentication plugin allows a system root user or a user with sudo rights to login as root@locahost to MariaDB database without a password.
With unix_socket authentication plugin, while being a root user, you can simply login by running either of the commands below;
mysqlor
mysql -u rootEven if you run, mysql -u root -p, and press ENTER for blank password, you will still login.
As a user with sudo rights, prefix the commands above with sudo.
Enable MariaDB password Authentication (this doesnt disable passwordless authentication for root and sudo user)
The mysql_native_password plugin is used as a failover for the unix_socket plugin. However, the account has an invalid password. To enable password authentication, you need to login to MariaDB as root user as shown above and set the password.
mysqlset password = password("P@sSw0Rd123");flush privileges;
quitThis re-enables the MariaDB password authentication and hence, you can now login as non root or non sudo user.
[email protected]:~$ mysql -u root -p
Enter password: ENTER PASSWORD
Welcome to the MariaDB monitor. Commands end with ; or \g.
Your MariaDB connection id is 37
Server version: 10.8.2-MariaDB-1:10.8.2+maria~focal mariadb.org binary distribution
Copyright (c) 2000, 2018, Oracle, MariaDB Corporation Ab and others.
Type 'help;' or '\h' for help. Type '\c' to clear the current input statement.
MariaDB [(none)]>
Similarly, you can login as mysql user;
sudo -u mysql mysqlSet Native Password Authentication Method as Default
To completely disable unix_socket authentication plugin and instead use the msqyl_native_password authentication method, simply login to MariaDB and change the authentication plugin for root user.
mysqlALTER USER root@localhost IDENTIFIED VIA mysql_native_password USING PASSWORD("MyPQQSSword");flush privileges;
quitNext time you try to login without specifying the password, login will fail.
sudo mysql -u rootERROR 1045 (28000): Access denied for user 'root'@'localhost' (using password: NO)That marks the end of our guide on how to install MariaDB 10.8 on Ubuntu.
Install MariaDB 10.x on Rocky Linux 8


