In this blog post, I’ll walk you through a flawless step-by-step guide on how to upgrade OpenShift Cluster, from pre-update preparation to post-upgrade validation. By the end, you’ll have the confidence and expertise to handle any OpenShift update scenario. Managing OpenShift cluster upgrades doesn’t have to be a stressful, downtime-heavy process. Whether you’re upgrading a single development cluster or orchestrating upgrades across dozens of production environments, mastering the step-by-step process is what separates confident administrators from those who dread update day.
Table of Contents
How to Upgrade OpenShift Cluster
OpenShift Container Platform (OCP) 4 revolutionized how cluster upgrades are handled. Unlike traditional upgrade processes that required extensive downtime and manual intervention, OpenShift 4’s OTA (Over-the-air) updates system enables seamless updates with minimal service disruption. This isn’t just convenient – it’s essential for maintaining security, performance, and compliance in today’s fast-paced development environment.
The Business Impact of Proper Upgrade Management
Poor update practices can cost organizations thousands in downtime and lost productivity. However, with the right approach, you can:
- Reduce security vulnerabilities by staying current with patches
- Minimize planned downtime through rolling updates
- Improve application performance with the latest optimizations
- Maintain compliance with organizational and regulatory requirements.
Understanding OpenShift’s Over-the-Air Update System
OpenShift’s Over-the-Air (OTA) update system revolutionizes how Kubernetes clusters receive updates by providing automated, tested, and version-aware upgrade paths — eliminating the need for manual updates and compatibility checks.
At the core of this system is the OpenShift Update Service (OSUS), which powers the OTA mechanism. Maintained by Red Hat, OSUS serves as a public, hosted service that provides OpenShift clusters with a dynamic update graph, a map of valid upgrade paths between OpenShift Container Platform (OCP) releases. This graph is built from official release images and continuously maintained to ensure that only verified and stable upgrades are offered.
By default, OpenShift clusters are configured to connect to the public OSUS instance. When a cluster checks for updates, OSUS responds with a curated list of valid upgrade targets based on the current version, ensuring safe and reliable cluster lifecycle management.
It is also good to note that starting with OpenShift 4.10, the OTA system requires a persistent connection to the Internet.
How OTA Works Behind the Scenes
The OTA update system in OpenShift follows a client-server architecture where:
- Server-Side (Red Hat Infrastructure):
- Quay.io container registry hosts OpenShift release images used for cluster updates.
- console.redhat.com provides access to the OpenShift Update Service (OSUS), which serves a dynamic update graph via the Cincinnati protocol.
- Telemetry data collected from clusters informs Red Hat about real-world usage and helps determine safe, tested upgrade paths by modifying or blocking edges in the update graph.
- Client-Side (Cluster Components):
- Cluster Version Operator (CVO): Continuously monitors for updates by querying OSUS. When an update is approved, it pulls the release payload and orchestrates the rollout. It also monitors update progress and handles failures via resynchronization. It coordinates with MCO and OLM for node updates.
- Machine Config Operator (MCO): Applies changes at the node level, such as OS updates, kernel patches, and configuration changes across worker and control plane nodes.
- Operator Lifecycle Manager (OLM): Manages lifecycle and upgrades for optional Operators installed from OperatorHub, ensuring they are compatible with the current OpenShift version.
This architecture ensures that updates are not only available but also tested and verified for your specific cluster configuration.
The 5-Phase Mastery Steps for OpenShift Updates
Before diving into the technical details, let me share the high-level steps that has made every update I’ve executed successful:
- Phase 1: Strategic Planning & Channel Selection
- Phase 2: Pre-Update Assessment & Preparation
- Phase 3: Execution & Monitoring
- Phase 4: Validation & Verification
- Phase 5: Documentation & Optimization
Each phase builds upon the previous one, creating a systematic approach that eliminates guesswork and reduces risk. Let’s master each phase.
Phase 1: Strategic Planning & Channel Selection
One of the most critical decisions in OpenShift upgrade management is selecting the appropriate update channel. Each channel serves different use cases and risk tolerances.
There are four update channels in OpenShift. An update channel name is made of different parts:
- Tier: Indicates the update strategy and stability level:
- release candidate: Early-access, unsupported versions for testing (e.g., candidate).
- fast: Delivers updates as soon as they reach general availability (GA).
- stable: Provides thoroughly tested updates, delayed for stability.
- extended update support (eus): Supports extended maintenance phases, typically for even-numbered minor versions.
- Major Version: The major release of OpenShift (e.g., 4 for OpenShift 4.x).
- Minor Version: The target minor release (e.g., .17 for 4.17 or .18 for 4.18).
Understanding the four OpenShift update channels:
- Candidate Channel (candidate-4.x): The candidate channel provides access to the latest features and fixes but comes with higher risk. Use this channel when you need to test upcoming features or contribute to OpenShift’s development process.
- Fast Channel (fast-4.x): The fast channel receives updates as soon as Red Hat declares them generally available. While supported, these updates haven’t undergone the additional validation of the stable channel.
- Stable Channel (stable-4.x): The stable channel is where most production clusters should operate. Updates here have been tested not just in labs but in real operational environments through the fast channel.
- Extended Update Support (EUS) Channel (eus-4.x): EUS channels apply to even-numbered minor releases (4.10, 4.12, 4.14, 4.16, 4.18) and provide extended support for organizations that can’t update frequently.
Based on my experience managing enterprise OpenShift environments, here are my recommendations for channel selection:
- Production workloads: Always use stable-4.x.
- Pre-production testing: Use fast-4.x to catch issues before they hit production.
- Development environments: Candidate or fast channels for early access to features.
- Regulated environments: Consider EUS channels for extended support lifecycles.
Phase 2: Pre-Update Assessment & Preparation
This phase is where most administrators either set themselves up for success or create problems they’ll face during the update. Here’s my systematic approach:
Step 1: Cluster Health Assessment
Before initiating any cluster update, proper preparation is crucial:
Review the cluster state:
oc get clusterversionNAME VERSION AVAILABLE PROGRESSING SINCE STATUS
version 4.17.14 True False 97d Cluster version is 4.17.14
Check the state of the cluster operators:
oc get clusteroperatorsNAME VERSION AVAILABLE PROGRESSING DEGRADED SINCE MESSAGE
authentication 4.17.14 True False False 2d13h
baremetal 4.17.14 True False False 97d
cloud-controller-manager 4.17.14 True False False 97d
cloud-credential 4.17.14 True False False 97d
cluster-autoscaler 4.17.14 True False False 97d
config-operator 4.17.14 True False False 97d
console 4.17.14 True False False 2d18h
control-plane-machine-set 4.17.14 True False False 97d
csi-snapshot-controller 4.17.14 True False False 2d18h
dns 4.17.14 True False False 2d18h
etcd 4.17.14 True False False 95d
image-registry 4.17.14 True False False 2d18h
ingress 4.17.14 True False False 2d18h
insights 4.17.14 True False False 6d6h
kube-apiserver 4.17.14 True False False 97d
kube-controller-manager 4.17.14 True False False 97d
kube-scheduler 4.17.14 True False False 97d
kube-storage-version-migrator 4.17.14 True False False 2d18h
machine-api 4.17.14 True False False 97d
machine-approver 4.17.14 True False False 97d
machine-config 4.17.14 True False False 97d
marketplace 4.17.14 True False False 97d
monitoring 4.17.14 True False False 6d6h
network 4.17.14 True False False 97d
node-tuning 4.17.14 True False False 37d
openshift-apiserver 4.17.14 True False False 37d
openshift-controller-manager 4.17.14 True False False 45d
openshift-samples 4.17.14 True False False 97d
operator-lifecycle-manager 4.17.14 True False False 97d
operator-lifecycle-manager-catalog 4.17.14 True False False 97d
operator-lifecycle-manager-packageserver 4.17.14 True False False 2d18h
service-ca 4.17.14 True False False 97d
storage 4.17.14 True False False 97d
Ensure AVAILABLE=True, PROGRESSING=False, DEGRADED=False for all operators (e.g., authentication, etcd, kube-apiserver).
A degraded cluster can fail during upgrades.
If an operator is degraded, run oc describe clusteroperator <name> and resolve the issues (e.g., resource shortages) or contact Red Hat Support.
Similarly, Check for alerts and warning events in the cluster. Alerts signal real-time issues detected by OpenShift’s monitoring system (e.g., Prometheus), which could block the Cluster Version Operator (CVO) from proceeding with the upgrade. Warning Events provide a historical view of issues across namespaces, revealing problems like pod failures, node issues, or certificate errors that might not yet trigger alerts but could impact the upgrade.
You can check for alerts in the web console (Observe > Alerting) or from the CLI;
oc get events -A --field-selector type=WarningYou can also sort by time:
oc get events -A --field-selector type=Warning --sort-by=".lastTimestamp" Resolve any critical issue before you can proceed.
Step 2: Check for Deprecated API usage
Remember, OpenShift Container Platform is built on Kubernetes foundation, sharing the underlying technology. Each OpenShift version corresponds to a specific Kubernetes version:
| OpenShift Version | Kubernetes Version |
|---|---|
| 4.18 | 1.31 |
| 4.17 | 1.30 |
| 4.16 | 1.29 |
| 4.15 | 1.28 |
Specific Kubernetes version included with OpenShift can be found in the About this release section of the Release Notes.
You can also get your current version of OpenShift and the underlying Kubernetes version using oc version command.
oc versionSee sample command output below;
Client Version: 4.17.14
Kustomize Version: v5.0.4-0.20230601165947-6ce0bf390ce3
Server Version: 4.17.14
Kubernetes Version: v1.30.7
When upgrading OpenShift, deprecated Kubernetes APIs may be removed, breaking existing workloads. Therefore, identifying deprecated APIs helps you proactively fix issues before they cause outages during or after the upgrade.
Kubernetes categorizes APIs based on maturity:
- Alpha (
v1alpha1) – Experimental, may change or be removed. - Beta (
v1beta1) – Pre-release, may still change. - Stable (
v1) – Generally available, long-term support.
Deprecation Timelines:
- Beta APIs are deprecated when stable version is released.
- They are removed after 3 releases from deprecation.
OpenShift includes two alerts that are triggered when a workload uses a deprecated API version:
APIRemovedInNextReleaseInUse: Triggered if the API will be removed in the next standard releaseAPIRemovedInNextEUSReleaseInUse: Triggered if the API will be removed in the next Extended Update Support (EUS) release
These alerts, however:
- Do not indicate which specific workloads are using the APIs.
- Are intentionally not overly sensitive to avoid excessive alerting in production environments.
To accurately identify deprecated API usage by workload, use the APIRequestCount API. You must have access to the cluster as a user with the cluster-admin role in order to use use the APIRequestCount API.
To identify deprecated APIs, run the command below;
oc get apirequestcounts | awk '{if(NF==4){print $0}}'Sample output;
NAME                                                                               REMOVEDINRELEASE   REQUESTSINCURRENTHOUR   REQUESTSINLAST24H
customresourcedefinitions.v1beta1.apiextensions.k8s.io                             1.22               0                       0
flowschemas.v1beta1.flowcontrol.apiserver.k8s.io                                   1.26               0                       0
prioritylevelconfigurations.v1beta1.flowcontrol.apiserver.k8s.io                   1.26               0                       0
A blank REMOVEDINRELEASE column indicates that the current API version will be kept in future releases.
You can even use JSONPATH output filter to filter for deprecated APIs:
FILTER='{range .items[?(@.status.removedInRelease!="")]}{.status.removedInRelease}{"\t"}{.status.requestCount}{"\t"}{.metadata.name}{"\n"}{end}'oc get apirequestcounts -o jsonpath="${FILTER}" | column -t -N "RemovedInRelease,RequestCount,Name"Sample output;
RemovedInRelease  RequestCount  Name
1.22              0             customresourcedefinitions.v1beta1.apiextensions.k8s.io
1.26              0             flowschemas.v1beta1.flowcontrol.apiserver.k8s.io
1.26              0             prioritylevelconfigurations.v1beta1.flowcontrol.apiserver.k8s.io
So, we have three resources with deprecation alerts as you can see in the output above. In order to identify which workloads are using the API, you can examine the APIRequestCount resource for a given API version.
From the output above, you can see that both the REQUESTSINCURRENTHOUR and REQUESTSINLAST24H shows 0 count for all the resources, indicating that these deprecated APIs are not in use.
You can run the following command and examine the username and userAgent fields to help identify the workloads that are using the API:
oc get apirequestcounts <resource>.<version>.<group> -o yamlLet’s take for example, customresourcedefinitions.v1beta1.apiextensions.k8s.io;
oc get apirequestcounts customresourcedefinitions.v1beta1.apiextensions.k8s.io -o yamlTo extract the username and userAgent values from an APIRequestCount resource:
oc get apirequestcounts customresourcedefinitions.v1beta1.apiextensions.k8s.io \
-o jsonpath='{range .status.currentHour..byUser[*]}{..byVerb[*].verb}{","}{.username}{","}{.userAgent}{"\n"}{end}'   | sort -k 2 -t, -u | column -t -s, -NVERBS,USERNAME,USERAGENT
This will give an empty output if the resource is not in use. Otherwise if there an hit, then you can safely ignore certain system and operator-related API usage entries when reviewing deprecated API reports. These entries often come from core controllers or installed operators (e.g., GitOps, Pipelines, Velero) that access APIs as part of normal operations or upgrade paths:
- Garbage Collector & Namespace Controller:
system:serviceaccount:kube-system:generic-garbage-collectorsystem:serviceaccount:kube-system:namespace-controller
- Policy Enforcement Controllers:
system:kube-controller-managersystem:cluster-policy-controller
- OpenShift GitOps (if installed):
system:serviceaccount:openshift-gitops:openshift-gitops-argocd-application-controller
- OpenShift Pipelines (if installed):
- User agent:
openshift-pipelines-operator
- User agent:
- Velero (in OSD/ROSA or if installed):
system:serviceaccount:openshift-velero:velerosystem:serviceaccount:openshift-oadp:velero
Step 3: Perform etcd Backup [Critical!]
When updating your OpenShift Container Platform cluster, etcd backup is absolutely the most critical step you cannot afford to skip. etcd serves as the key-value store that persists the state of all resource objects in your cluster. Without a proper backup, a failed update could leave you with an unrecoverable cluster.
Also, it is good to note that your etcd backup must be taken from the exact same z-stream release you’re running. For example, if you’re updating from OpenShift 4.17.14, your backup must be from that exact 4.17.14 version. This compatibility requirement makes pre-update backups absolutely essential for recovery scenarios.
Some other key considerations to make in regards to etcd backup include:
- Always before cluster updates – This is non-negotiable
- Run the backup during non-peak hours – etcd snapshots have high I/O costs
To be on the safe side, always have cronjobs to take etcd backup and store them outside the cluster nodes.
So, how to take etcd backup? Ensure you have cluster admin access before you can proceed.
Check for Cluster-Wide Proxy
oc get proxy cluster -o yaml
Look for these fields in the output:
httpProxyhttpsProxynoProxy
If ANY of these fields have values set, the proxy is enabled and you’ll need the proxy configuration in step below.
Debug into one of the master nodes. CRITICAL: Only backup from ONE control plane host. Do not take backups from multiple control plane nodes.
oc debug node/<control_plane_node_name>Change root directory;
chroot /hostConfigure Proxy (if enabled):
export HTTP_PROXY=http://<your_proxy.DOMAIN>:PORT
export HTTPS_PROXY=https://<your_proxy.DOMAIN>:PORT
export NO_PROXY=<DOMAIN>
Run backup script;
/usr/local/bin/cluster-backup.sh /home/core/etcd-201326052025The directory etcd-201326052025 will be created if not exists already.
Sample command output;
Certificate /etc/kubernetes/static-pod-certs/configmaps/etcd-all-bundles/server-ca-bundle.crt is missing. Checking in different directory
Certificate /etc/kubernetes/static-pod-resources/etcd-certs/configmaps/etcd-all-bundles/server-ca-bundle.crt found!
found latest kube-apiserver: /etc/kubernetes/static-pod-resources/kube-apiserver-pod-29
found latest kube-controller-manager: /etc/kubernetes/static-pod-resources/kube-controller-manager-pod-5
found latest kube-scheduler: /etc/kubernetes/static-pod-resources/kube-scheduler-pod-7
found latest etcd: /etc/kubernetes/static-pod-resources/etcd-pod-8
26fc6426ab165b501b42b2700a233c60f9af65f45bf0422baa908e8f9a6e06a0
etcdctl version: 3.5.16
API version: 3.5
{"level":"info","ts":"2025-05-26T17:14:36.389564Z","caller":"snapshot/v3_snapshot.go:65","msg":"created temporary db file","path":"/home/core/etcd-201326052025/snapshot_2025-05-26_171434.db.part"}
{"level":"info","ts":"2025-05-26T17:14:36.396125Z","logger":"client","caller":"[email protected]/maintenance.go:212","msg":"opened snapshot stream; downloading"}
{"level":"info","ts":"2025-05-26T17:14:36.396190Z","caller":"snapshot/v3_snapshot.go:73","msg":"fetching snapshot","endpoint":"https://192.168.122.210:2379"}
{"level":"info","ts":"2025-05-26T17:14:37.372149Z","logger":"client","caller":"[email protected]/maintenance.go:220","msg":"completed snapshot read; closing"}
{"level":"info","ts":"2025-05-26T17:14:37.386813Z","caller":"snapshot/v3_snapshot.go:88","msg":"fetched snapshot","endpoint":"https://192.168.122.210:2379","size":"125 MB","took":"now"}
{"level":"info","ts":"2025-05-26T17:14:37.386943Z","caller":"snapshot/v3_snapshot.go:97","msg":"saved","path":"/home/core/etcd-201326052025/snapshot_2025-05-26_171434.db"}
Snapshot saved at /home/core/etcd-201326052025/snapshot_2025-05-26_171434.db
{"hash":2799967548,"revision":34239769,"totalKey":8886,"totalSize":125427712}
snapshot db and kube resources are successfully saved to /home/core/etcd-201326052025
The backup process creates two critical files:
snapshot_<timestamp>.db– The etcd snapshot containing all cluster statestatic_kuberesources_<timestamp>.tar.gz– Static pod resources and encryption keys (if etcd encryption is enabled)
You need then to store the backup, out of the cluster in a safer location where you can easily retrieve when needed.
chown -R core: /home/core/etcd-201326052025Copy the backup data out of the master node:
scp -r -i <ssh-key-path> core@<master-node-IP>:<etcd-backup-file> <backup-location>Step 4: Pause Machine Health Checks
Before upgrading the cluster, pause all Machine Health Check resources. This prevents the system from mistakenly identifying temporarily unavailable worker nodes as unhealthy and rebooting them during the upgrade process.
You can begin by listing MHC resources:
oc get machinehealthchecks.machine.openshift.io -n openshift-machine-apiYou can then pause the MHC by adding the cluster.x-k8s.io/paused annotation (Replace <MHC> with the name of the MHC to be paused):
oc annotate machinehealthcheck -n openshift-machine-api <MHC> cluster.x-k8s.io/paused=""For example:
oc annotate machinehealthchecks.machine.openshift.io -n openshift-machine-api machine-api-termination-handler cluster.x-k8s.io/paused=""You can confirm the same using the command below under the metadata.annotations.
oc get machinehealthchecks.machine.openshift.io -n openshift-machine-api machine-api-termination-handler -o yamlAfter upgrade, you can un-pause by removing the annotation:
oc annotate machinehealthchecks.machine.openshift.io -n openshift-machine-api machine-api-termination-handler cluster.x-k8s.io/paused-Step 5: Check Pod Disruption Budgets (PDBs)
A Pod Disruption Budget (PDB) helps control how many pods can be down during maintenance like upgrades or draining nodes. It’s a safety check to avoid too much downtime.
Some PDBs are too strict and can block the upgrade, especially if they require a pod to always be running especially on a single-node pool.
Therefore, list all PDBs in the cluster:
oc get pdb -ALook for PDBs where minAvailable is set high — these are more likely to cause problems.
Relax the strict PDBs (temporarily), for example:
oc patch pdb/<pdb-name> -n <namespace> --type merge -p '{"spec":{"minAvailable":0}}'Be sure to write down any changes you make! After the upgrade, revert the PDBs back to their original values to restore high availability settings.
Step 6: Verify Resource Availability
Resource shortages can fail operators or nodes. Check node resources:
oc describe nodes- Ensure sufficient CPU, memory, and storage.
- Scale down non-critical workloads if needed.
Step 7: Verify update channel settings
You can get the update channel from the dashboard or from the cli.
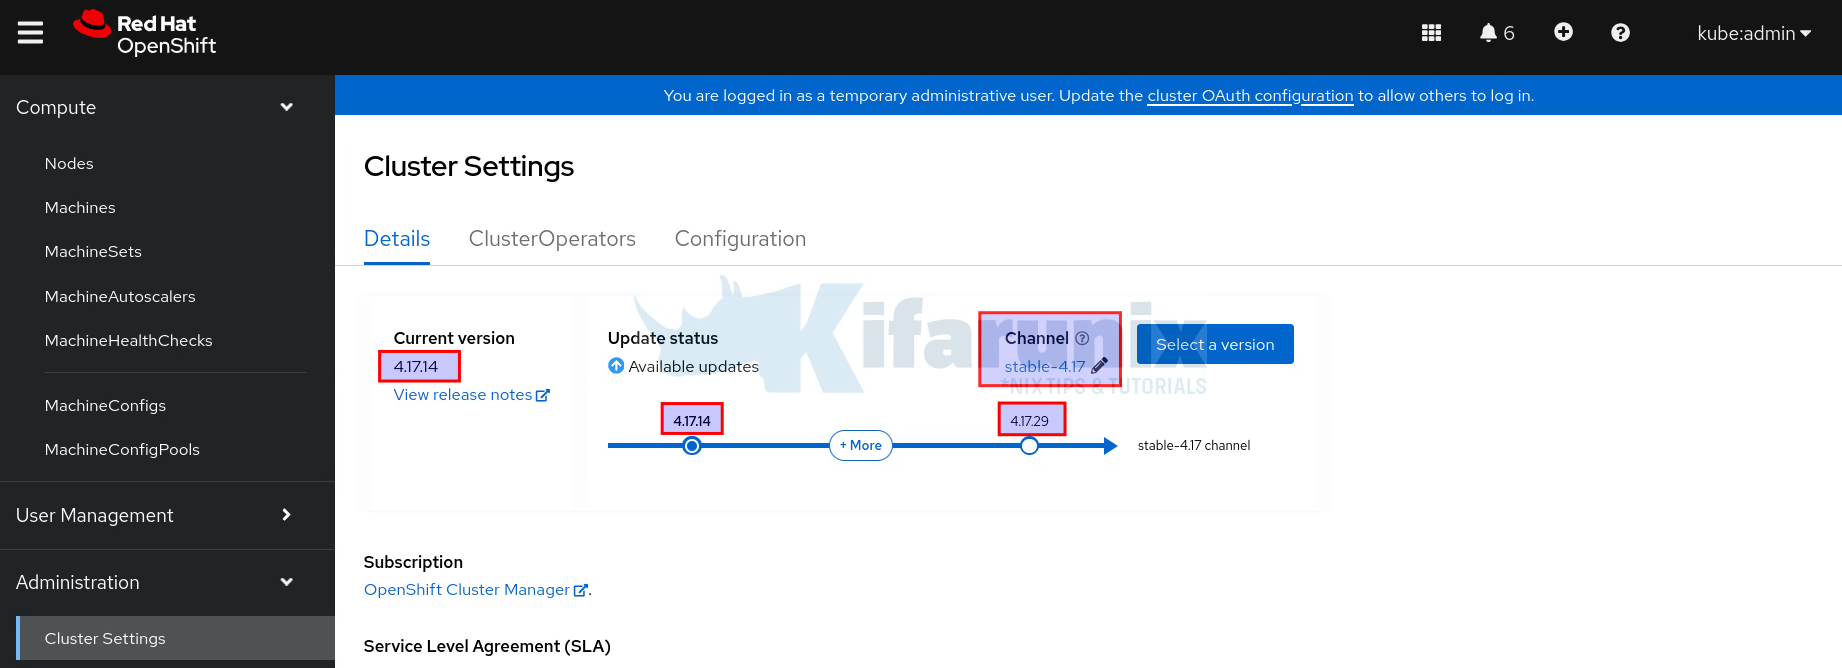
On the web console, navigate to Administrator > Administration > Cluster settings > Details.
As you can see in the screenshot below, my current OpenShift version is 4.17.14 and the latest available version I can upgrade to on the stable-4.17 channel is version 4.17.29.
For the disconnected clusters that are air-gapped and have no access to Internet to be able to fetch the upgrade path graph, you can utilize the Red Hat OpenShift Container Platform Update Graph to view the update path for your cluster.
To retrieve the current version and available OpenShift updates based on the currently selected channel from the cli, run the command:
oc adm upgradeSample output;
Cluster version is 4.17.14

Upstream is unset, so the cluster will use an appropriate default.
Channel: stable-4.17

Recommended updates:

  VERSION     IMAGE
  4.17.29     quay.io/openshift-release-dev/ocp-release@sha256:7124b2338d76634df82f50db70418e87f9bdcc49d20c93e81fedea55193cbcc5
  4.17.28     quay.io/openshift-release-dev/ocp-release@sha256:6d54694549b517be359578229f690af58ed425c0baa8b8803d8b98e582ecf576
  4.17.27     quay.io/openshift-release-dev/ocp-release@sha256:3d77e2b05af596df029ad4c3f331dd12de86d3ddb2b938394e220ee3096faf2d
  4.17.26     quay.io/openshift-release-dev/ocp-release@sha256:21d6a79a2f8deaa8fef92dd434b07645266f1ec84c70da7118467800efc59ed4
  4.17.25     quay.io/openshift-release-dev/ocp-release@sha256:a1aa63c1645d904f06996e7fff8b6bf9defbaecff154e1b9e1cd574443061e8d
  4.17.24     quay.io/openshift-release-dev/ocp-release@sha256:0f4bf6ccd8ef860f780b49a3a763f32b40c24a4f099b7e41458d5584202eabeb
  4.17.23     quay.io/openshift-release-dev/ocp-release@sha256:458965a0a777cbbc97a3957f45dbd5118268f5d4f4ce1dab9a7556930e1c0764

Additional updates which are not recommended for your cluster configuration are available, to view those re-run the command with --include-not-recommended.
If you want to get the current channel:
oc get clusterversion -o jsonpath='{.items[0].spec.channel}{"\n"}'
Sample output;
stable-4.17
To see more details, just use:
oc get clusterversion -o yamlNow, since I am planning to upgrade to OpenShift 4.18, I need to select the stable-4.18 channel. This can done on the CLI or on the web.
On the web, just edit the channel, enter channel-4.18 as the value and save.
On the CLI:
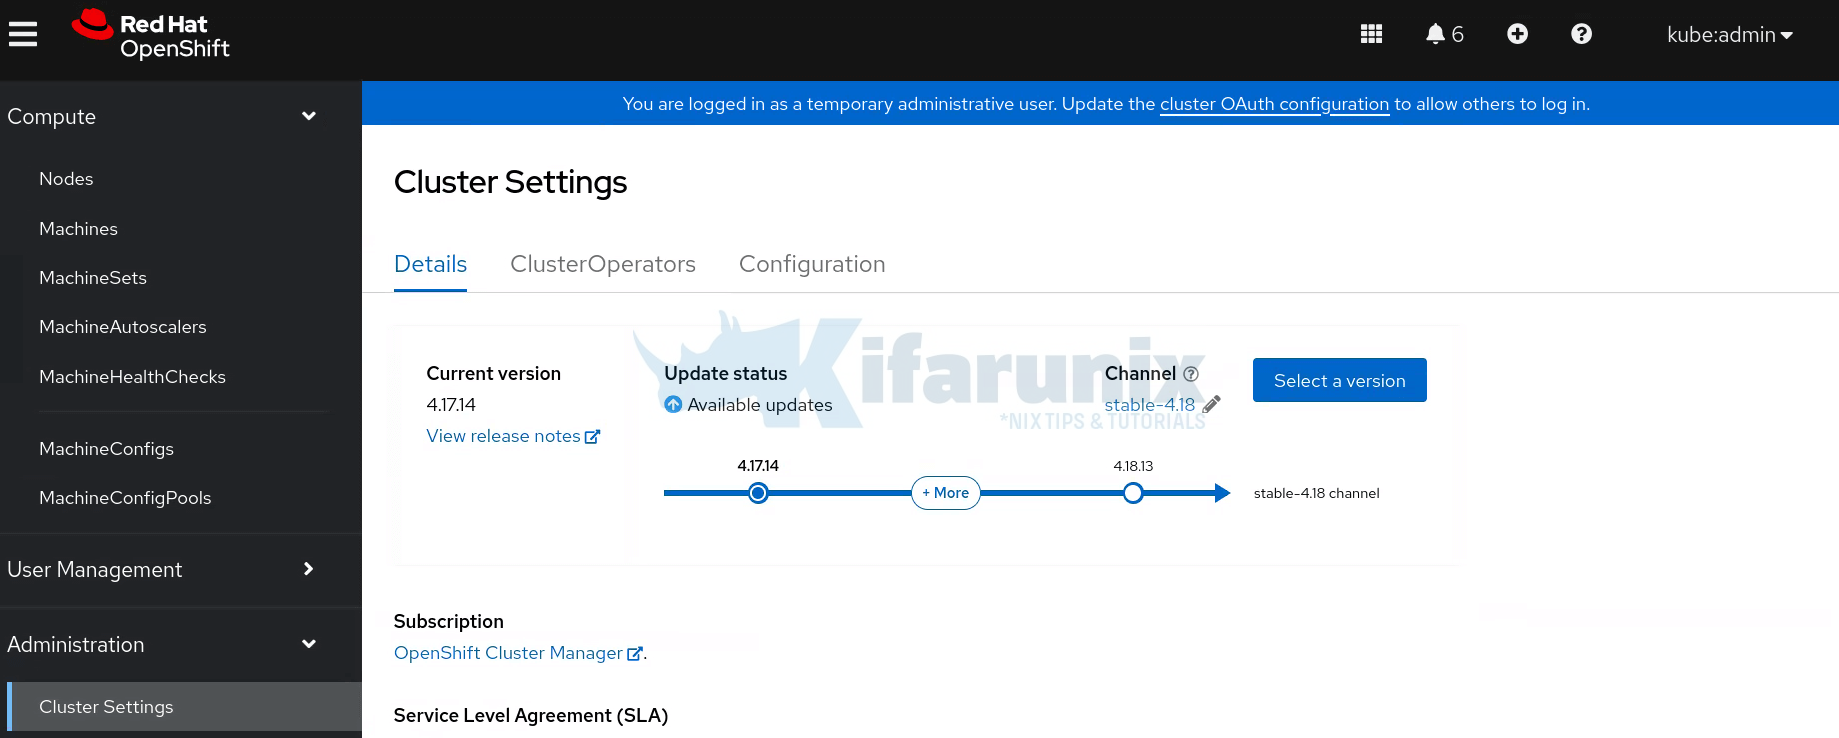
oc patch clusterversion version --type json -p '[{"op": "replace", "path": "/spec/channel", "value": "stable-4.18"}]'The channel should now be updated to stable-4.18 and the upgrade path updated!
Confirm the same from the CLI;
oc adm upgradeSample output;
Cluster version is 4.17.14

Upstream is unset, so the cluster will use an appropriate default.
Channel: stable-4.18

Recommended updates:

  VERSION     IMAGE
  4.18.13     quay.io/openshift-release-dev/ocp-release@sha256:e937c839faf254a842341489059ce47eac468c54cde28fae647a64f8bd3489fd
  4.17.29     quay.io/openshift-release-dev/ocp-release@sha256:7124b2338d76634df82f50db70418e87f9bdcc49d20c93e81fedea55193cbcc5
  4.17.28     quay.io/openshift-release-dev/ocp-release@sha256:6d54694549b517be359578229f690af58ed425c0baa8b8803d8b98e582ecf576
  4.17.27     quay.io/openshift-release-dev/ocp-release@sha256:3d77e2b05af596df029ad4c3f331dd12de86d3ddb2b938394e220ee3096faf2d
  4.17.26     quay.io/openshift-release-dev/ocp-release@sha256:21d6a79a2f8deaa8fef92dd434b07645266f1ec84c70da7118467800efc59ed4
  4.17.25     quay.io/openshift-release-dev/ocp-release@sha256:a1aa63c1645d904f06996e7fff8b6bf9defbaecff154e1b9e1cd574443061e8d
  4.17.24     quay.io/openshift-release-dev/ocp-release@sha256:0f4bf6ccd8ef860f780b49a3a763f32b40c24a4f099b7e41458d5584202eabeb
  4.17.23     quay.io/openshift-release-dev/ocp-release@sha256:458965a0a777cbbc97a3957f45dbd5118268f5d4f4ce1dab9a7556930e1c0764

Additional updates which are not recommended for your cluster configuration are available, to view those re-run the command with --include-not-recommended.
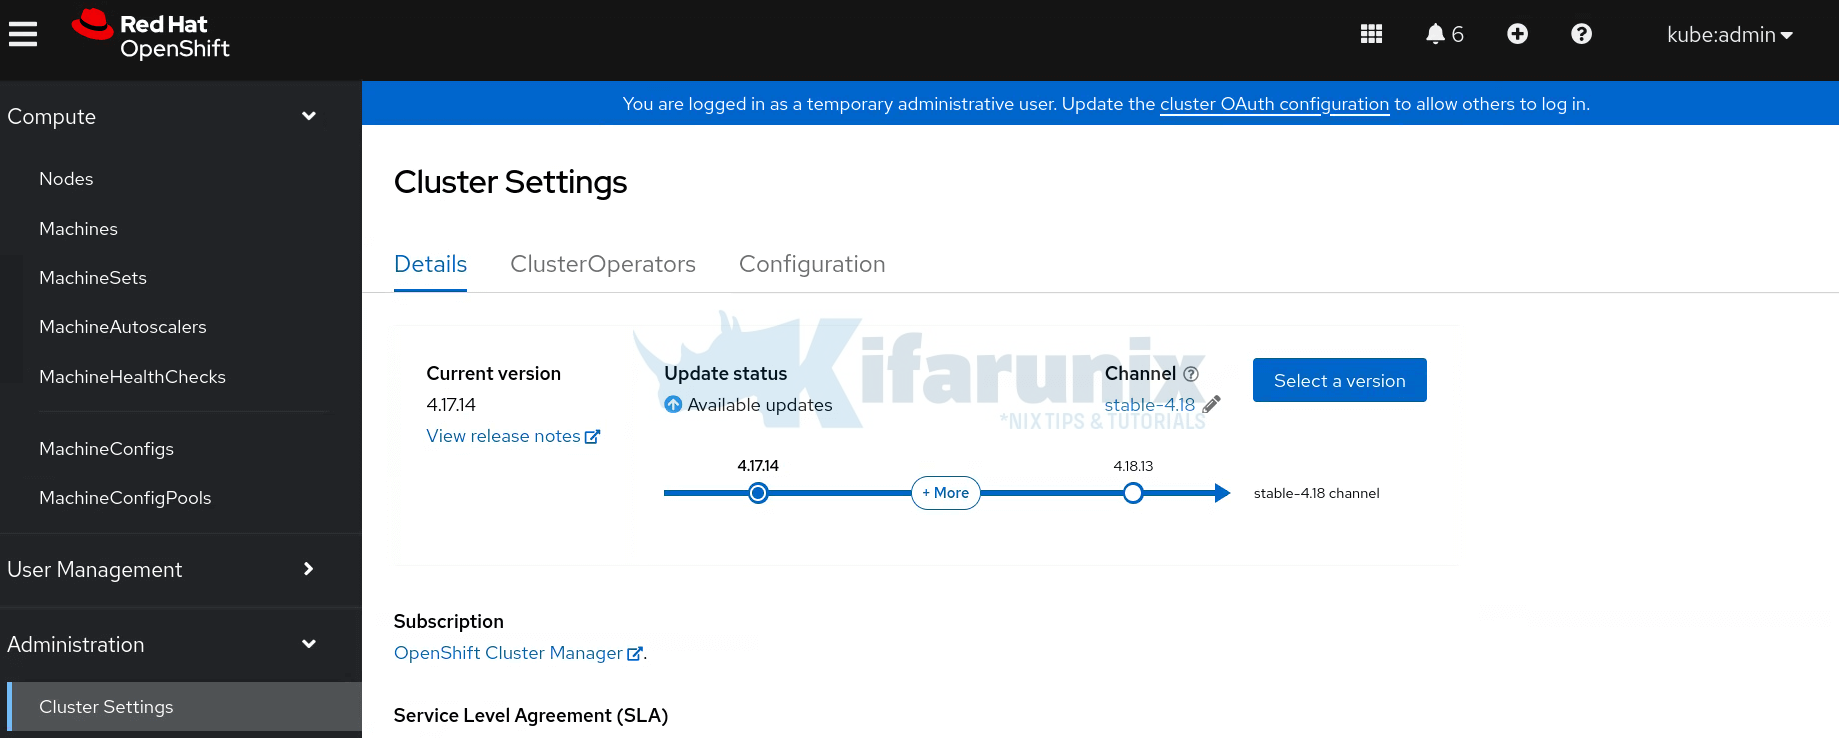
As you can see now, we have the latest release under 4.18 that we can upgrade to, 4.18.13.
Phase 3: Execution & Monitoring
Now comes the actual update execution. From the information given above, I will upgrade my cluster to OpenShift 4.18.13 from 4.17.14.
You can use CLI or web console to run the upgrades.
Note that it might take some time for all the objects to finish updating.
To use the web console;
- Navigate to Administration > Cluster Settings > Details.
- Review current version and available updates.
- Click Select a version to choose your target version.
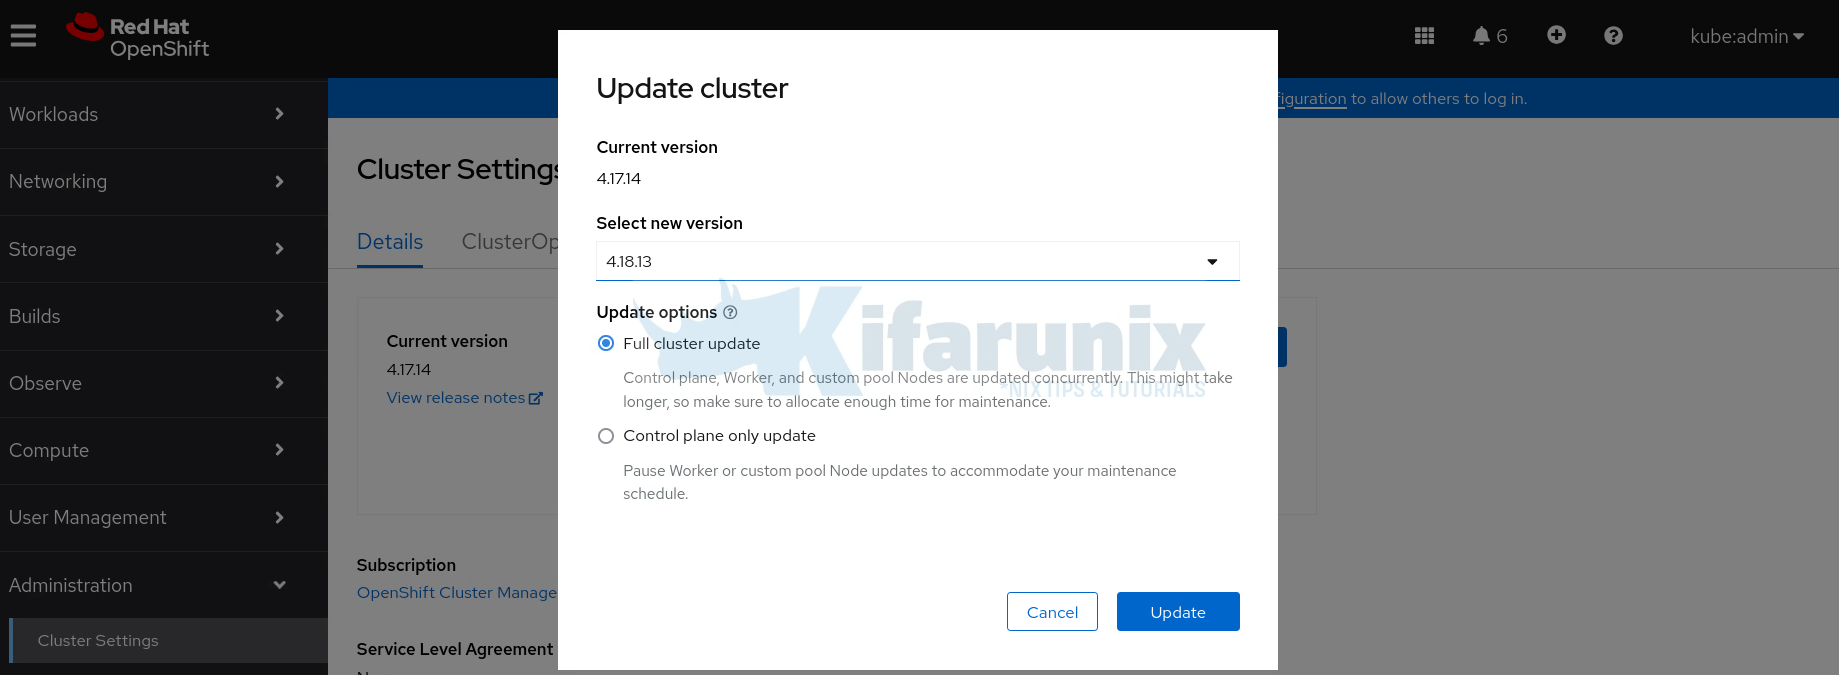
- Confirm the update and monitor progress.
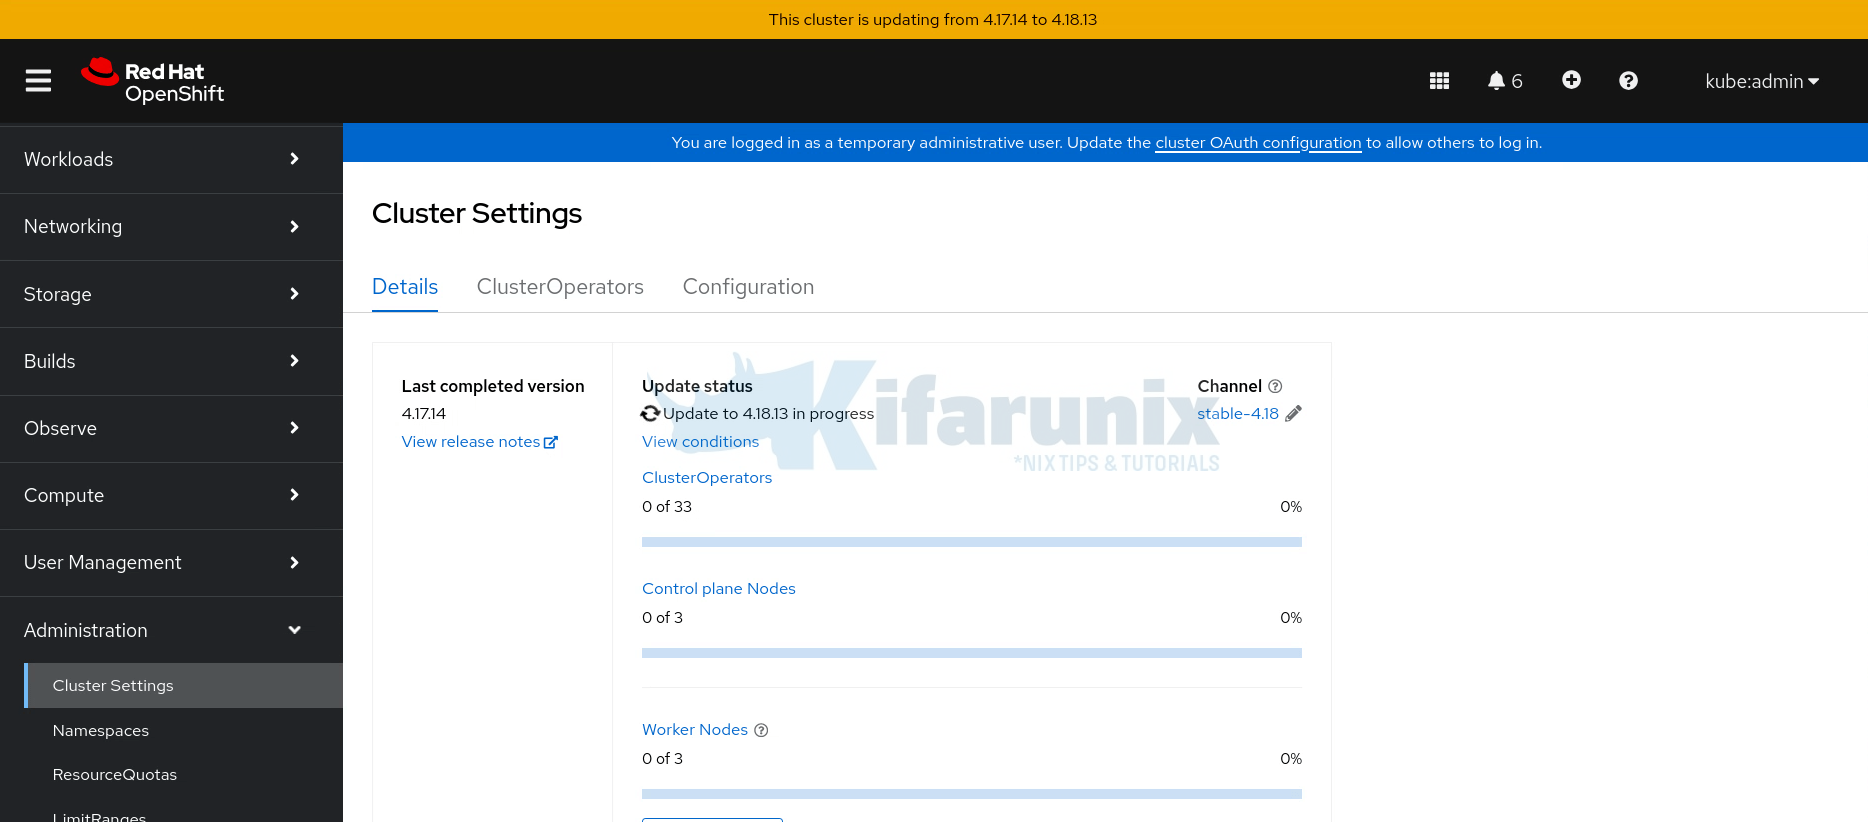
To run the upgrade from the CLI:
- Run the following command to install the latest available update for your cluster.
oc adm upgrade --to-latest=true- Run the following command to install a specific version. VERSION corresponds to one of the available versions that the
oc adm upgradecommand returns.
oc adm upgrade --to=VERSIONTrack the upgrade process either from the web console or via the CLI. From the CLI, you can utilize the command below;
oc get clusterversion -wThe CVO updates operators and nodes sequentially, pausing on errors.
Sample command output;
NAME      VERSION   AVAILABLE   PROGRESSING   SINCE   STATUS
version   4.17.14   True        True          3m16s   Working towards 4.18.13: 111 of 901 done (12% complete), waiting on etcd, kube-apiserver
You can also check the operators:
oc get clusteroperatorsSample output;
NAME                                       VERSION   AVAILABLE   PROGRESSING   DEGRADED   SINCE   MESSAGE
authentication                             4.17.14   True        False         False      12h
baremetal                                  4.17.14   True        False         False      99d
cloud-controller-manager                   4.17.14   True        False         False      99d
cloud-credential                           4.17.14   True        False         False      99d
cluster-autoscaler                         4.17.14   True        False         False      99d
config-operator                            4.18.13   True        False         False      99d
console                                    4.17.14   True        False         False      4d13h
control-plane-machine-set                  4.17.14   True        False         False      99d
csi-snapshot-controller                    4.17.14   True        False         False      4d13h
dns                                        4.17.14   True        False         False      12h
etcd                                       4.17.14   True        True          False      96d     NodeInstallerProgressing: 1 node is at revision 8; 2 nodes are at revision 10
image-registry                             4.17.14   True        False         False      4d13h
ingress                                    4.17.14   True        False         False      12h
insights                                   4.17.14   True        False         False      24h
kube-apiserver                             4.17.14   True        True          False      99d     NodeInstallerProgressing: 3 nodes are at revision 29; 0 nodes have achieved new revision 31
kube-controller-manager                    4.17.14   True        False         False      99d
kube-scheduler                             4.17.14   True        False         False      99d
kube-storage-version-migrator              4.17.14   True        False         False      4d13h
machine-api                                4.17.14   True        False         False      99d
machine-approver                           4.17.14   True        False         False      99d
machine-config                             4.17.14   True        False         False      99d
marketplace                                4.17.14   True        False         False      99d
monitoring                                 4.17.14   True        False         False      12h
network                                    4.17.14   True        False         False      99d
node-tuning                                4.17.14   True        False         False      39d
openshift-apiserver                        4.17.14   True        False         False      13h
openshift-controller-manager               4.17.14   True        False         False      47d
openshift-samples                          4.17.14   True        False         False      99d
operator-lifecycle-manager                 4.17.14   True        False         False      99d
operator-lifecycle-manager-catalog         4.17.14   True        False         False      99d
operator-lifecycle-manager-packageserver   4.17.14   True        False         False      12h
service-ca                                 4.17.14   True        False         False      99d
storage                                    4.17.14   True        False         False      99d
You can also describe the clusterversion to see the update history:
oc describe clusterversionCheck the history section of the output. Sample output;
...
  History:
    Completion Time:    <nil>
    Image:              quay.io/openshift-release-dev/ocp-release@sha256:e937c839faf254a842341489059ce47eac468c54cde28fae647a64f8bd3489fd
    Started Time:       2025-05-27T08:42:49Z
    State:              Partial
    Verified:           true
    Version:            4.18.13
    Completion Time:    2025-02-16T18:49:06Z
    Image:              quay.io/openshift-release-dev/ocp-release@sha256:a4453db87f1fb9004ebb58c4172f4d5f4024e15b7add9cc84727275776eba247
    Started Time:       2025-02-16T18:11:29Z
    State:              Completed
    Verified:           false
    Version:            4.17.14
  Observed Generation:  10
  Version Hash:         Gj9WR_gZsp0=
Events:                 <none>
From the sample output above:
- The cluster was upgraded to 4.17.14 on 2025-02-16, and that upgrade completed successfully.
- An upgrade to 4.18.13 started on 2025-05-27, but the state is
Partial, and there’s noCompletion Timeyet — meaning it’s in progress or partially failed.
You can view this information on the web console, under Cluster settings, update history.
Phase 4: Validation & Verification
Ensure the cluster and applications are fully functional post-upgrade.
Upgrade complete!
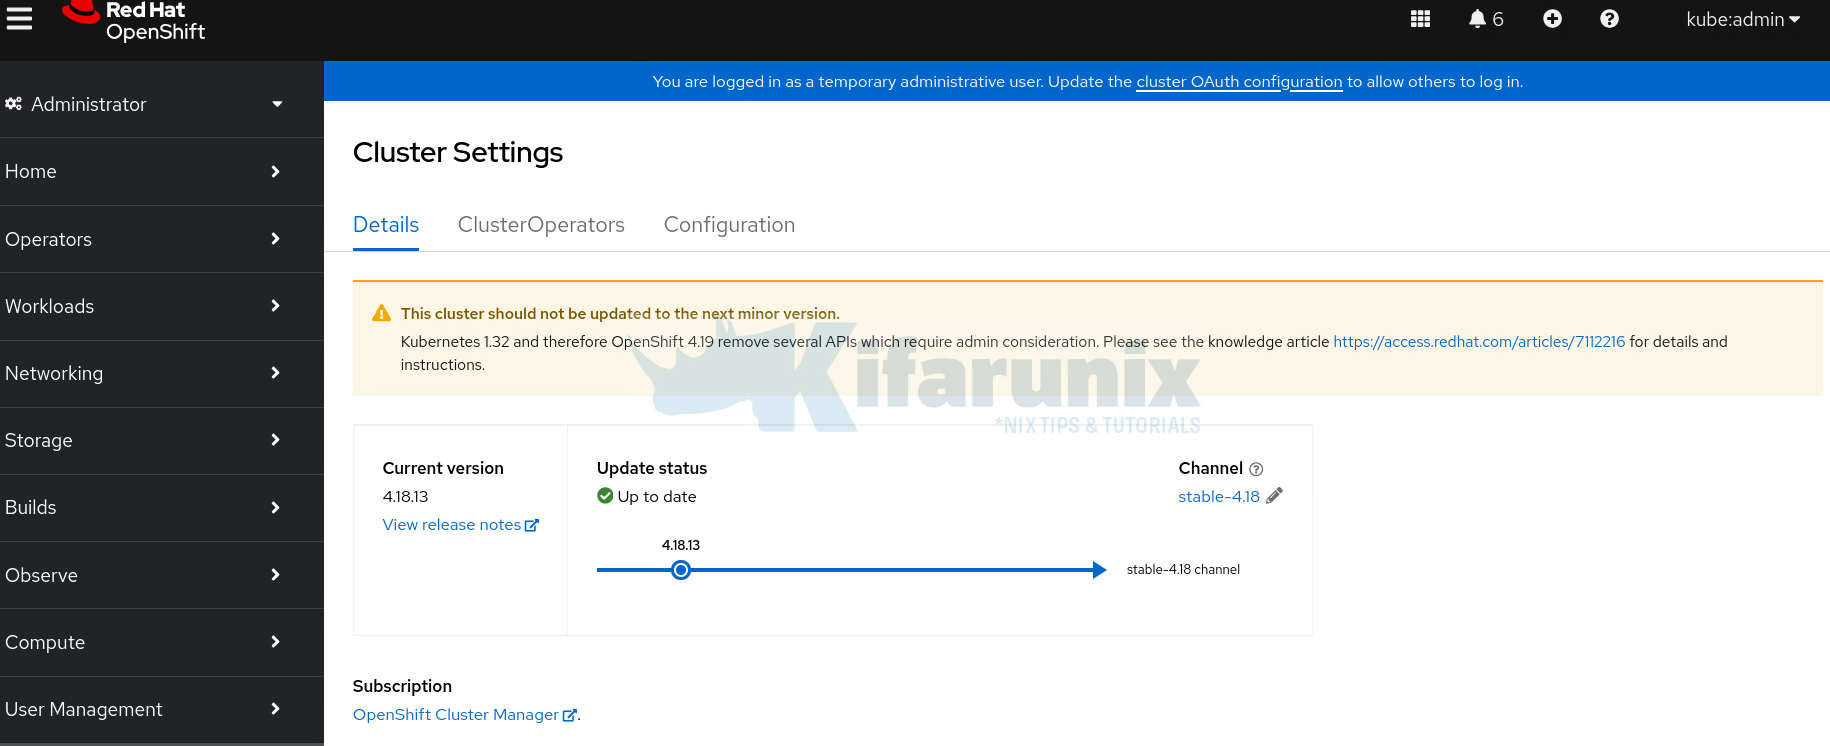
You can do other checks from CLI
Verify cluster version:
oc get clusterversion
NAME      VERSION   AVAILABLE   PROGRESSING   SINCE   STATUS
version   4.18.13   True        False         3m50s   Cluster version is 4.18.13
Check all operators are healthy:
oc get clusteroperators
Sample output;
NAME                                       VERSION   AVAILABLE   PROGRESSING   DEGRADED   SINCE   MESSAGE
authentication                             4.18.13   True        False         False      13h
baremetal                                  4.18.13   True        False         False      99d
cloud-controller-manager                   4.18.13   True        False         False      99d
cloud-credential                           4.18.13   True        False         False      99d
cluster-autoscaler                         4.18.13   True        False         False      99d
config-operator                            4.18.13   True        False         False      99d
console                                    4.18.13   True        False         False      4d15h
control-plane-machine-set                  4.18.13   True        False         False      99d
csi-snapshot-controller                    4.18.13   True        False         False      4d15h
dns                                        4.18.13   True        False         False      14h
etcd                                       4.18.13   True        False         False      96d
image-registry                             4.18.13   True        False         False      19m
ingress                                    4.18.13   True        False         False      13h
insights                                   4.18.13   True        False         False      26h
kube-apiserver                             4.18.13   True        False         False      99d
kube-controller-manager                    4.18.13   True        False         False      99d
kube-scheduler                             4.18.13   True        False         False      99d
kube-storage-version-migrator              4.18.13   True        False         False      19m
machine-api                                4.18.13   True        False         False      99d
machine-approver                           4.18.13   True        False         False      99d
machine-config                             4.18.13   True        False         False      99d
marketplace                                4.18.13   True        False         False      99d
monitoring                                 4.18.13   True        False         False      13h
network                                    4.18.13   True        False         False      99d
node-tuning                                4.18.13   True        False         False      48m
olm                                        4.18.13   True        False         False      11m
openshift-apiserver                        4.18.13   True        False         False      14h
openshift-controller-manager               4.18.13   True        False         False      47d
openshift-samples                          4.18.13   True        False         False      99d
operator-lifecycle-manager                 4.18.13   True        False         False      99d
operator-lifecycle-manager-catalog         4.18.13   True        False         False      99d
operator-lifecycle-manager-packageserver   4.18.13   True        False         False      14h
service-ca                                 4.18.13   True        False         False      99d
storage                                    4.18.13   True        False         False      99d
Ensure VERSION matches the target (e.g., 4.18.13) and no operators are degraded.
Remove Machine Health Check pause:
oc annotate machinehealthchecks.machine.openshift.io -n openshift-machine-api machine-api-termination-handler cluster.x-k8s.io/paused-Test the applications (prioritize critical apps). Test application endpoints (e.g., via curl or browser).
oc get podsCheck OperatorHub for pending updates.
Confirm that every other component is working as expected.
Phase 5: Documentation & Optimization
Document the process and optimize for future upgrades.
Step 1: Document the Upgrade process
- Log all commands, outputs, and issues in a text file or ticketing system (e.g., Jira).
- This makes it easy to help troubleshoot future upgrades and train team members.
- Ensure you include timestamps and version details.
Step 2: Automate Backups
- Ensure at least etcd is backed-up regularly. Backups are really useful in case things go south during an upgrade.
Step 3: Optimize for Future Upgrades
- Test upgrades in a pre-production cluster on the fast channel.
- Automate upgrades with Red Hat Advanced Cluster Management (RHACM) for multiple clusters.
Conclusion
That marks the end of our guide on how to upgrade OpenShift Cluster. This 5-phase framework ensures OpenShift upgrades are safe, efficient, and downtime-free. By following these steps, even new administrators can master the process with confidence. Practice in a test environment, document everything, and leverage Red Hat Support for complex issues.


Interesting article but a lot of points need improvements.
In the introduction, you talk about major and minor versions but you don’t talk about patch versions.
Then, you forget to say that choosing candidate channel implies that you won’t be able to later upgrade to a further minor version, which is a real problem. You will have to reinstall.
You are still using the ‘oc get events’ command when it is much better and easier to use the ‘oc events’ command since OCP 4.12.
Concerning problems that might happen during upgrades, you don’t talk about pods in Terminating state: they will stop a node from rebooting and therefore an upgrade from progressing.
Finally, you don’t talk about how to follow the upgrade process itself. If I follow your process, I’m almost blind! I only catch very high level problems.
With the following bash commands, you get a much better view about what’s going on:
while true
do logs -l k8s-app=machine-config-controller -c machine-config-controller -n openshift-machine-config-operator -f | awk ‘{ $3=null; $4=null; print $0; }’
done