In this tutorial, we will show you an easy way to extend Linux root partition on OpenStack instance. In OpenStack, it is possible to extend or shrink virtual machine instance disk based on your usage requirements. OpenStack virtual machine disks can be expanded/extended or shrinked by attaching a specific flavor to the instance. We will however only focus on expanding the root partition in this guide. We will discuss about shrinking in another guide.
Table of Contents
Extending Linux Root Partition on OpenStack Instance
For demonstration purposes, we have an instance running on OpenStack with the following highlighted resources allocated;
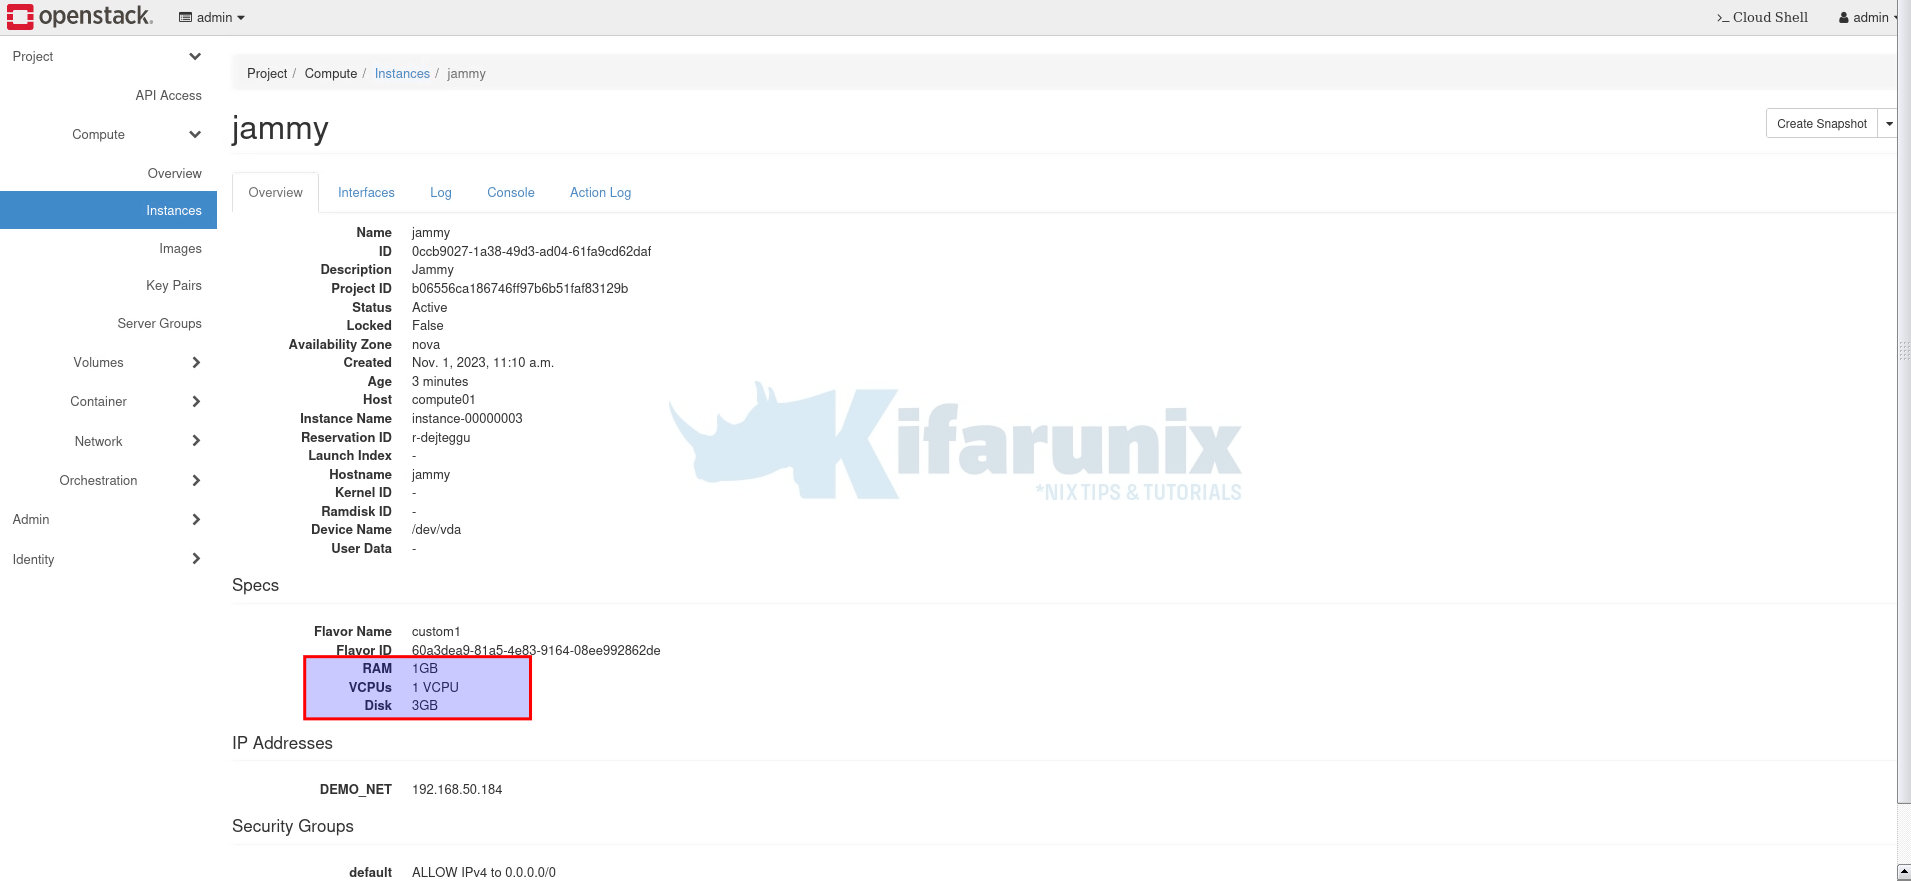
As you can see, the instance resources are 1GB of RAM, 1 vCPU, and 3GB of Disk;
You can also get the instance details from the command line;
First of all, load the OpenStack credentials
   source $HOME/kolla-ansible/bin/activate
   source /etc/kolla/admin-openrc.sh
Then use the openstack commands to get the Flavour assigned;
openstack server list -c Name -c Status -c Flavor --name jammyWhere jammy is the name of the instance. It can be a different name for your instance.
Sample output;
+-------+--------+---------+
| Name  | Status | Flavor  |
+-------+--------+---------+
| jammy | ACTIVE | custom1 |
+-------+--------+---------+
To get the details of the OpenStack flavor on command line;
openstack flavor show custom1Sample output;
+----------------------------+--------------------------------------+
| Field                      | Value                                |
+----------------------------+--------------------------------------+
| OS-FLV-DISABLED:disabled   | False                                |
| OS-FLV-EXT-DATA:ephemeral  | 0                                    |
| access_project_ids         | None                                 |
| description                | None                                 |
| disk                       | 3                                    |
| id                         | 60a3dea9-81a5-4e83-9164-08ee992862de |
| name                       | custom1                              |
| os-flavor-access:is_public | True                                 |
| properties                 |                                      |
| ram                        | 1024                                 |
| rxtx_factor                | 1.0                                  |
| swap                       |                                      |
| vcpus                      | 1                                    |
+----------------------------+--------------------------------------+
Similarly, login to the instance from the openstack console and confirm the disk details;
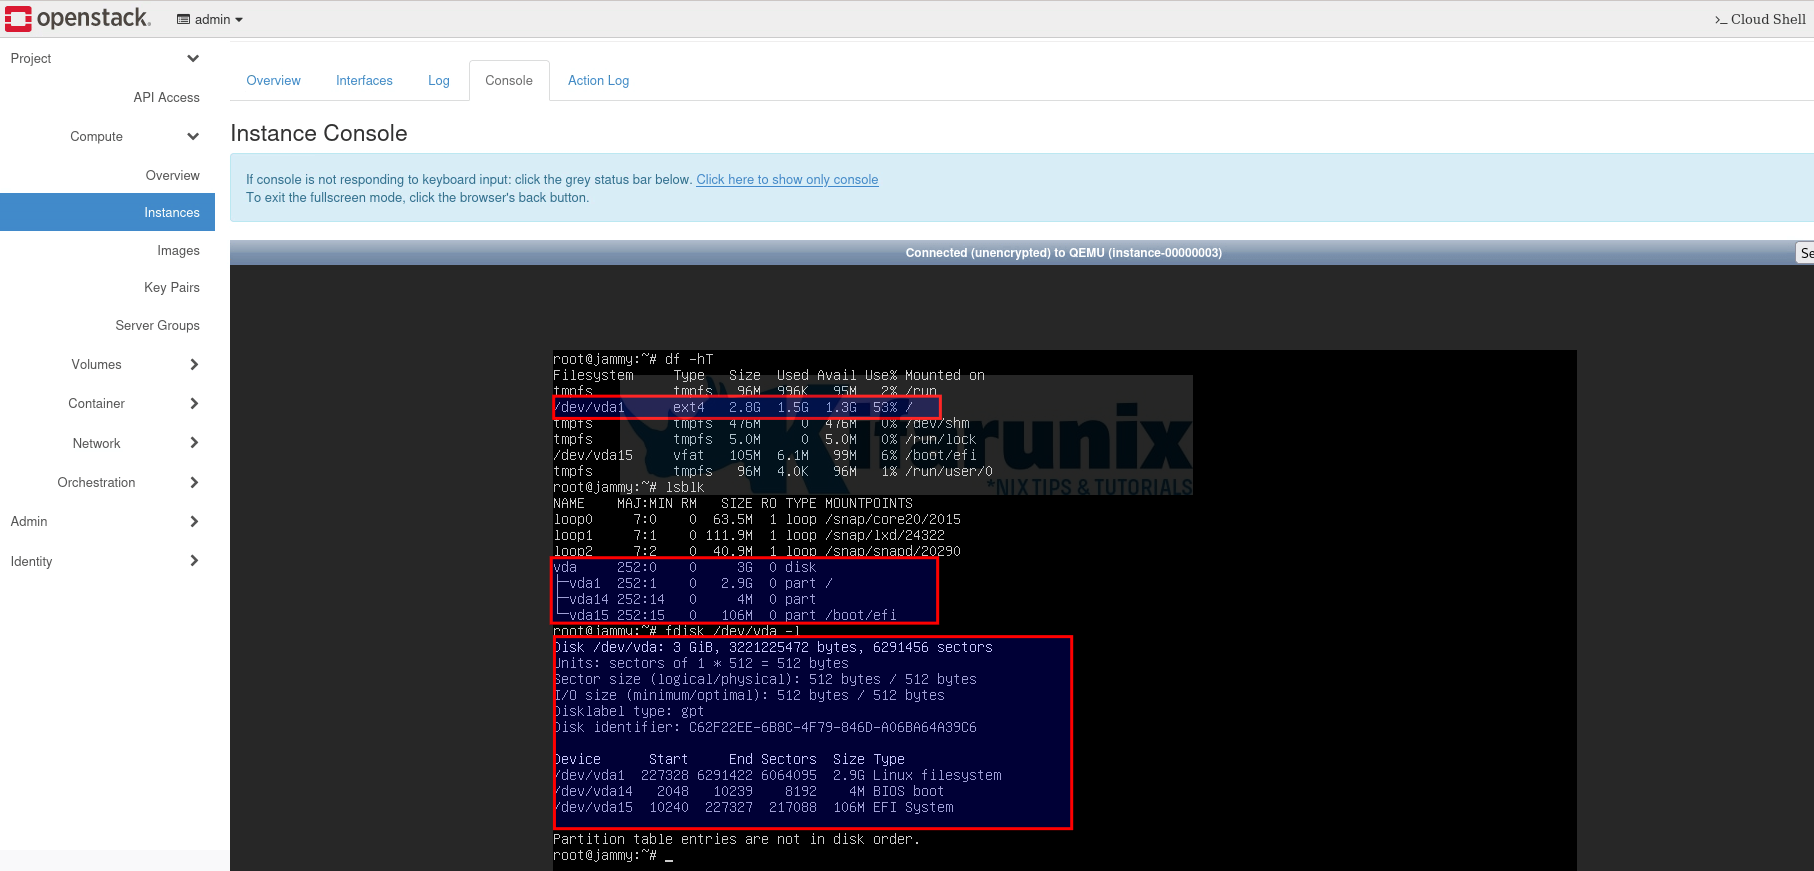
So how can you easily extend/resize Linux root partition on OpenStack instance?
Create Required Flavor
To extend linux root partition, the first thing you need to is to ensure you have a required flavor already created for your instances.
For example, the flavor specs of our instance at the moment is 1GB RAM, 1 vCPU and 3GB Disk.
In this example, we will update the flavor of the instance to a new one with the specs 1GB RAM, 1 vCPU and 10GB Disk.
At the moment, we don’t have a flavor with the new required resources;
openstack flavor list+--------------------------------------+---------+------+------+-----------+-------+-----------+
| ID | Name | RAM | Disk | Ephemeral | VCPUs | Is Public |
+--------------------------------------+---------+------+------+-----------+-------+-----------+
| 60a3dea9-81a5-4e83-9164-08ee992862de | custom1 | 1024 | 3 | 0 | 1 | True |
| c92170b6-95a0-4fdf-9f61-dc002a87c9ae | mini | 1024 | 5 | 0 | 1 | True |
+--------------------------------------+---------+------+------+-----------+-------+-----------+
You can also check available flavors from horizon dashboard under Admin > Compute > Flavors.
As such, you can create your flavor from command line or from the horizon dashboard.
To create from command line (update the command to match your required resource size);
openstack flavor create --ram 1024 --disk 10 --vcpus 1 --public <flavor_name>Or from the horizon Admin > Flavors > Create Flavor.
Change/Update/Replace Instance Flavor
To change the flavor of the instance, you can either do it from the horizon dashboard or from the command line.
Before you can proceed, ensure that the instance is not booting from the volume. Consider the instances below. Jammy is booting from the image while cirros is booting from the volume.
openstack server list+--------------------------------------+--------+--------+-------------------------+--------------------------+---------+
| ID | Name | Status | Networks | Image | Flavor |
+--------------------------------------+--------+--------+-------------------------+--------------------------+---------+
| e7e0864c-6bc6-45cc-bedb-35770e9f037c | jammy | ACTIVE | DEMO_NET=192.168.50.112 | jammy | custom1 |
| 344897e5-d391-413a-af1f-edcb360f5b48 | cirros | ACTIVE | DEMO_NET=192.168.50.109 | N/A (booted from volume) | custom2 |
+--------------------------------------+--------+--------+-------------------------+--------------------------+---------+
If you try to change flavor of the instance booting from the volume, the changes wont reflect in the instance filesystem.
Thus, to change the flavor of the instance from the Horizon;
- Navigate to respective Project where the instance is running and go to Compute > Instances.
- Under Actions column of the instance, click the drop down and click Resize Instance.
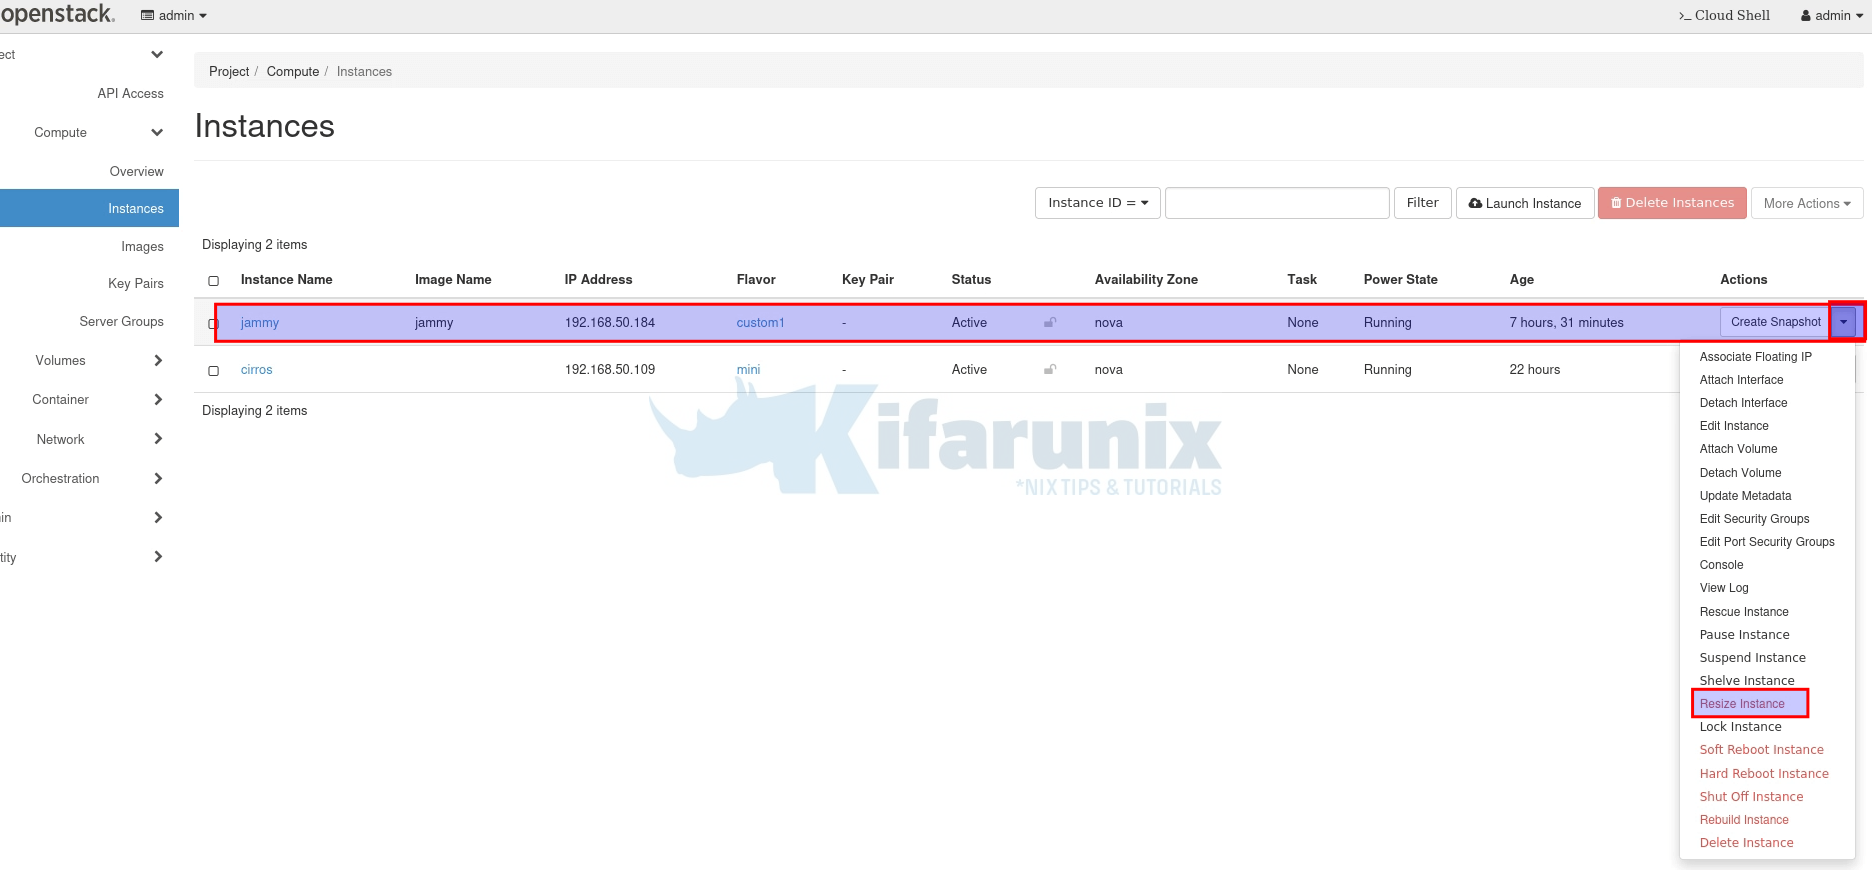
- This will open the Resize Wizard.
- On the instance resize wizard, select New Flavor. Under Advanced Options, leave disk partition as automatic.
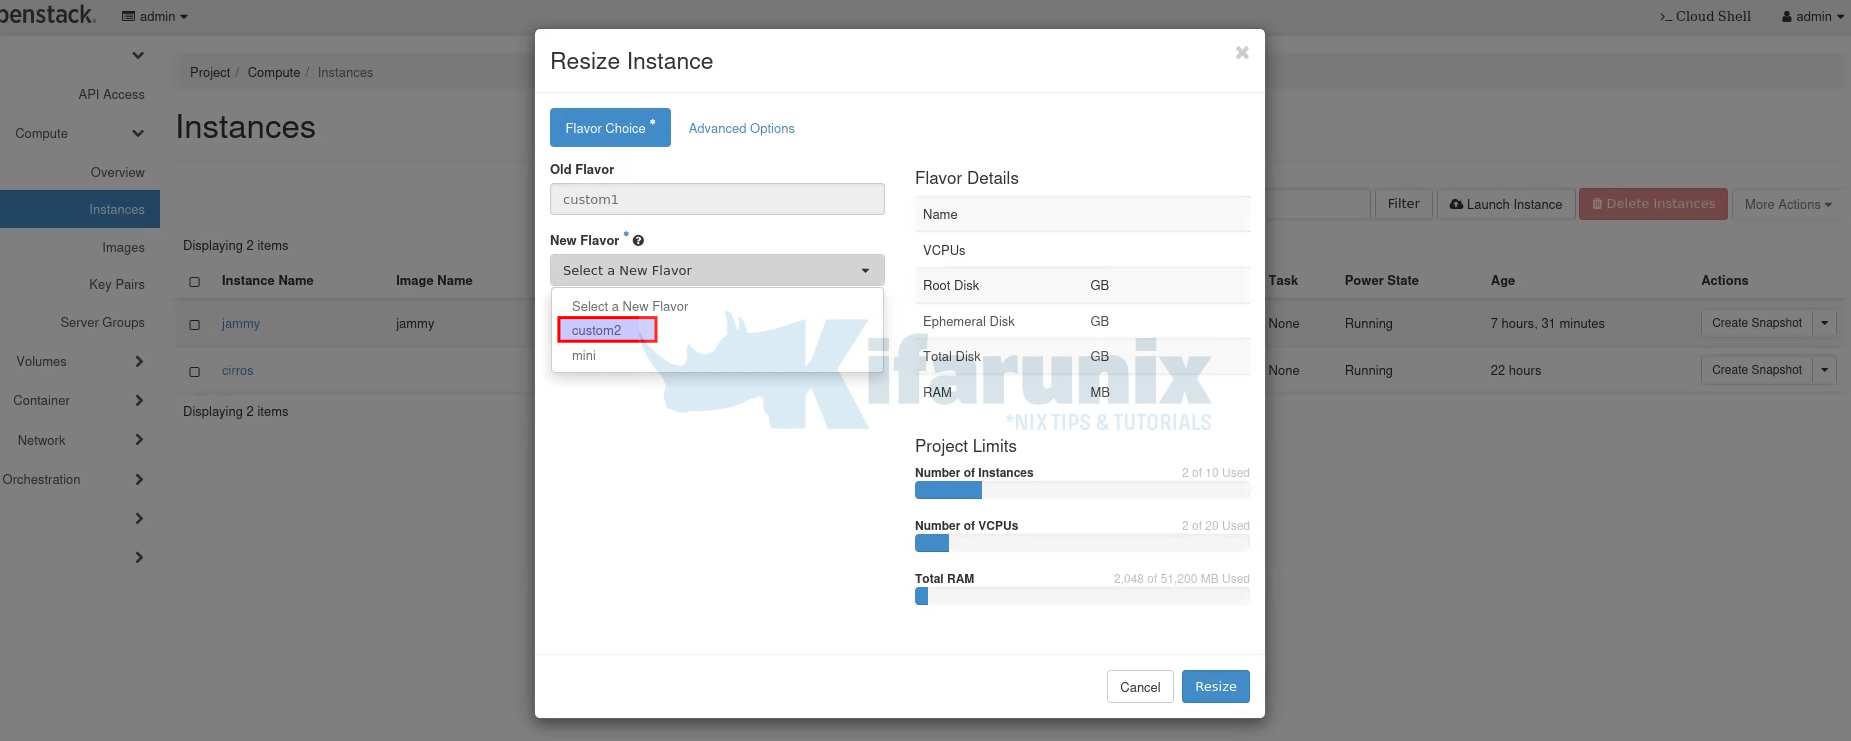
- Click Resize to extend Linux root partition.
- You should now see the instance status resizing.

- When done resizing, you will be prompted to confirm resizing or revert. Hence, click Confirm Resize.

And that is it.
You can also change flavor of the instance from the command line;
List the flavors and find out the one you want to use;
openstack flavor list+--------------------------------------+---------+------+------+-----------+-------+-----------+
| ID | Name | RAM | Disk | Ephemeral | VCPUs | Is Public |
+--------------------------------------+---------+------+------+-----------+-------+-----------+
| 60a3dea9-81a5-4e83-9164-08ee992862de | custom1 | 1024 | 3 | 0 | 1 | True |
| b2f23a43-de35-4971-97de-36fc53adb9a2 | custom2 | 1024 | 10 | 0 | 1 | True |
| c92170b6-95a0-4fdf-9f61-dc002a87c9ae | mini | 1024 | 5 | 0 | 1 | True |
+--------------------------------------+---------+------+------+-----------+-------+-----------+
Once you have identified the flavor to use, get the server/instance name;
openstack server list+--------------------------------------+--------+--------+-------------------------+--------------------------+---------+
| ID | Name | Status | Networks | Image | Flavor |
+--------------------------------------+--------+--------+-------------------------+--------------------------+---------+
| 5dec3f57-33ec-4cce-9242-d6edaa6cf879 | cirros | ACTIVE | DEMO_NET=192.168.50.123 | N/A (booted from volume) | custom1 |
| d8e589da-09a7-49be-83fc-5b7ea838511c | jammy | ACTIVE | DEMO_NET=192.168.50.104 | ubuntu22-minimal | mini |
+--------------------------------------+--------+--------+-------------------------+--------------------------+---------+
So, now I want to update the flavor of jammy instance from mini to custom2. You can do this by using the openstack server resize command.
openstack server resize [-h] [--flavor <flavor>] [--wait] <server>A resize operation is implemented by creating a new server and copying the contents of the original disk into a new one. It is a two-step process for the user: the first step is to perform the resize, and the second step is to either confirm (verify) success and release the old server or to declare a revert to release the new server and restart the old one.
openstack server resize --flavor custom2 jammyYou can then confirm the server resize to verify success of resize operation and release the old server.
openstack server resize confirm jammyConfirm again;
openstack server listCheck the assigned flavor.
Resize Linux Root Partition on OpenStack Instance
You can now open the instance console from OpenStack dashboard and proceed to expand the disk.
We will discuss two ways in which you can easily resize Linux root partition after you have updated or replaced the flavor.
- Manually extend Root Partition
- Automatically extend Root Partition
Manually Extend Root Partition
Consider our jammy instance, we have adjusted the flavor from 1vcpu, 1G ram, 5G disk to 1vcpu, 1G ram and 10G disk;
Let’s confirm the new size from the console;
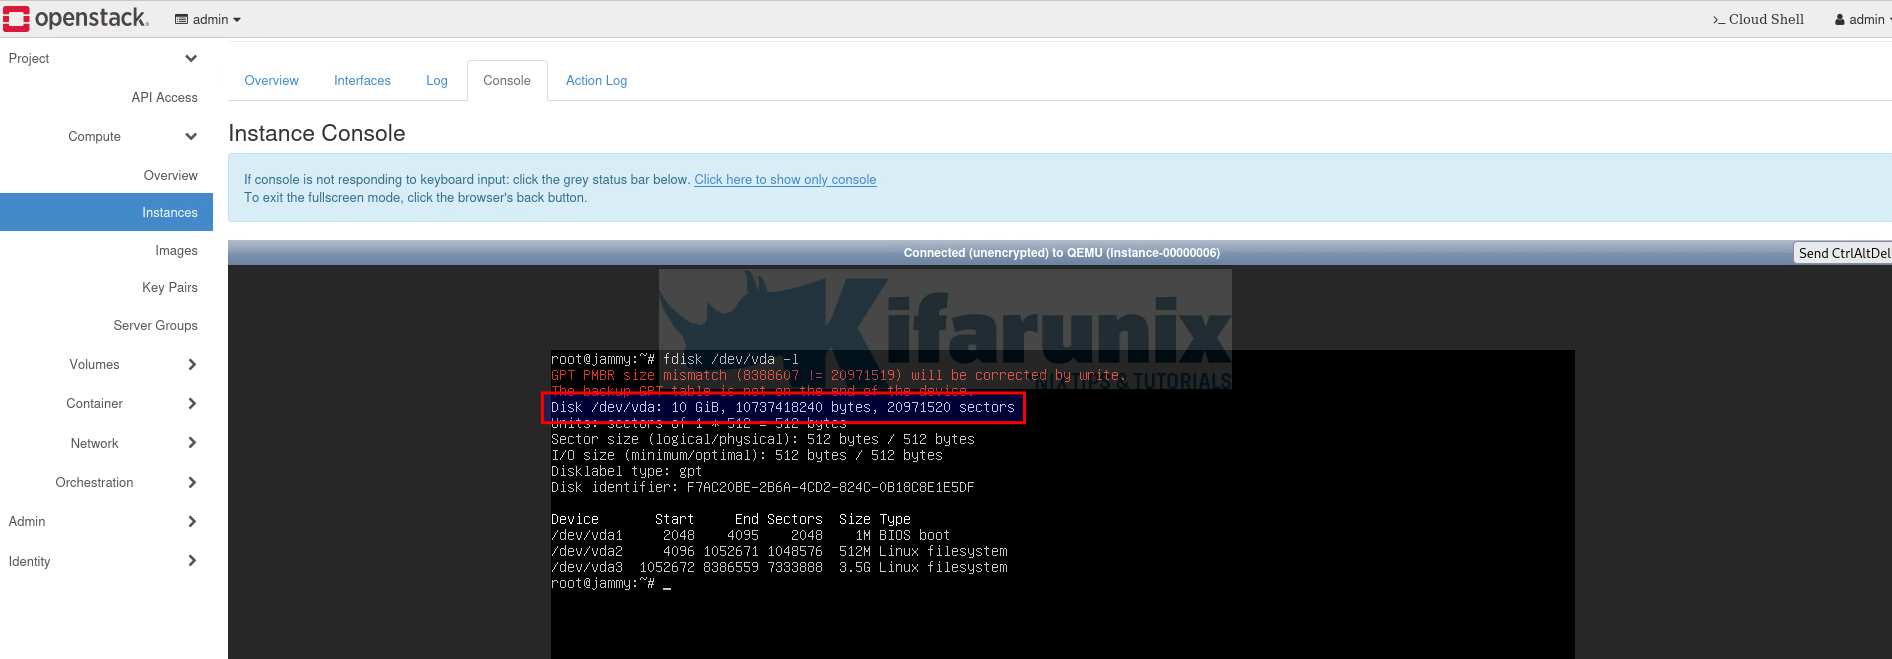
In our previous guides, we covered how to extend/shrink disks. However, for the purposes of the demonstrating the manual extension;
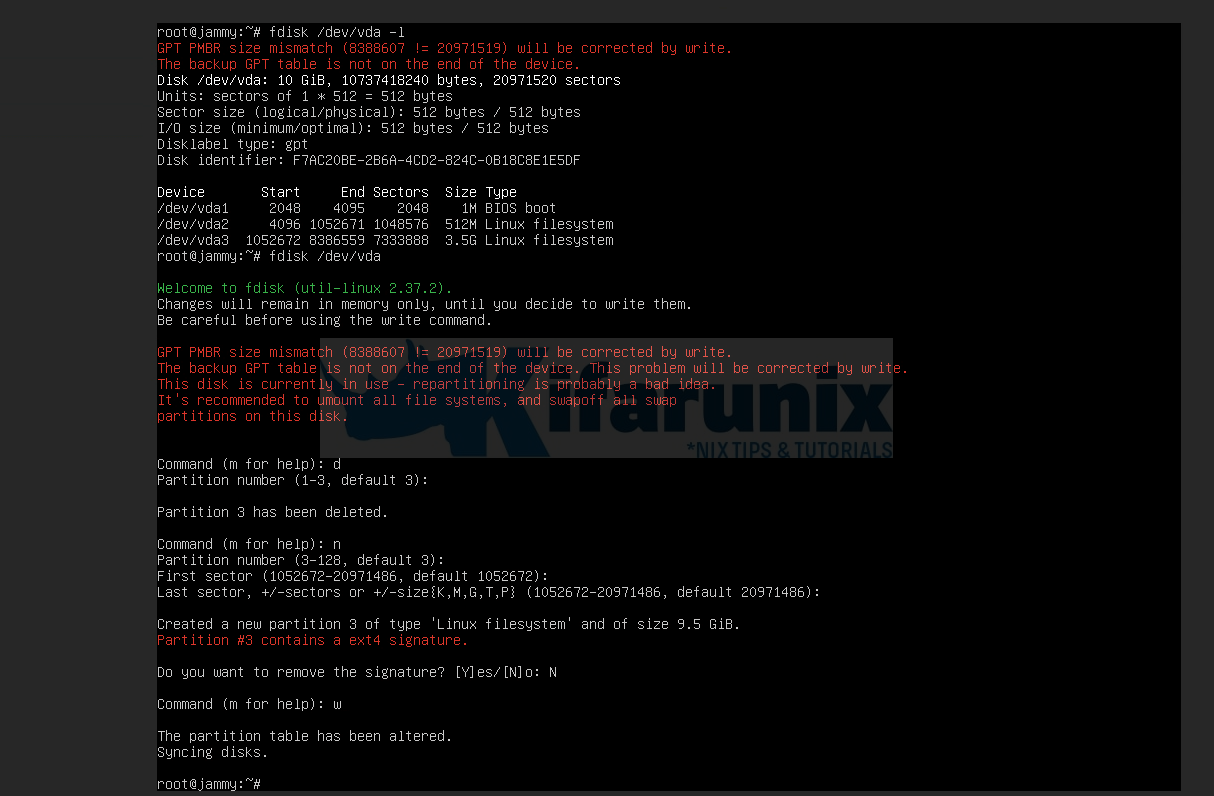
- open the disk using fdisk or what disk management tool of your choice e.g.,
fdisk /dev/vda. - delete the root partition, which is partition 3 for my instance; d
- create new partition, n
- select same parition number. e.g 3.
- use all remaining sectors
- IMPORTANT: when asked whether to remove the partition signature, say No!
- Write the changes to the disk.
Next, extend the filesystem.
If it is non-lvm, ext4/3/xfs;
resize2fs /dev/vda3xfs_growfs /dev/vda3confirm again;
df -hT -P /
if it is LVM, check our guides for reference.
Automatically Extend Root Partition
To enable instance automatic disk extension when flavors are changed, you need to install the Cloud-init package in the OpenStack instance, before changing the flavor. One of its key functions is facilitating automatic disk resizing. Cloud-init processes user data or metadata provided during instance creation, enabling it to detect and respond to disk size changes dynamically.
You can install cloud-init as follows
Ubuntu/Debian
apt install cloud-init cloud-initramfs-growrootCentOS/RHEL/
yum install cloud-init cloud-initramfs-growrootNow, when you change your instance flavor, it should automatically resize your disk!
And that brings us to a close of our guide on how to easily extend/resize Linux root partition on OpenStack instance. If using extended/logical partitions, it may not automatically resize. try and see!

